AgML Tutorials
Getting started developing geometries for the STAR experiment with AgML.
Setting up your local environment
You need to checkout several directories and complie in this order:
$ cvs co StarVMC/Geometry $ cvs co StarVMC/StarGeometry $ cvs co StarVMC/xgeometry$ cvs co pams/geometry$ cons +StarVMC/Geometry $ cons
This will take a while to compile, during which time you can get a cup of coffee, or do your laundry, etc...
If you only want to visualize the STAR detector, you can checkout:
$ cvs co StarVMC/Geometry/macros
Once this is done you can visualize STAR geometries using the viewStarGeometry.C macro in AgML 1, and the loadAgML.C macro in AgML 2.0.
$ root.exeroot [0] .L StarVMC/Geometry/macros/viewStarGeometry.C root [1] nocache=true root [2] viewall=true root [3] viewStarGeometry("y2012")root [0] .L StarVMC/Geometry/macros/loadAgML.C root [1] loadAgML("y2016") root [2] TGeoVolume *cave = gGeoManager->FindVolumeFast("CAVE"); root [3] cave -> Draw("ogl"); // ogl uses open GL viewer
Tutorial #1 -- Creating and Placing Volumes
Start by firing up your favorite text editor... preferably something which does syntax highlighting and checking on XML documents. Edit the first tutorial geometries located in StarVMC/Geometry/TutrGeo ...
$ emacs StarVMC/Geometry/TutrGeo/TutrGeo1.xml
This module illustrates how to create a new detector module, how to create and place a simple volume, and how to create and place multiple copies of that volume. Next, we need to attach this module to a geometry model in order to visualize it. Geometry models (or "tags") are defined in the StarGeo.xml file.
$ emacs StarVMC/Geometry/StarGeo.xml
There is a simple geometry, which only defines the CAVE. It's the first geometry tag called "black hole". You can add your detector here...
xxx
$ root.exe
root [0] .L StarVMC/Geometry/macros/viewStarGeometry.C root [1] nocache=true root [2] viewStarGeometry("test","TutrGeo1");
The "test" geometry tag is a very simple geometry, implementing only the wide angle hall and the cave. All detectors, beam pipes, magnets, etc... have been removed. The second arguement to viewStarGeometry specifies which geometry module(s) are to be built and added to the test geometry. In this case we add only TutrGeo1. (A comma-separated list of geometry modules could be provided, if more than one geometry module was to be built).
Now you can try modifying TutrGeo1. Feel free to add as many boxes in as many positions as you would like. Once you have done this, recompile in two steps
$ cons +StarVMC/Geometry
$ cons
Tutorial #2 -- A few simple shapes, rotations and reflections
The second tutorial geometry is in StarVMC/Geometry/TutrGeo/TutrGeo2.xml. Again, view it using viewStarGeometry.C
$ root.exe
root [0] .L viewStarGeometry.C
root [1] nocache=true
root [2] viewStarGeometry("test","TutrGeo2")
What does the nocache=true statement do? It instructs viewStarGeometry.C to recreate the geometry, rather than load it from a root file created the last time you ran the geometry. By default, if the macro finds a file name "test.root", it will load the geometry from that file to save time. You don't want this since you know that you've changed the geometry.
The second tutorial illustrates a couple more simple shapes: cones and tubes. It also illustrates how to create reflections. Play around with the code a bit, recompile in the normal manner, then try viewing the geometry again.
Tutorial #3 -- Variables and Structures
|
AgML provides variables and structures. The third tutorial is in StarVMC/Geometry/TutrGeo/TutrGeo3.xml. Open this up in a text editor and let's look at it. We define three variables: boxDX, boxDY and boxDZ to hold the dimensions of the box we want to create. AgML is case-insensitve, so you can write this as boxdx, BoxDY and BOXDZ if you so choose. In general, choose what looks best and helps you keep track of the code you're writing. Next check out the volume "ABOX". Note how the shape's dx, dy and dz arguements now reference the variables boxDX, boxDY and boxDZ. This allows us to create multiple versions of the volume ABOX. Let's view the geometry and see.
$ root.exe
root [0] .L StarVMC/Geometry/macros/viewStarGeometry.C
root [1] nocache=true
root [2] viewStarGeometry("test","TutrGeo3")
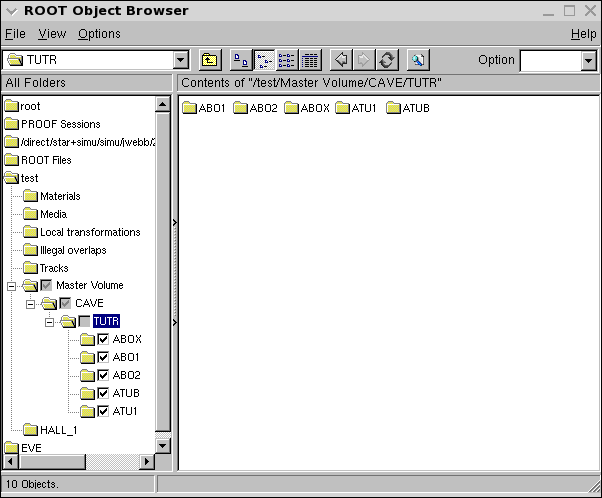
Launch a new TBrowser and open the "test" geometry. Double click test --> Master Volume --> CAVE --> TUTR. You now see all of the concrete volumes which have been created by ROOT. It should look like what you see at the right. We have "ABOX", but we also have ABO1 and ABO2. This demonstrates the an important concept in AgML. Each <Volume ...> block actually defines a volume "factory". It allows you to create multiple versions of a volume, each differing by the shape of the volume. When the shape is changed, a new volume is created with a nickname, where the last letter in the volume name is replaced by [1 2 3 ... 0 a b c ... z] (then the second to last letter, then the third...). Structures provide an alternate means to define variables. In order to populate the members of a structure with values, you use the Fill statement. Multiple fill statements for a given structure may be defined, providing multiple sets of values. In order to select a given set of values, the <Use ...> operator is invoked. In TutrGeo3, we create and place 5 different tubes, using the data stored in the Fill statements. However, you might notice in the browser that there are only two concrete instances of the tube being created. What is going on here? This is another feature of AgML. When the shape is changed, AgML will look for another concrete volume with exactly the same shape. If it finds it, it will use that volume. If it doesn't, then a new volume is created. There's alot going on in this tutorial, so play around a bit with it. |
|
Tutorial #4 -- Some more shapes
