Interfacing the New Detector with the STAR Big Full Chain
As STAR gradually comes to the end of its AA heavy ion program and more focus are put on polarized pp/pA physics and future ep/eA project at eRHIC era, many upgrades are foreseen to strengthen the detector capability at forward region. These include both the near-term upgrades for polarized pp program, eg. FMS/FSC/FHC calorimeters and FGT/VFGT tracking, and upgrades for eSTAR in about 5 to 10 years. Different detector concepts exist and optimization is needed to fit them in STAR physics and into the current STAR detector system. To reach a proper solution a lot of Monte Carlo (MC) works will be carried out, especially in the STAR simulation framework for its flexibility, robustness and proven performance during the last decade.
During the last 9 months, I have worked with the colleagues at BNL for developing a new detector concept for eSTAR east-side endcap upgrade to identify reliably the recoiled electrons in ep/eA collisions. This detector design consists of several parts and its functionality need be evaluated in the STAR simulation framework. This procedure, including implementing a new detector into the STAR system and then generating/analyzing the MC data, requires quite a few efforts and collaborations with software experts, at least for a “rookie” (like me, who usually analyzes data without many code development). For the purpose to better arrange my own understanding on this and provide a guide for peoples that will do similar jobs in the future, I write this note based on my experience. Many software experts helped me much in dealing all kinds of problems I met in this work. I hope this guide can also relief their burden, to some extent, from being frequently interrupted by new code developer like me (remember they are already over-occupied to maintain the STAR software environment). Since I’m still not a veteran, this simple note will not contain all pieces but only necessary parts, likely most suitable for beginners only.
- Ming Shao (USTC)
Assume you will work on RCF (RACF) because this is the best-maintained place for computing work at STAR. Normally you should work in the evaluation version, since you'll add and tune new detector models which are not part of the current STAR experiment. So please remember type ‘star eval’ before you start. You’d better also create a new directory for this.
> mkdir [your work path]
> cd [your work path]
> star eval
First you should get the STAR detector geometry description, and then add or modify your new detector. STAR has switched to a new Extensible Markup Language (XML), called AgML, to describe its detector system. This is done by
cvs co StarVMC/Geometry
cvs co StarVMC/StarGeometry
cvs co StarVMC/xgeometry
Then you should create a new directory in StarVMC/Geometry, like all other detectors, with its name representing your new detector (usually ‘XXXXGeo’). For example, I added a new detector geometry named ‘EiddGeo’ into this directory, which is intending to identify electrons (Electron ID Detector). In this directory (XXXXGeo), you can create and further modify your new detector geometry in AgML language. You can find an example - StarVMC/Geometry/BBcmGeo/BbcmGeo.xml, which contains very detailed in-line explanation of this language. You can copy and modify it for your new detector, just following the style. More details about AgML can be found at Jason’s webpage (Jason Webb is the AgML expert).
After you finish your modeling of your new detector, try compile it by type ‘cons’ TWICE in your base work directory (the directory containing the StarVMC directory).
> cons
> cons
Debug your code if compilation fails until it succeeds all the way to create geometry libraries in the .sl53_gcc432 directory). Then you can check if the geometry of new detector satisfies your expectation by plotting it out. This can be done by modify the macros in the StarVMC/Geometry and execute them in ROOT.
> root.exe (in the base work directory)
> .L StarVMC/Geometry/macros/viewStarGeometry.C
> viewStarGeometry.C(“XXXX”)
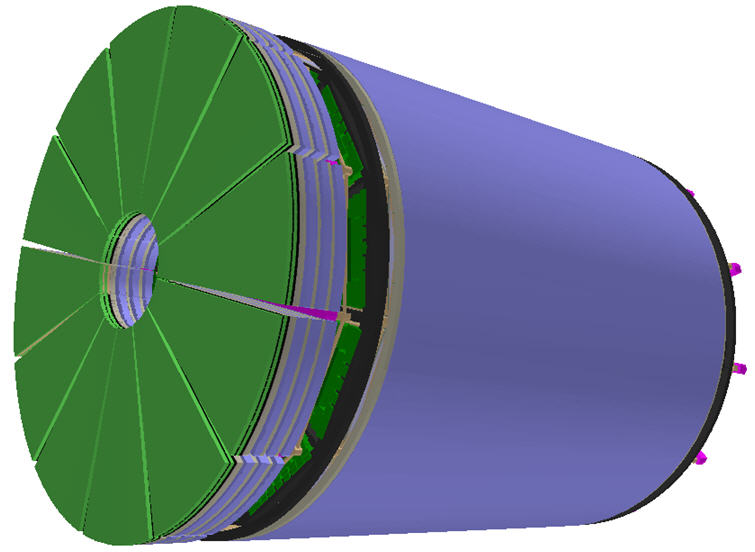
XXXX is a geometry tag. An exmaple is shown on the right. The geometry of a new detector - EIDD - is plotted along with the STAR-TPC. Other detectors and magnetic system are omitted.
For related macros modification Jason can provide help. Note: Jason must acknowledge your work so he can modify the geometry tag or create a new one for you.
Once the new detector geometry is fine you may want to run some simulation events, based on GEANT. Before you can really do MC simulation via STARSIM (formerly known as GSTAR), you should make sure you have instrumented sensitive detector and hit digitalization in your detector geometry. Then you can initialize STARSIM by type ‘starsim’ in your work directory. In STARSIM you can execute your kumac macro to generate some MC events. Kumac is PAW based macro, and for a simple test run (eg. with file name ‘testrun.kumac’) it may look like this:
MACRO testrun
DETP geom devE | devE is a tag for eSTAR simulation
GEXE .$STAR_HOST_SYS/lib/xgeometry.so | use local geometry
GCLO all
MODE All SIMU 1 | 0: no secondary; 1: default secondary; 2: save all secondary
GKIN 1 6 2.0 2.0 -1.5 -1.5
gfile o test1.fzd
TRIG 1
RETURN
This macro will generate 1 negative muon from the center of STAR detector with a transverse momentum 2GeV/c, to pseudo-rapidity -1.5. The azimuthal angle is randomly chosen in the range from 0 to 360 degree. The simulated event, with all hits created in the detector system, is then saved into file ‘test1.fzd’. Before you exit STARSIM, you can print out information of this simulation to check your new detector. For example, you can print all hits created in the detector system by
> gprin hits
The STARSIM manual can be found at this URL. A built-in help command in STARSIM can also help in some details. Just type ‘help’ in STARSIM and follow the help instruction. The section 14 (GEANT related commands), 15 (GSTAR user commands) and 16 (advance GEANT user interface) in the help may be especially important to read.
If you find the generated hits reasonable and want to go forward, you need check out and modify necessary codes in the 'pams' directory, where codes transferring GEANT hits from STARSIM to STAR compatible hit type, are contained. You need at your work directory do
> cvs co pams
The codes contained in 'pams/sim' are especially useful for simulation purpose. Several files at different locations are then to be added or changed. You need create your own hit type in pams/sim/idl directory, where all kinds of hit types are defined. The file name is usually g2t_XXX_hit.idl (XXX is a three character name representing your detector). If your hit type is similar to those already exists, you can also just use that hit type (so no new hit type is needed). For example, a new hit type ‘g2t_etr_hit.idl’ was created when I tried to add a new detector (EiddGeo) into STAR.
struct g2t_etr_hit { /* G2t_etr_hit */
long id; /* primary key */
long next_tr_hit_p;/* Id of next hit on same track */
long track_p; /* Id of parent track */
long volume_id; /* STAR volume identification */
float de; /* energy deposition at hit */
float ds; /* path length within padrow */
float p[3]; /* local momentum */
float tof; /* time of flight */
float x[3]; /* coordinate (Cartesian) */
float lgam; /* ALOG10(GEKin/AMass) */
float length; /* track length up to this hit */
float adc; /* signal in ADC after digitization */
float pad; /* hit pad position used in digitization */
float timebucket; /* hit time position -"- */
};
This hit type is basically the same as TPC hit type since their functionality is similar. If you want this hit be associated with a track, you need also modify the g2t_track.idl in the same directory. Just add two line in the g2t_track struct.
long hit_XXX_p; /* Id of first XXX hit on track linked list */
and
long n_XXX_hit; /* Nhits on XXX */
Several other files necessary to be changed are located at another directory pams/sim/g2t. These files are g2t_XXX.idl, g2t_XXX.F and g2t_volume_id.g (XXX is a three character name representing your detector). g2t_XXX.idl connects g2t_track and your hit type (g2t_XXX_hit.idl) to your detector and g2t_XXX.F implements the actual function. One can refer to codes from detectors with similar functionalities to write your code. For example, g2t_tpc.F is a tracking type detector with energy loss of the track, g2t_tof.F is for timing and g2t_emc.F deals with properties of calorimeter type detector. You should basically follow the style in these example files and just make necessary changes (mostly detector names) related to your detector. For g2t_XXX.idl, an example is
#include "PAM.idl"
#include "g2t_track.idl"
#include "g2t_XXX_hit.idl"
interface g2t_XXX : amiModule{ STAFCV_T call (inout g2t_track g2t_track,
out g2t_XXX_hit g2t_XXX_hit ); };
For g2t_XXX.F, there is one important line in this file ‘call G2R_GET_SYS ('XXXX','YYYY',Iprin,Idigi)’, where XXXX is your detector name already shown in your geometry description ‘XXXXGeo.xml’, and YYYY is the sensitive volume name in your geometry. For example, it’s ‘call G2R_GET_SYS ('EIDD','TABD',Iprin,Idigi)’ in g2t_etr.F, since the corresponding sensitive volume is ‘TABD’ in ‘EiddGeo.xml’.
The g2t_volume_id.g file must also be modified to identify the new detector sensitive volumes, in an unambiguous way. You need provide an unique volume_id for each sensitive volume based on the hit volume id in GEANT, contained in an array numbv. In GEANT, a touchable volume can be uniquely found from its volume architecture. This volume architecture is smartly stored in the array numbv. Unnecessary part of the architecture is omitted provided the sensitive volume can still be located unambiguously. Assume a volume architecture of A containing B, B containing C, C containing D1 and D2, both of which are sensitive. Then numbv only store the volume id of D1 and D2, ie. only 1 number, since A, B and C are the same for D1/D2. However, if B contains another sensitive volume D3 (parallel to C), numbv will contain 2 number for a hit so that D1/D2/D3 can be uniquely identified. You should use the numbers in numbv to form a final volume_id value, eg.
elseif (Csys=='etr') then
sector = MOD( (numbv(1)-1), 12 ); "Sectors count from 0 - 11"
layer = (numbv(1)-1)/ 12; "Layers count from 0 - 2"
section = numbv(2) - 1; "Sections count from 0 - 29"
volume_id = section + 100*layer + 10000*sector
Please note numbv array element start from 1, not 0. Refer to other volume_id’s in the g2t_volume_id.g file.
When these modifications are successfully done, you need re-compile once again, by just type
> cons
in your work directory. WARNING: when you compile pams with your new detector items for the first time, you’re likely to get errors like “.sl53_gcc432/obj/pams/sim/g2t/St_g2t_XXX_Module.cxx:2:31: error: St_g2t_XXX_Module.h: No such file or directory” (XXX is your new detector). If you try “cons” again, the errors may disappear and your compilation seems to end good. However, there might be hidden vulnerability in your compiled code, which may sometimes cause execution problem. So here is a trick – when you meet such errors, clean your previous compilation first, then do the following in correct order.
> cons +pams/sim
> cons +pams
> cons +StarVMC/Geometry
> cons
> cons +pams
> cons +StarVMC/Geometry
> cons
In this way you can get correctly compiled code.
From now on, when you generate your simulation events in STARSIM, the correct type of hits in your new detector will be saved in the GEANT output file. However, the GEANT file is not plainly readable. The code in STAR software framework to read these data is the St_geant_Maker, which is always contained in the StRoot modular. You should check it out from the library,
> cvs co StRoot/St_geant_Maker
The major file you need to modify is St_geant_Maker.cxx. Its header file St_geant_Maker.h can be often left as it is. The following changes are necessary.
Add a line ‘#include "g2t/St_g2t_XXX_Module.h"’ to the header part of the file (XXX represents your detector abbreviation, as defined in pams/sim/g2t). You needn’t worry about this header file since it is automatically generated when you compile pams.
Add a part of code to read the hits from your detector to STAR TDataSet. An example to add ‘etr’ hits is shown as below.
nhits = 0;
geant3 -> Gfnhit("EIDH","TABD", nhits);
if ( nhits > 0 )
{
St_g2t_etr_hit *g2t_etr_hit = new St_g2t_etr_hit("g2t_etr_hit",nhits);
m_DataSet->Add(g2t_etr_hit);
iRes = g2t_etr( g2t_track, g2t_etr_hit);
if ( Debug() > 1 ) g2t_etr_hit->Print(0,10);
}
Just replace ‘etr’ to your hit type. One attention must be paid to the line ‘geant3 -> Gfnhit("EIDH","TABD", nhits)’. Here EIDH and TABD represent the names of the detector and sensitive volume. However, the actual detector name EIDD is changed to EIDH. This is the protocol – replace the last character of the detector name to ‘H’ (this also means the first 3 characters of your detector name should differ from all other detectors to avoid ambiguity).
The data retrieved from the GEANT files should now be written out for further processing. As a first step, the simulation events are usually stored in StMcEvent, a STAR class dedicated for record MC events. You should start by checking out this class to your work directory.
> cvs co StRoot/StMcEvent
> cvs co StRoot/StMcEventMaker
The second calss ‘StMcEventMaker’, as its name suggested, is intended to write out all necessary information from GEANT simulation to StMcEvent.
There are several classes in the directory StRoot/StMcEvent for you to add and modify. The first 2 classes are your detector hit definition class and collector class, usually with names like StMcXXXHit and StMcXXXHitCollection, where XXX represents your detector. You can refer to other classes in StRoot/StMcEvent with similar function to your detector, or even just use an existing one if you feel it already contains all information you need. For myself, I create 4 new classes StMcEtrHit, StMcEtrHitCollection, StMcEtfHit and StMcEtfHitCollection, at the same time use 2 existing class StMcCalorimeterHit and StMcEmcHitCollection, to implement my EIDD detector.
Then you should add your hit collector to StMcEvent class. In StMcEvent.hh file, add a line
class StMcXXXHitCollection;
to the header part of this file. Then add your hit collector to StMcEvent class protected member
StMcXXXHitCollection* mXXXHits;
and corresponding ‘Get’ and ‘Set’ methods to public function member, respectively
StMcXXXHitCollection* XXXHitCollection() { return mXXXHits; }
const StMcXXXHitCollection* XXXHitCollection() const { return mXXXHits; }
void setXXXHitCollection(StMcXXXHitCollection*);
Again here XXX is for your new detector name. Next in StMcEvent.cc file, add include files
#include "StMcXXXHitCollection.hh"
#include "StMcXXXHit.hh"
to the header part. Add a initialization call
mXXXHits = new StMcXXXHitCollection();
in the function ‘void StMcEvent::makeColls()’. Implement the ‘Set’ method declared in the StMcEvent.hh file
void StMcEvent::setXXXHitCollection(StMcXXXHitCollection* val)
{
if (mXXXHits && mXXXHits!= val) delete mXXXHits;
mXXXHits = val;
}
You may also want to print out your hits in some cases to check if they are OK. So in
void StMcEvent::Print(Option_t *option) const
function, you need a line or more to do this job. Usually it looks like
PrintHeader(Name,name);
PrintHitCollection(Name,name);
where PrintHeader and PrintHitCollection are C++ macros defined in StMcEvent.cc file, and Name/name represent your detector name. There are more than one such macros so you can choose the one best suits your case.
The detector hits caused by charged particles are usually related to track class. For simulation events, this is StMcTrack. You may also want to modify this class to have your detector hits in. Similar to StMcEvent class, you need add your hit member in StMcTrack.hh file, as well as ‘Get’, ‘Set’, ‘Add’ and ‘Remove’ methods.
StPtrVecMcXXXHit mXXXHits;
StPtrVecMcXXXHit& XXXHits() { return mXXXHits; }
const StPtrVecMcXXXHit& XXXHits() const { return mXXXHits; }
void setXXXHits(StPtrVecMcXXXHit&);
void addXXXHit(StMcXXXHit*);
void removeXXXHit(StMcXXXHit*);
Then implement them in StMcTrack.cc file. This is quite straightforward - just refer to other detector hit type in this file to see how to do it.
Besids, don’t forget clear the hits in the destructor StMcTrack::~StMcTrack() by adding a line
mXXXHits.clear();
Other methods you may want to implement are:
ostream& operator<<(ostream& os, const StMcTrack& t),
void StMcTrack::Print(Option_t *option) const
const StPtrVecMcHit *StMcTrack::Hits(StDetectorId Id) const
const StPtrVecMcCalorimeterHit *StMcTrack::CalorimeterHits(StDetectorId Id) const
Neither of them is difficult.
You may notice that a vector class type is used in the codes above which is not declared before - StPtrVecMcXXXHit. This is done in another class StMcContainer.hh. You should add several lines in this file in the following order.
class StMcXXXHit;
typedef vector<StMcXXXHit*> StSPtrVecMcXXXHit;
typedef vector<StMcXXXHit*> StPtrVecMcXXXHit;
typedef StPtrVecMcXXXHit::iterator StMcXXXHitIterator;
typedef StPtrVecMcXXXHit::const_iterator StMcXXXHitConstIterator;
Two other classes contains necessary definitions and links you should modify are StMcEventTypes.hh and StMcEventLinkDef.h. In StMcEventTypes.hh add two lines
#include "StMcXXXHit.hh"
#include "StMcXXXHitCollection.hh"
In StMcEventLinkDef.h, the following lines are to be added.
#pragma link C++ function operator<<(ostream&, const StMcXXXHit&);
#pragma link C++ typedef StSPtrVecMcXXXHit;
#pragma link C++ typedef StPtrVecMcXXXHit;
#pragma link C++ typedef StMcXXXHitIterator;
#pragma link C++ typedef StMcXXXHitConstIterator;
#pragma link C++ class vector<StMcXXXHit*>+;
#pragma link C++ class vector<StMcXXXHit*>+;
Now the basic structure of adding your new detector hits into StMcEvent class is accomplished. It’s time to modify the StMcEventMaker class for your new detector. In the header file you need add a Boolean member
Bool_t doUseXXX; //!
If you are adding a new detector of calorimeter type, you’re likely to add a method
void fillXXX(St_g2t_emc_hit*); (if you just use emc hit type)
or
void fillXXX(St_g2t_XXX_hit*); (if you use your own calorimeter hit type)
Then in StMcEventMaker.cxx the following places are to be changed.
Initialize doUseEcl to kTRUE in class constructor.
In StMcEventMaker::Make() function, add
St_g2t_YYY_hit *g2t_XXX_hitTablePointer = (St_g2t_YYY_hit *) geantDstI("g2t_XXX_hit");
One should pay attention to the type St_g2t_YYY_hit. Here YYY is the hit type (g2t_YYY_hit.idl) you used in pams/sim/g2t_XXX.idl. YYY is not necessary the same as XXX, since you can use existing hit type (YYY) for your new detector (XXX).
Then retrieve the hits by
// XXX Hit Tables
g2t_YYY_hit_st *XXXHitTable = 0;
if (g2t_XXX_hitTablePointer)
XXXHitTable = g2t_XXX_hitTablePointer->GetTable();
if (Debug()) cerr << "Table g2t_XXX_hit found in Dataset " << geantDstI.Pwd()->GetName() << endl;
else
if (Debug()) cerr << "Table g2t_XXX_hit Not found in Dataset " << geantDstI.Pwd()->GetName() << endl;
Then fill the hits, either by AddHits(XXX,XXX,XXX) macro, or your own method fillXXX(St_g2t_emc_hit*) or fillXXX(St_g2t_XXX_hit*). Read carefully the methods if you use the existing StMcCalorimeterHit hit type.
Now you can try to compile StRoot by
> cons +StRoot
After all the codes above are successfully compiled, you can proceed to run your GEANT data through BFC chain to generate STAR data, such as .McEvent.root file. The BFC options you choose depends on which detectors you want to include. A simple option example can be
Debug,devE,agml,McEvent,NoSvtIt,NoSsdIt,Idst,Tree,logger,genvtx,tags,IdTruth,geantout,big,fzin,McEvOut
However, if you need full simulation of STAR TPC, you need add many more options such as tpcrs and related database.
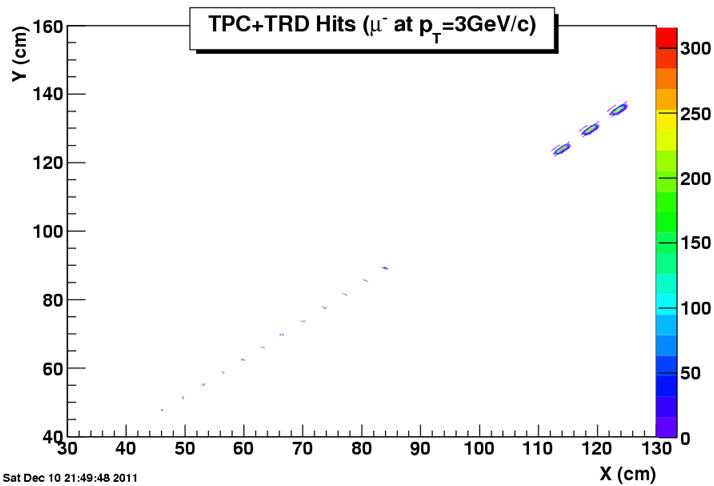
Further process on McEvent should be similar to all other MC data based analysis, but with your own detector feature. One example you may refer to is the StMiniMcMaker. You can check it out from STAR class library and make modifications to suit your work. As an example, I plot the hit points generated by TRD (in the EIDD) and TPC with a MC negative muon track at fixed momentum and direction. It's shown on the right.
All work above described are based on simulation. If you want to further implement “real” data type StEvent, you need add or change the classes in StRoot/StEvent. StEvent data should generally base on real experiment, such as a beam test on your new detector prototype. However, there may be needs for it since the functionality of some STAR classes rely on StEvent rather than StMcEvent.
Similar to what you have done for StMcEvent, you need add StXXXHit and StXXXHitCollection classes and attach them to StEvent and other relevant classes. Other auxiliary classes such as StContainers, StEnumerations and StDetectorDefinitions also need your modification too. All these classes are contained in StRoot/StEvent directory.
You also need add your own detector maker under StRoot directory. A recent example is StEtrFastSimMaker, which is a simple maker to add the endcap TRD hits to StEvent for further process. It’s a fast simulation maker since more realistic makers should base on experimental data. Victor add this maker just to test Stv track finding with endcap TRD - a more complicated work for experts only.