Grid and Cloud
These pages are dedicated to the GRID effort in STAR as part of our participation in the Open Science Grid.
Our previous pages are being migrated tot his area. Please find the previous content here.
Articles and publications
- October 10th 2012 - The Next Step of HPC in the Cloud
- July 28th 2011 - Magellan Tackles the Mysterious Proton Spin
- June 1st 2011 - The case of the missing proton spin
- March 24th 2010 - Video of the week - RHIC’s hot quark soup
- May 29th 2009 - Nimbus cloud project saves brainiacs' bacon
- May 2nd 2009 - Number Crunching Made Easy
- April 8th 2009 - Feature - Clouds make way for STAR to shine (also as OSG highlight)
- April 2nd 2009 - Nimbus and cloud computing meet STAR production demands (see also HPCwire)
- August 13th 2008 - Feature - STAR of the show
- April 30th 2008 - The new Nimbus: first steps in the clouds
- September 2007 - CHEP 2007 OSG SUMS Workspace Demo (also attached)
- August 7th 2006 - SunGrid and the STAR Experiment (flyer attached)
- June 2006 - From Data To Discovery
- July 27th 2005 - Sao Paulo Joins STAR GRID
- October 25th, 2005 - Probing the Perfect Liquid with the STAR Grid
- June 14th 2006 - SUMS schedules MIT
- June 28th 2006 - São Paulo Seizes Grid Initiative
- March 19th 2004 - Physics results from the STAR experiment at RHIC benefit from production Grid data services
- September 25th 2002 - STAR/HRM achieves robust, effective, Terabyte-scale multi-file replication
Data Management
The data management section will have information on data transfer and development/consolidation of tools used in STAR for Grid data transfer.
SRM/DRM Testing June/July 2007
SRM/DRM Testing June/July 2007
Charge
From email:
We had a discussion with Arie Shoshani and group pertaining
to the use of SRM (client and site caching) in our analysis
scenario. We agreed we would proceed with the following plan,
giving ourselves the best shot at achieving the milestone we
have with the OSG.
- first of all, we will try to restore the SRM service both at
LBNL and BNL . This will require
* Disk space for the SRM cache at LBNL - 500 GB is plenty
* Disk space for the SRM cache at BNL - same size is fine
- we hope for a test of transfer to be passed to the OSG troubleshooting
team who will stress test the data transfer as we have defined i.e.
* size test and long term stability - we would like to define a test
where each job would transfer 500 MB of data from LBNL to BNL
We would like 100 jobs submitted at a time
For the test to be run for at least a few days
* we would like to be sure the test includes burst of
100 requests transfer /mn to SRM
+ the success matrix
. how many time the service had to be restarted
. % success on data transfer
+ we need to document the setup i.e.number of streams
(MUST be greater than 1)
- whenever this test is declared successful, we would use
the deployment in our simulation production in real
production mode - the milestone would then behalf
achieved
- To make our milestone fully completed, we would reach
+1 site. The question was which one?
* Our plan is to move to SRM v2.2 for this test - this
is the path which is more economical in terms of manpower,
OSG deliverables and allow for minimal reshuffling of
manpower and current assignment hence increasing our
chances for success.
* FermiGrid would not have SRM 2.2 however
=> We would then UIC for this, possibly leveraging OSG
manpower to help with setting up a fully working
environment.
Our contact people would be
- Doug Olson for LBNL working with Alex Sim, Andrew Rose,
Eric Hjort (whenever necessary) and Alex Sim
* The work with the OSG troubleshooting team will be
coordinated from LBNL side
* We hope Andrew/Eric will work along with Alex to
set the test described above
- Wayne Betts for access to the infrastructure at BNL
(assistance from everyone to clean the space if needed)
- Olga Barannikova will be our contact for UIC - we will
come back to this later according to the strawman plan
above
As a reminder, I have discussed with Ruth that at
this stage, and after many years of work which are bringing
exciting and encouraging sign of success (the recent production
stability being one) I have however no intent to move, re-scope
or re-schedule our milestone. Success of this milestone is path
forward to make Grid computing part of our plan for the future.
As our visit was understood and help is mobilize, we clearly
see that success is reachable.
I count on all of you for full assistance with
this process.
Thank you,
--
,,,,,
( o o )
--m---U---m--
Jerome
Test Plan (Alex S., 14 June)
Hi all,
The following plan will be performed for STAR SRM test by SDM group with
BeStMan SRM v2.2.
Andrew Rose will duplicate, in the mean time, the successful analysis case
that Eric Hjort had previously.
1. small local setup
1.1. small number of analysis jobs will be submitted directly to PDSF job
queue.
1.2. A job will transfer files from datagrid.lbl.gov via gsiftp into the
PDSF project working cache.
1.3. a fake analysis will be performed to produce a result file.
1.4 the job will issue srm-client to call BeStman to transfer the result
file out to datagrid.lbl.gov via gsiftp.
2. small remote setup
2.1. small number of analysis jobs will be submitted directly to PDSF job
queue.
2.2. A job will transfer files from stargrid?.rcf.bnl.gov via gsiftp into
the PDSF project working cache.
2.3. a fake analysis will be performed to produce a result file.
2.4 the job will issue srm-client to call BeStman to transfer the result
file out to stargrid?.rcf.bnl.gov via gsiftp.
3. large local setup
3.1. about 100-200 analysis jobs will be submitted directly to PDSF job
queue.
3.2. A job will transfer files from datagrid.lbl.gov via gsiftp into the
PDSF project working cache.
3.3. a fake analysis will be performed to produce a result file.
3.4 the job will issue srm-client to call BeStman to transfer the result
file out to datagrid.lbl.gov via gsiftp.
4. large remote setup
4.1. about 100-200 analysis jobs will be submitted directly to PDSF job
queue.
4.2. A job will transfer files from stargrid?.rcf.bnl.gov via gsiftp into
the PDSF project working cache.
4.3. a fake analysis will be performed to produce a result file.
4.4 the job will issue srm-client to call BeStman to transfer the result
file out to stargrid?.rcf.bnl.gov via gsiftp.
5. small remote sums setup
5.1. small number of analysis jobs will be submitted to SUMS.
5.2. A job will transfer files from stargrid?.rcf.bnl.gov via gsiftp into
the PDSF project working cache.
5.3. a fake analysis will be performed to produce a result file.
5.4 the job will issue srm-client to call BeStman to transfer the result
file out to stargrid?.rcf.bnl.gov via gsiftp.
6. large remote setup
6.1. about 100-200 analysis jobs will be submitted to SUMS.
6.2. A job will transfer files from stargrid?.rcf.bnl.gov via gsiftp into
the PDSF project working cache.
6.3. a fake analysis will be performed to produce a result file.
6.4 the job will issue srm-client to call BeStman to transfer the result
file out to stargrid?.rcf.bnl.gov via gsiftp.
7. have Andrew and Lidia use the setup #6 to test with real analysis jobs
8. have a setup #5 on UIC and test
9. have a setup #6 on UIC and test
10. have Andrew and Lidia use the setup #9 to test with real analysis jobs
Any questions? I'll let you know when things are in progress.
-- Alex
asim at lbl dot gov
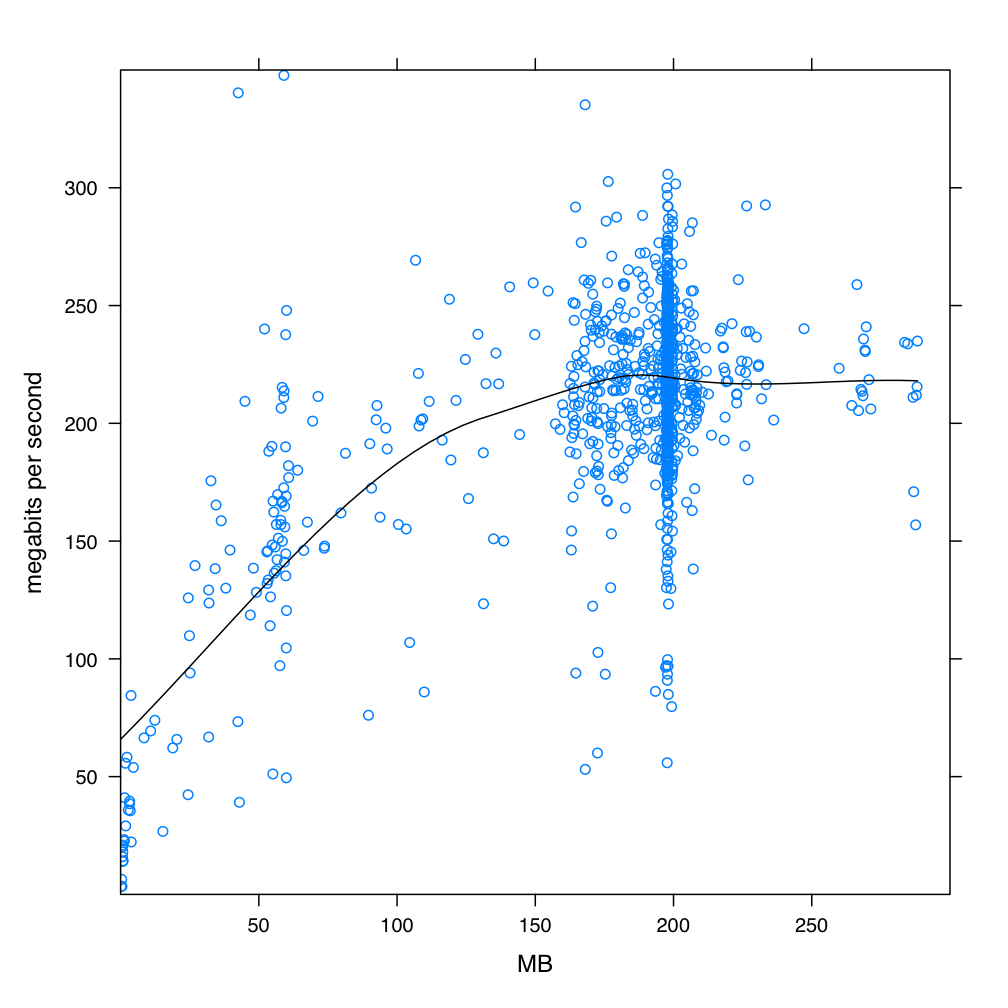
Site Bandwidth Testing

The above is a bandwidth test done using the tool iperf (version iperf_2.0.2-4_i386) between the site KISTI (ui03.sdfarm.kr) and BNL (stargrid03) around the beginning of the year 2014. The connection was noted to collapse (drop to zero) a few times during testing before a full plot could be prepared.
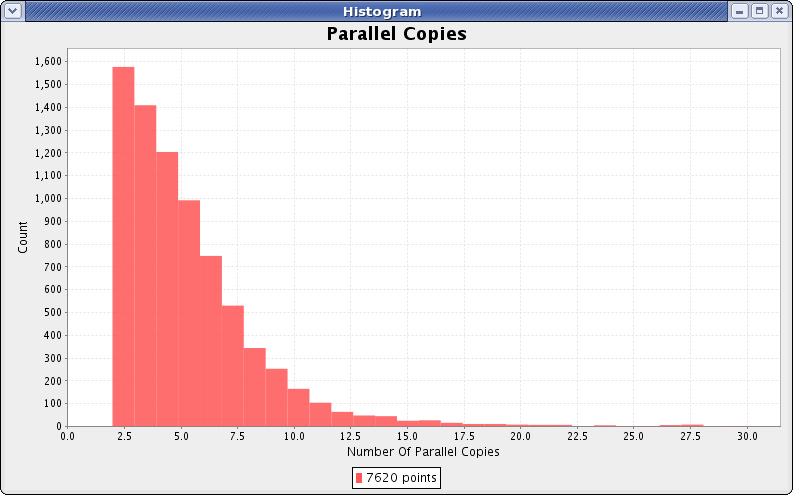
The above histogram shows the number of simultaneous copies in one minute bins, extracted from a few week segment of the actual production at KISTI. Solitary copies are suppressed because they overwhelm the plot. Copies represent less than 1% of the jobs total run time.
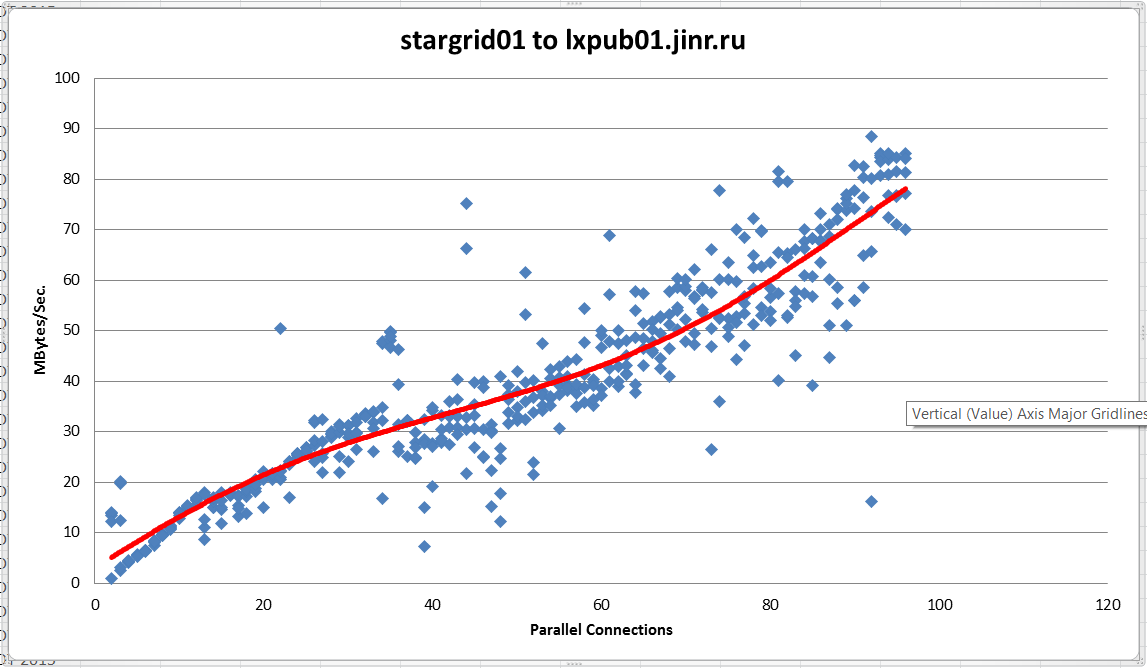
The above is a bandwidth test done using the tool iperf (version iperf_2.0.2-4_i386) between the site Dubna (lxpub01.jinr.ru) and BNL (stargrid01) on 8/14/2015. After exactly 97 parallel connections the connection was noted to collapse with many parallel processes timing out, this behavior was consistent across three attempts but was not present at any lower number of parallel connections. It is suspected that a soft limit is placed on the number of parallel processes somewhere.The raw data is attached at the bottom.
The 2006 STAR analysis scenario
This page will describe in detail the STAR analysis scenario as it was in ~2006. This scenario involves SUMS grid job submission at RCF through condor-g to PDSF using SRM's at both ends to transfer input and output files in a managed fashion.
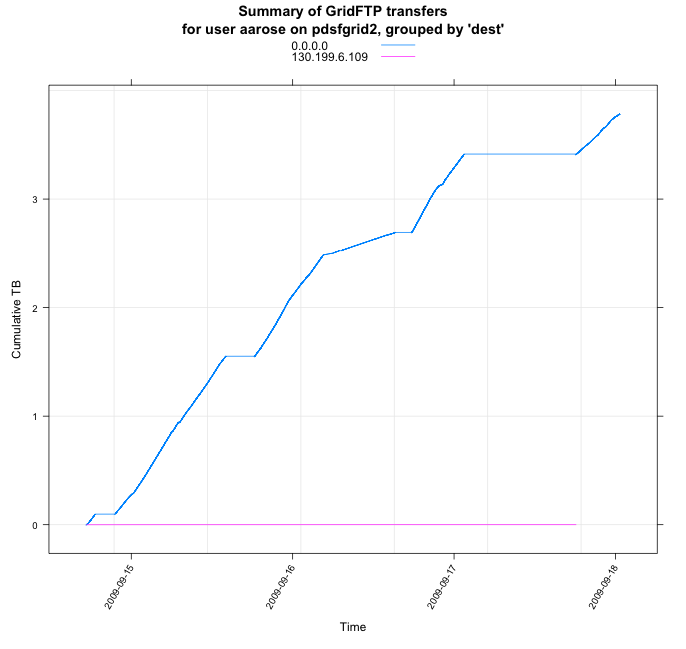
Transfer BNL/PDSF, summer 2009
This page will document the data transfers from/to PDSF to/from BNL in the summer/autumn of 2009.
October 17, 2009
I repeated earlier tests I had run with Dan Gunter (see below "Previous results"). It takes onlt 3 streams to saturate the 1GigE network interface of stargrid04.
[stargrid04] ~/> globus-url-copy -vb file:///dev/zero gsiftp://pdsfgrid2.nersc.gov/dev/null
   2389704704 bytes        23.59 MB/sec avg        37.00 MB/sec inst

[stargrid04] ~/> globus-url-copy -vb -tcp-bs 8388608 file:///dev/zero gsiftp://pdsfgrid2.nersc.gov/dev/null
   1569718272 bytes        35.39 MB/sec avg        39.00 MB/sec inst

[stargrid04] ~/> globus-url-copy -vb -tcp-bs 4388608 file:///dev/zero gsiftp://pdsfgrid2.nersc.gov/dev/null
   1607467008 bytes        35.44 MB/sec avg        38.00 MB/sec inst

[stargrid04] ~/> globus-url-copy -p 2 -vb -tcp-bs 4388608 file:///dev/zero gsiftp://pdsfgrid2.nersc.gov/dev/null
   3414425600 bytes        72.36 MB/sec avg        63.95 MB/sec inst

[stargrid04] ~/> globus-url-copy -p 4 -vb -tcp-bs 4388608 file:///dev/zero gsiftp://pdsfgrid2.nersc.gov/dev/null
   8569487360 bytes       108.97 MB/sec avg       111.80 MB/sec inst

[stargrid04] ~/> globus-url-copy -p 3 -vb -tcp-bs 4388608 file:///dev/zero gsiftp://pdsfgrid2.nersc.gov/dev/null
   5576065024 bytes       106.36 MB/sec avg       109.70 MB/sec inst


[stargrid04] ~/> globus-url-copy -vb gsiftp://pdsfgrid2.nersc.gov/dev/zero file:///dev/null
    625999872 bytes         9.95 MB/sec avg        19.01 MB/sec inst

[stargrid04] ~/> globus-url-copy -vb -tcp-bs 4388608 gsiftp://pdsfgrid2.nersc.gov/dev/zero file:///dev/null
   1523580928 bytes        30.27 MB/sec avg        38.00 MB/sec inst

[stargrid04] ~/> globus-url-copy -vb -p 2 -tcp-bs 4388608 gsiftp://pdsfgrid2.nersc.gov/dev/zero file:///dev/null
   8712617984 bytes        71.63 MB/sec avg        75.87 MB/sec inst

[stargrid04] ~/> globus-url-copy -vb -p 3 -tcp-bs 4388608 gsiftp://pdsfgrid2.nersc.gov/dev/zero file:///dev/null
   7064518656 bytes       102.08 MB/sec avg       111.88 MB/sec inst
October 15, 2009 - evening
After replacing network card to 10GigE so that we could plug directly into the core switch quicktest gives:
[stargrid04] ~/> iperf -c pdsfsrm.nersc.gov -m -w 8388608 -t 120 -p 60005
------------------------------------------------------------
Client connecting to pdsfsrm.nersc.gov, TCP port 60005
TCP window size: 8.00 MByte
------------------------------------------------------------
[  3] local 130.199.6.109 port 50291 connected with 128.55.36.74 port 60005
[ ID] Interval       Transfer     Bandwidth
[  3]  0.0-120.0 sec  4.39 GBytes    314 Mbits/sec
[  3] MSS size 1368 bytes (MTU 1408 bytes, unknown interface)
More work tomorrow.
October 15, 2009
Comparison between the signal from an optical tap at the NERSC border with the tcpdump on the node showed most of the loss happening between the border and pdsfsrm.nersc.gov.
More work was done to optimize single-stream throughput.
- pdsfsrm was moved from a switch that serves the rack where it resides to a switch that is one level up and closer to the border
- a configuration of the forcedeth driver was changed (options forcedeth optimization_mode=1 poll_interval=100 set in /etc/modprobe.conf).
Changes resulted in an improved throughput but it is stillfar from what should be (see details below). We are going to insert a 10 GigE card into the node and move it even closer to the border.
Here are the results with those buffer memory settings as of the morning 10/15/2009. There is a header from the first -------------------------------------------------------------------------
measurement and then results from a few tests run minutes apart.
-------------------------------------------------------------------------
[stargrid04] ~/> iperf -c pdsfsrm.nersc.gov -m -w 8388608 -t 120 -p 60005
-------------------------------------------------------------------------
Client connecting to pdsfsrm.nersc.gov, TCP port 60005 TCP window size: 8.00 MByte
-------------------------------------------------------------------------
[ 3] local 130.199.6.109 port 44070 connected with 128.55.36.74 port 60005
[ ID] Interval Transfer Bandwidth [ 3] 0.0-120.0 sec 1.81 GBytes 129 Mbits/sec
[ 3] 0.0-120.0 sec 3.30 GBytes 236 Mbits/sec
[ 3] 0.0-120.0 sec 1.86 GBytes 133 Mbits/sec
[ 3] 0.0-120.0 sec 2.04 GBytes 146 Mbits/sec
[ 3] 0.0-120.0 sec 3.61 GBytes 258 Mbits/sec
[ 3] 0.0-120.0 sec 1.88 GBytes 135 Mbits/sec
[ 3] 0.0-120.0 sec 3.35 GBytes 240 Mbits/sec
Then I restored the "dtn" buffer memory settings - again morning 10/15/2009 and I got similar if not worse results:
[stargrid04] ~/> iperf -c pdsfsrm.nersc.gov -m -w 8388608 -t 120 -p 60005
-------------------------------------------------------------------------
Client connecting to pdsfsrm.nersc.gov, TCP port 60005 TCP window size: 8.00 MByte
-------------------------------------------------------------------------
[ 3] local 130.199.6.109 port 44361 connected with 128.55.36.74 port 60005
[ ID] Interval Transfer Bandwidth [ 3] 0.0-120.0 sec 2.34 GBytes 168 Mbits/sec
[ 3] 0.0-120.0 sec 1.42 GBytes 101 Mbits/sec
[ 3] 0.0-120.0 sec 2.08 GBytes 149 Mbits/sec
[ 3] 0.0-120.0 sec 2.13 GBytes 152 Mbits/sec
[ 3] 0.0-120.0 sec 1.76 GBytes 126 Mbits/sec
[ 3] 0.0-120.0 sec 1.42 GBytes 102 Mbits/sec
[ 3] 0.0-120.0 sec 2.07 GBytes 148 Mbits/sec
[ 3] 0.0-120.0 sec 2.07 GBytes 148 Mbits/sec
And here if for comparison and to show how things vary with more or less same load on pdsfgrid2 results for the "dtn" settings
just like above from 10/14/2009 afternoon.--------------------------------------------------------------------------------------
[stargrid04] ~/> iperf -c pdsfsrm.nersc.gov -m -w 8388608 -t 120 -p 60005
--------------------------------------------------------------------------------------
Client connecting to pdsfsrm.nersc.gov, TCP port 60005 TCP window size: 8.00 MByte
--------------------------------------------------------------------------------------
[ 3] local 130.199.6.109 port 34366 connected with 128.55.36.74 port 60005
[ ID] Interval Transfer Bandwidth
[ 3] 0.0-120.0 sec 1.31 GBytes 93.5 Mbits/sec
[ 3] 0.0-120.0 sec 1.58 GBytes 113 Mbits/sec
[ 3] 0.0-120.0 sec 1.75 GBytes 126 Mbits/sec
[ 3] 0.0-120.0 sec 1.88 GBytes 134 Mbits/sec
[ 3] 0.0-120.0 sec 2.56 GBytes 183 Mbits/sec
[ 3] 0.0-120.0 sec 2.53 GBytes 181 Mbits/sec
[ 3] 0.0-120.0 sec 3.25 GBytes 232 Mbits/sec
Since the "80Mb/s or worse" persisted for a long time and was measured on various occasions the new numbers are due to the forceth param or the switch change. Most probably it was the switch. It is also true that the "dtn" settings were able to cope slightly better with the location on the Dell switch but seem to be not doing much when pdsfgrid2 is plugged directly into the "old pdsfcore" switch.
October 2, 2009
Notes on third party srm-copy to PDSF:
1) on PDSF interactive node, you need to set up your environment:
source /usr/local/pkg/OSG-1.2/setup.csh
2) srm-copy (recursive) has the following form:
srm-copy gsiftp://stargrid04.rcf.bnl.gov//star/institutions/lbl_prod/andrewar/transfer/reco/production_dAu/ReversedFullField/P08ie/2008/023b/ srm://pdsfsrm.nersc.gov:62443/srm/v2/server\?SFN=/eliza9/starprod/reco/production_dAu/ReversedFullField/P08ie/2008/023/ -recursive -td /eliza9/starprod/reco/production_dAu/ReversedFullField/P08ie/2008/023/
October 1, 2009
We conducted srm-copy tests between RCF and PDSF this week. Initially, the rates we saw for a third party srm-copy between RCF (stargrid04) and PDSF (pdsfsrm) are detailed in plots from Dan:
September 24, 2009
We updated the transfer proceedure to make use of the OSG automated monitoring tools. Perviously, the transfers ran between stargrid04 and one of the NERSC data transfer nodes. To take advantage of Dan's automated log harvesting, we're switiching the target to pdsfsrm.nersc.gov.
Transfers between stargrid04 and pdsfsrm are fairly stable at ~20MBytes/sec (as reported by the "-vb" option in the globus-url-copy). The command used is of the form:
globus-url-copy -r -p 15 gsiftp://stargrid04.rcf.bnl.gov/[dir]/ gisftp://pdsfsrm.nersc.gov/[target dir]/
Plots from the first set using the pdsfsrm node:
The most recent rates seen are given in Dan's plots from Sept. 23rd:
![]()
So, the data transfer is progressing at ~100-200 Mb/s. We will next compare to rates using the new BeStMan installation at PDSF.
Previous results
Tests have been repeated as a new node (stargrid10) became available. We ran from the SRM end host at PDSF pdsfgrid2.nersc.gov to the new stargrid10.rhic.bnl.gov endpoint at BNL . Because of firewalls we could only run from PDSF to BNL, not the other way. A 60-second test got about 75Mb/s. This number is consistent with earlier iperf tests between stargrid02 and pdsfgrid2.
globus-url-copy with 8 streams would go up 400Mb/s and 16 streams 550MB/s. Also with stargrid10, the transfer rates would be the same to and from BNL.
Details below.
pdsfgrid2 59% iperf -s -f m -m -p 60005 -w 8388608 -t 60 -i 2
------------------------------------------------------------
Server listening on TCP port 60005
TCP window size: 16.0 MByte (WARNING: requested 8.00 MByte)
------------------------------------------------------------
[  4] local 128.55.36.74 port 60005 connected with 130.199.6.208 port 36698
[  4]  0.0- 2.0 sec  13.8 MBytes  57.9 Mbits/sec
[  4]  2.0- 4.0 sec  19.1 MBytes  80.2 Mbits/sec
[  4]  4.0- 6.0 sec  4.22 MBytes  17.7 Mbits/sec
[  4]  6.0- 8.0 sec  0.17 MBytes  0.71 Mbits/sec
[  4]  8.0-10.0 sec  2.52 MBytes  10.6 Mbits/sec
[  4] 10.0-12.0 sec  16.7 MBytes  70.1 Mbits/sec
[  4] 12.0-14.0 sec  17.4 MBytes  73.1 Mbits/sec
[  4] 14.0-16.0 sec  16.1 MBytes  67.7 Mbits/sec
[  4] 16.0-18.0 sec  15.8 MBytes  66.4 Mbits/sec
[  4] 18.0-20.0 sec  17.5 MBytes  73.6 Mbits/sec
[  4] 20.0-22.0 sec  17.6 MBytes  73.7 Mbits/sec
[  4] 22.0-24.0 sec  18.1 MBytes  75.8 Mbits/sec
[  4] 24.0-26.0 sec  19.5 MBytes  81.7 Mbits/sec
[  4] 26.0-28.0 sec  19.3 MBytes  80.9 Mbits/sec
[  4] 28.0-30.0 sec  13.8 MBytes  58.1 Mbits/sec
[  4] 30.0-32.0 sec  14.5 MBytes  60.7 Mbits/sec
[  4] 32.0-34.0 sec  14.7 MBytes  61.8 Mbits/sec
[  4] 34.0-36.0 sec  14.6 MBytes  61.2 Mbits/sec
[  4] 36.0-38.0 sec  17.2 MBytes  72.2 Mbits/sec
[  4] 38.0-40.0 sec  19.5 MBytes  81.6 Mbits/sec
[  4] 40.0-42.0 sec  19.5 MBytes  81.6 Mbits/sec
[  4] 42.0-44.0 sec  19.5 MBytes  81.6 Mbits/sec
[  4] 44.0-46.0 sec  19.5 MBytes  81.7 Mbits/sec
[  4] 46.0-48.0 sec  19.5 MBytes  81.6 Mbits/sec
[  4] 48.0-50.0 sec  19.1 MBytes  79.9 Mbits/sec
[  4] 50.0-52.0 sec  19.3 MBytes  80.9 Mbits/sec
[  4] 52.0-54.0 sec  19.4 MBytes  81.3 Mbits/sec
[  4] 54.0-56.0 sec  19.4 MBytes  81.5 Mbits/sec
[  4] 56.0-58.0 sec  19.5 MBytes  81.6 Mbits/sec
[  4] 58.0-60.0 sec  19.5 MBytes  81.7 Mbits/sec
[  4]  0.0-60.4 sec    489 MBytes  68.0 Mbits/sec
[  4] MSS size 1368 bytes (MTU 1408 bytes, unknown interface)
The client was on stargrid10.
on stargrid10
from stargrid10 to pdsfgrid2:
[stargrid10] ~/> globus-url-copy -vb file:///dev/zero gsiftp://pdsfgrid2.nersc.gov/dev/null Source: file:///dev/ Dest: gsiftp://pdsfgrid2.nersc.gov/dev/
zero  ->  null
  513802240 bytes         7.57 MB/sec avg         9.09 MB/sec inst
Cancelling copy...
[stargrid10] ~/> globus-url-copy -vb -p 4 file:///dev/zero gsiftp://pdsfgrid2.nersc.gov/dev/null Source: file:///dev/ Dest: gsiftp://pdsfgrid2.nersc.gov/dev/
zero  ->  null
 1863843840 bytes        25.39 MB/sec avg        36.25 MB/sec inst
Cancelling copy...
[stargrid10] ~/> globus-url-copy -vb -p 6 file:///dev/zero gsiftp://pdsfgrid2.nersc.gov/dev/null Source: file:///dev/ Dest: gsiftp://pdsfgrid2.nersc.gov/dev/
zero  ->  null
 3354394624 bytes        37.64 MB/sec avg        44.90 MB/sec inst
Cancelling copy...
[stargrid10] ~/> globus-url-copy -vb -p 8 file:///dev/zero gsiftp://pdsfgrid2.nersc.gov/dev/null Source: file:///dev/ Dest: gsiftp://pdsfgrid2.nersc.gov/dev/
zero  ->  null
 5016649728 bytes        47.84 MB/sec avg        57.35 MB/sec inst
Cancelling copy...
[stargrid10] ~/> globus-url-copy -vb -p 12 file:///dev/zero gsiftp://pdsfgrid2.nersc.gov/dev/null Source: file:///dev/ Dest: gsiftp://pdsfgrid2.nersc.gov/dev/
zero  ->  null
 5588647936 bytes        62.70 MB/sec avg        57.95 MB/sec inst
Cancelling copy...
[stargrid10] ~/> globus-url-copy -vb -p 16 file:///dev/zero gsiftp://pdsfgrid2.nersc.gov/dev/null Source: file:///dev/ Dest: gsiftp://pdsfgrid2.nersc.gov/dev/
zero  ->  null
15292432384 bytes        74.79 MB/sec avg        65.65 MB/sec inst
Cancelling copy...
and on stargrid10 the other way, from pdsfgrid2 to stargrid10 (similar although slightly better)
[stargrid10] ~/> globus-url-copy -vb gsiftp://pdsfgrid2.nersc.gov/dev/zero file:///dev/null Source: gsiftp://pdsfgrid2.nersc.gov/dev/ Dest: file:///dev/
zero  ->  null
 1693450240 bytes        11.54 MB/sec avg        18.99 MB/sec inst
Cancelling copy...
[stargrid10] ~/> globus-url-copy -vb -p 4 gsiftp://pdsfgrid2.nersc.gov/dev/zero file:///dev/null Source: gsiftp://pdsfgrid2.nersc.gov/dev/ Dest: file:///dev/
zero  ->  null
12835618816 bytes        45.00 MB/sec avg        73.50 MB/sec inst
Cancelling copy...
[stargrid10] ~/> globus-url-copy -vb -p 8 gsiftp://pdsfgrid2.nersc.gov/dev/zero file:///dev/null Source: gsiftp://pdsfgrid2.nersc.gov/dev/ Dest: file:///dev/
zero  ->  null
14368112640 bytes        69.20 MB/sec avg       100.50 MB/sec inst
And now on pdsfgrid2 from pfsfgrid2 to stargrid10 (similar to the result for 4 stream in same direction above)
pdsfgrid2 70% globus-url-copy -vb -p 4 file:///dev/zero gsiftp://stargrid10.rcf.bnl.gov/dev/null Source: file:///dev/ Dest: gsiftp://stargrid10.rcf.bnl.gov/dev/
zero  ->  null
20869021696 bytes        50.39 MB/sec avg        73.05 MB/sec inst
Cancelling copy...
and to stargrid02, really, really bad. but since the node is going away we won't be investigating the mistery.
pdsfgrid2 71% globus-url-copy -vb -p 4 file:///dev/zero gsiftp://stargrid02.rcf.bnl.gov/dev/null Source: file:///dev/ Dest: gsiftp://stargrid02.rcf.bnl.gov/dev/
zero  ->  null
  275513344 bytes         2.39 MB/sec avg         2.40 MB/sec inst
Cancelling copy...
12 Mar 2009
Baseline from bwctl from SRM end host at PDSF -- pdsfgrid2.nersc.gov -- to a perfsonar endpoint at BNL -- lhcmon.bnl.gov. Because of firewalls, could only run from PDSF to BNL, not the other way around. Last I checked, this direction was getting about 5Mb/s from SRM. A 60-second test to the perfsonar host got about 275Mb/s.
Summary: Current baseline from perfSONAR is more than 50X what we're seeing.
RECEIVER START
bwctl: exec_line: /usr/local/bin/iperf -B 192.12.15.23 -s -f m -m -p 5008 -w 8388608 -t 60 -i 2
bwctl: start_tool: 3445880257.865809
------------------------------------------------------------
Server listening on TCP port 5008
Binding to local address 192.12.15.23
TCP window size: 16.0 MByte (WARNING: requested 8.00 MByte)
------------------------------------------------------------
[ 14] local 192.12.15.23 port 5008 connected with 128.55.36.74 port 5008
[ 14]  0.0- 2.0 sec  7.84 MBytes  32.9 Mbits/sec
[ 14]  2.0- 4.0 sec  38.2 MBytes    160 Mbits/sec
[ 14]  4.0- 6.0 sec    110 MBytes    461 Mbits/sec
[ 14]  6.0- 8.0 sec  18.3 MBytes  76.9 Mbits/sec
[ 14]  8.0-10.0 sec  59.1 MBytes    248 Mbits/sec
[ 14] 10.0-12.0 sec    102 MBytes    428 Mbits/sec
[ 14] 12.0-14.0 sec    139 MBytes    582 Mbits/sec
[ 14] 14.0-16.0 sec    142 MBytes    597 Mbits/sec
[ 14] 16.0-18.0 sec  49.7 MBytes    208 Mbits/sec
[ 14] 18.0-20.0 sec    117 MBytes    490 Mbits/sec
[ 14] 20.0-22.0 sec  46.7 MBytes    196 Mbits/sec
[ 14] 22.0-24.0 sec  47.0 MBytes    197 Mbits/sec
[ 14] 24.0-26.0 sec  81.5 MBytes    342 Mbits/sec
[ 14] 26.0-28.0 sec  75.9 MBytes    318 Mbits/sec
[ 14] 28.0-30.0 sec  45.5 MBytes    191 Mbits/sec
[ 14] 30.0-32.0 sec  56.2 MBytes    236 Mbits/sec
[ 14] 32.0-34.0 sec  55.5 MBytes    233 Mbits/sec
[ 14] 34.0-36.0 sec  58.0 MBytes    243 Mbits/sec
[ 14] 36.0-38.0 sec  61.0 MBytes    256 Mbits/sec
[ 14] 38.0-40.0 sec  61.6 MBytes    258 Mbits/sec
[ 14] 40.0-42.0 sec  72.0 MBytes    302 Mbits/sec
[ 14] 42.0-44.0 sec  62.6 MBytes    262 Mbits/sec
[ 14] 44.0-46.0 sec  64.3 MBytes    270 Mbits/sec
[ 14] 46.0-48.0 sec  66.1 MBytes    277 Mbits/sec
[ 14] 48.0-50.0 sec  33.6 MBytes    141 Mbits/sec
[ 14] 50.0-52.0 sec  63.0 MBytes    264 Mbits/sec
[ 14] 52.0-54.0 sec  55.7 MBytes    234 Mbits/sec
[ 14] 54.0-56.0 sec  56.9 MBytes    239 Mbits/sec
[ 14] 56.0-58.0 sec  59.5 MBytes    250 Mbits/sec
[ 14] 58.0-60.0 sec  50.7 MBytes    213 Mbits/sec
[ 14]  0.0-60.3 sec  1965 MBytes    273 Mbits/sec
[ 14] MSS size 1448 bytes (MTU 1500 bytes, ethernet)
bwctl: stop_exec: 3445880322.405938

RECEIVER END
11 Feb 2009
By: Dan Gunter and Iwona Sakrejda
Measured between the STAR SRM hosts at NERSC/PDSF and Brookhaven:
- pdsfgrid2.nersc.gov (henceforth, "PDSF")
- stargrid02.rcf.bnl.gov (henceforth, "BNL")
Current data flow is from PDSF to BNL, but plans are to have data flow both ways.
All numbers are in megabits per second (Mb/s). Layer 4 (transport) protocol was TCP. Tests were at least 60 sec. long, 120 sec. for the higher numbers (to give it time to ramp up). All numbers are approximate, of course.
Both sides had recent Linux kernels with auto-tuning. The max buffer sizes were at Brian Tierney's recommended sizes.
From BNL to PDSF
Tool: iperf
- 1 stream: 50-60 Mb/s (but some dips around 5Mb/s)
- 8 or 16 streams: 250-300Mb/s aggregate
Tool: globus-url-copy (see PDSF to BNL for details). This was to confirm that globus-url-copy and iperf were roughly equivalent.
- 1 stream: ~70 Mb/s
- 8 streams: 250-300 Mb/s aggregate. Note: got same number with PDSF iptables turned off.
From PDSF to BNL
Tool: globus-url-copy (gridftp) -- iperf could not connect, which we proved was due to BNL restrictions by temporarily disabling IPtables at PDSF. To avoid any possible I/O effects, ran globus-url-copy from /dev/zero to /dev/null.
- 1 stream: 5 Mb/s
- 8 streams: 40 Mb/s
- 64 streams: 250-300 Mb/s aggregate. Note: got same number with PDSF iptables turned off.
18 Aug 2008 - BNL (stargrid02) - LBLnet (dlolson)
Below are results from iperf tests bnl to lbl.
650 Mbps with very little loss is quite good.
For the uninformed (like me), we ran iperf server on dlolson.lbl.gov
listening on port 40050, then ran client on stargrid02.rcf.bnl.gov
sending udp packets with max rate of 1000 Mbps

[olson@dlolson star]$ iperf -s -p 40050 -t 60 -i 1 -u
[ ID] Interval       Transfer     Bandwidth       Jitter   Lost/Total Datagrams
[  3] 40.0-41.0 sec  78.3 MBytes    657 Mbits/sec  0.012 ms    0/55826 (0%)
[ ID] Interval       Transfer     Bandwidth       Jitter   Lost/Total Datagrams
[  3] 41.0-42.0 sec  78.4 MBytes    658 Mbits/sec  0.020 ms    0/55946 (0%)
[ ID] Interval       Transfer     Bandwidth       Jitter   Lost/Total Datagrams
[  3] 42.0-43.0 sec  78.4 MBytes    658 Mbits/sec  0.020 ms    0/55911 (0%)
[ ID] Interval       Transfer     Bandwidth       Jitter   Lost/Total Datagrams
[  3] 43.0-44.0 sec  76.8 MBytes    644 Mbits/sec  0.023 ms    0/54779 (0%)
[ ID] Interval       Transfer     Bandwidth       Jitter   Lost/Total Datagrams
[  3] 44.0-45.0 sec  78.4 MBytes    657 Mbits/sec  0.016 ms    7/55912 (0.013%)
[ ID] Interval       Transfer     Bandwidth       Jitter   Lost/Total Datagrams
[  3] 45.0-46.0 sec  78.4 MBytes    658 Mbits/sec  0.016 ms    0/55924 (0%)
[ ID] Interval       Transfer     Bandwidth       Jitter   Lost/Total Datagrams
[  3] 46.0-47.0 sec  78.3 MBytes    656 Mbits/sec  0.024 ms    0/55820 (0%)
[ ID] Interval       Transfer     Bandwidth       Jitter   Lost/Total Datagrams
[  3] 47.0-48.0 sec  78.3 MBytes    657 Mbits/sec  0.016 ms    0/55870 (0%)


[stargrid02] ~/> iperf -c dlolson.lbl.gov -t 60 -i 1 -p 40050 -u -b 1000M
[ ID] Interval       Transfer     Bandwidth
[  3] 40.0-41.0 sec  78.3 MBytes    657 Mbits/sec
[ ID] Interval       Transfer     Bandwidth
[  3] 41.0-42.0 sec  78.4 MBytes    658 Mbits/sec
[ ID] Interval       Transfer     Bandwidth
[  3] 42.0-43.0 sec  78.4 MBytes    657 Mbits/sec
[ ID] Interval       Transfer     Bandwidth
[  3] 43.0-44.0 sec  76.8 MBytes    644 Mbits/sec
[ ID] Interval       Transfer     Bandwidth
[  3] 44.0-45.0 sec  78.4 MBytes    657 Mbits/sec
[ ID] Interval       Transfer     Bandwidth
[  3] 45.0-46.0 sec  78.4 MBytes    658 Mbits/sec
[ ID] Interval       Transfer     Bandwidth
[  3] 46.0-47.0 sec  78.2 MBytes    656 Mbits/sec
[ ID] Interval       Transfer     Bandwidth
[  3] 47.0-48.0 sec  78.3 MBytes    657 Mbits/sec

Additional notes:
iperf server at bnl would not answer tho we used port 29000 with
GLOBUS_TCP_PORT_RANGE=20000,30000

iperf server at pdsf (pc2608) would not answer either.
25 August 2008 BNL - PDSF iperf results, after moving pdsf grid nodes to 1 GigE net
(pdsfgrid5) iperf % build/bin/iperf -s -p 40050 -t 20 -i 1 -u
------------------------------------------------------------
Server listening on UDP port 40050
Receiving 1470 byte datagrams
UDP buffer size: 64.0 KByte (default)
------------------------------------------------------------
[  3] local 128.55.36.73 port 40050 connected with 130.199.6.168 port 56027
[ ID] Interval       Transfer     Bandwidth       Jitter   Lost/Total Datagrams
[  3]  0.0- 1.0 sec  78.5 MBytes    659 Mbits/sec  0.017 ms   14/56030 (0.025%)
[  3]  0.0- 1.0 sec  44 datagrams received out-of-order
[ ID] Interval       Transfer     Bandwidth       Jitter   Lost/Total Datagrams
[  3]  1.0- 2.0 sec  74.1 MBytes    621 Mbits/sec  0.024 ms    8/52834 (0.015%)
[  3]  1.0- 2.0 sec  8 datagrams received out-of-order
[ ID] Interval       Transfer     Bandwidth       Jitter   Lost/Total Datagrams
[  3]  2.0- 3.0 sec  40.4 MBytes    339 Mbits/sec  0.023 ms   63/28800 (0.22%)
[  3]  2.0- 3.0 sec  63 datagrams received out-of-order
[ ID] Interval       Transfer     Bandwidth       Jitter   Lost/Total Datagrams
[  3]  3.0- 4.0 sec  73.0 MBytes    613 Mbits/sec  0.016 ms  121/52095 (0.23%)
[  3]  3.0- 4.0 sec  121 datagrams received out-of-order
[ ID] Interval       Transfer     Bandwidth       Jitter   Lost/Total Datagrams
[  3]  4.0- 5.0 sec  76.6 MBytes    643 Mbits/sec  0.020 ms   18/54661 (0.033%)
[  3]  4.0- 5.0 sec  18 datagrams received out-of-order
[ ID] Interval       Transfer     Bandwidth       Jitter   Lost/Total Datagrams
[  3]  5.0- 6.0 sec  76.8 MBytes    644 Mbits/sec  0.015 ms   51/54757 (0.093%)
[  3]  5.0- 6.0 sec  51 datagrams received out-of-order
[ ID] Interval       Transfer     Bandwidth       Jitter   Lost/Total Datagrams
[  3]  6.0- 7.0 sec  77.1 MBytes    647 Mbits/sec  0.016 ms   40/55012 (0.073%)
[  3]  6.0- 7.0 sec  40 datagrams received out-of-order
[ ID] Interval       Transfer     Bandwidth       Jitter   Lost/Total Datagrams
[  3]  7.0- 8.0 sec  74.9 MBytes    628 Mbits/sec  0.040 ms   64/53414 (0.12%)
[  3]  7.0- 8.0 sec  64 datagrams received out-of-order
[ ID] Interval       Transfer     Bandwidth       Jitter   Lost/Total Datagrams
[  3]  8.0- 9.0 sec  76.0 MBytes    637 Mbits/sec  0.021 ms   36/54189 (0.066%)
[  3]  8.0- 9.0 sec  36 datagrams received out-of-order
[ ID] Interval       Transfer     Bandwidth       Jitter   Lost/Total Datagrams
[  3]  9.0-10.0 sec  75.6 MBytes    634 Mbits/sec  0.018 ms   21/53931 (0.039%)
[  3]  9.0-10.0 sec  21 datagrams received out-of-order
[ ID] Interval       Transfer     Bandwidth       Jitter   Lost/Total Datagrams
[  3] 10.0-11.0 sec  54.7 MBytes    459 Mbits/sec  0.038 ms   20/38994 (0.051%)
[  3] 10.0-11.0 sec  20 datagrams received out-of-order
[ ID] Interval       Transfer     Bandwidth       Jitter   Lost/Total Datagrams
[  3] 11.0-12.0 sec  75.6 MBytes    634 Mbits/sec  0.019 ms   37/53939 (0.069%)
[  3] 11.0-12.0 sec  37 datagrams received out-of-order
[ ID] Interval       Transfer     Bandwidth       Jitter   Lost/Total Datagrams
[  3] 12.0-13.0 sec  74.1 MBytes    622 Mbits/sec  0.056 ms    4/52888 (0.0076%)
[  3] 12.0-13.0 sec  24 datagrams received out-of-order
[ ID] Interval       Transfer     Bandwidth       Jitter   Lost/Total Datagrams
[  3] 13.0-14.0 sec  75.4 MBytes    633 Mbits/sec  0.026 ms  115/53803 (0.21%)
[  3] 13.0-14.0 sec  115 datagrams received out-of-order
[ ID] Interval       Transfer     Bandwidth       Jitter   Lost/Total Datagrams
[  3] 14.0-15.0 sec  77.1 MBytes    647 Mbits/sec  0.038 ms   50/54997 (0.091%)
[  3] 14.0-15.0 sec  50 datagrams received out-of-order
[ ID] Interval       Transfer     Bandwidth       Jitter   Lost/Total Datagrams
[  3] 15.0-16.0 sec  75.2 MBytes    631 Mbits/sec  0.016 ms   26/53654 (0.048%)
[  3] 15.0-16.0 sec  26 datagrams received out-of-order
[ ID] Interval       Transfer     Bandwidth       Jitter   Lost/Total Datagrams
[  3] 16.0-17.0 sec  78.2 MBytes    656 Mbits/sec  0.039 ms   39/55793 (0.07%)
[  3] 16.0-17.0 sec  39 datagrams received out-of-order
[ ID] Interval       Transfer     Bandwidth       Jitter   Lost/Total Datagrams
[  3] 17.0-18.0 sec  76.6 MBytes    643 Mbits/sec  0.017 ms   35/54635 (0.064%)
[  3] 17.0-18.0 sec  35 datagrams received out-of-order
[ ID] Interval       Transfer     Bandwidth       Jitter   Lost/Total Datagrams
[  3] 18.0-19.0 sec  76.5 MBytes    641 Mbits/sec  0.039 ms   23/54544 (0.042%)
[  3] 18.0-19.0 sec  23 datagrams received out-of-order
[ ID] Interval       Transfer     Bandwidth       Jitter   Lost/Total Datagrams
[  3] 19.0-20.0 sec  78.0 MBytes    654 Mbits/sec  0.017 ms    1/55624 (0.0018%)
[  3] 19.0-20.0 sec  29 datagrams received out-of-order
[ ID] Interval       Transfer     Bandwidth       Jitter   Lost/Total Datagrams
[  3]  0.0-20.0 sec  1.43 GBytes    614 Mbits/sec  0.018 ms   19/1044598 (0.0018%)
[  3]  0.0-20.0 sec  864 datagrams received out-of-order


[stargrid02] ~/> iperf -c pdsfgrid5.nersc.gov -t 20 -i 1 -p 40050 -u -b 1000M
------------------------------------------------------------
Client connecting to pdsfgrid5.nersc.gov, UDP port 40050
Sending 1470 byte datagrams
UDP buffer size:   128 KByte (default)
------------------------------------------------------------
[  3] local 130.199.6.168 port 56027 connected with 128.55.36.73 port 40050
[ ID] Interval       Transfer     Bandwidth
[  3]  0.0- 1.0 sec  78.5 MBytes    659 Mbits/sec
[ ID] Interval       Transfer     Bandwidth
[  3]  1.0- 2.0 sec  74.1 MBytes    621 Mbits/sec
[ ID] Interval       Transfer     Bandwidth
[  3]  2.0- 3.0 sec  40.4 MBytes    339 Mbits/sec
[ ID] Interval       Transfer     Bandwidth
[  3]  3.0- 4.0 sec  73.0 MBytes    613 Mbits/sec
[ ID] Interval       Transfer     Bandwidth
[  3]  4.0- 5.0 sec  76.6 MBytes    643 Mbits/sec
[ ID] Interval       Transfer     Bandwidth
[  3]  5.0- 6.0 sec  76.8 MBytes    644 Mbits/sec
[ ID] Interval       Transfer     Bandwidth
[  3]  6.0- 7.0 sec  77.1 MBytes    647 Mbits/sec
[ ID] Interval       Transfer     Bandwidth
[  3]  7.0- 8.0 sec  74.8 MBytes    628 Mbits/sec
[ ID] Interval       Transfer     Bandwidth
[  3]  8.0- 9.0 sec  76.0 MBytes    637 Mbits/sec
[ ID] Interval       Transfer     Bandwidth
[  3]  9.0-10.0 sec  75.6 MBytes    634 Mbits/sec
[ ID] Interval       Transfer     Bandwidth
[  3] 10.0-11.0 sec  54.6 MBytes    458 Mbits/sec
[ ID] Interval       Transfer     Bandwidth
[  3] 11.0-12.0 sec  75.7 MBytes    635 Mbits/sec
[ ID] Interval       Transfer     Bandwidth
[  3] 12.0-13.0 sec  74.1 MBytes    622 Mbits/sec
[ ID] Interval       Transfer     Bandwidth
[  3] 13.0-14.0 sec  75.4 MBytes    633 Mbits/sec
[ ID] Interval       Transfer     Bandwidth
[  3] 14.0-15.0 sec  77.1 MBytes    647 Mbits/sec
[ ID] Interval       Transfer     Bandwidth
[  3] 15.0-16.0 sec  75.2 MBytes    631 Mbits/sec
[ ID] Interval       Transfer     Bandwidth
[  3] 16.0-17.0 sec  78.2 MBytes    656 Mbits/sec
[ ID] Interval       Transfer     Bandwidth
[  3] 17.0-18.0 sec  76.6 MBytes    643 Mbits/sec
[ ID] Interval       Transfer     Bandwidth
[  3] 18.0-19.0 sec  76.4 MBytes    641 Mbits/sec
[ ID] Interval       Transfer     Bandwidth
[  3]  0.0-20.0 sec  1.43 GBytes    614 Mbits/sec
[  3] Sent 1044598 datagrams
[  3] Server Report:
[ ID] Interval       Transfer     Bandwidth       Jitter   Lost/Total Datagrams
[  3]  0.0-20.0 sec  1.43 GBytes    614 Mbits/sec  0.017 ms   19/1044598 (0.0018%)
[  3]  0.0-20.0 sec  864 datagrams received out-of-order
Transfers to/from Birmingham
IntroductionTransfers where either the source or target are on the Birmingham cluster. I am keeping a log of these as they come up. I don't do them too often so it will take a while to accumulate enough data points to discern any patterns…
| Date | Type | Size | Command | Duration | p | rate agg. | rate/p | Source | Destination |
| 2006.9.5 | DAQ | 40Gb | g-u-c | up to 12 hr | 3-5 | 1 MB/s | ~0.2 MB/s | pdsfgrid1,2,4 | rhilxs |
| 2006.10.6 | MuDst | 50 Gb | g-u-c | 3-5 hr | 15 | ~3.5 MB/s | 0.25 MB/s | rhilxs | pdsfgrid2,4,5 |
| 2006.10.20 | event.root geant.root | 500 Gb | g-u-c -nodcau | 38 hr | 9 | 3.7 MB/s | 0.41 MB/s | rhilxs | garchive |
Notes
g-u-c is just shorthand for globus-url-copy
'p' is the total number of simultaneous connections and is the sum of the parameter for g-u-c -p option for all the commands running together
e.g. 4 g-u-c commands with no -p option gives total p=4 but 3 g-u-c commands with -p 5 gives total p=15
Links
May be useful for the beginner?
PDSF Grid info
Documentation
This page will add documents / documentation links and help for Grid beginners or experts. Those documents are either created by us or gathered from the internet.
Getting site information from VORS
VORS (Virtual Organization Resource Selector) provides information about grid sites similar to GridCat. You can find VORS information here.As per information received at a GOC meeting on 8/14/06, VORS information is the to be be the preferred OSG information service. VORS provides information through the HTTP protocol. This can be in plane text format or HTML, both are viewable from a web browser. For the html version use the link:
Virtual Organization Selection
The plain text version may be more important because it can be easily parsed by other programs. This allows for the writing of information service modules for SUMS in a simple way.
Step 1:
Go to the link below in a web browser:
VORS text interface
Note that to get the text version index.cgi is replaced with tindex.cgi. This will bring up a page that looks like this:
238,Purdue-Physics,grid.physics.purdue.edu:2119,compute,OSG,PASS,2006-08-21 19:16:25
237,Rice,osg-gate.rice.edu:2119,compute,OSG,FAIL,2006-08-21 19:17:07
13,SDSS_TAM,tam01.fnal.gov:2119,compute,OSG,PASS,2006-08-21 19:17:10
38,SPRACE,spgrid.if.usp.br:2119,compute,OSG,PASS,2006-08-21 19:17:51
262,STAR-Bham,rhilxs.ph.bham.ac.uk:2119,compute,OSG,PASS,2006-08-21 19:23:12
217,STAR-BNL,stargrid02.rcf.bnl.gov:2119,compute,OSG,PASS,2006-08-21 19:24:11
16,STAR-SAO_PAULO,stars.if.usp.br:2119,compute,OSG,PASS,2006-08-21 19:26:55
44,STAR-WSU,rhic23.physics.wayne.edu:2119,compute,OSG,PASS,2006-08-21 19:29:10
34,TACC,osg-login.lonestar.tacc.utexas.edu:2119,compute,OSG,FAIL,2006-08-21 19:30:23
19,TTU-ANTAEUS,antaeus.hpcc.ttu.edu:2119,compute,OSG,PASS,2006-08-21 19:30:54
This page holds little information about the site its self however it links the site with the resource number of the site. The resource number is the first number that starts each line. It this example site STAR-BNL is resource 217.
Step 2:
To find out more useful information about the site this has to be applied to the link below (note I have already filled in 217 for STAR-BNL):
STAR-BNL VORS Information
The plane text information that comes back will look like this:
#VORS text interface (grid = All, VO = all, res = 217)
shortname=STAR-BNL
gatekeeper=stargrid02.rcf.bnl.gov
gk_port=2119
globus_loc=/opt/OSG-0.4.0/globus
host_cert_exp=Feb 24 17:32:06 2007 GMT
gk_config_loc=/opt/OSG-0.4.0/globus/etc/globus-gatekeeper.conf
gsiftp_port=2811
grid_services=
schedulers=jobmanager is of type fork
jobmanager-condor is of type condor
jobmanager-fork is of type fork
jobmanager-mis is of type mis
condor_bin_loc=/home/condor/bin
mis_bin_loc=/opt/OSG-0.4.0/MIS-CI/bin
mds_port=2135
vdt_version=1.3.9c
vdt_loc=/opt/OSG-0.4.0
app_loc=/star/data08/OSG/APP
data_loc=/star/data08/OSG/DATA
tmp_loc=/star/data08/OSG/DATA
wntmp_loc=: /tmp
app_space=6098.816 GB
data_space=6098.816 GB
tmp_space=6098.816 GB
extra_variables=MountPoints
SAMPLE_LOCATION default /SAMPLE-path
SAMPLE_SCRATCH devel /SAMPLE-path
exec_jm=stargrid02.rcf.bnl.gov/jobmanager-condor
util_jm=stargrid02.rcf.bnl.gov/jobmanager
sponsor_vo=star
policy=http://www.star.bnl.gov/STAR/comp/Grid
From the unix command line the command wget can be used to collect this information. From inside a java application the Socket class can be used to pull this information back as a String, and then parse as needed.
Globus 1.1.x
QuickStart.pdf is for Globus version 1.1.3 / 1.1.4 .
Globus Toolkit Error FAQ
Globus Toolkit Error FAQ
For GRAM error codes, follow this link.
The purpose of this document is to outline common errors encountered after the installation and setup of the Globus Toolkit.
- GRAM Job Submission failed because the connection to the server failed (check host and port) (error code 12)
- error in loading shared libraries
- ERROR: no valid proxy, or lifetime to small (one hour)
- GRAM Job submission failed because authentication with the remote server failed (error code 7)
- GRAM Job submission failed bacause authentication failed: remote certificate not yet valid (error code 7)
- GRAM Job submission failed bacause authentication failed: remote certificate has expired (error code 7)
- GRAM Job submission failed because data transfer to the server failed (error code 10)
- GRAM Job submission failed because authentication failed: Expected target subject name="/CN=host/hostname"
Target returned subject name="/O=Grid/O=Globus/CN=hostname.domain.edu" (error code 7) - Problem with local credentials no proxy credentials: run grid-proxy-init or wgpi first
- GRAM Job submission failed because authentication failed: remote side did not like my creds for unknown reason
- GRAM Job submission failed because the job manager failed to open stdout (error code 73)
or
GRAM Job submission failed because the job manager failed to open stderr (error code 74) - GRAM Job submission failed because the provided RSL string includes variables that could not be identified (error code 39)
- 530 Login incorrect / FTP LOGIN REFUSED (shell not in /etc/shells)
- globus_i_gsi_gss_utils.c:866: globus_i_gsi_gss_handshake: Unable to verify remote side's credentials: Couldn't verify the remote certificate
OpenSSL Error: s3_pkt.c:1031: in library: SSL routines, function SSL3_READ_BYTES: sslv3 alert bad certificate (error code 7) - globus_gsi_callback.c:438: globus_i_gsi_callback_cred_verify: Could not verify credential: self signed certificate in certificate chain (error code 7)
or
globus_gsi_callback.c:424: globus_i_gsi_callback_cred_verify: Can't get the local trusted CA certificate: Cannot find issuer certificate for local credential (error code 7) - SSL3_GET_CLIENT_CERTIFICATE: no certificate returned
- undefined symbol: lutil_sasl_interact
followed by a failure to load a module
/usr/local/globus-2.4.2/etc/grid-info-slapd.conf: line 23: failed to load or initialize module libback_giis.la
- GRAM Job Submission failed because the connection to the server failed (check host and port) (error code 12)
Diagnosis
Your client is unable to contact the gatekeeper specified. Possible causes include:- The gatekeeper is not running
- The host is not reachable.
The gatekeeper is on a non-standard port
Solution
Make sure the gatekeeper is being launched by inetd or xinetd. Review the Install Guide if you do not know how to do this. Check to make sure that ordinary TCP/IP connections are possible; can you ssh to the host, or ping it? If you cannot, then you probably can't submit jobs either. Check for typos in the hostname.
Try telnetting to port 2119. If you see a "Unable to load shared library", the gatekeeper was not built statically, and does not have an appropriate LD_LIBRARY_PATH set. If that is the case, either rebuild it statically, or set the environment variable for the gatekeeper. In inetd, use /usr/bin/env to wrap the launch of the gatekeeper, or in xinetd, use the "env=" option.
Check the $GLOBUS_LOCATION/var/globus-gatekeeper.log if it exists. It may tell you that the private key is insecure, so it refuses to start. In that case, fix the permissions of the key to be read only by the owner.
If the gatekeeper is on a non-standard port, be sure to use a contact string of host:port.
Back to top - error in loading shared libraries
Diagnosis
LD_LIBRARY_PATH is not set.
Solution
If you receive this as a client, make sure to read in either $GLOBUS_LOCATION/etc/globus-user-env.sh (if you are using a Bourne-like shell) or $GLOBUS_LOCATION/etc/globus-user-env.csh (if you are using a C-like shell)
Back to top - ERROR: no valid proxy, or lifetime to small (one hour)
Diagnosis
You are running globus-personal-gatekeeper as root, or did not run grid-proxy-init.
Solution
Don't run globus-personal-gatekeeper as root. globus-personal-gatekeeper is designed to allow an ordinary user to establish a gatekeeper using a proxy from their personal certificate. If you are root, you should setup a gatekeeper using inetd or xinetd, and using your host certificates. If you are not root, make sure to run grid-proxy-init before starting the personal gatekeeper.
Back to top - GRAM Job submission failed because authentication with the remote server failed (error code 7)
Diagnosis
Check the $GLOBUS_LOCATION/var/globus-gatekeeper.log on the remote server. You will probably see something like:
Authenticated globus user: /O=Grid/O=Globus/OU=your.domain/OU=Your Name
Failure: globus_gss_assist_gridmap() failed authorization. rc =1Solution
This indicates that your account is not in the grid-mapfile. Create the grid-mapfile in /etc/grid-security (or wherever the -gridmap flag in $GLOBUS_LOCATION/etc/globus-gatekeeper.conf points to) with an entry pairing your subject name to your user name. Review the Install Guide if you do not know how to do this. If you see "rc = 7", you may have bad permissions on the /etc/grid-security/. It needs to be readable so that users can see the certificates/ subdirectory.
Back to top - GRAM Job submission failed bacause authentication failed: remote certificate not yet valid (error code 7)
Diagnosis
This indicates that the remote host has a date set greater than five minutes in the future relative to the remote host.
Try typing "date -u" on both systems at the same time to verify this. (The "-u" specifies that the time should be displayed in universal time, also known as UTC or GMT.)
Solution
Ultimately, synchronize the hosts using NTP. Otherwise, unless you are willing to set the client host date back, you will have to wait until your system believes that the remote certificate is valid. Also, be sure to check your shell environment to see if you have any time zone variables set.
Back to top - GRAM Job submission failed because authentication failed: remote certificate has expired (error code 7)
Diagnosis
This indicates that the remote host has an expired certificate.
To double-check, you can use grid-cert-info or grid-proxy-info. Use grid-cert-info on /etc/grid-security/hostcert.pem if you are dealing with a system level gatekeeper. Use grid-proxy-info if you are dealing with a personal gatekeeper.
Solution
If the host certificate has expired, use grid-cert-renew to get a renewal. If your proxy has expired, create a new one with grid-proxy-init.
Back to top - GRAM Job submission failed because data transfer to the server failed (error code 10)
Diagnosis
Check the $GLOBUS_LOCATION/var/globus-gatekeeper.log on the remote server. You will probably see something like:
Authenticated globus user: /O=Grid/O=Globus/OU=your.domain/OU=Your Name
Failure: globus_gss_assist_gridmap() failed authorization. rc =1Solution
This indicates that your account is not in the grid-mapfile. Create the grid-mapfile in /etc/grid-security (or wherever the -gridmap flag in $GLOBUS_LOCATION/etc/globus-gatekeeper.conf points to) with an entry pairing your subject name to your user name. Review the Install Guide if you do not know how to do this.
Back to top - GRAM Job submission failed because authentication failed: Expected target subject name="/CN=host/hostname"
Target returned subject name="/O=Grid/O=Globus/CN=hostname.domain.edu" (error code 7)Diagnosis
New installations will often see errors like the above where the expected target subject name has just the unqualified hostname but the target returned subject name has the fully qualified domain name (e.g. expected is "hostname" but returned is "hostname.domain.edu").
This is usually becuase the client looks up the target host's IP address in /etc/hosts and only gets the simple hostname back.
Solution
The solution is to edit the /etc/hosts file so that it returns the fully qualified domain name. To do this find the line in /etc/hosts that has the target host listed and make sure it looks like:
xx.xx.xx.xx hostname.domain.edu hostname
Where "xx.xx.xx.xx" should be the numeric IP address of the host and hostname.domain.edu should be replaced with the actual hostname in question. The trick is to make sure the full name (hostname.domain.edu) is listed before the nickname (hostname).
If this only happens with your own host, see the explanation of the failed to open stdout error, specifically about how to set the GLOBUS_HOSTNAME for your host.
Back to top - Problem with local credentials no proxy credentials: run grid-proxy-init or wgpi first
Diagnosis
You do not have a valid proxy.
Solution
Run grid-proxy-init
Back to top - GRAM Job submission failed because authentication failed: remote side did not like my creds for unknown reason
Diagnosis
Check the $GLOBUS_LOCATION/var/globus-gatekeeper.log on the remote host. It probably says "remote certificate not yet valid". This indicates that the client host has a date set greater than five minutes in the future relative to the remote host.
Try typing "date -u" on both systems at the same time to verify this. (The "-u" specifies that the time should be displayed in universal time, also known as UTC or GMT.)
Solution
Ultimately, synchronize the hosts using NTP. Otherwise, unless you are willing to set the client host date back, you will have to wait until the remote server believes that your proxy is valid. Also, be sure to check your shell environment to see if you have any time zone variables set.
Back to top - GRAM Job submission failed because the job manager failed to open stdout (error code 73)
Or GRAM Job submission failed because the job manager failed to open stderr (error code 74)
Diagnosis
The remote job manager is unable to open a connection back to your client host. Possible causes include:- Bad results from globus-hostname. Try running globus-hostname on your client. It should output the fully qualified domain name of your host. This is the information which the GRAM client tools use to let the jobmanager on the remote server know who to open a connection to. If it does not give a fully qualified domain name, the remote host may be unable to open a connection back to your host.
- A firewall. If a firewall blocks the jobmanager's attempted connection back to your host, this error will result.
- Troubles in the ~/.globus/.gass_cache on the remote host. This is the least frequent cause of this error. It could relate to NFS or AFS issues on the remote host.
It is also possible that the CA that issued your Globus certificate is not trusted by your local host. Running 'grid-proxy-init -verify' should detect this situation.
Solution
Depending on the cause from above, try the following solutions:- Fix the result of 'hostname' itself. You can accomplish this by editing /etc/hosts and adding the fully qualified domain name of your host to this file. See how to do this in the explanation of the expected target subject error. If you cannot do this, or do not want to do this, you can set the GLOBUS_HOSTNAME environment variable to override the result of globus-hostname. Set GLOBUS_HOSTNAME to the fully qualified domain name of your host.
- To cope with a firewall, use the GLOBUS_TCP_PORT_RANGE environment variable. If your host is behind a firewall, set GLOBUS_TCP_PORT_RANGE to the allowable incoming connections on your firewall. If the firewall is in front of the remote server, you will need the remote site to set GLOBUS_TCP_PORT_RANGE in the gatekeeper's environment to the allowable incoming range of the firewall in front of the remote server. If there are firewalls on both sides, perform both of the above steps. Note that the allowable ranges do not need to coincide on the two firewalls; it is, however, necessary that the GLOBUS_TCP_PORT_RANGE be valid for both incoming and outgoing connections of the firewall it is set for.
- If you are working with AFS, you will want the .gass_cache directory to be a link to a local filesystem. If you are having NFS trouble, you will need to fix it, which is beyond the scope of this document.
Install the trusted CA for your certificate on the local system.
Back to top - GRAM Job submission failed because the provided RSL string includes variables that could not be identified (error code 39)
Diagnosis
You submitted a job which specifies an RSL substitution which the remote jobmanager does not recognize. The most common case is using a 2.0 version of globus-job-get-output with a 1.1.x gatekeeper/jobmanager.
Solution
Currently, globus-job-get-output will not work between a 2.0 client and a 1.1.x gatekeeper. Work is in progress to ensure interoperability by the final release. In the meantime, you should be able to modify the globus-job-get-output script to use $(GLOBUS_INSTALL_PATH) instead of $(GLOBUS_LOCATION).
Back to top - 530 Login incorrect / FTP LOGIN REFUSED (shell not in /etc/shells)
Diagnosis
The 530 Login incorrect usually indicates that your account is not in the grid-mapfile, or that your shell is not in /etc/shells.
Solution
If your account is not in the grid-mapfile, make sure to get it added. If it is in the grid-mapfile, check the syslog on the machine, and you may see the /etc/shells message. If that is the case, make sure that your shell (as listed in finger or chsh) is in the list of approved shells in /etc/shells.
Back to top - globus_i_gsi_gss_utils.c:866: globus_i_gsi_gss_handshake: Unable to verify remote side's credentials: Couldn't verify the remote certificate
OpenSSL Error: s3_pkt.c:1031: in library: SSL routines, function SSL3_READ_BYTES: sslv3 alert bad certificate (error code 7)Diagnosis
This error message usually indicates that the server you are connecting to doesn't trust the Certificate Authority (CA) that issued your Globus certificate.
Solution
Either use a certificate from a different CA or contact the administer of the resource you are connecting to and request that they install the CA certificate in their trusted certificates directory.
Back to top - globus_gsi_callback.c:438: globus_i_gsi_callback_cred_verify: Could not verify credential: self signed certificate in certificate chain (error code 7)
Or globus_gsi_callback.c:424: globus_i_gsi_callback_cred_verify: Can't get the local trusted CA certificate: Cannot find issuer certificate for local credential (error code 7)
Diagnosis
This error message indicates that your local system doesn't trust the certificate authority (CA) that issued the certificate on the resource you are connecting to.
Solution
You need to ask the resource administrator which CA issued their certificate and install the CA certificate in the local trusted certificates directory.
Back to top - SSL3_GET_CLIENT_CERTIFICATE: no certificate returned
Diagnosis
This error message indicates that the name in the certificate for the remote party is not legal according local signing_policy file for that CA.
Solution
You need to verify you have the correct signing policy file installed for the CA by comparing it with the one distributed by the CA.
Back to top - undefined symbol: lutil_sasl_interact
Diagnosis
Globus replica catalog was installed along with MDS/Information Services.
Solution
Do not install the replica bundle into a GLOBUS_LOCATION containing other Information Services. The Replica Catalog is also deprecated - use RLS instead.
Back to top
Intro to FermiGrid site for STAR users
The FNAL_FERMIGRID site policy and some documentation can be found here:
http://fermigrid.fnal.gov/policy.html
You must use VOMS proxies (rather than grid certificate proxies) to run at this site. A brief intro to voms proxies is here: Introduction to voms proxies for grid cert users
All users with STAR VOMS proxies are mapped to a single user account ("star").
Technical note: (Quoting from an email that Steve Timm sent to Levente) "Fermigrid1.fnal.gov is not a simple jobmanager-condor. It is emulating the jobmanager-condor protocol and then forwarding the jobs on to whichever clusters have got free slots, 4 condor clusters and actually one pbs cluster behind it too." For instance, I noticed jobs submitted to this gatekeeper winding up at the USCMS-FNAL-WC1-CE site in MonAlisa. (What are the other sites?)
You can use SUMS to submit jobs to this site (though this feature is still in beta testing) following this example:
star-submit-beta -p dynopol/FNAL_FERMIGRID jobDesription.xml
where jobDescription.xml is the filename of your job's xml file.
Site gatekeeper info:
Hostname: fermigrid1.fnal.gov
condor queue is available (fermigrid1.fnal.gov/jobmanager-condor)
If no jobmanager is specified, the job runs on the gatekeeper itself (jobmanager-fork, I’d assume)
[stargrid02] ~/> globus-job-run fermigrid1.fnal.gov
/bin/cat /etc/redhat-release
Scientific Linux Fermi LTS release 4.2 (Wilson)
Fermi worker node info:
[stargrid02] ~/> globus-job-run fermigrid1.fnal.gov/jobmanager-condor /bin/cat /etc/redhat-release
Scientific Linux SL release 4.2 (Beryllium)
[stargrid02] ~/> globus-job-run fermigrid1.fnal.gov/jobmanager-condor /usr/bin/gcc -v
Using built-in specs.
Configured with: ../configure --prefix=/usr --mandir=/usr/share/man --infodir=/usr/share/info --enable-shared --enable-threads=posix --disable-checking --with-system-zlib --enable-__cxa_atexit --disable-libunwind-exceptions --enable-java-awt=gtk --host=i386-redhat-linux
Thread model: posix
gcc version 3.4.4 20050721 (Red Hat 3.4.4-2)
There doesn't seem to be a GNU fortran compiler such as g77 on the worker nodes.
Open question: What is the preferred file transfer mechanism?
In GridCat they list an SRM server at srm://fndca1.fnal.gov:8443/ but I have not made any attempt to use it.
Introduction to voms proxies for grid cert users
The information in a voms proxy is a superset of the information in a grid certificate proxy. This additional information includes details about the VO of the user. For users, the potential benefit is the possibility to work as a member of multiple VOs with a single DN and have your jobs accounted accordingly. Obtaining a voms-proxy (if all is well configured) is as simple as “voms-proxy-init -voms star” (This is of course for a member of the STAR VO).Here is an example to illustrate the difference between grid proxies and voms proxies (note that the WARNING and Error lines at the top don’t seem to preclude the use of the voms proxy – the fact is that I don’t know why those appear or what practical implications there are from the underlying cause – I hope to update this info as I learn more):
[stargrid02] ~/> voms-proxy-info -allWARNING: Unable to verify signature!
Error: Cannot find certificate of AC issuer for vo star
subject : /DC=org/DC=doegrids/OU=People/CN=Wayne Betts 602856/CN=proxy
issuer : /DC=org/DC=doegrids/OU=People/CN=Wayne Betts 602856
identity : /DC=org/DC=doegrids/OU=People/CN=Wayne Betts 602856
type : proxy
strength : 512 bits
path : /tmp/x509up_u2302
timeleft : 4:10:20
=== VO star extension information ===
VO : star
subject : /DC=org/DC=doegrids/OU=People/CN=Wayne Betts 602856
issuer : /DC=org/DC=doegrids/OU=Services/CN=vo.racf.bnl.gov
attribute : /star/Role=NULL/Capability=NULL
timeleft : 4:10:19
[stargrid02] ~/> grid-proxy-info -all
subject : /DC=org/DC=doegrids/OU=People/CN=Wayne Betts 602856/CN=proxy
issuer : /DC=org/DC=doegrids/OU=People/CN=Wayne Betts 602856
identity : /DC=org/DC=doegrids/OU=People/CN=Wayne Betts 602856
type : full legacy globus proxy
strength : 512 bits
path : /tmp/x509up_u2302
timeleft : 4:10:14
In order to obtain the proxy, the VOMS server for the requested VO must be contacted (with the potential drawback that it introduces a dependency on a working VOMS server that doesn’t exist with a simple grid cert. It is worth further noting that either a VOMS or GUMS server (I should investigate this) will also be contacted by VOMS-aware gatekeepers to authenticate the users at job submission time, behind the scenes. One goal (or consequence at least) of this sort of usage is to eliminate static grid-map-files.)
Something else to note (and investigate): the voms-proxy doesn’t necessarily last as long as the basic grid cert proxy – the voms part can apparently expire independent of the grid-proxy. Consider this example, in which the two expiration times are different:
[stargrid02] ~/> voms-proxy-info -allWARNING: Unable to verify signature!
Error: Cannot find certificate of AC issuer for vo star
subject : /DC=org/DC=doegrids/OU=People/CN=Wayne Betts 602856/CN=proxy
issuer : /DC=org/DC=doegrids/OU=People/CN=Wayne Betts 602856
identity : /DC=org/DC=doegrids/OU=People/CN=Wayne Betts 602856
type : proxy
strength : 512 bits
path : /tmp/x509up_u2302
timeleft : 35:59:58
=== VO star extension information ===
VO : star
subject : /DC=org/DC=doegrids/OU=People/CN=Wayne Betts 602856
issuer : /DC=org/DC=doegrids/OU=Services/CN=vo.racf.bnl.gov
attribute : /star/Role=NULL/Capability=NULL
timeleft : 23:59:58
(Question: What determines the duration of the voms-proxy extension - the VOMS server or the user/client?)
Technical note 1: on stargrid02, the “vomses” file, which lists the URL for VOMS servers, was not in a default location used by voms-proxy-init, and thus it was not actually working (basically, it worked just like grid-proxy-init). I have put an existing vomses file in /opt/OSG-0.4.1/voms/etc and it seems content to use it.
Technical note 2: neither stargrid03’s VDT installation nor the WNC stack on the rcas nodes has VOMS tools. I’m guessing that the VDT stack is too old on stargrid03 and that voms-proxy tools are missing on the worker nodes because that functionality isn't really needed on a worker node.
Job Managers
Several job managers are available as part of any OSG/VDT/Globus deploymenets. They may restrict access to keywords fundamental to job control and efficiency or may not even work.The pages here will documents the needed changes or features.
Condor Job Manager
Condor job manager code is provided as-is for quick code inspection. The version below is from the OSG 0.4.1 software stack.
LSF job manager
LSF job manager code below is from globus 2.4.3.
SGE Job Manager
SGE job manager code was developed by the UK Grid eScience. It is provided as-is for quick code inspection. The version below is as integrated in VDT 1.5.2 (post OSG 0.4.1). Please, note that the version below includes patches provided by the RHIC/STAR VO. Consult SGE Job Manager patch for more information.
Modifying Virtual Machine Images and Deploying Them
Modifying Virtual Machine Images and Deploying Them
The steps:
login to stargrid01
Check that your ssh public key is in $home/.ssh/id_rsa.pub, if not put it there.
Select the base image you wish to modify. You will find the name of the image you are currently using for your cluster by looking inside:
/star/u/lbhajdu/ec2/workspace-cloud-client-010/samples/[cluster discretions].xmlOpen up this file you will find a structure that looks something like the one below. There are two <workspace> blocks one for the gatekeeper and one for the worker nodes. The name of the image for the worker node is in the second block in-between the <image> tags. So for the example below the name would be osgworker-012.
To make a modification to the image we have to mount/deploy that image. Once we know the name, simply type:
./bin/cloud-client.sh --run --name [image name] --hours 50Where [image name] is the name we found in step 3. This image will be up for 50 hours. You will have to save the image before you run out of time, else all of your changes will be lost.
The output of this command will look something like:
[stargrid01] ~/ec2/workspace-cloud-client-010/> ./bin/cloud-client.sh --run --name osgworker-012 --hours 50
(Overriding old GLOBUS_LOCATION '/opt/OSG-0.8.0-client/globus')
(New GLOBUS_LOCATION: '/star/u/lbhajdu/ec2/workspace-cloud-client-010/lib/globus')
SSH public keyfile contained tilde:
- '~/.ssh/id_rsa.pub' --> '/star/u/lbhajdu/.ssh/id_rsa.pub'
Launching workspace.
Workspace Factory Service:
https://tp-vm1.ci.uchicago.edu:8445/wsrf/services/WorkspaceFactoryService
Creating workspace "vm-003"... done.
IP address: 128.135.125.29
Hostname: tp-x009.ci.uchicago.edu
Start time: Tue Jan 13 13:59:04 EST 2009
Shutdown time: Thu Jan 15 15:59:04 EST 2009
Termination time: Thu Jan 15 16:09:04 EST 2009
Waiting for updates.
"vm-003" reached target state: Running
Running: 'vm-003'It will take some time for the command to finish, usually a few minutes. Make sure you do not loose the output for this command. Inside the output there are two pieces of information you must note. They are the hostname and the handle. In this example the hostname is tp-x009.ci.uchicago.edu and the handle is vm-003.
Next log on to the host using the host name from step 4. Note that your ssh public key will be copied to the /root/.ssh/id_rsa.pub. To log on type:
ssh root@[hostname]
Example:
ssh root@tp-x009.ci.uchicago.edu
Next make the change(s) to the image, you wish to make (this step is up to you).
To save the changes you will need the handle from step 2. And you will need to pick a name for the new image. Run this command:
./bin/cloud-client.sh --save --handle [handle name] --newname [new image name]
Where [handle name] is replaced with the name of the handle and [new image name] is replaced with the new image’s name. If you do not use the name option you will overwrite your image. Here is an example with the values from above.
./bin/cloud-client.sh --save --handle vm-003 --newname starworker-sl08f
The output will look something like this:
[stargrid01] ~/ec2/workspace-cloud-client-010/> ./bin/cloud-client.sh --save --handle vm-004 --newname starworker-sl08e
(Overriding old GLOBUS_LOCATION '/opt/OSG-0.8.0-client/globus')
(New GLOBUS_LOCATION: '/star/u/lbhajdu/ec2/workspace-cloud-client-010/lib/globus')
Saving workspace.
- Workspace handle (EPR): '/star/u/lbhajdu/ec2/workspace-cloud-client-010/history/vm-004/vw-epr.xml'
- New name: 'starworker-sl08e'
Waiting for updates.
"Workspace #919": TransportReady, calling destroy for you.
"Workspace #919" was terminated.This is an optional step, because the images can be several GB big you may want to delete the old image with this command:
./bin/cloud-client.sh --delete --name [old image name]This is what it would look like:
(Overriding old GLOBUS_LOCATION '/opt/OSG-0.8.0-client/globus')
(New GLOBUS_LOCATION: '/star/u/lbhajdu/ec2/workspace-cloud-client-010/lib/globus')
Deleting: gsiftp://tp-vm1.ci.uchicago.edu:2811//cloud/56441986/starworker-sl08f
Deleted.To start up a cluster with the new image you will need to modify one of the:
/star/u/lbhajdu/ec2/workspace-cloud-client-010/samples/[cluster discretion].xml
file inside the <workspace> block of the worker node replace <image> with the name of your own image from step 7. You can also set the number of worker node images you wish to bring up by setting the number in the <quantity> tag.
Note: Be careful remember there are usually at least two <workspace> blocks in each xml fie.
Next just bring up the cluster like any other VM cluster. (See my Drupal documentation)
<workspace>
  <name>head-node</name>
    <image>osgheadnode-012</image>
    <quantity>1</quantity>
	.
	.
	.
</workspace>
<workspace>
    <name>compute-nodes</name>
    <image>osgworker-012</image>
    <quantity>3</quantity>
    <nic interface=”eth1”>private</nic>
	.
	.
	.
</workspace>
Rudiments of grid map files on gatekeepers
This is intended as a practical introduction to mapfiles for admins of new sites to help get the *basics* working and avoid some common problems with grid user management and accounting.It should be stressed that manually maintaining mapfiles is the most primitive user management technique. It is not scalable and it has been nearly obsoleted by two factors:
1. There are automated tools for maintaining mapfiles (GUMS with VOMS in the background, for instance, but that's not covered here).
2. Furthermore, VOMS proxies are replacing grid certificate proxies, and the authentication mechanism no longer relies on static grid mapfiles, but instead can dynamically authenticate against GUMS or VOMS servers directly for each submitted job.
But let's ignore all that and proceed with good old-fashioned hand edits of two critical files on your gatekeeper:
/etc/grid-security/grid-mapfile
and
$VDT_LOCATION/monitoring/grid3-user-vo-map.txt
(the location of the grid-mapfile in /etc/grid-security is not universal, but that's the default location)
In the grid-mapfile, you'll want entries like the following, in which user DNs are mapped to specific user accounts. You can see from this example that multiple DNs can map to one user account (rgrid000 in this case):
#---- members of vo: star ----#
"/DC=org/DC=doegrids/OU=People/CN=Valeri Fine 224072" fine
"/DC=org/DC=doegrids/OU=People/CN=Wayne Betts 602856" wbetts
#---- members of vo: mis ----#
"/DC=org/DC=doegrids/OU=People/CN=John Rosheck (GridScan) 474533" rgrid000
"/DC=org/DC=doegrids/OU=People/CN=John Rosheck (GridCat) 776427" rgrid000
(The lines starting with '#' are comments and are ignored.)
You see that if you want to support the STAR VO, then you will need to include the DN for every STAR user with a grid cert (though as of this writing, it is only a few dozen, and only a few of them are actively submitting any jobs. Those two above are just a sampling.) You can support multiple VOs if you wish, as we see with the MIS VO. But MIS is a special VO -- it is a core grid infrustructure VO, and the DNs shown here are special testing accounts that you'll probably want to include so that you appear healthy in various monitoring tools.
In the grid3-user-vo-map.txt file, things are only slightly more complicated, and could look like this:
#User-VO map
# #comment line, format of each regular line line: account VO
# Next 2 lines with VO names, same order, all lowercase, with case (lines starting with #voi, #VOc)
#voi mis star
#VOc MIS STAR
#---- accounts for vo: star ----#
fine star
wbetts star
#---- accounts for vo: mis ----#
rgrid000 mis
(Here one must be careful -- the '#' symbol denotes comments, but the two lines starting with #voi and #VOc are actually read by VORS (this needs to be fleshed out), so keep them updated with your site's actual supported VOs.)
In this example, we see that users 'fine' and 'wbetts' are mapped to the star VO, while 'rgrid000' is mapped to the mis VO.
Maintaining this user-to-VO map is not critical to running jobs at your site, but it does have important functions:
1. MonAlisa uses this file in its accounting and monitoring (such as VO jobs per site)
2. VORS advertises the supported VOs at each site based on this file, and users use VORS to locate sites that claim to support their VO... thus if you claim to support a VO that you don't actually support, then sooner or later someone from that VO will submit jobs to your site, which will fail and then THEY WILL REPORT YOU TO THE GOC!
(Don't worry, there's no great penalty, just the shame of having to respond to the GOC ticket. Note that updates to this file can take several hours to be noticed by VORS.)
If you aren't familiar with VORS or MonAlisa, then hop to it. You can find links to both of them here:
http://www.opensciencegrid.org/?pid=1000098
SRM instructions for bulk file transfer to PDSF
These links describe how to do bulk file transfers from RCF to PDSF.
How to run the transfers
The first step is to figure out what files you want to transfer and make some file lists for SRM transfers:At PDSF make subdirectories ~/xfer ~/hrm_g1 ~/hrm_g1/lists
Copy from ~hjort/xfer the files diskOrHpss.pl, ConfigModule.pm and Catalog.xml into your xfer directory.
You will need to contact ELHjort@lbl.gov to get Catalog.xml because it has administrative privileges in it.
Substitute your username for each "hjort" in ConfigModule.pm.
Then in your xfer directory run the script (in redhat8):
pdsfgrid1 88% diskOrHpss.pl
Usage: diskOrHpss.pl [production] [trgsetupname] [magscale]
e.g., diskOrHpss.pl P04ij ppMinBias FullField
pdsfgrid1 89%
Note that trgsetupname and magscale are optional. This script may take a while depending on what you specify. If all goes well you'll get some files created in your hrm_g1/lists directory. A brief description of the files the script created:
*.cmd: Commands to transfer files from RCF disks
*.srmcmd: Commands to transfer files from RCF HPSS
in lists:
*.txt: File list for transfers from RCF disks
*.rndm: Same as *.txt but randomized in order
*.srm: File list for transfer from RCF HPSS
Next you need to get your cert installed in the grid-mapfiles at PDSF and at RCF. At PDSF you do it in NIM. Pull up your personal info and find the "Grid Certificates" tab. Look at mine to see the form of what you need to enter there. For RCF go here:
http://orion.star.bnl.gov/STAR/comp/Grid/Infrastructure/certs-vomrs/
Also, you'll need to copy a file of mine into your directory:
cp ~hjort/hrm_g1/pdsfgrid1.rc ~/hrm_g1/pdsfgrid1.rc
That's the configuration file for the HRM running on pdsfgrid1. When you've got that done you can try to move some files by executing one of the srm-copy.linux commands found in the .cmd or .srmcmd file.
Monitoring transfers
You can tell if transfers are working from the messages in your terminal window.You can monitor the transfer rate on the pdsfgrid1 ganglia page on the “bytes_in” plot. However, it’s also good to verify that rrs is entering the files into the file catalog as they are sunk into HPSS. This can be done with get_file_list.pl:
pdsfgrid1 172% get_file_list.pl -as Admin -keys 'filename' -limit 0 –cond 'production=P06ic' | wc -l
11611
pdsfgrid1 173%
A more specific set of conditions will of course result in a faster query. Note that the “-as Admin” part is required if you run this in the hrm_g1 subdirectory due to the Catalog.xml file. If you don't use it you will query the PDSF mirror of the BNL file catalog instead of the PDSF file catalog.
Running the HRM servers at PDSF
I suggest creating your own subdirectory ~/hrm_g1 similar to ~hjort/hrm_g1. Then copy from my directory to yours the following files:
setup
hrm
pdsfgrid1.rc
hrm_rrs.rc
Catalog.xml (coordinate permissions w/me)
Substitute your username for “hjort” in these files and then start the HRM by doing “source hrm”. Note that you need to run in redhat8 and your .chos file is ignored on grid nodes so you need to chos to redhat8 manually. If successful you should see the following 5 tasks running:
pdsfgrid1 149% ps -u hjort
PID TTY TIME CMD
8395 pts/1 00:00:00 nameserv
8399 pts/1 00:00:00 trm.linux
8411 pts/1 00:00:00 drmServer.linux
8461 pts/1 00:00:00 rrs.linux
8591 pts/1 00:00:00 java
pdsfgrid1 150%
Note that the “hrm” script doesn’t always work depending on the state things are in but it should always work if the 5 tasks shown above are all killed first.
Running the HRM servers at RCF
I suggest creating your own subdirectory ~/hrm_grid similar to ~hjort/hrm_grid. Then copy from my directory to yours the following files:
srm.sh
hrm
bnl.rc
drmServer.linux (create the link)
trm.linux (create the link)
Substitute your username for “hjort” in these files and then start the HRM by doing “source hrm”. If successful you should see the following 3 tasks running:
[stargrid03] ~/hrm_grid/> ps -u hjort
PID TTY TIME CMD
13608 pts/1 00:00:00 nameserv
13611 pts/1 00:00:00 trm.linux
13622 pts/1 00:00:01 drmServer.linux
[stargrid03] ~/hrm_grid/>
Scalability Issue Troubleshooting at EC
Scalability Issue Troubleshooting at EC2
Running jobs at EC2 show some scalability issues with grater then 20-50 jobs submitted at once. The pathology can only be seen once the jobs have completed there run cycle, that is to say, after the jobs copy back the files they have produced and the local batch system reports the job as having finished. The symptoms are as follows:
No stdout from the job as defined in the .condorg file as “output=” comes back. No stderror from the job as defined in the .condorg file as “error=” comes back.
It should be noted that the std output/error can be recovered from the gate keeper at EC2 by scp'ing it back. The std output/error resides in:
/home/torqueuser/.globus/job/[gk name]/*/stdout
/home/torqueuser/.globus/job/[gk name]/*/stderr
The command would be:
scp -r root@[gk name]:/home/torqueuser/.globus/job /star/data08/users/lbhajdu/vmtest/io/
Jobs are still reported as running under condor_q on the submitting end long after they have finished, and the batch system on the other end reports them is finished.
Below is a standard sample condor_g file from a job:
[stargrid01] /<1>data08/users/lbhajdu/vmtest/> cat globusscheduler= ec2-75-101-199-159.compute-1.amazonaws.com/jobmanager-pbs
output =/star/data08/users/starreco/prodlog/P08ie/log/C3A7967022377B3E5F2DCCE2C60CB79D_998.log
error =/star/data08/users/starreco/prodlog/P08ie/log/C3A7967022377B3E5F2DCCE2C60CB79D_998.err
log =schedC3A7967022377B3E5F2DCCE2C60CB79D_998.condorg.log
transfer_executable= true
notification =never
universe =globus
stream_output =false
stream_error =false
queue
The job parameters:
Work flow:
Copy in event generator configuration
Run raw event generator
Copy back raw event file (*.fzd)
Run reconstruction on raw events
Copy back reconstructed files(*.root)
Clean Up
Work flow processes : globus-url-copy -> pythia -> globus-url-copy -> root4star -> globus-url-copy
Note: Some low runtime processes not shown
Run time:
23 hours@1000 eventes
1 hour@10-100 events
Output:
15M rcf1504_*_1000evts.fzd
18M rcf1504_*_1000evts.geant.root
400K rcf1504_*_1000evts.hist.root
1.3M rcf1504_*_1000evts.minimc.root
3.7M rcf1504_*_1000evts.MuDst.root
60K rcf1504_*_1000evts.tags.root
14MB stdoutput log, later changed to 5KB by piping output to file and copying back via globus-url-copy.
Paths:
Jobs submitted form:
/star/data08/users/lbhajdu/vmtest/
Output copied back to:
/star/data08/users/lbhajdu/vmtest/data
STD redirect copied back to:
/star/data08/users/starreco/prodlog/P08ie/log
The tests:
We first tested 100nodes. Whit 14MB of text going to stdoutput. Failed with symptoms above.
Next test was with 10nodes. With 14MB of text going to stdoutput. This worked without any problems.
Next test was 20 nodes. With 14MB of text going to stdoutput. This worked without any problems.
Next test was 40 nodes. With 14MB of text going to stdoutput. Failed with symptoms above.
Next we redirected “>” the output of the event generator and the reconstruction to a file and copied this file back directly with globus-url-copy after the job was finished. We tested again with 40 nodes. The std out now is only 15K. This time it worked without any problems. (Was this just coincidence?)
Next we tried with 75 nodes and the redirected output trick. This failed with symptoms above.
Next we tried with 50 nodes. This failed with symptoms above.
We have consulted Alain Roy who has advised an upgrade of globus and condor-g. He says the upgrade of condor-g is most likely to help. Tim has upgraded the image with the latest version of globus and I will be submitting from stargrid05 which has a newer condor-g version. The software versions are listed here:
Stargrid01
Condor/Condor-G 6.8.8
Globus Toolkit, pre web-services, client 4.0.5
Globus Toolkit, web-services, client 4.0.5
Stargrid05
$CondorVersion: 7.0.5 Sep 20 2008 BuildID: 105846
Globus Toolkit, pre web-services, client 4.0.7
Globus Toolkit, pre web-services, server 4.0.7
We have tested on a five node cluster (1 head node, 4 works) and discovered a problem with stargrid05. Jobs do not get transfered over to the submitting side. The RCF has been contacted we know this is on our side. It was decided we should not submit until we can try from stargrid05.
Specification for a Grid efficiency framework
The following is an independently developed grid efficiency framework that will be consolidated with Lidia’s framework.
The point of this work is to be able to add wrappers around the job that will report back key parameters about the job such as the time it started and the time it stopped the type of node it ran on, if it was successful and so on. These commands execute and return back strings in the jobs output stream. These can be parsed by an executable (I call it the job scanner) that extracts the parameters and writes them into a database. Later other programs use this data to produce web pages, and plots out of any parameter we have recorded.
The image attached shows the relation between elements in my database and commands in my CSH. The commands in my CSH script will be integrated into SUMS soon. This will make it possible for any framework to parse out these parameters.


Starting up a Globus Virtual Workspace with STAR’s image.
The steps:
1) login to stargrid01
2) Check that your ssh public key is at $home/.ssh/id_rsa.pub. This will be the key the client package copies to the gatekeeper and client nodes under the root account allowing local password free login as root, which you will need to install grid host certs.
a. Note the file name location must be as defined exactly as above or you must modify the path and name in the client configuration at ./workspace-cloud-client-009/conf/cloud.properties (more on this later).
b. If your using a Putty generated ssh public key it will not work directly. You can simply edit it with a text editor to get it in to this format. Below is an example of the right format A and the wrong format B. If it has multiple lines then it is the wrong format.
Right format A:
| ssh-rsa AAAAB3NzaC1yc2EAAAABJQAAAIEAySIkeTLsijvh1U01ass8XvfkBGocUePTkuG2F8TwRilq1gIcuTP5jBFSCF0eYXOpfNcgkujIsRj/+xS1QqM7c5Fs0hrRyLzyxgZrCKeXojVUFYfg9QuokqoY2ymgjxAdwNABKXI2IKMvM0UGBtmxphCuxUSUpMzNfmWk9H4HIrE= |
Wrong format B:
| ---- BEGIN SSH2 PUBLIC KEY ---- Comment: "imported-openssh-key" AAAAB3NzaC1yc2EAAAABJQAAAIEAySIkeTLsijvh1U01ass8XvfkBGocUePTkuG2 F8TwRilq1gIcuTP5jBFSCF0eYXOpfNcgkujIsRj/+xS1QqM7c5Fs0hrRyLzyxgZr CKeXojVUFYfg9QuokqoY2ymgjxAdwNABKXI2IKMvM0UGBtmxphCuxUSUpMzNfmWk 9H4HIrE= ---- END SSH2 PUBLIC KEY ---- |
3) Get the grid client. By copying the folder /star/u/lbhajdu/ec2/workspace-cloud-client-009 to your area. It is recommended you execute your commands from inside the workspace-cloud-client-009. The manual describes all commands and paths relative to this directory, I will do the same.
a. This grid client is almost the same as the one you download from globus except it has the ./samples/star1.xml, which is configured to load STAR’s custom image.
4) cp to the workspace-cloud-client-009 and type:
| ./bin/grid-proxy-init.sh -hours 100 |
The output should look like this:
| [stargrid01] ~/ec2/workspace-cloud-client-009/> ./bin/grid-proxy-init.sh (Overriding old GLOBUS_LOCATION '/opt/OSG-0.8.0-client/globus') (New GLOBUS_LOCATION: '/star/u/lbhajdu/ec2/workspace-cloud-client-009/lib/globus') Your identity: DC=org,DC=doegrids,OU=People,CN=Levente B. Hajdu 105387 Enter GRID pass phrase for this identity: Creating proxy, please wait... Proxy verify OK Your proxy is valid until Fri Aug 01 06:19:48 EDT 2008 |
Normal
0
false
false
false
MicrosoftInternetExplorer4
/* Style Definitions */
table.MsoNormalTable
{mso-style-name:"Table Normal";
mso-tstyle-rowband-size:0;
mso-tstyle-colband-size:0;
mso-style-noshow:yes;
mso-style-parent:"";
mso-padding-alt:0in 5.4pt 0in 5.4pt;
mso-para-margin:0in;
mso-para-margin-bottom:.0001pt;
mso-pagination:widow-orphan;
font-size:10.0pt;
font-family:"Times New Roman";
mso-ansi-language:#0400;
mso-fareast-language:#0400;
mso-bidi-language:#0400;}
5.) To start the cluster type:
| ./bin/cloud-client.sh --run --hours 1 --cluster samples/star1.xml |
Two very important things you will want to make a note of from this output are the cluster handle (usually looks something like “cluster-025”) and the gatekeeper name. It will take about 10minutes to lunch this cluster. The cluster will have one gatekeeper and one worker node. The max life time of the cluster is set in the command line arguments, more parameters are in the xml file (you will want to check with Tim before changing these).
If the command hangs up really quickly (about a minute) and says something like “terminating cluster”, this usually means that you do not have a sufficient number of slots to run.It should look something like this:
|
[stargrid01] ~/ec2/workspace-cloud-client-009/> ./bin/cloud-client.sh --run --hours 1 --cluster samples/star1.xml
|
5) But hold on you can’t submit yet even thought the grid map file has our DNs in it, the gatekeeper is not trusted. We will need to install an OSG host cert on the other side. Not just anybody can do this. Doug and Leve can do this at least (and I am assuming Wayne). Open up another terminal and logon into the newly instantiated gatekeeper as root. Example here:
| [lbhajdu@rssh03 ~]$ ssh root@tp-x009.ci.uchicago.edu The authenticity of host 'tp-x009.ci.uchicago.edu (128.135.125.29)' can't be established. RSA key fingerprint is e3:a4:74:87:9e:69:c4:44:93:0c:f1:c8:54:e3:e3:3f. Are you sure you want to continue connecting (yes/no)? yes Warning: Permanently added 'tp-x009.ci.uchicago.edu,128.135.125.29' (RSA) to the list of known hosts. Last login: Fri Mar 7 13:08:57 2008 from 99.154.10.107 |
6) Create a .globus directory:
| [root@tp-x009 ~]# mkdir .globus |
7) Go back to the stargrid node and copy over your grid cert and key:
|
[stargrid01] ~/.globus/> scp usercert.pem root@tp-x009.ci.uchicago.edu:/root/.globus [stargrid01] ~/.globus/> scp userkey.pem root@tp-x009.ci.uchicago.edu:/root/.globus |
8) Move over to /etc/grid-security/ on the gate keeper:
| cd /etc/grid-security/ |
9) Create a host cert here:
|
[root@tp-x009 grid-security]# cert-gridadmin -host 'tp-x002.ci.uchicago.edu' -email lbhajdu@bnl.gov -affiliation osg -vo star -prefix tp-x009
|
10) Change right on the credentialed:
| [root@tp-x009 grid-security]# chmod 644 tp-x009cert.pem [root@tp-x009 grid-security]# chmod 600 tp-x009key.pem |
11) Delete the old host credentialed:
| [root@tp-x009 grid-security]# rm hostcert.pem [root@tp-x009 grid-security]# rm hostkey.pem |
12) Rename the credentials:
| [root@tp-x009 grid-security]# mv tp-x009cert.pem hostcert.pem [root@tp-x009 grid-security]# mv tp-x009key.pem hostkey.pem |
13) Check grid functionality back on stargrid01
| [stargrid01] ~/admin_cert/> globus-job-run tp-x009.ci.uchicago.edu /bin/date Thu Jul 31 18:23:55 CDT 2008 |
14) Do your grid work
15) When its time for the cluster to go down (if there is unused time remaining) run the below command. Note that you will need the cluster handle from the command used to bring up the cluster.
| ./bin/cloud-client.sh --terminate --handle cluster-025 |
If there are problems:
If there are problems try this web page:
http://workspace.globus.org/clouds/cloudquickstart.html
If there are still problems try this mailing list:
workspace-user@globus.org
If there are still problems contact Tim Freeman (tfreeman at mcs.anl.gov).
Troubleshooting gsiftp at STAR-BNL
An overview of STAR troubleshooting with the official involvement of the OSG Troubleshooting Team in late 2006 and early 2007 history can be found here:https://twiki.grid.iu.edu/twiki/bin/view/Troubleshooting/TroubleshootingStar
As of mid March, the biggest open issue is intermittently failing file transfers when multiple simultaneous connections are attempted from a single client node to the STAR-BNL gatekeeper.
This article will initially summarize the tests and analysis conducted during the period from ~March 23 to March 29, though not in chronological order. Updates on testing at later dates will be added sequentially at the bottom.
A typical test scenario goes like this: Log on to a pdsf worker node, such as pc2607.nersc.gov and exceute a test script such as mytest.perl, which calls myguc.perl (actually, myguc.pl, but I had to change the file extensions in order for drupal to handle these properly. Btw, both of these were originally written by Eric Hjort). Sample versions of these scripts are attached. These start multiple transfers simultaneously (or very nearly so).
In a series of such tests, we've gathered a variety of information to try to understand what's going on.
In one test, in which 2 of 17 transfers failed, we had a tcpdump on the client node (attached as PDSF-tcpdump.pcap), the gridftp-auth.log and gridftp.log files from the gatekeeper (both attached) and I acquired the BNL firewall logs covering the test period (relevant portions (filtered by me) are attached as BNL_firewall.txt).
In a separate test, a tcpdump was acquired on the server side (attached as BNL-tcpdump.pcap). In this test, 7 of 17 transfers failed.
Both tcpdumps are in a format that Wireshark (aka Ethereal) can handle, and the Statistics -> Converstations List -> TCP is a good thing to look at early on (it also makes very useful filtering quite easy if you know how to use it).
Missing from all this is any info from the RCF firewall log, which I requested, but I got no response. (The RCF firewall is inside the BNL firewall.) From putting the pieces together as best I can without this, I doubt this firewall is interfering, but it would be good to verify if possible.)
What follows is my interpretation of what goes on in a successful transfer:
A. The client establishes a connection to port 2811 on the server (the "control" connection).
B. Using this connection, the user is authenticated and the details of the requested transfer are exchanged.
C. A second port (within the GLOBUS_TCP_PORT_RANGE, if defined) is opened on the server.
D. The client (which is itself using a new port as well) connects to the new port on the server (the "transfer" connection) and the file is transfered.
E. The transfer connection is closed at the end of the transfer.
F. The control connection is closed.
The failing connections seem to be breaking at step B, which I'll explain momentarily. But first, I'd like to point out that if this is correct, then GLOBUS_TCP_PORT_RANGE and GLOBUS_TCP_SOURCE_RANGE and state files are all irrelevant, because the problem is occurring before those are ever consulted to open the transfer connection. I point this out because the leading suspect to this point has been a suspected bug in the BNL Cisco firewalls that was thought to improperly handle new connections if source and destination ports were reused too quickly.
So, what is the evidence that the connection is failing at such an early point? I'm afraid the only way to really follow along at this point to dig into the tcpdumps youself, or you'll just have to take my interpretation on most of this.
1. The gridftp-auth.log clearly shows successful authentications for the successful transfers and no mention of authentication for the failed transfers.
2. From the tcpdumps, three conversation "types" are evident -- successful control connections, corresponding transfer connections, and failed control connections. There are no remaining packets that would constitute a failed transfer connection.
3. The failed control connections are obviously failed, in that they quickly degnerate into duplicate ACKs from the server and retransmissions from the client, which both sides are seeing. I interpret this to mean that any intermediate firewalls aren't interferring at the end of the connection either, but I suppose it doesn't mean they haven't plucked a single packet out of the stream somewhere in the middle.)
Here's what I've noticed from the packets in the tcpdumps when looking at the failed connection. From the client side, it looks like the fifth packet in the converation never reaches the server, since the server keeps repeating its previous ACK (SEQ=81). From the server side, things are more peculiar. There is a second [SYN,ACK] sent from the server AFTER the TCP connection is "open" (the server has already received an [ACK] from the client side in response to the first [SYN,ACK]). This is strange enough, but looking back at the client tcpdump, it doesn't show any second [SYN,ACK] arriving at the client!
Why is this second [SYN,ACK] packet coming from the server, and why is it not received on the client side (apparently)?
At this point, I'm stumped. I haven't painstakingly pieced together all the SEQ and ACK numbers from the packets to see if that reveals anything, but it probably best to leave that until we have simultaneous client and server dumps, at which point the correspondences should be easier to ferret out. [note: simultaneous dumps from a test run were added on April 2 (tcpdump_BNL_1of12.pcap and tcpdump_PDSF_1of12.pcap). See the updates section below.]
One more thing just for the record: the client does produce an error message for the failed transfers, but it doesn't shed any more light on the matter:
error: globus_ftp_client: the server responded with an error
421 Idle Timeout: closing control connection.
Additional tests were also done, such as:
Iptables was disabled on the client side -- failures still occurred.
Iptables was disabled on the server side -- failures still occurred.
Similar tests have been lauched by Eric and me from PDSF clients connecting to the STAR-WSU and NERSC-PDSF gatekeepers instead of STAR-BNL. There were no unexplained failures at sites other than STAR-BNL, which seems to squarely put the blame somewhere at BNL.
Updates on March 30:
The network interfaces of client and server show no additional errors or dropped packets occuring during failed transfers (checked from the output of ifconfig on both sides).Increased the control_preauth_timeout on the server to 120, then 300 seconds (default is 30). Failures occured with all settings.
Ran a test with GLOBUS_TCP_XIO_DEBUG set on the client side. The resulting output of a failed transfer (with standard error and standard out intermixed) is attached as "g-u-c.TCP_XIO_DEBUG".
Bumped up the server logging level to ALL (from the default "ERROR,WARN,INFO"). A test with 2 failures out of 12 is recorded in gridftp.log.ALL and gridftp-auth.log.ALL. (The gridftp.log.ALL only shows activity for the 10 successful transfers, so it probably isn't useful.) It appears that [17169] and [17190] in the gridftp-auth.log.ALL file represent failed transfers, but no clues as to the problem -- it just drops out at the point where the user is authenticated, so there's nothing new to be learned here as far as I can tell. However, I do wonder about the fact that these two failing connections do seem to be the LAST two connections to be initiated on the server side, though they were the first and ninth connections in the order started from the client. Looking at a small set of past results, the failed connections are very often the last ones to reach the server, regardless of the order started on the client, but this isn't 100%, and perhaps should be verified with a larger sample set.
Updates on April 2:
I've added simultaneous tcpdumps from the server and client side ("tcpdump_BNL_1of12.pcap" and "tcpdump_PDSF_1of12.pcap"). These are from a test with one failed connection out of 12. Nothing new jumps out at me from these, with the same peculiar packets as described above.I ran more than 10 tests using stargrid01 (inside the BNL and RCF firewalls) as the client host requesting 40 transfers each time, and saw no failures. This seems strong evidence that the problem is somewhere in the network equipment, but where? I have initiated a request for assistance from BNL ITD in obtaining the RCF firewall logs as well as any general assistance they can offer.
Updates on April 16:
In the past couple of weeks, a couple of things were tried, based on a brief conversation with a BNL ITD network admin:1. On the server (stargrid02.rcf.bnl.gov), I tried disabling TCP Windows Scaling ("sysctl -w net.ipv4.tcp_window_scaling=0") -- no improvement
2. On the server (stargrid02.rcf.bnl.gov), I tried disabling MTU discovery ("sysctl -w net.ipv4.ip_no_pmtu_disc=1") -- no improvement
In response to a previous client log file with the TCP_XIO debug enabled, Charles Bacon contributed this via email:
>Thanks for the -dbg+TCP logs! I posted them in a new ticket at http://bugzilla.globus.org/bugzilla/show_bug.cgi?id=5190
>The response from the GridFTP team, posted there, is:
>"""
>What this report shows me is that the client (globus-url-copy) successfully forms a TCP control channel connection with the server. It then successfully reads the 220 Banner message from the server. The client then attempts to authenicate with the server. It sends the AUTH GSSAPI command and posts a read for a response. It is this second read that times out.
>From what i see here the both sides believe the TCP connection is formed successfully, enough so that at least 1 message is sent from the server to the client (220 banner) and possibly 1 from the client to the server (AUTH GSSAPI, since we dont have server logs we cannot confirm the server actually received it).
>I think the next step should be looking at the gssapi authentication logs on the gridftp server side to see what commands were actually received and what replies sent. I think debugging at the TCP layer may be premature and may be introducing some red herrings.
>To get the desired logs sent the env
>export GLOBUS_XIO_GSSAPI_FTP_DEBUG=255,filename
>"""
>So, is it possible to get this set in the env of the server you're
using, trigger the problem, then send the resulting gridftp.log?
I have done that and a sample log file (including log_level ALL) is attached as "gridftp-auth.xio_gssapi_ftp_debug.log" This log file covers a sample test of 11 transfers in which 1 failed.
Updates on April 20:
Here is the Globus Bugzilla ticket on this matter: http://bugzilla.globus.org/bugzilla/show_bug.cgi?id=5190They have suggested better debug logging parameters to log each transfer process in separate files and requested new logs with the xio_gssapi_ftp_debug enabled, which I will do, but currently have urgent non-grid matters to work on.
Also, we have been given the go ahead to do some testing with ATLAS gatekeepers in different parts of the BNL network structure, which may help isolate the problem, so this is also on the pending to-do list which should get started no later than Monday, April 23.
AJ Temprosa, from BNL's ITD networking group has been assigned my open ticket. On April 17 we ran a test with some logging at the network level, which he was going to look over, but I have not heard anything back from him, despite an email inquiry on April 19.
Updates on April 23:
Labelled gridftp logs with xio_gssapi_ftp_debug and the tcp_xio_debug enabled are attached as gridftp-auth.xio_gssapi_ftp_debug.labelled.log and gridftp-auth.xio_tcp_debug.labelled.log. (By "labelled", I mean that each entry is tagged with the PID of the gsiftp server instance, so the intermixed messages can be easily sorted out.) Ten of twenty-one transfers failed in this test.I now have authorization and access to run tests with several additional gsiftp servers in different locations on the BNL network. In a simple model of the situation, there are two firewalls involved -- the BNL firewall, and within that, the RACF firewall. Two of the new test servers are in a location similar to stargrid02, which is inside both firewalls. One new server is between the two firewalls, and one is outside both firewalls. In ad hoc preliminary tests, the same sort of failures occurred with all the servers EXCEPT the one located outside both firewalls. I've fed this back to the BNL ITD network engineer assigned to our open ticket and am still waiting for any response from him.
Updates on May 10:
[Long ago,] Eric Hjort did some testing with 1 second delays between successive
connections and found no failures. In recent limited testing with shorter
delays, it appears that there is a threshhold at about 0.1 sec. With delays longer than 0.1 sec, I've not seen any failures of this sort.
I installed the OSG-0.6.0 client package on presley.star.bnl.gov, which is between the RACF and BNL firewalls. It also experiences failures when connecting to stargrid02 (inside the RACF firewall).
We've made additional tests with different server and client systems and collected additional firewall logs and tcpdumps. For instance, using the g-u-c client on stargrid01.rcf.bnl.gov (inside both the RACF and BNL perimeter firewalls) and a gsiftp server on netmon.usatlas.bnl.gov (outside both firewalls) we see failures that appear to be the same. I have attached firewall logs from both the RACF firewall ("RACF_fw_logs.txt") and the BNL firewall ("BNL_perimeter_fw_logs.txt") for a test with 4 failures out of 50 transfers (using a small 2.5 KB file). Neither log shows anything out of the ordinary, with each expected connection showing up as permitted. Tcpdumps from the client and server are also attached ("stargrid01-client.pcap" and "netmon-server.pcap" respectively). They show a similar behaviour as in the previous dumps from NERSC and stargrid02, in which the failed connections appear to break immediately, with the client's first ACK packet somehow not quite being "understood" by the server.
RACF and ITD networking personnel have looked into this a bit. To
make a long story short, their best guess is "kernel bug,
probably a race condition". This is a highly speculative guess, with
no hard evidence. The fact that the problem has only been noticed when
crossing firewalls at BNL casts doubt on this. For instance, using a
client on a NERSC host connecting to netmon, I've seen no failures, and I need to make this clear to them. Based on tests with other clients (eg. presley.star.bnl.gov) and servers (eg. rftpexp01.rhic.bnl.gov), there is additional evidence that the problem only occurs when crossing firewalls at BNL, but I would like to quantify this, rather than relying on ad hoc testing by hand, with the hope of removing any significant possibility of statistical flukes in the test results so far.
Updates on May 25:
In testing this week, I have focused on eliminating a couple of suspects. First, I replaced gsiftpd with a telnetd on stargrid03.rcf.bnl.gov. The telnetd was setup to run under xinetd using port 2811 -- thus very similar to a stock gsiftp service (and conveniently punched through the various firewalls). Testing this with connections from PDSF quickly turned up the same sort of broken connections as with gsiftp. This seems to exonerate the globus/VDT/OSG software stack, though it doesn't rule out the possiblity of a bug in a shared library that is used by the gsiftp server.
https://rhn.redhat.com/errata/RHBA-2005-208.html , https://rhn.redhat.com/errata/RHBA-2005-546.html and http://www.xinetd.org/#changes
Here is a sample problem description:
"Under some circumstances, xinetd confused the file descriptor used for
logging with the descriptors to be passed to the new server. This resulted
in the server process being unable communicate with the client. This
updated package contains a backported fix from upstream. "
(NB - These Redhat errata have been applied to stagrid02 and stargrid03, but there are prior examples of errata updates that failed to fix the problem they claimed :-( )
Updates on May 30:
SOLUTION(?)
By building xinetd from the latest source (v 2.3.14, released Oct. 24, 2005) and replacing the executable from the stock Red Hat RPM on stargrid02 (with prior testing on stargrid03), the connection problems disappeared. (minor note: I built it with the libwrap and loadavg options compiled in, as I think Red Hat does.)
For the record, here is some version information for the servers used in various testing to date:
stargrid02 and stargrid03 are identical as far as relevant software versions:
Linux stargrid02.rcf.bnl.gov 2.4.21-47.ELsmp #1 SMP Wed Jul 5 20:38:41 EDT 2006 i686 i686 i386 GNU/Linux
Red Hat Enterprise Linux WS release 3 (Taroon Update 8)
xinetd-2.3.12-6.3E.2 (the most recent update from Red Hat for this package for RHEL 3. Confusingly enough, the CHANGELOG for this package indicates it is version 2:2.3.***13***-6.3E.2 (not 2.3.***12***))
Replacing this with xinetd-2.3.14 built from source has apparently fixed the problem on this node.
rftpexp01.rhic.bnl.gov (between the RACF and BNL firewalls):
Linux rftpexp01.rhic.bnl.gov 2.4.21-47.0.1.ELsmp #1 SMP Fri Oct 13 17:56:20 EDT 2006 i686 i686 i386 GNU/Linux
Red Hat Enterprise Linux WS release 3 (Taroon Update 8)
xinetd-2.3.12-6.3E.2
netmon.usatlas.bnl.gov (outside the firewalls at BNL):
Linux netmon.usatlas.bnl.gov 2.6.9-42.0.8.ELsmp #1 SMP Tue Jan 23 13:01:26 EST 2007 i686 i686 i386 GNU/Linux
Red Hat Enterprise Linux WS release 4 (Nahant Update 4)
xinetd-2.3.13-4.4E.1 (the most recent update from Red Hat for this package in RHEL 4.)
Miscellaneous wrap-up:
As a confirmation of the xinetd conclusion, we ran some additional tests with a server at Wayne State with xinetd-2.3.12-6.3E (latest errata for RHEL 3.0.4). When crossing BNL firewalls (from stargrid01.rcf.bnl.gov for instance), we did indeed find connection failures. Wayne State then upgraded to RedHat's xinetd-2.3.12-6.3E.2 (latest errata for any version of RHEL 3) and the problems persisted. Upon building xinetd 2.3.14 from source, the connection failures disappeared. With two successful "fixes" in this manner, I filed a RedHat Bugzilla ticket:https://bugzilla.redhat.com/bugzilla/show_bug.cgi?id=243315
Open questions and remaining tests:
A time-consuming test of the firewalls would be a "tabletop" setup with two isolated nodes and a firewall to place between them at will. In the absence of more detailed network analysis, that would seem to be the most definitive possible demonstration that the firewall is playing a role, though a negative result wouldn't be absolutely conclusive, since it may be configuration dependent as well.Whatever YOU, the kind reader suggests! :-)
Using the GridCat Python client at BNL
If you want to run the GridCat Python client, there is a problem on some nodes at BNL related to BNL's proxy settings. Here are some notes that may help.
First, you'll need to get the gcatc.py Python script itself and put it somewhere that you can access. Here is the URL I used to get it, though apparently others exist:
http://gdsuf.phys.ufl.edu:8080/releases/gridcat/gridcat-client/bin/gcatc.py
(I used wget on the node on which I planned to run it, you may get it any way that works.)
Now, the trick at BNL is to get the proxy set correctly. Even though nodes like stargrid02.rcf.bnl.gov have a default "http_proxy" environment variable, it seems that Python's httplib doesn't parse it correctly and thus it fails. But it is easy enough to override as needed.
For example, here is one way in a bash shell:
[root@stargrid02 root]# http_proxy=192.168.1.4:3128; python gcatc.py --directories STAR-WSU
griddir /data/r23b/grid
appdir /data/r20g/apps
datadir /data/r20g/data
tmpdir /data/r20g/tmp
wntmpdir /tmp
Similarly in a tcsh shell:
[stargrid02] ~/> env http_proxy=192.168.1.4:3128 python /tmp/gcatc.py --gsiftpstatus STAR-BNL
gsiftp_in Pass
gsiftp_out Pass
Doug's email of November 3, 2005 contained a more detailed shell script (that requires gcatc.py) to query lots of information:
http://lists.bnl.gov/mailman/private/stargrid-l/2005-November/002426.html.
You could add the proxy modification into that script, presumably as a local variable.
Grid Infrastructure
This page will be used for general information about our grid Infrastructure, news, upgrade stories, patches to the software stack, network configuration and studies etc ... Some documents containing local information are however protected.
External links
CERTS & VOMS/VOMRS
CERTS
If you do NOT have a grid certificate yet or need to renew your certificate, you need to either request a certificate or request a renewal. Instructions are available as:
- Obtaining a Grid CERT
- Renewing a CERT
- Convert and export a CERT
- Installing your CERT (browser install)
- Join the STAR VO
- FAQ
- Your Sponsor and point of contact should be "Jerome Lauret" the STAR/VO representative (and not your supervisor name or otherwise)
- Note that as a request for a CERT, being added to the STAR VO requires approval from the STAR/RA and the STAR/VO representative (the RA are aware of this - best chance for your request to be promptly approved is to have the proper "Sponsor")
- It does not hurt to specify that you belong to STAR when the ticket is created
- Please, indicate on the request for a CERTificate what is your expected use of Grid services (data transfer? rnning jobs? anything else?)
- Requesting a using a CERT and using it binds you to the OSG Policy Agreement you have to accept during the request. Failure to comply or violations will lead to a revocation of your CERT validity (in STAR, you have to expect that your VO representative will make sure of the polity IS respected in full)
- The big advantage of renewing a CERT rather than requesting a new one is that the CN will be preserved (so no need for gridmap change)
- The STAR/VO does NOT acept CERT-ificates other than STAR related CERT-ificates that is, OSG DigiCert-Grid CERT obtained for STAR related work and purposes. A user owning a CERT from a different VO will not be granted membership in VOMS - request a new CERT uniquely associated to STAR related work.
- STAR rule of thumb / convention - Additional user certificates mapped to generic accounts: the CN would indicate the CERT owner's name. The generic account would appear in parenthesis. An example: /CN=Lidia Didenko (starreco)
- STAR rule of thumb / convention - Service certificates: The CN field shows the requestor of the certificate
VOMS and VOMRS
Having a CERT is the first step. You now need to be part of a Virtual Organization (VO).
STAR used VOMRS during PPDG time and switched to VOMS at OSG time to maintained its VO user's certificates.
Only VOMS is currentely maintained. A VO is used as a centralized repository of user based information so all sites on the grid could be updated on addition (or removal) of identifications. VOMS service and Web interface are maintained by the RACF.
Using your Grid CERT to sign or encrypt Emails
Apart from allowing you to access the Grid, an SSL Client Certificate is imported into the Web browser from which you requested your Grid certificate. This certificate could be used to digtially sign or encrypt Email. For the second, you will need te certificate from the correspondign partner in order to encrypt Emails. To make use of it, folow the below guidance.- first export your certificate from your Web browser. This is explain on the how to Export your key pair for use by Globus grid-proxy-init page. In summary:
- Find in your browser certificate management interface an 'export' or 'backup' option. THis interface varies from browser to browser and from Email client to Email client. We have checked only in Thudenrbird as an Email client and inventoried possible location for browser-based tools.
- Internet Explorer: "Tools -> Internet Options -> Content"
- Netscape Communicator as a "Security" vutton on the top bar menu
- Mozilla: "Edit -> Prefercences -> Privacy and Security -> Certificates"
- The file usually end-up withe xtension .p12 or .pfx.
ATTENTION: Although the backup/export process will ask you for a "backup password" (and further encrypt your CERT), please guard this file carefully. Store it OFF your computer or remove the file once you are done with this process. - After exporting your certificate from your Web browser, you will need to re-import it into your Mail client. Let's assume it is Thuderbird for simplicity.
- FIRST:
Verify you have the DOEGrids Certificate Authority already imported in your Mail client and/or upload them.
Note that the DOEGrid Certificate Authority is a subordinate CA of the ESnet CA ; therefore the ESnet CA root certificate should also be present. To check this - Go to "Tools -> Options -> Privacy -> Security -> View Cretificate"
- Click on the "Authorities" tab
- You should see both "DOEGrids CA 1" and "ESnet Root CA 1" under an "Esnet" tree as illustrated in this first picture
- Be certain the "DOEGrids CA 1" is allowed to allow mail users. To do this, select the cert, click Edit. A window as illustrated in the next picture should appear. Both This certificate can indentify Web sites and This certificate can identify mail users should be checked.
- If you DO NOT SEE those certificate authorities, you will need to import them.
- Do so by downloading the doe-certs.zip attached at the bottom of this document, unzip . Two files should be there
- Load them using the "Tools -> Options -> Privacy -> Security -> View Cretificate -> Aurthorities -> Import" button.
- A similar window as displayed above will appear and you will need to check box at least This certificate can identify mail users.
- Now, import your certificate.
- Use the "Tools -> Options -> Privacy -> Security -> View Cretificate -> Your Certificate" menu and click "Import"
- A file browser will appear, select the file you have exported from your browser. It will ask you for a password. You will need to use the smae password you used during the export phase from your Web Browser.
- Click OK
- Your are set to go ...
Usage note:
- If you want a remote partner to send you encrypted messages, you MUST send first a digitally signed Email so your certificate public part could be imported into his/her Email client Certificate Manager under "Other People's". When done for the first time, THuderbird will ask you to set a certificate as default certificate ; the interface and selection is straight forwardso we will not detail the steps ...
- If you want to send an encrypted message to a remote partner, you MUST have his public part imported into your Email client and then select the "Encrypt This Message" option in the Security drop down menu of Thunderbird.
- Whenever a certificate expires, DO NOT remove from you Certificate Manager. If so, you will no longer be able to read / decrypt old encrypted Emails.
OSG Issues
This page will anchor various OSG-related collaborative efforts.
SGE Job Manager patch
We should come on this page with a draft that we want to send to the VDT guys about the SGE Job Manager.- Missing environment variables definition
- In the BEGIN section check if $SGE_ROOT, $SGE_CELL and the commands ($qsub, $qstat, etc) are defined properly
- in the SUBMIT, POOL and CLEAR sections, locate the line
$ENV{"SGE_ROOT"} = $SGE_ROOT;and add the line$ENV{"SGE_CELL"} = $SGE_CELL;
- Bug finding the correct job id when clearing jobs
- in the CLEAR section, locate the line
system("$qdel $job_id > /dev/null 2 > /dev/null");and replace for the following block$ENV{"SGE_ROOT"} = $SGE_ROOT; $ENV{"SGE_CELL"} = $SGE_CELL; $job_id =~ /(.*)\|(.*)\|(.*)/; $job_id = $1; system("$qdel $job_id > /dev/null 2 > /dev/null");
- in the CLEAR section, locate the line
- SGE Job Manager modifies definitions of both the standard output and standard error file names by appending .real. This procedure fails when a user specifies /dev/null for either of those files. The problem happens twice - once starting at line 318
    #####
    # Where to write output and error?
    #
    if(($description->jobtype() eq "single") && ($description->count() > 1))
    {
      #####
      # It's a single job and we use job arrays
      #
      $sge_job_script->print("#\$ -o "
                             . $description->stdout() . ".\$TASK_ID\n");
      $sge_job_script->print("#\$ -e "
                             . $description->stderr() . ".\$TASK_ID\n");
    }
    else
    {
        # [dwm] Don't use real output paths; copy the output there later.
        #       Globus doesn't seem to handle streaming of the output
        #       properly and can result in the output being lost.
        # FIXME: We would prefer continuous streaming.  Try to determine
        #       precisely what's failing so that we can fix the problem.
        #       See Globus bug #1288.
      $sge_job_script->print("#\$ -o " . $description->stdout() . ".real\n");
      $sge_job_script->print("#\$ -e " . $description->stderr() . ".real\n");
    }
and then again at line 659:
      if(($description->jobtype() eq "single") && ($description->count() > 1))
      #####
      # Jobtype is single and count>1. Therefore, we used job arrays. We
      # need to merge individual output/error files into one.
      #
      {
        # [dwm] Use append, not overwrite to work around file streaming issues.
        system ("$cat $job_out.* >> $job_out");
        system ("$cat $job_err.* >> $job_err");
      }
      else
      {
        # [dwm] We still need to append the job output to the GASS cache file.
        #       We can't let SGE do this directly because it appears to
        #       *overwrite* the file, not append to it -- which the Globus
        #       file streaming components don't seem to handle properly.
        #       So append the output manually now.
        system("$cat $job_out.real >> $job_out");
      }
        #       So append the output manually now.
        system("$cat $job_out.real >> $job_out");
      }
it should read:
        #       So append the output manually now.
        system("$cat $job_out.real >> $job_out");
        system("$cat $job_err.real >> $job_err");
      }
    $ENV{"SGE_ROOT"} = $SGE_ROOT;
    if ( -r "$ENV{HOME}/.chos" ){
      $chos=`cat $ENV{HOME}/.chos`;
      $chos=~s/\n.*//;
      $ENV{CHOS}=$chos;
    }
gridftp update for VDT 1.3.9 or VDT 1.3.10
To install the updated gridftp server that includes a fix for secondary group membership:for VDT 1.3.9 (which is what I got with OSG 0.4.0) in the OSG/VDT directory, do:
pacman -get http://vdt.cs.wisc.edu/vdt_139_cache:Globus-Updates
This nominally makes your VDT installation 1.3.9c, though it didn't update my vdt-version.info file accordingly -- it still says 1.3.9b
for VDT 1.3.10, similar installation should work:
pacman -get http://vdt.cs.wisc.edu/vdt_1310_cache:Globus-Updates
STAR VO Privilege Configuration
This page gives the GUMS and vomss configuration information for OSG sites to allow access for the STAR VO.VOMS entry for edg-mkgridmap.conf
group vomss://vo.racf.bnl.gov:8443/edg-voms-admin/star osg-star
Example GUMS config:
<!--- 9 STAR ---!>
<groupMapping name='star' accountingVo='star' accountingDesc='STAR'>
    <userGroup className='gov.bnl.gums.VOMSGroup'
       url='https://vo.racf.bnl.gov:8443/edg-voms-admin/star/services/VOMSAdmin'
       persistenceFactory='mysql'
       name='osg-star'
       voGroup="/star"
       sslCertfile='/etc/grid-security/hostcert.pem'
       sslKey='/etc/grid-security/hostkey.pem' ignoreFQAN="true"/>
    <accountMapping className='gov.bnl.gums.GroupAccountMapper'
      groupName='osg-star' />
</groupMapping>
Note that in the examples above "osg-star" refers to the local UID/GID names and can be replaced with whatever meets your local site policies.
Also the paths shown for sslKey and sslCertfile should be replaced with the correct values on your system.
Site information
This page will provide information specific to the STAR Grid sites.
BNL
GK Infrastructure
Gatekeeper Infrastructure
This page was last updated on May 17, 2016.
The nodes for STAR's grid-related activities at BNL are as follows:
Color coding
- Black: in production (please, do NOT modify without prior warning)
- Green: machine was setup for testing particular component or setup
- Red : status unknown
- Blue: available for upgrade upon approval
| Grid Machine | Usage | Notes | Hardware Make and Model | OS version, default gcc version |
Hardware arrangement | OSG base | Condor |
|---|---|---|---|---|---|---|---|
| stargrid01 | FROM BNL, submit grid jobs from this node | Dell PowerEdge 2950 dual quad-core Xeon E5440 (2.83 GHz/ 1.333 GHz FSB), 16 GB RAM |
RHEL Client 5.11, gcc 4.3.2 |
6 x 1TB SATA2: 1GB /boot (/dev/md0) is RAID 1 across all six drives There are 3 RAID 1 arrays using pairs of disks (eg. /dev/sda2 and /dev/sdb2 are one array). The various local mount points and swap space are logical volumes scattered across these RAIDed pairs. There are 2.68 TB of unassigned space in the current configuration. |
OSG 3.2.25 Client software stack for job submission | 8.2.8-1.4 (part of OSG install -- only for grid submission, not part of RACF condor) | |
| stargrid02 | file transfer (gridftp) server | Attention: on stargrid02, the mappings *formerly* were all grid mappings (i.e. to VO group accounts: osgstar, engage, ligo, etc...) On May 17, 2016, this was changed to map STAR VO users to individual user accounts (matching the behaviour of stargrid03 and stargrid04). This behavior may be changed back. (TBD) Former STAR-BNL site gatekeeper |
Dell PowerEdge 2950 dual quad-core Xeon E5440 (2.83 GHz/ 1.333 GHz FSB), 16 GB RAM |
RHEL Client 5.11, gcc 4.3.2 |
6 x 1TB SATA2: Configured the same as stargrid01 above NIC 2 x 1Gb/s (one in use for RACF IPMI/remote administration on private network) |
OSG CE 3.1.23 |
7.6.10 (RCF RPM), NON-FUNCTIONAL (non-working configuration) |
| stargrid03 | file transfer (gridftp) server | To transfer using STAR individual user mappings, please use this node or stargrid04 | Dell PowerEdge 2950 dual quad-core Xeon E5440 (2.83 GHz/ 1.333 GHz FSB), 16 GB RAM |
RHEL Client 5.11, gcc 4.3.2 |
6 x 1TB SATA2: Configured the same as stargrid01 above NIC 2 x 1Gb/s (one in use for RACF IPMI/remote administration on private network) |
OSG CE 3.1.18 | 7.6.10 (RCF RPM), NON-FUNCTIONAL (non-working configuration) |
| stargrid04 | file transfer (gridftp) server | To transfer using STAR individual user mappings, please use this node or stargrid03 | Dell PowerEdge 2950 dual quad-core Xeon E5440 (2.83 GHz/ 1.333 GHz FSB), 16 GB RAM |
RHEL Client 5.11, gcc 4.3.2 |
6 x 1TB SATA2: Configured the same as stargrid01 above NIC 2 x 1Gb/s (one in use for RACF IPMI/remote administration on private network) |
OSG CE 3.1.23 | 7.6.10 (RCF RPM), NON-FUNCTIONAL (non-working configuration) |
stargrid0[234] are using the VDT-supplied gums client (version 1.2.16).
stargrid02 has a local hack in condor.pm to adjust the condor parameters for STAR users with local accounts.
All nodes have GLOBUS_TCP_PORT_RANGE=20000,30000 and matching firewall conduits for Globus and other dynamic grid service ports.
- General upgrade history (generally obsolete, but some valuable tidbits)
- stargridXX (generally obsolete, but some valuable tidbits)
- stargrid02 (generally obsolete, but some valuable tidbits)
- stargrid04 (generally obsolete, but some valuable tidbits)
LBL
MIT
CMS Analysis Facility
MIT’s CMS Analysis Facility is a large Tier-2 computing center built for CMS user analyses. We’re looking into the viability of using it for STAR computing.
Initial Setup
First things first. I went to http://www2.lns.mit.edu/compserv/cms-acctappl.html and applied for a local account. The welcome message contained a link to the CMSAF User Guide found on this TWiki page.
AFS isn’t available on CMSAF, so I started a local tree at /osg/app/star/afs_rhic and began to copy over stuff. Here’s a list of what I copied so far (nodes are running SL 4.4):
CERNLIB
/afs/rhic.bnl.gov/asis/sl4/slc4_ia32_gcc345/cern
OPTSTAR
/afs/rhic.bnl.gov/i386_sl4/opt/star/sl44_gcc346GROUP_DIR
/afs/rhic.bnl.gov/star/groupROOT 5.12.00
/afs/rhic.bnl.gov/star/ROOT/5.12.00/root
/afs/rhic.bnl.gov/star/ROOT/5.12.00/.sl44_gcc346SL07e (sl44_gcc346 only)
/afs/rhic.bnl.gov/star/packages/SL07eI copied these precompiled libraries over instead of building them myself because of a tricky problem with the interactive nodes’ configuration. The main gateway node is a 64-bit machine, so regular attempts at compilation produce 64-bit libraries that we can’t use. CMSAF has a node reserved for 32-bit builds, but it’s running SL 3.0.5. We’re still working on a proper resolution of that problem. Perhaps we can force cons to do 32-bit compilations.
The environment scripts are working, although I had to add more hacks than I thought were necessary. I only changed the following files:
- ~/.login
- ~/.cshrc
- $GROUP_DIR/site_post_setup.csh
It doesn’t seem possible to change the default login shell (chsh and ypchsh both fail), so when you login you need to type “tcsh” to get a working STAR environment (after copying my .login and .cshrc to your home directory, of course).
Basic interactive tests look good, and I’ve got a SUMS configuration that will do local job submissions to the Condor system (that’s a topic for another post). DB calls use the MIT database mirror. I think that’s all for now.
STAR Scheduler Configuration
I deployed a private build of SUMS (roughly 1.8.10) on CMSAF and made the following changes to globalConfig.xml to get local job submission working:
In the Queue List
In the Policy List
Now for the Dispatcher
And finally, here's the site configuration block
Database Mirror
MIT has a local slave connected to the STAR master database server. A dbServers.xml with the following content will allow you to connect to it:
<StDbServer>
<server> star1 </server>
<host> star1.lns.mit.edu </host>
<port> 3316 </port>
<socket> /tmp/mysql.3316.sock </socket>
</StDbServer>
For more information on selecting database mirrors please visit this page. You can also view a heartbeat of all the STAR database slaves here. Finally, if you're interested in setting up your own database slave, Michael DePhillips has put some preliminary instructions on the
Guidelines For MIT Tier2 Job Requests
In order to facilitate the submission of jobs, all requests for the Tier2 must contain the following information. Note that, because we cannot maintain stardev on Tier2, all jobs must be run from a tagged release. It is the users responsibility to ensure that the requested job runs from a tagged release, with any necessary updates from CVS made explicit.
1. Tagged release of the STAR environment from which the job will be run, e.g. SL08a.
2. Link to all custom macros and/or kumacs.
3. Link to pams/ and StRoot/ directories containing any custom code, including all necessary CVS updates of the tagged release.
5. List of commands to be executed, i.e. the contents of the <job></job> in your submission XML.
One is also free to include a custom log4j.xml, but this is not necessary.
MIT Simulation Productions
| Production Name |
STAR Library |
Species | Subprocesses |
PYTHIA Library |
BFC |
Geometry |
Notes |
| mit0000 |
SL08a | pp200 | QCD 2->2 | pythia6410PionFilter |
"trs fss y2006c Idst IAna l0 tpcI fcf ftpc Tree logger ITTF Sti VFPPV bbcSim tofsim tags emcY2 EEfs evout -dstout IdTruth geantout big fzin MiniMcMk clearmem eemcDb beamLine sdt20050727" |
y2006c | CKIN(3) = 4, CKIN(4) = 5 |
| mit0001 |
SL08a | pp200 | QCD 2->2 | pythia6410PionFilter |
"trs fss y2006c Idst IAna l0 tpcI fcf ftpc Tree logger ITTF Sti VFPPV bbcSim tofsim tags emcY2 EEfs evout -dstout IdTruth geantout big fzin MiniMcMk clearmem eemcDb beamLine sdt20050727" |
y2006c | CKIN(3) = 5, CKIN(4) = 7 |
| mit0002 | SL08a | pp200 | QCD 2->2 | pythia6410PionFilter | "trs fss y2006c Idst IAna l0 tpcI fcf ftpc Tree logger ITTF Sti VFPPV bbcSim tofsim tags emcY2 EEfs evout -dstout IdTruth geantout big fzin MiniMcMk clearmem eemcDb beamLine sdt20050727" | y2006c | CKIN(3) = 7, CKIN(4) = 9 |
| mit0003 | SL08a | pp200 | QCD 2->2 | pythia6410PionFilter | "trs fss y2006c Idst IAna l0 tpcI fcf ftpc Tree logger ITTF Sti VFPPV bbcSim tofsim tags emcY2 EEfs evout -dstout IdTruth geantout big fzin MiniMcMk clearmem eemcDb beamLine sdt20050727" | y2006c | CKIN(3) = 9, CKIN(4) = 11 |
| mit0004 | SL08a | pp200 | QCD 2->2 | pythia6410PionFilter | "trs fss y2006c Idst IAna l0 tpcI fcf ftpc Tree logger ITTF Sti VFPPV bbcSim tofsim tags emcY2 EEfs evout -dstout IdTruth geantout big fzin MiniMcMk clearmem eemcDb beamLine sdt20050727" | y2006c | CKIN(3) = 11, CKIN(4) = 15 |
| mit0005 | SL08a | pp200 | QCD 2->2 | pythia6410PionFilter | "trs fss y2006c Idst IAna l0 tpcI fcf ftpc Tree logger ITTF Sti VFPPV bbcSim tofsim tags emcY2 EEfs evout -dstout IdTruth geantout big fzin MiniMcMk clearmem eemcDb beamLine sdt20050727" | y2006c | CKIN(3) = 15, CKIN(4) = 25 |
| mit0006 | SL08a | pp200 | QCD 2->2 | pythia6410PionFilter | "trs fss y2006c Idst IAna l0 tpcI fcf ftpc Tree logger ITTF Sti VFPPV bbcSim tofsim tags emcY2 EEfs evout -dstout IdTruth geantout big fzin MiniMcMk clearmem eemcDb beamLine sdt20050727" | y2006c | CKIN(3) = 25, CKIN(4) = 35 |
| Production Name |
STAR Library |
Species | Subprocesses | PYTHIA Library | BFC | Geometry | Notes |
| mit0007 | SL08a | pp500 | W | pythia6_410 | "trs -ssd upgr13 Idst IAna l0 tpcI fcf -ftpc Tree logger ITTF Sti StiRnd -IstIT -SvtIt -NoSvtIt SvtCL,svtDb -SsdIt MakeEvent McEvent geant evout geantout IdTruth bbcSim emcY2 EEfs bigbig -dstout fzin -MiniMcMk McEvOut clearmem -ctbMatchVtx VFPPV eemcDb beamLine" | upgr13 | CKIN(3)=10, Custom BFC, vertex(0.1,-0.2,-60), beamLine matched |
| mit0008 | SL08a | pp500 | QCD 2->2 | pythia6_410 | "trs -ssd upgr13 Idst IAna l0 tpcI fcf -ftpc Tree logger ITTF Sti StiRnd -IstIT -SvtIt -NoSvtIt SvtCL,svtDb -SsdIt MakeEvent McEvent geant evout geantout IdTruth bbcSim emcY2 EEfs bigbig -dstout fzin -MiniMcMk McEvOut clearmem -ctbMatchVtx VFPPV eemcDb beamLine" | upgr13 |
CKIN(3)=20, CKIN(4)=30, Custom BFC, vertex(0.1,-0.2,-60), beamLine matched |
| mit0009 | SL08a | pp500 | W | pythia6410FGTFilter | "trs -ssd upgr13 Idst IAna l0 tpcI fcf -ftpc Tree logger ITTF Sti StiRnd -IstIT -SvtIt -NoSvtIt SvtCL,svtDb -SsdIt MakeEvent McEvent geant evout geantout IdTruth bbcSim emcY2 EEfs bigbig -dstout fzin -MiniMcMk McEvOut clearmem -ctbMatchVtx VFPPV eemcDb beamLine" | upgr13 | CKIN(3)=10, Custom BFC, vertex(0.1,-0.2,-60), beamLine matched |
| mit00010 | SL08a | pp500 | QCD 2->2 | pythia6410FGTFilter | "trs -ssd upgr13 Idst IAna l0 tpcI fcf -ftpc Tree logger ITTF Sti StiRnd -IstIT -SvtIt -NoSvtIt SvtCL,svtDb -SsdIt MakeEvent McEvent geant evout geantout IdTruth bbcSim emcY2 EEfs bigbig -dstout fzin -MiniMcMk McEvOut clearmem -ctbMatchVtx VFPPV eemcDb beamLine" | upgr13 | CKIN(3)=20, CKIN(4)=30, Custom BFC, vertex(0.1,-0.2,-60), beamLine matched |
| mit0011 |
SL08a | pp500 | QCD 2->2 | pythia6410FGTFilterV2 | "trs -ssd upgr13 Idst IAna l0 tpcI fcf -ftpc Tree logger ITTF Sti StiRnd -IstIT -SvtIt -NoSvtIt SvtCL,svtDb -SsdIt MakeEvent McEvent geant evout geantout IdTruth bbcSim emcY2 EEfs bigbig -dstout fzin -MiniMcMk McEvOut clearmem -ctbMatchVtx VFPPV eemcDb beamLine" | upgr13 | CKIN(3)=5, CKIN(4)=10, Custom BFC, vertex(0.1,-0.2,-60), beamLine matched |
| mit0012 | SL08a | pp500 | QCD 2->2 | pythia6410FGTFilter | "trs -ssd upgr13 Idst IAna l0 tpcI fcf -ftpc Tree logger ITTF Sti StiRnd -IstIT -SvtIt -NoSvtIt SvtCL,svtDb -SsdIt MakeEvent McEvent geant evout geantout IdTruth bbcSim emcY2 EEfs bigbig -dstout fzin -MiniMcMk McEvOut clearmem -ctbMatchVtx VFPPV eemcDb beamLine" | upgr13 | CKIN(3)=10, Custom BFC, vertex(0.1,-0.2,-60), beamLine matched |
| mit0013 | SL08a | pp500 | QCD 2->2 | pythia6410FGTFilterV2 | "trs -ssd upgr13 Idst IAna l0 tpcI fcf -ftpc Tree logger ITTF Sti StiRnd -IstIT -SvtIt -NoSvtIt SvtCL,svtDb -SsdIt MakeEvent McEvent geant evout geantout IdTruth bbcSim emcY2 EEfs bigbig -dstout fzin -MiniMcMk McEvOut clearmem -ctbMatchVtx VFPPV eemcDb beamLine" | upgr13 | CKIN(3)=15, CKIN(4)=20, Custom BFC, vertex(0.1,-0.2,-60), beamLine matched |
| mit0014 | SL08a | pp500 | QCD 2->2 | pythia6410FGTFilterV2 | "trs -ssd upgr13 Idst IAna l0 tpcI fcf -ftpc Tree logger ITTF Sti StiRnd -IstIT -SvtIt -NoSvtIt SvtCL,svtDb -SsdIt MakeEvent McEvent geant evout geantout IdTruth bbcSim emcY2 EEfs bigbig -dstout fzin -MiniMcMk McEvOut clearmem -ctbMatchVtx VFPPV eemcDb beamLine" | upgr13 | CKIN(3)=20, CKIN(4)=30, Custom BFC, vertex(0.1,-0.2,-60), beamLine matched |
| mit0015 | SL08a | pp500 | QCD 2->2 | pythia6410FGTFilterV2 | "trs -ssd upgr13 Idst IAna l0 tpcI fcf -ftpc Tree logger ITTF Sti StiRnd -IstIT -SvtIt -NoSvtIt SvtCL,svtDb -SsdIt MakeEvent McEvent geant evout geantout IdTruth bbcSim emcY2 EEfs bigbig -dstout fzin -MiniMcMk McEvOut clearmem -ctbMatchVtx VFPPV eemcDb beamLine" | upgr13 | CKIN(3)=30, CKIN(4)=50, Custom BFC, vertex(0.1,-0.2,-60), beamLine matched |
| mit0016 | SL08a | pp500 | QCD 2->2 | pythia6410FGTFilterV2 | "trs -ssd upgr13 Idst IAna l0 tpcI fcf -ftpc Tree logger ITTF Sti StiRnd -IstIT -SvtIt -NoSvtIt SvtCL,svtDb -SsdIt MakeEvent McEvent geant evout geantout IdTruth bbcSim emcY2 EEfs bigbig -dstout fzin -MiniMcMk McEvOut clearmem -ctbMatchVtx VFPPV eemcDb beamLine" | upgr13 | CKIN(3)=50, Custom BFC, vertex(0.1,-0.2,-60), beamLine matched |
| Production Name | STAR Library | Species | Subprocess | PYTHIA Library | BFC | Geometry | Notessuffix |
| mit0019 | SL08c | pp200 | Prompt Photon | p6410BemcGammaFilter | "trs fss y2006g Idst IAna l0 tpcI fcf ftpc Tree logger ITTF Sti VFPPV bbcSim tofsim tags emcY2 EEfs evout -dstout IdTruth geantout big fzin MiniMcMk clearmem eemcDb beamLine sdt20050727" | y2006g | CKIN(3)=2, CKIN(4)=3, StGammaFilterMaker |
| mit0020 | SL08c | pp200 | Prompt Photon | p6410BemcGammaFilter | "trs fss y2006g Idst IAna l0 tpcI fcf ftpc Tree logger ITTF Sti VFPPV bbcSim tofsim tags emcY2 EEfs evout -dstout IdTruth geantout big fzin MiniMcMk clearmem eemcDb beamLine sdt20050727" | y2006g | CKIN(3)=3, CKIN(4)=4, StGammaFilterMaker |
| mit0021 | SL08c | pp200 | Prompt Photon | p6410BemcGammaFilter | "trs fss y2006g Idst IAna l0 tpcI fcf ftpc Tree logger ITTF Sti VFPPV bbcSim tofsim tags emcY2 EEfs evout -dstout IdTruth geantout big fzin MiniMcMk clearmem eemcDb beamLine sdt20050727" | y2006g | CKIN(3)=4, CKIN(4)=6, StGammaFilterMaker |
| mit0022 | SL08c | pp200 | Prompt Photon | p6410BemcGammaFilter | "trs fss y2006g Idst IAna l0 tpcI fcf ftpc Tree logger ITTF Sti VFPPV bbcSim tofsim tags emcY2 EEfs evout -dstout IdTruth geantout big fzin MiniMcMk clearmem eemcDb beamLine sdt20050727" | y2006g | CKIN(3)=6, CKIN(4)=9, StGammaFilterMaker |
| mit0023 | SL08c | pp200 | Prompt Photon | p6410BemcGammaFilter | "trs fss y2006g Idst IAna l0 tpcI fcf ftpc Tree logger ITTF Sti VFPPV bbcSim tofsim tags emcY2 EEfs evout -dstout IdTruth geantout big fzin MiniMcMk clearmem eemcDb beamLine sdt20050727" | y2006g | CKIN(3)=9, CKIN(4)=15, StGammaFilterMaker |
| mit0024 | SL08c | pp200 | Prompt Photon | p6410BemcGammaFilter | "trs fss y2006g Idst IAna l0 tpcI fcf ftpc Tree logger ITTF Sti VFPPV bbcSim tofsim tags emcY2 EEfs evout -dstout IdTruth geantout big fzin MiniMcMk clearmem eemcDb beamLine sdt20050727" | y2006g | CKIN(3)=15, CKIN(4)=25, StGammaFilterMaker |
| mit0025 | SL08c | pp200 | Prompt Photon | p6410BemcGammaFilter | "trs fss y2006g Idst IAna l0 tpcI fcf ftpc Tree logger ITTF Sti VFPPV bbcSim tofsim tags emcY2 EEfs evout -dstout IdTruth geantout big fzin MiniMcMk clearmem eemcDb beamLine sdt20050727" | y2006g | CKIN(3)=25, CKIN(4)=35, StGammaFilterMaker |
| mit0026 | SL08c | pp200 | QCD | p6410BemcGammaFilter | "trs fss y2006g Idst IAna l0 tpcI fcf ftpc Tree logger ITTF Sti VFPPV bbcSim tofsim tags emcY2 EEfs evout -dstout IdTruth geantout big fzin MiniMcMk clearmem eemcDb beamLine sdt20050727" | y2006g | CKIN(3)=2, CKIN(4)=3, StGammaFilterMaker |
| mit0027 | SL08c | pp200 | QCD | p6410BemcGammaFilter | "trs fss y2006g Idst IAna l0 tpcI fcf ftpc Tree logger ITTF Sti VFPPV bbcSim tofsim tags emcY2 EEfs evout -dstout IdTruth geantout big fzin MiniMcMk clearmem eemcDb beamLine sdt20050727" | y2006g | CKIN(3)=3, CKIN(4)=4, StGammaFilterMaker |
| mit0028 | SL08c | pp200 | QCD | p6410BemcGammaFilter | "trs fss y2006g Idst IAna l0 tpcI fcf ftpc Tree logger ITTF Sti VFPPV bbcSim tofsim tags emcY2 EEfs evout -dstout IdTruth geantout big fzin MiniMcMk clearmem eemcDb beamLine sdt20050727" | y2006g | CKIN(3)=4, CKIN(4)=6, StGammaFilterMaker |
| mit0029 | SL08c | pp200 | QCD | p6410BemcGammaFilter | "trs fss y2006g Idst IAna l0 tpcI fcf ftpc Tree logger ITTF Sti VFPPV bbcSim tofsim tags emcY2 EEfs evout -dstout IdTruth geantout big fzin MiniMcMk clearmem eemcDb beamLine sdt20050727" | y2006g | CKIN(3)=6, CKIN(4)=9, StGammaFilterMaker |
| mit0030 | SL08c | pp200 | QCD | p6410BemcGammaFilter | "trs fss y2006g Idst IAna l0 tpcI fcf ftpc Tree logger ITTF Sti VFPPV bbcSim tofsim tags emcY2 EEfs evout -dstout IdTruth geantout big fzin MiniMcMk clearmem eemcDb beamLine sdt20050727" | y2006g | CKIN(3)=9, CKIN(4)=15, StGammaFilterMaker |
| mit0031 | SL08c | pp200 | QCD | p6410BemcGammaFilter | "trs fss y2006g Idst IAna l0 tpcI fcf ftpc Tree logger ITTF Sti VFPPV bbcSim tofsim tags emcY2 EEfs evout -dstout IdTruth geantout big fzin MiniMcMk clearmem eemcDb beamLine sdt20050727" | y2006g | CKIN(3)=15, CKIN(4)=25, StGammaFilterMaker |
| mit0032 | SL08c | pp200 | QCD | p6410BemcGammaFilter | "trs fss y2006g Idst IAna l0 tpcI fcf ftpc Tree logger ITTF Sti VFPPV bbcSim tofsim tags emcY2 EEfs evout -dstout IdTruth geantout big fzin MiniMcMk clearmem eemcDb beamLine sdt20050727" | y2006g | CKIN(3)=25, CKIN(4)=35, StGammaFilterMaker |
| mit0033 | SL08c | pp200 | QCD | p6410BemcGammaFilter | "trs fss y2006g Idst IAna l0 tpcI fcf ftpc Tree logger ITTF Sti VFPPV bbcSim tofsim tags emcY2 EEfs evout -dstout IdTruth geantout big fzin MiniMcMk clearmem eemcDb beamLine sdt20050727" | y2006g | CKIN(3)=35, CKIN(4)=65, StGammaFilterMaker |
| Production Name | STAR Library | Species | Subprocess | PYTHIA Library | BFC | Geometry | Notessuffix |
| mit0034 | SL08c | pp200 | Prompt Photon | p6410EemcGammaFilter | "trs fss y2006g Idst IAna l0 tpcI fcf ftpc Tree logger ITTF Sti VFPPV bbcSim tofsim tags emcY2 EEfs evout -dstout IdTruth geantout big fzin MiniMcMk clearmem eemcDb beamLine sdt20050727" | y2006g | CKIN(3)=2, CKIN(4)=3, StGammaFilterMaker |
| mit0035 | SL08c | pp200 | Prompt Photon | p6410EemcGammaFilter | "trs fss y2006g Idst IAna l0 tpcI fcf ftpc Tree logger ITTF Sti VFPPV bbcSim tofsim tags emcY2 EEfs evout -dstout IdTruth geantout big fzin MiniMcMk clearmem eemcDb beamLine sdt20050727" | y2006g | CKIN(3)=3, CKIN(4)=4, StGammaFilterMaker |
| mit0036 | SL08c | pp200 | Prompt Photon | p6410EemcGammaFilter | "trs fss y2006g Idst IAna l0 tpcI fcf ftpc Tree logger ITTF Sti VFPPV bbcSim tofsim tags emcY2 EEfs evout -dstout IdTruth geantout big fzin MiniMcMk clearmem eemcDb beamLine sdt20050727" | y2006g | CKIN(3)=4, CKIN(4)=6, StGammaFilterMaker |
| mit0037 | SL08c | pp200 | Prompt Photon | p6410EemcGammaFilter | "trs fss y2006g Idst IAna l0 tpcI fcf ftpc Tree logger ITTF Sti VFPPV bbcSim tofsim tags emcY2 EEfs evout -dstout IdTruth geantout big fzin MiniMcMk clearmem eemcDb beamLine sdt20050727" | y2006g | CKIN(3)=6, CKIN(4)=9, StGammaFilterMaker |
| mit0038 | SL08c | pp200 | Prompt Photon | p6410EemcGammaFilter | "trs fss y2006g Idst IAna l0 tpcI fcf ftpc Tree logger ITTF Sti VFPPV bbcSim tofsim tags emcY2 EEfs evout -dstout IdTruth geantout big fzin MiniMcMk clearmem eemcDb beamLine sdt20050727" | y2006g | CKIN(3)=9, CKIN(4)=15, StGammaFilterMaker |
| mit0039 | SL08c | pp200 | Prompt Photon | p6410EemcGammaFilter | "trs fss y2006g Idst IAna l0 tpcI fcf ftpc Tree logger ITTF Sti VFPPV bbcSim tofsim tags emcY2 EEfs evout -dstout IdTruth geantout big fzin MiniMcMk clearmem eemcDb beamLine sdt20050727" | y2006g | CKIN(3)=15, CKIN(4)=25, StGammaFilterMaker |
| mit0040 | SL08c | pp200 | QCD | p6410EemcGammaFilter | "trs fss y2006g Idst IAna l0 tpcI fcf ftpc Tree logger ITTF Sti VFPPV bbcSim tofsim tags emcY2 EEfs evout -dstout IdTruth geantout big fzin MiniMcMk clearmem eemcDb beamLine sdt20050727" | y2006g | CKIN(3)=2, CKIN(4)=3, StGammaFilterMaker |
| mit0041 | SL08c | pp200 | QCD | p6410EemcGammaFilter | "trs fss y2006g Idst IAna l0 tpcI fcf ftpc Tree logger ITTF Sti VFPPV bbcSim tofsim tags emcY2 EEfs evout -dstout IdTruth geantout big fzin MiniMcMk clearmem eemcDb beamLine sdt20050727" | y2006g | CKIN(3)=3, CKIN(4)=4, StGammaFilterMaker |
| mit0042 | SL08c | pp200 | QCD | p6410EemcGammaFilter | "trs fss y2006g Idst IAna l0 tpcI fcf ftpc Tree logger ITTF Sti VFPPV bbcSim tofsim tags emcY2 EEfs evout -dstout IdTruth geantout big fzin MiniMcMk clearmem eemcDb beamLine sdt20050727" | y2006g | CKIN(3)=4, CKIN(4)=6, StGammaFilterMaker |
| mit0043 | SL08c | pp200 | QCD | p6410EemcGammaFilter | "trs fss y2006g Idst IAna l0 tpcI fcf ftpc Tree logger ITTF Sti VFPPV bbcSim tofsim tags emcY2 EEfs evout -dstout IdTruth geantout big fzin MiniMcMk clearmem eemcDb beamLine sdt20050727" | y2006g | CKIN(3)=6, CKIN(4)=9, StGammaFilterMaker |
| mit0044 | SL08c | pp200 | QCD | p6410EemcGammaFilter | "trs fss y2006g Idst IAna l0 tpcI fcf ftpc Tree logger ITTF Sti VFPPV bbcSim tofsim tags emcY2 EEfs evout -dstout IdTruth geantout big fzin MiniMcMk clearmem eemcDb beamLine sdt20050727" | y2006g | CKIN(3)=9, CKIN(4)=15, StGammaFilterMaker |
| mit0045 | SL08c | pp200 | QCD | p6410EemcGammaFilter | "trs fss y2006g Idst IAna l0 tpcI fcf ftpc Tree logger ITTF Sti VFPPV bbcSim tofsim tags emcY2 EEfs evout -dstout IdTruth geantout big fzin MiniMcMk clearmem eemcDb beamLine sdt20050727" | y2006g | CKIN(3)=15, CKIN(4)=25, StGammaFilterMaker |
STAR environment on OS X
This page is obsolete -- please see Mac port of STAR offline software for the current status
In order of decreasing importance:
- pams - still can't get too far here. No idea how the whole gcc -> agetof -> g77 works to compile "Mortran". I know VMC is the future and all that, but I think we really do need pams in order to have a useful STAR cluster.
- dynamic library paths - specifying a relative object pathname to g++ -o means that the created dylib always looks for itself in the current directory on OS X. In other words, the repository is useless. Need to figure out how to tell cons to send the absolute path when linking. Executables work just fine; it's only the .dylibs that have this problem.
- starsim - crashing on startup (!!!!! ZFATAL called from MZIOCH) Hopefully this is related to pams problems, although I do remember having some trouble linking.
- root4star - StarRoot,StUtilities,StarClassLibrary,St_base do not load automatically as I thought they were supposed to. How do we do this at BNL?
- QtRoot - has it's own build system that didn't work out of the box for me. Disabled StEventDisplayMaker and St_geom_Maker until I figure this out.
Contents of $OPTSTAR
I went through the list of required packages in /afs/rhic.bnl.gov/star/common/AAAREADME and figured out which ones were installed by default in an Intel OS X 10.4.8 client. Here's what I found:
- perl 5.8.6: /usr/bin/perl (slightly newer than requested 5.8.4)
- make 3.8.0: /usr/bin/make -> gnumake
- tar (??): /usr/bin/tar
- flex 2.5.4: /usr/bin/flex
- libXpm 4.11: /usr/X11R6/lib/libXpm.dylib
- libpng: not found
- mysql: not found
- gcc 4.0.1: /usr/bin/gcc -> gcc-4.0 (yeah, I know. Apple does not support gcc 3.x in 10.4 for Intel! We can do gcc_select to go back to 3.3 on ppc though.)
- dejagnu: not found
- gdb 6.3.50: /usr/bin/gdb (instead of 5.2)
- texinfo: not found
- emacs 21.2.1: /usr/bin/emacs (instead of 20.7)
- findutils: not found
- fileutils: not found
- cvs 1.11: /usr/bin/cvs
- grep 2.5.1: /bin/grep (instead of 2.5.1a)
- m4 1.4.2: /usr/bin/m4 (instead of 1.4.1)
- autoconf 2.59: /usr/bin/autoconf (2.53)
- automake 1.6.3: /usr/bin/automake
- libtool (??): /usr/bin/libtool (1.5.8)
I was able to find nearly all of the missing packages in the unstable branch for Fink (Intel machine). I wouldn't worry about the "unstable" moniker; as long as you don't do a blind update-all it's certainly possible to stick to a solid config, and there are several packages on the list that are only available in unstable (only because they haven't yet gotten the votes to move them over to stable). I've gone ahead and installed some of the missing packages in a fresh Fink installation and will serve it up over NFS at /Volumes/star1.lns.mit.edu/STAR/opt/star/osx48_i386_gcc401 (with a power_macintosh_gcc401 to match, although a more consistent $STAR_HOST_SYS would probably have been osx48_ppc_gcc401).
Here's a summary table of the packages installed in $OPTSTAR for the two OS X architectures at MIT. Note that many of these packages have additional dependencies, so the full list of installed packages on each system (attached at the bottom of the page) is actually much longer.
| package | version |
| Fortran compiler | gfortran 4.2 (i386), g77 3.4.3 (ppc) |
| libpng | 1.2.12 |
| mysql | 5.0.16-1002 (5.0.27 will break!) |
| dejagnu | skipped |
| texinfo | 4.8 |
| findutils | 4.2.20 |
| fileutils | 5.96 |
| qt-x11 | 3.3.7 |
| slang | 1.4.9 |
| doxygen | 1.4.6 |
| lynx | 2.8.5 |
| ImageMagick | 6.2.8 |
| nedit | 5.5 |
| astyle | 1.15.3 (ppc only) |
| unixodbc | 2.2.11 |
| myodbc | not available (2.50.39, if we want it) |
| libxml | 2.6.26 |
I also looked for required perlmods in Fink. I stuck with the default Perl 5.86, so the modules that say e.g. pm588 required I did not install. I found that some of the modules are already part of core. If the older ones hosted by STAR are still needed, let me know. Virtual package means that it came with the OS already:
| perlmod | version |
| Compress-Zlib | virtual package |
| DateManip | 5.42a |
| DBI | 1.53 |
| DBD-mysql | 3.0008 |
| Digest-MD5 | core module |
| HTML-Parser | virtual package |
| HTML-Tagset | 3.10 |
| libnet | not available |
| libwww-perl | 5.805 |
| LWPng-alpha | not available |
| MD5 | not available |
| MIME-Base64 | 3.05 |
| Proc-ProcessTable | 0.39-cvs20040222-sf77 |
| Statistics-Descriptive | 2.6 |
| Storable | core module |
| Time-HiRes | core module |
| URI | virtual package |
| XML-NamespaceSupport | 1.08 |
| XML-SAX | 0.14 |
| XML-Simple | 2.16 |
There were some additional perlmods that install_perlmods listed as "Linux only" but Fink offered to install:
| perlmod | version |
| GD | 2.30 |
| perlindex | not available |
| Pod-Escapes | 1.04 |
| Pod-Simple | 3.04 |
| Tk | 804.026 |
| Tk-HistEntry | not available |
| Tk-Pod | not available |
Questions:
- what was with all those soft-links (/usr/bin/sed -> /bin/sed, etc.) that Jerome had me make? Will they be needed on every machine running STAR environment (that's a problem), or just on the one he was compiling on?
- is perl in /usr/bin sufficient or do we need to put it in $OPTSTAR as directed in AAAREADME?
- what to do about mysql? Is 5.0 back-compatible, or do we only need development headers and shared libraries?
Building PYTHIA dylibs with gfortran
The default makePythia6.macosx won't work out of the box for 10.4, since it requires g77. Here's what I did to get the libraries built for Pythia 5:
$ gfortran -c jetset74.f $ gfortran -c pythia5707.f $ echo 'void MAIN__() {}' > main.c $ gcc -c main.c $ gcc -dynamiclib -flat_namespace -single_module -undefined dynamic_lookup -install_name $OPTSTAR/lib/libPythia.dylib -o libPythia.dylib *.o $ sudo cp libPythia.dylib $OPTSTAR/lib/. and for Pythia 6: $ export MACOSX_DEPLOYMENT_TARGET=10.4 $ gfortran -c pythia6319.f In file pythia6319.f:50551 IF (AAMAX.EQ.0D0) PAUSE 'SINGULAR MATRIX IN PYLDCM' 1 Warning: Obsolete: PAUSE statement at (1) $ gfortran -fno-second-underscore -c tpythia6_called_from_cc.F $ echo 'void MAIN__() {}' > main.c $ gcc -c main.c $ gcc -c pythia6_common_address.c $ gcc -dynamiclib -flat_namespace -single_module -undefined dynamic_lookup -install_name $OPTSTAR/lib/libPythia6.dylib -o libPythia6.dylib main.o tpythia6_called_from_cc.o pythia6*.o $ ln -s libPythia6.dylib libPythia6.so $ sudo cp libPythia6.* $OPTSTAR/lib/.
CERNLIB notes
All the CERNLIB libraries are static and the binaries depend only on system libraries, so the whole installation should be portable. For PowerPC I had a CERNLIB 2005 build left over from a different Fink installation, so I just copied those binaries and libraries to the new location and downloaded the headers from CERN. Fink doesn't support CERNLIB on Intel Macs, so for this build I used Robert Hatcher's excellent shell script:
http://home.fnal.gov/~rhatcher/macosx/readme.html
Hatcher's binaries link against the gfortran dylib, so I made sure to build them with gfortran from $OPTSTAR.
CERNLIB 2005 doesn't include libshift.a, but STAR really wants to link against it. Here's a hack from Robert Hatcher to build your own cat > fakeshift.c < eof int rshift_(int* in, int* ishft) { return *in >> *ishft; } int ishft_(int* in, int* ishft) { if (*ishft == 0) return *in; if (*ishft > 0) return *in << *ishft; else return *in >> *ishft; } EOF gcc -O -fPIC -c fakeshift.c fi g77 -fPIC -c getarg_stub.f ar cr libshift.a fakeshift.o eof
ROOT build notes
Following the instructions at http://www.star.bnl.gov/STAR/comp/root/building_root.html was basically fine. Here was my configure command for rootdeb:
./configure macosx --build=debug --enable-qt --enable-table --enable-pythia6 --enable-pythia --with-pythia-libdir=$OPTSTAR/lib --with-pythia6-libdir=$OPTSTAR/lib --with-qt-incdir=$OPTSTAR/include/qt which resulted in the final list Enabled support for asimage, astiff, builtin_afterimage, builtin_freetype, builtin_pcre, builtin_zlib, cern, cintex, exceptions, krb5, ldap, mathcore, mysql, odbc, opengl, pch, pythia, pythia6, python, qt, qtgsi, reflex, shared, ssl, table, thread, winrtdebug, xml, xrootd. I did run into a few snags:
- MakeRootDir.pl didn't find my /usr/X11R6/bin/lndir automatically (even though that was in my $PATH) so I had edit the script and do it manually.
- Had to run MakeRootDir.pl twice to get root and rootdeb directory structures in place, editing the script in between.
- CVS was a mess. I had to drill down into each subdirectory that needed updating, and even then it puked out conflicts instead of patching the files, so I had to trash the originals first. Also, I'm fairly sure that root5/qt/inc/TQtWidget.h should have been included in the v5-12-00f tag, since my first attempt at compiling failed without the HEAD version of that file.
Hacking the environment scripts
- set rhflavor = "osx48_" in STAR_SYS to get the name I chose for $STAR_HOST_SYS
- I installed Qt in $OPTSTAR, so group_env.csh fails to find it
Building STAR software
I'm working with a checked out copy of the STAR software and modifying codes when necessary if the fix is obvious. So far I've got the following cons working: cons %QtRoot %StEventDisplayMaker %pams %St_dst_Maker %St_geom_Maker St_dst_Maker tries to subtract an int and a struct! Pams is a crazy mess of VAX-style Fortran STRUCTURES, but we really need it in order to run starsim. I haven't delved too deeply into the QtRoot-related stuff; I'm sure Valeri can help when the time comes. Hopefully we can get these things fixed without too much delay.
Power PC notes
- why does everything insist on linking with libshift? It's not a part of CERNLIB 2005, so I used Hatcher's hack to get around it and stuck libshift.a in $OPTSTAR/lib
- libnsl is not needed on OS X, so we don't link against it anymore
- remove -dynamiclib and -single_module for executables
- cfortran.h can't identify our Fortran compiler -- define it as f2c
- asps/Simulation/starsim/deccc/fputools.c won't compile under power pc (contains assembly code!) -- skip it for now
- g++ root4star brings out lots of linking issues; one killer seems to be that libpacklib from Fink is missing fzicv symbol.
- one very hack solution: install gfortran, use it to build CERNLIB with Hatcher script, replace libpacklib.a, copy libgcc.a and libgfortran.a from gcc 4.2.0 into $OPTSTAR/lib or other, then link against them explicitly
- needed to -lstarsim to get gufile, srndmc symbols defined
- <malloc.h> -- on Mac they decided to put this in /usr/include/malloc, so we add this to path in ConsDefs.pm
- cons wanted to link starsim using gcc and statically include libstdc++; on Mac we'll let g++ do the work. Also, -lstarsim seems to be included too early in the chain. Need to talk to Jerome about proper way to fix this, but for now I can hack a fix.
- PAMS -- ACK!
Problems requiring changes to codes:
- struct mallinfo isn't available on OS X
- for now we surround any mallinfo with #ifndef __APPLE__; Frank Laue says there may be a workaround
- 'fabs' was not declared in this scope
- add <cmath> in header
- TCL.h from ROOT conflicts with system tcl.h because of case-insensitive FS
- TCL.h renamed to TCernLib.h in newer ROOT versions (ROOT bug 19313)
- copied TCL.h to TCernLib.h myself and added #ifdef __APPLE__ #include "TCernLib.h"
- this problem will go away when we patch/upgrade ROOT
- passing U_Int to StMatrix::inverse() when it wants a size_t
- changed input to size_t (only affected StFtpcTrackingParams)
- abs(float) is not legal
- change to fabs(float) and #include <cmath>
Intel notes
Basic problem here is (im)maturity of gfortran. Current Fink unstable version 4.2.0-20060617 still does not include some instrinsic symbols (lshift, lstat) that we expect to be there. Newer versions do have these symbols, and as soon as Fink updates I'll give it another go. I may try installing gcc 4.3 from source in the meantime, but it's not a high priority. Note that Intel machines should be able to run the Power PC build in translated mode with some hacking of the paths (force $STAR_HOST_SYS = osx48_power_macintosh_gcc401).
Xgrid
Summary of Apple's Xgrid cluster software and the steps we've taken to get it up and running at MIT.http://deltag5.lns.mit.edu/xgrid/
Xgrid jobmanager status report
- xgrid.pm can submit and cancel jobs successfully, haven't tested "poll" since the server is running WS-GRAM.
- Xgrid SEG module monitors jobs successfully. Current version of Xgrid logs directly to /var/log/system.log (only readable by admin group), so there's a permissions issue to resolve there. My understanding is that the SEG module can run with elevated permissions if needed, but at the moment I'm using ACLs to explicitly allow user "globus" to read the system.log. Unfortunately the ACLs get reset when the logs are rotated nightly.
- CVS is up-to-date, but I can't promise that all of the Globus packaging stuff actually works. I ended up installing both Perl module and the C library into my Globus installation by hand.
- Current test environment uses SimpleCA, but I've applied for a server certificate at pki1.doegrids.org as part of the STAR VO.
Important Outstanding Issues
- streaming stdout/stderr and stagingOut files is a little tricky. Xgrid requires an explicit call to "xgrid -job results", otherwise it just keeps all job info in the controller DB. I haven't yet figured out where to inject this system call in the WS-GRAM job life cycle, so I'm asking for help on gram-dev@globus.org.
- Need to decide how to do authentication. Xgrid offers two options on the extreme ends of the spectrum. On the one hand we can use a common password for all users, and on the other hand we can use K5 tickets. Submitting a job using WS-GRAM involves a roundtrip user account -> container account -> user account via sudo, and I don't know how to forward a TGT for the user account through all of that. I looked around and saw a "pkinit" effort that promised to do passwordless generation of TGTs from grid certs, but it doesn't seem like it's quite ready for primetime.
USP
This is a copy of the web page that contains a log of the Sao Paulo grid activities. For the full documentaion, please go to http://stars.if.usp.br:8080/~suaide/grid/Installation
In order to be fully integrated to the STAR GRID you need to have the following items installed and running (the order I present the items are the same order I installed them in the cluster). There are other software to install before full integration but this is the actual status of the integration.Installing the batch system (SGE)
We decided to install the SGE because it is the same system used in PDSF (so it is scheduler compatible) and it is free. The SGE web site is here. You can donwload the latest version from their website.Instructions to install SGE
- Download from the SGE web site
- gunzip and untar the file
- cd to the directory
-
In the batch system server (in our case, STAR1)
- Create the SGE_ROOT directory. In our case, mkdir /home/sge-root. This
directory HAS to be available in all the exec nodes
- copy the entire content of the installation directory to the SGE_ROOT directory
- add the lines bellow to your /etc/services file
sge_execd 19001/udp
sge_qmaster 19000/tcp
sge_qmaster 19000/udp
sge_execd 19001/tcp - cd to the SGE_ROOT directory
- Type ./install_qmaster
- follow the instructions in the screen. In our case, the answers to the questions were:
- Do you want to install Grid Engine under an user id other than >root< (y/n) >> n
- $SGE_ROOT = /home/sge-root
- Enter cell name >> star
- Do you want to select another qmaster spool directory (y/n) [n] >> n
- verify and set the file permissions of your distribution (y/n) [y] >> y
- Are all hosts of your cluster in a single DNS domain (y/n) [y] >> y
- Please choose a spooling method (berkeleydb|classic) [berkeleydb] >> classic
- You can change at any time the group id range in your cluster configuration. Please enter a range >> 20000-21000
- The pathname of the spool directory of the execution hosts. Default: [/home/sge-root/star/spool] >> [ENTER]
- Please enter an email address in the form >user@foo.com<. Default: [none] >> [PUT YOUR EMAIL]
- Do you want to change the configuration parameters (y/n) [n] >> n
- We can install the startup script that will start
qmaster/scheduler at machine boot (y/n) [y] >> y
- Adding Grid Engine hosts. Do you want to use a file which contains the list of hosts (y/n) [n] >> n
- Host(s): star1 star2 star3 star4 ...... (ADD ALL HOSTS THAT WILL BE CONTROLED BY THE BATCH SYSTEM)
- Do you want to add your shadow host(s) now? (y/n) [y] >> n
- Scheduler Tuning. Default configuration is [1] >> 1
- Proceed with the default answers until the end of the script
- You have installed the master system. To make sure the system
will start at boot time type
ln -s /etc/init.d/sgemaster /etc/rc3.d/S95sgemaster
ln -s /etc/init.d/sgemaster /etc/rc5.d/S95sgemaster -
Install the execution nodes (including the server, if it will be a exec node). This needs to be done in ALL exec nodes
- add the lines bellow to your /etc/services file
sge_execd 19001/udp
sge_qmaster 19000/tcp
sge_qmaster 19000/udp
sge_execd 19001/tcp - cd to your SGE_ROOT directory
- type ./install_execd
- Answer the question about the SGE_ROOT directory location
- Please enter cell name which you used for the qmaster. >> star
- Do you want to configure a local spool directory for this host (y/n) [n] >> n
- We can install the startup script that will start execd at machine boot (y/n) [y] >> y
- Do you want to add a default queue instance for this host (y/n) [y] >> n (WE WILL CREATE A QUEUE LATER)
- follow the default instructions until the end
- You have now installed the master system. To start the system
at boot time. type
ln -s /etc/init.d/sgeexecd /etc/rc3.d/S96sgeexecd
ln -s /etc/init.d/sgeexecd /etc/rc5.d/S96sgeexecd -
Install a default queue to your batch system
- type qmon
It opens a GUI window where you can configure all the batch system. - Click in the buttom QUEUE CONTROL
- It opens another screen with the queues you have in your system
- Click on ADD
- Fill the instructions. See the file sge-admin.pdf for
instructions. It is very simple.
Installing GANGLIA
Aditional information from STAR web siteYou can download the ganglia packages from their web site. You need to install the following packages:
- gmond - the monitoring system. Should be installed in ALL machines in the cluster
- gmetad - the gathering information system. Should be installed in the machine that will collect the data (in our case, STAR1)
- the web front end. This is nice to have but not essential. It creates a web page, like this one, with all the information in your cluster. You should have a web server running in the collector machine (STAR1) for this to work
- rrdtool - this is a package that creates the plots in the web page. Necessary only if you have the web frontend.
-
In each machine in the cluster
- Install the gmond package (change the name to match the version
you are installing)
rpm -ivh ganglia-gmond-3.0.1-1.i386.rpm - edit the /etc/gmond.conf
file. The only change I made in this file was
cluster {
name = "STAR"
} - Type
ln -s /etc/init.d/gmond /etc/rc5.d/S97gmond
ln -s /etc/init.d/gmond /etc/rc3.d/S97gmond
/etc/init.d/gmond stop
/etc/init.d/gmond start -
In the collector machine (STAR1)
- Install the gmetad, web and rrdtool packages (change the name
to match the version you are installing)
rpm -ivh ganglia-gmetad-3.0.1-1.i386.rpm
rpm -ivh ganglia-web-3.0.1-1.noarch.rpm
rpm -ivh rrdtool-1.0.28-1.i386.rpm - edit the /etc/gmetad.conf
file. The only change I made in this file was
data_source "STAR" 10 star1:8649 star2:8649 star3:8649 star4:8649 star5:8649 - Type
ln -s /etc/init.d/gmetad /etc/rc5.d/S98gmetad
ln -s /etc/init.d/gmetad /etc/rc3.d/S98gmetad
/etc/init.d/gmetad stop
/etc/init.d/gmetad start
MonaLISA
Aditional information from STAR web siteTo install Monalisa in your system you need to download the files from their web site. After you gunzip and untar the file you need to perform the following steps:
- Create a monalisa user in your master computer and its home directory
- cd to the monalisa installation dir
- type ./install.sh
- Answer the following questions:
- Please specify an account for the MonALISA service [monalisa]: [ENTER]
- Where do you want MonaLisa installed ? [/home/monalisa/MonaLisa] : [ENTER]
- Path to the java home []: [enter the path name for your java distribution]
- Please specify the farm name [star1]: [star]
- Answer the next questions as you wish
- Make sure that Monalisa will run after reboot by typing:
ln -s /etc/init.d/MLD /etc/rc5.d/S80MLD
ln -s /etc/init.d/MLD /etc/rc3.d/S80MLD - You need to edit the following files in the directory /home/monalisa/MonaLisa/Services
- ml.properties
MonaLisa.ContactName=your name
MonaLisa.ContactEmail=xxx@yyyy.yyy
MonaLisa.LAT=-23.25
MonaLisa.LONG=-47.19
lia.Monitor.group=OSG, star (Note that we are being part of both OSG and STAR groups)
lia.Monitor.useIPaddress=xxx.xxx.xxx.xxx (your IP)
lia.Monitor.MIN_BIND_PORT=9000
lia.Monitor.MAX_BIND_PORT=9010 - Need to tell MonaLisa that I am using SGE
as a batch system. For this, edit the Service/CMD/site_env file and add
SGE_LOCATION=/home/sge-root
export SGE_LOCATION
SGE_ROOT=/home/sge-root
export SGE_ROOT
To start the MonaLisa service just type /etc/init.d/MLD start
Requesting a GRID certificate
By the way, you will have to request (for Grid usage) a user certificate. For instructions, click on the link http://www.star.bnl.gov/STAR/comp/Grid/Infrastructure/#CERTA grid installation will require a "host" certificate. Jerome told me he never asked for one really ...
The certificate arrived three days after I requested it (with some help from Jerome). I them followed
the instructions that came with the email to validade and export the certificate.
Installing OSG
I think this is the last step to be fully GRID integrated. I have not used the certificate I got up to now. Lets see. To install the OSG package I followed the instructions in the following web pagehttp://osg.ivdgl.org/twiki/bin/view/Documentation/OsgCEInstallGuide
The basic steps were
- Make sure pacman is installed. For this I had to update python to a version above 2.3. Pacman is a package management system. It can be downloaded from here
- create a directory at /home/grid. This is where I installed the grid stuff. Thid directory needs to be visible in all the cluster machines
- I typed
export VDT_LOCATION=/home/grid
I just followed the log and answered the questions.
cd $VDT_LOCATION
pacman -get OSG:ce
After this installation was done I typed source setup.sh to complete the installation. No messages in the screen...
Because our batch system is SGE, we need to install extra packages, as stated in the OSG documentation page. I typed:
pacman -get http://www.cs.wisc.edu/vdt/vdt_136_cache:Globus-SGE-Setupand these extra packages were installed in a few seconds.
I just followed the instructions in the OSG installation guide and everything went fine. One important thing is related to firewall setup. If you have a firewall running with MASQUERADE, in which your private network is not accessible from the outside world, and your gatekeeper is not the firewall machine, remember to open the necessary ports (above 1024) and redirect the ports number 2119, 2811 and 2812 to your gatekeeper machine. The command depends on your firewall program. If using iptables, just add the following rule to your filter tables:
$filter -t nat -A PREROUTING -p tcp -d $GLOBALIP --dport 2119 -j DNAT --to $STAR1where $GLOBALIP is the external IP of your firewall and $STAR1 is the IP of the machine running the GRID stuff.
$filter -t nat -A PREROUTING -p udp -d $GLOBALIP --dport 2119 -j DNAT --to $STAR1
$filter -t nat -A PREROUTING -p tcp -d $GLOBALIP --dport 2135 -j DNAT --to $STAR1
$filter -t nat -A PREROUTING -p udp -d $GLOBALIP --dport 2135 -j DNAT --to $STAR1
$filter -t nat -A PREROUTING -p tcp -d $GLOBALIP --dport 2136 -j DNAT --to $STAR1
$filter -t nat -A PREROUTING -p udp -d $GLOBALIP --dport 2136 -j DNAT --to $STAR1
$filter -t nat -A PREROUTING -p udp -d $GLOBALIP --dport 2811 -j DNAT --to $STAR1
$filter -t nat -A PREROUTING -p tcp -d $GLOBALIP --dport 2811 -j DNAT --to $STAR1
$filter -t nat -A PREROUTING -p udp -d $GLOBALIP --dport 2812 -j DNAT --to $STAR1
$filter -t nat -A PREROUTING -p tcp -d $GLOBALIP --dport 2812 -j DNAT --to $STAR1
$filter -t nat -A PREROUTING -p udp -d $GLOBALIP --dport 2912 -j DNAT --to $STAR1
$filter -t nat -A PREROUTING -p tcp -d $GLOBALIP --dport 2912 -j DNAT --to $STAR1
$filter -t nat -A PREROUTING -p tcp -d $GLOBALIP --dport 7512 -j DNAT --to $STAR1
$filter -t nat -A PREROUTING -p udp -d $GLOBALIP --dport 7512 -j DNAT --to $STAR1
$filter -t nat -A PREROUTING -p tcp -d $GLOBALIP --dport 8443 -j DNAT --to $STAR1
$filter -t nat -A PREROUTING -p udp -d $GLOBALIP --dport 8443 -j DNAT --to $STAR1
$filter -t nat -A PREROUTING -p tcp -d $GLOBALIP --dport 19000 -j DNAT --to $STAR1
$filter -t nat -A PREROUTING -p udp -d $GLOBALIP --dport 19000 -j DNAT --to $STAR1
$filter -t nat -A PREROUTING -p tcp -d $GLOBALIP --dport 19001 -j DNAT --to $STAR1
$filter -t nat -A PREROUTING -p udp -d $GLOBALIP --dport 19001 -j DNAT --to $STAR1
$filter -t nat -A PREROUTING -p udp -d $GLOBALIP --dport 20000:65000 -j DNAT --to $STAR1
$filter -t nat -A PREROUTING -p tcp -d $GLOBALIP --dport 20000:65000 -j DNAT --to $STAR1
I also had to modify the files /home/grid/setup.csh and setup.sh to fix the HOSTNAME and port range. I added, in each file:
setup.csh
setenv GLOBUS_TCP_PORT_RANGE "60000 65000"setup.sh
setenv GLOBUS_HOSTNAME="stars.if.usp.br"
export GLOBUS_TCP_PORT_RANGE="60000 65000"This assures that the port range opened in the firewall will correspond to those used in the GRID environment. Also, because I run the firewall in masquerade mode, I had to set the proper hostname, otherwise it will pick the machine name, and I do not want that to happen.
export GLOBUS_HOSTNAME="stars.if.usp.br"
GridCat and making things to work...
It is very interesting to add your grid node to GridCat. It is a map, just like MonaLisa but it performs periodical tests to your gatekeeper, making it easier to find out problems (and, if you got to this point, there should be a few of them)To add your gatekeeper to GridCat, go to http://osg.ivdgl.org/twiki/bin/view/Integration/GridCat
You will have to fill a form, following the instructions in the following link:
http://osg.ivdgl.org/twiki/bin/view/Documentation/OsgCEInstallGuide#OSG_Registration
If everything goes right, when your application is aproved you will show up in the GridGat Map, located http://osg-cat.grid.iu.edu:8080
well, this is were debuggins starts. Every 2-3 hours the GridCat tests their gatekeepers and assign a status light for each one, based on tests results. The tests are basically:
- Authentication test
- Hello world test
- Batch submition (depends on your batch system)
- submit a job
- query the status of the job
- canceling the job
- file transfer (gridFtp)
How to turn authentication and hello world to green?
This is the easiest... Need to map the following certificates to your grid map (/etc/grid-security/grid-mapfile)"/DC=org/DC=doegrids/OU=People/CN=Leigh Grundhoefer (GridCat) 693100" XXXXThe username 'XXXX' is the local username in your cluster... After this certificates were added to my mapfile the first two tests turned green
"/DC=org/DC=doegrids/OU=People/CN=Bockjoo Kim 740786" XXXX
How to turn the batch system test green
It seems that SGE is not the preferable batch system in the GRID... Too bad because it is really nice and SIMPLE. Because of this the OSG interface to OSG does not work right.... I hope the bugs are fixed in the next release but just to keep log of what I did (with a lot of hel) in case they forget to fix it :)- mis-ci-functions
- This file, located at $VDT_LOCATION/MIS-CI/etc/misci/ is responsible for checking your system basically every 10 minutes and extract information about your cluster. It uses the batch system to grab information. Of course, it does not work with SGE. Replace the file with the version 0.2.7, located here. Please check if your version is newer than this one before replacing...
- sge.pm
- This file is located at $VDT_LOCATION/globus/lib/perl/Globus/GRAM/JobManager/
- Please check the following
- In the BEGIN section
- if $SGE_ROOT, $SGE_CELL and the commands ($qsub, $qstat, etc) are defined properly
- In the submit section
- Locate the line
- $ENV{"SGE_ROOT"} = $SGE_ROOT;
- add the line
- $ENV{"SGE_CELL"} = $SGE_CELL;
- The same in the pool section
- In the clear section
- locate the line system("$qdel $job_id >/dev/null 2>/dev/null");
- replace for the following
- $ENV{"SGE_ROOT"}
= $SGE_ROOT;
$ENV{"SGE_CELL"} = $SGE_CELL;
$job_id =~ /(.*)\|(.*)\|(.*)/;
$job_id = $1;
system("$qdel $job_id");
Making the gridFTP to work
This was the most difficult part because of my firewall configuration and thanks google for making reseach in the web easier...Before, please check if the services are listed in your /etc/services file
globus-gatekeeper 2119/tcp # Added by the VDTIf not, add them...
gsiftp 2811/tcp # Added by the VDT
gsiftp2 2812/tcp # Added by the VDT
gsiftp 2811/udp # Added by the VDT
gsiftp2 2812/udp # Added by the VDT
I started testing file transfer between gatekeepers by logging into another gatekeeper, getting my proxy (grid-proxy-init) and do a file transfer with the command:
globus-url-copy -dbg file:///star/u/suaide/gram_job_mgr_13594.log gsiftp://stars.if.usp.br/home/star/c
The -dbg mean debug is turned on... Everything goes fine until it
starts transfering the data (STOR
/home/star/c). It hangs and times out. Researching on the web, I
found a bug report athttp://bugzilla.globus.org/globus/show_bug.cgi?id=1127
And a quote in the bottom of the page:
" ... The wuftp based gridftp server is not supported behind a firewall. The problem is in reporting the external IP address in the PASV response. You can see this by using the -dbg flag to globus-url-copy. You will see the the PASV response specifies your internal IP address.
The server should, however, work for clients using PORT. ..."
which means I am doommed... Researching more the web I found some solutions and what I did was:
- replace file /etc/xinetd.d/gsiftp
for this one
service gsiftp
{
     socket_type = stream
     protocol = tcp
     wait = no
     user = root
     instances = UNLIMITED
     cps = 400 10
     server = /auto/home/grid/vdt/sbin/vdt-run-gsiftp2.sh
     disable = no
} - restarted xinetd
- modified the file /hom/grid/globus/etc/gridftp.conf
to
# Configuration for file the new (3.9.5) GridFTP Server
inetd 1
log_level ERROR,WARN,INFO,ALL
log_single /auto/home/grid/globus/var/log/gridftp.log
hostname "XXX.XXX.XXX.XXX" - XXX.XXX.XXX.XXX is the IP of the gateway for the outside world
Now all tests are geen and I am happy and tired!!! There are still a few issues left, basically in the cluster information query (number of CPU's, batch queues, etc) that are related to mis-ci-functions (I think) and I will have a look latter.
Another important thing, if you plan to have a cluster running jobs from outside and making file transfers with gsiftp it is necessary that the directory /etc/grid-security is available in all machines in the cluster, even if they are not gatekeepers. Also, the grid setup should be executed in all the nodes (/home/grid/setup.csh). If not, when a job start running in one of the nodes and it attempts to transfer the file with globus-url-copy it will fail. The solution I used was to have the directory grid-security in the /home/grid and make symbolic links in all the nodes.
WSU
Grid Production
| Summary of Reconstruction Production on GRID | |
|
Dataset name |
Description |
Events | Submit Date |
Finish Date |
Number of jobs submitted |
Output size |
Efficiency |
Cluster or Site |
CPU in hours |
|---|---|---|---|---|---|---|---|---|---|
|
rcf1304 |
pp200/pythia6_410/55_65gev/cdf_a/y2006c/gheisha_on |
118K | 2007-06-11 |
2007-06-12 |
60 |
35GB |
98% |
pdsf.nersc.gov |
14hours |
|
rcf1302 |
pp200/pythia6_410/45_55gev/cdf_a/y2006c/gheisha_on |
118K | 2007-06-01 |
2007-06-02 |
60 |
29.4GB |
100% |
pdsf.nersc.gov |
14hours |
|
rcf1303 |
pp200/pythia6_410/35_45gev/cdf_a/y2006c/gheisha_on |
119K | 2007-06-02 |
2007-06-02 |
120 |
36.2GB |
97% |
pdsf.nersc.gov |
11hours |
|
rcf1306 |
pp200/pythia6_410/25_35gev/cdf_a/y2006c/gheisha_on |
393K | 2007-06-04 |
2007-06-06 |
200 |
119GB |
98% |
pdsf.nersc.gov |
41hours |
|
rcf1307 |
pp200/pythia6_410/15_25gev/cdf_a/y2006c/gheisha_on |
391K | 2007-06-06 |
2007-06-07 |
200 |
114GB |
98% |
pdsf.nersc.gov |
34hours |
|
rcf1308 |
pp200/pythia6_410/11_15gev/cdf_a/y2006c/gheisha_on |
416K | 2007-06-08 |
2007-06-10 |
210 |
115GB |
98% |
pdsf.nersc.gov |
39hours |
|
rcf1309 |
pp200/pythia6_410/9_11gev/cdf_a/y2006c/gheisha_on |
409K | 2007-06-10 |
2007-06-12 |
210 |
109GB |
98% |
pdsf.nersc.gov |
47hours |
|
rcf1310 |
pp200/pythia6_410/7_9gev/cdf_a/y2006c/gheisha_on |
420K | 2007-06-13 |
2007-06-14 |
210 |
107GB |
100% |
pdsf.nersc.gov |
31hours |
|
rcf1311 |
pp200/pythia6_410/5_7gev/cdf_a/y2006c/gheisha_on |
394K | 2007-06-14 |
2007-06-16 |
199 |
96GB |
98% |
pdsf.nersc.gov |
48hours |
|
rcf1317 |
pp200/pythia6_410/4_5gev/cdf_a/y2006c/gheisha_on |
683K | 2007-06-16 |
2007-06-19 |
343 |
158GB |
99% |
pdsf.nersc.gov |
69hours |
|
rcf1318 |
pp200/pythia6_410/3_4gev/cdf_a/y2006c/gheisha_on |
688K | 2007-06-19 |
2007-06-22 |
345 |
152GB |
100% |
pdsf.nersc.gov |
78hours |
|
rcf1319 |
pp200/pythia6_410/minbias/cdf_a/y2006c/gheisha_on |
201K | 2007-06-22 |
2007-06-23 |
120 |
21GB |
99% |
pdsf.nersc.gov |
13hours |
|
rcf1321 |
pp62/pythia6_410/3_4gev/cdf_a/y2006c/gheisha_on |
250K | 2007-06-25 |
2007-06-26 |
125 |
41GB |
100% |
pdsf.nersc.gov |
20hours |
|
rcf1320 |
pp62/pythia6_410/4_5gev/cdf_a/y2006c/gheisha_on |
400K | 2007-06-26 |
2007-06-27 |
200 |
67GB |
100% |
pdsf.nersc.gov |
28hours |
|
rcf1322 |
pp62/pythia6_410/5_7gev/cdf_a/y2006c/gheisha_on |
218K | 2007-06-24 |
2007-06-25 |
110 |
38GB |
100% |
pdsf.nersc.gov |
17hours |
|
rcf1323 |
pp62/pythia6_410/7_9gev/cdf_a/y2006c/gheisha_on |
220K | 2007-06-29 |
2007-06-30 |
110 |
39GB |
100% |
pdsf.nersc.gov |
18hours |
|
rcf1324 |
pp62/pythia6_410/9_11gev/cdf_a/y2006c/gheisha_on |
220K | 2007-06-30 |
2007-06-30 |
110 |
41GB |
100% |
pdsf.nersc.gov |
14hours |
|
rcf1325 |
pp62/pythia6_410/11_15gev/cdf_a/y2006c/gheisha_on |
220K | 2007-07-01 |
2007-07-02 |
110 |
41GB |
100% |
pdsf.nersc.gov |
19hours |
|
rcf1326 |
pp62/pythia6_410/15_25gev/cdf_a/y2006c/gheisha_on |
220K | 2007-07-03 |
2007-07-04 |
110 |
40GB |
100% |
pdsf.nersc.gov |
21hours |
|
rcf1327 |
pp62/pythia6_410/25_35gev/cdf_a/y2006c/gheisha_on |
220K | 2007-07-04 |
2007-07-05 |
110 |
38GB |
100% |
pdsf.nersc.gov |
18hours |
|
rcf1312 |
pp200/pythia6_410/7_9gev/bin1/y2004y/gheisha_on |
539K | 2007-07-13 |
2007-07-18 |
272 |
143GB |
99.6% |
pdsf.nersc.gov |
53hours |
|
rcf1313 |
pp200/pythia6_410/9_11gev/bin2/y2004y/gheisha_on |
758K | 2007-07-19 |
2007-07-22 |
380 |
203GB |
100% |
pdsf.nersc.gov |
72hours |
|
rcf1314 |
pp200/pythia6_410/11_15gev/bin3/y2004y/gheisha_on |
116K | 2007-07-31 |
2007-08-01 |
58 |
32GB |
100% |
pdsf.nersc.gov |
182hours |
|
rcf1315 |
pp200/pythia6_410/11_15gev/bin4/y2004y/gheisha_on |
420K | 2007-08-04 |
2007-08-05 |
210 |
119GB |
100% |
pdsf.nersc.gov |
527hours |
|
rcf1316 |
pp200/pythia6_410/11_15gev/bin5/y2004y/gheisha_on |
158K | 2007-08-08 |
2007-08-09 |
79 |
45GB |
100% |
pdsf.nersc.gov |
183hours |
| rcf1317 | pp200/pythia6_410/4_5gev/cdf_a/y2006c/gheisha_on | 683K | |||||||
| rcf1318 | pp200/pythia6_410/3_4gev/cdf_a/y2006c/gheisha_on | 688K | 2007-06-04 | 2007-06-04 | 360 | 83.4GB | 95.8% | fnal.gov | 619hours |
| rcf1319 | pp200/pythia6_410/minbias/cdf_a/y2006c/gheisha_on | 201K | 2007-06-04 | 2007-06-04 | 120 | 11.7GB | 100.0% | fnal.gov | 105hours |
| rcf1320 | pp62/pythia6_410/4_5gev/cdf_a/y2006c/gheisha_on | 400K | 2007-06-06 | 2007-06-06 | 200 | 35.7GB | 100.0% | fnal.gov | 241hours |
| rcf1321 | pp62/pythia6_410/3_4gev/cdf_a/y2006c/gheisha_on | 250K | 2007-06-06 | 2007-06-06 | 125 | 21.6GB | 100.0% | fnal.gov | 139hours |
| rcf1322 | pp62/pythia6_410/5_7gev/cdf_a/y2006c/gheisha_on | 218K | 2007-06-07 | 2007-06-07 | 110 | 20.1GB | 100.0% | fnal.gov | 114hours |
| rcf1323 | pp62/pythia6_410/7_9gev/cdf_a/y2006c/gheisha_on | 220K | 2007-06-07 | 2007-06-07 | 110 | 20.6GB | 100.0% | fnal.gov | 112hours |
| rcf1324 | pp62/pythia6_410/9_11gev/cdf_a/y2006c/gheisha_on | 220K | 2007-06-07 | 2007-06-07 | 110 | 20.6GB | 99.0% | fnal.gov | 124hours |
| rcf1325 | pp62/pythia6_410/11_15gev/cdf_a/y2006c/gheisha_on | 220K | 2007-06-07 | 2007-06-07 | 110 | 20.7GB | 100.0% | fnal.gov | 91hours |
| rcf1326 | pp62/pythia6_410/15_25gev/cdf_a/y2006c/gheisha_on | 220K | 2007-06-08 | 2007-06-08 | 110 | 20.2GB | 100.0% | fnal.gov | 132hours |
| rcf1327 | pp62/pythia6_410/25_35gev/cdf_a/y2006c/gheisha_on | 220K | 2007-06-08 | 2007-06-09 | 110 | 18.3GB | 100.0% | fnal.gov | 133hours |
| rcf1501 | pp200/pythia6_410/minbias/cdf_a/y2006g/gheisha_on | 1.99M | 2008-09-30 | 2008-11-12 | 1991 | 412GB | 99.6% | nersc.gov | 1,026hours |
| rcf1504 | 1DplusOnly/gkine/pt10/eta1_5/y2005g/gheisha_on | 1.097M | 2009-01-16 | 2009-02-10 | 1102 | 80.7GB | 99.9% | nersc.gov | 1,216hours |
| rcf9003 | pp200/pythia6_410/5_7gev/cdf_a/y2007g/gheisha_on | 389K | part grid and part local, because of urgency (high priority) | ec2.internal | |||||
| rcf9004 | pp200/pythia6_410/7_9gev/cdf_a/y2007g/gheisha_on | 408K | part grid and part local, because of urgency (high priority) | ec2.internal | |||||
| rcf9005 | pp200/pythia6_410/9_11gev/cdf_a/y2007g/gheisha_on | 401K | 200-03-07 | 2009-03-17 | 782 | 333.7GB | 99.10% | ec2.internal | 13,022hours |
| rcf9010 | pp200/pythia6_410/45_55gev/cdf_a/y2007g/gheisha_on | 118K | part grid and part local, because of urgency (high priority) | ec2.internal | |||||
| rcf9011 | pp200/pythia6_410/55_65gev/cdf_a/y2007g/gheisha_on | 119K | 2009-03-07 | 2009-03-11 | 295 | 108.4GB | 100% | ec2.internal | 8,060hours |
| rcf10020 | pp200/pythia6_422/2_3gev/tune100/y2005h/gheisha_on | 115K | 2010-4-07 | 2010-4-07 | 115 | 406.5GB | 99.1% | pdsf.nersc.gov | 946hours |
| pdsf10021 | pp200/pythia6_422/3_4gev/tune100/y2005h/gheisha_on | 114K | 2010-4-07 | 2010-4-09 | 115 | 438.4GB | 99.1% | pdsf.nersc.gov | 1,728hours |
| pdsf10022 | pp200/pythia6_422/4_5gev/tune100/y2005h/gheisha_on | 114K | 2010-4-08 | 2010-4-09 | 115 | 458.6GB | 99.1% | pdsf.nersc.gov | 1,926hours |
| pdsf10023 | pp200/pythia6_422/5_7gev/tune100/y2005h/gheisha_on | 116K | 2010-4-09 | 2010-4-12 | 115 | 983.1GB | 96.6% | pdsf.nersc.gov | 1,293hours |
| pdsf10024 | p200/pythia6_422/7_9gev/tune100/y2005h/gheisha_on | 1.19M | 2010-4-08 | 2010-4-17 | 1200 | 9615.4GB | 95.8% | pdsf.nersc.gov | 18,261hours |
| pdsf10025 | pp200/pythia6_422/9_11gev/tune100/y2005h/gheisha_on | 115K | 2010-4-10 | 2010-4-12 | 115 | 1018.4GB | 98.2% | pdsf.nersc.gov | 951hours |
| pdsf10026 | pp200/pythia6_422/11_15gev/tune100/y2005h/gheisha_on | 115K | 2010-4-12 | 2010-4-13 | 115 | 509.5GB | 94.6% | pdsf.nersc.gov | 965hours |
| pdsf10027 | pp200/pythia6_422/15_25gev/tune100/y2005h/gheisha_on | 112K | 2010-4-13 | 2010-4-14 | 115 | 466.0GB | 83.5% | pdsf.nersc.gov | 822hours |
| pdsf10028 | pp200/pythia6_422/25_35gev/tune100/y2005h/gheisha_on | 114K | 2010-4-13 | 2010-4-13 | 115 | 525.7GB | 89.5% | pdsf.nersc.gov | 999hours |
| pdsf10029 | pp200/pythia6_422/35_infgev/tune100/y2005h/gheisha_on | 104K | 2010-4-13 | 2010-4-14 | 115 | 521.9GB | 90.4% | pdsf.nersc.gov | 442hours |
| pdsf10030 |
AuAu7.7/hijing_382/B0_20/minbias/y2010a/gheisha_on |
1.02M | part grid and part local, becuase of urgency (high priority) | pdsf.nersc.gov | 129,939hours | ||||
| pdsf10031 |
AuAu11.5/hijing_382/B0_20/minbias/y2010a/gheisha_on |
400K | 2010-08-06 | 2010-08-14 | 2000 | 14,598GB | 94.5% | pdsf.nersc.gov | 95,938hours |
| pdsf10033 | AuAu7.7/hijing_382/B0_20/minbias/y2010a/gheisha_on | 3.0M | 2010-12-06 | 2011-01-30 | 15,300 | 10TB | 89.4% | pdsf.nersc.gov | 465,000hours |
| pdsf11010 | pp200/pythia6_423/minbias/highptfilt/y2005i/tune_pro_pt0 | 3.4M | 2011-02-14 | 2011-02-20 | 1,700 | 1.024TB | 97.17% | pdsf.nersc.gov | 22,022hours |
| pdsf11000 | pp200/pythia6_220/fmspi0filt/default/y2008e/gheisha_on | 1.2M | 2011-05-23 | 2011-06-01 | 600 | 403GB | 20% | pdsf.nersc.gov | 9,800hours |
| pdsf11001 | pp200/pythia6_220/minbias/default/y2008e/gheisha_on | 300K | 2011-05-21 | 2011-05-22 | 150 | 84GB | 100% | pdsf.nersc.gov | 600hours |
| pdsf11002 | dAu200/herwig_382/fmspi0filt/shadowing_on/y2008e/gheisha_on | 200K | 2011-06-02 | 2011-06-03 | 250 | 207GB | 88% | pdsf.nersc.gov | 2500hours |
| pdsf11003 | dAu200/herwig_382/fmspi0filt/shadowing_off/y2008e/gheisha_on | 200K | 2011-06-03 | 2011-06-04 | 250 | 233GB | 100% | pdsf.nersc.gov | 2500hours |
| pdsf11011 |
pp200/pythia6_423/highptfilt/jp2filt/y2005i/tune_pro_pt0 |
45M (100k filtered) |
2011-06-24 | 2011-07-14 | 4,500 | 653G | 88.8% | pdsf.nersc.gov | 67,500hours |
| pdsf11010 |
pp200/pythia6_423/minbias/highptfilt/y2005i/tune_pro_pt0 (Expanding statistics for preexisting dataset pdsf11010) |
30.3M |
part grid (2,940jobs) and part local, becuase of urgency (high priority) 2011-08-05 2011-08-26 5,500 8.50T(inc. .FZD) ??% |
pdsf.nersc.gov | 82,500hours | ||||
| pdsf11020 | tracker review 2012 | 1K | 2011-08-29 | 2011-09-05 | 10 | 484M | 100% | pdsf.nersc.gov | 7.8hours |
| pdsf11021 | tracker review 2012 | 10K | 2011-08-29 | 2011-09-05 | 100 | 27G | 100% | pdsf.nersc.gov | 600hours |
| pdsf11022 | tracker review 2012 | 10K | 2011-08-29 | 2011-09-06 | 250 | 102G | 98.00% | pdsf.nersc.gov | 2,500hours |
| pdsf11023 | tracker review 2012 | 10K | 2011-08-29 | 2011-09-08 | 700 | 332G | 98.14% | pdsf.nersc.gov | 3,500hours |
| pdsf11024 | tracker review 2012 | 10K | 2011-08-29 | 2011-09-05 | 100 | 28G | 100% | pdsf.nersc.gov | 900hours |
| pdsf11025 | tracker review 2012 | 10K | 2011-08-29 | 2011-09-05 | 100 | 5.1G | 100% | pdsf.nersc.gov | 200hours |
| pdsf11026 | tracker review 2012 | 10K | 2011-08-14 | 2011-08-16 | 200 | 94GB | 100% | pdsf.nersc.gov | 2,000hours |
| pdsf11027 | pending | pending | pending | pending | pending | pending | pending | pending | pending |
Notes:
Notes for getting file size from catalog:
* This method is an approximation because the .fzd files are not cataloged, however there size is about the same as the geant.root files so an approximation is done as:
[rcas6010] ~/> get_file_list.pl -keys 'sum(size)' -cond 'path~pp200/pythia6_422/2_3gev/tune100/y2005h/gheisha_on,storage=HPSS'
27758788009
[rcas6010] ~/> get_file_list.pl -keys 'sum(size)' -cond 'path~pp200/pythia6_422/2_3gev/tune100/y2005h/gheisha_on,filetype=MC_reco_geant,storage=HPSS'
14106791434
[rcas6010] ~/> echo `echo "(27758788009+14106791434)/100000000" | bc`" GB"
418 GB
The true dataset value is 406.5GB so there is a +2.75% error.
The dataset
description can be found at:
http://www.star.bnl.gov/public/comp/prod/MCProdList.html
#Example of getting the size
SELECT CONCAT(SUM(size_workerNode) / 1000000000 , 'GB')
FROM MasterIO f
WHERE f.`jobID_MD5` = 'C88562E422AF05783ACF43F6172DC95A';
#Example of fining Start Time
SELECT j.`jobID_MD5`, j.`submitTime`, f.`name_requester`
FROM MasterIO f, MasterJobEfficiency j
WHERE f.`jobID_MD5` = 'C88562E422AF05783ACF43F6172DC95A'
AND f.`jobID_MD5`= j.`jobID_MD5`
AND f.`name_requester` IS NOT NULL
ORDER BY `submitTime` ASC
LIMIT 3;
#Example of fining end time
SELECT j.`jobID_MD5`, j.`endTime`, f.`name_requester`
FROM MasterIO f, MasterJobEfficiency j
WHERE f.`jobID_MD5` = 'C88562E422AF05783ACF43F6172DC95A'
AND f.`jobID_MD5`= j.`jobID_MD5`
AND f.`name_requester` IS NOT NULL
ORDER BY `endTime` DESC
LIMIT 3;
Notes finding the number if events from catalog:
[rcas6010] ~/> get_file_list.pl -keys 'sum(events)' -cond 'path~pp200/pythia6_422/2_3gev/tune100/y2005h/gheisha_on,filetype=MC_reco_geant,storage=HPSS'
115000
*Note select only one type of file ( filetype=MC_reco_geant ), else you will be double counting.
#Example of getting the production Efficiency:
SELECT concat(
((SELECT count(*) AS jobsCount FROM MasterJobEfficiency j
WHERE submitAttempt = 1
AND overAllState = 'success'
AND j.`jobID_MD5` = 'C88562E422AF05783ACF43F6172DC95A'
) * 100 ) /
(SELECT count(*) AS jobsCount FROM MasterJobEfficiency j
WHERE submitAttempt = 1
AND j.`jobID_MD5` = 'C88562E422AF05783ACF43F6172DC95A'
),'%');
#Example of getting the run time. Note there is a filter for run-way jobs:
SELECT AVG((`endTime` - `startTime`) / 60 / 60) FROM MasterJobEfficiency f
WHERE endTime > 0
AND startTime > 0
AND ((`endTime` - `startTime`) / 60 / 60) < 200
AND f.`jobID_MD5` = 'C88562E422AF05783ACF43F6172DC95A';
Monitoring
Metrics and Accounting
Lets try to post the grid metrics and accounting info here.- SUMS Grid Job Statistics
- Lidia's job status URL's:
daily jobs submission status
plots with job efficiency - OSG ML reporting for the STAR VO
SUMS and Grid snapshots
On this page, we will save snapshots of how SUMS "sees" the Grid utilization.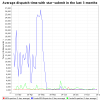
MySQL project activities
The STAR MySQL for GRID project is an effort to integrate MySQL database in the GRID infrastructure. This means providing tools to help management of networks of replicated database and providing GSI authentication for MySQL connection.
The current subprojects are:
Slides of the presentation given at LBL. They give a summary of the scope and the aims of this project.
Two version are posted: PowerPoint and HTML
Gabriele Carcassi - Richard Casella
GSI Enabled MySQL
Grid Security Infrastructure (GSI) is the mechanism used by the Globus Toolkit for enabling secure authentication and communication for a Grid over an open network. GSI provides a number of useful services for Grids, including mutual authentication and single sign-on. For detailed information regarding GSI you can read the GSI overview from Globus. Enabling MySQL to use GSI security and authentication will enable Grid users with grid proxy certificates to securely communicate with MySQL daemons on the grid without having to do further authentication. Processes that have been scheduled and initiated on the grid by an authenticated user will be able to communicate with MySQL daemons as well without further authentication.GSI
GSI uses X.509 certificates and SSL providing:- secure communication
- security across organizational boundaries
- single sign-on for users of the Grid
MySQL
As of version 4.0.0, MySQL is both SSL and X.509 enabled.By default, MySQL is not SSL enabled, since using encrypted connections to access the database would slow down transactions and MySQL is, by default, optimized fo speed. Read the MySQL documentation on Using Secure Connections for details on how to set up MySQL for SSL, including how to create and set up the user certificates and grant the proper privleges for a user to authenticate.
The current implementation requires that the Certificate Authority (CA) certificate which signs the user and server certificates be available for the SSL/X.509 configuration to work. This is fine for applications which do not work with GSI enabled applications. It does not, howerver fit with the GSI model for authentication. The CA only need sign user and service certificates to use GSI. An example of a successful implementation of GSI using SSL on legacy software is the GSI Enabled OpenSSH.
Testing
- MySQL with SSL and X.509 Certificates
- GSI Enabled OpenSSH
Presentations
Richard A. Casella
GSI Enabled MySQL - Testing
To Grid-enable MySQL is to allow client authentication using X509 certificates as used in the Globus Toolkit. Using the X509 certificates issued by the Globus Toolkit CA will alleviate the need for the client to authenticate separately after issuing the "grid-proxy-init" command. To do this in MySQL, one needs to connect over an SSL encrypted channel. This document will outline the steps needed to prepare MySQL for such connections, demonstrate a simple Perl DBI script which accomplishes the connection, and discuss future plans for testing and implementation.Setup
- MySQL For a more in-depth explanation of the why's and how's, see the MySQL documentation. What is included here are exerpts and observations from that documentation.
- Build MySQL with SSL enabled. The following conditions apply to MySQL 4.0.0 or greater. If you are running an older version, you should definitely check the documentation mentioned above.
- Install OpenSSL Library >= OpenSSL 0.9.6
- Configure and build with options --with-vio --with-openssl
- Check that your server supports OpenSSL by examining if
SHOW VARIABLES LIKE 'have_openssl' returns
YES - X509 Certificates Check documentation for more detailed explanation of key creation.
- Setup. First create a directory for the keys, copy and modify openssl.cnf
- Certificate Authority openssl req -new -keyout cakey.pem -out $PRIV/cacert.pem -config $DIR/openssl.cnf
- Server Request and Key
- Client Request and Key
- Init Files MySQLd needs to be made aware of the certificates at start-up time. MySQLd reads /etc/my.cnf at start-up time. Add the following lines (be sure to replace $DIR with the actuaal location) to /etc/my.cnf
- Grant Options Again, the MySQL documentation should be consulted, but basically, the following options are added to the grant options in the user table of the mysql database. Not all of the following options have been tested at this time, but they will be before all is said and done. These options are added as needed in the following manner...
	      DIR=~/openssl
              PRIV=$DIR/private
              mkdir $DIR $PRIV $DIR/newcerts
              cp /usr/share/openssl.cnf $DIR/openssl.cnf
              replace .demoCA $DIR -- $DIR/openssl.cnf
	      openssl req -new -keyout $DIR/server-key.pem -out $DIR/server-req.pem \
                 -days 3600 -config $DIR/openssl.cnf
	      openssl rsa -in $DIR/server-key.pem -out $DIR/server-key.pem
	      openssl ca -policy policy_anything -out $DIR/server-cert.pem \
                 -config $DIR/openssl.cnf -infiles $DIR/server-req.pem
	      openssl req -new -keyout $DIR/client-key.pem -out $DIR/client-req.pem \
                -days 3600 -config $DIR/openssl.cnf
	      openssl rsa -in $DIR/client-key.pem -out $DIR/client-key.pem
	      openssl ca -policy policy_anything -out $DIR/client-cert.pem \
                -config $DIR/openssl.cnf -infiles $DIR/client-req.pem
	      [server]
	      ssl-ca=$DIR/cacert.pem
	      ssl-cert=$DIR/server-cert.pem
	      ssl-key=$DIR/server-key.pem
	      [client]
	      ssl-ca=$DIR/cacert.pem
	      ssl-cert=$DIR/client-cert.pem
	      ssl-key=$DIR/client-key.pem
	  mysql> GRANT ALL PRIVILEGES ON test.* to username@localhost
	      -> IDENTIFIED BY "secretpass" REQUIRE SSL;
- REQUIRE SSL limits the server to allow only SSL connections
REQUIRE X509 "issuer"means that the client should have a valid certificate, but we do not care about the exact certificate, issuer or subjectREQUIRE ISSUERmeans the client must present a valid X509 certificate issued by issuer "issuer".REQUIRE SUBJECT "subject"requires clients to have a valid X509 certificate with the subject "subject" on it.REQUIRE CIPHER "cipher"is needed to ensure strong ciphers and keylengths will be used. (ie.REQUIRE CIPHER "EDH-RSA-DES-CBC3-SHA")
-ssl, then build and install it
on the machine where you will be running your Perl code.
Testing
**Richard A. Casella -