11 Nov
November 2009 posts
2009.11.02 Jason EEMC geometry: results with and without LOW_EM options
Monte-Carlo setup:
- One photon per event
- Disabled SMD layers (EXPS EBLS EFLS) in Jason geometry
geometry configurations with and without LOW_EM option
(using Victor's geometry fix)- Throw particles flat in eta (1.08, 2.0), phi (0, 2pi), and pt (6-10 GeV)
- Using A2Emaker to get reconstructed Tower/SMD energy
(no EEMC SlowSimulator in chain) - Vertex z=0
- ~50K/per particle type
- Non-zero energy: 3 sigma above pedestal
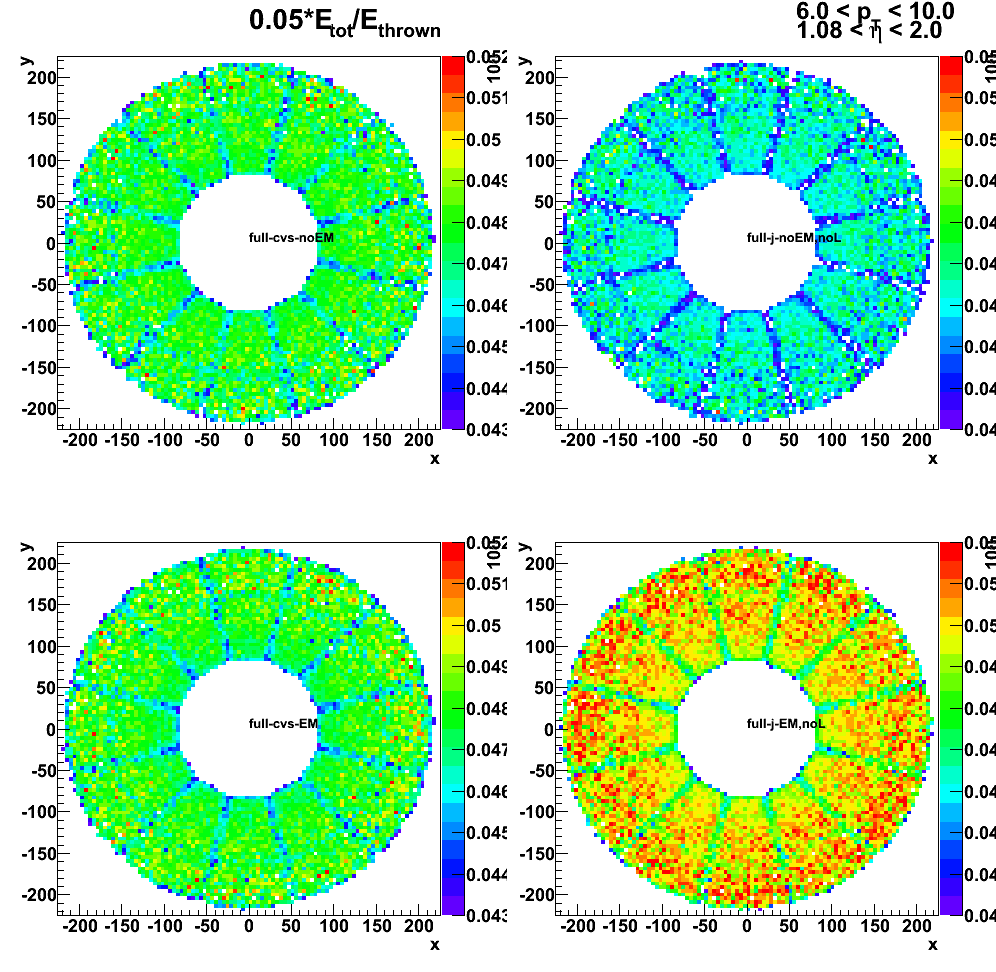
Geometry configurations and notations (shown in the center of the plot):
- full-cvs-noEM (dashed): CVS geometry (cAir-fixed) without LOW_EM option
- full-cvs-EM (solid): CVS geometry (cAir-fixed) with LOW_EM option
- full-j-NoEM-noL: Jason geometry (disabled 3-new SMD layers) without LOW_EM option
- full-j-EM-noL: Jason geometry (disabled 3-new SMD layers) with LOW_EM option
Figure 1: Distribution of the sampling fraction (total energy in EEMC)
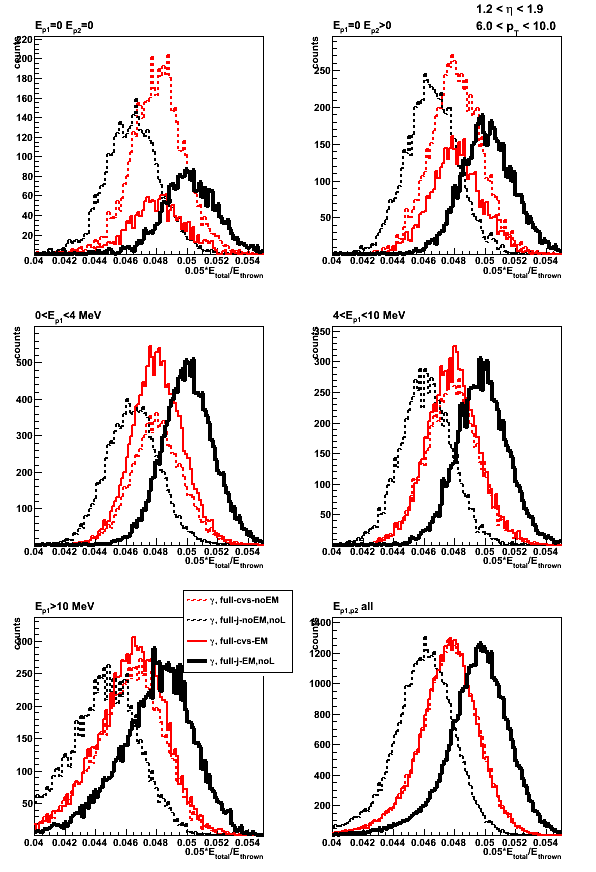
Figure 2: Sampling fraction (total energy in EEMC) vs. thrown energy

Figure 3: Sampling fraction (total energy in EEMC) vs. position of the thrown photon
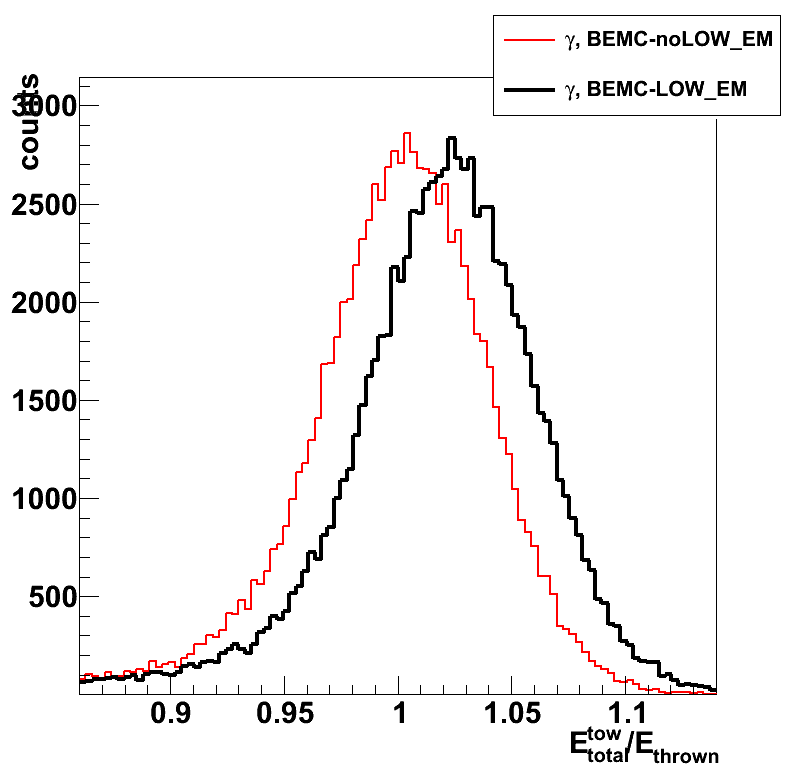
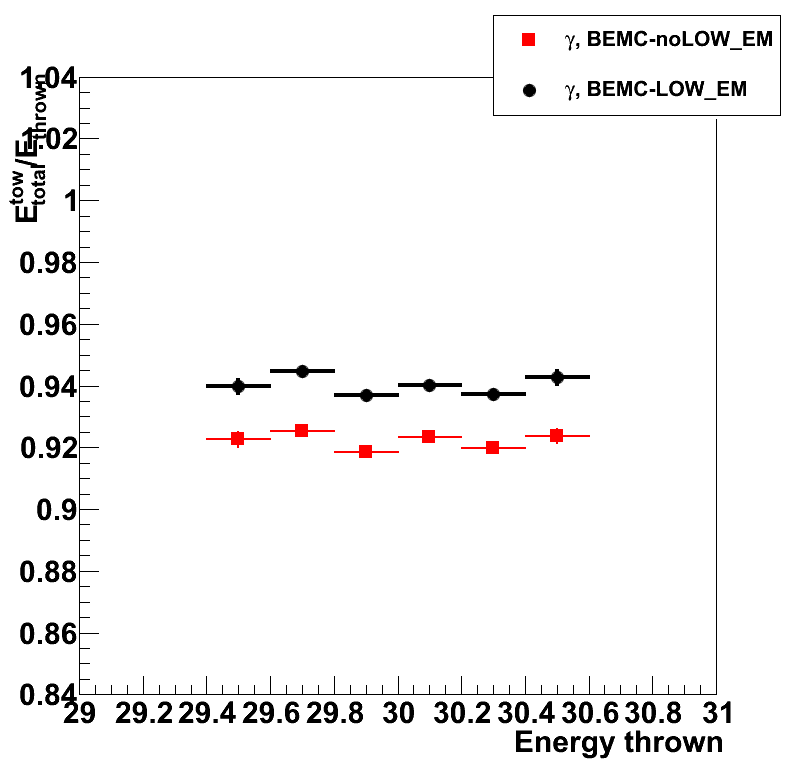
2009.11.03 BEMC sampling fraction: with and without LOW_EM option
Monte-Carlo setup:
- Throwing one photon per event
- Full STAR geometry (y2006g) configurations with and without LOW_EM option.
Note: LOW_EM cuts are listed at the bottom of this page,
and some related discussion can be found in this phana thread - Throw particles flat in eta (-1,1), phi (0, 2pi), and energy (30 +/- 0.5 GeV)
- Vertex z=0
- 50K/per particle type
Geometry configurations and notations:
- BEMC-noLOW_EM: Full STAR y2006g without LOW_EM option
- BEMC-LOW_EM: Full STAR y2006g with LOW_EM option
data base settings (same settings in bfc.C (Jan's trick) and in my MuDst reader):
dbMk->SetFlavor("sim","bemcPed");
dbMk->SetFlavor("Wbose","bemcCalib");
dbMk->SetFlavor("sim","bemcGain");
dbMk->SetFlavor("sim","bemcStatus");
dbMk->SetFlavor("sim","bprsPed");
dbMk->SetFlavor("Wbose","bprsCalib");
dbMk->SetFlavor("sim","bprsGain");
dbMk->SetFlavor("sim","bprsStatus");
dbMk->SetFlavor("sim","bsmdePed");
dbMk->SetFlavor("Wbose","bsmdeCalib");
dbMk->SetFlavor("sim","bsmdeGain");
dbMk->SetFlavor("sim","bsmdeStatus");
dbMk->SetFlavor("sim","bsmdpPed");
dbMk->SetFlavor("Wbose","bsmdpCalib");
dbMk->SetFlavor("sim","bsmdpGain");
dbMk->SetFlavor("sim","bsmdpStatus");
Note: for BEMC ideal pedSigma set to 0, so effectively
there is no effect when I apply 3-sigma threshold above pedestal.
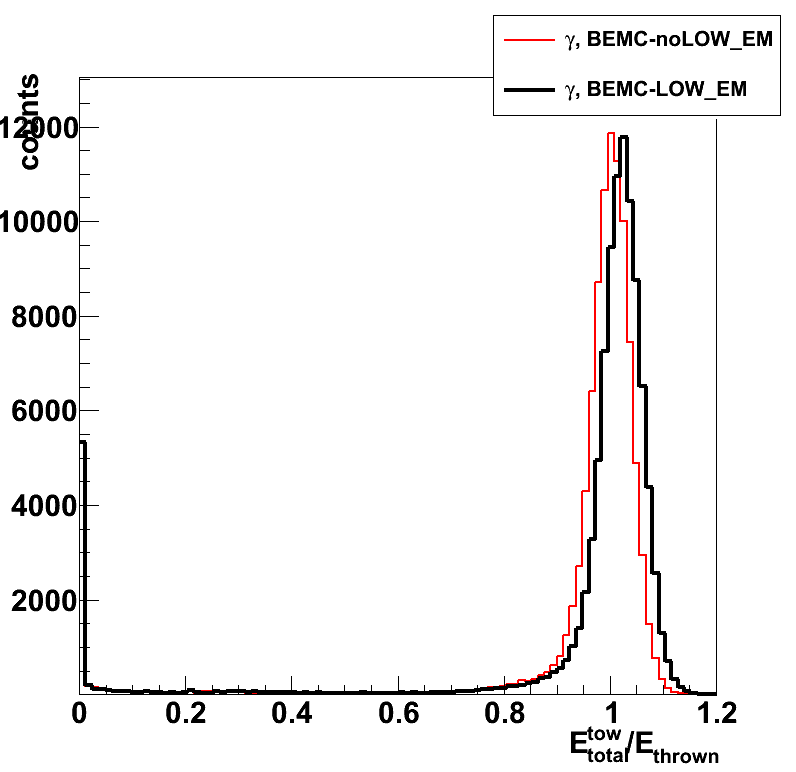
Figure 1: E_reco/E_thrown distribution.
E_reco is the total energy in the BEMC towers from mMuDstMaker->muDst()->muEmcCollection()
E_thrown energy of the thrown photon from tne GEant record
No cut (yet) applied to exclude otliers in the average
Outliers in E_reco/E_thrown
Figure 2: Average E_reco/E_thrown vs. thrown photon eta (left) and phi (right)
Average is taken over a slice in eta or phi (no gaussian fits)
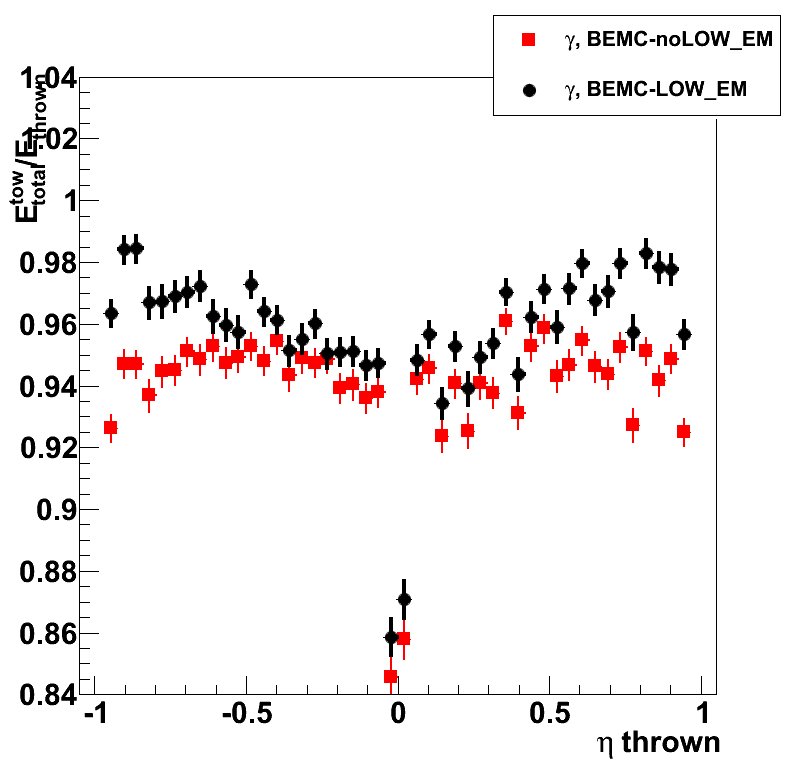
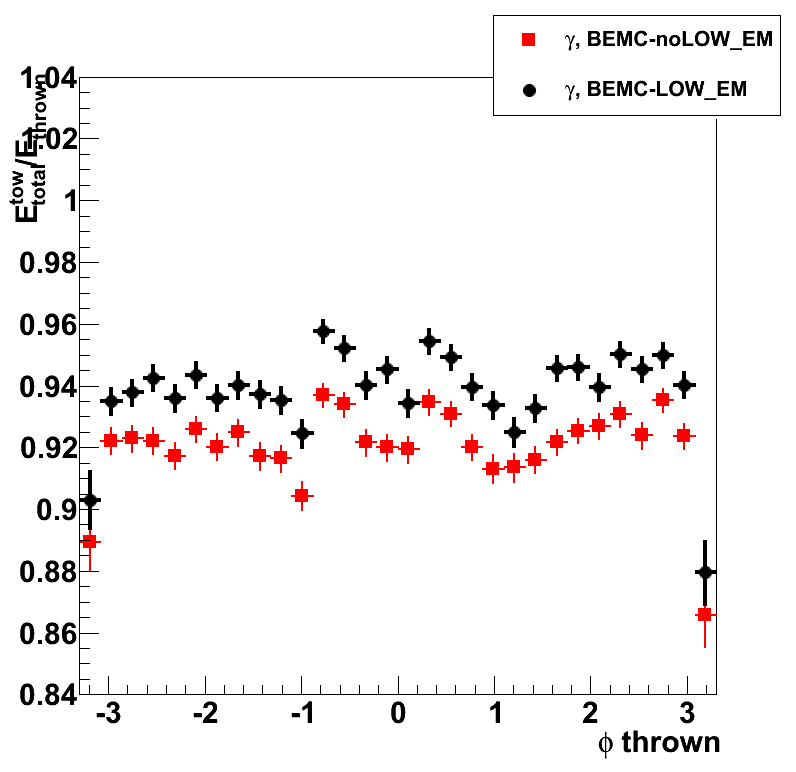
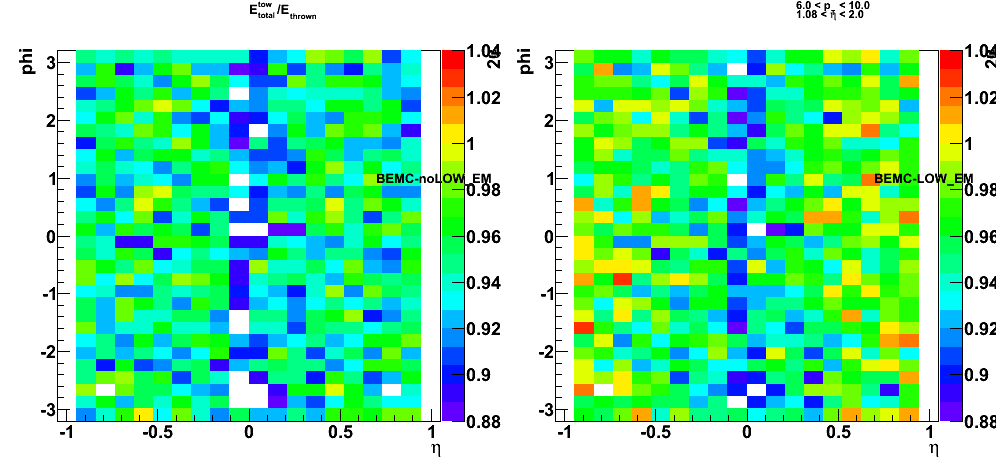
Figure 3: Average E_reco/E_thrown vs. thrown position (eta and phi)
Left: without LOW_EM option; right: with LOW_EM option
No cut applied to exclude otliers
2009.11.03 Jason EEMC geometry: Effect of ELED block change
Monte-Carlo setup:
- One photon per event
- Disabled SMD layers (EXPS EBLS EFLS) in Jason geometry
- Alter the ELED block (lead absorber plate) in Jason geometry file
- Full STAR geometry configurations with and without LOW_EM option
(using Victor's geometry fix) - Throw particles flat in eta (1.08, 2.0), phi (0, 2pi), and pt (6-10 GeV)
- Using A2Emaker to get reconstructed Tower/SMD energy
(no EEMC SlowSimulator in chain) - Vertex z=0
- ~50K/per particle type
- Non-zero energy: 3 sigma above pedestal
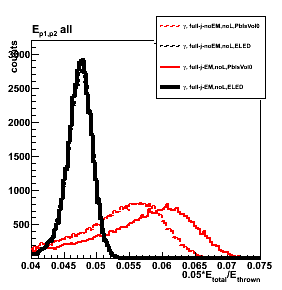
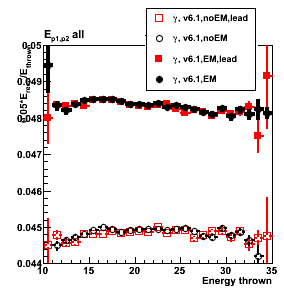
Figure 1: Sampling fraction (total energy in EEMC)
- Solid symbols and lines present results with LOW_EM option
Note: the black are the same in left and right plots - Open/dashed symbols and lines - results without LOW_EM option
- Upper plots - distribution of the sampling fcation
- Lower plots - Sampling fcation vs. thrown photon energy
- Left plots: CVS geometry vs. Jason with removed extra SMD layers.
ELED block is the same in all 4 cases, and is taken from CVS file.
in red: CVS geometry, in black - Jason geometry - Right plots:
Jason with new ELED block (in red) vs. Jason with ELED block from CVS (in black)
Extra SMD layers are removed in all 4 cases

Figure 2: Sampling fraction (total energy in EEMC)
black: same black as in Fig. 1, upper plots
red: EEMC geometry with Material PbAlloy isvol=0
(modification suggested by Jason in this post)
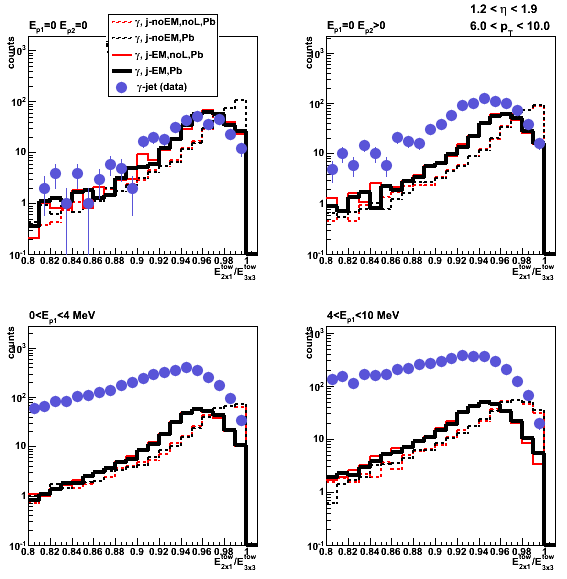
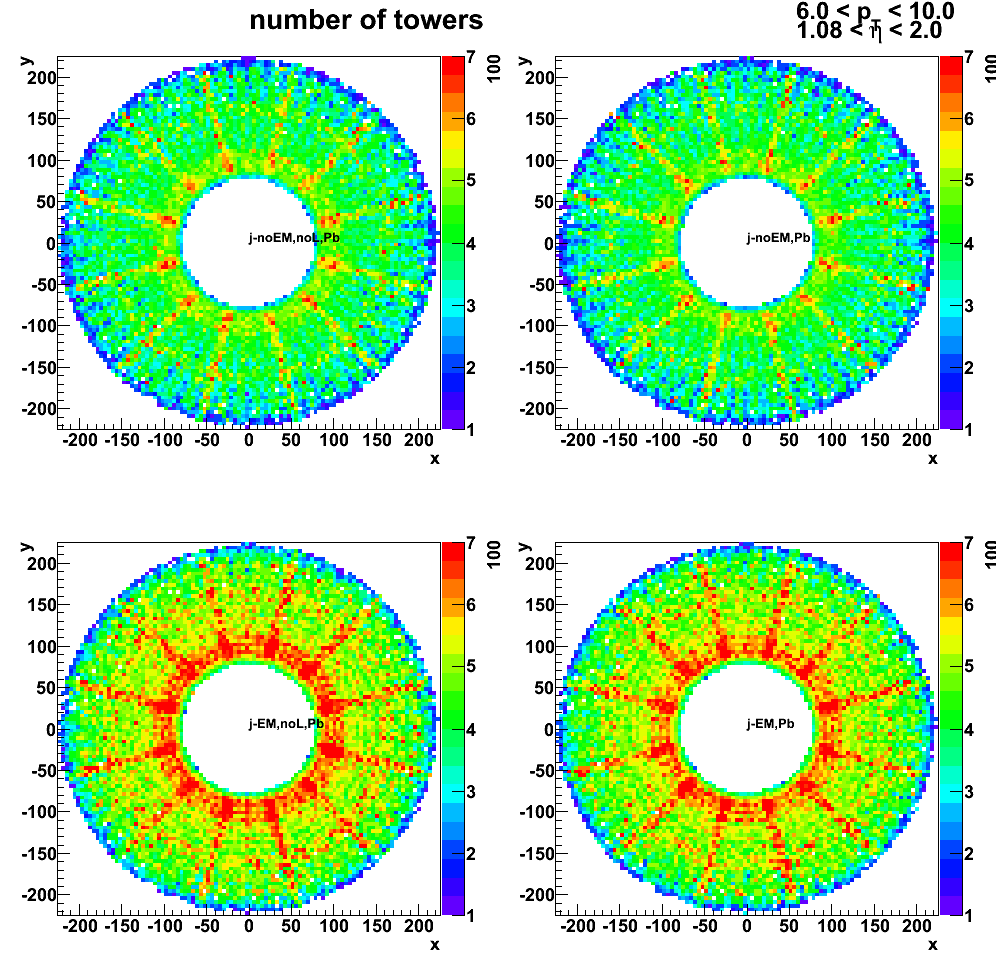
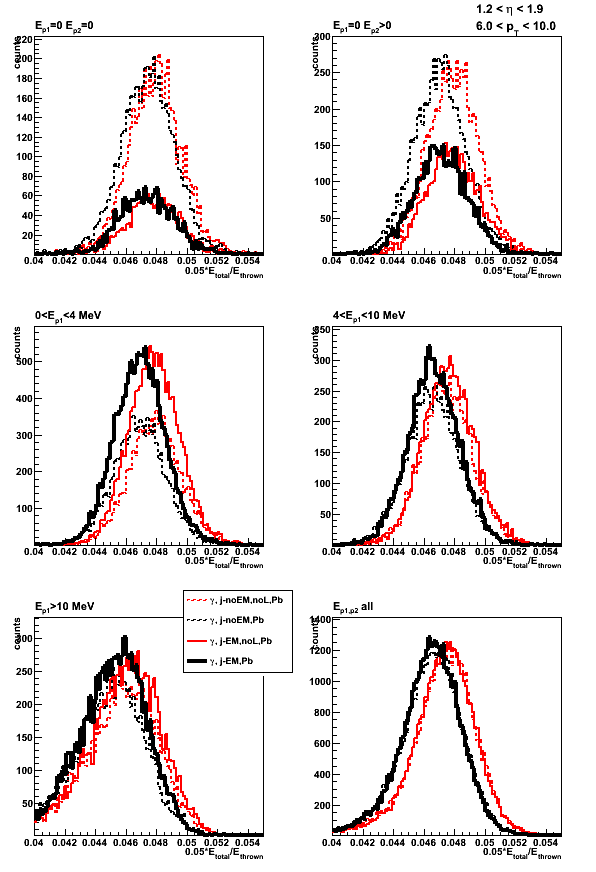
2009.11.06 new EEMC geometry: Pure lead and new SMD layers
Monte-Carlo setup:
- One photon per event
- Disabled/Enabled SMD layers (EXPS EBLS EFLS) in Jason geometry
- Alter the ELED block with pure lead
- Full STAR geometry configurations with and without LOW_EM option
(using Victor's geometry fix) - Throw particles flat in eta (1.08, 2.0), phi (0, 2pi), and pt (6-10 GeV)
- Using A2Emaker to get reconstructed Tower/SMD energy
(no EEMC SlowSimulator in chain) - Vertex z=0
- ~50K/per particle type
- Non-zero energy: 3 sigma above pedestal
Geometry configurations
- dashed/open red (j-noEM,noL,Pb):
full STAR y2006, no LOW_EM, Jason EEMC geometry without new SMD layers, pure lead in ELED block - solid red (j-EM,noL,Pb):
full STAR y2006, LOW_EM, Jason EEMC geometry without new SMD layers, pure lead in ELED block - dashed/open black (j-noEM,Pb):
full STAR y2006, no LOW_EM, Jason EEMC geometry with new SMD layers, pure lead in ELED block - solid black (j-EM,Pb):
full STAR y2006, LOW_EM, Jason EEMC geometry with new SMD layers, pure lead in ELED block
Sampling fraction of various EEMC layers (tower, SMD, pre1-,pre2-, post- shower)
Figure 1: Tower sampling fraction distribution
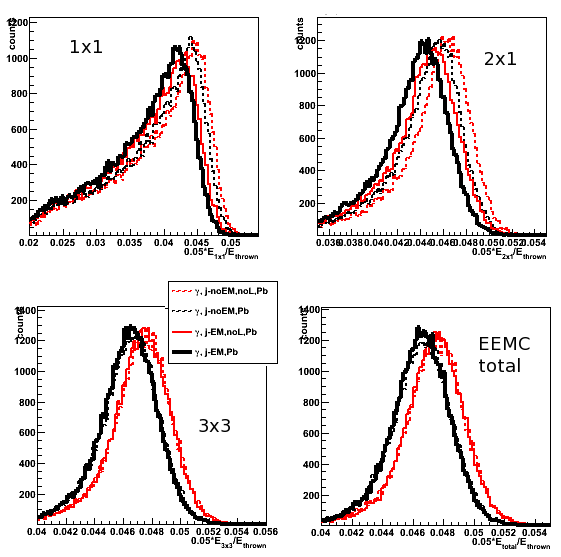
Figure 2: Tower sampling fraction vs. thrown energy
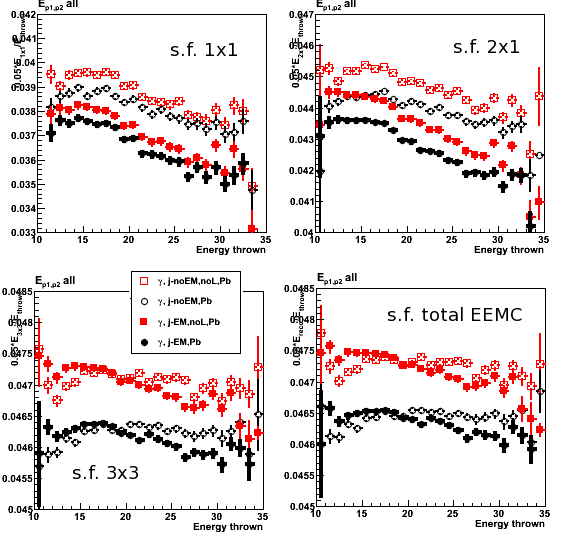
Figure 3: Tower sampling fraction vs. position of the thrown photon
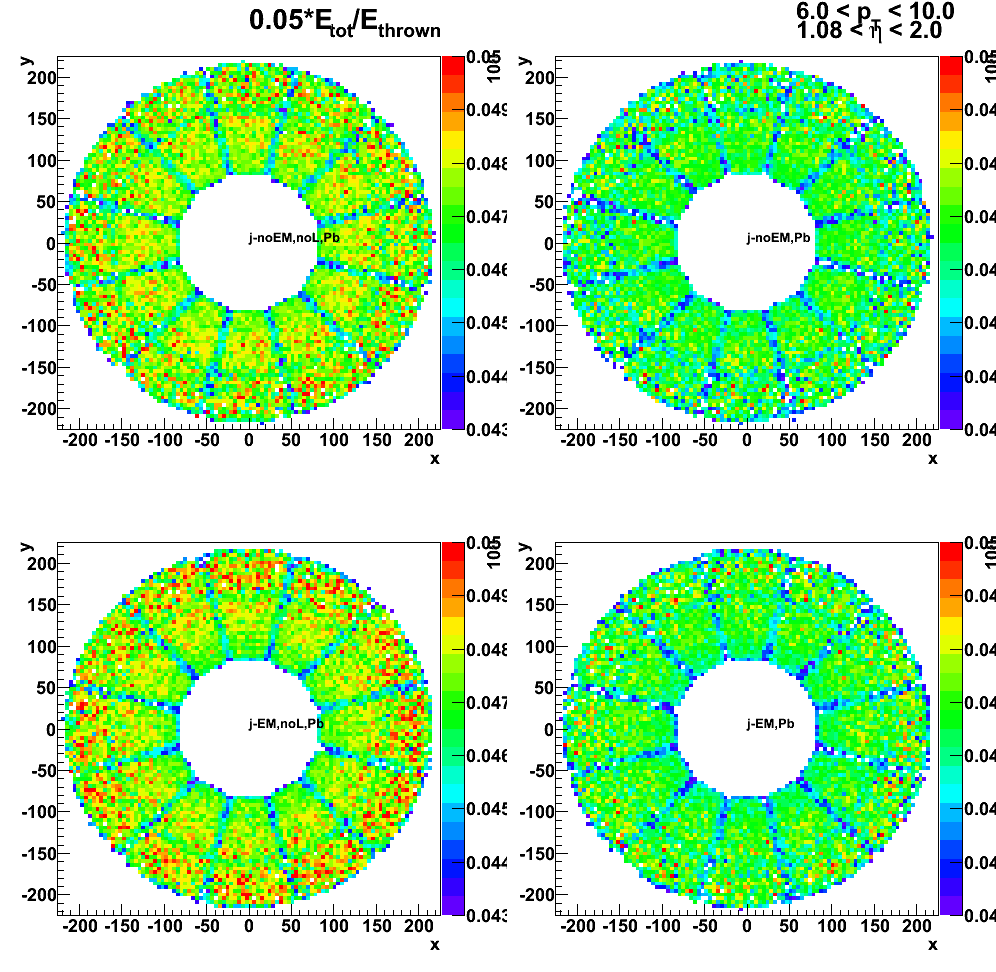
Figure 4: Pre1, pre2, post and SMD sampling fraction distribution
Figure 5: Pre1, pre2, post and SMD sampling fraction vs. thrown energy
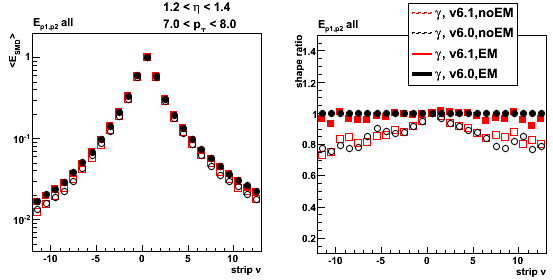
SMD shower shapes
Figure 6: SMD-v shower shapes

Figure 7: SMD-v shower shape ratios
Figure 8: Number of SMD-u strips

Figure 9: Number of SMD-v strips
Tower energy profile
Figure 10: Energy ractio of 2x1 to 3x3 cluster vs. gamma-jet data
Energy deposition in various EEMC layers vs. position of the thrown photon
Figure 11: Pre-shower1 energy
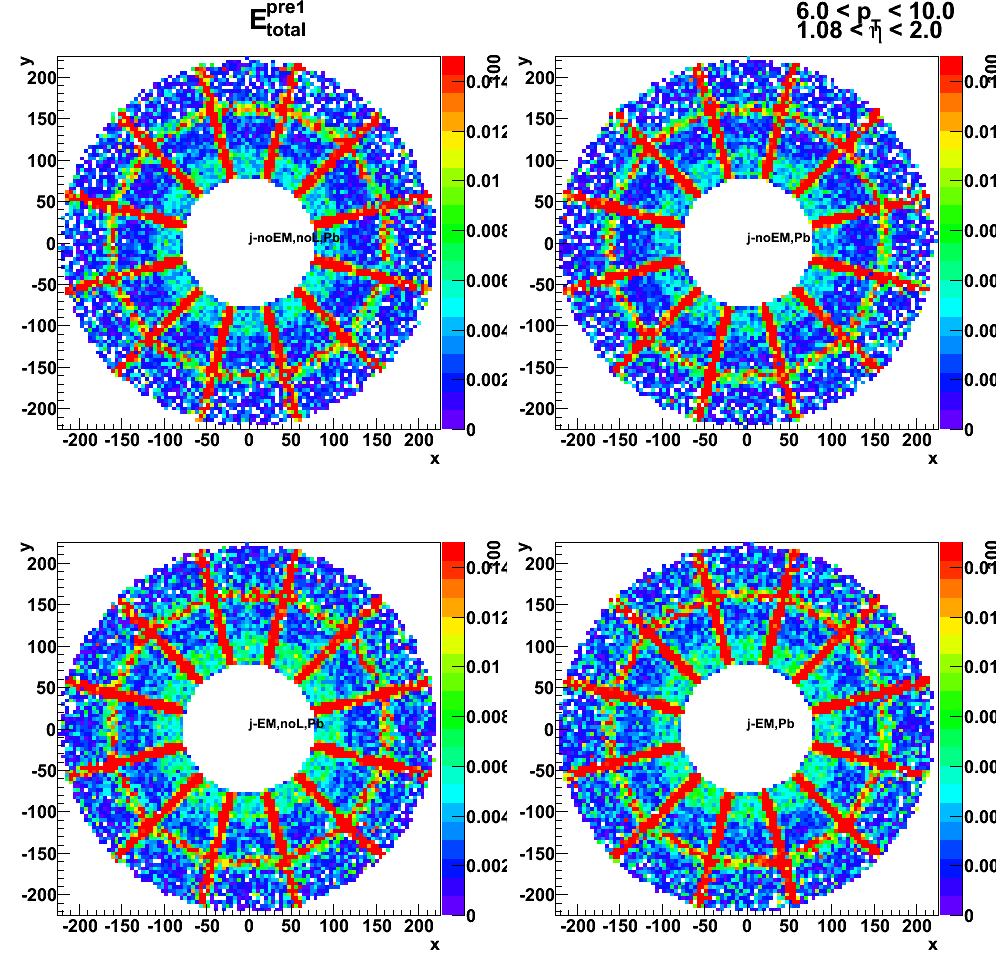
Figure 12: Pre-shower2 energy
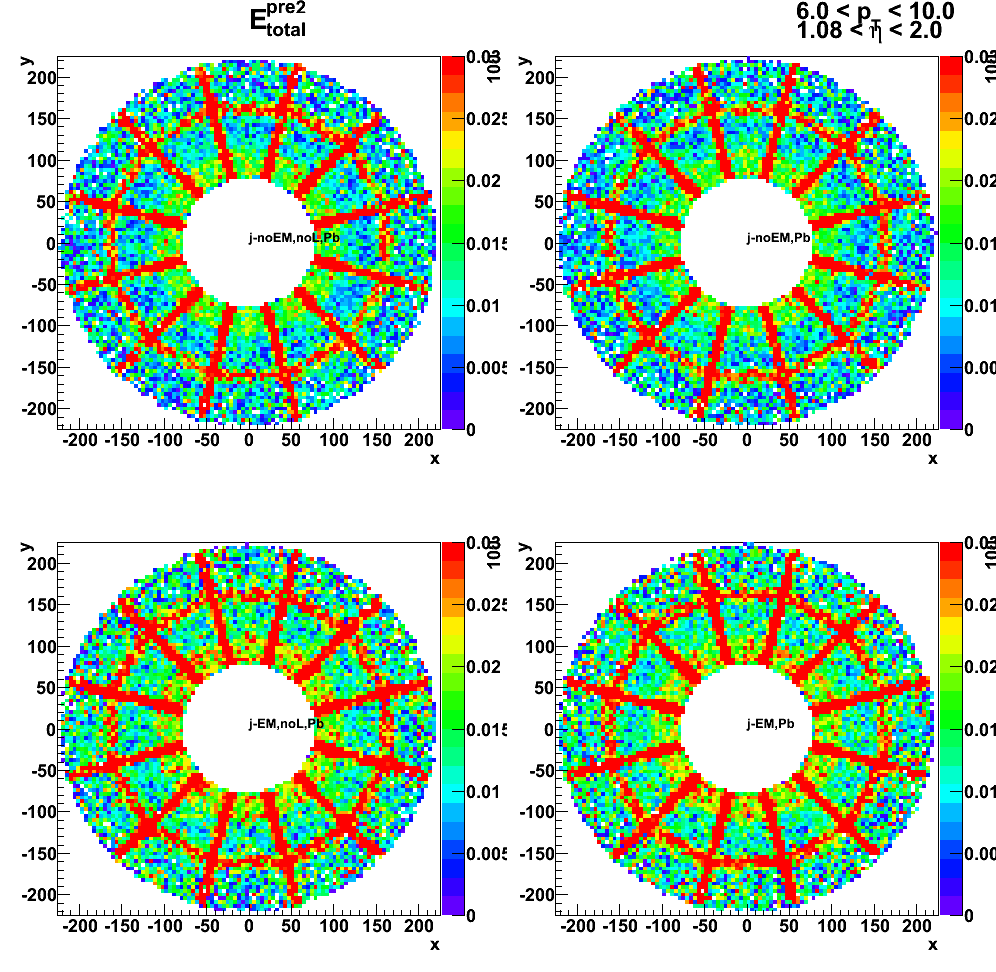
Figure 13: Post-shower energy
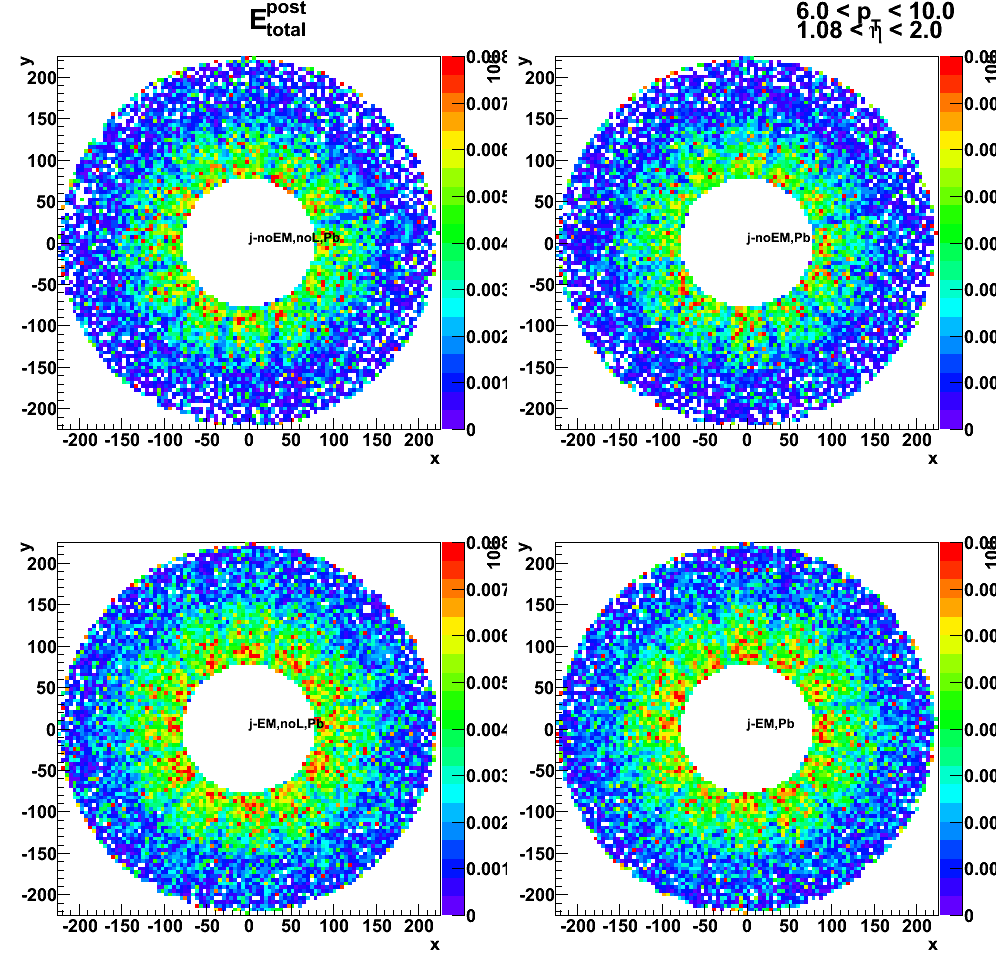
Figure 14: SMD-v energy
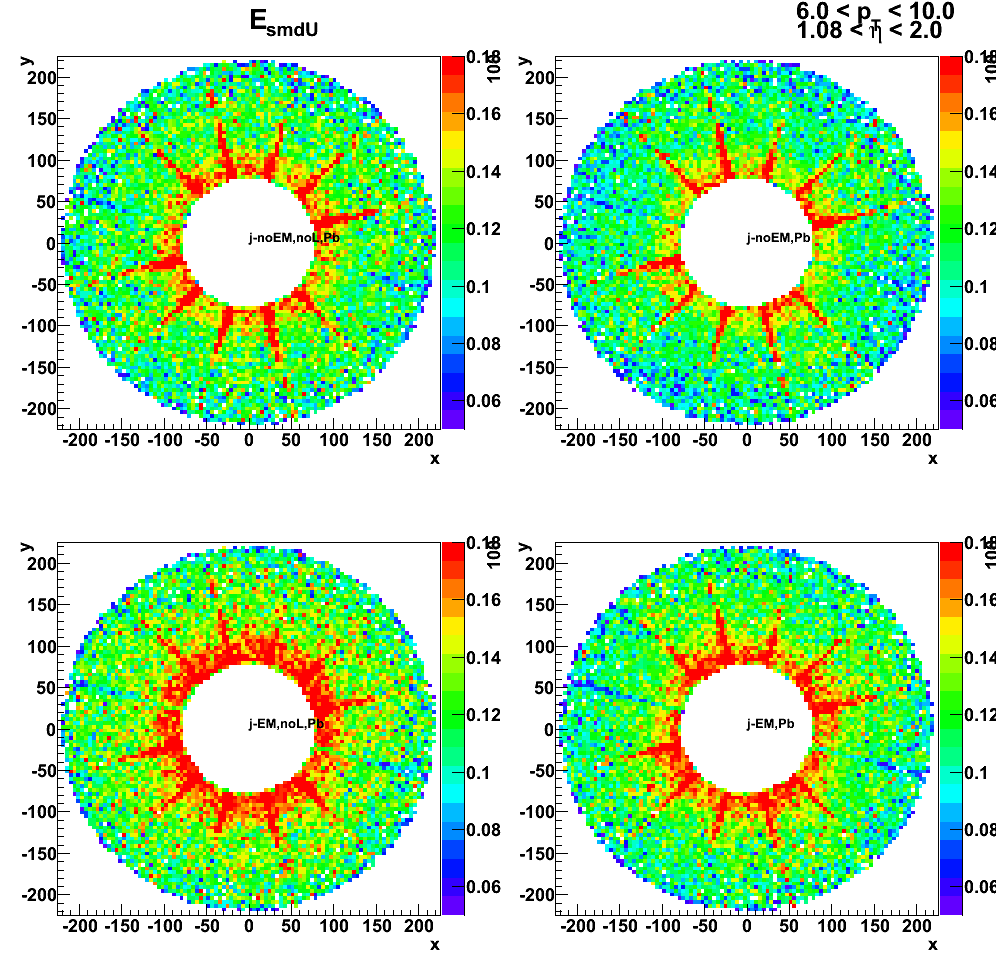
Figure 15: Number of towers
LOW_EM option and pre-shower migration
Figure 16: Tower Sampling fraction: LOW_EM option and pre-shower migration
2009.11.10 BEMC sampling fraction and clustering
Monte-Carlo setup:
- Throwing one photon per event
- Full y2009 STAR geometry configurations with and without LOW_EM option.
Note: LOW_EM cuts are listed at the bottom of this page,
and some related discussion can be found in this phana thread - Throw particles flat in eta (-0.95,0.05) amd (0.05, 0.95), phi (0, 2pi), and energy (30 +/- 0.5 GeV)
- bfc.C options:
trs,fss,y2009,Idst,IAna,l0,tpcI,fcf,ftpc,Tree,logger,ITTF,Sti,MakeEvent,McEvent,
geant,evout,IdTruth,tags,bbcSim,tofsim,emcY2,EEfs,
GeantOut,big,-dstout,fzin,-MiniMcMk,beamLine,clearmem,eemcDB,VFPPVnoCTB - Use fixed (7%) sampling fraction in StEmcSimpleSimulator.cxx
mSF[0] = 1/0.07;
mSF[1] = 0.;
mSF[2] = 0.; - Vertex z=0
- 50K/per particle type
Geometry configurations and notations:
- BEMC-noLOW_EM: Full STAR y2009 without LOW_EM option
- BEMC-LOW_EM: Full STAR y2009 with LOW_EM option
data base settings (same settings in bfc.C (Jan's trick) and in my MuDst reader):
dbMk->SetFlavor("sim","bemcPed");
dbMk->SetFlavor("Wbose","bemcCalib");
dbMk->SetFlavor("sim","bemcGain");
dbMk->SetFlavor("sim","bemcStatus");
Note: for BEMC ideal pedSigma set to 0, so effectively
there is no effect when I apply 3-sigma threshold above pedestal.
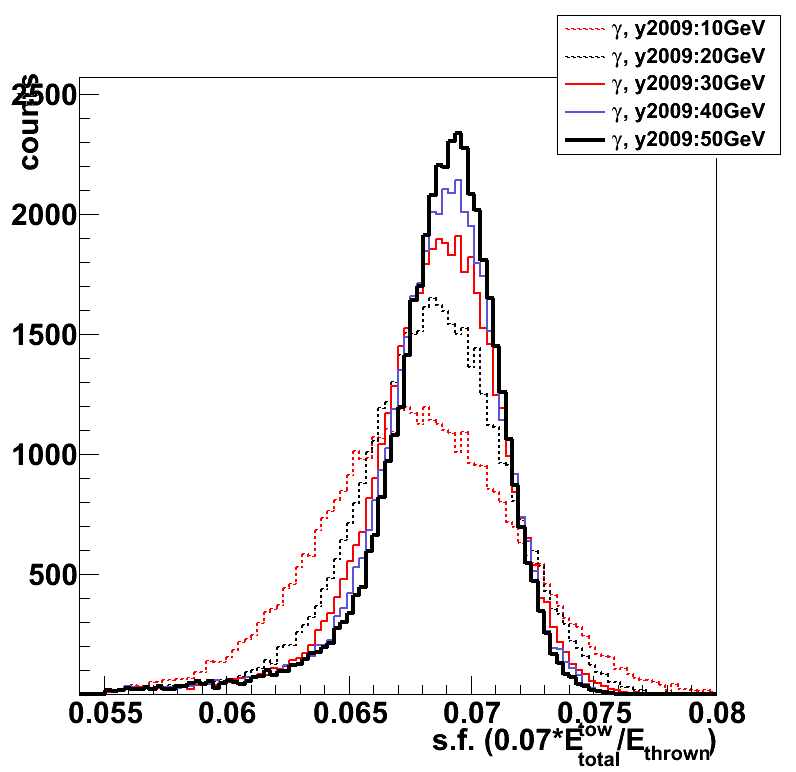
Figure 1: Sampling fraction (0.07*E_reco/E_thrown) distribution: average vs. gaussian fit
E_reco is the total energy in the BEMC towers from mMuDstMaker->muDst()->muEmcCollection()
E_thrown energy of the thrown photon from tne GEant record
The difference between fit and using average values is < 0.7%
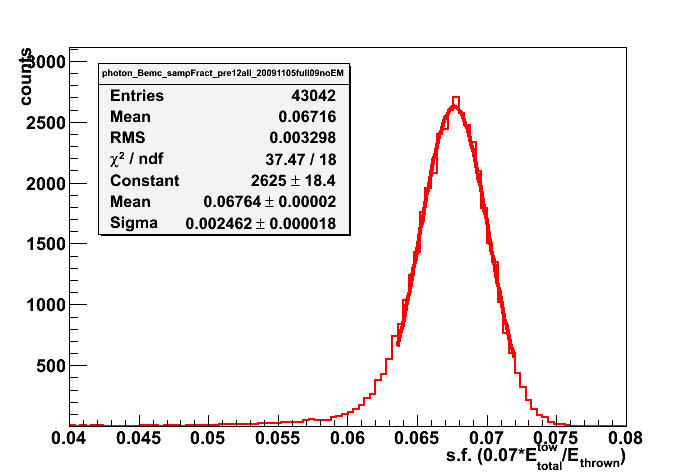
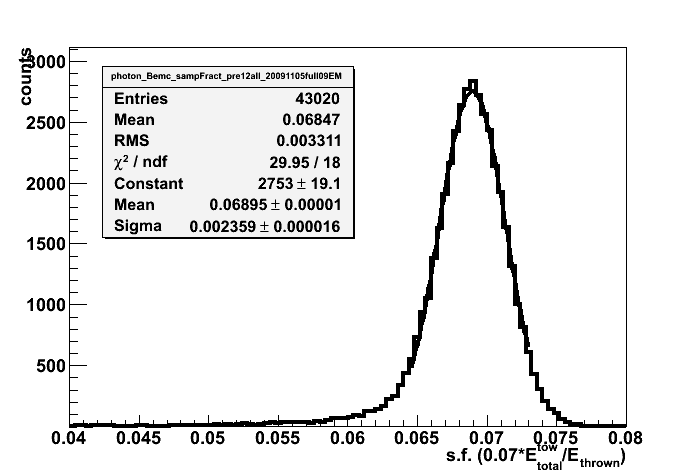
Figure 2: Otliers vs. eta and phi: (left) no energy reconstrycted, (right) s.f. < 55%
Most outlier are at eta = 0, -1, +1

Figure 3: Sampling fraction (0.07*E_reco/E_thrown) distribution
Effect of LOW_EM cuts
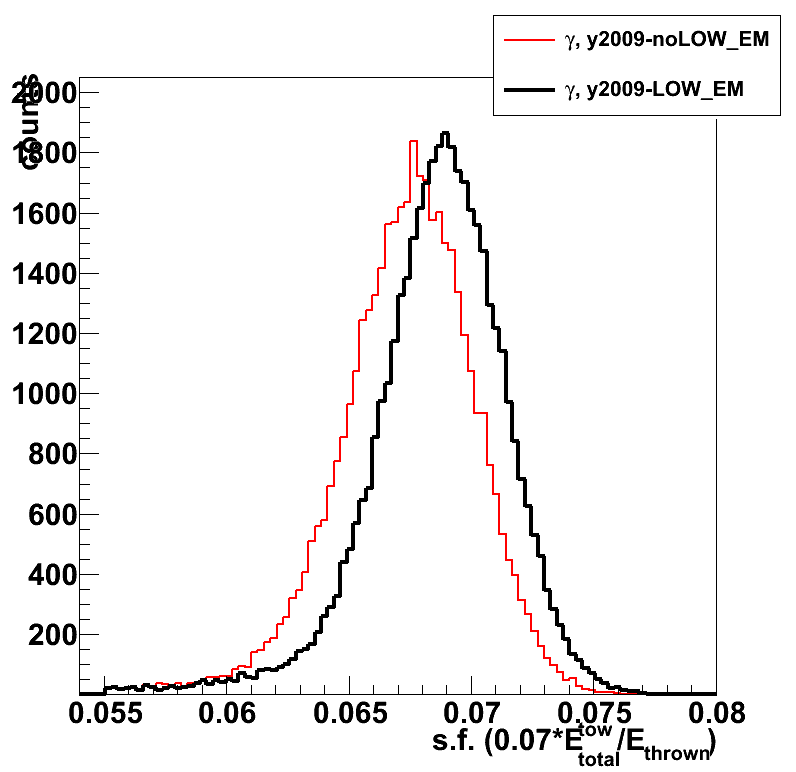

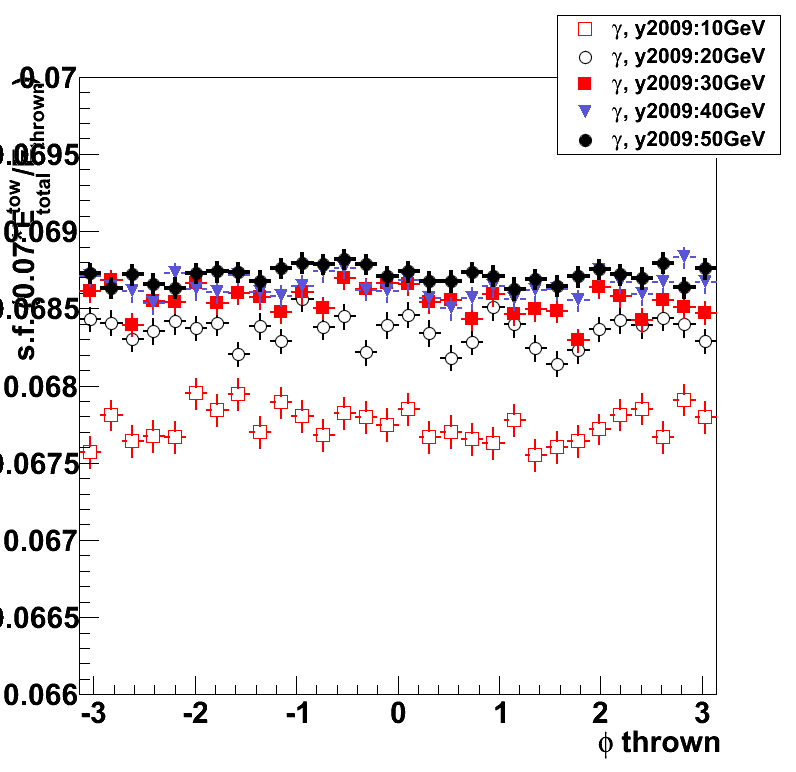
Figure 4: Sampling fraction vs. thrown photon eta (left) and phi (right)
Average is taken over a slice in eta or phi with cut on outliers (events with s.f. < 5.5% rejected)
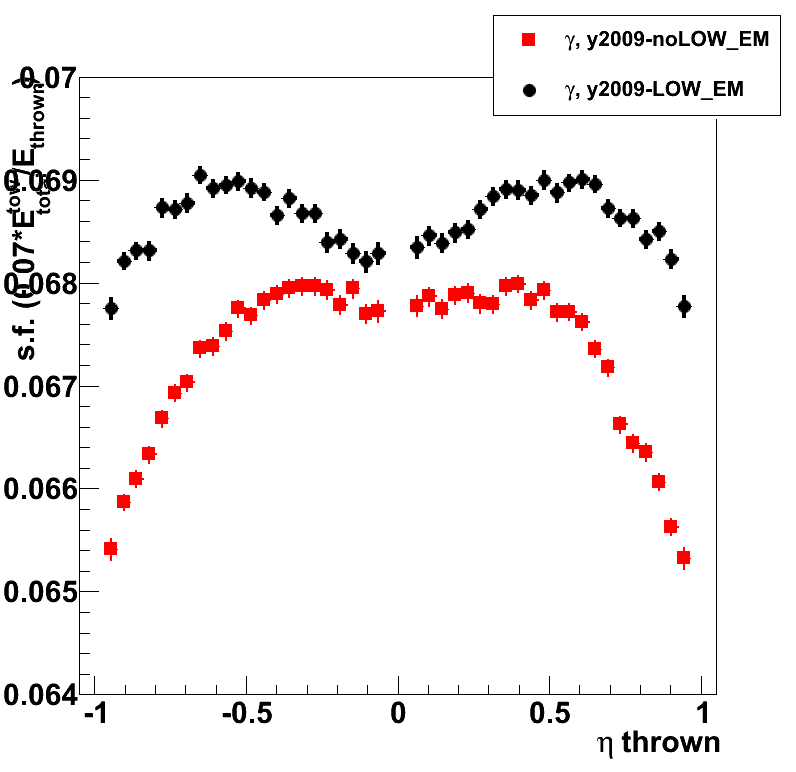

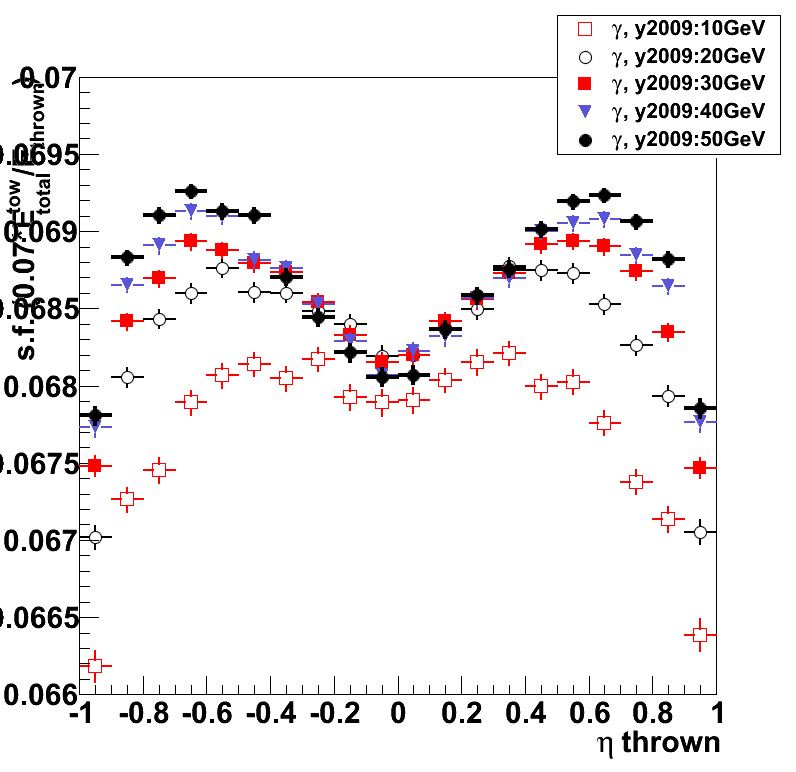
Figure 5: Sampling fraction vs. thrown position (eta and phi)
Average is taken over a slice in eta or phi with cut on outliers (events with s.f. < 5.5% rejected)
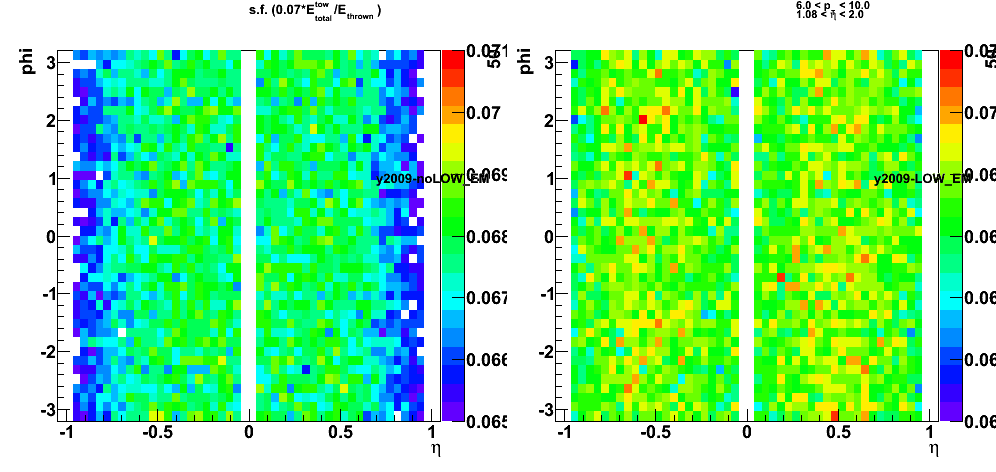
Figure 6: (left) Single tower sampling fraction
and (right) energy ratio of 1x1 cluster to the total BEMC energy
Not much of the effect from LOW_EM cuts on the 1x1 clustering. Need to look at other (2x1, 2x2 clusters)
![]()
![]()
2009.11.11 Tests of EEMC geometry, version 6.1
Monte-Carlo setup:
- Throwing one photon per event
- Compare EEMC geometry v6.0 (pure lead) vs. v6.1
- Full STAR geometry configurations with and without LOW_EM option
- Throw particles flat in eta (1.08, 2.0), phi (0, 2pi), and pt (6-10 GeV)
- Using A2Emaker to get reconstructed Tower/SMD energy (no EEMC SlowSimulator in chain)
- Vertex z=0
- ~50K/per particle type
- Non-zero energy: 3 sigma above pedestal
Geometry configurations
- dashed/open red: full STAR y2006, no LOW_EM, EEMC geometry v6.1
- solid red: full STAR y2006, with LOW_EM, EEMC geometry v6.1
- dashed/open black: full STAR y2006, full STAR y2006, no LOW_EM, EEMC geometry v6.0
- solid black: full STAR y2006, full STAR y2006, with LOW_EM, EEMC geometry v6.0
Sampling fraction of various EEMC layers (tower, SMD, pre1-,pre2-, post- shower)
Figure 1: Sampling fraction of various EEMC layers vs. thrown photon energy:
(a) tower s.f.; (b) tower s.f. distribution; (c) pre-shower1; (d) pre-shower2; (e) SMD, (f) post-shower

Figure 2: (left) Shower shapes and (right) shower shape ratios
2009.11.16 Tests of EEMC geometry, version 6.1: lead vs. mixture
Monte-Carlo setup:
- Throwing one photon per event
- Compare EEMC geometry v6.1 with pure lead vs. mixture
- Full STAR geometry configurations with and without LOW_EM option
- Throw particles flat in eta (1.08, 2.0), phi (0, 2pi), and pt (6-10 GeV)
- Using A2Emaker to get reconstructed Tower/SMD energy (no EEMC SlowSimulator in chain)
- Vertex z=0
- ~50K/per particle type
- Non-zero energy: 3 sigma above pedestal
Geometry configurations
- dashed/open red: full STAR y2006, no LOW_EM, EEMC geometry v6.1 with pure lead
- solid red: full STAR y2006, with LOW_EM, EEMC geometry v6.1 with pure lead
- dashed/open black: full STAR y2006, full STAR y2006, no LOW_EM, EEMC geometry v6.1 with lead-ally mixture
- solid black: full STAR y2006, full STAR y2006, with LOW_EM, EEMC geometry v6.1 with lead-ally mixture
Figure 1: EEMC sampling fraction vs. thrown photon energy:
2009.11.17 BEMC sampling fraction: energy dependence
Monte-Carlo setup:
- Throwing one photon per event
- Full y2009 STAR geometry configurations with LOW_EM option
- Throw particles flat in eta (-1,1), phi (0, 2pi),
with energy steps: 10, 20, 30, 40, and 50 GeV with flat (+/-0.5 GeV) spread - bfc.C options:
trs,fss,y2009,Idst,IAna,l0,tpcI,fcf,ftpc,Tree,logger,ITTF,Sti,MakeEvent,McEvent,
geant,evout,IdTruth,tags,bbcSim,tofsim,emcY2,EEfs,
GeantOut,big,-dstout,fzin,-MiniMcMk,beamLine,clearmem,eemcDB,VFPPVnoCTB - Use fixed (7%) sampling fraction in StEmcSimpleSimulator.cxx
mSF[0] = 1/0.07;
mSF[1] = 0.;
mSF[2] = 0.; - Vertex z=0
- 50K/per particle type
data base settings (same settings in bfc.C (Jan's trick) and in my MuDst reader):
dbMk->SetFlavor("sim","bemcPed");
dbMk->SetFlavor("Wbose","bemcCalib");
dbMk->SetFlavor("sim","bemcGain");
dbMk->SetFlavor("sim","bemcStatus");
Note: for BEMC ideal pedSigma set to 0, so effectively
there is no effect when I apply 3-sigma threshold above pedestal.
Figure 1: Rapidity cuts study (no eta cuts, no cuts on otliers in this figure)
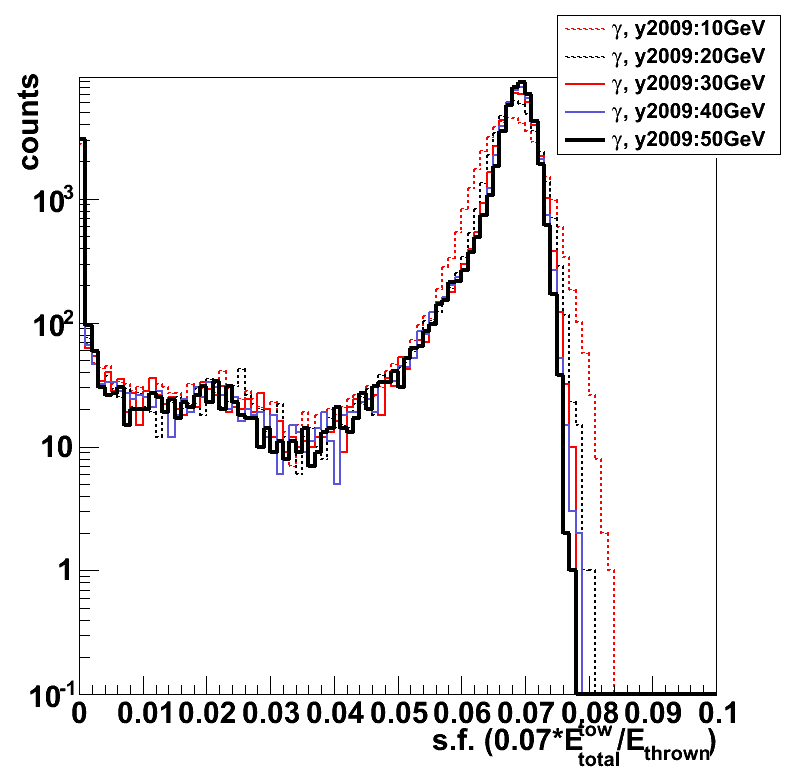
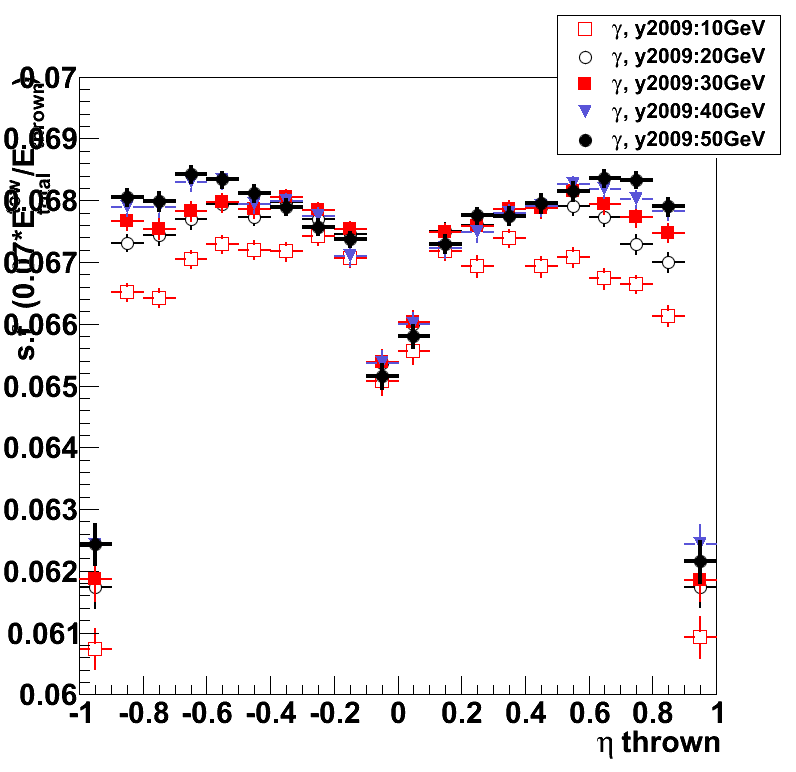


Figure 2: Sampling fraction (0.07*E_reco/E_thrown) distribution
E_reco is the total energy in the BEMC towers from mMuDstMaker->muDst()->muEmcCollection()
E_thrown energy of the thrown photon from tne Geant record
Cuts: |eta| < 0.97 && |eta|>0.01 && s.f. > 0.055
s.f. distribution on the log scale

2009.11.19 LOW_EM and EEMC time/event in starsim
Monte-Carlo setup:
- Throwing one photon/electron per event
- y2009 geometry tag (EEMC geometry v6.1)
- Full STAR geometry configurations with and without LOW_EM option
- Throwing particles flat in eta (1.08, 2.0), phi (0, 2pi), and energy (5-35 GeV)
- ~50K/per particle type, 250 events per job, 200 jobs
Geometry configurations
- red: without LOW_EM option
- black: with LOW_EM option
- circles - electrons, squares - photons
Figure 1: (left) time/event distribution, (right) average time for the particle type
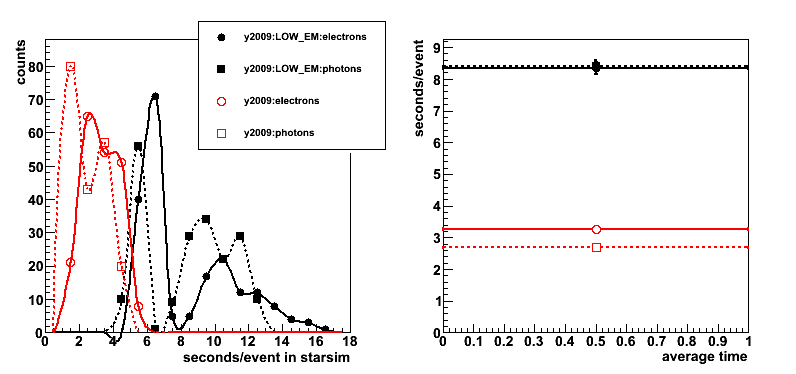
Conclusion: for single particle Monte-Carlo required time in starsim
with LOW_EM option is ~ 2.6 times higher.
2009.11.23 New EEMC geometry (CVS v6.1): y2006 vs. y2009 STAR configurations
Monte-Carlo setup:
- Throwing one photon per event
- Compare new EEMC geometry in CVS for y2006 and 2009 configurations
- Full STAR geometry configurations with and without LOW_EM option
- Throw particles flat in eta (1.08, 2.0), phi (0, 2pi), and energy (5-35 GeV)
- Using A2Emaker to get reconstructed Tower/SMD energy (no EEMC SlowSimulator in chain)
- Vertex z=0
- ~50K/per particle type
- Non-zero energy: 3 sigma above pedestal
Geometry configurations
- red: full STAR y2009, with/without LOW_EM, EEMC geometry
- black: full STAR y2006, with/without LOW_EM, EEMC geometry v6.1
Figure 1: EEMC sampling fraction (left) distribution (right) vs. thrown photon energy (1.2 < eta < 1.9; no pt cuts)
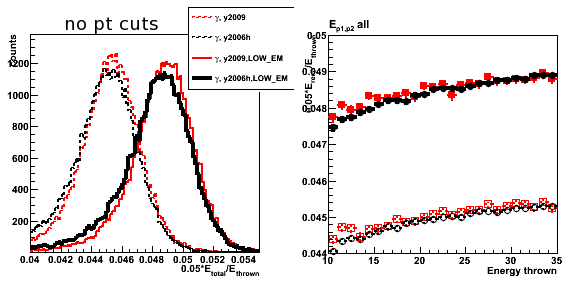
Figure 2: EEMC sampling fraction (left) distribution (right) vs. thrown photon energy (1.2 < eta < 1.9; pt > 7GeV cut)
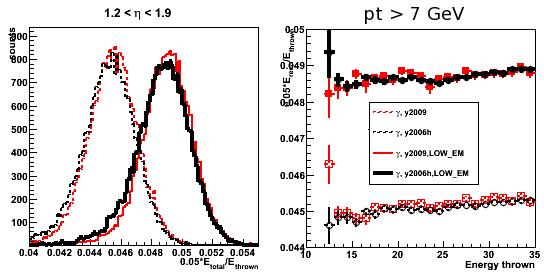
Figure 3: 2x1/3x3 clustering
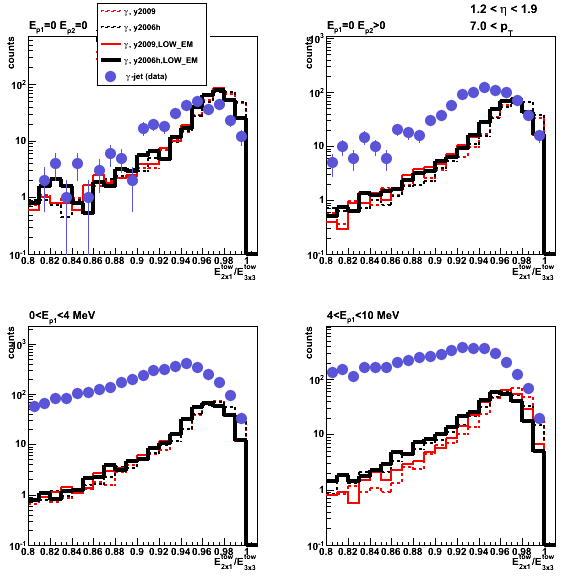
Figure 4: Shower shapes
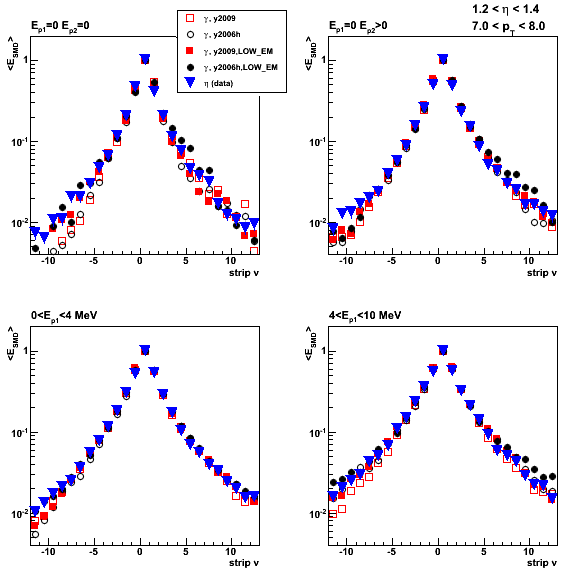
Figure 5: Shower shape ratios (v plane)

Figure 6: Shower shape ratios (u plane)

Figure 7: Pre-shower migration (1.2 < eta < 1.9; no pt cuts)
