Facility Access
A selection of tips on how to log to the RCF
facility. We hope to augment those pages and add
information as user request or need.
Getting a computer account in STAR
Introduction
First of all, if you are a new user, WELCOME to the RHIC/STAR collaboration and experiment. STAR is located at Brookhaven National Laboratory and is one of the premier particle detectors in the world.
As a (new) STAR user, you will need to be granted access to our BNL Tier0 computing facility in order to have access to the offline and online infrastructure and resources. This includes accessing BNL from remote or directly while visiting us on site. Access includes access to data, experiment, mailing lists, desktop computer for visitors to name only those. As a National Facility under the Department of Energy (DOE) regulations, a few steps are required for this to happen. Please, follow them precisely and make sure you understand their relevance.
The DOE requires proper credentials for anyone accessing a computing "resource" and expect such individual to keep credentials up-to-date i.e. in good standing. It is YOUR responsibility to keep valid credentials with Brookhaven National Laboratory's offices. Credentials include: being a valid and active STAR member, having a valid and active guest/user ID and appointment, having and keeping proper trainings. Any missing component would cause an immediate closure of access to computing resources.
In many cases, we rely on account name matching the one created at the RCF (for example, Hypernews or Drupal accounts need exact match to be approved) - this is enforced so we can accurately rely on the work already done by the RCF personnel and only base our automation on "RCF account exist and is active". The RCF personnel work with the user's office and other agencies to verify your credentials.
If you were a STAR user before and seek to re-activate your account, this page also has information for you.
Getting an account and performing work at BNL
Note that along the process of requesting either an appointment or a computing account implies a check from the facility and user office personnel of your good standing with RHIC/STAR as the affiliated experiment. Therefore, we urge you to follow the steps as described belowALL USERS - Ensure/Verify you are affiliated to STAR in our records
Whenever you join a group affiliated with STAR, please- Ask your council representative that he/she sends your information to the collaboration's record keeping person (at this point in time, this person is Liz Mogavero).
Note: Your council representative IS the one responsible for keeping the list of authors and active members at all times. We will not (and cannot) consider requests coming from other STAR members.
- Pro-actively check the presence of your name and record in our Phone Book.
Note: If you are not in our Phone Book, you are simply NOT a STAR user as far as we know as our PhoneBook is the central repository of active STAR members as defined by the STAR council representatives.
New users in STAR
- Request a Guest appointment
You must be sure you have a valid guest appointment with the BNL User Office.
Note1: Requesting a Guest ID requires a procedure called “Foreign Visit and Assignment”. This procedure involves steps such as background checks with Counter Intelligence and approval from the Department of State. The procedure could take up to 60 days from the time it is started (sensitive countries may take 90 days).
Note2 : If you have done this already and are a valid Guest, please go to to this section.
- Go to the Guest Registration Form and complete the registration as instructed.
- Purpose of Visit: likely "Research" but if you come for other purposes, chose as appropriate ("CRADA" or "Interview" may apply for example)
- Experiment/Facility: "Physics Dept (RHIC/AGS)"
- Facility Code: "RHIC"
- Type of Research: "STAR"
- Type of Access Requested: likely "Open Research" if you stated your visit purpose as "Research"
- Subject Code for this Visit/Assignment: likely "General Physics"
- Go to the Guest Registration Form and complete the registration as instructed.
- Be patient and wait for further instructions and the approval.
- ONLY AFTER THE FIRST STEPS will you be able to proceed with the rest of the instructions below.
- We will assume that you, from now on, have a valid Guest appointment and hold a Guest/BNL ID.
- Ensure you have the required and mandatory training
You MUST take the Cyber Security training and course GE-CYBERSEC. This training is mandatory and access to the facility computing resources will NOT be granted without it.
You are also requested to read the Personal User Agreement which describes your responsibilities, the reasonable use and scope of personal use of computing equipments. In recent years, the BNL User Office have requested for the form to be signed and returned for their records. Please, do not skip any of those steps.
- Request an RCF account
To request a new RCF account, start here. The fields are explained on this instruction page.
Note: There is a "Contact information" field which is aimed to be filled using an existing RHIC member (holder of a valid account and appointment) who can vouch for you. Put your council representative or team lead name there OR (in case of interview / CRADA etc...) the name of your contact and host at BNL. DO NOT use your own name for this field. DO NOT use the name a person who is NOT yet a STAR Member.
- Additional steps are described below.
Previously a STAR user
If you were a STAR user before and consulting those pages, it may mean that either- you cannot remember how to login and need access but you are in good standing (all training valid, your BNL appointment is valid)
- you have let your training expire but you are a valid BNL guest (your appointment with BNL has NOT expired)
- your BNL appointment is about to expire or has expired not long ago
- you are a RHIC user (from another experiment), and now coming to STAR
- First of all, please make sure you are in the STAR PhoneBook as indicated here.
If you were a member of another experiment before, you will be joining STAR as either a member of an existing institution or joining as a new institution. All membership handling are the responsibilities of the STAR council (approval of new institutions) or your council representative. In both cases, we MUST find your name in our PhoneBook records.
- Instructions for the several use cases above
- If you are in good standing but cannot remember your login information at the RCF facility, please see Account re-activation
- You have let your BNL training expire - likely, you have not renewed or taken GE-CYBERSEC training available from the training page (please locate in the list at the bottom the course named GE-CYBERSEC). Within 24 hours of the training being taken/renewed again, the privilege to access the BNL computing resources using your RCF account will be re-established (the process will be automatic).
- Your appointment is about to expire, or has expired not long ago - you will need to go to the Extension requests .
The Guest Central interface will help identifying your status and appointment expiration. This form could be used by users already having a BNL Guest ID. If you have let your appointment expire for a long time however, this form may let you know (or not show your old BNL badge/guest ID at all). In such a case, you should consider yourself as a "New user" and follow the first set of instructions above.
For an appointment renewal, the starting point will be the Guest Extension Form.
- If you were a user before and now coming to STAR, you will need to follow
- The general principles of being recorded in our PhoneBook as described above.
- Request a NEW account at the RCF (using a different username than the one you previously had in another experiment)
- Keep your training up-to-date as before (GE-CYBERSEC) ...
- Additional steps are described below.
- If you are in good standing but cannot remember your login information at the RCF facility, please see Account re-activation
Additional steps for everyone
- Generate and upload your SSH keys to ensure secure login
You may now read SSH Keys and login to the SDCC and following information in this section.
- Drupal access
- Log in to RCF node to verify your account username/password working
- Download 2-Factor Authentication app to your mobile device (application ranges from Google or Microsoft Authenticator, Duo Mobile, Authy, FreeOTP, Aegis, ...)
- If you have never logged into STAR Drupal before, log in using your SDCC login, SDCC password, and 0000 as a code, then set your 2FA access (top item in the left menu)
- If you have failed to setup your 2FA access or used an authenticator app that does not backup codes, please contact Dmitry Arkhipkin (@dmarkh) or Jerome Lauret (@jeromel) via "Direct Message" on MatterMost chat (https://chat.sdcc.bnl.gov, choose "BNL Login" with your SDCC login and password) to obtain the 2-Factor Authentication QR code.
- Use your SDCC login, SDCC password, and one-time 2-Factor Authentication code (read from the app on your mobile device) to log in to Drupal.
- Web Access
- Accessing The STAR Protected Network your ssh keys will need to be uploaded to a different interface if you have a need to login to the online setup - this is needed mostly by experts (not by all users in STAR).
- Software Infrastructure for general information
- Video Conferencing ... and the related comments at the bottom of some of those pages (viewable only if you are authenticated to Drupal).
Wishing you a great time in STAR.
Account re-activation
The instructions here are for users who have an account at the RCF but have unfortunately let their BNL appointment expire or do not know how to access their (old) account.
- Account expired or is disabled
- Forgot your Kerberos password but need to upload your SSH keys to log-in
Account expired or is disabled
First of all, please be sure you understand the requirements and rationals explained in Getting a computer account in STAR.
As soon as your appointment with BNL ends or expires, all access to BNL computing resources are closed / suspended and before re-establishing it, you MUST renew your appointment first. In such case, we will not provide you with any access which may include access to Drupal (personal account) and mailing lists.
The simplest way to proceed is to
- Check that you do have GE-CYBERSEC training. You can do this by checking your training records.
- If you do not, please take this training NOW as any future request will be denied until this training is complete
- Send an Email to RT-RACF-UserAccounts@bnl.gov requesting re-activation of your account. Specify the account name (Unix account name, not your name) if you remember it. If you don't your full name may do. The RCF team will check your status (Cyber training, appointment status) and
- if any is not valid, you will be notified and further actions will be needed.
- If all is fine, they will re-activate your account after verifying with us that you are a valid STAR user. Please consult Getting a computer account in STAR for what this means ...
If your appointment has expired, you will need to renew it. Please, follow the instructions available here.
Chicken and Egg issue? Forgot your password but did not upload SSH keys
If your account is valid, so is your appointment but you have not logged in the facility for a while and hence, are unable to upload your SSH keys (as described in SSH Keys and login to the SDCC and related documents) this may be for you.
You cannot access the upload page unless you have a valid password as the access to the RCF requires a double authentication scheme (Kerberos password + SSH key). In case you have forgotten your password, you have first to send an Email to the RCF at RT-RACF-UserAccounts@bnl.gov asking to reset your password, then thereafter go to the SSH key upload interface and proceed.
Drupal access
This page describes how you can obtain the access to the STAR drupal pages. Please understand that your Drupal access is now tight to a valid SDCC login - no SDCC account, no access to Drupal. This is because we integrated Drupal login to the common infrastructure (the login is Kerberos based). Here are the steps to gain access then:
-
Get a computer account in STAR, make sure you have a valid guest appointment and valid cyber training, then request a RCF account
https://drupal.star.bnl.gov/STAR/comp/sofi/facility-access/general-access
- Generate SSH keys and upload them to the SDCC - this has formally little to do with access to Drupal but will allow you to log to the facility and verify you know your Kerberos password (it should have been sent to you via EMail during the account creating with instructions on how to change it)
https://drupal.star.bnl.gov/STAR/comp/sofi/facility-access/ssh-keys
Now Log in to RCF node- again, this is to ensure you have the proper- ssh xxx@ssh.rhic.bnl.gov (xxx is your username on RCF, enter the passphrase for your SSH key)
- kinit (enter your SDCC kerberos password - this is the one you will use for accessing Drupal)
- Download 2-Factor Authentication app to your mobile device (application ranges from Google or Microsoft Authenticator, Duo Mobile, Authy, FreeOTP, Aegis, ...)
- The FIRST time you log to Drupal, you will actually NOT need a second factor (leave the "code" box blank) but MUST generate it right away (the second login will require it).
- To generate it, use the "(re)Create 2FA login" in the left hand-side menu, leave all default option (you need a time based OTP), import the QRCode displayed.
- Once imported, a 6 Digits code should appear in your app - this is he "code" you will need to enter in future in the third field named "code". Note the code changes every 30 seconds.
- IF you have logged out without generating a QRCode or forgot to import and have no "code", then you will need to contact Dmitry Arkhipkin or Jerome Lauret on MatterMost to obtain your 2FA QR-code (either can generate it for you after the fact or start a chat with both). SDCC chat is available at https://chat.sdcc.bnl.gov (please use a Direct Message, not a channel). Use "BNL Login" and your SDCC account user/Kerberos password to login. Do as discussed above (import the QRCode, make sure an entry appears, test your login right away, ...)
- You are set. Drupal login will now ask for your SDCC username and Kerberos password and a 6-digit code you read from the 2-Factor Authentication app.
SSH Keys and login to the SDCC
How to generate keys for about every platform ... and actually be able to log to the SDCC
- General / Introduction
- Instructions for Windows, Linux/Windows interoperability
- Uploading keys to the SDCC
- I have done all of this, what's next?
General
What you find below is especially useful for those of you that work on several machines and platforms in and out of BNL and need to use ssh key pairs to get into SDCC.
- If you use Linux only or Windows only everywhere, all you need is follow the instructions on the SDCC web site and you are all set (see especially their Unix SSH Key generation page).
- Otherwise this page is for you.
The findings on this web page are a combined effort of Jérôme Lauret, Jim Thomas, and Thomas Ullrich. All typos and mistakes on this page are my doing. I am also not going to discuss the wisdom of having to move private keys around - all I want to do is get things done.
The whole problem arises from the fact that there are 3 different formats to store ssh key-pairs and all are not compatible:
- ssh.com: Secure Shell is the company that invented the (now public) ssh protocol. They provide the (so far) best ssh version for Windows which is far nicer than PuTTY. Especially the File Browser provided is so much nicer than the scp command interface. It is free for academic/university sites.
- PuTTY: a free ssh tool for Windows.
- OpenSSH: runs on all Linux boxes and via cygwin on Windows.
Despite all claims, OpenSSH cannot export private keys into ssh.com format, nor can it import ssh.com private keys. Public keys seem to work but this is not what we want. So here is how it goes:
[A] Windows: follow one of the instructions below
- PuTTY (Windows)
- Download puttygen.exe from the PuTTY download page. You only need it once, but it might be good to keep it in case you need to regenerate your keys.
- Start the program puttygen.exe
- Under parameters pick SSH-2 (RSA) and 1024 for the size of the key in bits.
- Then press the Generate button. You will be asked to move your mouse over the blank area.
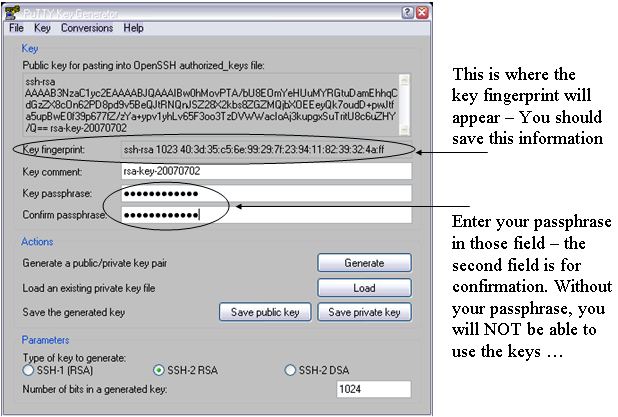
- Enter a passphrase in the referring fields. The passphrase is needed as it will correspond to a password. Make a mental note of it as keys will not be usable without it.
- I recommend to save the "key fingerprint" too since you will need it at the SDCC web site when uploading your public key. Just save it in a plain text file.
Note: You can always generate it later from Linux with ssh-keygen -l -f <key_file> but since you will need access to a Linux system to do this, it is important you keep a copy of this now so you could proceed with the rest of the instructions. The picture below shows where the important fields are
- Saving keys
- Press Save Public Key. To not confuse all the keys you are going to generate I strongly recommend to call it rsa_putty.pub.
- Next press Save Private Key. Type rsa_putty as a name when prompted. PuTTY will automatically name it rsa_putty.ppk. That's your private key.
Don't quit puttygen yet. Now comes the important stuff. - In the menu bar pick Conversions->Export OpenSSH key. When prompted give a name that indicated that this is the private key for OpenSSH (Linux). I used rsa_openssh. There is no public key stored only the private. We will generate the public one from the private one later.
- In the menu bar pick Conversions->Export ssh.com key. When prompted give a name that indicated that this is the private key for ssh.com. I used rsa_sshcom. Again, there is no public key stored only the private. We will generate the public one from the private one later.
- All done. Now you have essentially 4 files: public and private keys for putty and private keys for ssh.com and OpenSSH.
- Getting ssh.com to work (Windows):
- Here I assume that you have SSHSecureShell (client) installed, that is the ssh.com version. Open a DOS (or cygwin) shell. We now need to generate a public key from the private key we got from puttygen. Best is to change into the directory where your private key is stored and type: ssh-keygen2 -D rsa_sshcom . Note that the command has a '2' at the end. This will generate a file called rsa_sshcom.pub containing the public key. Now you have your key pair.
- Launch SSH and pick from the menu bar Edit->Settings.
Click on GlobalSettings/UserAuthentication/Keys and press the Import button. Point to your public key rsa_sshcom.pub. The private key will be automatically loaded too. That's it. Press OK and quit SSH. We are not quite ready yet. We still have to generate and upload the OpenSSH key to SDCC.
- Getting keys to work with OpenSSH/Linux:
- Copy the private key rsa_openssh to a Linux box (cygwin on Windows works of course too).
- Set the permissions such that only you can read the private key file:
% chomod 600 rsa_openssh
- Generate the public key with:
% ssh-keygen -y -f rsa_openssh > rsa_openssh.pub
- Now you have the key pair.
- To install the key pair on a Linux box copy rsa_openssh and rsa_openssh.pub to your ~/.ssh directory.
Important: the keys ideally will be named id_rsa and id_rsa.pub, otherwise extra steps/options will be required to work with them. So, you are recommended to also do% mv rsa_openssh ~/.ssh/id_rsa
All done. Note that there is no need to put your key files on every machine to which you are going to connect. In fact, you should keep your private key file in as few places as possible -- just the source machine(s) from which you will initiate SSH connections. Your public key file is indeed safe to share with the public, so you need not be so careful with it and in fact will have to provide it to remote systems (such in the next section) in order to use your keys at all.% mv rsa_openssh.pub ~/.ssh/id_rsa.pub
[B] Uploading the public key to SDCC:
- https://web.racf.bnl.gov/Facility/SshKeys/UploadSshKey.php
- Make sure you upload the OpenSSH public key. Everything else won't work.
You need to provide the key fingerprint which you hopefully saved from the instructions above. In case of OpenSSH based keys, you can re-generate the fingerprint with
% ssh-keygen -Emd5 -l -f <key_file>
Note that forcing MD5 hash is important (default hash is SHA256 the RACF interface will not take). All done.
If you followed all instructions you now have 3 key pairs (files). This covers essentially all SSH implementations there are. Where ever you go, whatever machine and system you deal with, one key pair will work. Keep them all in a very save place.
[C] Done.What's next?
Uploading your keys to the SDCC and STAR SSH-key management interfaces
You need to upload your SSH keys only once. But after your first upload, please wait a while (30 mnts) before connecting to the SDCC SSH Gatekeepers. Basic connection instructions, use:
% ssh -AX xxx@sssh.sdcc.bnl.gov
% rterm
The rterm command will open an X-terminal on a valid STAR interactive node. If you do NOT have an X11 server running on your computer, you could use the -i options of rterm for interactive (non X-term based) session.
If you intend to logon to our online enclave, please check the instructions on Accessing The STAR Protected Network to request an account on the STAR SSH gateways and Linux pool (and upload your keys to the STAR Key SSH Management system). Note that you cannot upload your keys anywhere without a Kerberos password (both the SDCC and STAR's interface will require a real account kerberos password to log in). Logging in to the Online enclave involves the following ssh connection:
% ssh -AX xxx@cssh.sdcc.bnl.gov
% ssh -AX xxx@stargw.starp.bnl.gov
A first thing to see is that SDCC gatekeeper is here "cssh" as the network is spearated into a "campus" side (cssh) and a ScienceZone side (sssh). For convenience, we have asked Cyber security to allow connections from "sssh" to our online enclave as well (so if you use sssh all the time, it will work).
For the requested an account online ... note that users do not request access to the individual stargw machines directly. Instead, a shared user database is kept on onlcs.starp.bnl.gov - approval for access to onlcs grants access to the stargw machines and the Online Linux Pool. Such access is typically requested on the user's behalf when the user requests access to the online resources following the instructions at Accessing The STAR Protected Network, though users may also initiate the request themselves.
Logging in to the stargw machines is most conveniently done Using the SSH Agent, and is generally done through the SDCC's SSSH gateways. This additional step of starting an agent would be removed whenever we will be able to directly access the STAR SSH GW (as per 2009, this is not yet possible due to technical details).
See also
To learn more, see:
- SSH connection stability
- Caveats, issues, special cases and possible problems
- SSH Key Management (an overview of the STAR SSH key management system)
Caveats, issues, special cases and possible problems
Shortcut links
- SSH side effects (login in using different user names than on the remote client)
- X11 Forwarding, -X or -Y?? (and all of what you want to know and what you may not want to know)
- When to use trusted (-Y not-secure) and untrusted (-X secure)
- Customized setups
- Kerberos hand-shake and the RCF
- Generic group accounts - how does this work?
- Special nodes
- Other caveats related to Kerberos
SSH side effects
Please note that if you remote account name is different from your RCF account name, you will need to use
% ssh -X username@rssh.rhic.bnl.gov
specifying explicitly username rather as the form
% ssh -X rssh.rhic.bnl.gov
will assume a username defaulting to your local machine (remote from the BNL ssh-daemon stand point) user name where you issue the ssh command. This has been a source of confusion for a few users. The first form by the way is preferred as always work and removes all ambiguities.
X11 Forwarding: -X or -Y ??
-X is used to automatically set the display environment to a secure channel (also called untrusted X11 forwarding) . In other words, it enables X11 forwarding without having to grant remote applications the right to manipulate your Xserver parameters. If you want ssh client to always act like with X11 forwarding, have the following line added in your /etc/ssh/ssh_config (or any /etc/ssh*/ssh*_config ).
ForwardX11 yes
-Y enables trusted X11 forwarding. So, what does trusted mean? It means that the X-client will be allowed to gain full access to your Xserver, including changing X11 properties (i.e. attributes and values which alters the look and feel of opened X windows or things such as mouse controls and position info, keyboard input reading and so on). Starting with OpenSSH 3.8, you will need to set
ForwardX11Trusted yes
in the client configuration to allow remote nodes full access to your Xserver as it is NOT enabled by default.
When to use trusted, when to use untrusted
Recent OpenSSH version supports both untrusted (-X) and trusted (-Y) X11 Forwarding. As hinted above, the difference is what level of permissions the client application has on the Xserver running on the client machine. Untrusted (-X) X11 Forwarding is more secure, but unfortunately several applications (especially older X-based applications) do not support running with less privileges and will eventually die and/or crash your entire Xserver session.
Dilema? A rule of thumb is that while using trusted (-Y) X11 Forwarding will have less applications problems for the near future, try first the most secured untrusted (-X) way and see what happens. If remote X applications fail with a errorssimilar to the below:
X Error of failed request: BadAtom (invalid Atom parameter)
  Major opcode of failed request: 18 (X_ChangeProperty)
  Atom id in failed request: 0x114
  Serial number of failed request: 370
  Current serial number in output stream: 372
you will have to use the trusted (-Y) connection.
Instead of a system global configuration which will require your system administrator's assistance, you may create a config file in your user’s home directory (client side) under the .ssh directory with the following line $HOME/.ssh/config
ForwardX11Trusted yes
Host *.edu
	ForwardX11 no
	User jlauret

Host *.starp.bnl.gov
	ForwardX11 yes
    	Cipher blowfish
	User jeromel

Host orion.star.bnl.gov
     ForwardAgent yes
     Cipher 3des
     ForwardX11Trusted yes

Host what.is.this
    User exampleoptions
    ServerAliveInternal=900
    Port 666
    Compression yes
    PasswordAuthentication no
    KeepAlive yes
    ForwardAgent yes
    ForwardX11 yes
    RhostsAuthentication no
    RhostsRSAAuthentication no
    RSAAuthentication yes
    TISAuthentication no
    PasswordAuthentication no
    FallBackToRsh no
    UseRsh no
As a side note, 3des is more secure thank blowfish but also 3x slower. If speed and security is important, use at least aes cypher.
Kerberos hand-shake, How to.
OK, now you are logged to the facility gatekeeper but any sub-sequent login would ask for your password again (and this would defeat security). But you can cure this problem by, on the gatekeeper, issue the following command (we assume $user is your user name)
% kinit -5 -d -l 7d $user
-l 7d is used to provide a long life K5 ticket (7 days long credentials). Note that you should afterward be granted an AFS token automatically upon login to the worker nodes on the facility. From the gatekeeper, the command
% rterm
would open a terminal from the least loaded node on the cluster where you are allowed to log.
Generic (group) accounts
Due to policy regulations, group or generic accounts login cannot be allowed at the facility unless the login is traceable to an individual. The way to log in is therefore to
- Log to the gatekeeper using SSH keys under your PERSONAL account as described at SSH Keys and login to the SDCC
- kinit -5 -4 -l 7d $gaccount
- In case of wide use generic account, one more jump to a "special" node will be necessary. For starreco and starlib for example, this additional gatekeeper node is rcas6003. From there, login to the rest of the facility could be done using rterm as usual (at least in STAR)
Special nodes
This section is about standing on one foot, tapping on to of your head and chanting a mantra unless the moon is full (in such case, the procedure involves parsley and sacrificial offerings). OK, we are in the realm of the very very special tricks for very very special nodes:
- The rmine nodes CANNOT be connected to anymore. However, one can use rsec00.rhic.bnl.gov has a gatekeeper, using your desktop keys and then jump from there to the rmine nodes.
Scope: Subject to special authorization. - The test node aplay1.usatlas.bnl.gov cannot be accessed using a Kerberos trick. Since there are two HOPs from your machine to aplay1, you need to use the ssh-agent. See instructions on the Using the SSH Agent help page.
K5 Caveats
- If you log to gatekeeper GK1 for your personal account, you will need to chose another gatekeeepr GK2 for your group account login. This will allow not interference of Kerberos credentials.
- Whenever you log in a gatekeeper and you know you had previously obtained Kerberos credentials on this gatekeeper, you should ensure the destruction of previous credential to avoid premature lifetime expiration. In other words, -l 7d will NOT give you a 7 days lifetime K5 ticket on a gatekeeper where previous credentials exists. To destroy previous credentials, be sure
- you do not have (still) opened windows using the credential. Check this by issuing a klist and observe the listing. Valid credentials used in opened session would look like this
Valid starting Expires Service principal 12/26/06 10:59:28 12/31/06 10:59:28 krbtgt/RHIC.BNL.GOV@RHIC.BNL.GOV renew until 01/02/07 10:59:25 12/26/06 10:59:30 12/31/06 10:59:28 host/rcas6005.rcf.bnl.gov@RHIC.BNL.GOV renew until 01/02/07 10:59:25 12/26/06 11:11:48 12/31/06 10:59:28 host/rplay43.rcf.bnl.gov@RHIC.BNL.GOV renew until 01/02/07 10:59:25 12/26/06 17:51:05 12/31/06 10:59:28 host/stargrid02.rcf.bnl.gov@RHIC.BNL.GOV renew until 01/02/07 10:59:25 12/26/06 18:34:03 12/31/06 10:59:28 host/stargrid01.rcf.bnl.gov@RHIC.BNL.GOV renew until 01/02/07 10:59:25 12/26/06 18:34:22 12/31/06 10:59:28 host/stargrid03.rcf.bnl.gov@RHIC.BNL.GOV renew until 01/02/07 10:59:25 12/28/06 17:53:29 12/31/06 10:59:28 host/rcas6011.rcf.bnl.gov@RHIC.BNL.GOV renew until 01/02/07 10:59:25 - If nothing appears to be relevant or existing, it is safe to issue the kdestroy command to wipe out all old credentials and then re-initiate a kinit.
- you do not have (still) opened windows using the credential. Check this by issuing a klist and observe the listing. Valid credentials used in opened session would look like this
Using the SSH Agent
General
The ssh-agent is a program you may use together with OpenSSH or similar ssh programs. The ssh-agent provides a secure way of storing the passphrase of the private key.
One advantage and common use of the agent is to use the agent forwarding. Agent forwarding allows you to open ssh sessions without having to repeatedly type your passphrase as you make multiple SSH hops. Below, we provide instructions on starting the agent, loading your keys and how to use key forwarding.
Instructions
Starting the agent
The ssh-agent is started as follow.
% ssh-agent
Note however that the agent will immediately display information such as the one below
% ssh-agent
SSH_AUTH_SOCK=/tmp/ssh-fxDmNwelBA/agent.5884; export SSH_AUTH_SOCK;
SSH_AGENT_PID=3520; export SSH_AGENT_PID;
echo Agent pid 3520;
It may not be immediately obvious to you but you actually MUST type those commands on the command line for the next steps to be effective.
Here is what I usually do: redirect the message to a file and source it from the shell like this:
% ssh-agent >agent.sh
% source agent.sh
The commands above will create a script containing the necessary shell commands, then the source command will load the information into your shell. This assumes you are using sh. For csh, you need use the setenv shell command to define both SSH_AUTH_SOCK and SSH_AGENT_PID. A simpler approach may however be to use
% ssh-agent csh
The command above will start a new shell, in which the necessary environment variables will be defined in the newly started shell (no sourcing needed).
Yet another method to start an agent and set the environment variables in tcsh or bash (and probably other shells) is this:
% eval `ssh-agent`
Now that you've started an agent and set the environment variables to use it, the next step is to load your SSH key.
Loading a key
The agent alone is not very useful until you've actually put keys into it. All your agent key management is handled by the ssh-add command. If you run it without arguments, it will add any of the 'standard' keys $HOME/.ssh/identity, $HOME/.ssh/id_rsa, and $HOME/.ssh/id_dsa.
To be sure the agent has not loaded any id yet, you may use the -l option with ssh-add. Here's what you should see if you have not loaded a key:
% ssh-add -l
The agent has no identities.
To load your key, simply type
% ssh-add
Enter passphrase for /home/jlauret/.ssh/id_rsa:
Identity added: /home/jlauret/.ssh/id_rsa (/home/jlauret/.ssh/id_rsa)
To very if all is fine, you may use again the ssh-add command with the -l option. The result should be different now and similar to the below (if not, something went wrong).
% ssh-add -l
1024 34:a0:3f:56:6d:a2:02:d1:c5:23:2e:a0:27:16:3d:e5 /home/jlauret/.ssh/id_rsa (RSA)
Is so, all is fine.
Agent forwarding
Two conditions need to be present for agent forwarding to function:
- The server need to be set to accept forwards (enabled by default)
- You need to use the ssh client with the -A option
Usage is simply
% ssh -A user@remotehost
And that is all. For every hop, you need to use the -A option to have the key forwarded throughout the chain of ssh logins. Ideally, you may want to use -AX (where "X" enabled X11 agent forwarding).
Agent security concern
The ssh-agent creates a unix domain socket, and then listens for connections from /usr/bin/ssh on this socket. It relies on simple unix permissions to prevent access to this socket, which means that any keys you put into your agent are available to anyone who can connect to this socket. BE AWARE that root especially has acess to any file hence any sockets and as a consequence, may acquire access to your remote system whenever you use an agent.
Manpages indicates you may use the -c of ssh-add and this indeed adds one more level of safety to the agent mechanism (the agent will aks for the passphrase confirmation at each new session). However, if root has its mind on stealing a session, you are set for a lost battle from the start so do not feel over-confident of this option.
Addittional information
Help pages below links to the OpenSSH implementation of the ssh client/server and other ssh related documentation from our site.
- ssh-agent manpage
- ssh-add manpage
- ssh manpage
- How to safely start the ssh-agent from .bashrc
- ssh-add / ssh-agent issue
- SSH connection stability
SSH connection stability
IF- Your SSH connections are closed from home
- You get disconnected from any nodes without any reasons?
- ... and you are a PuTTY user
- ... or an Uglix SSH client user
PuTTY users
PuTTY to connect to gateway (from a home connection), you have to
set a session, be sure to enable SSH
go to the 'Connection' menu and have the following options box checked
Disable Nagle's algorithm (TCP_NODELAY option)
Enable TCP keepalives (SO_KEEPALIVE option)
Furthermore, in 'Connection' -> 'SSH' -> 'Tunnels' enable the option
Enable X11 forwarding
Enable MIT-Magic-Cookie-1
Save the session
Documentation on those features (explanation for the interested) are added at the end of this document.
SSH Users
SSH users and owner of their system could first of all be sure to manipulate the SSH client configuration file and be sure settings are turned on by default. The client configuration is likely located as /etc/ssh_config or /usr/local/etc/ssh_config depending on where you have ssh installed.
But if you do NOT have access to the configuration file, the client can nonetheless pass on options from the command line. Those options would have the same name as they would appear in the config file.
Especially, KEEP_ALIVE is controlled via the SSH configuration option TCPKeepAlive.
% ssh -o TCPKeepAlive=yes
You will note in the next section that a spoofing issue exists with keep alive (I know it works well, but please consider the ServerAliveCountMax mechanism) so, you may use instead
% ssh -o TCPKeepAlive=no -o ServerAliveInterval=15
Note that the value 15 in our example is purely empirical. There are NO magic values and you need to test your connection and detect when (after what time) you get kicked out and disconnected and set the parameters from your client accordingly. Let's explain the default first and come back to this and a rule of thumb.
There are two relevant parameters (in addition of TCPKeepAlive):
ServerAliveInterval
Sets a timeout interval in seconds after which if no data has been received from the server, ssh will send a message through the encrypted channel to request a response from the server. The default is 0, indicating that these messages will not be sent to the server.
This option applies to protocol version 2 only.
ServerAliveCountMax
Sets the number of server alive messages (see above) which may be sent without ssh receiving any messages back from the server. If this threshold is reached while server alive messages are being sent, ssh will disconnect from the server, terminating the session. It is important to note that the use of server alive messages is very different from TCPKeepAlive (below). The server alive messages are sent through the encrypted channel and therefore will not be spoofable. The TCP keepalive option enabled by TCPKeepAlive is spoofable. The server alive mechanism is valuable when the client or server depend on knowing when a connection has become inactive.
The default value is 3. If, for example, ServerAliveInterval (above) is set to 15, and ServerAliveCountMax is left at the default, if the server becomes unresponsive ssh will disconnect after approximately 45 seconds.
In our example
% ssh -o TCPKeepAlive=no -o ServerAliveInterval=15
The recipe should be: if you get disconnected after N seconds, play with the above and be sure to set a
time of ServerAliveInterval*ServerAliveCountMax <= 0.8*N, N being the timeout. Since ServerAliveCountMax is typically not modified, in our example we assume the default value of 3 and therefore a a 3x15 = 45 seconds (and we guessed a disconnect every minute or so). If you set the value too low, the client will send to much "chatting" to the server and there will be a traffic impact.
Appendix
Nagle's algorithm
This was written based on this article.
RPC implementations on TCP should disable Nagle. This reduces average RPC request latency on TCP, and makes network trace tools work a little nicer.
Determines whether Nagle's algorithm is to be used. The Nagle's algorithm tries to conserve bandwidth by minimizing the number of segments that are sent. When applications wish to decrease network latency and increase performance, they can disable Nagle's algorithm (that is enable TCP_NODELAY). Data will be sent earlier, at the cost of an increase in bandwidth consumption.
KeepAlive
The KEEPALIVE option of the TCP/IP Protocol ensures that connections are kept alive even while they are idle. When a connection to a client is inactive for a period of time (the timeout period), the operating system sends KEEPALIVE packets at regular intervals. On most systems, the default timeout period is two hours (7,200,000 ms).
If the network hardware or software drops connections that have been idle for less than the two hour default, the Windows Client session will fail. KEEPALIVE timeouts are configured at the operating system level for all connections that have KEEPALIVE enabled.
If the network hardware or software (including firewalls) have a idle limit of one hour, then the KEEPALIVE timeout must be less than one hour. To rectify this situation TCP/IP KEEPALIVE settings can be lowered to fit inside the firewall limits. The implementation of TCP KEEPALIVE may vary from vendor to vendor. The original definition is quite old and described in RFC 1122.
MIT Magic cookie
To avoid unauthorized connections to your X display, the command xauth for encrypted X connections is widely used. When you login, a .Xauthority file is created in your home directory ($HOME). Even SSH initiate the creation of a magic cookie and without it, no display could be opened. Note that since the .Xauthority file IS the file containing the MIT Magic cookie, if you ever run out of disk quota or the file system is full, this file CANNOT be created or updated (even from the sshd impersonating the user) and consequently, no X connections can be opened.
The .Xauthority file sometimes contains information from older sessions, but this is not important, as a new key is created at every login session. The Xauthority is simple and powerful, and eliminates many of the security problems with X.