- General information
- Data readiness
- Grid and Cloud
- Infrastructure
- Online Computing
- Software Infrastructure
- Batch system, resource management system
- CVS->Git
- Computing Environment
- Facility Access
- FileCatalog
- HPSS services
- Home directories and other areas backups
- Hypernews
- Installing the STAR software stack
- Provision CVMFS and mount BNL/STAR repo
- RCF Contributions
- Security
- Software and Libraries
- Storage
- Tools
- Tutorials
- Video Conferencing
- Web Access
- Machine Learning
- Offline Software
- Production
- S&C internal group meetings
- Test tree
SSH Keys and login to the SDCC
Updated on Fri, 2021-01-15 12:58 by starweb. Originally created by jeromel on 2006-12-19 16:32.
Under:
How to generate keys for about every platform ... and actually be able to log to the SDCC
- General / Introduction
- Instructions for Windows, Linux/Windows interoperability
- Uploading keys to the SDCC
- I have done all of this, what's next?
General
What you find below is especially useful for those of you that work on several machines and platforms in and out of BNL and need to use ssh key pairs to get into SDCC.
- If you use Linux only or Windows only everywhere, all you need is follow the instructions on the SDCC web site and you are all set (see especially their Unix SSH Key generation page).
- Otherwise this page is for you.
The findings on this web page are a combined effort of Jérôme Lauret, Jim Thomas, and Thomas Ullrich. All typos and mistakes on this page are my doing. I am also not going to discuss the wisdom of having to move private keys around - all I want to do is get things done.
The whole problem arises from the fact that there are 3 different formats to store ssh key-pairs and all are not compatible:
- ssh.com: Secure Shell is the company that invented the (now public) ssh protocol. They provide the (so far) best ssh version for Windows which is far nicer than PuTTY. Especially the File Browser provided is so much nicer than the scp command interface. It is free for academic/university sites.
- PuTTY: a free ssh tool for Windows.
- OpenSSH: runs on all Linux boxes and via cygwin on Windows.
Despite all claims, OpenSSH cannot export private keys into ssh.com format, nor can it import ssh.com private keys. Public keys seem to work but this is not what we want. So here is how it goes:
[A] Windows: follow one of the instructions below
- PuTTY (Windows)
- Download puttygen.exe from the PuTTY download page. You only need it once, but it might be good to keep it in case you need to regenerate your keys.
- Start the program puttygen.exe
- Under parameters pick SSH-2 (RSA) and 1024 for the size of the key in bits.
- Then press the Generate button. You will be asked to move your mouse over the blank area.
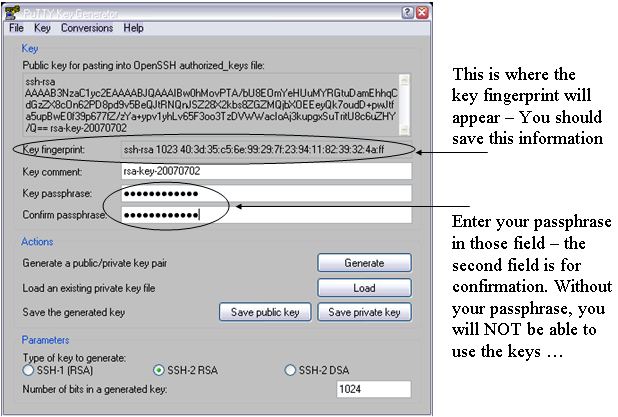
- Enter a passphrase in the referring fields. The passphrase is needed as it will correspond to a password. Make a mental note of it as keys will not be usable without it.
- I recommend to save the "key fingerprint" too since you will need it at the SDCC web site when uploading your public key. Just save it in a plain text file.
Note: You can always generate it later from Linux with ssh-keygen -l -f <key_file> but since you will need access to a Linux system to do this, it is important you keep a copy of this now so you could proceed with the rest of the instructions. The picture below shows where the important fields are
- Saving keys
- Press Save Public Key. To not confuse all the keys you are going to generate I strongly recommend to call it rsa_putty.pub.
- Next press Save Private Key. Type rsa_putty as a name when prompted. PuTTY will automatically name it rsa_putty.ppk. That's your private key.
Don't quit puttygen yet. Now comes the important stuff. - In the menu bar pick Conversions->Export OpenSSH key. When prompted give a name that indicated that this is the private key for OpenSSH (Linux). I used rsa_openssh. There is no public key stored only the private. We will generate the public one from the private one later.
- In the menu bar pick Conversions->Export ssh.com key. When prompted give a name that indicated that this is the private key for ssh.com. I used rsa_sshcom. Again, there is no public key stored only the private. We will generate the public one from the private one later.
- All done. Now you have essentially 4 files: public and private keys for putty and private keys for ssh.com and OpenSSH.
- Getting ssh.com to work (Windows):
- Here I assume that you have SSHSecureShell (client) installed, that is the ssh.com version. Open a DOS (or cygwin) shell. We now need to generate a public key from the private key we got from puttygen. Best is to change into the directory where your private key is stored and type: ssh-keygen2 -D rsa_sshcom . Note that the command has a '2' at the end. This will generate a file called rsa_sshcom.pub containing the public key. Now you have your key pair.
- Launch SSH and pick from the menu bar Edit->Settings.
Click on GlobalSettings/UserAuthentication/Keys and press the Import button. Point to your public key rsa_sshcom.pub. The private key will be automatically loaded too. That's it. Press OK and quit SSH. We are not quite ready yet. We still have to generate and upload the OpenSSH key to SDCC.
- Getting keys to work with OpenSSH/Linux:
- Copy the private key rsa_openssh to a Linux box (cygwin on Windows works of course too).
- Set the permissions such that only you can read the private key file:
% chomod 600 rsa_openssh
- Generate the public key with:
% ssh-keygen -y -f rsa_openssh > rsa_openssh.pub
- Now you have the key pair.
- To install the key pair on a Linux box copy rsa_openssh and rsa_openssh.pub to your ~/.ssh directory.
Important: the keys ideally will be named id_rsa and id_rsa.pub, otherwise extra steps/options will be required to work with them. So, you are recommended to also do% mv rsa_openssh ~/.ssh/id_rsa
All done. Note that there is no need to put your key files on every machine to which you are going to connect. In fact, you should keep your private key file in as few places as possible -- just the source machine(s) from which you will initiate SSH connections. Your public key file is indeed safe to share with the public, so you need not be so careful with it and in fact will have to provide it to remote systems (such in the next section) in order to use your keys at all.% mv rsa_openssh.pub ~/.ssh/id_rsa.pub
[B] Uploading the public key to SDCC:
- https://web.racf.bnl.gov/Facility/SshKeys/UploadSshKey.php
- Make sure you upload the OpenSSH public key. Everything else won't work.
You need to provide the key fingerprint which you hopefully saved from the instructions above. In case of OpenSSH based keys, you can re-generate the fingerprint with
% ssh-keygen -Emd5 -l -f <key_file>
Note that forcing MD5 hash is important (default hash is SHA256 the RACF interface will not take). All done.
If you followed all instructions you now have 3 key pairs (files). This covers essentially all SSH implementations there are. Where ever you go, whatever machine and system you deal with, one key pair will work. Keep them all in a very save place.
[C] Done.What's next?
Uploading your keys to the SDCC and STAR SSH-key management interfaces
You need to upload your SSH keys only once. But after your first upload, please wait a while (30 mnts) before connecting to the SDCC SSH Gatekeepers. Basic connection instructions, use:
% ssh -AX xxx@sssh.sdcc.bnl.gov
% rterm
The rterm command will open an X-terminal on a valid STAR interactive node. If you do NOT have an X11 server running on your computer, you could use the -i options of rterm for interactive (non X-term based) session.
If you intend to logon to our online enclave, please check the instructions on Accessing The STAR Protected Network to request an account on the STAR SSH gateways and Linux pool (and upload your keys to the STAR Key SSH Management system). Note that you cannot upload your keys anywhere without a Kerberos password (both the SDCC and STAR's interface will require a real account kerberos password to log in). Logging in to the Online enclave involves the following ssh connection:
% ssh -AX xxx@cssh.sdcc.bnl.gov
% ssh -AX xxx@stargw.starp.bnl.gov
A first thing to see is that SDCC gatekeeper is here "cssh" as the network is spearated into a "campus" side (cssh) and a ScienceZone side (sssh). For convenience, we have asked Cyber security to allow connections from "sssh" to our online enclave as well (so if you use sssh all the time, it will work).
For the requested an account online ... note that users do not request access to the individual stargw machines directly. Instead, a shared user database is kept on onlcs.starp.bnl.gov - approval for access to onlcs grants access to the stargw machines and the Online Linux Pool. Such access is typically requested on the user's behalf when the user requests access to the online resources following the instructions at Accessing The STAR Protected Network, though users may also initiate the request themselves.
Logging in to the stargw machines is most conveniently done Using the SSH Agent, and is generally done through the SDCC's SSSH gateways. This additional step of starting an agent would be removed whenever we will be able to directly access the STAR SSH GW (as per 2009, this is not yet possible due to technical details).
See also
To learn more, see:
- SSH connection stability
- Caveats, issues, special cases and possible problems
- SSH Key Management (an overview of the STAR SSH key management system)
»
- Printer-friendly version
- Login or register to post comments