Infrastructure
The pages in this tree relates to the Infrastructure sub-group of the S&C team.
The areas comprise: General infrastructure (software, web service, security,...), Online computing, operations and user support.
Online Computing
General
The online Web server front page is available here. This Drupal section will hold complementary informations.
A list of all operation manuals (beyond detector sub-systems) is available at You do not have access to view this node.
Please use it a startup page.
Detector sub-systems operation procedures - Updated 2008, requested confirmation for 2009
- BEMC Detector Operator Manual
- E-EMC Operations
- FTPC detector operator home
- Basic Operation Procedure for STAR PMD
Online computing run preparation plans
This page will list by year action items, run plans and opened questions. It will server as a repository for documents serving as basis for drawing the requirements. To see documents in this tree, you must belong to the Software and Computing OG (the pages are not public).
Run 19
Feedback from software coordinators
Active feedback
| Sub-system | Coordinator | Calibration POC | Online monitoring POC |
| MTD | Rongrong Ma | - same - | - same - |
| EMC |
Raghav Kunnawalkam Elayavalli Nick Lukow |
- same - |
Note: L2algo, bemc and bsmdstatus |
| EPD | Prashant Shanmuganathan | N/A | - same - |
| BTOF | Frank Geurts | - same - | Frank Geurts Zaochen Ye |
| ETOF | Florian Seck | - same - | Florian Seck Philipp Weidenkaff |
| HLT | Hongwei Ke | - same - | - same - |
Other software coordinators
| sub-system | Coordinator |
| iTPC (TPC?) | Irakli Chakaberia |
| Trigger | Akio Ogawa |
| DAQ | Jeff Landgraf |
| ... |
Run 20
Status of calibration timeline initialization
In RUN: EEMC, EMC, EPD, ETOF, GMT, TPC, MTD, TOF
Test: FST, FCS, STGC (no tables)
Desired init dates where announced to all software coordinators:
- Geometry tag has a timestamp of 20191120
- Simulation timeline [20191115,20191120[
- DB initialization for real data [20191125,...]

     Please initialize your table content appropriate yi.e.
sim flavor initial values are entered at 20191115 up to 20191119
(please exclude the edge),  ofl initial values at 20191125
(run starting on the 1st of December, even tomorrow's cosmic
and commissioning would pick the proper values).
Status - 2019/12/10
EMC = ready
ETOF = ready - initialized at 2019-11-25, no sim (confirming)
TPC = NOT ready [look at year 19 for comparison]
MTD = ready
TOF = Partially ready? INL correction, T0, TDC, status and alignement tables initialized
EPD = gain initialized at 2019-12-15 (!?), status not initialized, no sim
EEMC = ready? (*last init at 2017-12-20)
GMT = ready (*no db tables)
Status - 2019/12/09
EMC = ready
ETOF = ready? initialized at 2019-11-25, no sim
TPC = NOT ready
MTD = ready
TOF = NOT ready
EPD = gain initialized at 2019-12-15 (!?), status not initialized, no sim
EEMC = ready? (*last init at 2017-12-20)
GMT = ready (*no db tables)
Software coordinator feedback for Run 20 - Point of Contacts
| Sub-system | Coordinator | Calibration POC | Online monitoring POC |
| MTD | Rongrong Ma | - same - | - same - |
| EMC EEMC |
Raghav Kunnawalkam Elayavalli Nick Lukow |
- same - |
Note: L2algo, bemc and bsmdstatus |
| EPD | [ TBC] | - same - | - same - |
| BTOF | Frank Geurts | - same - | Frank Geurts Zaochen Ye |
| ETOF | Florian Seck | - same - | Florian Seck Philipp Weidenkaff |
| HLT | Hongwei Ke | - same - | - same - |
| TPC | Irakli Chakaberia | - same - |
Flemming Videbaek
|
| Trigger detectors | Akio Ogawa | - same - | - same - |
| DAQ | Jeff Landgraf | N/A |
---
Run 21
Status of calibration timeline initialization
- Simulation timeline [20201210, 20201215]
- DB initialization for real data [20201220,...]
Status - 2020/12/10
Software coordinator feedback for Run 21 - Point of Contacts
| Sub-system | Coordinator | Calibration POC | Online monitoring POC |
| MTD | Rongrong Ma | - same - | - same - |
| EMC EEMC |
Raghav Kunnawalkam Elayavalli Nick Lukow |
- same - |
Note: L2algo, bemc and bsmdstatus |
| EPD | Prashanth Shanmuganathan (TBC) | Skipper Kagamaster | - same - |
| BTOF | Zaochen | - same - | Frank Geurts Zaochen Ye |
| ETOF | Philipp Weidenkaff | - same - | Philipp Weidenkaff |
| HLT | Hongwei Ke | - same - | - same - |
| TPC | Yuri Fisyak | - same - | Flemming Videbaek |
| Trigger detectors | Akio Ogawa | - same - | - same - |
| DAQ | Jeff Landgraf | N/A | |
| Forward Upgrade | Daniel Brandenburg | - same - | FCS - Akio Ogawa sTGC - Daniel Brandenburg FST - Shenghui Zhang/Zhenyu Ye |
---
Run 22
Status of calibration timeline initialization
- Simulation timeline [20211015, 20211020[
- DB initialization for real data [20211025,...]
Status - 2021/10/13
Software coordinator feedback for Run 22 - Point of Contacts (TBC)
| Sub-system | Coordinator | Calibration POC | Online monitoring POC |
| MTD | Rongrong Ma | - same - | - same - |
| EMC EEMC |
Raghav Kunnawalkam Elayavalli |
- same - |
Note: L2algo, bemc and bsmdstatus |
| EPD | Prashanth Shanmuganathan (TBC) | Skipper Kagamaster | - same - |
| BTOF | Zaochen | - same - | Frank Geurts Zaochen Ye |
| ETOF | Philipp Weidenkaff | - same - | Philipp Weidenkaff |
| HLT | Hongwei Ke | - same - | - same - |
| TPC | Yuri Fisyak | - same - | Flemming Videbaek |
| Trigger detectors | Akio Ogawa | - same - | - same - |
| DAQ | Jeff Landgraf | N/A | |
| Forward Upgrade | Daniel Brandenburg | - same - | FCS - Akio Ogawa sTGC - Daniel Brandenburg FST - Shenghui Zhang/Zhenyu Ye |
---
Run XIII
Preparation meeting minutes
- Preparation meeting #1 (this included a summary of the You do not have access to view this node)
- Preparation meeting #2 (this meeting was informal, meeting #3 bundled two weeks progress)
- Preparation meeting #3 (in meeting #4 announcement)
- Preparation meeting #4 (minutes were not sent)
- Preparation meeting #5
- Preparation meeting #6
- Preparation meeting #7
- Preparation meeting #8
- Preparation meeting #9
- Preparation meeting #10 (informally met with a few team members, no formal meeting)
- Run support meeting, #11
- Run support meeting, #12
- Run support meeting #13 (minutes were not sent - all action items followed-up)
- Run support meeting #14
- Run support meeting #15
- Run support meeting #16
Database initialization check list
TPC Software  – Richard Witt          NO
GMT Software  – Richard Witt          NO
EMC2 Software - Alice Ohlson          Yes
FGT Software  - Anselm Vossen         Yes
FMS Software  - Thomas Burton         Yes
TOF Software  - Frank Geurts          Yes
Trigger Detectors  - Akio Ogawa       ??
HFT Software  - Spyridon Margetis     NO (no DB interface, hard-coded values in preview codes)
Calibration Point of Contacts per sub-system
If a name is missing, the POC role falls onto the coordinator.
                Coordinator           Possible POC
                ------------          ---------------
TPC Software  – Richard Witt
GMT Software  – Richard Witt
EMC2 Software - Alice Ohlson          Alice Ohlson
FGT Software  - Anselm Vossen
FMS Software  - Thomas Burton         Thomas Burton
TOF Software  - Frank Geurts
Trigger Detectors  - Akio Ogawa
HFT Software  - Spyridon Margetis     Hao Qiu
Online Monitoring POC
The final list from the SPin PWGC can be found at You do not have access to view this node . The table below includes the Spin PWGC feedback and other feedbacks merged.| Directories we inferred are being used (as reported in the RTS Hypernews) | |||
| scaler | Len Eun and Ernst Sichtermann (LBL) | This directory usage was indirectly reported | |
| SlowControl | James F Ross (Creighton) | ||
| HLT | Qi-Ye Shou | The 2012 directory had a recent timestamp but owned by mnaglis. Aihong Tang contacted 2013/02/12 Answer from Qi-Ye Shou 2013/02/12 - will be POC. |
|
| fmsStatus | Yuxi Pan (UCLA) | This was not requested but the 2011 directory is being overwritten by user=yuxip FMS software coordinator contacted for confirmation 2013/02/12 Yuxi Pan confirmed 2013/02/13 as POC for this directory |
|
| Spin PWG monitoring related directories follows |
|||
| L0trg | Pibero Djawotho (TAMU) | ||
| L2algo | Maxence Vandenbroucke (Temple) | ||
| cdev | Kevin Adkins (UKY) | ||
| zdc | Len Eun and Ernst Sichtermann (LBL) | ||
| bsmdStatus | Keith Landry (UCLA) | ||
| emcStatus | Keith Landry (UCLA) | ||
| fgtStatus | Xuan Li (Temple) | This directory is also being written by user=akio causing protection access and possible clash problems. POC contacted on 2013/02/08, both Akio and POC contacted again 2013/02/12 -> confirmed as OK. |
|
| bbc | Prashanth (KSU) | ||
Run XIV
- Meeting minutes
- Pre run-preparation notes (basic checks, annoucements)
- Database initialization check list
- Calibration Point of Contacts per sub-system
- Online Monitoring POC
Preparation meeting meetings, links
- You do not have access to view this node
- You do not have access to view this node
- You do not have access to view this node
- You do not have access to view this node
- You do not have access to view this node
- You do not have access to view this node
- You do not have access to view this node
- You do not have access to view this node
- You do not have access to view this node
- You do not have access to view this node
Notes
- 2013/11/15
- Info gathering begins (directories/areas and Point of Contacts)
Status:
2013/11/22, directory structure, 2 people provided feedback, Renee coordinated the rest
2013/11/25, calibration POC, 3 coordinators provided feedback - Closed 2013/12/04
2013/12/04, geometry for Run 14,
- Basic check: CERT for online is old if coming from the Wireless
Status: fixed at ITD level, 2013/11/18 - the reverse proxy did not have the proper CERT
- Info gathering begins (directories/areas and Point of Contacts)
- 2013/1125
- Send the request to software sub-system cooridnators for calibration POC for Run 14, deadline December 2nd.
Database initialization check list
This actions suggested by this section has not started yet.| Sub-system | Coordinator | Check done |
| DAQ |
Jeff Landgraf | |
| TPC | Richard Witt | |
| GMT | Richard Witt | |
| EMC2 | Mike Skoby Kevin Adkins |
|
| FMS | Thomas Burton | |
| TOF | Daniel Brandenburg | |
| MTD | Rongrong Ma | |
| HFT | Spiros Margetis | (not known) |
| Trigger | Akio Ogawa | |
| FGT | Xuan Li |
Calibration Point of Contacts per sub-system
"-" indicates no feedback was provided. But if a name is missing, the POC role falls onto the coordinator.| Sub-system | Coordinator | Calibration POC |
| DAQ | Jeff Landgraf | - |
| TPC | Richard Witt | - |
| GMT | Richard Witt | - |
| EMC2 | Mike Skoby Kevn Adkins |
- |
| FMS | Thomas Burton | - |
| TOF | Daniel Brandenburg | - |
| MTD | Rongrong Ma | Bingchu Huan |
| HFT | Spiros Margetis | Jonathan Bouchet |
| Trigger | Akio Ogawa | - |
| FGT | Xuan Li | N/A |
Online Monitoring POC
| Not needed 2013/11/25 | ||
| SlowControl | Chanaka DeSilva | OKed on second Run preparation meeting |
| HLT | Zhengquia Zhang | Learn incidently on 2014/01/28 |
| HFT | Shusu Shi | Learn about it on 2014/02/26 |
| Not needed 2013/11/25 | ||
| L0trg | Zilong Chang Mike Skoby |
Informed 2013/11/10 and created 2013/11/15 |
| L2algo | Nihar Sahoo | Informed 2013/11/25 |
| Not needed 2013/11/25 | ||
| zdc | may not be used (TBC) | |
| bsmdStatus | Janusz Oleniacz | Info will be passed from Keith Landry 2014/01/20 Possible backup, Leszek Kosarzewski 2014/03/26 |
| emcStatus | Janusz Oleniacz | Info will be passed from Keith Landry 2014/01/20 Possible backup, Leszek Kosarzewski 2014/03/26 |
| Not needed 2013/11/25 | ||
| bbc |
Akio Ogawa | Informed 2013/11/15, created same day |
Run XV
Run 15 was preapred essentiallydiscussing with indviduals and a comprehensive page not maintained.
Run XVI
This page will contain feedback related to the preparation of the online setup.
Notes
Online Monitoring POC
| scaler | ||
| SlowControl | ||
| HLT | Zhengqiao | Feedback 2015/11/24 |
| HFT | Guannan Xie | Spiros: Feedback 2015/11/24 |
| Akio: Possibly not needed (TBC). 2016/01/13 noted this was not used in Run 15 and wil probably never be used again. | ||
| fmsTrg | Confirmed neded 2016/01/13 | |
| fps | Akio: Not neded in Run 16? Perhaps later. | |
| L0trg | Zilong Chang | Zilong: Feedback 2015/11/24 |
| L2algo | Kolja Kauder | Kolja: will be POC - 2015/11/24 |
| cdev | Chanaka DeSilva | |
| zdc | ||
| bsmdStatus | Kolja Kauder | Kolja: will be POC - 2015/11/24 |
| bemcTrgDb | Kolja Kauder | Kolja: will be POC - 2015/11/24 |
| emcStatus | Kolja Kauder | Kolja: will be POC - 2015/11/24 |
| Not needed since Run 14 ... May drop from the list | ||
| bbc |
Akio Ogawa | Feedback 2015/11/24, needed |
| rp |
Calibration Point of Contacts per sub-system
| Sub-system | Coordinator | Calibration POC |
| DAQ | Jeff Landgraf | - |
| TPC | Richard Witt Yuri Fisyak |
- |
| GMT | Richard Witt | - |
| EMC2 | Kolja Kauder Ting Lin |
- |
| FMS | Oleg Eysser | - |
| TOF | Daniel Brandenburg | - |
| MTD | Rongrong Ma | (same confirmed 2015/11/24) |
| HFT | Spiros Margetis | Xin Dong |
| HLT | Hongwei Ke | (same confirmed 2015/11/24) |
| Trigger | Akio Ogawa | - |
| RP | Kin Yip | - |
Database initialization check list
Shift Accounting
This page will now hold the shift accounting pages. They complement the Shift Sign-up process by documenting it.
- Shift Dues and Special Requests Run 20
- Run 19 special requests
- Run 18 shift dues
- You do not have access to view this node
- You do not have access to view this node
- Shift accounting, dues for Run 15 and findings
- You do not have access to view this node
- You do not have access to view this node
- You do not have access to view this node
- ...
Run 18 shift dues
Run 18 Shift Dues & Notes
Period coordinators
As usual, period coordinators are pre-assigned, as arranged by the Spokespersons.
Special arrangements and requests
- Under the family-related policy, the following 6 weeks of offline QA shifts were pre-assigned:
MAR 27 Kevin Adkins (Kentucky)
APR 03 Kevin Adkins
APR 10 Sevil Salur (Rutgers)
APR 17 Richard Witt (USNA/Yale)
MAY 22 Juan Romero (UC Davis)
JUN 12 Terry Tarnowsky (Michigan State)
- Lanny Ray (UT Austin), as QA coordinator, always is pre-assigned the first QA week.
- FIAS remains in “catch-up mode” and is taking extra shifts above their dues. Pre-assigned shifts can be requested in this scenario. FIAS has been pre-assigned 4 Detector Op shifts.
- Bob Tribble (TAMU) requests the evening Shift leader slot during Apr 10-17.
Run 19 special requests
The following pre-assigned slot requests were made.
    9 WEEKS PRE-ASSIGNED QA AS FOLLOWS
    ==================================
    Lanny Ray (UT Austin) QA Mar 5
    Richard Witt (USNA/Yale) QA Mar 19
    Sevil Salur (Rutgers) QA Apr 16
    Wei Li (Rice) QA Apr 23
    Kevin Adkins (Kentucky) QA May 14
    Juan Romero (UC Davis) QA May 21
    Jana Bielcikova (NPI, Czech Acad of Sci) QA May 28
    Yanfang Liu (TAMU) QA June 25
    Yanfang Liu (TAMU) QA July 02

    8 WEEKS PRE-ASSIGNED REGULAR SHIFTS AS FOLLOWS
    ==================================
    Bob Tribble (BNL) Feb 05 SL evening
    Daniel Kincses (Eotvos) Mar 12  DO Trainee Day
    Daniel Kincses (Eotvos) Mar 19  DO Day
    Mate Csanad (Eotvos) Mar 12 SC Day
    Ronald Pinter (Eotvos) Mar 19 SC Day
    Carl Gagliardi (TAMU)  May 14  SL day
    Carl Gagliardi (TAMU)  May 21 SL day
    Grazyna Odyniec (LBNL) July 02 SL evening
Shift Dues and Special Requests Run 20
For the calculation of shift dues, there are two considerations.
1) The length of time of the various shift configurations (2 person, 4 person no trainees, 4 person with trainees, plus period coordinators/QA shifts)
2) The percent occupancy of the training shifts
For many years, 2) has hovered about 45%, which is what we used to calculate the dues. Since STAR gives credit for training shifts (as we should) this needs to be factored in or we would not have enough shifts.
The sum total of shifts needed are then divided by the total number of authors minus authors from Russian institutions who can not come to BNL.
date weeks crew training PC OFFLINE
11/26-12/10 2 2 0 0 0
12/10-12/24 2 4 2 1 0
12/24-6/30 27 4 2 1 1
7/02-7/16 2 4 0 1 1
Adding these together (3x a shift for crew, 3x45% for training, plus pc plus offline) gives a total of 522 shifts.
The total number of shifters is 303 - 30 Russian collaborators = 273 people
Giving a total due of 1.9 per author.
For a given institution, their load is calculated as # of authors - # of expert credits x due -> Set to an integer value as cutting collaborators into pieces is non-collegial behavior.
However, this year, this should have been:
date weeks crew training PC OFFLINE
11/26-12/10 2 2 0 0 0
12/10-12/24 2 4 2 1 0
12/24-6/02 23 4 2 1 1
6/02-6/16 2 4 0 1 1
Adding these together (3x a shift for crew, 3x45% for training, plus pc plus offline) gives a total of 456 shifts for a total due of 1.7 per author.
We allowed some people to pre-sign up, due to a couple different reasons.
Family reasons so offline QA:
James Kevin Adkins
Jana Bielčíková
Sevil Selur
Md. Nasim
Yanfang Liu
Additionally, Lanny Ray is given the first QA shift of the year as our experience QA shifter.
This year, to add an incentive to train for shift leader, we allowed people who were doing shift leader training to sign up for both their training shift and their "real" shift early:
Justin Ewigleben
Hanna Zbroszczyk
Jan Vanek
Maria Zurek
Mathew Kelsey
Kun Jiang
Yue-Hang Leung
Both Bob Tribble and Grazyna Odyniec sign up early for a shift leader position in recognition of their schedules and contributions
This year because of the date of Quark Matter and the STAR pre-QM meeting, several people were traveling on Tuesday during the sign up. These people I signed up early as I did not want to punish some of our most active colleagues for the QM timing:
James Daniel Brandenburg
Sooraj Radhakrishnan
3 other cases that were allowed to pre-sign up:
Panjab University had a single person who had the visa to enter the US, and had to take all of their shifts prior to the end of their contract in March. So that the shifter could have some spaces in his shifts for sanity, I signed up:
Jagbir Singh
Eotvos Lorand University stated that travel is complicated for their group, and so it would be good if they could insure that they were all on shift at the same time. Given that they are coming from Europe I signed up:
Mate Csanad
Daniel Kincses
Roland Pinter
Srikanta Tripathy
Frankfurt Institute for Advanced Studies (FIAS) wanted to be able to bring Masters students to do shift, but given the training requirements and timing with school and travel for Europe, this leaves little availability for shift. So I signed up:
Iouri Vassiliev
Artemiy Belousov
Grigory Kozlov
Tools
This is to serve as a repository of information about various STAR tools used in experimental operations.
Implementing SSL (https) in Tomcat using CA generated certificates
The reason for using a certificate from a CA as opposed to a self-signed certificate is that the browser gives a warning screen and asks you to except the certificate in the case of a self-signed certificate. As there already exists a given list of trusted CAs in the browser this step is not needed.The following list of certificates and a key are needed:
Concatenate the following certs into one file in this example I call it: Global_plus_Intermediate.crt/etc/pki/tls/certs/wildcard.star.bnl.gov.Nov.2012.cert – host cert.
/etc/pki/tls/private/wildcard.star.bnl.gov.Nov.2012.key – host key (don’t give this one out)
/etc/pki/tls/certs/GlobalSignIntermediate.crt – intermediate cert.
/etc/pki/tls/certs/GlobalSignRootCA_ExtendedSSL.crt –root cert.
/etc/pki/tls/certs/ca-bundle.crt – a big list of many cert.
cat /etc/pki/tls/certs/GlobalSignIntermediate.crt > Global_plus_Intermediate.crt
cat /etc/pki/tls/certs/GlobalSignRootCA_ExtendedSSL.crt >> Global_plus_Intermediate.crt
cat /etc/pki/tls/certs/ca-bundle.crt >> Global_plus_Intermediate.crt
Run this command. Note that “-name tomcat” and “-caname root” should not be changed to any other value. The command will still work but will fail under tomcat. If it works you will be asked for a password, that password should be set to "changeit".
openssl pkcs12 -export -in wildcard.star.bnl.gov.Nov.2012.cert -inkey wildcard.star.bnl.gov.Nov.2012.key -out mycert.p12 -name tomcat -CAfile Global_plus_Intermediate.crt -caname root -chain
Test the new p12 output file with this command:
keytool -list -v -storetype pkcs12 -keystore mycert.p12
Note it should say: "Certificate chain length: 3"
In tomcat’s the server.xml file add a connector that looks like this:
<Connector port="8443" protocol="HTTP/1.1" SSLEnabled="true"
           maxThreads="150" scheme="https" secure="true"
           keystoreFile="/home/lbhajdu/certs/mycert.p12" keystorePass="changeit"
           keystoreType="PKCS12" clientAuth="false" sslProtocol="TLS"/>
Note the path should be set to the correct path of the certificate. And the p12 file should only be readable by the Tomcat account because it holds the host key.
Online Linux pool
March 15, 2012:
THIS PAGE IS OBSOLETE! It was written as a guide in 2008 for documenting improvements in the online Linux pool, but has not been updated to reflect additional changes to the state of the pool, so not all details are up to date.
One particular detail to be aware of: the name of the pool nodes is now onlNN.starp.bnl.gov, where 01<=NN<=14. The "onllinuxN" names were retired several years ago.
Historical page (circa 2008/9):
Online Linux pool for general experiment support needs
GOAL:
Provide a Linux environment for general computing needs in support of the experiemental operations.
HISTORY (as of approximately June 2008):
A pool of 14 nodes, consisting of four different hardware classes (all circa 2001) has been in existence for several years. For the last three (or more?) years, they have had Scientific Linux 3.x with support for the STAR software environment, along with access to various DAQ and Trigger data sources. The number of significant users has probably been less than 20, with the heaviest usage related to L2. User authentication was originally based on an antique NIS server, to which we had imported the RCF accounts and passwords. Though still alive, we have not kept this NIS information maintained over time. Over time, local accounts on each node became the norm, though of course this is rather tedious. Home directories come in three categories: AFS, NFS on onllinux5, and local home directories on individual nodes. Again, this gets rather tedious to maintain over time.
There are several "special" nodes to be aware of:
- Three of the nodes (onllinux1, 2 and 3) are in the Control Room for direct console login as needed. (The rest are in the DAQ room.)
- onllinux5 has the NFS shared home directories (in /online/users). (NB. /online/users is being backed up by the ITD Networker backup system.)
- onllinux6 is (was?) used for many online database maintenance scripts (check with Mike DePhillps about this -- we had planned to move these scripts to onldb).
- onllinux1 was configured as an NIS slave server, in case the NIS master (starnis01) fails.
PLAN:
For the run starting in 2008 (2009?), we are replacing all of these nodes with newer hardware.
The basic hardware specs for the replacement nodes are:
Dual 2.4 GHZ Intel Xeon processors
1GB RAM
2 x 120 GB IDE disks
These nodes should be configured with Scientific Linux 4.5 (or 4.6 if we can ensure compatibility with STAR software) and support the STAR software environment.
They should have access to various DAQ and Trigger NFS shares. Here is a starter list of mounts:
| SERVER | DIRECTORY on SERVER | LOCAL MOUNT PONT | MOUNT OPTIONS |
| evp.starp | /a | /evp/a | ro |
| evb01.starp | /a | /evb01/a | ro |
| evb01 | /b | /evb01/b | ro |
| evb01 | /c | /evb01/c | ro |
| evb01 | /d | /evb01/d | ro |
| evb02.starp | /a | /evb02/a | ro |
| evb02 | /b | /evb02/b | ro |
| evb02 | /c | /evb02/c | ro |
| evb02 | /d | /evb02/d | ro |
| daqman.starp | /RTS | /daq/RTS | ro |
| daqman | /data | /daq/data | rw |
| daqman | /log | /daq/log | ro |
| trgscratch.starp | /data/trgdata | /trg/trgdata | ro |
| trgscratch.starp | /data/scalerdata | /trg/scalerdata | ro |
| startrg2.starp | /home/startrg/trg/monitor/run9/scalers | /trg/scalermonitor | ro |
| online.star | /export | /onlineweb/www | rw |
WISHLIST Items with good progress:
- <Uniform and easy to maintain user authentication system to replace the current NIS and local account mess. Either a local LDAP, or a glom onto RCF LDAP seems most feasible> -- An ldap server (onlldap.starp.bnl.gov) has been set-up and the 15 onllinux nodes are authenticating to it *BUT* it is using NIS!
- <Shared home directories across the nodes with backups> -- onlldap is also hosting the home directories and sharing them via NFS. EMC Networker is backing up the home directories and Matt A. is recieving the email notifications.
- <Integration into SSH key management system (mechanism depends upon user authentication method(s) selected).> -- The ldap server has been added to the STAR SSH key management system, and users are able to login to the new onlXX nodes with keys now.
- <Common configuration management system> -- Webmin is in use.
- <Ganglia monitoring of the nodes> -- I think this is done...
- <Osiris monitoring of the nodes> -- I think this is done - Matt A. and Wayne B. are receiveing the notices...
WISHLIST Items still needing significant work:
- None?
SSH Key Management
Overview
An SSH public key management system has been developed for STAR (see 2008 J. Phys.: Conf. Ser. 119 072005), with two primary goals stemming from the heightened cyber-security scrutiny at BNL:
- Use of two-factor authentication for remote logins
- Identification and management of remote users accessing our nodes (in particular, the users of "group" accounts which are not tied to one individual) and achieve accountability
A benefit for users also can be seen in the reduction in the number of passwords to remember and type.
In purpose, this system is similar to the RCF's key management system, but is somewhat more powerful because of its flexibility in the association of hosts (client systems), user accounts on those clients, and self-service key installation requests.
Here is a typical scenario of the system usage:
- A sysadmin of a machine named FOO creates a user account named "JDOE" and, if not done already, installs the key_services client.
- A user account 'JDOE' on host 'FOO' is configured in the Key Management system by a key management administrator.
- John Doe uploads (via the web) his or her public ssh key (in openssh format).
- John Doe requests (via the web) that his key be added to JDOE's authorized_keys file on FOO.
- A key management administrator approves the request, and the key_services client places the key in ~JDOE/.ssh/authorized_keys.
At this point, John Doe has key-based access to JDOE@FOO. Simple enough? But wait, there's more! Now John Doe realizes that he also needs access to the group account named "operator" on host BAR. Since his key is already in the key management system he has only to request that his key be added to operator@BAR, and voila (subject to administrator approval), he can now login with his key to both JDOE@FOO and operator@BAR. And if Mr. Doe should leave STAR, then an administrator simply removes him from the system and his keys are removed from both hosts.
Slightly Deeper...
There are three things to keep track of here -- people (and their SSH keys of course), host (client) systems, and user accounts on those hosts:
People want access to specific user accounts at specific hosts.
So the system maintains a list of user accounts for each host system, and a list of people associated with each user account at each host.
(To be clear -- the system does not have any automatic user account detection mechanism at this time -- each desired "user account@host" association has to be added "by hand" by an administrator.)
This Key Management system, as seen by the users (and admins), consists simply of users' web browsers (with https for encryption) and some PHP code on a web server (which we'll call "starkeyw") which inserts uploaded keys and user requests (and administrator's commands) to a backend database (which could be on a different node from the web server if desired).
Behind the scenes, each host that is participating in the system has a keyservices client installed that runs as a system service. The keyservices_client periodically (at five minute intervals by default) interacts a different web server (serving different PHP code that we'll call starkeyd). The backend database is consulted for the list of approved associations and the appropriate keys are downloaded by the client and added to the authorized_keys files accordingly.
In our case, our primary web server at www.star.bnl.gov hosts all the STAR Key Manager (SKM) services (starkeyw and starkeyd via Apache, and a MySQL database), but they could each be on separate servers if desired.
Perhaps a picture will help. See below for a link to an image labelled "SKMS in pictures".
Deployment Status and Future Plans
We have begun using the Key Management system with several nodes and are seeking to add more (currently on a voluntary basis). Only RHEL 3/4/5 and Scientific Linux 3/4/5 with i386 and x86_64 kernels have been tested, but there is no reason to believe that the client couldn't be built on other Linux distributions or even Solaris. We do not anticipate "forcing" this tool onto any detector sub-systems during the 2007 RHIC run, but we do expect it (or something similar) to become mandatory before any future runs. Please contact one of the admins (Wayne Betts, Jerome Lauret or Mike Dephillips) if you'd like to volunteer or have any questions.
User access is currently based on RCF Kerberos authentication, but may be extended to additional authentication methods (eg., BNL LDAP) if the need arises.
Client RPMs (for some configurations) and SRPM's are available, and some installation details are available here:
http://www.star.bnl.gov/~dmitry/skd_setup/
An additional related project is the possible implementation of a STAR ssh gateway system (while disallowing direct login to any of our nodes online) - in effect acting much like the current ssh gateway systems role in the SDCC. Though we have an intended gateway node online (stargw1.starp.bnl.gov, with a spare on hand as well), it's use is not currently required.
Anxious to get started?
Here you go: https://www.star.bnl.gov/starkeyw/
You can use your RCF username and Kerberos password to enter.
When uploading keys, use your SSH public keys - they need to be in OpenSSH format. If not, please consult SSH Keys and login to the SDCC.
Software Infrastructure
On the menu today ...
- General Information
- Infrastructure & Software
Software Release, Sanity, ..
Problem reporting: General RCF Information and problem reporting, STAR problem reporting, - General Tools
- Web Sanity, Software & Documentation tools
- HPSS tools & services
General Information
SOFI stands for SOFtware infrastructure and Infrastructure. It includes any topics related to code standards, tools compiling your code, problems with base code and Infrastructure. SOFI also addresses (or try to address) your need in terms of monitoring or easily manage activities and resources in the STAR environment.
- Discussion list: starsoft-l@lists.bnl.gov (old: starsofi-hn@www.star.bnl.gov)
- Web archive
- RCF liaison meeting support documents
- IO performance of some of our hardware or tested hardware.
Infrastructure & Software
- Current software releases page
- A tutorial exists on Setting up your computing environment and what is defined and how to use it ...
- See the Autobuild & Code Sanity page where you will find the AutoBuild, Insure++, profiling compilation results as well as information about valgrind, Jprof etc ...
- If you are searching for a quick startup documentation for Batch system, resource management system, ...
- General RCF problems should be reported using Computing Facility Issue reporting system (RT).
You should NOT use this system to report STAR-specific problems. Instead, use the STAR Request Tracking system described below. - To report STAR specific problems: Request Tracking (bug and issues tracker) system,
Submitting a problem (bug), help request or issue to the Request Tracking system using Email
You can always submit a report to the bug tracking system by sending an Email directly. There is no need for a personalized account and using the Web Interface is not mandatory. For each BugTracking category, an equivalent @www.star.bnl.gov mailing list exists.
The currently available queues are
bugs-high problem with ANY STAR Software with a need to be fixed without delay bugs-medium problem with ANY STAR Software and must be fixed for the next release bugs-low problem with ANY STAR Software. Should be fixed for the next release comp-support General computing operation support (user, hardware and middleware provisioning) issues-infrstruct Any Infrastructure issues (General software and libraries, tools, network)
issues-scheduler Issues related to the SUMS project (STAR Unified Meta-Scheduler)
issues-xrootd Issues related to the (X)rootd distributed data usage issues-simu Issues related to Simulation grid-general STAR VO general Grid support : job submission, infrastructure, components, testing problem etc ... grid-bnl STAR VO, BNL Grid Operation support grid-lbl STAR VO, LBNL Grid Operation support wishlist Use it for or suggesting what you would wish to see soon, would be nice to have etc ...
You may use the guest account for accessing the Web interface. The magic word is here.
- To create a ticket, select the queue (drop down menu after the create-ticket button). Queues are currently sorted by problem priority. Select the appropriate level. A wishlist queue has been created for your comments and suggestions. After the queue is selected, click on the create-ticket button and fill the form. Please, do not forget the usual information i.e. the result of STAR_LEVELS and of uname -a AND a description of how to reproduce the problem.
- If you want to request a private account instead of using the guest account, send a message to the wishlist queue. There are 2 main reasons for requesting a personalized account :
- If you are planning to be an administrator or a watcher of the bug tracking system (that is, receive tickets automatically, take responsibility for solving them etc ...) you MUST have a private account.
- If you prefer to see the summary and progress of your own submitted tickets at login instead of seeing all tickets submitted under the guest account, you should also ask for a private account.
- At login, the left side panels shows the tickets you have requested and the tickets you own. The right panel shows a the status of all queues. Having a private account setup does NOT mean that you cannot browse the other users tickets. It only affects the left panels summary.
- To find a particular bug, click on search and follow the instructions.
- Finally, if you would like to have a new queue created for a particular purpose (sub-system specific problems), feel free to request to setup such a queue.
General Tools
Data location tools
- Several tools exists to locate data both on disk and in HPSS. Some tools are available from the production page and we will list here only the tools we are developing for the future.
- FileCatalog (command line interface get_file_list.pl and Perl module interface).
- You do not have access to view this node
Resource Monitoring tools
- Nova shows jobs running per users, per machine etc ...
- STAR disk space overall
- GPFS occupancy
- Farm monitoring - Ganglia Reports
- STAR Ganglia reports - those pages required the protected or the ganglia password.
- STAR Offline Ganglia monitoring a tool monitoring global resources.
- The Online Ganglia monitoring page
- RCF/STAR Ganglia reports - you need to use your RCF/Kerberos credentials for the below monitoring
- STAR Ganglia reports - those pages required the protected or the ganglia password.
- Queue Monitoring
- Users with Heavy NFS (GPFS) IO traffic [coming soon]
- Condor Status and Information : Occupancy plot, Usage plot, Pool/Queue plot and Running users and shares statistics.
- (Old and may break soon: pool usage monitoring and condor pool occupancy and general aggregate statistics)
- CRS jobs monitoring for STAR
- Nagios Based Farm Alert
- Cacti network traffic plots (to/from a few selected nodes incuding DB and Xrootd)
Browsers
- Database Browser
- Current RunLog Browser
- 2008 RunLog Browser
- 2007 RunLog Browser
- 2006 RunLog Browser
- ...
- Fast-Offline Browser
Web Sanity, Software & documentation tools
Web based access and tools
- Available CGIs
- You do not have access to view this node
- RCF Web based Email access
Web Sanity
- You can consult the server's log by using this cgi.
- Usage statistics using awstats.
- Status interafce includes: perl-status, serv-status, serv-info.
Software & documentation auto-generation
- Our STAR Software CVS Repositories browser
Allows browsing the full offline and online CVS repositories with listings showing days since last modification, modifier, and log message of last commit, display and download (checkout) access to code, access to all file versions and tags, and diff'ing between consecutive or arbitrary versions, direct file-level access to the cross-referenced presentation of a file, ... You can also sort by - Doxygen Code documentation (what is already doxygenized )
and the User documentation (a quick startup ...) Our current Code documentation is generated using the doxygen generator. Two utilities exists to help you with this new documentation scheme :- doxygenize is a utility which takes as argument a list of header files and modify them to include a "startup" doxygen tag documentation. It tries to guess the comment block, the author and the class name based on content. The current version also documents struct and enum lists. Your are INVITED TO CHECK the result before committing anything. I have tested on several class headers but there is always the exception where the parsing fails ...
- An interface to doxygen named doxycron.pl was created and installed on our Linux machines to satisfy the need of users to generate the documentation by themselves for checking purposes. That same generator interface is used to produce our Code documentation every day so, a simple convention has been chosen to accomplish both tasks. But why doxycron.plinstead of directly using doxygen? If you are a doxygen expert, the answer is 'indeed, why ?'. If not, I hope you will appreciate that doxycron.pl not only takes care of everything for you (like creating the directory structure, a default actually-functional configuration file, safely creating a new documentation set etc ....) but also adds a few more tasks to its list you normally have to do it yourself when using doxygen base tools (index creation, sorting of run-time errors etc ...). This being said, let me describe this tool now ...
The syntax for doxycron.pl is
% doxycron.pl [-i] PathWhereDocWillBeGenerated Path(s)ToScanForCode Project(s)Name SubDir(s)Tag
The arguments are:- -i is used here to disable the doxytag execution, a useless pass if you only want to test your documentation.
- PathWhereDocWillBeGenerated is the path where the documentation tree will be or TARGETD
- Path(s)ToScanForCode is the path where the sources are or INDEXD (default is the comma separated list /afs/rhic.bnl.gov/star/packages/dev/include,/afs/rhic.bnl.gov/star/packages/dev/StRoot)
- Project(s)Name is a project name (list) or PROJECT (default is the comma separated include,StRoot)
- SubDir(s)Tag an optional tag (list) for an extra tree level or SUBDIR. The default is the comma separated list include, . Note that the last element is null i.e. "". When encountered, the null portion of a SUBDIR list will tell doxycron.pl to generate an searchable index based all previous non-null SUBDIR in the list.
Note that if one uses lists instead of single values, then, ALL arguments MUST be a list and the first 3 are mandatory.
To pass an empty argument in a list, you must use quotations as in the following example
% doxycron.pl /star/u/jeromel/work/doxygen /star/u/jeromel/work/STAR/.$STAR_HOST_SYS/DEV/include,/star/u/jeromel/work/STAR/DEV/StRoot include,StRoot 'include, '
In order to make it clear what the conventions are, let's describe a step by step example as follow:
Examples 1 (simple / brief explaination):
% doxycron.pl `pwd` `pwd`/dev/StRoot StRoot
would create a directory dox/ in `pwd` containing the code documentation generated from the relative tree dev/StRoot for the project named StRoot. Likely, this (or similar) will generate the documentation you need.
Example 2 (fully explained):
% doxycron.pl /star/u/jeromel/work/doxygen /star/u/jeromel/work/STAR/DEV/StRoot Test
In this example, I scan any source code found in my local cvs checked-out area /star/u/jeromel/work/STAR/DEV starting from StRoot. The output tree structure (where the documentation will end) are requested to be in TARGETD=/star/u/jeromel/work/doxygen. In order to accomplish this, doxycron.pl will check and do the following:- Check that the doxygen program is installed
- Create (if it does not exists) $TARGETD/dox directory where everything will be stored and the tree will start
- Search for a $TARGETD/dox/$PROJECT.cfg file. If it does not exists, a default configuration file will be created. In our example, the name of the configuration file defaults to /star/u/jeromel/work/doxygen/dox/Test.cfg. You can play with several configuration file by changing the project name. However, changing the project name would not lead to placing the documents in a different directory tree. You have to play with the $SUBDIR value for that.
- The $SUBDIR variable is not used in our example. If I had chosen it to be, let's say, /bof, the documentation would have been created in $TARGETD/dox/bof instead but the template is still expected to be $TARGETD/dox/$PROJECT.cfg.
The configuration file should be considered as a template file, not a real configuration file. Any item appearing with a value like Auto-> or Fixed-> will be replaced on the fly by the appropriate value before doxygen is run. This ensures keeping the conventions tidy and clean. You actually, do not have to think about it neither, it works :) ... If it does not, please, let me know. Note that the temporary configuration file will be created in /tmp on the local machine and left there after running.
What else does one need to know : the way doxycron.pl works is the safest I could think off. Each new documentation set is re-generated from scratch, that is, using temporary directories, renaming old ones and deleting very old ones. After doxycron.pl has completed its tasks, you will end up with the directories $TARGETD/dox$SUBDIR/html and $TARGETD/dox$SUBDIR/latex. The result of the preceding execution of doxycron.pl will be in directories named html.old and latex.old.
One thing will not work for users though : the indexing. The installation of indexing mechanism in doxygen is currently not terribly flexible and fixed values were chosen so that clicking on the Search index link will go to the cgi searching the entire main documentation pages.As a last note, doxygen understands ABSOLUTE path names only and therefore, doxycron.pl will die out if you try to use relative paths as the arguments. Just as a reminder, /titi/toto is an absolute path while things like ./or ./tata are relative path.
HPSS tools & services
- How to retrieve files from HPSS. Please, use the Data Carousel and ONLY the DataCarousel.
Note: DO NOT use hsi to retrieve files from HPSS - this access mode locks tape drives for exclusive use (only you, not shared with any other user) and have dire impacts on STAR;s operations from production to data restores. If you are caught using it, you will be banned from accessing HPSS (your privilege to access HPSS resources will be revoked).
Again - Please, use the Data Carousel.- Data Carousel Quick Start/Tutorial
- Accounting interface (see the result of you requests as they are processed)
- DataCarousel Input file generator for raw files (valid only for what the FastOffline system knows about)
- Archiving into HPSS
Several utilities exists. You can find the reference on the RCF HPSS Service page. Those utilities will bring you directly in the Archive class of service. Note that the DataCarousel can retrieve files from ANY class of service. The prefered mode for archining is the use of htar.
NOTE: You should NOT abuse those services to retreive massive amount of files from HPSS (your operation will otherwise clash with other operations, including stall or slow down data production). Use the DataCarousel instead for massive file retreival. Abuse may lead to supression of access to archival service.
- For rftp, history is in an Hypernews post Using rftp . If you save individual files and have lots of files in a directory, please avoid causing a Meta_data lookup. Meta-data lookup happens when you 'ls -l'. As a reminder, please keep in mind that HPSS is NOT made for neither small files and large amount of files in directories but for massive large files storage (on 2007/10/10 for example, a user crashed HPSS with a single 'ls -l' lookup of a 3000 files directory). In that regard, rftp is most useful if you create first an archive of your files yourself (tar, zip,...) and push the archive into HPSS afterward. If this is not your mode of operation, the preferred method is the use of htar which provides a command-line direct HPSS archive creation interface.
- htar is the recommended mode for archining into HPSS. This utility provides a tar-like interface allowing for bundling together several files or an entire directory tree. Note the syntax of htar and especiallythe extract below from this thread:
If you want the file to be created in /home/<username>/<subdir1> and <subdir1> does not existed yet, use
% htar -Pcf /home/<username>/<subdir1>/<filename> <source>

If you want the file to be created into /home/<username>/<subdir2> and <subdir2> already exists, use
% htar -cf /home/<username>/<subdir2>/<filename> <source>
Please consult the help on the web for more information about htar. - File size is limited to be <55GB, and if exceeded you will get Error -22. In this case consider using split-tar. A simple example/syntax on how to use split-tar is:
% split-tar -s 55G -c blabla.tar blabla/
This will at least create blabla-000.tar but also the next sequences (001, 002, ...) each of 55 GBytes until all files from directory blabla/ are packed. The magic 55 G suggested herein and in many posts works for any generation of drive for the past decade. But a limit of 100-150 GB should also work on most media at BNL as per 2016. See this post for a summary of past pointers. - You may make split-tar archive cross-compatible with htar by creating afterward the htar indexes. To do this, use a command such as
% htar -X -E -f blabla-000.tar
this will create blabla-000.tar.idx you will need to save in HPSS along the archive.
Batch system, resource management system
SUMS (aka, STAR Scheduler)
SUMS, the product of the STAR Scheduler project, stands for Star Unified Meta-Scheduler. This tool is currently documented on its own pages. SUMS provides a uniform user interface to submitting jobs on "a" farm that is, regardless of the batch system used, the language it provides (in XML) is identical. The scheduling is controlled by policies handling all the details on fitting your jobs in the proper queue, requesting proper resource allocation and so on. In other words, it isolates users from the infrastructure details.
You would benefit from starting with the following documents:
- Manual for users
- Description of existing policies and dispatchers
- The SUMS' FAQ
LSF
LSF was dropped from BNL facility support in July 2008 due to licensing cost. Please, refer to the historical revision for information about it. If a link brought you here, please update or send a note to the page owner. Information have been kept un-published You do not have access to view this node.
Condor
Quick start ...
Condor Pools at BNL
The condor pools are segmented into four pools extracted from this RACF page:
| production jobs | +Experiment = "star" | +Job_Type = "crs" | high priority CRS jobs, no time limit, may use all the slots on CRS nodes and up to 1/2 available job slots per system on CAS ; the CRS portion is not available to normal users and using this Job_Type for user will fail |
| users normal jobs | +Experiment = "star" | +Job_Type = "cas" | short jobs, 3 to 5 hour soft limit (when resources are requested by others), 40 hour hard limit - this has higher priority than the "long" Job_Type. |
| user long jobs | +Experiment = "star" | +Job_Type = "long" | long running jobs, 5 day soft limit (when resources are requested by others), 10 day hard limit, may use 1 job slot per system on a subset of machines |
| general queue | +Experiment = "general" +Experiment = "star" |
General queue shared by multiple experiments, 2 hours guaranteed time minimum (can be evicted afterward by any experiment's specific jobs claiming the slot) |
The Condor configurations do not have create a simple notion of queues but generates a notion of pools. Pools are group of resources spanning all STAR machines (RCAS and RCRS nodes) and even other experiment's nodes. The first column tend to suggest four of such pools although we will see below that life is more complicated than that.
First, it is important to understand that the +Experiment attribute is only used for accounting purposes and what makes the difference between a user job or a production job or a general job is really the other attributes.
Selection of how your jobs will run is the role of +Job_Type attribute. When it is unspecified, the general queue (spanning all RHIC machines at the facility) is assumed but your job may not have the same time limit. We will discuss the restriction later. The 4th column of the table above shows the CPU time limits and additional constraints such as the number of slots within a given category one may claim. Note that the +Job_type="crs" is reserved and its access will be enforced by Condor (only starreco may access this type).
In addition of using +Job_type which as we have seen controls what comes as close as possible to a queue in Condor, one may need to restrict its jobs to run on a subset of machines by using the CPU_Type attribute in the Requirements tag (if you are not completely lost by now, you are good ;-0 ). An example to illustrate this:
+Experiment = "star"
+Job_type = "cas"
Requirements = (CPU_type != "crs") && (CPU_Experiment == "star")
In this example, a cas job (interpret this as "a normal user analysis job") is being run on behalf of the experiment star. The CPU / nodes requested are the CPU belonging to the star experiment and the nodes are not RCRS nodes. By specifying those two requirements, the user is trying to make sure that jobs will be running on RCAS nodes only (or != "crs") AND, regardless of a possible switch to +Experiment="general", the jobs will still be running on the nodes belonging to STAR only.
In this second example
+Experiment = "star"
+Job_type = "cas"
Requirements = (CPU_Experiment == "star")
we have pretty much the same request as before but the jobs may also run on RCRS nodes. However, if data production runs (+Job_type="crs" only starreco may start), the user's job will likely be evicted (as production jobs will have higher priorities) and the user may not want to risk that hence specifying the first Requirements tag.
Pool rules
A few rules apply (or summarized) below:
- Production jobs cannot be evicted on their claimed slots ... since they have higher priority than user jobs even on CAS nodes, this means that as soon as production jobs starts, its pool of slots will slowly but surely be taken - user's jobs may use those slots at low-downs of utlization.
- Users jobs can be evicte. Eviction happens after 3 hours of runtime from the time they start but only if the slot they are running in is claimed by other jobs. For example, if a production job wants a node being used by a user job that has been running for two hours then that user job has one hour left before it gets kicked out ...
- This time limit comes into effect when a higher priority job wants the slot (i.e. production vs. user or production)
- general queue jobs are evicted after two hours of guaranteed time when the slot is wanted by ANY STAR job (production, user)
- general queue jobs will be evicted however if they consume more than 750 MB of memory
This provides the general structure of the Condor policy in place for STAR. The other policy options in place goes as follows:
- The following options apply to all machines: the 1 mn load has to be less than 1.4 on a two CPU node for a job to start
- General queue jobs will not start on any node unless 1 min < 1.4, swap > 200M, memory > 100M.
- User fairshare is in place.
In the land of confusion ...
Also, users are often confused of the meaning of their job priority. Condor will consider a user's job priority and submit jobs in priority order (where the larger the number, more likely the job willl start) but those priorities have NO meaning across two distinct users. In other words, it is not because user A sets job priorities larger by an order of magitude comparing to user B that his job will start first. Job priority only providesa mechanism for a user to specify which of their idle jobs in the queue are most important. Jobs with higher numerical priority should run before those with lower priority, although because jobs can be submitted from multiple machines, this is not always the case. Job prioritties are listed by the condor_q command in the PRIO column.
The effective user priority is dynamic, on the other hand, and changes as a user has been given access to resources over a period of time. A lower numerical effective user priority (EUP) indicates a higher priority. Condor's fairshare mechanism is implemented via EUP. The condor_userprio command hence provides an indication of your faireshareness.
You should be able to use condor_qedit to manually modify the "Priority" parameter, if desired. If a job does not run for weeks, there is likely a problem with its submitfile or one of its input, and in particular its Requirements line. You can use condor_q -analyze JOBID, or condor_q -better-analyze JOBID to determine why it cannot be scheduled.
What you need to know about Condor
First of all, we recommend you use SUMS to submit to Condor as we would take care of adding codes, tricks, tweaks to make sure your jobs run smoothly. But if you really don't want to, here are a few issues you may encounter:
- Unless you use the GetEnv=true datacard directive in your condor job description, Condor jobs will start with a blank set of environment variables unlike a shell startup. Especially, none of
SHELL, HOME, LOGNAME, PATH, TERM and MAIL
will be define. The absence of $HOME will have for side effect that, whenever a job starts, your .cshrc and .login will not be seen hence, your STAR environment will not be loaded. You must take this into account and execute the STAR login by hand (within your job file).
Note that using GetEnv=true has its own sde effects which includes a full copy of the environment variables as defined from the submitter node. This will NOT be suitable for distributed computing jobs. The use of getenv() C primitive in your code is especially questionable (it will unlikely return a valid value) and- STAR user may look at this post for more information on how to use ROOT function calls for defining some of the above.
- You may also use getent shell command (if exists) to get the value of your home directory
- A combinations of getpwuid(), getpwnam() would allow to define $USER and $HOME
- Condor follows a multi-submitter node model with no centralized repository for all jobs. As a consequence, whenever you use a command such as condor_rm, you would kill the jobs you have submitted from that node only. To kill jobs submitted from other submitter nodes (any interactive node at BNL is a potential submitter node), you need to loop over the possibilities and use the -name command line option.
- Condor will keep your jobs indefinitely in the Pool unless you either remove the jobs or specify a condition allowing for jobs to be automatically removed upon status and expiration time. A few examples below could be used for the PeriodicRemove Condor datacard
- To automatically remove jobs which have been in the queue for more than 2 days but marked as status 5 (held for a reason or another and not moving) use
(((CurrentTime - EnteredCurrentStatus) > (2*24*3600)) && JobStatus == 5)
- To automatically remove jobsruning the the queue for more than 2 days but using less than 10% of the CPU (probably looping or inefficient jobs blocking a job slot), use
(JobStatus == 2 && (CurrentTime - JobCurrentStartDate > (54000)) &&
                    ((RemoteUserCpu+RemoteSysCpu)/(CurrentTime-JobCurrentStartDate) < 0.10))
PeriodicRemove = (JobStatus == 2 && (CurrentTime - JobCurrentStartDate > (54000)) && ((RemoteUserCpu+RemoteSysCpu)/(CurrentTime-JobCurrentStartDate) < 0.10)) || (((CurrentTime - EnteredCurrentStatus) > (2*24*3600)) && JobStatus == 5) - To automatically remove jobs which have been in the queue for more than 2 days but marked as status 5 (held for a reason or another and not moving) use
Some condor commands
This is not meant to be an exhaustive set of commands nor a tutorial. You are invited to read to the manpages for condor_submit, condor_rm, condor_q, condor_status. Those will be most of what you will need to use on a daily basis. Help for version 6.9 is available online.
- Query and information
- condor_q -submitter $USER
List jobs of specific submitter $USER from all the queues in the pool - condor_q -submitter $USER -format "%s\n" ClusterID
Shows the JobID for all jobs of $USER. This command may succeed although an unconstrained condor_q may fell if we had a large amount of jobs - condor_q -analyze $JOBID
Perform an approximate analysis to determine how many resources are available to run the requested jobs. - condor_status -submitters
shows the numbers of running/idle/held jobs for each user on all machines - condor_status -claimed
Summarize jobs by servers as claimed - condor_status -avail
Summarize resources which are available
- condor_q -submitter $USER
- Removing jobs, controlling them
- condor_rm $USER
removes all of your jobs submitted from this machine - condor_rm -name $node $USER
removed all jobs for $USER submitted from machine $node
- condor_rm -forcex $JOBID
Forces the immediate local removal of jobs in undefined state (only affects jobs already being removed). This is needed if condor_q -submitter shows your job but condor_q -analyze $JOBID does not (indicating an out of sync information at Condor level).
- condor_release $USER
releases all of your held jobs back into the pending pool for $USER - condor_vacate -fast
may be used to remove all jobs from the submitter node job queue. This is a fast mode command (no checks) and applies to running jobs (not pending ones)
- condor_rm $USER
- More advanced
- condor_status -constraint 'RemoteUser == "$USER@bnl.gov"'
lists the machines on which your jobs are currently running
- condor_q -submitter username -format "%d" ClusterId -format " %d" JobStatus -format " %s\n" Cmd
shows the job id, status, and command for all of your jobs. 1==Idle, 2==Running for Status. I use something like this because the default output of condor_q truncates the command at 80 characters and prevents you from seeing the actually scheduler job ID associated with the Condor job. I'll work on improving this command, but this is what I've got for now. - To access the reason for job 26875.0 to be held from a submitter node advertized to be rcas6007, use the following command to have a human readable format
condor_q -pool condor02.rcf.bnl.gov:9664 -name rcas6007 -format "%s\n" HoldReason 26875.0
- condor_status -constraint 'RemoteUser == "$USER@bnl.gov"'
Computing Environment
The pages below will give you a rapid overview of the computing environment at BNL, including information for visitors and employees, accessible printers, best practices, recommended tools for managing Windows.
FAQs and Tips
Software Site Licenses
Do we have a site license for software package XYZ? The answer is (almost) always: No!
Neither STAR nor BNL have site licences for any Microsoft product, Hummingbird Exceed, WinZIP, ssh.com's software or much of anything intended to run on individual users' desktops. Furthermore, for most purposes BNL-owned computers do not qualify for academic software licenses, though exceptions do exist.
FAQ: PDF creation
How can I create a file in pdf format?Without Adobe Acrobat (an expensive bit of software), this can be a daunting question. I am researching answers, some of which are available in my Windows software tips. Here is the gist of it in a nutshell as I write this -- there are online conversion services and OpenOffice is capable of exporting PDF documents.
FAQ: X Servers
What X server software should I use in Windows?I recommend trying the X Server that is available freely with Cygwin, for which I have created some documentation here: Cygwin Tips. If you can't make that work for you, then I next recommend a commercial product called Xmanager, available from http://www.netsarang.com. Last time I checked, you could still download a fully functional version for a time-limited evaluation period.
TIP: Windows Hibernation trick
Hibernate or Standby -- There is a difference which you might find handy:- "Standby" puts the machine in a low power state from which it can be woken up nearly instantly with some stimulus, such as a keystroke or mouse movement (much like a screensaver) but the state requires a continuous power source. The power required is quite small compared to normal running, but it can eventually deplete the battery (or crash hard if the power is lost in the case of a desktop).
- "Hibernate" actually dumps everything in memory to disk and turns off the computer, then upon restarting it reloads the saved memory and basically is back to where it was. While hibernating, no power source is required. It can't wake up quickly (it takes about as long as a normal bootup), but when it does wake up, (almost) everything is just the way you left it. One caveat about networking is in order here: Stateful connections (eg. ssh logins) are not likely to survive a hibernation mode (though you may be able to enable such a feature if you control both the client and server configurations), but most web browsing activity and email clients, which don't maintain an active connection, can happily resume where they left off.
Imagine: the lightning is starting, and you've got 50 windows open on your desktop that would take an hour to restore from scratch. You want to hibernate now! Here's how to enable hibernating if it isn't showing up in the shutdown box:
Open the Control Panels and open "Power Options". Go to the "Hibernate" tab and make sure the the box to enable Hibernation is checked. When you hit "Turn Off Computer" in the Start menu, if you still only see a Standby button, then try holding down a Shift key -- the Standby button should change to a Hibernate button. Obvious, huh?
For the curious:
There are actually six (or seven depending on what you call "official") ACPI power states, but most motherboards/BIOSes only support a subset of these. To learn more, try Googling "acpi power state", or you can start here as long as this link works. (Note there is an error in the main post -- the S5 state is actually "Shutdown" in Microsoft's terminology).
From the command line, you can play around with these things with such straightforward commands as:
%windir%\System32\rundll32.exe powrprof.dll,SetSuspendState 1
Even more obvious, right? If you like that, then try this on for size.
TIP: My new computer is broken!:
It's almost certainly true - your new computer is faulty and the manufacturer knows it! Unfortunately, that's just a fact of life. Straight out of the box, or after acquiring a used PC, you might just want to have a peek at the vendor's website for various updates that have been released. BIOS updates for the motherboard are a good place to start, as they tend to fix all sorts of niggling problems. Firmware updates for other components are common as are driver updates and software patches for pre-installed software. I've solved a number of problems applying these types of updates, though it can take hours to go through them thoroughly and most of the updates have no noticeable effect. And it is dangerous at times. One anecdote to share here -- we had a common wireless PC Card adapter that was well supported in both Windows and Linux. The vendor provided an updated firmware for the card, installed under Windows. But it turned out that the Linux drivers wouldn't work with the updated firmware. So back we went to reinstall a less new firmware. You'll want to try to be intelligent and discerning in your choices. Dell for instance does a decent job with this (your Dell Service Tag is one very useful key here), but still requires a lot from the updater to help ensure things go smoothly. This of course is in addition to OS updates that are so vital to security and discussed elsewhere.Printers
STAR's publicly available printers are listed below.
| IP name Wireless (Corus) CUPS URL |
IP address | Model | Location | rcf2 Queue Name | Features |
| lj4700.star.bnl.gov http://cups.bnl.gov:631/printers/HP_Color_LaserJet_4700_2 |
130.199.16.220 | HP Color LaserJet 4700DN | 510, room M1-16 | lj4700-star | color, duplexing, driver download site (search for LaserJet 4700, recommend the PCL driver) |
| lj4700-2.star.bnl.gov http://cups.bnl.gov:631/printers/lj4700-2.star.bnl.gov |
130.199.16.221 | HP Color LaserJet 4700DN | 510, room M1-16 | lj4700-2-star | color, duplexing, driver download site (search for LaserJet 4700, recommend the PCL driver) |
| onlprinter1.star.bnl.gov http://cups.bnl.gov/printers/onlprinter1.star.bnl.gov |
130.199.162.165 | HP Color LaserJet 4700DN | 1006, Control Room | staronl1 | color, duplexing |
| chprinter.star.bnl.gov N/A |
130.199.162.178 | HP Color LaserJet 3800dtn | 1006C, mailroom | n/a | color, duplexing |
There are additional printing resources available at BNL, such as large format paper, plotters, lamination and such. Email us at starsupport 'at' bnl.gov and we might be able to help you locate such a resource if needed.
Printing from the wireless (Corus) network
The "standard" way of printing from the wireless network is to go through ITD's CUPS server on the wireless network. How to do this varies from OS to OS, but here is a Windows walkthrough. The key thing is getting the URI for the printer into the right place:
- Open the Printers Control Panel and click "Add a Printer".
- Select the option to add a network printer. (Ignore the list of printers that it generates automatically).
- Click on the button or option for "the printer that I want isn't listed".
- Select the option for a shared printer and enter the green URL from the list above for the printer you want.
eg. http://cups.bnl.gov:631/printers/HP_Color_LaserJet_4700_2 - On the next window, select the hardware manufacturer and model (if not listed, let Windows search for additional models).
- Print a test page and cross your fingers...
- If your test print does not come out, it doesn't necessarily mean your configuration is wrong - sometimes a problem occurs on the the CUPS server that prevents printing - it isn't always easy to tell where the fault lies.
Since printing through ITD's CUPS servers at BNL has not been very reliable, here are some less convenient alternatives to using the printers that you may find handy. (Note that with these, you can even print on our printers while you are offsite - probably not something to do often, but might come in handy sometimes.)
1. Use VPN. But if you are avoiding the internal network altogether for some reason, or can't use the VPN client, then keep reading...
2. Get your files to rcf2.rhic.bnl.gov and print from there. Most of printers listed above have rcf print queues (hence the column "rcf2 queue name"). But if you want to use a printer for which there is no queue on rcf2, or you have a format or file type that you can't figure out how to print from rcf2, then the next tip might be what you need.
3. SSH tunnels can provide a way to talk directly (sort-of) to almost any printer on the campus wired network. At least as far as your laptop's print subsystem is concerned, you will be talking directly to the printer. (This is especially nice if you want to make various configuration changes to the print job through a locally installed driver.) But if you don't understand SSH tunnels, this is gonna look like gibberish:
Here is the basic idea, using the printer in the Control Room.
It assumes you have access to both the RSSH and STAR SSH gateways.

The ITD SSH gateways might also work in place of rssh (I haven't
tried them yet).  If they can talk directly to our printers,
then it would eliminate step C below.

A.  From your laptop:

ssh -A -L 9100:127.0.0.1:9100 <username>@rssh.rhic.bnl.gov

(Note 1:  -A is only useful if you are running an ssh-agent with a
loaded key, which I highly recommend)

(Note 2:   Unfortunately, the rssh gateways cannot talk directly to our
printers, so we have to create another tunnel to a node that can...  If the
ITD SSH gateways can communicate directly with the printers, then the
next hop would be unnecessary...)

B.  From the rssh session:

ssh -L 9100:130.199.162.165:9100 <username>@stargw1.starp.bnl.gov

(Note 1: 130.199.162.165 is the IP address of onlprinter1.star.bnl.gov -
it could be replaced with any printer's IP address on the wired network.)
(Note 2:  port 9100 is the HP JetDirect default port - non-HP printers
might not use this, and there are other ways of communicating with HP
network printers, so ymmv - but the general idea will work with most TCP
communications, if you know the port number in use.

C.  On your laptop, set up a local print queue as if you were going to
print directly to the printer over the network (with no intermediate
server), but instead of supplying the printer's IP address, use
127.0.0.1 instead.

D. Start printing...


If you close either of the ssh sessions above, you will have to
re-establish them before you can print again.

The two ssh commands can be combined into one and you can create an alias to
save typing the whole thing each time.  (Or use PuTTY or some other GUI SSH client
wrapper to save these details for reuse.)

You could set up multiple printers this way, but to use them
simultaneously, you would need to use unique port numbers for each one
(though the port number at the end of the printer IP would stay 9100).
Direct connection, internal network
You can use direct connections to access them over the network.
- Direct: These printers accept direct TCP/IP connections, without any intermediate server.
- JetDirect (AppSocket) and lpd usually work under Linux.
- For Windows NT/2K/XP, a Standard TCP/IP port is usually the way to go.
How to configure this varies with OS and your installed printing software.
Tips
What follows are miscellaneous tips and suggestions that will be irregularly maintained.
- The 2-sided printers are configured to print 2-sided by default, but the default for many printer drivers will override this and specify 1-sided. If you are printing from Windows, you can usually choose your preferences for this in the printer preferences or configuration GUI. You may need to look in the Advanced Settings and/or Printing Defaults to enable 2-sided printing in Windows.
- Depending on the print method and drivers used, from the Linux command line you may be able to specify various options for things like duplex printing. To see available options for a given print queue, try the "lpoptions" command. For instance, on rcf2 you could do "lpoptions -d xerox7300 -l". In the output, you will find a line like this: "Duplex/2-Sided Printing: DuplexNoTumble *DuplexTumble None" (DuplexNoTumble is the same as flip on long edge, while DuplexTumble is the same as flip on short edge, and the * indicates the default setting.) So to turn off duplex printing, you could do "lp -d xerox7300 -o Duplex=None <filename>". Keep in mind that not all options listed by lpoptions may actually be supported by the printer, and the defaults (especially in the rcf queues) may not be what you'd like. There are so many print systems, options and drivers in Linux/Unix that there's no way to quickly describe all the possible scenarios.
- There is a handy utility called a2ps that is available on most Linux distributions. It is an "Any to PostScript" filter that started as a Text to PostScript converter, with pretty printing features and all the expected features from this kind of program. But it is also able to deal with other file types (PostScript, Texinfo, compressed, whatever...) provided you have the necessary tools installed.
- psresize is another useful utility in Linux for dealing with undesired page sizes. If you are given a PostScript file that specifies A4 paper, but want to print it on US Letter-sized paper, then you can do:
psresize -PA4 -pletter in.ps out.ps
See the man page for more information.
- Some of the newer printers have installation wizards for Windows that can be accessed through their web interfaces. I've had mixed success with the HP IPP installation wizards. The Xerox wizard (linked above) has worked well, though it pops up some unnecessary windows and is a bit on the slow side.
- Windows 9x/Me users will likely have to install software on their machines in order to print directly to these printers. HP and Xerox have such software available for download from their respective support websites, but who uses these OSes anymore?
- For linux users setting up new machines, CUPS at least for recent distros is the default printing system (unless upgrading from an older distribution, in which case LPRng may still be in use). Given an appropriate PPD file, CUPS is capable of utilizing various print options, such as tray selection and duplexing, or at least you can create different queues with different options to a single printer.
- There are other potentially useful printers around that are not catalogued here. Some are STAR printers out of the mainstream (like in 1006D), and some belong to other groups in the physics department.
Quick (?) start guide for visitors with laptops
So you brought a laptop to BNL… and the first thing you want to do is get online, right?
Ok, here's a quick (?) guide to getting what you want without breaking too many rules.
Wired Options:
-
Visitors' network: Dark purple jacks (usually labeled VNxx) are on a visitors' network and are effectively outside of the BNL firewall. They support DHCP and do not require any sort of registration to use. Being outside the firewall can be advantageous, but will prevent you from
using some network services within BNL (printing, for instance). (The rest of this page is largely irrelevant if you are using the visitors' network.) - BNL network: If it isn't dark purple (and it isn't a phone jack) then it is on the BNL network, which supports DHCP on most subnets. (NB. The 60/61 subnet (available in parts of 1006, including the WAH) has a locally managed DHCP server -- contact Wayne Betts to be added to the access list). All devices on the BNL networks are required to be registered based on the MAC address that is unique to each network interface. To help enforce this policy, if you request a DHCP
address from an unregistered node, you will be assigned a restricted address. With a restricted IP address, your web browser will be automatically redirected to the BNL registration page, and you will be unable to surf anywhere else until you are registered.When registering a laptop, fill in "varies" for the location fields. For the computer name field, I recommend using "DHCP Client" (unless you have a static IP address of course).
Previously registered users are encouraged to verify and update their registration information by going to http://register.bnl.gov from the machine to be updated.
There you can also find out more about the registration system and find links to some useful information for network users.
Windows
This area is intended to provide information for STAR members to assist in configuring and using typical desktop/laptop PCs at BNL.
Windows 2000/XP and Scientific Linux/Redhat Enterprise Linux are the preferred Operating Systems within STAR at BNL for desktop computing, though there is no formal requirement to use any particular OS.
These pages are intended to be dynamic, subject to the constantly changing software world and user input. Feedback from users -- what you find indispensable; what is misleading, confusing or flat-out wrong; and what is missing that you wish was here -- can help to significantly increase the value of these pages.
Additional pages that are under consideration for creation:
- Windows installation checklist (the basic software and configuration that should probably be on every Windows PC)
- Linux installation checklist
- Common Linux details and useful links, such as Linux equivalents to software for Windows.
- Resources specific to the experiment operations (eg. common DAQ NFS mounts)
- Publically useable terminals
Cygwin installation and tips
To quote from the Cygwin website: "Cygwin is a Linux-like environment for Windows."The Linux-like nature is quite comprehensive... You can *almost* forget that you are using a Windows OS -- most utilities and software that you are familiar with from your Linux experience are available in Cygwin. For example, the Cygwin distribution has available an openssh client (and the server too, but I don't recommend you use it), PostScript and PDF viewers and editors, compression (eg. zip) utilities, software development tools and X Windows packages (more on X below).
Using the Cygwin X server
An example of Cygwin's usefulness and cost-saving potential is the X server. The Cygwin X server is, in most cases, easy and convenient to use in place of commercial X servers such as Hummingbird Exceed. Here is the short version for those familiar with Cygwin installations:- You need the xorg-x11-base and X-startup-scripts packages (and whatever dependencies they have, which the setup routine should solve for you). You'll probably also want the xwinclip package. All of these are in the X11 Category in the Cygwin Setup.
- Execute "startxwin.bat" (in <cygwin_root>/usr/X11R6/bin/). That will start a stand-alone X Server and an xterm with a cygwin shell. Edit this batch file as you see fit -- it includes documentation for a number of options.
- If you are displaying windows from a remote session over ssh, be sure you have X tunneling enabled in your ssh client configuration. Please do not try to open up your X server to the entire world with anything like "xhost +". That is a *VERY BAD IDEA*.
- In light of step 3 above: If you have a local firewall that asks about blocking access to the Xserver, you can usually block it without a problem -- if you have X forwarding enabled and working, then you are usually ok. (If you believe a localhost-based firewall is interfering with X, try allowing only connections from the loopback/localhost address (127.0.0.1)).
Subsidiary recommendation:
There is a handy tool for initiating shell connections to remote hosts (such as via ssh) and starting the Cygwin X server called Mortens Cygwin X-Launcher. Coming soon (?): screenshots of the X-Launcher configuration that are most likely to be useful...Installation Tip:
A Cygwin mirror is available at http://mirror.bnl.gov/cygwin/ making the installation go quite quickly if you are at BNL. This is quite handy for the cygwin installation and any subsequent use of the setup utility. One potential catch for onsite users -- even if you intend to use the local mirror, you must still configure a BNL proxy server during Setup, as shown in this walkthrough of a Cygwin installation (MS Word format).Please send comments, corrections and suggestions to Wayne Betts: wbetts {at} bnl.gov
FAQS and Tips that don't fit well elsewhere
Software Site Licenses:
Do we have a site license for software package XYZ?
The answer is (almost) always: No!
Neither STAR nor BNL have site licences for any Microsoft product,
Hummingbird Exceed, WinZIP, ssh.com's software or much of anything
intended to run on individual users' desktops. Furthermore, for most
purposes BNL-owned computers do not qualify for academic software
licenses, though exceptions do exist.
FAQ: PDF creation:
How can I create a file in pdf format?Without Adobe Acrobat (an expensive bit of software), this can be a daunting question. I am researching answers, some of which are available in my Windows software tips. Here is the gist of it in a nutshell as I write this -- there are online conversion services and OpenOffice is capable of exporting PDF documents.
FAQ: X Servers:
What X server software should I use in Windows?I recommend trying the X Server that is available freely with Cygwin, for which I have created some documentation here: Cygwin Tips. If you can't make that work for you, then I next recommend a commercial product called Xmanager, available from http://www.netsarang.com. Last time I checked, you could still download a fully functional version for a time-limited evaluation period.
TIP: Windows Hibernation trick:
Hibernate or Standby -- There is a difference which you might find handy:- "Standby" puts the machine in a low power state from which it can be woken up nearly instantly with some stimulus, such as a keystroke or mouse movement (much like a screensaver) but the state requires a continuous power source. The power required is quite small compared to normal running, but it can eventually deplete the battery (or crash hard if the power is lost in the case of a desktop).
- "Hibernate" actually dumps everything in memory to disk and turns off the computer, then upon restarting it reloads the saved memory and basically is back to where it was. While hibernating, no power source is required. It can't wake up quickly (it takes about as long as a normal bootup), but when it does wake up, (almost) everything is just the way you left it. One caveat about networking is in order here: Stateful connections (eg. ssh logins) are not likely to survive a hibernation mode (though you may be able to enable such a feature if you control both the client and server configurations), but most web browsing activity and email clients, which don't maintain an active connection, can happily resume where they left off.
Imagine: the lightning is starting, and you've got 50 windows open
on your desktop that would take an hour to restore from scratch.
You want to hibernate now!
Here's how to enable hibernating if it isn't showing up in the shutdown
box:
Open the Control Panels and open "Power Options".
Go to the "Hibernate" tab and make sure the the box to enable
Hibernation is checked.
When you hit "Turn Off Computer" in the Start menu, if you still only
see a Standby button, then try holding down a Shift key -- the Standby
button should change to a Hibernate button.
Obvious, huh?
For the curious:
There are actually six (or seven
depending on what you call "official") ACPI power states, but most
motherboards/BIOSes only support a subset of these.
To learn more, try Googling "acpi power state", or you can start here as long as this link works.
(Note there is an error in the main post -- the S5 state is actually "Shutdown" in Microsoft's terminology).
From the command line, you can play around with these things with such straighforward commands as:
%windir%\System32\rundll32.exe powrprof.dll,SetSuspendState 1
Even more obvious, right? If you like that, then try this on for size.
TIP: My new computer is broken!:
It's almost certainly true - your new computer is faulty and the manufacturer knows it! Unfortunately, that's just a fact of life. Straight out of the box, or after acquiring a used PC, you might just want to have a peek at the vendor's website for various updates that have been released. BIOS updates for the motherboard are a good place to start, as they tend to fix all sorts of niggling problems. Firmware updates for other components are common as are driver updates and software patches for pre-installed software. I've solved a number of problems applying these types of updates, though it can take hours to go through them thoroughly and most of the updates have no noticeable effect. And it is dangerous at times. One anecdote to share here -- we had a common wireless PC Card adapter that was well supported in both Windows and Linux. The vendor provided an updated firmware for the card, installed under Windows. But it turned out that the Linux drivers wouldn't work with the updated firmware. So back we went to reinstall a less new firmware. You'll want to try to be intelligent and discerning in your choices. Dell for instance does a decent job with this (your Dell Service Tag is one very useful key here), but still requires a lot from the updater to help ensure things go smoothly. This of course is in addition to OS updates that are so vital to security and discussed elsewhere.Please send comments, corrections and suggestions to Wayne Betts: wbetts {at} bnl.gov
Networking Software
Networking
Software
- PuTTY:
This is the preferred SSH client for Windows. It is free, easy to use
and well maintained for both security and bug issues.
(As with everything, it is only "maintained" if you regularly check
for updated versions!)
Please note that most other SSH clients for Windows are NOT free for
use on government computers or in the pursuit of lab business, though
they might function just fine without payment. - WinSCP: This is a fine graphical SFTP and SCP client utility with some additional features built in.
-
X servers (no, Exceed doesn't make the cut because of the high monetary cost):
- Cygwin: Please look at the separate Cygwin page for information on installing and configuring the Cygwin X server.
- Xmanager: I
recommend that you use the Cygwin X server, but if you find something
that it can't handle, then this is the recommended alternative.
It isn't free (but it does have fully functional time-limited
evaluation license if you want to try it out.)
It is much cheaper than Exceed and seemingly just as capable, but
without quite as much overhead.
I'm particularly interested in hearing about X Server alternatives, so
let me know if you have a favorite!
-
Alternatives to Microsoft's Internet Explorer and Outlook Express:
As
the leading web browser and mail client, these two apps are the target
of prolific viruses, trojans, malware and other nasties.
In addition to avoiding many of these, you may also like some of the
features available in the alternatives (eg. tabbed browsing is a
popular feature unavailable in IE).
Four alternatives are in common use (three of them share much of the
same code-base -- Mozilla, Netscape Navigator and Firefox).
This review
might help sort you out the differences.
As with anything, your preference is yours to decide (and also, as
with everything else here, feature and security updates are released
quite often, so you might try to check for new versions regularly):
They are listed here from highest recommendation to lowest:- Firefox/Thunderbird:
Though frequently mentioned as a pair, Firefox and Thunderbird are
stand-alone applications.
Firefox is a web browser, and Thunderbird is an email client.
"Stand alone" here means that these can be installed separately from
each other.
You can configure them to work with alternative software as you wish
(eg. use Firefox for surfing, but set Outlook as your default mail
client). Actually, you can generally mix and match pieces from all of
these alternatives, but most of them start out with defaults tied to
their suite companions.
Slight thumbs up to Firefox over the other alternatives because it has
almost every feature found in the corresponding Mozilla suite, plus
additional add-ons.
Vast numbers of independently produced add-ons and customizations are
available as well. - Mozilla Suite:
A suite that includes the big three: a browser, email client and HTML
editor.
This is a fine alternative, but as a browser alternative, this author
gives the bigger thumbs up to its sibling, Firefox, listed above. - Opera.
It is available in a free version with a "branding" bar that contains
advertisements, or you can buy the product to remove this minor
annoyance. (Branding/non-branding examples.) - Netscape:
The Netscape suite includes a browser (Navigator), email client (Mail),
HTML editor (Composer) and other tidbits.
Of the three Mozilla-based browsers, this is probably the least used
and has the most extraneous stuff thrown in, which is one of several
reasons it gets last place in this list.
It is good enough to recommend, but just not quite as highly as the
others.
- Firefox/Thunderbird:
- Java, WebStart, JRE, J2RE, JSDK,
Microsoft VM and all that Jazz...: The author of this segment finds
this to be very puzzling and sometimes frustrating stuff to understand,
keep up with, and especially to try to explain clearly and succinctly.
<Melodrama> Imagine Sun, IBM and Microsoft all walked into a bar
and had a few drinks. Heck, let Netscape walk in a few minutes later
for good measure.
Fifty states' attorneys general plus the US AG and DOJ are to act as a
referee.
Now imagine that you, a mere passerby on the street were harangued into
cleaning up the inevitable bar fight, complete with broken bottles,
flying bar stools and blood everywhere all while it is still going on.
That's not even close to how awful it is...</Melodrama> Details
to be filled in here! - OpenAFS, MIT Kerberos, Wake and Leash: Details to be filled in here!
- Google Toolbar :
This is a very convenient interface to initiate Google searches, plus a
decent pop-up blocker. Unfortunately, it is only available for Internet
Explorer (though other browsers may support similar features natively).
Please send comments, corrections and suggestions to Wayne Betts: wbetts {at} bnl.gov
Office applications and productivity software
Productivity software and viewers/utilities for various file types
- OpenOffice -- Free
and available on multiple platforms.
Perhaps the single best reason to use it is that it natively creates
PDF format.
In addition to its own formats, it can read (and write) MS Word, Excel
and PowerPoint files (usually -- sometimes formatting details go
haywire, but they are constantly updating it.)
- Adobe Reader
-- Used for viewing PDF documents.
(You will probably want to install it with the very useful text search
feature.) (Linux users can try xpdf as an alternative which is part of
many distributions.)
- Ghostscript and GSview: PostScript interpreter and viewer (and PDF too) that you probably want to have.
- Online Document Conversion Services: Neevia Technology and CERN Document Conversion Service
both have file convertors that allow you to submit a variety of common
(and uncommon) file formats in small numbers and produce files in
different formats (PDF being of most interest probably). Though not
convenient for many files or very large files (and certainly
inappropriate for confidential or non-public information), they are
good to know about. (Don't forget -- OpenOffice is able to export
documents in PDF format too and handles a lot of file types.)
-
Graphics and Image Manipulation software: The GIMP and ImageMagick
are both quite capable tools available for free for multiple platforms.
Perhaps not perfect replacements for Adobe PhotoShop, but pretty
darn good.
(If you are a PhotoShop veteran, then you'll have to spend some
time learning the ropes, but it will probably be worth it.)
- Compression Utilities: WinZip is not free (though many, many people use it without payment).
Fortunately, there are freeware alternatives.
For instance:
- 7Zip: This is the current recommendation of this page, the reasons for which may be included in the future..
- FreeZip (but not "FreeZip!" which is reported to contain spyware and/or adware)
- ZipCentral
- ZipItFast
- ExtractNow
- CAMUnZip
- ZipWrangler
- Freebyte Zip
- If you've ever spent a few minutes waiting for MS Windows
Search function to find a file on your system, then you might find the
following can save you some time. The basic idea is similar to most
internet search engines: index your files (while the computer would
otherwise be idle so as not to slow things down for the user) and then
consult the indexes when a search is requested:
- Yahoo! Desktop Search:
This is a free version of a well respected product from X1 with a few
features removed, such as indexing of remote drives, Eudora and
Mozilla-based email.
- Google Desktop Search:
Use Google's Desktop Search to quickly search for files on your
computer using an indexing system much like Google's web indexing.
Not all file types are supported, but most common ones are, such as
Outlook mail, MS Office documents and so on.
- Copernic Desktop Search:
This is similar to the Google Desktop Search, but appears to be a bit
more capable, though as of this writing I have not had time or cause to
test it much.
User comments would be appreciated.
- Windows 2000 and XP include an "Indexing Service" which (according to Microsoft) is "a base service [...] that extracts content from files and constructs an indexed catalog to facilitate efficient and rapid searching." To configure the Indexing Service open Control Panels -> Administrative Tools -> Computer Management. In the left pane, click the plus sign next to "Services and Applications", then right-click on the "Indexing Service" icon. In the popup menu, select "All Tasks | Tune Performance". The "Indexing Service Usage" dialog box will appear. The Indexing Service is actually quite customizable, though doing so can add significantly to the resources required by the service. A warning: it can eat up a surprising amount of disk space to maintain the indexes. It has sped up basic searches for this author, but your mileage may vary in both search efficiency gains and overall performance penalty.
- Yahoo! Desktop Search:
This is a free version of a well respected product from X1 with a few
features removed, such as indexing of remote drives, Eudora and
Mozilla-based email.
- Cygwin: Cygwin has a number of utilities for handling, viewing and transforming file formats, so I have a separate page of Cygwin tips
Multimedia Players (work related, of course!)
Pick one. Use it. If you find a format it doesn't support, try a different one, or go to the vendor's site and look for a download of an update or add-on (plug-in, patch, codec, etc.) for your format. This isn't the place to go into the details, but some quick thoughts are included here:- Microsoft's Media Player -- you've almost certainly already got it, so why not use it?
- Real Player: complaint -- by default it runs background processes continuously, pops up annoying little messages and practically begs you to register it, though it isn't nessecary for full functionality.. It isn't a big deal to disable these annoyances, but why should you have to?
- Winamp: There is a free version and an inexpensive "Pro" version that has CD burning. It has been up and down over the years, with some versions much quirkier than others. Currently it seems to be on par with the rest.
- Apple's iTunes: Though intended to suck you into Apple's music store, you can use the application without using the store. In keeping with most Apple stuff, it seems to be well liked by those who like it. Enough said.
Please send comments, corrections and suggestions to Wayne Betts: wbetts {at} bnl.gov
Performance and Security enhancement
Utilities for Security and Performance
If your computer seems to be running slower than it used to, pop-up advertising is appearing at an alarming rate, your web browser's settings keep changing in undesired ways or you just want a better idea what your computer is up to (eg. "What the heck is PRPCUI.exe?"), here are some resources for understanding what's going on and making things better, presented in roughly the order from those that require the lease detailed understanding to the most:-
Ad-Aware:
Ad-Aware was, not very long ago, *the* place to start for malware detection and removal, with the added bonus that it was free. Alas, recent versions of Ad-Aware (even the Personal version) are no longer licensed quite so freely (let's be clear -- a DOE-owned computer shouldn't have it installed without a paid license.) It is still free for personal use, so it is highly recommended for home and personal laptop use, though it may not be keeping up with the constantly expanding field, which is a common problem with this type of software. One thing to keep in mind: you must be sure to keep your definitions up-to-date, just like a virus scanner, in order to get the most benefit. -
Spybot - Search&Destroy:
This is the historical alternative to Ad-Aware, with similar good results "in the early days", but it too may be failing to keep up. Unlike Ad-Aware, it's license is quite liberal, so it can be installed as desired. It has an "Advanced" mode, with a variety of additional tools beyond the basic malware scanner, (but keep in mind that some of these features are indeed "Advanced" and not to be played with lightly). Broken record time: you must be sure to keep your definitions up-to-date. You should also consider using the "Immunize" feature to prevent some infestations, and to blacklist some sites known to host various forms of malware. - Microsoft's Malicious Software Removal Tool: This is a regularly updated (but far from comprehensive) online removal tool for Windows 2000 and Windows XP. It isn't a bad idea to run this scanner once a month or whenever you suspect you might have caught "something".
- Microsoft's AntiSpyware Beta: Though called a Beta product, this is essentially a re-GUIed and slightly modified version of a long standing and respected commercial product that Microsoft recently purchased. Some recent tests by more-or-less independent testers have shown this tool to be better even than the old reliables, Ad-Aware and SpyBot.
- Defragmenting your hard drive is something to put on the calendar 2-4 times a year. Because Windows' built-in defragmenter seems especially slow, and modern disk drives hold so much, this is something usually left running overnight. Third-party alternatives exist that may do a better job in various ways. Let's hope I get around to listing one or two here in the not-too-distant future...
- CrapCleaner: This is a system optimization tool for removing unnecesary temporary files and registry entries. The default installation creates a "Run CCleaner" entry in the Recycle Bin's context (right-click) menu.
-
Monitoring startup activity and services.
Programs that start when you boot or login to your computer can be big performance drains, in addition to doing unwanted things. The following may help you understand and control what's going on. (N.B. Some of the following are capable of rendering your system unusable if not handled with care! They may require significant understanding of Windows' internals to be most useful):- StartUp Monitor and Startup Control Panel. These are separate utilities, but they are from the same source and complement each other nicely. (The author of these has additional utilities that you may find worthwhile as well.)
- msconfig.exe: This is Windows' very own "System Configuration Utility", with which one can look at and configure system startup paramters and files, which is especially useful to see the effects of individual changes. You can hose things up quite good in here however, so be careful!
- services.msc: This provides a Management Console to configure the startup of various registered services. This is useul for disabling unnecessary or unused Windows services. A potentially informative feature in this Console is the "Description" column, though it can still be quite cryptic (or blank).
- Merijn.org's website provides several downloads that you might find useful, such as HijackThis ("a general homepage hijack detector and remover"), CWShredder (CoolWebsearch removal tool) and StartUpList ("way better than msconfig")
- BlackViper.com
- http://www.sysinfo.org/ (slow site)
- Security Task Manager
- http://www.sysinternals.com
- HijackThis
- BHODemon
-
Pop-up Blockers
-
ZoneAlarm
-
Microsoft Office updates: Office Updates home
-
Clock keepers
-
Multi-desktop software
Other resources
Please send comments, corrections and suggestions to Wayne Betts: wbetts {at} bnl.gov
Required software and configuration for Windows PCs at BNL
BNL-specific requirements and configuration for networked Windows computers:
-
A file and real-time virus scanner with up-to-date virus patterns/definitions is REQUIRED! (***Cyber-Security requirement***)
Information about the BNL-supported products from TrendMicro is available from the BNL ITD group: TrendMicro at BNL. It is critical that any anti-virus product receive regular updates (daily or even more often), which is sometimes difficult for mobile machines on a variety of networks. Four similar products are available to try to meet the demands of our diverse environment:Windows desktops that reside on the BNL internal networks are best served by TrendMicro's basic OfficeScan product. It has a master server inside the BNL firewall from which it receives updates and to which it reports infections. Every Windows desktop system at BNL should be using this product, with very few exceptions. You can
click here to go to the online install the OfficeScan product. (You'll need administrator privileges on your system for the installation.)Laptop users with wireless networking are encouraged to use a newer OfficeScan version that has a firewall module and is able to recieve virus pattern updates from multiple sources -- so it can roam around on- and off-site and usually still reach an update server. This OfficeScan version is also more capable of cleaning up some trojans and malware than the desktop version. To install it in the standard way, you must already be on the BNL external wireless network and go here. Repeat: you must be on the "BNLexternal" wireless network to use that link.
BNL employees' personal home computers are permitted to use the PC-cillin product, which gets its updates from servers that are outside the BNL firewall (and it does not report infections to anybody at BNL). PC-cillin includes a firewall module (OfficeScan does not) and PC-cillin has more (but quite limited) spy-ware and ad-ware detection capabilities.
If you are running a Windows *Server* OS (if you are unsure, then you almost certainly are not!), then there is yet another option, for which you will need to contact ITD (help desk at x5522 or Jim McManus directly at x4107).
or those readers to whom none of the above apply, which is to say, computers not owned or used primarily at BNL or by BNL employees, I recommend (though can offer no significant assistance with) the following three free anti-virus products about which we (Wayne / Jerome) have read or heard good things:
- AVG Anti-Virus - JL tried for 3 months, worked great but had conflict with fingerprint driver (thought to be a malicious script when activated)
- COMODO Free - JL tried this for years and it works just fine and appears to be a great product considering the cost (none :-) ). The free version is for home users only so NOT to be installed on a BNL system for sure (usually the case of most Free AV).
- Microsoft Sec. E - Microsoft Security Essentials is new on the market but starts doing a good job and supports Windows 7, Vista and XP
Other anti-virus resources available include online scanners, such as HouseCall from TrendMicro and Symantec's Security Check. Most major anti-virus vendors have something similar. Relying on these online scanners as you primary defense is unwise. In addition to the inconvenience of manually performing these scans, you really need a product monitoring your system at all times to prevent infections in the first place, rather than trying to clean up afterwards. But since no two products catch and/or clean the same set of problems, occaisionally using a second vendor's product can be useful.
-
Windows Critical Updates/SUS (***Cyber-Security requirement***)
Windows systems must be regularly patched with "critical" updates. Unfortunately, the BNL firewall and proxy configurations can interfere with the Windows Automatic Update feature in Windows 2000/XP (though you can still use Windows Updates in Internet Explorer if you have the proxies configured correctly, see below for proxy info). To help with this situation, BNL ITD has set up a Software Update Services server to locally host critical updates. To use this service (which places a notification icon in the System Tray when updates are available), please click here for more information and installation instructions. (It is quite easy, but you must have administrative privileges.) You can manually apply Windows updates (critical and otherwise) using Internet Explorer -- go to the Tools menu and click on "Windows Updates", at which point it is straightforward. Note that in many cases, the machine must be rebooted to complete the update process. -
Logon Banner (**Cyber-Security requirement**)
As required by the DOE, please install a logon banner for BNL-owned or BNL-based computers. (This includes other OSes as well -- essentially anything that you can log into is required to post a banner if technically possible.) Click here for more information about logon banners at BNL. To install the banner: Windows NT/2000/XP click here (must be an administrator to insert the registry changes). Window 95/98 click here instead.
-
MAC Registration (**Cyber-Security requirement**)
-
Security Scanning
-
STAR printers (separate page)
-
Wireless networking (separate page, password protected)
Please send comments, corrections and suggestions to Wayne Betts: wbetts {at} bnl.gov
Facility Access
A selection of tips on how to log to the RCF
facility. We hope to augment those pages and add
information as user request or need.
Getting a computer account in STAR
Introduction
First of all, if you are a new user, WELCOME to the RHIC/STAR collaboration and experiment. STAR is located at Brookhaven National Laboratory and is one of the premier particle detectors in the world.
As a (new) STAR user, you will need to be granted access to our BNL Tier0 computing facility in order to have access to the offline and online infrastructure and resources. This includes accessing BNL from remote or directly while visiting us on site. Access includes access to data, experiment, mailing lists, desktop computer for visitors to name only those. As a National Facility under the Department of Energy (DOE) regulations, a few steps are required for this to happen. Please, follow them precisely and make sure you understand their relevance.
The DOE requires proper credentials for anyone accessing a computing "resource" and expect such individual to keep credentials up-to-date i.e. in good standing. It is YOUR responsibility to keep valid credentials with Brookhaven National Laboratory's offices. Credentials include: being a valid and active STAR member, having a valid and active guest/user ID and appointment, having and keeping proper trainings. Any missing component would cause an immediate closure of access to computing resources.
In many cases, we rely on account name matching the one created at the RCF (for example, Hypernews or Drupal accounts need exact match to be approved) - this is enforced so we can accurately rely on the work already done by the RCF personnel and only base our automation on "RCF account exist and is active". The RCF personnel work with the user's office and other agencies to verify your credentials.
If you were a STAR user before and seek to re-activate your account, this page also has information for you.
Getting an account and performing work at BNL
Note that along the process of requesting either an appointment or a computing account implies a check from the facility and user office personnel of your good standing with RHIC/STAR as the affiliated experiment. Therefore, we urge you to follow the steps as described belowALL USERS - Ensure/Verify you are affiliated to STAR in our records
Whenever you join a group affiliated with STAR, please- Ask your council representative that he/she sends your information to the collaboration's record keeping person (at this point in time, this person is Liz Mogavero).
Note: Your council representative IS the one responsible for keeping the list of authors and active members at all times. We will not (and cannot) consider requests coming from other STAR members.
- Pro-actively check the presence of your name and record in our Phone Book.
Note: If you are not in our Phone Book, you are simply NOT a STAR user as far as we know as our PhoneBook is the central repository of active STAR members as defined by the STAR council representatives.
New users in STAR
- Request a Guest appointment
You must be sure you have a valid guest appointment with the BNL User Office.
Note1: Requesting a Guest ID requires a procedure called “Foreign Visit and Assignment”. This procedure involves steps such as background checks with Counter Intelligence and approval from the Department of State. The procedure could take up to 60 days from the time it is started (sensitive countries may take 90 days).
Note2 : If you have done this already and are a valid Guest, please go to to this section.
- Go to the Guest Registration Form and complete the registration as instructed.
- Purpose of Visit: likely "Research" but if you come for other purposes, chose as appropriate ("CRADA" or "Interview" may apply for example)
- Experiment/Facility: "Physics Dept (RHIC/AGS)"
- Facility Code: "RHIC"
- Type of Research: "STAR"
- Type of Access Requested: likely "Open Research" if you stated your visit purpose as "Research"
- Subject Code for this Visit/Assignment: likely "General Physics"
- Go to the Guest Registration Form and complete the registration as instructed.
- Be patient and wait for further instructions and the approval.
- ONLY AFTER THE FIRST STEPS will you be able to proceed with the rest of the instructions below.
- We will assume that you, from now on, have a valid Guest appointment and hold a Guest/BNL ID.
- Ensure you have the required and mandatory training
You MUST take the Cyber Security training and course GE-CYBERSEC. This training is mandatory and access to the facility computing resources will NOT be granted without it.
You are also requested to read the Personal User Agreement which describes your responsibilities, the reasonable use and scope of personal use of computing equipments. In recent years, the BNL User Office have requested for the form to be signed and returned for their records. Please, do not skip any of those steps.
- Request an RCF account
To request a new RCF account, start here. The fields are explained on this instruction page.
Note: There is a "Contact information" field which is aimed to be filled using an existing RHIC member (holder of a valid account and appointment) who can vouch for you. Put your council representative or team lead name there OR (in case of interview / CRADA etc...) the name of your contact and host at BNL. DO NOT use your own name for this field. DO NOT use the name a person who is NOT yet a STAR Member.
- Additional steps are described below.
Previously a STAR user
If you were a STAR user before and consulting those pages, it may mean that either- you cannot remember how to login and need access but you are in good standing (all training valid, your BNL appointment is valid)
- you have let your training expire but you are a valid BNL guest (your appointment with BNL has NOT expired)
- your BNL appointment is about to expire or has expired not long ago
- you are a RHIC user (from another experiment), and now coming to STAR
- First of all, please make sure you are in the STAR PhoneBook as indicated here.
If you were a member of another experiment before, you will be joining STAR as either a member of an existing institution or joining as a new institution. All membership handling are the responsibilities of the STAR council (approval of new institutions) or your council representative. In both cases, we MUST find your name in our PhoneBook records.
- Instructions for the several use cases above
- If you are in good standing but cannot remember your login information at the RCF facility, please see Account re-activation
- You have let your BNL training expire - likely, you have not renewed or taken GE-CYBERSEC training available from the training page (please locate in the list at the bottom the course named GE-CYBERSEC). Within 24 hours of the training being taken/renewed again, the privilege to access the BNL computing resources using your RCF account will be re-established (the process will be automatic).
- Your appointment is about to expire, or has expired not long ago - you will need to go to the Extension requests .
The Guest Central interface will help identifying your status and appointment expiration. This form could be used by users already having a BNL Guest ID. If you have let your appointment expire for a long time however, this form may let you know (or not show your old BNL badge/guest ID at all). In such a case, you should consider yourself as a "New user" and follow the first set of instructions above.
For an appointment renewal, the starting point will be the Guest Extension Form.
- If you were a user before and now coming to STAR, you will need to follow
- The general principles of being recorded in our PhoneBook as described above.
- Request a NEW account at the RCF (using a different username than the one you previously had in another experiment)
- Keep your training up-to-date as before (GE-CYBERSEC) ...
- Additional steps are described below.
- If you are in good standing but cannot remember your login information at the RCF facility, please see Account re-activation
Additional steps for everyone
- Generate and upload your SSH keys to ensure secure login
You may now read SSH Keys and login to the SDCC and following information in this section.
- Drupal access
- Log in to RCF node to verify your account username/password working
- Download 2-Factor Authentication app to your mobile device (application ranges from Google or Microsoft Authenticator, Duo Mobile, Authy, FreeOTP, Aegis, ...)
- If you have never logged into STAR Drupal before, log in using your SDCC login, SDCC password, and 0000 as a code, then set your 2FA access (top item in the left menu)
- If you have failed to setup your 2FA access or used an authenticator app that does not backup codes, please contact Dmitry Arkhipkin (@dmarkh) or Jerome Lauret (@jeromel) via "Direct Message" on MatterMost chat (https://chat.sdcc.bnl.gov, choose "BNL Login" with your SDCC login and password) to obtain the 2-Factor Authentication QR code.
- Use your SDCC login, SDCC password, and one-time 2-Factor Authentication code (read from the app on your mobile device) to log in to Drupal.
- Web Access
- You do not have access to view this node your ssh keys will need to be uploaded to a different interface if you have a need to login to the online setup - this is needed mostly by experts (not by all users in STAR).
- Software Infrastructure for general information
- Video Conferencing ... and the related comments at the bottom of some of those pages (viewable only if you are authenticated to Drupal).
Wishing you a great time in STAR.
Account re-activation
The instructions here are for users who have an account at the RCF but have unfortunately let their BNL appointment expire or do not know how to access their (old) account.
- Account expired or is disabled
- Forgot your Kerberos password but need to upload your SSH keys to log-in
Account expired or is disabled
First of all, please be sure you understand the requirements and rationals explained in Getting a computer account in STAR.
As soon as your appointment with BNL ends or expires, all access to BNL computing resources are closed / suspended and before re-establishing it, you MUST renew your appointment first. In such case, we will not provide you with any access which may include access to Drupal (personal account) and mailing lists.
The simplest way to proceed is to
- Check that you do have GE-CYBERSEC training. You can do this by checking your training records.
- If you do not, please take this training NOW as any future request will be denied until this training is complete
- Send an Email to RT-RACF-UserAccounts@bnl.gov requesting re-activation of your account. Specify the account name (Unix account name, not your name) if you remember it. If you don't your full name may do. The RCF team will check your status (Cyber training, appointment status) and
- if any is not valid, you will be notified and further actions will be needed.
- If all is fine, they will re-activate your account after verifying with us that you are a valid STAR user. Please consult Getting a computer account in STAR for what this means ...
If your appointment has expired, you will need to renew it. Please, follow the instructions available here.
Chicken and Egg issue? Forgot your password but did not upload SSH keys
If your account is valid, so is your appointment but you have not logged in the facility for a while and hence, are unable to upload your SSH keys (as described in SSH Keys and login to the SDCC and related documents) this may be for you.
You cannot access the upload page unless you have a valid password as the access to the RCF requires a double authentication scheme (Kerberos password + SSH key). In case you have forgotten your password, you have first to send an Email to the RCF at RT-RACF-UserAccounts@bnl.gov asking to reset your password, then thereafter go to the SSH key upload interface and proceed.
Drupal access
This page describes how you can obtain the access to the STAR drupal pages. Please understand that your Drupal access is now tight to a valid SDCC login - no SDCC account, no access to Drupal. This is because we integrated Drupal login to the common infrastructure (the login is Kerberos based). Here are the steps to gain access then:
-
Get a computer account in STAR, make sure you have a valid guest appointment and valid cyber training, then request a RCF account
https://drupal.star.bnl.gov/STAR/comp/sofi/facility-access/general-access
- Generate SSH keys and upload them to the SDCC - this has formally little to do with access to Drupal but will allow you to log to the facility and verify you know your Kerberos password (it should have been sent to you via EMail during the account creating with instructions on how to change it)
https://drupal.star.bnl.gov/STAR/comp/sofi/facility-access/ssh-keys
Now Log in to RCF node- again, this is to ensure you have the proper- ssh xxx@ssh.rhic.bnl.gov (xxx is your username on RCF, enter the passphrase for your SSH key)
- kinit (enter your SDCC kerberos password - this is the one you will use for accessing Drupal)
- Download 2-Factor Authentication app to your mobile device (application ranges from Google or Microsoft Authenticator, Duo Mobile, Authy, FreeOTP, Aegis, ...)
- The FIRST time you log to Drupal, you will actually NOT need a second factor (leave the "code" box blank) but MUST generate it right away (the second login will require it).
- To generate it, use the "(re)Create 2FA login" in the left hand-side menu, leave all default option (you need a time based OTP), import the QRCode displayed.
- Once imported, a 6 Digits code should appear in your app - this is he "code" you will need to enter in future in the third field named "code". Note the code changes every 30 seconds.
- IF you have logged out without generating a QRCode or forgot to import and have no "code", then you will need to contact Dmitry Arkhipkin or Jerome Lauret on MatterMost to obtain your 2FA QR-code (either can generate it for you after the fact or start a chat with both). SDCC chat is available at https://chat.sdcc.bnl.gov (please use a Direct Message, not a channel). Use "BNL Login" and your SDCC account user/Kerberos password to login. Do as discussed above (import the QRCode, make sure an entry appears, test your login right away, ...)
- You are set. Drupal login will now ask for your SDCC username and Kerberos password and a 6-digit code you read from the 2-Factor Authentication app.
SSH Keys and login to the SDCC
How to generate keys for about every platform ... and actually be able to log to the SDCC
- General / Introduction
- Instructions for Windows, Linux/Windows interoperability
- Uploading keys to the SDCC
- I have done all of this, what's next?
General
What you find below is especially useful for those of you that work on several machines and platforms in and out of BNL and need to use ssh key pairs to get into SDCC.
- If you use Linux only or Windows only everywhere, all you need is follow the instructions on the SDCC web site and you are all set (see especially their Unix SSH Key generation page).
- Otherwise this page is for you.
The findings on this web page are a combined effort of Jérôme Lauret, Jim Thomas, and Thomas Ullrich. All typos and mistakes on this page are my doing. I am also not going to discuss the wisdom of having to move private keys around - all I want to do is get things done.
The whole problem arises from the fact that there are 3 different formats to store ssh key-pairs and all are not compatible:
- ssh.com: Secure Shell is the company that invented the (now public) ssh protocol. They provide the (so far) best ssh version for Windows which is far nicer than PuTTY. Especially the File Browser provided is so much nicer than the scp command interface. It is free for academic/university sites.
- PuTTY: a free ssh tool for Windows.
- OpenSSH: runs on all Linux boxes and via cygwin on Windows.
Despite all claims, OpenSSH cannot export private keys into ssh.com format, nor can it import ssh.com private keys. Public keys seem to work but this is not what we want. So here is how it goes:
[A] Windows: follow one of the instructions below
- PuTTY (Windows)
- Download puttygen.exe from the PuTTY download page. You only need it once, but it might be good to keep it in case you need to regenerate your keys.
- Start the program puttygen.exe
- Under parameters pick SSH-2 (RSA) and 1024 for the size of the key in bits.
- Then press the Generate button. You will be asked to move your mouse over the blank area.
- Enter a passphrase in the referring fields. The passphrase is needed as it will correspond to a password. Make a mental note of it as keys will not be usable without it.
- I recommend to save the "key fingerprint" too since you will need it at the SDCC web site when uploading your public key. Just save it in a plain text file.
Note: You can always generate it later from Linux with ssh-keygen -l -f <key_file> but since you will need access to a Linux system to do this, it is important you keep a copy of this now so you could proceed with the rest of the instructions. The picture below shows where the important fields are
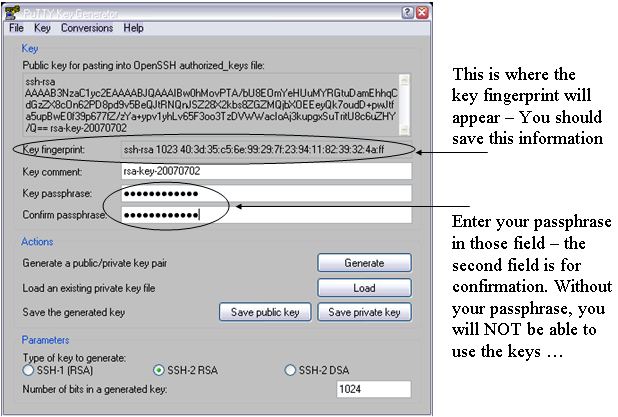
- Saving keys
- Press Save Public Key. To not confuse all the keys you are going to generate I strongly recommend to call it rsa_putty.pub.
- Next press Save Private Key. Type rsa_putty as a name when prompted. PuTTY will automatically name it rsa_putty.ppk. That's your private key.
Don't quit puttygen yet. Now comes the important stuff. - In the menu bar pick Conversions->Export OpenSSH key. When prompted give a name that indicated that this is the private key for OpenSSH (Linux). I used rsa_openssh. There is no public key stored only the private. We will generate the public one from the private one later.
- In the menu bar pick Conversions->Export ssh.com key. When prompted give a name that indicated that this is the private key for ssh.com. I used rsa_sshcom. Again, there is no public key stored only the private. We will generate the public one from the private one later.
- All done. Now you have essentially 4 files: public and private keys for putty and private keys for ssh.com and OpenSSH.
- Getting ssh.com to work (Windows):
- Here I assume that you have SSHSecureShell (client) installed, that is the ssh.com version. Open a DOS (or cygwin) shell. We now need to generate a public key from the private key we got from puttygen. Best is to change into the directory where your private key is stored and type: ssh-keygen2 -D rsa_sshcom . Note that the command has a '2' at the end. This will generate a file called rsa_sshcom.pub containing the public key. Now you have your key pair.
- Launch SSH and pick from the menu bar Edit->Settings.
Click on GlobalSettings/UserAuthentication/Keys and press the Import button. Point to your public key rsa_sshcom.pub. The private key will be automatically loaded too. That's it. Press OK and quit SSH. We are not quite ready yet. We still have to generate and upload the OpenSSH key to SDCC.
- Getting keys to work with OpenSSH/Linux:
- Copy the private key rsa_openssh to a Linux box (cygwin on Windows works of course too).
- Set the permissions such that only you can read the private key file:
% chomod 600 rsa_openssh
- Generate the public key with:
% ssh-keygen -y -f rsa_openssh > rsa_openssh.pub
- Now you have the key pair.
- To install the key pair on a Linux box copy rsa_openssh and rsa_openssh.pub to your ~/.ssh directory.
Important: the keys ideally will be named id_rsa and id_rsa.pub, otherwise extra steps/options will be required to work with them. So, you are recommended to also do% mv rsa_openssh ~/.ssh/id_rsa
All done. Note that there is no need to put your key files on every machine to which you are going to connect. In fact, you should keep your private key file in as few places as possible -- just the source machine(s) from which you will initiate SSH connections. Your public key file is indeed safe to share with the public, so you need not be so careful with it and in fact will have to provide it to remote systems (such in the next section) in order to use your keys at all.% mv rsa_openssh.pub ~/.ssh/id_rsa.pub
[B] Uploading the public key to SDCC:
- https://web.racf.bnl.gov/Facility/SshKeys/UploadSshKey.php
- Make sure you upload the OpenSSH public key. Everything else won't work.
You need to provide the key fingerprint which you hopefully saved from the instructions above. In case of OpenSSH based keys, you can re-generate the fingerprint with
% ssh-keygen -Emd5 -l -f <key_file>
Note that forcing MD5 hash is important (default hash is SHA256 the RACF interface will not take). All done.
If you followed all instructions you now have 3 key pairs (files). This covers essentially all SSH implementations there are. Where ever you go, whatever machine and system you deal with, one key pair will work. Keep them all in a very save place.
[C] Done.What's next?
Uploading your keys to the SDCC and STAR SSH-key management interfaces
You need to upload your SSH keys only once. But after your first upload, please wait a while (30 mnts) before connecting to the SDCC SSH Gatekeepers. Basic connection instructions, use:
% ssh -AX xxx@sssh.sdcc.bnl.gov
% rterm
The rterm command will open an X-terminal on a valid STAR interactive node. If you do NOT have an X11 server running on your computer, you could use the -i options of rterm for interactive (non X-term based) session.
If you intend to logon to our online enclave, please check the instructions on You do not have access to view this node to request an account on the STAR SSH gateways and Linux pool (and upload your keys to the STAR Key SSH Management system). Note that you cannot upload your keys anywhere without a Kerberos password (both the SDCC and STAR's interface will require a real account kerberos password to log in). Logging in to the Online enclave involves the following ssh connection:
% ssh -AX xxx@cssh.sdcc.bnl.gov
% ssh -AX xxx@stargw.starp.bnl.gov
A first thing to see is that SDCC gatekeeper is here "cssh" as the network is spearated into a "campus" side (cssh) and a ScienceZone side (sssh). For convenience, we have asked Cyber security to allow connections from "sssh" to our online enclave as well (so if you use sssh all the time, it will work).
For the requested an account online ... note that users do not request access to the individual stargw machines directly. Instead, a shared user database is kept on onlcs.starp.bnl.gov - approval for access to onlcs grants access to the stargw machines and the Online Linux Pool. Such access is typically requested on the user's behalf when the user requests access to the online resources following the instructions at You do not have access to view this node, though users may also initiate the request themselves.
Logging in to the stargw machines is most conveniently done Using the SSH Agent, and is generally done through the SDCC's SSSH gateways. This additional step of starting an agent would be removed whenever we will be able to directly access the STAR SSH GW (as per 2009, this is not yet possible due to technical details).
See also
To learn more, see:
- SSH connection stability
- Caveats, issues, special cases and possible problems
- SSH Key Management (an overview of the STAR SSH key management system)
Caveats, issues, special cases and possible problems
Shortcut links
- SSH side effects (login in using different user names than on the remote client)
- X11 Forwarding, -X or -Y?? (and all of what you want to know and what you may not want to know)
- When to use trusted (-Y not-secure) and untrusted (-X secure)
- Customized setups
- Kerberos hand-shake and the RCF
- Generic group accounts - how does this work?
- Special nodes
- Other caveats related to Kerberos
SSH side effects
Please note that if you remote account name is different from your RCF account name, you will need to use
% ssh -X username@rssh.rhic.bnl.gov
specifying explicitly username rather as the form
% ssh -X rssh.rhic.bnl.gov
will assume a username defaulting to your local machine (remote from the BNL ssh-daemon stand point) user name where you issue the ssh command. This has been a source of confusion for a few users. The first form by the way is preferred as always work and removes all ambiguities.
X11 Forwarding: -X or -Y ??
-X is used to automatically set the display environment to a secure channel (also called untrusted X11 forwarding) . In other words, it enables X11 forwarding without having to grant remote applications the right to manipulate your Xserver parameters. If you want ssh client to always act like with X11 forwarding, have the following line added in your /etc/ssh/ssh_config (or any /etc/ssh*/ssh*_config ).
ForwardX11 yes
-Y enables trusted X11 forwarding. So, what does trusted mean? It means that the X-client will be allowed to gain full access to your Xserver, including changing X11 properties (i.e. attributes and values which alters the look and feel of opened X windows or things such as mouse controls and position info, keyboard input reading and so on). Starting with OpenSSH 3.8, you will need to set
ForwardX11Trusted yes
in the client configuration to allow remote nodes full access to your Xserver as it is NOT enabled by default.
When to use trusted, when to use untrusted
Recent OpenSSH version supports both untrusted (-X) and trusted (-Y) X11 Forwarding. As hinted above, the difference is what level of permissions the client application has on the Xserver running on the client machine. Untrusted (-X) X11 Forwarding is more secure, but unfortunately several applications (especially older X-based applications) do not support running with less privileges and will eventually die and/or crash your entire Xserver session.
Dilema? A rule of thumb is that while using trusted (-Y) X11 Forwarding will have less applications problems for the near future, try first the most secured untrusted (-X) way and see what happens. If remote X applications fail with a errorssimilar to the below:
X Error of failed request: BadAtom (invalid Atom parameter)
  Major opcode of failed request: 18 (X_ChangeProperty)
  Atom id in failed request: 0x114
  Serial number of failed request: 370
  Current serial number in output stream: 372
you will have to use the trusted (-Y) connection.
Instead of a system global configuration which will require your system administrator's assistance, you may create a config file in your user’s home directory (client side) under the .ssh directory with the following line $HOME/.ssh/config
ForwardX11Trusted yes
Host *.edu
	ForwardX11 no
	User jlauret

Host *.starp.bnl.gov
	ForwardX11 yes
    	Cipher blowfish
	User jeromel

Host orion.star.bnl.gov
     ForwardAgent yes
     Cipher 3des
     ForwardX11Trusted yes

Host what.is.this
    User exampleoptions
    ServerAliveInternal=900
    Port 666
    Compression yes
    PasswordAuthentication no
    KeepAlive yes
    ForwardAgent yes
    ForwardX11 yes
    RhostsAuthentication no
    RhostsRSAAuthentication no
    RSAAuthentication yes
    TISAuthentication no
    PasswordAuthentication no
    FallBackToRsh no
    UseRsh no
As a side note, 3des is more secure thank blowfish but also 3x slower. If speed and security is important, use at least aes cypher.
Kerberos hand-shake, How to.
OK, now you are logged to the facility gatekeeper but any sub-sequent login would ask for your password again (and this would defeat security). But you can cure this problem by, on the gatekeeper, issue the following command (we assume $user is your user name)
% kinit -5 -d -l 7d $user
-l 7d is used to provide a long life K5 ticket (7 days long credentials). Note that you should afterward be granted an AFS token automatically upon login to the worker nodes on the facility. From the gatekeeper, the command
% rterm
would open a terminal from the least loaded node on the cluster where you are allowed to log.
Generic (group) accounts
Due to policy regulations, group or generic accounts login cannot be allowed at the facility unless the login is traceable to an individual. The way to log in is therefore to
- Log to the gatekeeper using SSH keys under your PERSONAL account as described at SSH Keys and login to the SDCC
- kinit -5 -4 -l 7d $gaccount
- In case of wide use generic account, one more jump to a "special" node will be necessary. For starreco and starlib for example, this additional gatekeeper node is rcas6003. From there, login to the rest of the facility could be done using rterm as usual (at least in STAR)
Special nodes
This section is about standing on one foot, tapping on to of your head and chanting a mantra unless the moon is full (in such case, the procedure involves parsley and sacrificial offerings). OK, we are in the realm of the very very special tricks for very very special nodes:
- The rmine nodes CANNOT be connected to anymore. However, one can use rsec00.rhic.bnl.gov has a gatekeeper, using your desktop keys and then jump from there to the rmine nodes.
Scope: Subject to special authorization. - The test node aplay1.usatlas.bnl.gov cannot be accessed using a Kerberos trick. Since there are two HOPs from your machine to aplay1, you need to use the ssh-agent. See instructions on the Using the SSH Agent help page.
K5 Caveats
- If you log to gatekeeper GK1 for your personal account, you will need to chose another gatekeeepr GK2 for your group account login. This will allow not interference of Kerberos credentials.
- Whenever you log in a gatekeeper and you know you had previously obtained Kerberos credentials on this gatekeeper, you should ensure the destruction of previous credential to avoid premature lifetime expiration. In other words, -l 7d will NOT give you a 7 days lifetime K5 ticket on a gatekeeper where previous credentials exists. To destroy previous credentials, be sure
- you do not have (still) opened windows using the credential. Check this by issuing a klist and observe the listing. Valid credentials used in opened session would look like this
Valid starting Expires Service principal 12/26/06 10:59:28 12/31/06 10:59:28 krbtgt/RHIC.BNL.GOV@RHIC.BNL.GOV renew until 01/02/07 10:59:25 12/26/06 10:59:30 12/31/06 10:59:28 host/rcas6005.rcf.bnl.gov@RHIC.BNL.GOV renew until 01/02/07 10:59:25 12/26/06 11:11:48 12/31/06 10:59:28 host/rplay43.rcf.bnl.gov@RHIC.BNL.GOV renew until 01/02/07 10:59:25 12/26/06 17:51:05 12/31/06 10:59:28 host/stargrid02.rcf.bnl.gov@RHIC.BNL.GOV renew until 01/02/07 10:59:25 12/26/06 18:34:03 12/31/06 10:59:28 host/stargrid01.rcf.bnl.gov@RHIC.BNL.GOV renew until 01/02/07 10:59:25 12/26/06 18:34:22 12/31/06 10:59:28 host/stargrid03.rcf.bnl.gov@RHIC.BNL.GOV renew until 01/02/07 10:59:25 12/28/06 17:53:29 12/31/06 10:59:28 host/rcas6011.rcf.bnl.gov@RHIC.BNL.GOV renew until 01/02/07 10:59:25 - If nothing appears to be relevant or existing, it is safe to issue the kdestroy command to wipe out all old credentials and then re-initiate a kinit.
- you do not have (still) opened windows using the credential. Check this by issuing a klist and observe the listing. Valid credentials used in opened session would look like this
Using the SSH Agent
General
The ssh-agent is a program you may use together with OpenSSH or similar ssh programs. The ssh-agent provides a secure way of storing the passphrase of the private key.
One advantage and common use of the agent is to use the agent forwarding. Agent forwarding allows you to open ssh sessions without having to repeatedly type your passphrase as you make multiple SSH hops. Below, we provide instructions on starting the agent, loading your keys and how to use key forwarding.
Instructions
Starting the agent
The ssh-agent is started as follow.
% ssh-agent
Note however that the agent will immediately display information such as the one below
% ssh-agent
SSH_AUTH_SOCK=/tmp/ssh-fxDmNwelBA/agent.5884; export SSH_AUTH_SOCK;
SSH_AGENT_PID=3520; export SSH_AGENT_PID;
echo Agent pid 3520;
It may not be immediately obvious to you but you actually MUST type those commands on the command line for the next steps to be effective.
Here is what I usually do: redirect the message to a file and source it from the shell like this:
% ssh-agent >agent.sh
% source agent.sh
The commands above will create a script containing the necessary shell commands, then the source command will load the information into your shell. This assumes you are using sh. For csh, you need use the setenv shell command to define both SSH_AUTH_SOCK and SSH_AGENT_PID. A simpler approach may however be to use
% ssh-agent csh
The command above will start a new shell, in which the necessary environment variables will be defined in the newly started shell (no sourcing needed).
Yet another method to start an agent and set the environment variables in tcsh or bash (and probably other shells) is this:
% eval `ssh-agent`
Now that you've started an agent and set the environment variables to use it, the next step is to load your SSH key.
Loading a key
The agent alone is not very useful until you've actually put keys into it. All your agent key management is handled by the ssh-add command. If you run it without arguments, it will add any of the 'standard' keys $HOME/.ssh/identity, $HOME/.ssh/id_rsa, and $HOME/.ssh/id_dsa.
To be sure the agent has not loaded any id yet, you may use the -l option with ssh-add. Here's what you should see if you have not loaded a key:
% ssh-add -l
The agent has no identities.
To load your key, simply type
% ssh-add
Enter passphrase for /home/jlauret/.ssh/id_rsa:
Identity added: /home/jlauret/.ssh/id_rsa (/home/jlauret/.ssh/id_rsa)
To very if all is fine, you may use again the ssh-add command with the -l option. The result should be different now and similar to the below (if not, something went wrong).
% ssh-add -l
1024 34:a0:3f:56:6d:a2:02:d1:c5:23:2e:a0:27:16:3d:e5 /home/jlauret/.ssh/id_rsa (RSA)
Is so, all is fine.
Agent forwarding
Two conditions need to be present for agent forwarding to function:
- The server need to be set to accept forwards (enabled by default)
- You need to use the ssh client with the -A option
Usage is simply
% ssh -A user@remotehost
And that is all. For every hop, you need to use the -A option to have the key forwarded throughout the chain of ssh logins. Ideally, you may want to use -AX (where "X" enabled X11 agent forwarding).
Agent security concern
The ssh-agent creates a unix domain socket, and then listens for connections from /usr/bin/ssh on this socket. It relies on simple unix permissions to prevent access to this socket, which means that any keys you put into your agent are available to anyone who can connect to this socket. BE AWARE that root especially has acess to any file hence any sockets and as a consequence, may acquire access to your remote system whenever you use an agent.
Manpages indicates you may use the -c of ssh-add and this indeed adds one more level of safety to the agent mechanism (the agent will aks for the passphrase confirmation at each new session). However, if root has its mind on stealing a session, you are set for a lost battle from the start so do not feel over-confident of this option.
Addittional information
Help pages below links to the OpenSSH implementation of the ssh client/server and other ssh related documentation from our site.
- ssh-agent manpage
- ssh-add manpage
- ssh manpage
- How to safely start the ssh-agent from .bashrc
- ssh-add / ssh-agent issue
- SSH connection stability
SSH connection stability
IF- Your SSH connections are closed from home
- You get disconnected from any nodes without any reasons?
- ... and you are a PuTTY user
- ... or an Uglix SSH client user
PuTTY users
PuTTY to connect to gateway (from a home connection), you have to
set a session, be sure to enable SSH
go to the 'Connection' menu and have the following options box checked
Disable Nagle's algorithm (TCP_NODELAY option)
Enable TCP keepalives (SO_KEEPALIVE option)
Furthermore, in 'Connection' -> 'SSH' -> 'Tunnels' enable the option
Enable X11 forwarding
Enable MIT-Magic-Cookie-1
Save the session
Documentation on those features (explanation for the interested) are added at the end of this document.
SSH Users
SSH users and owner of their system could first of all be sure to manipulate the SSH client configuration file and be sure settings are turned on by default. The client configuration is likely located as /etc/ssh_config or /usr/local/etc/ssh_config depending on where you have ssh installed.
But if you do NOT have access to the configuration file, the client can nonetheless pass on options from the command line. Those options would have the same name as they would appear in the config file.
Especially, KEEP_ALIVE is controlled via the SSH configuration option TCPKeepAlive.
% ssh -o TCPKeepAlive=yes
You will note in the next section that a spoofing issue exists with keep alive (I know it works well, but please consider the ServerAliveCountMax mechanism) so, you may use instead
% ssh -o TCPKeepAlive=no -o ServerAliveInterval=15
Note that the value 15 in our example is purely empirical. There are NO magic values and you need to test your connection and detect when (after what time) you get kicked out and disconnected and set the parameters from your client accordingly. Let's explain the default first and come back to this and a rule of thumb.
There are two relevant parameters (in addition of TCPKeepAlive):
ServerAliveInterval
Sets a timeout interval in seconds after which if no data has been received from the server, ssh will send a message through the encrypted channel to request a response from the server. The default is 0, indicating that these messages will not be sent to the server.
This option applies to protocol version 2 only.
ServerAliveCountMax
Sets the number of server alive messages (see above) which may be sent without ssh receiving any messages back from the server. If this threshold is reached while server alive messages are being sent, ssh will disconnect from the server, terminating the session. It is important to note that the use of server alive messages is very different from TCPKeepAlive (below). The server alive messages are sent through the encrypted channel and therefore will not be spoofable. The TCP keepalive option enabled by TCPKeepAlive is spoofable. The server alive mechanism is valuable when the client or server depend on knowing when a connection has become inactive.
The default value is 3. If, for example, ServerAliveInterval (above) is set to 15, and ServerAliveCountMax is left at the default, if the server becomes unresponsive ssh will disconnect after approximately 45 seconds.
In our example
% ssh -o TCPKeepAlive=no -o ServerAliveInterval=15
The recipe should be: if you get disconnected after N seconds, play with the above and be sure to set a
time of ServerAliveInterval*ServerAliveCountMax <= 0.8*N, N being the timeout. Since ServerAliveCountMax is typically not modified, in our example we assume the default value of 3 and therefore a a 3x15 = 45 seconds (and we guessed a disconnect every minute or so). If you set the value too low, the client will send to much "chatting" to the server and there will be a traffic impact.
Appendix
Nagle's algorithm
This was written based on this article.
RPC implementations on TCP should disable Nagle. This reduces average RPC request latency on TCP, and makes network trace tools work a little nicer.
Determines whether Nagle's algorithm is to be used. The Nagle's algorithm tries to conserve bandwidth by minimizing the number of segments that are sent. When applications wish to decrease network latency and increase performance, they can disable Nagle's algorithm (that is enable TCP_NODELAY). Data will be sent earlier, at the cost of an increase in bandwidth consumption.
KeepAlive
The KEEPALIVE option of the TCP/IP Protocol ensures that connections are kept alive even while they are idle. When a connection to a client is inactive for a period of time (the timeout period), the operating system sends KEEPALIVE packets at regular intervals. On most systems, the default timeout period is two hours (7,200,000 ms).
If the network hardware or software drops connections that have been idle for less than the two hour default, the Windows Client session will fail. KEEPALIVE timeouts are configured at the operating system level for all connections that have KEEPALIVE enabled.
If the network hardware or software (including firewalls) have a idle limit of one hour, then the KEEPALIVE timeout must be less than one hour. To rectify this situation TCP/IP KEEPALIVE settings can be lowered to fit inside the firewall limits. The implementation of TCP KEEPALIVE may vary from vendor to vendor. The original definition is quite old and described in RFC 1122.
MIT Magic cookie
To avoid unauthorized connections to your X display, the command xauth for encrypted X connections is widely used. When you login, a .Xauthority file is created in your home directory ($HOME). Even SSH initiate the creation of a magic cookie and without it, no display could be opened. Note that since the .Xauthority file IS the file containing the MIT Magic cookie, if you ever run out of disk quota or the file system is full, this file CANNOT be created or updated (even from the sshd impersonating the user) and consequently, no X connections can be opened.
The .Xauthority file sometimes contains information from older sessions, but this is not important, as a new key is created at every login session. The Xauthority is simple and powerful, and eliminates many of the security problems with X.
FileCatalog
The STAR FileCatalog is an a set of tools and API providing users access to the MeataData, File and Replica information pertaining to all data produced by the RHIC/STAR experiment. The STAR FileCatalog in other words provides users access to meta-data, file and replica information through a unified schema-agnostic API. The user never needs to know the details of the relation between elements (or keywords) but rather, is provided with a flexible yet powerful query API allowing them to request any combination of 'keywords' based on sets of conditions composed of sequences of keyword operation values combinations. The user manual provides a list of keywords.
The STAR FIleCatalog also provides multi-site support through the same API. In other words, the same set of tools and programmatic interface allows to register, update, maintain a global catalog for the experiment and serve as a core component to the Data Management system. To date, the STAR FileCatalog holds information on 22 Million files and 52 Million active replicas.
The history & version information7
- Migration and notes from V01.275 to V01.280 (March 4th 2004, level=minor)
- Migration and notes from V01.265 to V01.275 (January 13th 2004, level=major)
Manual
- You do not have access to view this node
- SQL Tables creation and attributes
- Data dictionary
XML(s) examples
- Connection description XML configuration
Examples and other documentation
A few examples will be left here to guide users and installer.
Data dictionary
This dictionary was created on 2012/03/12.
CollisionTypes
| Field | Type | Null | Default | Comments |
|---|---|---|---|---|
| collisionTypeID | smallint(6) | No | ||
| firstParticle | varchar(10) | No | ||
| secondParticle | varchar(10) | No | ||
| collisionEnergy | float | No | 0 | |
| collisionTypeIDate | timestamp | No | CURRENT_TIMESTAMP | |
| collisionTypeCreator | smallint(6) | No | 1 | |
| collisionTypeCount | int(11) | Yes | NULL | |
| collisionTypeComment | text | Yes | NULL |
Creators
| Field | Type | Null | Default | Comments |
|---|---|---|---|---|
| creatorID | bigint(20) | No | ||
| creatorName | varchar(15) | Yes | unknown | |
| creatorIDate | timestamp | No | CURRENT_TIMESTAMP | |
| creatorCount | int(11) | Yes | NULL | |
| creatorComment | varchar(512) | Yes | NULL |
DetectorConfigurations
| Field | Type | Null | Default | Comments |
|---|---|---|---|---|
| detectorConfigurationID | int(11) | No | ||
| detectorConfigurationName | varchar(50) | Yes | NULL | |
| dTPC | tinyint(4) | Yes | NULL | |
| dSVT | tinyint(4) | Yes | NULL | |
| dTOF | tinyint(4) | Yes | NULL | |
| dEMC | tinyint(4) | Yes | NULL | |
| dEEMC | tinyint(4) | Yes | NULL | |
| dFPD | tinyint(4) | Yes | NULL | |
| dFTPC | tinyint(4) | Yes | NULL | |
| dPMD | tinyint(4) | Yes | NULL | |
| dRICH | tinyint(4) | Yes | NULL | |
| dSSD | tinyint(4) | Yes | NULL | |
| dBBC | tinyint(4) | Yes | NULL | |
| dBSMD | tinyint(4) | Yes | NULL | |
| dESMD | tinyint(4) | Yes | NULL | |
| dZDC | tinyint(4) | Yes | NULL | |
| dCTB | tinyint(4) | Yes | NULL | |
| dTPX | tinyint(4) | Yes | NULL | |
| dFGT | tinyint(4) | Yes | NULL |
DetectorStates
| Field | Type | Null | Default | Comments |
|---|---|---|---|---|
| detectorStateID | int(11) | No | ||
| sTPC | tinyint(4) | Yes | NULL | |
| sSVT | tinyint(4) | Yes | NULL | |
| sTOF | tinyint(4) | Yes | NULL | |
| sEMC | tinyint(4) | Yes | NULL | |
| sEEMC | tinyint(4) | Yes | NULL | |
| sFPD | tinyint(4) | Yes | NULL | |
| sFTPC | tinyint(4) | Yes | NULL | |
| sPMD | tinyint(4) | Yes | NULL | |
| sRICH | tinyint(4) | Yes | NULL | |
| sSSD | tinyint(4) | Yes | NULL | |
| sBBC | tinyint(4) | Yes | NULL | |
| sBSMD | tinyint(4) | Yes | NULL | |
| sESMD | tinyint(4) | Yes | NULL | |
| sZDC | tinyint(4) | Yes | NULL | |
| sCTB | tinyint(4) | Yes | NULL | |
| sTPX | tinyint(4) | Yes | NULL | |
| sFGT | tinyint(4) | Yes | NULL |
EventGenerators
| Field | Type | Null | Default | Comments |
|---|---|---|---|---|
| eventGeneratorID | smallint(6) | No | ||
| eventGeneratorName | varchar(30) | No | ||
| eventGeneratorVersion | varchar(10) | Yes | 0 | |
| eventGeneratorParams | varchar(200) | Yes | NULL | |
| eventGeneratorIDate | timestamp | No | CURRENT_TIMESTAMP | |
| eventGeneratorCreator | smallint(6) | No | 1 | |
| eventGeneratorCount | int(11) | Yes | NULL | |
| eventGeneratorComment | varchar(512) | Yes | NULL |
FileData
| Field | Type | Null | Default | Comments |
|---|---|---|---|---|
| fileDataID | bigint(20) | No | ||
| runParamID | int(11) | No | 0 | |
| fileName | varchar(255) | No | ||
| baseName | varchar(255) | No | Name without extension | |
| sName1 | varchar(255) | No | Will be used for name+runNumber | |
| sName2 | varchar(255) | No | Will be used for name before runNumber | |
| productionConditionID | mediumint(9) | Yes | NULL | |
| numEntries | mediumint(9) | Yes | 0 | |
| md5sum | varchar(32) | Yes | 0 | |
| fileTypeID | smallint(6) | No | 0 | |
| fileSeq | smallint(6) | Yes | NULL | |
| fileStream | smallint(6) | Yes | 0 | |
| fileDataIDate | timestamp | No | CURRENT_TIMESTAMP | |
| fileDataCreator | smallint(6) | No | 1 | |
| fileDataCount | int(11) | Yes | NULL | |
| fileDataComment | text | Yes | NULL |
FileLocations
| Field | Type | Null | Default | Comments |
|---|---|---|---|---|
| fileLocationID | bigint(20) | No | ||
| fileDataID | bigint(20) | No | 0 | |
| filePathID | bigint(20) | No | 0 | |
| storageTypeID | mediumint(9) | No | 0 | |
| createTime | timestamp | No | CURRENT_TIMESTAMP | |
| insertTime | timestamp | No | 0000-00-00 00:00:00 | |
| owner | varchar(15) | Yes | NULL | |
| fsize | bigint(20) | Yes | NULL | |
| storageSiteID | smallint(6) | No | 0 | |
| protection | varchar(15) | Yes | NULL | |
| hostID | mediumint(9) | No | 1 | |
| availability | tinyint(4) | No | 1 | |
| persistent | tinyint(4) | No | 0 | |
| sanity | tinyint(4) | No | 1 |
FileLocationsID
| Field | Type | Null | Default | Comments |
|---|---|---|---|---|
| fileLocationID | bigint(20) | No |
FileLocations_0
| Field | Type | Null | Default | Comments |
|---|---|---|---|---|
| fileLocationID | bigint(20) | No | ||
| fileDataID | bigint(20) | No | 0 | |
| filePathID | bigint(20) | No | 0 | |
| storageTypeID | mediumint(9) | No | 0 | |
| createTime | timestamp | No | CURRENT_TIMESTAMP | |
| insertTime | timestamp | No | 0000-00-00 00:00:00 | |
| owner | varchar(15) | Yes | NULL | |
| fsize | bigint(20) | Yes | NULL | |
| storageSiteID | smallint(6) | No | 0 | |
| protection | varchar(15) | Yes | NULL | |
| hostID | mediumint(9) | No | 1 | |
| availability | tinyint(4) | No | 1 | |
| persistent | tinyint(4) | No | 0 | |
| sanity | tinyint(4) | No | 1 |
FileLocations_1
| Field | Type | Null | Default | Comments |
|---|---|---|---|---|
| fileLocationID | bigint(20) | No | ||
| fileDataID | bigint(20) | No | 0 | |
| filePathID | bigint(20) | No | 0 | |
| storageTypeID | mediumint(9) | No | 0 | |
| createTime | timestamp | No | CURRENT_TIMESTAMP | |
| insertTime | timestamp | No | 0000-00-00 00:00:00 | |
| owner | varchar(15) | Yes | NULL | |
| fsize | bigint(20) | Yes | NULL | |
| storageSiteID | smallint(6) | No | 0 | |
| protection | varchar(15) | Yes | NULL | |
| hostID | mediumint(9) | No | 1 | |
| availability | tinyint(4) | No | 1 | |
| persistent | tinyint(4) | No | 0 | |
| sanity | tinyint(4) | No | 1 |
FileLocations_2
| Field | Type | Null | Default | Comments |
|---|---|---|---|---|
| fileLocationID | bigint(20) | No | ||
| fileDataID | bigint(20) | No | 0 | |
| filePathID | bigint(20) | No | 0 | |
| storageTypeID | mediumint(9) | No | 0 | |
| createTime | timestamp | No | CURRENT_TIMESTAMP | |
| insertTime | timestamp | No | 0000-00-00 00:00:00 | |
| owner | varchar(15) | Yes | NULL | |
| fsize | bigint(20) | Yes | NULL | |
| storageSiteID | smallint(6) | No | 0 | |
| protection | varchar(15) | Yes | NULL | |
| hostID | mediumint(9) | No | 1 | |
| availability | tinyint(4) | No | 1 | |
| persistent | tinyint(4) | No | 0 | |
| sanity | tinyint(4) | No | 1 |
FileLocations_3
| Field | Type | Null | Default | Comments |
|---|---|---|---|---|
| fileLocationID | bigint(20) | No | ||
| fileDataID | bigint(20) | No | 0 | |
| filePathID | bigint(20) | No | 0 | |
| storageTypeID | mediumint(9) | No | 0 | |
| createTime | timestamp | No | CURRENT_TIMESTAMP | |
| insertTime | timestamp | No | 0000-00-00 00:00:00 | |
| owner | varchar(15) | Yes | NULL | |
| fsize | bigint(20) | Yes | NULL | |
| storageSiteID | smallint(6) | No | 0 | |
| protection | varchar(15) | Yes | NULL | |
| hostID | mediumint(9) | No | 1 | |
| availability | tinyint(4) | No | 1 | |
| persistent | tinyint(4) | No | 0 | |
| sanity | tinyint(4) | No | 1 |
FileParents
| Field | Type | Null | Default | Comments |
|---|---|---|---|---|
| parentFileID | bigint(20) | No | 0 | |
| childFileID | bigint(20) | No | 0 |
FilePaths
| Field | Type | Null | Default | Comments |
|---|---|---|---|---|
| filePathID | bigint(6) | No | ||
| filePathName | varchar(255) | No | ||
| filePathIDate | timestamp | No | CURRENT_TIMESTAMP | |
| filePathCreator | smallint(6) | No | 1 | |
| filePathCount | int(11) | Yes | NULL | |
| filePathComment | varchar(512) | Yes | NULL |
FileTypes
| Field | Type | Null | Default | Comments |
|---|---|---|---|---|
| fileTypeID | smallint(6) | No | ||
| fileTypeName | varchar(30) | No | ||
| fileTypeExtension | varchar(15) | No | ||
| fileTypeIDate | timestamp | No | CURRENT_TIMESTAMP | |
| fileTypeCreator | smallint(6) | No | 1 | |
| fileTypeCount | int(11) | Yes | NULL | |
| fileTypeComment | varchar(512) | Yes | NULL |
Hosts
| Field | Type | Null | Default | Comments |
|---|---|---|---|---|
| hostID | smallint(6) | No | ||
| hostName | varchar(30) | No | localhost | |
| hostIDate | timestamp | No | CURRENT_TIMESTAMP | |
| hostCreator | smallint(6) | No | 1 | |
| hostCount | int(11) | Yes | NULL | |
| hostComment | varchar(512) | Yes | NULL |
ProductionConditions
| Field | Type | Null | Default | Comments |
|---|---|---|---|---|
| productionConditionID | smallint(6) | No | ||
| productionTag | varchar(10) | No | ||
| libraryVersion | varchar(10) | No | ||
| productionConditionIDate | timestamp | No | CURRENT_TIMESTAMP | |
| productionConditionCreator | smallint(6) | No | 1 | |
| productionConditionCount | int(11) | Yes | NULL | |
| productionConditionComment | varchar(512) | Yes | NULL |
RunParams
| Field | Type | Null | Default | Comments |
|---|---|---|---|---|
| runParamID | int(11) | No | ||
| runNumber | bigint(20) | No | 0 | |
| dataTakingStart | timestamp | No | 0000-00-00 00:00:00 | |
| dataTakingEnd | timestamp | No | 0000-00-00 00:00:00 | |
| dataTakingDay | smallint(6) | Yes | 0 | |
| dataTakingYear | smallint(6) | Yes | 0 | |
| simulationParamsID | int(11) | Yes | NULL | |
| runTypeID | smallint(6) | No | 0 | |
| triggerSetupID | smallint(6) | No | 0 | |
| detectorConfigurationID | mediumint(9) | No | 0 | |
| detectorStateID | mediumint(9) | No | 0 | |
| collisionTypeID | smallint(6) | No | 0 | |
| magFieldScale | varchar(50) | No | ||
| magFieldValue | float | Yes | NULL | |
| runParamIDate | timestamp | No | CURRENT_TIMESTAMP | |
| runParamCreator | smallint(6) | No | 1 | |
| runParamCount | int(11) | Yes | NULL | |
| runParamComment | varchar(512) | Yes | NULL |
RunTypes
| Field | Type | Null | Default | Comments |
|---|---|---|---|---|
| runTypeID | smallint(6) | No | ||
| runTypeName | varchar(255) | No | ||
| runTypeIDate | timestamp | No | CURRENT_TIMESTAMP | |
| runTypeCreator | smallint(6) | No | 1 | |
| runTypeCount | int(11) | Yes | NULL | |
| runTypeComment | varchar(512) | Yes | NULL |
SimulationParams
| Field | Type | Null | Default | Comments |
|---|---|---|---|---|
| simulationParamsID | int(11) | No | ||
| eventGeneratorID | smallint(6) | No | 0 | |
| simulationParamIDate | timestamp | No | CURRENT_TIMESTAMP | |
| simulationParamCreator | smallint(6) | No | 1 | |
| simulationParamCount | int(11) | Yes | NULL | |
| simulationParamComment | varchar(512) | Yes | NULL |
StorageSites
| Field | Type | Null | Default | Comments |
|---|---|---|---|---|
| storageSiteID | smallint(6) | No | ||
| storageSiteName | varchar(30) | No | ||
| storageSiteLocation | varchar(50) | Yes | NULL | |
| storageSiteIDate | timestamp | No | CURRENT_TIMESTAMP | |
| storageSiteCreator | smallint(6) | No | 1 | |
| storageSiteCount | int(11) | Yes | NULL | |
| storageSiteComment | varchar(512) | Yes | NULL |
StorageTypes
| Field | Type | Null | Default | Comments |
|---|---|---|---|---|
| storageTypeID | mediumint(9) | No | ||
| storageTypeName | varchar(6) | No | ||
| storageTypeIDate | timestamp | No | CURRENT_TIMESTAMP | |
| storageTypeCreator | smallint(6) | No | 1 | |
| storageTypeCount | int(11) | Yes | NULL | |
| storageTypeComment | varchar(512) | Yes | NULL |
TriggerCompositions
| Field | Type | Null | Default | Comments |
|---|---|---|---|---|
| fileDataID | bigint(20) | No | 0 | |
| triggerWordID | mediumint(9) | No | 0 | |
| triggerCount | mediumint(9) | Yes | 0 |
TriggerSetups
| Field | Type | Null | Default | Comments |
|---|---|---|---|---|
| triggerSetupID | smallint(6) | No | ||
| triggerSetupName | varchar(50) | No | ||
| triggerSetupComposition | varchar(255) | No | ||
| triggerSetupIDate | timestamp | No | CURRENT_TIMESTAMP | |
| triggerSetupCreator | smallint(6) | No | 1 | |
| triggerSetupCount | int(11) | Yes | NULL | |
| triggerSetupComment | varchar(512) | Yes | NULL |
TriggerWords
| Field | Type | Null | Default | Comments |
|---|---|---|---|---|
| triggerWordID | mediumint(9) | No | ||
| triggerWordName | varchar(50) | No | ||
| triggerWordVersion | varchar(6) | No | V0.0 | |
| triggerWordBits | varchar(6) | No | ||
| triggerWordIDate | timestamp | No | CURRENT_TIMESTAMP | |
| triggerWordCreator | smallint(6) | No | 1 | |
| triggerWordCount | int(11) | Yes | NULL | |
| triggerWordComment | varchar(512) | Yes | NULL |
Tables creation and attributes
#use FileCatalog;

#
# All IDs are named after their respective table. This MUST
# remain like this.
#  eventGeneratorID        -> eventGenerator+ID       in 'EventGenerators'
#  detectorConfigurationID ->detectorConfiguration+ID in 'DetectorConfigurations'
#
# etc...
#

DROP TABLE IF EXISTS EventGenerators;
CREATE TABLE EventGenerators
(
  eventGeneratorID      SMALLINT     NOT NULL    AUTO_INCREMENT,
  eventGeneratorName    VARCHAR(30)        NOT NULL,
  eventGeneratorVersion VARCHAR(10)     NOT NULL,
  eventGeneratorParams  VARCHAR(200),

  eventGeneratorIDate   TIMESTAMP       NOT NULL,
  eventGeneratorCreator CHAR(15)        DEFAULT 'unknown' NOT NULL,
  eventGeneratorCount   INT,
  eventGeneratorComment TEXT,
  UNIQUE        EG_EventGeneratorUnique (eventGeneratorName, eventGeneratorVersion, eventGeneratorParams),
  PRIMARY KEY (eventGeneratorID)
) TYPE=MyISAM;

DROP TABLE IF EXISTS DetectorConfigurations; CREATE TABLE DetectorConfigurations
(
  detectorConfigurationID               INT             NOT NULL        AUTO_INCREMENT,
  detectorConfigurationName             VARCHAR(50)        NULL           UNIQUE,
  dTPC                                  TINYINT,
  dSVT                                  TINYINT,
  dTOF                                  TINYINT,
  dEMC                                  TINYINT,
  dEEMC                                 TINYINT,
  dFPD                                  TINYINT,
  dFTPC                                 TINYINT,
  dPMD                                  TINYINT,
  dRICH                                 TINYINT,
  dSSD                                  TINYINT,
  dBBC                                  TINYINT,
  dBSMD                                 TINYINT,
  dESMD                                 TINYINT,
  PRIMARY KEY (detectorConfigurationID)
) TYPE=MyISAM;


# Trigger related tables
DROP TABLE IF EXISTS TriggerSetups; CREATE TABLE TriggerSetups
(
   triggerSetupID               SMALLINT     NOT NULL    AUTO_INCREMENT,
   triggerSetupName             VARCHAR(50)        NOT NULL       UNIQUE,
   triggerSetupComposition      VARCHAR(255) NOT NULL,

   triggerSetupIDate            TIMESTAMP       NOT NULL,
   triggerSetupCreator          CHAR(15)       DEFAULT 'unknown' NOT NULL,
   triggerSetupCount            INT,
   triggerSetupComment          TEXT,
   PRIMARY KEY                  (triggerSetupID)
) TYPE=MyISAM;


DROP TABLE IF EXISTS TriggerCompositions; CREATE TABLE TriggerCompositions
(
  fileDataID                    BIGINT          NOT NULL,
  triggerWordID                 INT             NOT NULL,
  triggerCount                  MEDIUMINT       DEFAULT 0,
  PRIMARY KEY                   (fileDataID, triggerWordID)
) TYPE=MyISAM;


DROP TABLE IF EXISTS TriggerWords;
CREATE TABLE TriggerWords (
  triggerWordID         mediumint(9)   NOT NULL auto_increment,
  triggerWordName       varchar(50)  NOT NULL default '',
  triggerWordVersion    varchar(6)        NOT NULL default 'V0.0',
  triggerWordBits       varchar(6)   NOT NULL default '',
  triggerWordIDate      timestamp(14)       NOT NULL,
  triggerWordCreator    varchar(15)       NOT NULL default 'unknown',
  triggerWordCount      int(11)     default NULL,
  triggerWordComment    text,
  PRIMARY KEY           (triggerWordID),
  UNIQUE KEY TW_TriggerCharacteristic (triggerWordName,triggerWordVersion,triggerWordBits)
) TYPE=MyISAM;


DROP TABLE IF EXISTS CollisionTypes; CREATE TABLE CollisionTypes
(
  collisionTypeID SMALLINT NOT NULL AUTO_INCREMENT,
  firstParticle VARCHAR(10) NOT NULL,
  secondParticle VARCHAR(10) NOT NULL,
  collisionEnergy FLOAT NOT NULL,
  PRIMARY KEY (collisionTypeID)
) TYPE=MyISAM;


#
# A few dictionary tables
#
DROP TABLE IF EXISTS ProductionConditions; CREATE TABLE ProductionConditions
(
  productionConditionID         SMALLINT       NOT NULL      AUTO_INCREMENT,
  productionTag                 VARCHAR(10)   NOT NULL,
  libraryVersion                VARCHAR(10)   NOT NULL,

  productionConditionIDate      TIMESTAMP       NOT NULL,
  productionConditionCreator    CHAR(15)        DEFAULT 'unknown' NOT NULL,
  productionConditionCount      INT,
  productionConditionComments   TEXT,
  PRIMARY KEY                   (productionConditionID)
) TYPE=MyISAM;

DROP TABLE IF EXISTS StorageSites; CREATE TABLE StorageSites
(
  storageSiteID                 SMALLINT      NOT NULL     AUTO_INCREMENT,
  storageSiteName               VARCHAR(30)  NOT NULL,
  storageSiteLocation           VARCHAR(50),

  storageSiteIDate              TIMESTAMP       NOT NULL,
  storageSiteCreator            CHAR(15)       DEFAULT 'unknown' NOT NULL,
  storageSiteCount              INT,
  storageSiteComment            TEXT,
  PRIMARY KEY                   (storageSiteID)
) TYPE=MyISAM;

DROP TABLE IF EXISTS FileTypes; CREATE TABLE FileTypes
(
  fileTypeID                    SMALLINT NOT NULL        AUTO_INCREMENT,
  fileTypeName                  VARCHAR(30)    NOT NULL   UNIQUE,
  fileTypeExtension             VARCHAR(15)        NOT NULL,

  fileTypeIDate                 TIMESTAMP       NOT NULL,
  fileTypeCreator               CHAR(15) DEFAULT 'unknown' NOT NULL,
  fileTypeCount                 INT,
  fileTypeComment               TEXT,
  PRIMARY KEY                   (fileTypeID)
) TYPE=MyISAM;

DROP TABLE IF EXISTS FilePaths; CREATE TABLE FilePaths
(
  filePathID                    BIGINT         NOT NULL         AUTO_INCREMENT,
  filePathName                  VARCHAR(255)   NOT NULL         UNIQUE,

  filePathIDate                 TIMESTAMP       NOT NULL,
  filePathCreator               CHAR(15) DEFAULT 'unknown' NOT NULL,
  filePathCount                 INT,
  filePathComment               TEXT,
  PRIMARY KEY                   (filePathID)
) TYPE=MyISAM;

DROP TABLE IF EXISTS Hosts; CREATE TABLE Hosts
(
  hostID                        SMALLINT       NOT NULL         AUTO_INCREMENT,
  hostName                      VARCHAR(30)    NOT NULL DEFAULT 'localhost' UNIQUE,

  hostIDate                     TIMESTAMP       NOT NULL,
  hostCreator                   CHAR(15)     DEFAULT 'unknown' NOT NULL,
  hostCount                     INT,
  hostComment                   TEXT,
  PRIMARY KEY                   (hostID)
) TYPE=MyISAM;


DROP TABLE IF EXISTS RunTypes; CREATE TABLE RunTypes
(
  runTypeID                     SMALLINT  NOT NULL AUTO_INCREMENT,
  runTypeName                   VARCHAR(255)    NOT NULL   UNIQUE,

  runTypeIDate                  TIMESTAMP       NOT NULL,
  runTypeCreator                CHAR(15)  DEFAULT 'unknown' NOT NULL,
  runTypeCount                  INT,
  runTypeComment                TEXT,
  PRIMARY KEY                   (runTypeID)
) TYPE=MyISAM;


DROP TABLE IF EXISTS StorageTypes; CREATE TABLE StorageTypes
(
  storageTypeID                 MEDIUMINT       NOT NULL    AUTO_INCREMENT,
  storageTypeName               VARCHAR(6)   NOT NULL  UNIQUE,

  storageTypeIDate              TIMESTAMP       NOT NULL,
  storageTypeCreator            CHAR(15)       DEFAULT 'unknown' NOT NULL,
  storageTypeCount              INT,
  storageTypeComment            TEXT,
  PRIMARY KEY                   (storageTypeID)
) TYPE=MyISAM;


DROP TABLE IF EXISTS SimulationParams; CREATE TABLE SimulationParams
(
  simulationParamsID            INT             NOT NULL     AUTO_INCREMENT,
  eventGeneratorID              SMALLINT    NOT NULL,
  detectorConfigurationID       INT             NOT NULL,
  simulationParamComments       TEXT,
  PRIMARY KEY                   (simulationParamsID),
  INDEX         SP_EventGeneratorIndex          (eventGeneratorID),
  INDEX         SP_DetectorConfigurationIndex   (detectorConfigurationID)
) TYPE=MyISAM;

DROP TABLE IF EXISTS RunParams;
CREATE TABLE RunParams
(
  runParamID                  INT        NOT NULL AUTO_INCREMENT,
  runNumber                   BIGINT     NOT NULL UNIQUE,
  dataTakingStart             TIMESTAMP,
  dataTakingEnd               TIMESTAMP,
  simulationParamsID          INT       NULL,
  runTypeID                   SMALLINT     NOT NULL,
  triggerSetupID              SMALLINT      NOT NULL,
  detectorConfigurationID     INT            NOT NULL,
  collisionTypeID             SMALLINT             NOT NULL,
  magFieldScale               VARCHAR(50)    NOT NULL,
  magFieldValue               FLOAT,
  runComments                 TEXT,
  PRIMARY KEY                          (runParamID),
  INDEX RP_RunNumberIndex              (runNumber),
  INDEX RP_DataTakingStartIndex        (dataTakingStart),
  INDEX RP_DataTakingEndIndex          (dataTakingEnd),
  INDEX RP_MagFieldScaleIndex          (magFieldScale),
  INDEX RP_MagFieldValueIndex          (magFieldValue),
  INDEX RP_SimulationParamsIndex       (simulationParamsID),
  INDEX RP_RunTypeIndex                (runTypeID),
  INDEX RP_TriggerSetupIndex           (triggerSetupID),
  INDEX RP_DetectorConfigurationIndex  (detectorConfigurationID),
  INDEX RP_CollisionTypeIndex          (collisionTypeID)
) TYPE=MyISAM;

DROP TABLE IF EXISTS FileData; CREATE TABLE FileData
(
  fileDataID                    BIGINT          NOT NULL AUTO_INCREMENT,
  runParamID                    INT             NOT NULL,
  fileName                      VARCHAR(255)       NOT NULL,
  baseName                      VARCHAR(255)       NOT NULL COMMENT 'Name without extension',
  sName1                        VARCHAR(255) NOT NULL COMMENT 'Will be used for name+runNumber',
  sName2                        VARCHAR(255) NOT NULL COMMENT 'Will be used for name before runNumber',
  productionConditionID         INT             NULL,
  numEntries                    MEDIUMINT,
  md5sum                        CHAR(32)     DEFAULT 0,
  fileTypeID                    SMALLINT NOT NULL,
  fileSeq                       SMALLINT,
  fileStream                    SMALLINT,
  fileDataComments              TEXT,
  PRIMARY KEY                   (fileDataID),
  INDEX         FD_FileNameIndex                (fileName(40)),
  INDEX         FD_BaseNameIndex                (baseName),
  INDEX         FD_SName1Index                  (sName1),
  INDEX         FS_SName2Index                  (sName2),
  INDEX         FD_RunParamsIndex               (runParamID),
  INDEX         FD_ProductionConditionIndex     (productionConditionID),
  INDEX         FD_FileTypeIndex                (fileTypeID),
  INDEX         FD_FileSeqIndex                 (fileSeq),
  UNIQUE        FD_FileDataUnique               (runParamID, fileName, productionConditionID, fileTypeID, fileSeq)
) TYPE=MyISAM;


# FileParents
DROP TABLE IF EXISTS FileParents; CREATE TABLE FileParents
(
  parentFileID                  BIGINT          NOT NULL,
  childFileID                   BIGINT          NOT NULL,
  PRIMARY KEY                   (parentFileID, childFileID)
) TYPE=MyISAM;

# FileLocations
DROP TABLE IF EXISTS FileLocations; CREATE TABLE FileLocations
(
  fileLocationID                BIGINT          NOT NULL      AUTO_INCREMENT,
  fileDataID                    BIGINT          NOT NULL,
  filePathID                    BIGINT          NOT NULL,
  storageTypeID                 MEDIUMINT       NOT NULL,
  createTime                    TIMESTAMP,
  insertTime                    TIMESTAMP       NOT NULL,
  owner                         VARCHAR(30),
  fsize                         BIGINT,
  storageSiteID                 SMALLINT      NOT NULL,
  protection                    VARCHAR(15),
  hostID                        BIGINT          NOT NULL DEFAULT 1,
  availability                  TINYINT         NOT NULL DEFAULT 1,
  persistent                    TINYINT         NOT NULL DEFAULT 0,
  sanity                        TINYINT         NOT NULL DEFAULT 1,
  PRIMARY KEY                   (fileLocationID),
  INDEX         FL_FilePathIndex                (filePathID),
  INDEX         FL_FileDataIndex                (fileDataID),
  INDEX         FL_StorageTypeIndex             (storageTypeID),
  INDEX         FL_StorageSiteIndex             (storageSiteID),
  INDEX         FL_HostIndex                    (hostID),
  UNIQUE        FL_FileLocationUnique           (fileDataID, storageTypeID, filePathID, storageSiteID, hostID)
) TYPE=MyISAM;
XML configuration
<?xml version="1.0" encoding="ISO-8859-1" standalone="yes"?>
<!DOCTYPE SCATALOG [
   <!ELEMENT SCATALOG (SITE*)>
       <!ATTLIST SCATALOG VERSION CDATA #REQUIRED>
   <!ELEMENT SITE (SERVER+)>
       <!ATTLIST SITE name (BNL | LBL) #REQUIRED>
       <!ATTLIST SITE description CDATA #IMPLIED>
       <!ATTLIST SITE URI CDATA #IMPLIED>
   <!ELEMENT SERVER (HOST+)>
       <!ATTLIST SERVER SCOPE (Master | Admin | User) #REQUIRED>
   <!ELEMENT HOST (ACCESS+)>
       <!ATTLIST HOST NAME CDATA #REQUIRED>
       <!ATTLIST HOST DBTYPE CDATA #IMPLIED>
       <!ATTLIST HOST DBNAME CDATA #REQUIRED>
       <!ATTLIST HOST PORT CDATA #IMPLIED>
   <!ELEMENT ACCESS EMPTY>
       <!ATTLIST ACCESS USER CDATA #IMPLIED>
       <!ATTLIST ACCESS PASS CDATA #IMPLIED>
]>


<SCATALOG VERSION="1.0.1">
        <SITE name="BNL">
                <SERVER SCOPE="Master">
                        <HOST NAME="mafata.wherever.net" DBNAME="Catalog_XXX" PORT="1234">
                                <ACCESS USER="Moi" PASS="HelloWorld"/>
                        </HOST>
                        <HOST NAME="mafata.wherever.net" DBNAME="Catalog_YYY" PORT="1235">
                                <ACCESS USER="Moi" PASS="HelloWorld"/>
                        </HOST>
                        <HOST NAME="duvall.star.bnl.gov" DBNAME="FileCatalog" PORT="">
                                <ACCESS USER="FC_master" PASS="AllAccess"/>
                        </HOST>
                </SERVER>
                <SERVER SCOPE="Admin">
                        <HOST NAME="duvall.star.bnl.gov" DBNAME="FileCatalog_BNL" PORT="">
                                <ACCESS USER="FC_admin" PASS="ExamplePassword"/>
                        </HOST>
                </SERVER>
                <SERVER SCOPE="User">
                        <HOST NAME="duvall.star.bnl.gov" DBNAME="FileCatalog_BNL" PORT="">
                                <ACCESS USER="FC_user" PASS="FCatalog"/>
                        </HOST>
                </SERVER>
        </SITE>
</SCATALOG>
Migration and notes from V01.265 to V01.275
This document is intended for FileCatalog managers only who have previously deployed an earlier version of API and older database table layout. It is NOT intended for users.
Reasoning for this upgrade and core of the upgrade
One of the major problem with the preceding database layout started to show itself when we reached 4 Million entries (for some reason, we seem to have magic numbers). A dire restriction was the presence of the field 'path' and 'nodename' in the FileLocations table. This table became unnecessarily large (of the order of GB) and sorting and queries would become slow and IO demanding (regardless of our careful indexing). The main action was to move both field to separate tables. This change requires a two step modification :
- reshape of the database (leaving the old field), deployment of the database API in cross mode support
- run the normalization scripts filling the new table and fields, deployment of the final API and drop of the obsolete columns (+ index rebuild)
The steps are more carefully described below ...
Step by step migration instructions
Has to be made in several steps for safety a least interruption of service (although a pain to the manager). Note that you can do that much faster by cutting the Master/slave relationship, disabling all daemons auto-updating the database, proceed with table reshape and normalization script execution, drop and rebuild index, deploy the point-of-no-return API and restore Master/slave relation).
This upgrade is best if you have perl 5.8 or upper. Note that this transition will be the LAST one using perl 5.6 (get ready for a perl upgrade on your cluster).
We will assume you know how to connect to your database from an account able to manipulate and create any tables in the FileCatalog database.
- (0) Create the following tables
DROP TABLE IF EXISTS FilePaths; CREATE TABLE FilePaths ( filePathID BIGINT NOT NULL AUTO_INCREMENT, filePathName VARCHAR(255) NOT NULL UNIQUE, filePathCount INT, PRIMARY KEY (filePathID) ) TYPE=MyISAM; DROP TABLE IF EXISTS Hosts; CREATE TABLE Hosts ( hostID smallint(6) NOT NULL auto_increment, hostName varchar(30) NOT NULL default 'localhost', hostIDate timestamp(14) NOT NULL, hostCreator varchar(15) NOT NULL default 'unknown', hostCount int(11) default NULL, hostComment text, PRIMARY KEY (hostID), UNIQUE KEY hostName (hostName) ) TYPE=MyISAM; - Modify some table and recreate one
ALTER TABLE `FileLocations` ADD `filePathID` bigint(20) NOT NULL default '0' AFTER `fileDataID`; ALTER TABLE `FileLocations` ADD `hostID` bigint(20) NOT NULL default '1' AFTER `protection`; UPDATE TABLE `FileLocations` SET hostID=0; # note that I did that one from the Web interface (TBC) INSERT INTO Hosts VALUES(0,'localhost',NOW()+0,'',0,'Any unspecified node'); ALTER TABLE `FileLocations` ADD INDEX ( `filePathID` ) ALTER TABLE `FilePaths` ADD `filePathIDate` TIMESTAMP NOT NULL AFTER `filePathName` ; ALTER TABLE `FilePaths` ADD `filePathCreator` CHAR( 15 ) DEFAULT 'unknown' NOT NULL AFTER `filePathIDate` ; ALTER TABLE `FilePaths` ADD `filePathComment` TEXT AFTER `filePathCount`; ALTER TABLE `StorageSites` ADD `storageSiteIDate` TIMESTAMP NOT NULL AFTER `storageSiteLocation` ; ALTER TABLE `StorageSites` ADD `storageSiteCreator` CHAR( 15 ) DEFAULT 'unknown' NOT NULL AFTER `storageSiteIDate` ; ALTER TABLE `StorageSites` DROP `storageComment`; ALTER TABLE `StorageSites` ADD `storageSiteComment` TEXT AFTER `storageSiteCount`; ALTER TABLE `StorageTypes` ADD `storageTypeIDate` TIMESTAMP NOT NULL AFTER `storageTypeName` ; ALTER TABLE `StorageTypes` ADD `storageTypeCreator` CHAR( 15 ) DEFAULT 'unknown' NOT NULL AFTER `storageTypeIDate` ; ALTER TABLE `FileTypes` ADD `fileTypeIDate` TIMESTAMP NOT NULL AFTER `fileTypeExtension` ; ALTER TABLE `FileTypes` ADD `fileTypeCreator` CHAR( 15 ) DEFAULT 'unknown' NOT NULL AFTER `fileTypeIDate` ; ALTER TABLE `FileTypes` ADD `fileTypeComment` TEXT AFTER `fileTypeCount`; ALTER TABLE `TriggerSetups` ADD `triggerSetupIDate` TIMESTAMP NOT NULL AFTER `triggerSetupComposition` ; ALTER TABLE `TriggerSetups` ADD `triggerSetupCreator` CHAR( 15 ) DEFAULT 'unknown' NOT NULL AFTER `triggerSetupIDate`; ALTER TABLE `TriggerSetups` ADD `triggerSetupCount` INT AFTER `triggerSetupCreator`; ALTER TABLE `TriggerSetups` ADD `triggerSetupComment` TEXT AFTER `triggerSetupCount`; ALTER TABLE `EventGenerators` ADD `eventGeneratorIDate` TIMESTAMP NOT NULL AFTER `eventGeneratorParams` ; ALTER TABLE `EventGenerators` ADD `eventGeneratorCreator` CHAR( 15 ) DEFAULT 'unknown' NOT NULL AFTER `eventGeneratorIDate` ; ALTER TABLE `EventGenerators` ADD `eventGeneratorCount` INT AFTER `eventGeneratorCreator`; ALTER TABLE `RunTypes` ADD `runTypeIDate` TIMESTAMP NOT NULL AFTER `runTypeName` ; ALTER TABLE `RunTypes` ADD `runTypeCreator` CHAR( 15 ) DEFAULT 'unknown' NOT NULL AFTER `runTypeIDate` ; ALTER TABLE `ProductionConditions` DROP `productionComments`; ALTER TABLE `ProductionConditions` ADD `productionConditionIDate` TIMESTAMP NOT NULL AFTER `libraryVersion`; ALTER TABLE `ProductionConditions` ADD `productionConditionCreator` CHAR( 15 ) DEFAULT 'unknown' NOT NULL AFTER `productionConditionIDate`; ALTER TABLE `ProductionConditions` ADD `productionConditionComment` TEXT AFTER `productionConditionCount`; # # This table was not shaped as a dictionary so needs to be re-created # Hopefully, was not filled prior (but will be this year) # DROP TABLE IF EXISTS TriggerWords; CREATE TABLE TriggerWords ( triggerWordID MEDIUMINT NOT NULL AUTO_INCREMENT, triggerWordName VARCHAR(50) NOT NULL, triggerWordVersion CHAR(6) NOT NULL DEFAULT "V0.0", triggerWordBits CHAR(6) NOT NULL, triggerWordIDate TIMESTAMP NOT NULL, triggerWordCreator CHAR(15) DEFAULT 'unknown' NOT NULL, triggerWordCount INT, triggerWordComment TEXT, UNIQUE TW_TriggerCharacteristic (triggerWordName, triggerWordVersion, triggerWordBits), PRIMARY KEY (triggerWordID) ) TYPE=MyISAM; -
Deploy the new API CVS version 1.62 of FileCatalog.pm
- Run the following utility scripts
util/path_convert.pl
util/host_convert.plNote that those scripts use a new method $fC->connect_as("Admin"); which assumes that the Master Catalog will be accessed using the XML connection description. Also, it should be obvious that
use lib "/WhereverYourModulAPIisInstalled"; should be replaced by the appropriate path for your site (or test area). Finally, it uses API CVS version 1.62 which supports Xpath and Xnode transitional keywords allowing us to transfer the information from one field to one table.
- Check that Hosts table was filled properly and automatically with Creator/IDate
- Paranoia step : Re-run the scripts mentioned 2 steps ago
At this stage and ideally, nothing should happen (as you have already modified the records).
A few tips prior from doing that- % fC_cleanup.pl -modif node=localhost -cond node='' -doit
would hopefully do nothing but if you have messed something up in the past, hostName would be NULL and the above would be necessary. - After a full update, the following queries should return NOTHING
% get_file_list.pl -keys flid -cond rfpid=0 -all -alls -as Admin
% get_file_list.pl -keys flid -cond rhid=0 -all -alls -as Admin
Those are equivalent to the SQL statements>SELECT FileLocations.fileLocationID FROM FileLocations WHERE FileLocations.filePathID = 0 LIMIT 0, 100 >SELECT FileLocations.fileLocationID FROM FileLocations WHERE FileLocations.hostID = 0 LIMIT 0, 100
- % fC_cleanup.pl -modif node=localhost -cond node='' -doit
- Make a backup copy of the database for security (optional but safer) Backup can be done by easer a dump of mysql or more trivially, a cp -r of the database directory.
- Leave it running for a few days (should be fine) for confidence consolidation ;-)
You are ready for phase II. Hang on tight now ...
Those steps are no VERY intrusive and potentially destructive. Be careful from here on ...
- Stop all daemons, be sure that during the rest of the operations, NO command attempts to manipulate the database. If you want to shield your users from the upgrade, stop all Master/slave relations.
- Connect to the master FileCatalog as administrator for that database and execute the following SQL commands
  > ALTER TABLE `FileLocations` ADD INDEX FL_HostIndex (hostID);
  > ALTER TABLE `FileLocations` DROP INDEX `FL_FileLocationUnique`, ADD UNIQUE (fileDataID, storageTypeID, filePathID, storageSiteID, hostID);

  # drop the columns not in use anymore / should also get rid of the associated
  # indexes.
  > ALTER TABLE `FileLocations` DROP COLUMN nodeName;
  > ALTER TABLE `FileLocations` DROP COLUMN filePath;

  # "rename" index / was created with a name difference to avoid clash for transition
  # now renamed for consistency
  > ALTER TABLE `FileLocations` DROP INDEX `filePathID`, ADD INDEX  FL_FilePathIndex (filePathID);
-
OK, you should be done. Deploy either CVS version 1.63 which correspond to the FileCatalog API version V01.275 and above ... (by the way, get_file_list.pl -V gives the API version).
A few notes
- The new API is XML connection aware via a non-mandatory module named XML::Simple . You should install that module but there are some limitations if you are using perl 5.6 i.e., you MUST use the schema with ONLY one choice per category (Admin, Master or User).
- Your scripts will likely need to change if your Database Master and Slave are not on the same node (i.e. the administration account for the FileCatalog can be used only on the database Master and the regular user account on the Slave). There are a few forms of this such as the one below
# Get connection fills the blanks while reading from XML
# However, USER/PASSWORD presence are re-checked
#$fC->debug_on();
($USER,$PASSWD,$PORT,$HOST,$DB) = $fC->get_connection("Admin");
$port = $PORT if ( defined($PORT) );
$host = $HOST if ( defined($HOST) );
$db   = $DB   if ( defined($DB) );


if ( defined($USER) ){   $user = $USER;}
else {                   $user = "FC_admin";}

if ( defined($PASSWD) ){ $passwd = $PASSWD;}
else {                   print "Password for $user : ";
                         chomp($passwd = );}

#
# Now connect using a fully specified user/passwd/port/host/db
#
$fC->connect($user,$passwd,$port,$host,$db);
or counting on the full definition in the XML file
$fC = FileCatalog->new(); $fC->connect_as("Admin"); - Note a small future convenience when XML is ON. connect_as() does not only select as who you want to connect to but where as well. In fact, the proper syntax is intent=SITE::User (for example BNL::Admin is valid as well as LBL::User). This is only partly supported however.
- The new version of the API automatically add information in dictionary tables. Especially, the account under which a new dictionary value was inserted (Creator) and the insertion date (IDate) are filled automatically. A side effect being that the new API is NOT compatible with previous database table layout (no backward support will be attempted).
Migration and notes from V01.275 to V01.280
This document is intended for FileCatalog managers only who have previously deployed an earlier version of API and older database table layout. It is NOT intended for users.
Reasoning for this upgrade and core of the upgrade
This upgrade is a minor one, making support for two more detector sub-systems. The new API supports this modification. You need to alter the table DetectorConfigurations and add two columns. API are always forward compatible in that regard so it is completely safe to alter the table and deploy the API later.
ALTER TABLE `DetectorConfigurations` ADD dBSMD TINYINT;
ALTER TABLE `DetectorConfigurations` ADD dESMD TINYINT;
UPDATE `DetectorConfigurations` SET dBSMD=0;
UPDATE `DetectorConfigurations` SET dESMD=0;
And deploy the API V01.280 or later. You are done.
HPSS services
HPSS Performance study
Introduction
HPSS is software that manages petabytes of data on disk and robotic tape libraries. We will discuss in this section our observations as per the efficiency of accessing files in STAR as per a snapshot of the 2006 situation. It is clear that IO opptimizations has several components amongst which:- Access pattern optimization (request ordering, ...)
- Optimization based on tape drive and technology capabilities
- Miscellaneous technology considerations
(cards, interface, firmware and driver, RAID, disks, ...) - HPSS disk cache optimizations
- COS and/or PVR optimization
Tape drive and technology capabilities
A starting point would be to discuss the capabilities of the technologies involved and their maximum performance and limitations. In STAR, two technologies remain as per 1006/10:- the 994B drives
- the LTO-3 drives
Access pattern optimization (request ordering, ...)
A first simple and immediate consideration is to minimize tape mount and dismount operations, causing latencies and therefore performance drops. Since we use the DataCarousel for most restore operations, let's summarize its features.
The DataCarousel
The DataCarousel (DC) is an HPSS front end which main purpose is to coordinate requests from many un-correlated client's requests. Its main assumption is that all requests are asynchronous that is, you make a request from one client and it is satisfied “later” (as soon as possible). In other words, the DC aggregates all requests from all clients (many users could be considered as separate clients) and re-order them according policies, and possibly aggregating multiple requests for the same source into one request to the mass storage. The DC system itself is composed of a light client program (script), a plug-and-play policy based server architecture component (script) and a permanent process (compiled code) interfacing with the mass storage using HPSS API calls (this components is known as the “Oakridge Batch” although it current code content has little to do with the original idea from the Oakridge National Laboratory). Client and server interacts via a database component isolating client and server completely from each other (but sharing the same API , a perl module).
Policies may throttle the amount of data by group (quota, bandwidth percentage per user, etc ... i.e. queue request fairshare) but also perform tape access optimization such as grouping requests by tape ID (for equivalent share, all requests from the same tape are grouped together regardless of the time at which this request was performed or position in the request queue). The policy could be anything one can come up with based on the information either historical usage or current pending requests and characteristics of those requests (this could include file type, user, class of service, file size, ...). The DC then submits bundle of requests to the daemon component ; each request is a bundle of N file and known as a “job”. The DC submits K of those jobs before stopping and observing the mass storage behavior: if the jobs go through, more are submitted otherwise, either the server stops or proceed with a recovery procedure and consistency checks (as it will assume that no reaction and no unit of work being performed is a sign of MSS failure). In other words, the DC will also be error resilient and recover from intrinsic HPSS failures (being monitored). Whenever the files are moved from tape to cache in the MSS, a call back to the DC server is made and captive account connection is initiated to pull the file out of mass storage cache to more permanent storage.
Optimizations
While the policy is clearly a source of optimization (as far as the user is concerned), from a DataCarousel “post policy” perspective, N*K files are being requested at minimum at every point in time. In reality, more jobs are being submitted so the consumption of the “overflow”of job are used to monitor if the MSS is alive. The N*K files represents a total amount of files which should match the number of threads allowed by the daemon. The current setting are K=50, N=15 with an overflow allowed up to 25). The daemon itself has the possibility to treat requests simultaneously according to a“depth”. Those calls to HPSS are however only advisory. The depth is set at being 30 deep for the DST COS and 20 deep for the Raw COS. The deepest the request queue will be, more files will be requested simultaneously but this means that the daemon will also have to start more threads as previously noted. Those parameters have been showed to influence the performance to some extent (within 10%) with however a large impact on response time: the larger the request stack, the “less instantaneous” the response from a user's perspective (since the request queue length is longer).
The daemon has the ability of organizing X requests into a sorted list of tape ID and number of requests per tape. There are a few strategies allowing to alter the performance. We chose to enable “start with the tape with the largest number of files requested”. In addition, and since our queue depth is rather small comparing to the ideal number of files (K) per job, we order the files requested by the user by tape ID. Both optimizations are in place and lead to a 20% improvement within a realistic usage (bulk restore, Xrootd, other user activities).
Remaining optimizations
Optimization based on tapeID would need to be better quantified (graph, average restore rate) for several class of files and usage. TBD.
The tape ID program is a first implementation returning partial information. Especially, the MSS failures are not currently handled, leading to setting the tape ID to -1 (since there are now ways to recognize whether or not it is an error or a file missing in HPSS or even a file in the MSS MetaData server but located on a bad tape). Work in progress.
The queue depth parameters should be studied and adjusted according to the K and N values. However, this would need to respect the machine / hardware capabilities. The beefier the machine would be, the better but this is likely a fine tuning. This needs to be done with great care as the hardware is also shared by multiple experiments. Ideally the compiled daemon should auto-adjust to the DC API settings (and respect command line parameters for queue depth). TBD.
Currently, the daemon number of threads used for handling the HPSS API calls and to handle the call backs are sharing the same pool. This diminishes the number of threads available to communication with the Mass Storage and therefore, causes performance fluctuations (call back threads could get “stuck” or come in “waves” - we observed cosine behavior perhaps related to this issue). TBD.
Optimizations based on drive and technology capabilities
File size effects on IO performance
In this paper (CERN/IT 2005), the author measured the IO performance as a function of file size and number of files requested per tape. The figure of relevance is added here for illustration.
In STAR, we use the 9940B (read only as per 2006) and LT0-3 drives (read and write /all new files would go to LTO-3). The finding would not be altered but we have little marging of flexibility as per the "old" tape drive.
Below, we show the average file size per file type in STAR as a 2006 snapthot.
| Average (bytes) | Average (MB) | File Type |
| 943240627 | 899 | MC_fzd |
| 666227650 | 635 | MC_reco_geant |
| 561162588 | 535 | emb_reco_event |
| 487783881 | 465 | online_daq |
| 334945320 | 319 | daq_reco_laser |
| 326388157 | 311 | MC_reco_dst |
| 310350118 | 295 | emb_reco_dst |
| 298583617 | 284 | daq_reco_event |
| 246230932 | 234 | daq_reco_dst |
| 241519002 | 230 | MC_reco_event |
| 162678332 | 155 | MC_reco_root_save |
| 93111610 | 88 | daq_reco_MuDst |
| 52090140 | 49 | MC_reco_MuDst |
| 17495114 | 16 | MC_reco_minimc |
| 14982825 | 14 | daq_reco_emcEvent |
| 14812257 | 14 | emb_reco_geant |
| 12115661 | 11 | scaler |
| 884333 | 0 | daq_reco_hist |
Note that the average size for an event file is 284MB while for a MicroDST, the size average is 84 MB so a ratio of 3. The number of files per catriges is at best 1.2 files per cartriges with peaks at 10 or more. THis is mostly due to a request profile dominated by Xrootd "random" pattern and a few user's requests. According to the previous study, the IO efficiency should be around 8% for 84 MB file and reaching perhaps 20-25% efficiency for a 284 MB average file class. Cosndiering we have not studied the drive access pattern beyond a simple scaling (i.e. we will ignore to first order the fcat we have many drives at our disposal), we should see a performance change change from 8 to 20 so an improvement of x2.5-3 shall the file size argument stand.
In order to observe the IO performance when small or big files are being requested, we requested event files to the DataCarousel and produced the below two graphs for the dates ranging between 2006/10/26 and 2006/10/29. The first graph represents the IO "before" the massive submission of event file dominated requests, the second the graph "after" the event. The graphs are preliminary (work in progress).
Note: It is interresting to note that a significant mix of very small files (below 12 MB average) would bring the performance to a sub 1% efficiency. The net result for 9 drives (as we have in STAR) would be an aggregate performance no better than 3MB/sec for a 9940B x 9 drive configuration . We observe periods with such poor performance. The second observation is that even with MuDST dominated files only, we would not be able to exceed in speed 70% of the performance of one drive so at best, 21 MB/sec (this correspond to our current "best hour"). The results are coherent to first order.
MSS failures and cascading effects
A poor MSS IO efficiency is one thing, but stability is another. Under poor performance situations, failures are critical to minimize. We have already stated that the DC is error resilient. However, during failure periods, the request queue accumulates requests and whenever the mass storage comes back, all requests are suddenly released, opening the flood gate of IO ... which are not much of a flood than a drip. As a consequence, user's requests or bulk transfer would not suffer much but modes requiring immediate response (such as Xrootd) would become largely impacted. In fact, shall the downtime be long enough, it is likely that all requests occuring while the errors started will fail but subsequent accumulated requests will also cause further delays and spurious Xrootd failures - Xrootd will timeout if the DC has not satisfied its request for 3600 secondes i.e. 1 hour per file. The following graph shows an error sequence: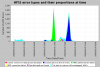
From all failures, the relative proprtion for that day is displayed below
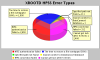
Miscellaneous technology considerations
All considerations in this sections are beyond our control and a facility work and optmization.HPSS disk cache optimizations
This section seems rather academic considering the previous sections improvement perspectives.
COS and PVR optimizations
In this section, we will discuss optimizing based on file size, perhaps isolated by PVR or COS. This will be possible in future run but would lead to a massive repackaging of files and data for the past years.
Appendix
Further reading:
- Data services tape use optimizations .
- Improving the Access Time of serpentine tape drives.
- Calculations for the sizing of tape performance .
- Ultrium LTO-2 tape drive testing .
- Performance to/from tape and recommended file size in Enstore .
HSI
This is an highlight of the HSI features. Please, visit the HSI Home Page for more information.
HSI is a friendly interface for users of the High Performance Storage System (HPSS). It is intended to provide a familiar Unix-style environment for working within the HPSS environment, while automatically taking advantage of the power of HPSS (e.g. for high speed parallel file transfers) without requiring any special user interaction, where possible.
HSI requires one of two authentication methods (see the HSI User Guide for more information):
- Kerberos (the preferred method)
- DCE keytab (using a keytab file generated for you by the HPSS system administrators)
- Familiar Unix-style command interface, with commands such as "LS", "CD", etc.
- Interactive, batch, or "one-liner" execution modes
- Ability to interactively pipe data into or out of HPSS, using filters such as "TAR"
- Recursive option is available for most commands; including the ability to copy an entire directory tree to or from HPSS with a single simple command
- Conditional put and get operations, including ability to update based on file timestamps
- Automatically uses HPSS parallel I/O features for file transfer operations
- Multi-threaded I/O within a single process space
- Command aliases and abbreviations
- 10 working directories
- Ability to read command input from a file, and write log or command output to a file.
- Non-DCE version runs on most major Unix-based platforms
- Non-DCE version provides the ability to connect to multiple HPSS systems and perform 3rd-party copies between the systems, using a "virtual drive" path notation.
HTAR
To use htar within the HPSS environment, users are required to have the valid Kerberos credentials.The following is the man page of how to use htar.
NAME
htar - HPSS tar utility
PURPOSE
Manipulates HPSS-resident tar-format archives.
SYNOPSIS
htar -{c|t|x|X} -f Archive [-?] [-B] [-E] [-L inputlist] [-h] [-m] [-o]
[-d debuglevel] [-p] [-v] [-V] [-w]
[-I {IndexFile | .suffix}] [-Y [Archive COS ID][:Index File COS ID]]
[-S Bufsize] [-T Max Threads] [Filespec | Directory ...]
DESCRIPTION
htar is a utility which manipulates HPSS-resident archives
by writing files to, or retrieving files from the High
Performance Storage System (HPSS). Files written to HPSS
are in the POSIX 1003.1 "tar" format, and may be retrieved
from HPSS, or read by native tar programs.
For those unfamiliar with HPSS, an introduction can be found
on the web at
http://www.sdsc.edu/hpss
The local files used by the htar command are represented by
the Filespec parameter. If the Filespec parameter refers to
a directory, then that directory, and, recursively, all
files and directories within it, are referenced as well.
Unlike the standard Unix "tar" command, there is no default
archive device; the "-f Archive" flag is required.
Archive and Member files
Throughout the htar documentation, the term "archive file"
is used to refer to the tar-format file, which is named by
the "-f filename" command line option. The term "member
file" is used to refer to individual files contained within
the archive file.
WHY USE HTAR
htar has been optimized for creation of archive files
directly in HPSS, without having to go through the
intermediate step of first creating the archive file on
local disk storage, and then copying the archive file to
HPSS via some other process such as ftp or hsi. The program
uses multiple threads and a sophisticated buffering scheme
in order to package member files into in-memory buffers,
while making use of the high-speed network striping
capabilities of HPSS.
In most cases, it will be signficantly faster to use htar
to create a tar file in HPSS than to either create a local
tar file and then copy it to HPSS, or to use tar piped into
ftp (or hsi) to create the tar file directly in HPSS.
In addition, htar creates a separate index file, (see next
section) which contains the names and locations of all of
the member files in the archive (tar) file. Individual
files and directories in the archive can be randomly
retrieved without having to read through the archive file.
Because the index file is usually smaller than the archive
file, it is possible that the index file may reside in HPSS
disk cache even though the archive file has been moved
offline to tape; since htar uses the index file for listing
operations, it may be possible to list the contents of the
archive file without having to incur the time delays of
reading the archive file back onto disk cache from tape.
It is also possible to create an index file for a tar file
that was not originally created by htar.
HTAR Index File
As part of the process of creating an archive file on HPSS,
htar also creates an index file, which is a directory of the
files contained in the archive. The Index File includes the
position of member files within the archive, so that files
and/or directories can be randomly retrieved from the
archive without having to read through it sequentially. The
index file is usually significantly smaller in size than the
archive file, and may often reside in HPSS disk cache even
though the archive file resides on tape. All htar operations
make use of an index file.
It is also possible to create an index file for an archive
file that was not created by htar, by using the "Build
Index" [-X] function (see below).
By default, the index filename is created by adding ".idx"
as a suffix to the Archive name specified by the -f
parameter. A different suffix or index filename may be
specified by the "-I " option, as described below.
By default, the Index File is assumed to reside in the same
directory as the Archive File. This can be changed by
specifying a relative or absolute pathname via the -I
option. The Index file's relative pathname is relative to
the Archive File directory unless an absolute pathname is
specified.
HTAR Consistency File
HTAR writes an extra file as the last member file of each
Archive, with a name similar to:
/tmp/HTAR_CF_CHK_64474_982644481
This file is used to verify the consistency of the Archive
File and the Index File. Unless the file is explicitly
specified, HTAR does not extract this file from the Archive
when the -x action is selected. The file is listed,
however, when the -t action is selected.
Tar File Restrictions
When specifying path names that are greater than 100
characters for a file (POSIX 1003.1 USTAR) format, remember
that the path name is composed of a prefix bufferFR, a /
(slash), and a name buffer.
The prefix buffer can be a maximum of 155 bytes and the name
buffer can hold a maximum of 100 bytes. Since some
implementations of TAR require the prefix and name buffers
to terminate with a null (' ') character, htar enforces the
restriction that the effective prefix buffer length is 154
characters (+ trailing zero byte), and the name buffer
length is 99 bytes (+ trailing zero byte). If the path name
cannot be split into these two parts by a slash, it cannot
be archived. This limitation is due to the structure of the
tar archive headers, and must be maintained for compliance
with standards and backwards compatibility. In addition, the
length of a destination for a hard or symbolic link ( the
'link name') cannot exceed 100 bytes (99 characters + zero-
byte terminator).
HPSS Default Directories
The default directory for the Archive file is the HPSS home
directory for the DCE user. An absolute or relative HPSS
path can optionally be specified for either the Archive file
or the Index file. By default, the Index file is created in
the same HPSS directory as the Archive file.
Use of Absolute Pathnames
Although htar does not restrict the use of absolute
pathnames (pathnames that begin with a leading "/") when the
archive is created, it will remove the leading / when files
are extracted from the archive. All extracted files use
pathnames that are relative to the current working
directory.
HTAR USAGE
Two groups of flags exist for the htar command; "action"
flags and "optional" flags. Action flags specify the
operation to be performed by the htar command, and are
specified by one of the following:
-c, -t, -x, -X
One action flag must be selected in order for the htar
command to perform any useful function.
File specification (Filespec)
A file specification has one of the following forms:
WildcardPath
or
Pathname
or
Filename
WildcardPath is a path specification that includes standard
filename pattern-matching characters, as specified for the
shell that is being used to invoke htar. The pattern-
matching characters are expanded by the shell and passed to
htar as command line arguments.
Action Flags
Action flags defined for htar are as follows:
-c Creates a new HPSS-resident archive, and writes the
local files specified by one or more File parameters
into the archive. Warning: any pre-existing archive file
will be overwritten without prompting. This behavior
mimics that of the AIX tar utility.
-t Lists the files in the order in which they appear in
the HPSS- resident archive. Listable output is
written to standard output; all other output is written
to standard error.
-x Extracts the files specified by one or more File
parameters from the HPSS-resident archive. If the File
parameter refers to a directory, the htar command
recursively extracts that directory and all of its
subdirectories from the archive.
If the File parameter is not specified, htar extracts
all of the files from the archive. If an archive
contains multiple copies of the same file, the last
copy extracted overwrites all previously extracted
copies. If the file being extracted does not already
exist on the system, it is created. If you have the
proper permissions, then htar command restores all
files and directories with the same owner and group IDs
as they have on the HPSS tar file. If you do not have
the proper permissions, then files and directories are
restored with your owner and group IDs.
-X builds a new index file by reading the entire tar file.
This operation is used either to reconstruct an index
for tar files whose Index File is unavailable (e.g.,
accidentally deleted), or for tar files that were not
originally created by htar.
Options
-? Displays htar's verbose help
-B Displays block numbers as part of the listing (-t
option). This is normally used only for debugging.
-d debuglevel
Sets debug level (0 - N) for htar. 0 disables debug, 1
- n enable progressively higher levels of debug output.
5 is the highest level; anything > 5 is silently mapped
to 5. 0 is the default debug level.
-E If present, specifies that a local file should be used
for the file specified by the "-f Archive" option. If
not specified, then the archive file will reside in
HPSS.
-f Archive
Uses Archive as the name of archive to be read or
written. Note: This is a required parameter for htar,
unlike the standard tar utility, which uses a built-in
default name.
If the Archive variable specified is - (minus sign),
the tar command writes to standard output or reads from
standard input. If you write to standard output, the -I
option is mandatory, in order to specify an Index File,
which is copied to HPSS if the Archive file is
successfully written to standard output. [Note: this
behavior is deferred - reading from or writing to pipes
is not supported in the initial version of htar].
-h Forces the htar command to follow symbolic links as if
they were normal files or directories. Normally, the
tar command does not follow symbolic links.
-I index_name
Specifies the index file name or suffix. If the first
character of the index_name is a period, then
index_name is appended to the Archive name, e.g. "-f
the_htar -I .xdnx" would create an index file called
"the_htar.xndx". If the first character is not a
period, then index_name is treated as a relative
pathname for the index file (relative to the Archive
file directory) if the pathname does not start with
"/", or an absolute pathname otherwise.
The default directory for the Index file is the same as
for the Archive file. If a relative Index file
pathname is specifed, then it is appended to the
directory path for the Archive file. For example, if
the Archive file resides in HPSS in the directory
"projects/prj/files.tar", then an Index file
specification of "-I projects/prj/files.old.idx" would
fail, because htar would look for the file in the
directory "projects/prj/projects/prj". The correct
specification in this case is "-I files.old.idx".
-L InputList
Writes the files and directories listed in the
"InputList" file to the archive. Directories named in
the InputList file are not treated recursively. For
directory names contained in the InputList file, the
tar command writes only the directory entry to the
archive, not the files and subdirectories rooted in the
directory. Note that "home directory" notation ("~")
is not expanded for pathnames contained in the
InputList file, nor are wildcard characters, such as
"*" and "?".
-m Uses the time of extraction as the modification time.
The default is to preserve the modification time of the
files. Note that the modification time of directories
is not guaranteed to be preserved, since the operating
system may change the timestamp as the directory
contents are changed by extracting other files and/or
directories. htar will explicitly set the timestamp on
directories that it extracts from the Archive, but not
on intermediate directories that are created during the
process of extracting files.
-o Provides backwards compatibility with older versions
(non-AIX) of the tar command. When this flag is used
for reading, it causes the extracted file to take on
the User and Group ID (UID and GID) of the user running
the program, rather than those on the archive. This is
the default behavior for the ordinary user. If htar is
being run as root, use of this option causes files to
be owned by root rather than the original user.
-p Says to restore fields to their original modes,
ignoring the present umask. The setuid, setgid, and
tacky bit permissions are also restored to the user
with root user authority.
-S bufsize
Specifies the buffer size to use when reading or
writing the HPSS tar file. The buffer size can be
specified as a value, or as kilobytes by appending any
of "k","K","kb", or "KB" to the value. It can also be
specified as megabytes by appending any of "m" or "M"
or "mb" or "MB" to the value, for example, 23mb.
-T max_threads
Specifies the maximum number of threads to use when
copying local member files to the Archive file. The
default is defined when htar is built; the release
value is 20. The maximum number of threads actually
used is dependent upon the local file sizes, and the
size of the I/O buffers. A good approximation is
usually
buffer size/average file size
If the -v or -V option is specified, then the maximum
number of local file threads used while writing the
Archive file to HPSS is displayed when the transfer is
complete.
-V "Slightly verbose" mode. If selected, file transfer
progress will be displayed in interactive mode. This
option should normally not be selected if verbose (-v)
mode is enabled, as the outputs for the two different
options are generated by separate threads, and may be
intermixed on the output.
-v "Verbose" mode. For each file processed, displays a
one-character operation flag, and lists the name of
each file. The flag values displayed are:
"a" - file was added to the archive
"x" - file was extracted from the archive
"i" - index file entry was created (Build Index
operation)
-w Displays the action to be taken, followed by the file
name, and then waits for user confirmation. If the
response is affirmative, the action is performed. If
the response is not affirmative, the file is ignored.
-Y auto | [Archive CosID][:IndexCosID]
Specifies the HPSS Class of Service ID to use when
creating a new Archive and/or Index file. If the
keyword auto is specified, then the HPSS hints
mechanism is used to select the archive COS, based upon
the file size. If -Y cosID is specified, then cosID
is the numeric COS ID to be used for the Archive File.
If -Y :IndexCosID is specified, then IndexCosID is the
numeric COS ID to be used for the Index File. If both
COS IDs are specified, the entire parameter must be
specified as a single string with no embedded spaces,
e.g. "-Y 40:30".
HTAR Memory Restrictions
When writing to an HPSS archive, the htar command uses a
temporary file (normally in /tmp) and maintains in memory a
table of files; you receive an error message if htar cannot
create the temporary file, or if there is not enough memory
available to hold the internal tables.
HTAR Environment
HTAR should be compiled and run within a non-DCE HPSS environment.
Miscellaneous Notes:
1. The maximum size of a single Member file within the
Archive is approximately 8 GB, due to restrictions in the
format of the tar header. HTAR does not impose any
restriction on the total size of the Archive File when it is
written to HPSS; however, space quotas or other system
restrictions may limit the size of the Archive File when it
is written to a local file (-E option).
2. HTAR will optionally write to a local file; however, it
will not write to any file type except "regular files". In
particular, it is not suitable for writing to magnetic tape.
To write to a magnetic tape device, use the "tar" or "cpio"
utility.
Exit Status
This command returns the following exit values:
0 Successful completion.
>0 An error occurred.
Examples
1. To write the file1 and file2 files to a new archive
called "files.tar" in the current HPSS home directory,
enter:
htar -cf files.tar file1 file2
2. To extract all files from the project1/src directory in
the Archive file called proj1.tar, and use the time of
extraction as the modification time, enter:
htar -xm -f proj1.tar project1/src
3. To display the names of the files in the out.tar
archive file within the HPSS home directory, enter:
htar -tvf out.tar
Related Information
For file archivers: the cat command, dd command, pax
command. For HPSS file transfer programs: pftp, nft, hsi
File Systems Overview for System Management in AIX Version 4
System Management Guide: Operating System and Devices
explains file system types, management, structure, and
maintenance.
Directory Overview in AIX Version 4 Files Reference explains
working with directories and path names.
Files Overview in AIX Version 4 System User's Guide:
Operating System and Devices provides information on working
with files.
HPSS web site at http://www.sdsc.edu/hpss
Bugs and Limitations:
- There is no way to specify relative Index file pathnames
that are not rooted in the Archive file directory without
specifying an absolute path.
- The initial implementation of HTAR does not provide the
ability to append, update or remove files. These features,
and others, are planned enhancements for future versions.
Home directories and other areas backups
Home directories
If you accidently erase a file in your home directoy at RFC, you can restore it using a two week backup that you can access directly. Two weeks worth of backups are kept as snapshots. The way it works is that as day pass, live backups are being made on the file system itself hence preserving your files in-place.
For example, your username is 123, your home directory is /star/u/123 and you erased a file /star/u/123/somedir/importantfile.txt and now realise that was a mistake. Don't panic. This is not the end of thw world as snapshot backups exist.
Simply look under /star/u/.snapshot
The directory names are odered by the date and time of backup. Pick a date when the file existed and under there is a copy of your home directory from that day. From here you can restore the file, i.e,
% cp /star/u/.snapshot/20yy-mm-dd_hhxx-mmxx.Daily_Backups_STAR-FS05/123/somedir/importantfile.txt
/star/u/123/somedir/importantfile.txt
See also starsofi #7363.
AFS areas
Each doc_proected/ AFS areas also have a .backup volume which keeps recently deleted files in that directory until a real AFS based backup is made (then the content is deleted and you will need to ask the RCF to restore your files). Finding it is tricky though because there is one such directory per volume. The best is to backward search for that directory. For example, let's suppose you are working in /afs/rhic.bnl.gov/star/doc_protected/www/bulkcorr/. If you bacward search for a .backup directory, you will find one as /afs/rhic.bnl.gov/star/doc_protected/www/bulkcorr/../.backup/ and this is where the files for this AFS volume will go upon deletion.
Other areas
Other areas are typically not backed-up.
Hypernews
Most Hypernews forum will have to be retired - please consult the list of mailing lists at this link to be sure you need HN at all.
While our Web serve ris down, many Computing related discussions are now happening on Mattermost Chat (later, will be Mail based by popular demand). Please log there using the 'BNL login' option (providing a facility wide unified login) and use your RACF/SDCC kerberos credentials to get in. If you are a STAR user, you will automatically be moved to the "STAR Team".
Please, read the Hypernews in STAR section before registering a new account (you may otherwise miss a few STAR specificities and constraints).
General Information
HyperNews is a cross between the hypermedia of the WWW and Usenet News. Readers can browse postings written by other people and reply to those messages. A forum (also called a base article) holds a tree of these messages, displayed as an indented outline that shows how the messages are related (i.e. all replies to a message are listed under it and indented).
Users can become members of HyperNews or subscribe to a forum in order to get Email whenever a message is posted, so they don't have to check if anything new has been added. A recipient can then send a reply email back to HyperNews, rather than finding a browser to write a reply, and HyperNews then places the message in the appropriate forum.
Hypernews in STAR
In STAR, there are a few specificities with Hypernews as listed below.
- Your Hypernews account should match your BNL/RCF account by name. This account must be part of the STAR group. For example, if you have a RCF STAR account named 'abc', you should create an Hypernews account named 'abc'. Any other account will be removed automatically. Note that if you have any other RCF unix account but not a STAR account, the result will be the same (you will not be able to register to STAR's Hypernews). This is done so automation of account approval can be achieved while complying with the DOE requirement mentioned in Getting a computer account in STAR. If you are a STAR user in good standing, the automation especially allows for immediate use of your account without further approval process.
- You should NOT use the same password for an Hypernews account as your RCF account. Hypernews has a weak authentication method and while physical access to the machine is needed to crack it, a focus on keeping the password different from the interactive login password(s) is important. In general, Web-based password authentication should not be the same than interactive account passwords.
- Hypernews does not accept Email attachments. This includes Emails containing a mix of text and html - they will be rejected by the system. Please, be aware that whenever you send "formatted" Emails (bold character, font changes etc...), your Email client does NOTHING ELSE than sending the content in two parts: one part is plain text, the second an attached HTML. Hence, Hypernews will NOT process formatting (but will take your Email anyhow).
- Hypernews posting DO NOT need to be done from the Web interface (this is true for ANY Hypernews systems); you can send an Email directly to the list address. However, posting must have a subject. Subject-less posting will be rejected. Also, we have a spam filter in place and it is noteworthy to mention that to date, we had no accidental rejections of valid Emails.
- As per 2012/06, all STAR Hypernews fora were made protected. In other words, and in addition of your Hypernews personal account, you MUST use the 'protected' password to access the Web interface.
Startup links
Here are a few startup links and tips, including where to start for a new Hypernews account.
- If you DO NOT have a STAR account, consult Getting a computer account in STAR first BUT you will STILL need the additional below information:
- You will need the famous “protected” area password. If you do not understand what this means, you are probably not a STAR collaborator ... Otherwise, you can get this information from your PAC, PWGC, OPS manager, council rep, etc ...
- For your RCF user account name, you will need to chose a User ID other than “protected”. Hopefully, this will be the case.
- After you get a RCF Unix account
- create an Hypernews account (as indicated in the Hypernews in STAR section) starting from here.
- IMPORTANT NOTE: please wait at least one hour after you get confirmation from the RCF before creating your Hypernews account as there is a delay in information propagation of accounts to the Hypernews system.
- To connect to the Web based Hypernews interface, please login to the system first. This will allow for your session to be authenticated properly and postings to be identified as you. As per 2006, any anonymous posting will be rejected.
- You can then proceed to either
- The forum list with all Hypernews forum displayed in descending order of 'last posted'
- You can Edit your membership to change your personal information (this is a typical link which DO require for you to login first)
- Use the Hypernews Search engine to search / locate a particular message. This is slow and painful (we have too many message) but is te only way you can search the huge 10 years worth of Email archive.
- Note again that as soon as you have located your forum of interest and it's address, you can send Emails directly to that list forum and/or answer previous post by using your mail client 'Reply'.
Tips related to message delivery to Hypernews
If you have problems sending EMail to Hypernews, please understand and verify the following before asking for help:
- Hypernews will silently discard EMails detected as spam. This is good news for our Hypernews subscribers but be aware that Spam filtering is a tricky business and some legitimate Email may be rejected unwillingly.
- The first and foremost reason for rejection is the use of internet service provider (ISP) EMail servers to send Emails to Hypernews. Several ISP are blacklisted as they do not protect their service against anonymous Emails. Using such ISP will have as unfortunate consequence to have your Email rejected. Be sure to use your lab or university as provider or a trusted ISP.
- The other reason is font encoding - DO NOT use special font encoding while sending Email - Korean (EUC-KR) or Chinese (GB2312, GB18030, Big5, ...) especially gets a high mark from the Spam filter and get you closet o the rejection rating threshold. A few unfortunate words here and there and ...
- Hypernews in STAR DOES NOT accept attachments: your Email will be silently rejected if any appears.
- Send instead a note of where your document resides for consulting.
- DO NOT send messages as HTML - HTML EMail actually send plain text and HTML as an attachment ... and your post will be rejected. Typically, your mail client gives you the possibility to send plain-text for entire domain matching. Hypernews is covered by the www.star.bnl.gov domain.
- MAC Users using Mac OSX Mail client, please consult this "How to Send a Message in Plain Text" (also explaining why MIME may be dangerous). Alternatively you may want to use Mozilla/Thunderbird as a client.
- To set this up in Thunderbird so as follow
Select the _Tools_ menu
   Select _Options_ a window opens. Select the tab [Composition] -then-> [General]
    click on <send option> in the new opened pannel, then select the [Plain text domain] tab
      click [add] and add star.bnl.gov
      click OK
- Sending EMail from BNL's Exchage server will result in MIME attachements and hence, cause a rejection of your posting. Two possible solutions offers themselves
- Use the Hypernews Web interafce to send messages (after making sure you are logged in, click on the bottom reference to go to the message and [Add message]
- Use a tool like Thunderbird with the SMTP outgoing server set to use the RCF server. Instructions are available here.
- The folowing restrictions apply:
- Use only one Hypernews forum in the To: field (and do not use CC: to another HN forum) - HN will not know where to post if you use multiple fora and the result will be un-predictable (depending on syntax used for the To: field and mailer, the post will end up in one of the specified fora or be discarded entirely)
- You will NOT be able to forward a post from one forum to another - HN will know and send the message again to the original forum. This is because the information HN keeps for archiving your posts and threading them is part of the message header and not based on where you send the message (header includes Newsgroups, X-HN-Forum, X-HN-Re and X-HN-Loop). Your options could be to strip the header or cut-and-paste the original message into a new one.
- Multiple recipient on the Email "To:" field will not post your EMail. Strictly speaking, this is a shortcoming in the parsing of the header as defined in RFC2822 (the RFC allows for a list, STAR HN implementation disallow mass posting).
- One frequent source of issues and unrelated to any of te above (and very STAR infrastructure specific):
- Always use address book entries using the alias of the form list [at] www.star.bnl.gov and NOT the node specific address (connery, orion, etc...). Especially, older users should remove from their address book any address not specifying the alias.
- If you need to test sending Email to the system, please do not spam an existing active list - instead, use our test fora: startest or tesp.
Installing the STAR software stack
The pages here are under constructions. They aim to help remote sites to install the STAR software stack.
You should read first Setting up your computing environment before going through the documents provided herein as we refer to this page very often. Please, pay particular attention to the list of environment variables defined by the group login script and their meanings in STAR. Be aware of the assumptions as per the software locations (all will be referred by the environment variables listed there) as well as the need to use a custom (provided) set of .cshrc and .login file (you may have to modify them if you install the STAR software locally). Setting up your computing environment is however NOT written as a software installation instruction and should not be read as such.
Please, follow the instructions in order they appear below
- Check first the availability of the CERN libraries as this may be a show stopper. If there is no CERN libraries for your OS version and/or the available libraries are not validated for your OS, you will NOT be able to get the STAR software working on your site.
- Your FIRST STEP is to install the Group login scripts. Although not all will be defined, the login should be successful after this step.
- The next step is then to install Additional software components
However, your OS should also have installed a few base system wide RPMs.
Lists are available on the OS Upgrade page as well as specific issues with some OS. Read it carefully. - Then, install the ROOT library Building ROOT in STAR
- Finally, you are ready for a STAR library installation STAR codes
Sparse notes are also in Post installation and special instructions for administrators at OS Upgrade.
Group login scripts
Installing
The STAR general group login scripts are necessary to define the STAR environment. They reside in $CVSROOT within the group/ sub-tree. Template files for users .cshrc and .login support also exists within this tree in a sub-directory group/templates. To install properly on a local cluster, there are two possibilities:
- if you have access to AFS, you should simply
    % mkdir  /usr/local/star # this is only an example
    % cd /usr/local/star     # this directory needs to be readable by a STAR group
    % cvs checkout group     # this assumes CVSROOT is defined
This will bring a copy of all you need locally in /usr/local/star/group - If you do not have access to AFS from your remote site, get a copy of the entire BNL $GROUP_DIR tree and unpack in a common place (like /usr/local/star above). A copy resides in the AFS tree mentioned Additional software components.
Note that wherever you install the login scripts, they need to be readable by a STAR members (you can do this by allowing a Unix group all STAR users will belong to read access to the tree or by making sure the scripts are all users accessible).
Also, as soon as you get a local copy of the group/templates/ files, EDIT BOTH the cshrc and login files and change on top the definition of GROUP_DIR to it matches your site GROUP script location (/usr/local/group in our example).
To enable a user to use the STAR environment, simply copy the template cshrc and login scripts as indicated in Setting up your computing environment.
Special scripts
Part of our login is optional and the scripts mentioned here will NOT be part of our CVS repository but, if exists, will be executed.
- site_pre_setup.csh - this script, if exists in $GROUP_DIR, will be executed before the execution of the STAR standard login. Its purpose is to define variables indicating non-standard location for your packages. For those variables which may be redefined, please consult Setting up your computing environment for all the variables (in blue) which may be redefined prior to login.
- site_post_setup.csh - this script, if exists in $GROUP_DIR, will be executed after the STAR standard login. Its purpose is to define local variables nor related to STAR's environment. Such variables may be for example the definition of a proxy (http_proxy, ftp_proxy, https_proxy), a NNTP server or a default WWW home directory (WW_HOME). Do not try to redefine STAR login's defined variables using this script.
Testing this phase
Testing this phase is as simple as creating a test account and verifying that the login does succeed. Whenever you start with a blank site, the login MUST succeed and lead to viable environment ($PATH especially should be minimally correct). A typical login example would be at this stage something like
Setting up WWW_HOME  = http://www.star.bnl.gov/

         ----- STAR Group Login from /usr/local/star/group/ -----

Setting up STAR_ROOT = /usr/local/star
Setting up STAR_PATH = /usr/local/star/packages
Setting up OPTSTAR   = /usr/local/star/opt/star
WARNING : XOPTSTAR points to /dev/null (no AFS area for it)
Setting up STAF      = /usr/local/star/packages/StAF/pro
Setting up STAF_LIB  = /usr/local/star/packages/StAF/pro/.cos46_gcc346/lib
Setting up STAF_BIN  = /usr/local/star/packages/StAF/pro/.cos46_gcc346/bin
Setting up STAR      = /usr/local/star/packages/pro
Setting up STAR_LIB  = /usr/local/star/packages/pro/.cos46_gcc346/lib
Setting up STAR_BIN  = /usr/local/star/packages/pro/.cos46_gcc346/bin
Setting up STAR_PAMS = /usr/local/star/packages/pro/pams
Setting up STAR_DATA = /usr/local/star/data
Setting up CVSROOT   = /usr/local/star/packages/repository
Setting up ROOT_LEVEL= 5.12.00
Setting up SCRATCH   = /tmp/jeromel
CERNLIB version pro has been initiated with CERN_ROOT=/cernlib/pro
STAR setup on star.phys.pusan.ac.kr by Tue Mar 12 06:43:47 KST 2002  has been completed
LD_LIBRARY_PATH = .cos46_gcc346/lib:/usr/local/star/ROOT/5.12.00/.cos46_gcc346/rootdeb/lib:ROOT:/usr/lib/qt-3.3/lib
Suggestions
STAR group
You may want to to create a rhstar group on your local cluster matching GID 31012. This will make AFS integration easier as the group names in AFS will then translate to rhstar (it will however not grant you any special access obviously since AFS is Kerberos authentication based and not Unix UID based).
To do this, and after checking that /etc/group do not contain any mapping for gid 31012, you could (Linux):
% groupadd -g 31012 rhstar
Test account
It may be practical for testing the STAR environment to create a test account on your local cluster. The starlib account is an account used in STAR for software installation. You may want to create such account as follow (Linux):
% useradd -d /home/starlib -g rhstar -s /bin/tcsh starlib
This will allow for easier integration. Any account name will do (but testing is important and we will have a section on this later).
Additional software components
Scope & audience
Described in Setting up your computing environment, OPTSTAR is the environment variable pointing to an area which will supplement the operating system installation of libraries and program. This area is fundamental to the STAR software installation as it will contain needed libraries, approved software component version, shared files, configuration and so on.
The following path should contain all software components as sources for you to install a fresh copy on your cluster:
/afs/rhic.bnl.gov/star/common
Note that this path should allow anyuser to read so there is no need for an AFS token. The note below are sparse and ONLY indicate special instructions you need to follow if any. In the absence of special instructions, the "standard" instructions are to be followed. None of the explanations below are aimed to target a regular user but aimed to target system administrator or software infrastructure personnel.
System wide RPMs
Some RPMs from your OS distribution may be found at BNL under the directory /afs/rhic.bnl.gov/rcfsl/X.Y/*/ where X.Y is the major and minor version for your Scientific Linux version respectively. You should have a look and install. If you do not have AFS, you should log to the RCF and transfer whatever is appropriate.
In other words, we may have re-packaged some packages and/or created additional ones for compatibility purposes. An example of this for SL5.3 is flex32libs-2.5.4a-41.fc6.i386.rpm located in /afs/rhic.bnl.gov/rcfsl/5.3/rcf-custom/ which supports the 32 bits compatbility package for flex on a kernel with dual 32/64 bits support.
STAR Specific
The directory tree /afs/rhic.bnl.gov/star/common contains packages installed on our farm in addition of the default distribution software packages coming with the operating system. At BNL, all packages referred here are installed in the AFS tree
/opt/star -> /afs/rhic.bnl.gov/@sys/opt/star/
Be aware of the intent explained in Setting up your computing environment as per the difference between $XOPTSTAR and OPTSTAR.
OPTSTAR will either
- at BNL or to a remote site: be used to indicate and access the local software BUT may be supported through a soft-link to the same AFS area as showed above whereas @sys will expand to the operating system of interest (see Setting up your computing environment as well for a support matrix)
- at a remote site, will point to a LOCAL (that is, non-networked) installation of the software components. This space could be anywhere on your local cluster but obviously, will have to be shared and visible from all nodes in your cluster.
XOPTSTAR
The emergence of $XOPTSTAR started from 2003 to provide better support for software installation to remote institutions. Many packages add path information to their configuration (like the infamous .la files) and previously installed in $OPTSTAR, remote sites had problems loading libraries for a path reason. Hence, and unless specified otherwise below, $XOPTSTAR will be used preferably at BNL for installation the software so remote access to the AFS repository and copy will be made maximally transparent.
In 2005, we added an additional tree level reflecting the possibility of multiple compilers and possible mismatch between fs sysname setups and operating system versions. Hence, you may see path like OPTSTAR=/opt/star/sl44_gcc346 but this structure is a detail and if the additional layer does not exist for your site, later login will nonetheless succeed. This additional level is defined by the STAR login environment $STAR_HOST_SYS. In the next section, we explained how to set this up from a "blank" site (i.e. a site without the STAR environment and software installed).
On remote sites where you decide to install the software components locally, you should use $OPTSTAR in the configure or make statements.
Basic starting point
From a blank node on remote site, be sure to have $OPTSTAR defined. You can do this by hand for example like this
% setenv OPTSTAR /usr/local
or
% mkdir -p /opt/star
% setenv OPTSTAR /opt/star
are two possibilities. The second, being the default location of the software layer, will be automatically recognized by the STAR group login scripts. From this point, a few pre-requisites are
- you have to have a system with "a" compiler - we support gcc but also icc on Linux
- you should have the STAR group login scripts at hand (it could be from AFS). The STAR login scripts will NOT redefine $OPTSTAR if already defined.
Execute the STAR login. This will define $STAR_HOST_SYS appropriately. Then
% cd $OPTSTAR
% mkdir $STAR_HOST_SYS
% stardev
the definition of $OPTSTAR will change to the version dependent structure, adding $STAR_HOST_SYS to the path definition (the simple presence of the layer made the login script redefine it).
Changing platform or compiler
32 bits versus 64 bits
If you want to support native 64 bits on 64 bits, do not forget to pass/force -m64 -fPIC to the compiler and -m64 to the linker. If however you want to build a cross platform (64 bit/32 bit kernels compatible) executables and libraries, you will on the contrary need to force -m32 (use -fPIC). Even if you build the packages from a 32 bit kernel node, be aware that many applications and package save a setup including compilation flags (which will have to be using -m32 if you want a cross platform package). There are many places below were I do not specify this.
Often, using CFLAGS="-m32 -fPIC" CXXFLAGS="-m32 -fPIC" LDFLAGS="-m32" would do the trick for a force to 32 bits mode (similarly for -m64). You need to use such option for libraries and packages even if you assemble on a 32 bits kernel node as otherwise, the package may build extension later not compatible as cross-platform support.
Other GCC versions
As for the 32 bits versus 64 bits, often adding something like CC=`which gcc` and CXX=`which g++` to either the configure or make command would do the trick. If not, you will need to modify the Makefile accordingly. You may also define the environment variable CC for consistency.
Summary
If ylu do have a 64 bits kernel and intend to compile both 32 bits and 64 bits, you should define the envrionment variable as shown below. The variables will make configure (and some Makefile) pick the proper flags and make your life much easier - follow the specific instructions for the packages noted in those instructions for specific tricks. Note as well that even if you do have a 32 bits kernel only, you are encouraged to use the -m32 compilation option (this will make further integration with dual 32/64 bits support smoother as some of the packages configurations include compiler path and options).
32 bits
% setenv CFLAGS   "-m32 -fPIC"
% setenv CXXFLAGS "-m32 -fPIC"
% setenv FFLAGS   "-m32 -fPIC"
% setenv FCFLAGS  "-m32 -fPIC"
% setenv LDFLAGS  "-m32"
% setenv CC  `which gcc`     # only if you use a different compiler than the system default
% setenv CXX `which g++`     # only if you use a different compiler than the system default
and/or pass to Makefile and/or configure the arguments CFLAGS="-m32 -fPIC" CXXFLAGS="-m32 -fPIC" LDFLAGS="-m32" CC=`which gcc` CXX=`which g++` (will not hurt to use it in addition of the environment variables)
64 bits
% setenv CFLAGS   "-m64 -fPIC"
% setenv CXXFLAGS "-m64 -fPIC"
% setenv FFLAGS   "-m64 -fPIC"
% setenv FCFLAGS  "-m64 -fPIC"
% setenv LDFLAGS  "-m64"
% setenv CC  `which gcc`     # only if you use a different compiler than the system default
% setenv CXX `which g++`     # only if you use a different compiler than the system default
and/or pass to Makefile and/or configure the arguments CFLAGS="-m64 -fPIC" CXXFLAGS="-m64 -fPIC" LDFLAGS="-m64" CC=`which gcc` CXX=`which g++` (will not hurt to use it in addition of the environment variables)
Software repository directory - starting a build
In the instructions below, greyed instructions are historical instructions and/or package version which no longer reflects the current official STAR supported platform. However, if you try to install the STAR software under older OS, refer carefully to the instructions and package versions.
perl
The STAR envrionment and login scripts heavily rely on perl for string manipulation, compilation management and a bunch of utility scripts. Assembling it from the start is essential. You may rely on your system-wide installed perl version BUT if so, note that the minimum version indicated below IS required.
In our software repository path, you will find a perl/ sub-directory containing all packages and modules.
The package and minimal version are below
		perl-5.6.1.tar.gz      -- Moved to 5.8.0 starting from RH8
		perl-5.8.0.tar.gz      -- Solaris and True64 upgraded 2003
		perl-5.8.4.tar.gz      -- 2004, Scientific Linux
		perl-5.8.9.tar.gz      -- SL5+
                perl-5.10.1.tar.gz     -- SL6+
When building perl
- Use all default arguments BUT when you are asked for compilation / linker args, add -m32 or -m64 depending on the platform support you are building. Those questions are (example for the 32 bits version):
- Any additional cc flags? [] -fPIC -m32
- Any additional ld flags (NOT including libraries)? [] -m32
- Any special flags to pass to cc -c to compile shared library modules? [] -fPIC -m32
- Any special flags to pass to cc to create a dynamically loaded library? [-shared -O2] -shared -O2 -m32
- If you build a 32 bits support on a 64 bit node, you may also answer "no" below but the defalt naswer SHOULD appear as no if you properly passed -m32 as indicated above.
Try to use maximal 64-bit support, if available? [y] n <--- you probably did ot pass -m32
Try to use maximal 64-bit support, if available? [n] <--- just press return, all is fine
- when asked for the default prefix for the installation, give the value of $OPTSTAR as answer (or a base path starting with the value of $OPTSTAR wherever appropriate). Questions include
- Installation prefix to use? (~name ok) [/usr/local]
- If the build warn you at first that the directory does not exists but proceed - to questions like "Use that name anyway?" answer Yes
After installing perl itself, you will need to install the STAR required module.
The modules are installed using a bundle script (install_perlmods located in /afs/rhic.bnl.gov/star/common/bin/). It needs some work to get it generalized but the idea is that it contains the dependencies and installation order . To install, you can do the following (we assume install_perlmods is in the path for simplicity and clarity):
- first chose a work place where you would unpack the needed modules. Let's assume this is /home/xxx/myworkplace
- Check things out by running install_perlmods with arguments 0 as follow
% install_perlmods 0 /home/xxx/myworkplace
It will tell you the list of modules you need to unpack. If they are already unpacked and /home/xxx/myworkplace contains all needed package directories, skip to step 4. - You can unpack manually OR use the command
% install_perlmods 1 /home/xxx/myworkplace
to do this automatically. Note that you could have skipped step 2 and do that from the start (if confident enough). - The steps above should have created a file named /home/xxx/myworkplace/perlm-install-XXX.csh where XXX is the OS you are working on. Note that the same install directory may therefore be used for ALL platform on your cluster. However, versionning is not (yet) supported.
Execute this script after checking its content. It will run (hopefully smoothly) the perl Makerfile.PL and make / make install commands. Note that you could have also used
% install_perlmods 2 /home/xxx/myworkplace
and skip step 2 & 3. In this mode, it unpacks and proceeds with compilation. To do only if you have absolute blind faith in the process (I don't and have written those scripts ;-) ).
Very old note [this used to happen with older perl version]: if typing make, you get the following message
make: *** No rule to make target `<command-line>', needed by `miniperlmain.o'. Stop.
then you bumped into an old gcc/perl build issue (tending to come back periodically depending on message formats of gcc) and can resolve this by a using any perl version available and running the commands:
% make depend
% perl -i~ -nle 'print unless /<(built-in|command.line)>/' makefile x2p/makefile
This will suppress from the makefile the offending lines and will get you back on your feet.
After you install perl, and your setup is local (in /opt/star) you may want to do the following
% cd /opt/star
% ln -s $STAR_HOST_SYS/* .
%
% # prepare for later directories packages will create
% ln -s $STAR_HOST_SYS/share .
% ln -s $STAR_HOST_SYS/include .
% ln -s $STAR_HOST_SYS/info .
% ln -s $STAR_HOST_SYS/etc .
% ln -s $STAR_HOST_SYS/libexec .
% ln -s $STAR_HOST_SYS/qt .
% ln -s $STAR_HOST_SYS/jed .
%
While some of those directories will not yet exist, this will create a base set of directories (without the additional compiler / OS version) supporting future upgrades via the "default" set of directories. In other words, any future upgrade of compilers for example leading to a different $STAR_HOST_SYS will still lead as well to a functional environment as far as compatibility exists. Whenever compatibility will be broken, you will need of course to re-create a new $STAR_HOST_SYS tree.
At this stage, you should install as much of the libraries in $OPTSTAR and re-address the perl modules later as some depends on installed libraries necessary for the STAR environment to be functional.
Others/ [PLEASE READ, SOME PACKAGE MAY HAVE EXCEPTION NOTES]

        Needed on Other platform (but there on Linux). Unless specified
        otherwise, the packages were build with the default values.
                make-3.80
                tar-1.13
                flex-2.5.4
                xpm-3.4k
                libpng-1.0.9

                mysql-3.23.43 on Solaris
                mysql-3.23.55 starting from True64 days (should be tried as
                              an upgraded version of teh API)
                              BEWARE mysql-4.0.17 was tried and is flawed.
                              We also use native distribution MySQL
                mysql-4.1.22  *** IMPORTANT *** Actually this was an upgrade
                              on SL4.4 (not necessary but the default 4.1.20
                              has some bugs)

                <gcc-2.95.2>
                dejagnu-1.4.1
                gdb-5.2
                texinfo-4.3
                emacs-20.7

                findutils-4.1
                fileutils-4.1
                cvs-1.11       -- perl is needed before hand as it folds
                               it in generated scripts
                grep-2.5.1a    Started on Solaris 5.9 in 2005 as ROOT would complain
                               about too old version of egrep


This may be needed if not installed on your system. It is part of a needed
autoconf/automake deployment.
                m4-1.4.1
                autoconf-2.53
                automake-1.6.3

Linux only
                valgrind-2.2.0
                valgrind-3.2.3                (was for SL 4.4 until 2009)
                valgrind-3.4.1                SL4.4

General/   The installed packages/sources for diverse
           software layers. The order of installation was
                ImageMagick-5.4.3-9           On RedHat 8+, not needed for SL/RHE but see below
                ImageMagick-6.5.3-10          Used on SL5 as default revision is "old" (6.2.8) - TBC

                slang-1.4.5                   On RedHat 8+, ATTENTION: not needed for SL/RHE, install RPM
                lynx2-8-2
                lynx2-8-5                     Starting from SL/RHE
                xv-3.10a-STAR                 Note the post-fix STAR (includes patch and 32/64 bits
                                              support Makefile)
                nedit-5.2-src                 ATTENTION: No need on SL/RHE (installed by default) [+]
                pythia5
                pythia6
                text2c
                icalc

                dejagnu-1.4.1                 Optional / Dropped from SL3.0.5
                gdb-5.1.91                    For RH lower versions - Not RedHat , 8+
                gdb-6.2 (patched)             Done for SL3 only (do not install on others)

                gsl-1.13                      Started from SL5 and back ported to SL4
                gsl-1.16                      Update for SL6

                chtext
                jed-0.99-16
                jed-0.99.18                   Used from SL5+
                jed-0.99.19                   Used in SL6/gcc 4.8.2 (no change in instructions)

                qt-x11-free-3.1.0
                qt-x11-free-3.3.1             Starting with SL/RHE [+]
                qt-x11-opensource-4.4.3       Deployed from i386_sl4 and i386_sl305 (after dropping SL3.0.2), SL5
                qt-everywhere-opensource-src-4.8.5
                                              Deployed from SL6 onward
                qt-everywhere-opensource-src-4.8.7
                                              Deployed on SL6/gcc 4.8.2 (latest 4.8.x release)

                doxygen-1.3.5
                doxygen-1.3.7                 Starting with SL/RHE
                doxygen-1.5.9                 Use this for SL5+ - this package has a dependence in qt
                                              Installed native on SL6

                Python 2.7.1                  Started from SL4.4 and onward, provides pyROOT support
                Python 2.7.5                  Started from SL6 onward, provides pyROOT support
                        pyparsing V1.5.5      SL5 Note: "python setup.py install" to install
                        pyparsing V1.5.7      SL6 Note: "python setup.py install" to install
                        setuptools 0.6c11     SL5 Note: sh the .egg file to install
                        setuptools 0.9.8      SL6 Note: "python setup.py install" to install
                        MySQL-python-1.2.3    MySQL 14.x client libs compatible
                        virtualenv 1.9        SL6 Note: "python setup.py install" to install
                        Cython-0.24           SL6 Note: "python setup.py build ; python setup.py install"
                        pyflakes / pygments   {TODO}

                libxml2                       Was used only for RH8.0, installed as part of SL later [+]

                libtool-1.5.8                 This was used for OS not having libtool, Use latest version.
                libtool-2.4                   Needed under SL5 64 bits kernel (32 bits code will not assemble
                                              otherwise). This was re-packaged with a patch.

                Coin-3.1.1                    Coin 3D and related packages
                Coin-3.1.3                    ... was used for SL6/gcc 4.8.2 + patch
                                              (use the package named Coin-3.1.3-star)
                simage-1.7a
                SmallChange-1.0.0a
                SoQt-1.5.0a


                astyle_1.15.3                 Started from SL3/RHE upon user request
                astyle_1.19                   SL4.4 and above
                astyle_1.23                   SL5 and above
                astyle_2.03                   SL6 and above

                unixODBC-2.2.6                (depend on Qt) Was experimental Linux only for now.
                unixODBC-2.3.0                SL5+, needed if you intend to use DataManagement tools

                MyODBC-3.51.06                Was Experimental on Linux at first, ignore this version
                MyODBC-3.51.12                Version for SL4.4 (needed for mysql 4.1 and above)
                mysql-connector-odbc-3.51.12  <-- Experimental package change - new name starting from 51.12. BEWARE.
                mysql-connector-odbc-5.x      SL5+. As above, only if you intend to use Data Management tools

                boost                         Experimental and introduced in 2010 but not used then
                boost_1_54_0                  SL6+ needed

                log4cxx 0.9.7                 This should be general, initial version
                log4cxx 0.10.0                Started at SL5 - this is now from Apache
			apr-1.3.5             and depend on the Apache Portable Runtime (apr) package
			apr-util-1.3.7        which need to be installed BEFORE log4cxx and in the order
			expat-1.95.7          showed

                valkyrie-1.4.0                Added to SL3 as a GUI companion to valgrind (requires Qt3)
                                              Not installed in SL5 for now (Qt4 only) so ignore

               fastjet-2.4.4                  Started from STAR Library version SL11e, essentially for analysis
               fastjet-3.0.6                  SL6 onward

               unuran-1.8.1                   Requested and installed from SL6+
               LHAPDF-6.1.6                   Added after SL6.4, gcc 4.8.2

In case you have problems
               emacs-24.3                     Installed under SL6 as the default version had font troubles
               vim-7.4                        Update made under SL6.4, please prefer RPM if possible

Not necessary (installed anyway)
                chksum
                pine4.64                      Added at SL4.4 as removed from base install at BNL

Retired
                xemacs-21.5.15                << Linux only  -- This was temporary and removed

Other directories are

WorkStation/   contains packages such as OpenAFS or OpenOffice Linux
WebServer/     mostly perl modules needed for our WebServer
Linux/         Linux specific utilities (does not fit in General) or
               packages tested under Linux only.


Some notes about packages :
 Most of them are pretty straight forward to install (like ./configure
 make ; make install (changing the base path /usr/local to $OPTSTAR).
 With configure, this is done using either
   ./configure --prefix=$OPTSTAR
   ./configure --prefix=$XOPTSTAR

 Specific notes follows and include packages which are NOT yet official
 but tried out.


- Beware that the Msql-Mysql-modules perl module requires a hack
  I have not quite understood yet how to make automatic (the
  advertized --blabla do not seem to work) on platforms supporting
  the client in OPTSTAR
   INC = ... -I$(XOPTSTAR)/include/mysql ...
   H_FILES = $(XOPTSTAR)/include/mysql/mysql.h
   OTHERLDFLAGS = -L$(XOPTSTAR)/lib/mysql
   LDLOADLIBS = -lmysqlclient -lm -lz

- GD-2+
  Do NOT select support for animated GIF. This will fail on standard
  SL distributions (default gd lib has no support for that).
Really easy to install (usual configure / make / make install) but however, the PerlMagick part should be installed separatly (the usual perl module way i.e. cd to the directory, perl Makefile.PL and make / make install). I used the distribution's module. Therefore, that perl-module is not in perl/Installed/ as the other perl-modules. The copy of PerlMagick to /bin/ by default will fail so you may want to additionally do
% make install-info
% make install-data-html
which comes later depending on version.
- lynx2-8-2 / lynx2-8-5
Note: First, I tried lynx2-8-4 and the make file / configure
is a real disaster. For 2-8-2/2-8-5, follow the notes
below
General :
% ./configure --prefix=$XOPTSTAR {--with-screen=slang}
Do not forget to
% make install-help
% make install-doc
caveat 1 -- Linux (lynx 2-8-2 only, fixed at 2-8-5)
$OPTSTAR/lib/lynx.cfg was modified as follow
96,97c96,97
< #HELPFILE:http://www.crl.com/~subir/lynx/lynx_help/lynx_help_main.html
< HELPFILE:file://localhost/opt/star/lib/lynx_help/lynx_help_main.html
---HELPFILE:http://www.crl.com/~subir/lynx/lynx_help/lynx_help_main.html
#HELPFILE:file://localhost/PATH_TO/lynx_help/lynx_help_main.html
   For using curses (needed under Linux, otherwise, the screen looks funny),
   one has to do a few manipulation by hand i.e.
   . start with ./configure --prefix=$XOPTSTAR --with-screen=slang
   . edit the makefile and add -DUSE_SLANG to SITE_DEFS
   . change CPPFLAGS from /usr/local/slang to $OPTSTAR/include [when slang is local]
     Version 2-8-5 has this issue fixed.
   . Change LIBS -lslang to -L$OPTSTAR/lib -lslang
   . You are ready now
   There is probably an easier way but as usual, I gave up after close
   to 15mnts reading, as much struggle and complete flop at the end ..

 caveta 2 -- Solaris/True64 :
   We did not build with slang but native (slang screws colors up)
Those packages can be assembled simply by using the following command:
% make clean && make install PREFIX=$OPTSTAR
To build a 32 bits versions of the executable under a 64 bits kernel, use
- text2c: % make CC=`which gcc` CFLAGS="-lfl -m32"
- icalc: % make CC=`which gcc` CFLAGS="-lm -m32"
- chksum: % make CC=`which gcc` CFLAGS="-m32 -trigraphs"
- chtext: % make CC=`which gcc` CFLAGS="-lfl -m32"
This package distributed already patched and in principle, only a few 'make' commands should suffice. Note
- xv is licensed so the usage as to remain stricly for your users' amusement only. If you use this package for doing any work, you are violating the law. Please, read the license agreement at http://www.trilon.com/xv/pricing.html
Normal build
Now, you should be ready to build the main program (I am not sure why some depencies fail on some platform and did not bother to fix).
% cd tiff/
% make clean && make
% cd ../jpeg
% make clean && make
% cd ..
% rm -f *.o  && make
% make -f Makefile.gcc64 install BINDIR=$OPTSTAR/bin
For 32 bits compilation under a 64 bits kernel
% cd tiff/
% make clean && make CC=`which gcc` COPTS="-O -m32"
% cd ../jpeg
% make clean && make CC=`which gcc` CFLAGS="-O -I. -m32" LDFLAGS="-m32"
% cd ..
% rm -f *.o   && make -f Makefile.gcc32
% make -f Makefile.gcc32 install BINDIR=$OPTSTAR/bin
Makefile.gcc32 and Makefile.gcc64 are both provided for commodity.
Building from scratch (good luck)
However, if you need to re-generate the makefile (may be needed for new architectures), use
% xmkmf
Then, the patches is as follow
% sed "s|/usr/local|$OPTSTAR|" MakeFile >Makefile.new
% mv Makefile.new Makefile
and in xv.h, line 119 becomes
# if !defined(__NetBSD__) && ! defined(__USE_BSD)
After xmkmf, you will need to
% make depend
before typing make. This may generate some warnings. Ignore then.
However, I had to fix diverse caveats depending on situations ...
Caveat 1 - no tiff library found
Go into the tiff/ directory and do
% cd tiff % make -f Makefile.gcc % cd ..
to generate the mkg3states (itself creating the g3states.h file) as it did not work.
Caveat 2 - tiff and gcc 4.3.2 in tiff/
With gcc 4.3.2 I created an additional .h file named local_types.h and force the definition of a few of the u_* types but using define statements (I know, it is bad). The content of that file is as follows
#ifndef _LOCAL_TYPES_
#define _LOCAL_TYPES_

#if !defined(u_long)
# define u_long unsigned long
#endif
#if !defined(u_char)
# define u_char unsigned char
#endif
#if !defined(u_short)
# define u_short unsigned short
#endif
#if !defined(u_int)
# define u_int unsigned int
#endif

#endif
and it needs to be included in tiff/tif_fax3.h and tiff/tiffiop.h .
Caveat 3 -- no jpeg library?
In case you have a warning about jpeg such as No rule to make target `libjpeg.a', do the following as well:
% cd jpeg
% ./configure
% make
% cd ..
There is no install provided. I did
% make linux
% cp source/nc source/nedit $OPTSTAR/bin/
% cp doc/nc.man $OPTSTAR/man/man1/nc.1
% cp doc/nedit.man $OPTSTAR/man/man1/nedit.1
Other targets
% make dec
% make solaris
If you need to build for another compiler or another platform, you may want to copy one of the provided makefile and modify them to create a new target. For example, if you have a 64 bits kernel but want to build a 32 bits nedit (for consistency or otherwise), you could do this:
% cp makefiles/Makefile.linux makefiles/Makefile.linux32
then edit and add -m32 to bothe CFLAGS and LIBS. This will add a target "platform" linux32 for a make linux32 command (tested this and worked fine). The STAR provided package added (in case) both a linux64 and a linux32 reshaped makefile to ensure easy install for all kernels (gcc compiler should be recent and accept the -m flag).
The unpacking is "raw". So, go in a working directory where the .tar.gz are, and do the following (for linux)
% test -d Pythia && rm -fr Pythia ; mkdir Pythia && cd Pythia && tar -xzf ../pythia5.tar.gz
% ./makePythia.linux
% mv libPythia.so $OPTSTAR/lib/
% cd ..
%
% test -d Pythia6 && rm -fr Pythia6 ; mkdir Pythia6 && cd Pythia6 && tar -xzf ../pythia6.tar.gz
% test -e main.c && rm -f main.c
% ./makePythia6.linux
% mv libPythia6.so $OPTSTAR/lib
%
Substitute linux with solaris for Solaris platform. On Solaris, Pythia6 requires gcc to build/link.
On SL5, 64 bits note
Depending on whether you compile a native 64 bit library support or a cross-platform 32/64, you will need to handle it differently.
For a 64 bits platform, I had to edit the makePythia.linux and -fPIC to the options for a so the binaries main.c . I did not provide a patched package mainly because v5 is not really needed in STAR. For pythia6 caveat: On SL5, 64 bits, use makePythia6.linuxx8664 file. You will need to chmod +x first as it was not executable in my version.
On 64 bit platform to actually build a cross-platform version, I had instead to use the normal build but make sure to add -m32 to compilation and linker options and -fPIC to compilation option.
True64
% chmod +x ./makePythia.alpha && ./makePythia.alpha Pythia6
% chmod +x ./makePythia6.alpha && ./makePythia6.alpha
The following script was used to split the code which was too big
 #!/usr/bin/env perl
 $filin = $ARGV[0];
 open(FI,$filin);
 $idx = $i = 0;
 while( defined($line = <FI>) ){
    chomp($line); $i++;

    if ($i >= 500 && $line =~ /subroutine/){
	$i = 0;
	$idx++;
    }

    if ($i == 0){
	close(FO);
	open(FO,">$idx.$filin");
	print "Opening $idx.$filin\n";
    }
    print FO "$line\n";
 }
 close(FO);
 close(FI);
Starts the same than Qt3 i.e. assuming that SRC=/afs/rhic.bnl.gov/star/common/General/Sources/ and $x and $y stands for major and minor versions of Qt. There are multiple flavors of the package name (it was called qt-x11-free* then qt-x11-opensource* and with more recent package qt-everywhere-opensource-src*). For the sake of instructions, I provide a generic example with the most recent naming (please adapt as your case requires). WHEREVER is a location of your choice (not the final target directory).
% cd $WHEREVER
% tar -xzf $SRC/qt-everywhere-opensource-src-4.$x.$y.tar.gz
% cd qt-everywhere-opensource-src-4.$x.$y
% ./configure --prefix=$XOPTSTAR/qt4.$x -qt-sql-mysql -no-exceptions -no-glib -no-rpath
To build a 32/64 bits version on a 64 bits OS or forcing a 32 bits exec (shared mode) on a 32 bits OS, use a configure target like the below
% ./configure  -platform linux-g++-32 -mysql_config $OPTSTAR/bin/mysql_config [...]
% ./configure  -platform linux-g++-64 [...]
Note that the above assumes you have a proper $OPTSTAR/bin/mysql_config. ON a mixed 64/32 bits node, the default in /usr/bin/mysql_config will return the linked library as the /usr/lib64/mysql path and not the /usr/lib/mysql and hence, Qt make will fail finding the dependencies necessary to link with -m32. The trick we had was to copy mysql_config and replace lib64 by lib and voila!.
Compiling
  % make
  % make install

  % cd $OPTSTAR
  % ln -s qt4.$x ./qt4
For compiling with a different compiler, note that the variables referenced in this section will be respected by configure. You HAVE TO do this as the project files and other configuration files from Qt will include information on the compiler (inconsistency may arrise otherwise).
Misc notes
- If you use the same directory tree for compiling the 64 bits and the 32 bits version, please note that 'make clean' will not do the proper job. You will need to use a more systematic % find . -name '*.o' -exec rm -f {} \; command before running ./configure again.
- We added mysql support in Qt4 and Qt can now be compiled in a separate directory and installed properly (at last!). If the mysql support gives you trouble on a 64 bit OS attempting to build a 32 bit image, be sure you have used as indicated above the -mysql_config /usr/lib/mysql/mysql_config option as otherwise, the default mysql_config will be picked from /usr/bin and that version will refer to the 64 bits libraries (the link will then fail).
- For SL44, we created a qt3 distribution as then, both 3 and 4 existed. Otherwise, the ./qt4 link as indicated above is sufficient for SL5 and above.
- On some systems (SL3.0.2 for sure), I also used
- -no-openssl as there were include problems with ssl.h and krb5.h
- -qt-libtiff as the default system included header did not agree with Qt code
- -platform linux-icc could be used for icc based compiler
Horribly packaged, the easiest is to unpack in $OPTSTAR, cd to qt-x11-free-3.X.X (where X.X stands for the current sub-version deployed on our node), run the configure script, make the package, then make clean. Then, link
% cd $OPTSTAR && ln -s qt-x11-free-3.X.X qt
Later release can be build that way with changing the soft-link without removing the preceeding version entirely. Before building, do the following (if you had previous version of Qt installed). This is not necessary if you install the package the first time around. Please, close windows after compilation to ensure STAR path sanity.
  % cd $OPTSTAR/qt
  % setenv QTDIR `pwd`
  % setenv LD_LIBRARY_PATH `pwd`/lib:$LD_LIBRARY_PATH
  % setenv PATH `pwd`/bin:$PATH
To configure the package, then use one of:
- Linux gcc: ./configure --prefix=`pwd` -no-xft -thread
- Linux icc: ./configure --prefix=`pwd` -no-xft -thread -platform linux-icc
- True64 : ./configure --prefix=`pwd` -no-xft -thread
- Solaris: ./configure --prefix=`pwd` -no-xft
In case of thread, the regular version is build first then the threaded version (so far, they have different names and no Soft links).
You may also want to edit $QTDIR/mkspecs/default/qmake.conf and replace the line
QMAKE_RPATH = -Wl,-rpath,
by
QMAKE_RPATH =
By doing so, you would disable the rpath shared library loading and rely on LD_LIBRARY_PATH only for loading your Qt related libraries. This has the advantages that you may copy the Qt3 libraries along your project and isolate onto a specific machine without the need to see the original installation directory.
% ./configure --prefix=$XOPTSTAR [CC=icc CXX=icc]
% make clean       # in case you are re-using the same directory for multiple platform
% make
% make install
Use the environment variables noted in this section and all will go well.
Note on versions earlier than 2.3.0 (including 2.2.14 previously suggested)
The problem desribed below DOES NOT exist if you use 32 bits kernel OS and is specific to 64 bits kernel with 32 bits support.
For a 32 bits compilation under a 64 bits kernel, please use % cp -f $OPTSTAR/bin/libtool . after the ./configure and before the make (see this section for an explaination of why). unixODBC versions 2.3.0 does not have this problem.
Older version
Came with sources and one could compile "easily" (and register manually).
- MyODBC
  Linux  % ./configure --prefix=$XOPTSTAR --with-unixODBC=$XOPTSTAR [CC=icc CXX=icc]
  Others % ./configure --prefix=$XOPTSTAR --with-unixODBC=$XOPTSTAR --with-mysql-libs=$XOPTSTAR/lib/mysql
           --with-mysql-includes=$XOPTSTAR/include/mysql --with-mysql-path=$XOPTSTAR

  Note : Because of an unknown issue, I had to use --disable-gui on True64
         as it would complain about not finding the X include ... GUI is
         not important for ODBC client anyway but whenever time allows ...

  Deploy instructions at http://www.mysql.com/products/myodbc/faq_toc.html
Get the proper package, currently named mysql-connector-odbc-5.x.y-linux-glibc2.3-x86-32bit or mysql-connector-odbc-5.x.y-linux-glibc2.3-x86-64bit. the package are available from the MySQL Web site. The install will need to be manual i.e.
% cp -p bin/myodbc-installer $OPTSTAR/bin/
% cp -p lib/*  $OPTSTAR/lib/
% rehash
To register the driver, use the folowing command
% myodbc-installer -d -a -n "MySQL ODBC 5.1 Driver" -t "DRIVER=$OPTSTAR/lib/libmyodbc5.so;SETUP=$OPTSTAR/lib/libmyodbc3S.so"
% myodbc-installer -d -a -n "MySQL" -t "DRIVER=$OPTSTAR/lib/libmyodbc5.so;SETUP=$OPTSTAR/lib/libmyodbc3S.so"
this will add a few lines in $OPTSTAR/etc/odbcinst.ini . The myodbc-installer -d -l does not seem to be listing what you installed though (but the proper lines will be added to the configuration).
Installation would benefit from some smoothing + note the space between the --prefix and OPTSTAR (non standard option set for configure).
Use one of
% ./configure --prefix $OPTSTAR                       # for general compilation
% ./configure --platform linux-32 --prefix $OPTSTAR   # Linux, gcc 32 bits - this option was added in the STAR package
% ./configure --platform linux-64 --prefix $OPTSTAR   # Linux, gcc 64 bits - this option was fixed in the STAR package
then
% make
% make install
as usual but also
% make docs
which will fail d ue to missing eps2pdf program. Will create however the HTML files you will need to copy somewhere.
% cp -r html $WhereverTheyShouldGo
and as example
% cp -r html /afs/rhic.bnl.gov/star/doc/www/comp/sofi/doxygen
Note: The linux-32 and linux-64 platform were packaged in the archive provided for STAR (linux-32 does not exists in the original doxygen distribution while linux-64 is not consistent with -m64 compilation option).
Starting from SL5, we also deployed the following: coin, simage, SmallChange, SoQt. Those needs to be installed before Qt4 but after doxygen. All options are specified below to install those packages. Please, substitute -m32 by -m64 for a 64 bits native support. After the configure, the usual make and make install is expected.
The problem desribed below DOES NOT exist if you use 32 bits kernel OS and is specific to 64 bits kernel with 32 bits support.
For the 32 bits version compilation under a 64 bits kernel and for ALL sub-packages below, please be sure you have the STAR version of libtool installed and use the command
% cp -f $OPTSTAR/bin/libtool .
after the ./configure to replace the generated local libtool script. This will correct a link problem which will occur at link time (see the libtool help for more information).
% ./configure --enable-debug --disable-dependency-tracking --enable-optimization=yes \
--prefix=$XOPTSTAR CFLAGS="-m32 -fPIC -fpermissive" CXXFLAGS="-m32 -fPIC -fpermissive" LDFLAGS="-m32 -L/usr/lib" \
--x-libraries=/usr/lib
or, for or the 64 bits version
% ./configure --enable-debug --disable-dependency-tracking --enable-optimization=yes \
--prefix=$XOPTSTAR CFLAGS="-m64 -fPIC -fpermissive" CXXFLAGS="-m64 -fPIC -fpermissive" LDFLAGS="-m64"
simage (needs Qt installed and QTDIR defined prior):
% ./configure --prefix=$XOPTSTAR --enable-threadsafe --enable-debug --disable-dependency-tracking \
--enable-optimization=yes --enable-qimage CFLAGS="-m32 -fPIC" CXXFLAGS="-m32 -fPIC" \
LDFLAGS="-m32" FFLAGS="-m32 -fPIC" --x-libraries=/usr/lib
or, for the 64 bits version
% ./configure --prefix=$XOPTSTAR --enable-threadsafe --enable-debug --disable-dependency-tracking \
--enable-optimization=yes --enable-qimage CFLAGS="-m64 -fPIC" CXXFLAGS="-m64 -fPIC" \
LDFLAGS="-m64" FFLAGS="-m64 -fPIC"
% ./configure --prefix=$XOPTSTAR --enable-threadsafe --enable-debug --disable-dependency-tracking \
--enable-optimization=yes CFLAGS="-m32 -fPIC -fpermissive" CXXFLAGS="-m32 -fPIC -fpermissive" \
LDFLAGS="-m32" FFLAGS="-m32 -fPIC"
or, for the 64 bits version
% ./configure --prefix=$XOPTSTAR --enable-threadsafe --enable-debug --disable-dependency-tracking \
--enable-optimization=yes CFLAGS="-m64 -fPIC -fpermissive" CXXFLAGS="-m64 -fPIC -fpermissive" \
LDFLAGS="-m64" FFLAGS="-m64 -fPIC"
./configure --prefix=$XOPTSTAR --enable-threadsafe --enable-debug --disable-dependency-tracking \
--enable-optimization=yes --with-qt=true --with-coin CFLAGS="-m32 -fPIC  -fpermissive" CXXFLAGS="-m32 -fPIC  -fpermissive" \
LDFLAGS="-m32" FFLAGS="-m32 -fPIC"
or, for the 64 bits version
./configure --prefix=$XOPTSTAR --enable-threadsafe --enable-debug --disable-dependency-tracking \
--enable-optimization=yes --with-qt=true --with-coin CFLAGS="-m64 -fPIC  -fpermissive" CXXFLAGS="-m64 -fPIC -fpermissive" \
LDFLAGS="-m64" FFLAGS="-m64 -fPIC"
Flex is usually not needed but some OS have pre-GNU flex not adequate so I would recommend to deploy flex-2.5.4 anyway (the latest version since Linux 2001). Do not install under Linux if you have flex already on your system as rpm.
Attention: Under SL5 64 bits, be sure you have flex32libs-2.5.4a-41.fc6 installed as documented on Scientific Linux 5.3 from 4.4. Linkage of 32 bits executable would otherwise dramatically fail.
- Xpm (Solaris)
  % xmkmf
  % make Makefiles
  % make includes
  % make
  I ran the install command by hand changing the path (cut and paste)
  Had to


  % cd lib
  % installbsd -c -m 0644 libXpm.so $OPTSTAR/lib
  % installbsd -c -m 0644 libXpm.a $OPTSTAR/lib
  % cd ..
  % cd sxpm/
  % installbsd -c sxpm $OPTSTAR/bin
  % cd ../cxpm/
  % installbsd -c cxpm $OPTSTAR/bin
  %

  Onsolaris, the .a was not there, add to
  % cd lib && ar -q libXpm.a *.o && cp libXpm.a $OPTSTAR/lib
  % cd ..

  Additionally needed
  % if ( ! -e $OPTSTAR/include) mkdir $OPTSTAR/include
  % cp lib/xpm.h $OPTSTAR/include/


- libpng
  ** Solaris **
  % cat scripts/makefile.solaris | sed "s/-Wall //" > scripts/makefile.solaris2
  % cat scripts/makefile.solaris2 | sed "s/gcc/cc/" > scripts/makefile.solaris3
  % cat scripts/makefile.solaris3 | sed "s/-O3/-O/" > scripts/makefile.solaris2
  % cat scripts/makefile.solaris2 | sed "s/-fPIC/-KPIC/" > scripts/makefile.solaris3
  %
  % make -f scripts/makefile.solaris3

  will eventually fail related to libucb. No worry, this can be sorted
  out (http://www.unixguide.net/sun/solaris2faq.shtml) by including
  /usr/ucblib in the -L list
  % cc -o pngtest -I/usr/local/include -O pngtest.o -L. -R. -L/usr/local/lib \
    -L/usr/ucblib -R/usr/local/lib -lpng -lz -lm
  % make -f scripts/makefile.solaris3 install prefix=$OPTSTAR


  ** True64 **
  Copy the make file but most likely, a change like
ZLIBINC = $(OPTSTAR)/include
ZLIBLIB = $(OPTSTAR)/lib

  in the makefile is neeed.

  pngconf.h and png.h needed for installation and either .a or .a + .so

cp pngconf.h png.h $OPTSTAR/include/
cp libpng.* $OPTSTAR/lib


- mysql client (Solaris)
 % ./configure --prefix=$XOPTSTAR --without-server {--enable-thread-safe-client}
 (very smooth)
 The latest option is needed to create the libmysqlclient_r needed by some
 applications. While this so is build with early version of MySQL, version
 4.1+ requires the configure option explicitly.


- dejagnu-1.4.1	[Solaris specific]
  the install program was not found.
  % cd doc/ && cp ./runtest.1 $OPTSTAR/man/man1/runtest.1
  % chmod 644 $OPTSTAR/man/man1/runtest.1
The basic principles is as usual
% ./configure --prefix=$OPTSTAR
% make
% make xjed
% make install
However, on some platform (but this was not seen as a problem on SL/RHE), you may need to apply the following tweak before typing make. Edit the configure script and add $OPTSTAR (possibly /opt/star) to it as follow.
JD_Search_Dirs="$JD_Search_Dirs \
                $includedir,$libdir \
                /opt/star/include,/opt/star/lib \
                /usr/local/include,/usr/local/lib \
                /usr/include,/usr/lib \
                /usr/include/slang,/usr/lib \
                /usr/include/slang,/usr/lib/slang"
32 / 64 bit issue?
The problem desribed below DOES NOT exist if you use 32 bits kernel OS and is specific to 64 bits kernel with 32 bits support.
The variables described here will make configure pick up the right comiler and compiler options. On our initial system, the 32 bits compilation under the 64 bits kernel Makefile tried to do something along the line of -L/usr/X11R6/lib64 -lX11 but did not find X11 libs (since the path is not adequate). To correct for this problem, edit src/Makefile and replace XLIBDIR = -L/usr/lib64 by XLIBDIR = -L/usr/lib . You MUST have the 32 bits compatibility libraries installed on your 64 bits kernel for this to work.
AIX
I had to make some hack on AIX (well, who wants to run on AIX in the first place right ?? but since AIX do not have any emacs etc ... jed is great) as follow
- make a copy of unistd.h and comment the sleep() prototype
- modify file.c to include the local version (replace <> by "")
- modify main.c to include sys/io.h (and not io.h) and comment out direct.h
Voila (works like a charm, don't ask).
emacs
Version 24.3
In the below options, I recommend the with-x-toolkit=motif as the default GTK will lead to many warnings depending on the user's X11 server version and supported features. Motif may create an "old look and feel" but will work. However, you may have a local fix for GTK (by installing all required modules and dependencies) and not need to go to the Motif UI.
% ./configure --with-x-toolkit=motif --prefix=$OPTSTAR
For the 32 bits version supporting 64/32 bits, use the below
% ./configure --with-crt-dir=/usr/lib --with-x-toolkit=motif --prefix=$OPTSTAR CFLAGS="-m32 -fPIC" CXXFLAGS="-m32 -fPIC" LDFLAGS="-m32"
Then the usual 'make' and 'make install'.
Below are old instructions you should ignore
- emacs
  Was repacked with leim package (instead of keeping both separatly)
  in addition of having a patch in src/s/sol2.h for solaris as follow
 #define HAVE_VFORK 1
 #endif

+/* Newer versions of Solaris have bcopy etc. as functions, with
+   prototypes in strings.h.  They lose if the defines from usg5-4.h
+   are visible, which happens when X headers are included.  */
+#ifdef HAVE_BCOPY
+#undef bcopy
+#undef bzero
+#undef bcmp
+#ifndef NOT_C_CODE
+#include <strings.h>
+#endif
+#endif
+

  Nothing to do differently here. This is just a note to keep track
  of changes found from community mailing lists.

  % ./configure --prefix=$OPTSTAR --without-gcc


- Xemacs (Solaris)
  % ./configure --without-gcc --prefix=$OPTSTAR
  Other solution, forcing Xpm
  % ./configure --without-gcc --prefix=$OPTSTAR --with-xpm --site-prefixes=$OPTSTAR

  Possible code problem :
  /* #include <X11/xpm.h> */
  #include <xpm.h>

- gcc-2.95 On Solaris was used as a base compiler
  % ./configure --prefix=$OPTSTAR
  % make bootstrap

  o Additional gcc on Linux
  Had to do it in multiple passes (you do not need to do the first pass
  elsewhere ; this is just because we started without a valid node).

  A gcc version < 2.95.2 had to be used. I used a 6.1 node to assemble
  it and install in a specific AFS tree (cross version)
  % cd /opt/star && ln -s /afs/rhic/i386_linux24/opt/star/alt .
  Move to the gcc source directory
  % ./configure --prefix=/opt/star/alt
  % make bootstrap
  % make install
  install may fail in AFS land. Edit gcc/Makefile and remove "p" option
  to the tar options TAROUTOPTS .

  For it work under 7.2, go on a 7.2 node and
  % cp /opt/star/alt/include/g++-3/streambuf.h /opt/star/alt/include/g++-3/streambuf.h-init
  % cp -f /usr/include/g++-3/streambuf.h /opt/star/alt/include/g++-3/streambuf.h
  ... don't ask ...


  o On Solaris, no problems
  % ./configure --prefix=/opt/star/alt
  etc ...

- Compress-Zlib-1.12 --> zlib-1.1.4
  If installed in $OPTSTAR,
  % setenv ZLIB_LIB $OPTSTAR/lib
  % setenv ZLIB_INCLUDE $OPTSTAR/include


- findutil
  Needed a patch in lib/fnmatch.h for True64
  as follow :
  + addition of defined(__GNUC__) on line 49
  + do a chmod +rw lib/fnmatch.h  first

#if !defined (_POSIX_C_SOURCE) || _POSIX_C_SOURCE < 2 || defined (_GNU_SOURCE) || defined(__GNUC__)


* CLHEP1.8                      *** Experimental only ***
 printVersion.cc needs a correction #include <string> to <string.h>
 for True64 which is a bit strict in terms of compilation.

 On Solaris, 2 caveats
  o gcc was used (claim that CC is used but do not have the include)
  o install failed running a "kdir" command instead of mkdir so do a
    % make install MKDIR='mkdir -p'

 Using icc was not tried and this package when then removed.


- mysqlcc
 ./configure --prefix=$OPTSTAR --with-mysql-include=$OPTSTAR/include/mysql --with-mysql-lib=$OPTSTAR/lib/mysql
 The excutable do not install itself so, one needs to
 % cp -f  mysqlcc $OPTSTAR/bin/
First, please note that the package distributed for STAR contains a patch for support of the 32 / 64 bits environment. If you intend to download from the original site, please apply the patch below as indicated. If you do not use our distributed package and attempt to assemble a 32 bits library under a 64 bits kernel, we found cases where the default libtool will fail.
Why the replacement of libtool? Sometimes, "a" version of libtool is added along software packages indicated in this help. However, those do not consider the 32 bits / 64 bits mix and often, their use lead to the wrong linkage (typical problem is that a 32 bits executable or shared library is linked against the 64 bits stdc++ versions, creating a clash).
This problem does not existswhen you assemble a 64 bits code under a 64 bits kernel or assemble a 32 bits codes under a 32 bits kernel.
In all cases, to compile and assemble, use a command line like the below:
% ./configure --prefix=$XOPTSTAR CFLAGS="-m32 -fPIC" CXXFLAGS="-m32 -fPIC" \
FFLAGS="-m32 -fPIC" FCFLAGS="-m32 -fPIC" LDFLAGS="-m32"                        # 32 bits version
% ./configure --prefix=$XOPTSTAR CFLAGS="-m64 -fPIC" CXXFLAGS="-m64 -fPIC" \
FFLAGS="-m64 -fPIC" FCFLAGS="-m64 -fPIC" LDFLAGS="-m64"                        # 64 bits version
% make
% make install
Patches
libtool 2.4
The file ./libltdl/config/ltmain.sh needs the following patch
<
< # JL patch 2010 -->
< if [ -z "$m32test" ]; then
< #echo "Defining m32test"
< m32test=$($ECHO "${LTCFLAGS}" | $GREP m32)
< fi
< if [ "$m32test" != "" ] ; then
< dependency_libs=`$ECHO " $dependency_libs" | $SED 's% \([^ $]*\).ltframework% -framework \1%g' | $SED 's|lib64|lib|g'`
< else
< dependency_libs=`$ECHO " $dependency_libs" | $SED 's% \([^ $]*\).ltframework% -framework \1%g'`
< fi
< # <-- end JL patch
<
---
dependency_libs=`$ECHO " $dependency_libs" | $SED 's% \([^ $]*\).ltframework% -framework \1%g'`
in gdb/linux-nat.c
         /*
   fprintf_filtered (gdb_stdout,
                     "Detaching after fork from child process %d.\n",
                     child_pid);
       */
and go (no, I will not explain).
Version 2.03
% cd astyle_2.03/src
% make -f ../build/gcc/Makefile CXX="g++ -m32 -fPIC"   # for the 64 bits version, use the same command
                                                       # with   CXX="g++ -m64 -fPIC"
% cp bin/astyle $XOPTSTAR/bin/
% test -d $XOPTSTAR/share/doc/astyle || mkdir -p $XOPTSTAR/share/doc/astyle
% cp ../doc/*.* $XOPTSTAR/share/doc/astyle
The target
% make -f ../build/gcc/Makefile clean
also works fine and is needed between versions.
Version 1.23
Directory structure changes but easier to make the package so use instead
% cd astyle_1.23/src/
% make -f ../buildgcc/Makefile  CXX="$CXX $CFLAGS"
% cp ../bin/astyle $OPTSTAR/bin/
% cd ..
Note that the compressed command above assumes you have define dthe envrionment variables as described in this section. Between OS (32 / 64 bits) you may need to % rm -f obj/* as the make system will not reocgnize the change between kernels (you alternately may make -f ../buildgcc/Makefile clean but a rm will be faster :-) ).
Documentation
A crummy man page was added (will make it better later if really important). It was generted as follow and provided for convenience in the packages for STAR (do not overwrite because I will not tell you what to do to make the file a good pod):
% cd doc/
% lynx -dump astyle.html >astyle.pod
[... some massage beyond the scope of this help - use what I provided ...]
% pod2man astyle.pod >astyle.man
% cp astyle.man $OPTSTAR/man/man1/astyle.1
Versions < 1.23
Find where the code really unpacks. There are no configure for this package.
% cd astyle_1.15.3 ! or
% cd astyle/src
% make
% cp astyle $OPTSTAR/bin/
Version 1.15.3
The package comes as a zip archive. Be aware that unpacking extracts files in the current directory. So, the package was remade for convenience. Although written in C++, this executable will perform as expected under icc environment. On SL4 and for versions, gcc 3.4.3, add -fpermissive to the Makefile CPPFLAGS.
MUST be installed using $XOPTSTAR because there is an explicit reference to the install path. Copying to a local /opt/star would therefore not work. For icc, use the regular command as this is a self-contained program without C++ crap and can be copied from gcc/icc directory. The command is
% ./configure --prefix=$XOPTSTAR
Note: valgrind version >= 3.4 may ignore additional compiler options (but will respect the CC and CXX variables) as it will assemble both 32 bits and 64 bits version on a dual architecture platform. You could force a 32 build only by adding the command line options --enable-only32bit.
Caveats for earlier revisions below:
Version 2.2
A few hacks were made on the package, a go-and-learn experience as problems appeared
coregrind/vg_include.h
123c123
< #define VG_N_RWLOCKS 5000
---
#define VG_N_RWLOCKS 500
coregrind/vg_libpthread.vs
195a196
> __pthread_clock_gettime; __pthread_clock_settime;
to solve problems encountered with large programs and pthread.
The problem desribed below DOES NOT exist if you use 32 bits kernel OS and is specific to 64 bits kernel with 32 bits support.
For a 32 bits compilation under a 64 bits kernel, please use % cp -f $OPTSTAR/bin/libtool . after the ./configure and before the make (see this section for an explaination of why) for both the apr and expat packages.
apr is an (almost) straight forward installation:
% ./configure --prefix=$OPTSTAR
apr-util needs to have one more argument i.e.
% ./configure --prefix=$OPTSTAR --with-apr=$OPTSTAR
The configure script will respect the environment variables described in this section and, provided you have defined them properly for the intended target (32 or 64 bits executable), the resulting Mkaefile will be properly generated without further modifications needed.
Note however that the package distributed in STAR has one hack to the fconfigure script a follows (apply if you download from anoher source than STAR's distributed packages):
% diff configure.orig configure
4255c4255,4256
<     CFLAGS="-g -O2"
---
>     # CFLAGS="-g -O2"
>     CFLAGS="-g -m32"
4261c4262,4263
<     CFLAGS="-O2"
---
>     # CFLAGS="-O2"
>     CFLAGS="-m32"
This will allow another way to assemble the package (without having to define the env variables) but you will need to substitute -m32 by -m64 as appropriate.
% ./configure --prefix=$OPTSTAR
log4cxx 0.10.x
This distribution is part of the Apache project and requires APR library (see above).
The package was taken nearly as-is apart from the following patches:
- inputstreamreader.cpp, socketoutputstream.cpp, console.cxx - requires adding #include <string.h> on top as memmove, mencpy are no longer implicit but declared in string.h
After installing APR and using the patches as indicated, use
% ./configure --prefix=$XOPTSTAR --with-apr=$XOPTSTAR CFLAGS="-m32 -fPIC" CXXFLAGS="-fno-inline -g -m32" LDFLAGS="-m32"
or
% ./configure --prefix=$XOPTSTAR --with-apr=$XOPTSTAR CFLAGS="-m64 -fPIC" CXXFLAGS="-fno-inline -g -m64" LDFLAGS="-m64"

% cp -f $OPTSTAR/bin/libtool .
% make
% make install
Please do NOT forget to use % cp -f $OPTSTAR/bin/libtool . after the ./configure and before the make (see this section for an explaination of why). This assummes you installed libtool as instructed.
Finally, there is one patch needed if you download the package from other sources than where STAR provides the packages. The patch relates to a problem with atomic operations handling.
Index: src/main/cpp/objectimpl.cpp
===================================================================
--- src/main/cpp/objectimpl.cpp    (revision 654826)
+++ src/main/cpp/objectimpl.cpp    (working copy)
@@ -36,12 +36,12 @@

  void ObjectImpl::addRef() const
  {
-  apr_atomic_inc32( & ref );
+  ref++;
  }

  void ObjectImpl::releaseRef() const
  {
-  if ( apr_atomic_dec32( & ref ) == 0 )
+  if ( --ref == 0 )
    {
      delete this;
    }
log4cxx 0.9.5
There is a bug on Linux so, start with commenting all lines related to HAVE_LINUX_ATOMIC_OPERATIONS in configure.in before the below. Finally, two code had to be patched are now repacked
- filewatchdog.cpp line 21: comment #ifdef WIN32 and the associated #endif
- cocketimpl.cpp line 41: add #include <errno.h>
For ODBC support, one needs
% setenv CPPFLAGS "-I$XOPTSTAR/include"
% setenv LDFLAGS  "-L$XOPTSTAR/lib"
log4cxx 0.9.7
Also need to do the below or it will not even find the libs at configure.
% setenv CPPFLAGS "-I$XOPTSTAR/include"
% setenv LDFLAGS  "-L$XOPTSTAR/lib"
On Scientific Linux 4.4 aka Linux 2.6 replace as follows
#AC_CHECK_FUNCS(gettimeofday ftime setenv)
AC_CHECK_FUNCS(setenv)
Linux 7.3 distributions note
On Version 7.3 of Linux, this is hard to install. You will need to upgrade m4, autoconf to at the least the versions specified for "other platforms". It won't compile easily with gcc 2.96 though. But it can using
% ./configure --prefix=$OPTSTAR CC=/usr/bin/gcc3 CXX=/usr/bin/g++3
if you have all gcc 3 ready.
Finally, if you install log4cxx from a new Linux version (especially one having a different version of autoconf tools), you better start from a fresh directory and not attempt to use the 'clean' target (it will fail).
Summay then:
Linux gcc (general instructions, all log4cxx)
% ./autogen.sh
% ./configure --prefix=$OPTSTAR [--with-ODBC=unixODBC]
Linux icc
% setup icc
% ./configure --prefix=$XOPTSTAR CC=icc CXX=icc [--with-ODBC=unixODBC]
If icc is the second target, you should use 'make clean' before the configure.
Solaris
Does not configure (need the autoconf tools)
True64
Not tried yet
Platform: so far needed to update RH 8.0 only, add to propagate to other platform in 2006 due to a component dependence issue.
% ./configure --without-python --prefix=$XOPTSTAR
Re-added at BNL since SL4.4 because it was removed from the base installation, this may not be needed for your site (install from RPM, it exists).
Scientific Linux (don't get fooled by the targets)
% ./build lrh
% cp bin/pine bin/pico $OPTSTAR/bin/
On a mixed of 32 / 64 bits architecture and/or with alternate gcc versions, the command examples below could be used:
% ./build lrh CC=`which gcc` SSLDIR=/usr/include/openssl/ EXTRALDFLAGS="-m32" EXTRACFLAGS="-m32 -fPIC"
[or]
% ./build lrh CC=`which gcc` SSLDIR=/usr/include/openssl/ EXTRALDFLAGS="-m64" EXTRACFLAGS="-m64 -fPIC"
GSL - GNU Scientific Library
The install is straight forward with the usual configure but on 64 bit machine, you will need to add the CCFLAGS and LDFLAGS as showed below
% ./configure --prefix=$OPTSTAR                                    ! default bits
% ./configure --prefix=$OPTSTAR CFLAGS="-m32 -fPIC" LDFLAGS="-m32" ! 32 bits
% ./configure --prefix=$OPTSTAR CFLAGS="-m64 -fPIC" LDFLAGS="-m64" ! 64 bits
% make
% make install
The below were fine with verison 2.7.1
% setenv BASECFLAGS "-m32 -fPIC"
% setenv CXXFLAGS "-m32 -fPIC"
% setenv LDFLAGS "-m32"
%  ./configure --prefix=$XOPTSTAR
On a mixed architecture, I had to modify the generated pyconfig.h as the use of VA_LIST_IS_ARRAY would get pythong to crash.
1069c1069
< //#define VA_LIST_IS_ARRAY 1
---
> #define VA_LIST_IS_ARRAY 1
For the 64 bits version, please substitute -m32 with -m64 as follows
% setenv BASECFLAGS "-m64 -fPIC"
% setenv CXXFLAGS "-m64 -fPIC"
% setenv LDFLAGS "-m64"
%  ./configure --prefix=$XOPTSTAR
Note: The default compilation (without using the environment variable setting) may succeed but binding with ROOT and other package will fail and require -fPIC and additionally, it is best to have in all configurations -m32/-m64 specified explicitely.
Build is straight forward in principle i.e.
% python setup.py build
% python setup.py install
but
- on a mixed 32/64 bits platform, the 32 bits will need to be persuaded by
- editing site.cfg and setting mysql_config to the 32 bit version (likely /usr/lib/mysql/mysql_config ) - you can be sure of this as the return value for --cflags would have -m32
- Add the following code in setup_posix.py
65,68d64
<     for i in range(len(extra_compile_args)):
<         if extra_compile_args[i] == '-m32':
<             extra_link_args += ['-m32']
<
I am sure there are other more ellegant ways but this works fine.
- If your default MySQL distribution resides in $OPTSTAR, you will also need to edit the site.cfg script before running the setup script and modify the mysql_config variable accordingly. This will prevent running into symnbol loading conflicts later (usually happening because a third party product would, in this case, use one version of MySQL and STAR code another).
The basic compilation requires
./configure --prefix=$OPTSTAR CXXFLAGS="-m32 -fPIC -fno-inline" CFLAGS="-m32 -fPIC -fno-inline" LDFLAGS="-m32"
For the 64 bits, replace -m32 by -m64. -fno-inline is needed still to circuvnet a gcc bug with inlining.
Certainly, the most helpful reference was this boost reference. But those are not immediate instructions. Here is what you will need to do:
% ./bootstrap.sh --prefix=$XOPTSTAR
In any cases, this will build a few 64 bits executables on a 32/64 bits machine but don't panic yet ... To build, use one of the below (as appropriate):
% ./bjam cflags="-m64 -fPIC" cxxflags="-m64 -fPIC" linkflags="-m64 -fPIC" address-model=64 threading=multi architecture=x86 stage
or
% ./bjam cflags="-m32 -fPIC" cxxflags="-m32 -fPIC" linkflags="-m32 -fPIC" address-model=32 threading=multi architecture=x86 stage
I am sure you already see the problem - on AMD processors, you may have a different "arhitecture" so we cannot give you the exact instruction to use here. Possible architectures are x86, x86_amd64, x86_ia64, amd64 or ia64.
When you are done wth compiling, execute nearly the same command but instead of "stage" use
% ... install --prefix=$XOPTSTAR
and you will be hopefully done.
unuran
This package follows a typical install i.e.
% ./configure --prefix=$XOPTSTAR CXXFLAGS="-m32 -fPIC" CFLAGS="-m32 -fPIC" LDFLAGS="-m32"
or
% ./configure --prefix=$XOPTSTAR CXXFLAGS="-m64 -fPIC" CFLAGS="-m64 -fPIC" LDFLAGS="-m64"

% make
% make install
This will allow ROOT to build the TUnuran classes.
LHAPDF-6.1.6
This package is not straight forward to install. Use the usual initial setup i.e.
./configure --prefix=$XOPTSTAR CXXFLAGS="-m32 -fPIC" CFLAGS="-m32 -fPIC" LDFLAGS="-m32"
or
./configure --prefix=$XOPTSTAR CXXFLAGS="-m64 -fPIC" CFLAGS="-m64 -fPIC" LDFLAGS="-m64"
then the usual
% make
However, before make install, modify lhapdf-config and add -m32 -fPIC (-m64 -fPIC for 64 bits platform) to cflags and -m32 (-m64) to the ldflags i.e.
40c40
< test -n "$tmp" && OUT="$OUT -m32 -fPIC -I${prefix}/include "
---
> test -n "$tmp" && OUT="$OUT -I${prefix}/include "
46c46
< test -n "$tmp" && OUT="$OUT -m32 -L${exec_prefix}/lib -lLHAPDF"
---
> test -n "$tmp" && OUT="$OUT -L${exec_prefix}/lib -lLHAPDF"
as the configure will not do that and hence, not generate a config script suitable for a a mix 32/64 bits.
vim
Configure is standard, use a minimal option set and features=big as below
% ./configure --enable-pythoninterp=yes --enable-perlinterp=yes --enable-cscope --with-features=big \
--prefix=$XOPTSTAR CFLAGS="-m64 -fPIC" CXXFLAGS="-m64 -fPIC" LDFLAGS="-m64"
or
./configure --enable-pythoninterp=yes --enable-perlinterp=yes --enable-cscope --with-features=big \--prefix=$XOPTSTAR CFLAGS="-m32 -fPIC" CXXFLAGS="-m32 -fPIC" LDFLAGS="-m32"
then the usual make and make install.
CERN libraries
The STAR simulation framework will require the CERN libraries to be installed. This will likely be the most problematic portion of the STAR software installation as there is little support for the CERNLib nowadays (so, you must rely on existing supported versions).
- Information about the CERN libraries can be found here with the appropriate download area.
If you do not find a version of the CERNlib for your platform, well ... you are out of luck.
If you have the same OS as BNL and do not want to spend to much time, copy from BNL and move on.
- If you experience problems with the 64 bit versions and this was not copied from BNL, consider one of the following:
Note however that (for example) a generic Linux distribution or an older Linux version based distribution may work for respectively a different flavor of Linux or a more recent of Linux.
Building ROOT in STAR
Building ROOT in STAR
How to build ROOT at BNL and other sites (support documentation)
Some of the above help is similar than what you will find in the PDSF page mentioned above.
Older help version could be found from the revision tab.
ATTENTION
- BEWARE that the target for 64 bit machine is specific to your platform. We use linuxx8664gcc at BNL.
- Several patches are available for this revision (see at the bottom as usual). All sources were repackages in Additional software components as root_v5.34.30_2-star.source.tar.gz (this revision was last made on 2014/06/25). Taking the repacked tar ball is the preffered and recomended approach. Alternatively, you may download the root code from root.cern.ch (the source tar balls are available on their site) but extra steps/actions noted in orange below are needed.
- This revision supports Qt4 in its latest incarnation i.e. qt-everywhere-opensource-src-4.8.7 (see Additional software components for more information) - qt 4.4 was left for use for SL5.3
- We substantially dropped several OS support since the previous release and this still applies to 5.34.09 i.e.:
- cygwin not tested at all
- Mac OSX not tested
- Solaris and True64 are no longer available to us as build platform and hence, we cannot conclude
- Linux revisions prior to 5.3 (Boron) are no longer supported.
- Only Pythia6 is supported in this version (and is default)
The build
The build is in several steps ; we will assume for this example that we are building root version 5.22.00 ; the % sign is used for the Unix prompt.
- Go to the $ROOT directory, create a directory named after the version i.e. 5.22.00, and unpack the tar ball using
% cd $ROOT
% mkdir 5.34.30_2
% cd 5.34.30_2
% setenv ROOTB `pwd`
One note : the ROOTB environment variable will be used throughout this help but is not used by the STAR environment. It only serves the purpose of finding back easily the base tree for the ROOT version you are trying to install.
If you are a STAR user, you can also find a copy of the package in AFS at the location
/afs/rhic/star/common/General/Sources/ (again, this is the reocmmended approach to avoid extra complications).
% tar -xzf root_v5.34.30_2-star.source.tar.gz
Remember to remove the archive tar.gz file after unpacking. It is not helpful to keep it around.
ALL required files (including the STAR specific configurations) are part of our repackaged sources. Starting from ROOT 5.34, no other means are recommended (you may still download the original codes from the ROOT Web site but the STAR specific configs and patches will not be present).
- The structure is not ready ... yet ... You still have to create the OS dependent tree structure we use to allow concurrent platform support in addition of the two layers (with debugging, without debugging information). This is done in a one-does-it-all script.
% $STAR/mgr/MakeRootDir.pl
This command needs to be executed ONCE on EACH supported platform.
IMPORTANT NOTE: $STAR environment variable needs to be defined here but it case it is not, the latest version available in /afs/rhic.bnl.gov/star/packages/dev/mgr is the safest to use (because it is the latest available). You need to access this script from the AFS path (or make a local copy) if you start building a site from scratch as well (ROOT needs to be installed before $STAR).
- The next step will give an example on how to build it under the linux platform. The above assumes that root is installed in AFS (to make it generic) and that .@sys allows to separate the OS/compiler flavors (which is the case, but not valid for off-site NFS resident tree structure where you will have to specifically use .$STAR_HOST_SYS instead of .@sys ).
% cd $ROOTB/.$STAR_HOST_SYS/rootdeb
% setenv ROOTSYS `pwd`
% $STAR/mgr/fixrootmk -unlink
% ./configure linux --build=debug ... remaining options ... +
% cd $ROOTB/.$STAR_HOST_SYS/root
% setenv ROOTSYS `pwd`
% $STAR/mgr/fixrootmk -unlink
% ./configure linux ... remaining options ... +
The above examples are both building the standard root distribution and option. This IS NOT what we are using in STAR and the above table shows the default options currently in use. You MUST of course add the --build=debug flag where appropriate as shown above while using that table (i.e. the main point of the two commands as shown is that the rootdeb tree is build with the configure command --build=debug while the optimized version is not).
Notes:- You MUST issue a similar command on ALL platform you are supporting before proceeding to the next step.
- You need to run ./configure ONCE only. In case of any further updates, you should NOT repeat this action.
- Execute the following script before compiling
% $STAR/mgr/fixrootmk
This will check the configuration file for special tags (in the old versions, it would check and fix CERNLIB for example).
Note that the same command prior with -unlink moved the system.rootrc aside before the configure and make local copies of some of the files which should not be shared between multiple-platforms. At the end of compilation, we will ask you to execute the script again to re-install the system.rootrc and similar files (i.e. make use of the global one for all platforms).
- Now we are ready to compile. To do this, simply use the below sequence where you have configured the package.
% gmake
Notes:- the gmake step may display messages like No such file or directory .
Please, ignore since this is normal and will trigger the proper directory tree creation. - All is compiled AND INSTALLED. There is NO NEED to use make install.
- For those compiling on AFS, if gmake (or make) keeps calling the reconfigure script over and over again, you have two solutions. Either 'sleep 1 && touch Makefile' and type make again or use 'make --assume-new=Makefile'. The former will reset the Makefile timestamp to a second later of the last command executed and the later tell make to consider the timestamp of the Makefile file as if it has just been modified. You may also try a 'make clean' and try again.
- the gmake step may display messages like No such file or directory .
- As noted in a previous step, at the end, finalize the build by doing
% $STAR/mgr/fixrootmk -fix
and at least once
% cd $ROOT
% test -e 5.34.30 && rm -f 5.34.09 && ln -s 5.34.09_1 ./5.34.09
This last command link your current build tree to the official 5.34.09. If you had a previous patch level version, it will be replaced at that stage and the new build will become active. There should be NO need to rebuild root4star for incremental patch levels.
You are now done.
Table of options
|
Platform/OS |
32/64 bits |
configure script options |
|---|---|---|
| Linux = linux | 32 bits | --enable-table --enable-qt --with-pythia6-libdir=$XOPTSTAR/lib --enable-roofit --enable-mathmore --with-mysql-libdir=/usr/lib/mysql --enable-unuran --enable-xrootd --with-thread-libdir=/lib --enable-vc --enable-cxx11 |
| Linux = linuxx8664gcc | 64 bits | --enable-table --enable-qt --with-pythia6-libdir=$XOPTSTAR/lib --enable-roofit --enable-mathmore --with-mysql-libdir=/usr/lib64/mysql --enable-unuran --enable-xrootd --with-thread-libdir=/lib64 --enable-vc --enable-cxx11 |
Notes:
- You should use $OPTSTAR at remote sites having a local /opt/star and $XOPTSTAR if you provide support over AFS.
- If you build Python support, please refer to You do not have access to view this node for quick tests to see if it works
- To enable the build with QT4, you MUST define QTROOT to point to the QT4 directory prior to executing the configure script (the build will oherwise be silent on missing it)
- For SL5.3, this version of ROOT was built with the additional option --enable-builtin-pcre
- If you intend to build ROOT with another compiler revision, ad the options --with-cc=`which gcc` --with-cxx=`which g++`.
- --disable-xrootd should be used wherever you do not have Xrootd support (or do not need it)
- If you change the Python verison on your system, note that the PyROOT binding will need to be remade. However, this will not be as easy as typing make as specific version-keyed includes will be needed. You may however try something like
% modify python2.4 python2.7 ./config/Makefile.config
in the $ROOTSYS directory and type make afterward (this will work). Ultimately, you may also re-build in your private area and
% cp -fp lib/libPyROOT.so $ROOTSYS/lib
% cp -fp lib/ROOT.py* $ROOTSYS/lib
i.e. no need to compile in-place.
List of updated files
The below list is provided for convenience but you should send a note if you note ANY differences from this list and what was packaged for use by remote sites. In the below, A=added, P=patched, U=updated:
P    root/cint/cint/inc/G__ci.h
P    root/math/vc/Module.mk
P    root/bindings/pyroot/Module.mk
Typical patched codes The following codes are tweaked
| cint/cint/inc/G__ci.h |
#define G__LONGLINE #define G__ONELINE #define G__MAXNAME #define G__ONELINEDICT |
Check if appropriate (like at least 1024, 512, 256, 8) | Alter behaviors of CINT but generally, G__LONGBUF setting is fine (usually forced). |
STAR codes
Basic
The STAR code and libraries follows a structure and policy described in Library release structure and policy. Changes in each version is described in Library release history.
Installing the core STAR software is (should be) as simple as getting a full set of code for a given library, unpacking it into $STAR_PATH (default is $STAR_ROOT/packages as described in Setting up your computing environment) and issuing the following commands (in our example, we use STAR_LEVEL=SL09b with revision 1 from that library).
% cd $STAR_PATH
% mkdir SL11d && cd SL11d
% cvs co -rSL11d asps mgr QtRoot StarVMC StRoot kumacs pams StarDb StDb OnlTools
% starver SL11d
% cd $STAR
% cons
And wait ... until all is done. This will actually build the non-optimized version of our libraries.
Modifiers
To build the optimized version, use
% setenv NODEBUG yes
before you execute the starver command. If you need both, you will hence have to build twice per libraries.
To build using alternate compilers, you will need to run the setup command before running cons. For example, for the icc compiler you will need an appropriate version of $OPTSTAR and
% setup icc
and for an alternate version of gcc (and pending the fact you have the specific version installed), you will need to use something similar to
% setup gcc 4.5.1
Note that those syntax assumes specific path for gcc (installed in either /opt/gcc/$version or $OPTSTAR/alt/) while icc is expected to have an setup program located in $GROUP_DIR (as intelcc.csh) defining the paths.
Finally, on kernel supporting it, you can also switch to an alternate bits environment like this
% setup 64bits
and get the compilation proceed with the 64 bits support.
Tips
Excluding problematic directories
Sometimes, our libraries get packed with the "Pool" (user space) libraries and their support may vary. To be on the safe side, exclude several of them from compilation by setting the environment variable SKIP_DIRS before executing cons.
% setenv SKIP_DIRS "StEbyePool StHighptPool StAngleCorrMaker StSpinMaker StEbyeScaTagsMaker
StEbye2ptMaker StDaqClfMaker StFtpcV0Maker StStrangePool GeoTestMaker"
Special levels
The levels pro, new and dev are special levels as described in Library release structure and policy. pro is especially relevant as if no level is specified, the STAR login will revert to whatever pro is set to be. You may then do something like the below (again, our example assumes the default library is SL07b - please adjust accordingly).
% cd $STAR_PATH
% test -e pro && rm -f pro
% ln -s SL11d ./pro
Your default STAR library is then set for your site.
Post installation
Soft-links for compatibility
In /opt/star (or equivalent), $STAR and $ROOT/$ROOT_LEVEL, run the script $STAR/mgr/CreateLinks. This will create a few compatibility links to support additional (tested and proven to work) OS / sysname version.
Other
The list below is not exhaustive. Note that most does not need to be done and we separate the action items in two categories
To be checked or modify
- Consult the script site_pre_setup.csh and site_post_setup.csh . ANY site specific envrionment variables (such as STAR_ROOT, OPTSTAR and so on) can be set there. See the Setting up your computing environment used in STAR for more information on defaults (you should have read it before reaching this section though ;-) ).
- Please, modify your local template login files ${GROUP_DIR}/templates/ files and make sure the GROUP_DIR directory is properly reflected. Note that ANY other variables set for your site should be set in site_pre_setup.csh
Optional - for large site and Tier centers wanting network independence.
- Database connection setup - a local database setup could be used and is expected to be located in ${STAR_PATH}/conf/dbLoadBalancerLocalConfig_${SITE}.xml . Modify this file (based on existing template) to point to the local database service.
To setup a local database service, consult You do not have access to view this node for getting a local database service going.
Note: Attention, if you run on the Cloud, those instructions may be useful (a service can be created per VM)
- Setting up SUMS - only for site intending to submit jobs locally
SUMS will need a local batch system and a local config (ask the scheduler Hypernews).
We support LSF, PBS, Condor and SGE.
- FileCatalog - not needed unless you are a Tier1 center, holder of files in our distributed data management system.
A copy of the FileCatalog can be set to the local site and/or a multi-master setup can be done.
To first order, your local FileCatalog replica would minimally allow querrying the FC without the load we see at BNL (but is not that useful). A multi-master would allow full implementation of our data-management system and scheme including file transfer between sites and multi-site transfers.
But for the API to know about the local setup, you need to modify the unique local configuration file $STAR_PATH/conf/Catalog.xml and add your configuration in. The key is SITE name="XXXX" (add a new block for your site and please, pass on the information back to the Catalog maintainer). Make sute this value matches the value of $SITE set in group_env.csh .
- [*** data management / multi-site transfer instructions needed ***]
Provision CVMFS and mount BNL/STAR repo
These instructions are provided for you to install the CVMFS client and mount the STAR CVMFS repo – star.sdcc.bnl.gov The STAR software has been installed here and may be used as a replacement for AFS.
1. Get CVMFS yum repository
# wget -O /etc/yum.repos.d/cernvm.repo http://cvmrepo.web.cern.ch/cvmrepo/yum/cernvm.repo
1. Get CVMFS RPM GPG KEY
# wget -O /etc/pki/rpm-gpg/RPM-GPG-KEY-CernVM http://cvmrepo.web.cern.ch/cvmrepo/yum/RPM-GPG-KEY-CernVM
3. Install cvmfs (At this time the version we are installing is cvmfs-2.5.1-1.el7.x86_64)
# yum install cvmfs cvmfs-config-default
4. Run the command below to automate the creation of the cvmfs user and create an entry in autofs
# cvmfs_config setup
Note: At this time with these instructions (config files provided) and/or other undetermined factors, CVMFS pointing to the star.sdcc.bnl.gov repo via autofs is not stable. Further instructions have been provided (i.e hard mount)
5. Add the file /etc/cvmfs/default.local
# wget -O /etc/cvmfs/default.local http://www.star.bnl.gov/~mpoat/cvmfs/default.local
6. Add the file /etc/cvmfs/config.d/star.sdcc.bnl.gov.local
# wget -O /etc/cvmfs/config.d/star.sdcc.bnl.gov.local http://www.star.bnl.gov/~mpoat/cvmfs/star.sdcc.bnl.gov.local
7. Add the file /etc/cvmfs/domain.d/sdcc.bnl.gov.local
# wget -O /etc/cvmfs/domain.d/sdcc.bnl.gov.local http://www.star.bnl.gov/~mpoat/cvmfs/sdcc.bnl.gov.local
8. PUBLIC KEY NAME: star.sdcc.bnl.gov.pub - Create the sub directory for the public key & place the key in this directory
# mkdir /etc/cvmfs/keys/sdcc.bnl.gov
Note: Currently we are not making the ‘public key’ publicly available to all users. The key will be provided by request only. For scalability of this new infrastructure reasons, we have a need to trace the CVMFS connections, make recommendation on how to expand larger resources wherever we see problems etc ... Contact: Jerome Lauret (jlauret@bnl.gov) or Michael Poat (mpoat@bnl.gov) for further information.
9. You may need to restart autofs after adding the keys in
# systemctl restart autofs.service
10. Check to see if you can access CVMFS
# ls /cvmfs/star.sdcc.bnl.gov
RCF Contributions
This page will list and make available a few STAR contributions we made to the
RCF. Feel free to use them as needed.
LDAP scalability
The following scripts are suggested to provide a LDAP scalability. The basic idea is that LDAP lookups are flaky in the version we are using (client 2.0.27) and as a consequence, some lookups (including /usr/bin/id) fails in mass. Additionally, in our LDAP version, caching do not seem to work either.The scripts below "dump" the entry list to a local file so that network lookups are un-necessary while LDAP is still used to centralized the account information. They were written and deployed at PDSF and passed as-is to the RCF team for consideration.
create_files in /etc/cron.hourly
#!/bin/sh

#
# This script dumps the user and group data from ldap and creates standard
# UNIX passwd and group files.  This are propogated by cfengine to the compute nodes
#
# Shane Canon
# 2005

# Target destination
CFENGINE=/auto/config/nis
EXT="new"
HOST="-H ldaps://pdsfadmin02.nersc.gov/"

ldapsearch -x -L -L $HOST -b 'ou=people,o=ldapsvc,dc=nersc,dc=gov' > ldap-users.dump

# Did it work?
if [ $? -ne 0 ] ; then
  echo "Error with ldap query"
  exit -1
fi

LINES=`wc -l ldap-users.dump|awk '{print $1}'`
if [ $LINES -lt 100 ] ; then
  echo "User file from LDAP to short...exiting"
  exit -1
fi

ldapsearch -x -L -L $HOST -b 'ou=PosixGroup,o=ldapsvc,dc=nersc,dc=gov' > ldap-groups.dump

# Did it work?
if [ $? -ne 0 ] ; then
  echo "Error with ldap query"
  exit -1
fi

LINES=`wc -l ldap-groups.dump|awk '{print $1}'`
if [ $LINES -lt 100 ] ; then
  echo "Group file from LDAP to short...exiting"
  exit -1
fi

PASS="${CFENGINE}/passwd.ldap"
SHAD="${CFENGINE}/shadow.ldap"
PASSI="${CFENGINE}/passwd.ldap.int"
SHADI="${CFENGINE}/shadow.ldap.int"
GROUP="${CFENGINE}/group.ldap"
GSHAD="${CFENGINE}/gshadow.ldap"
# Temporary account
TPASS="$PASS.$EXT"
TSHAD="$SHAD.$EXT"
TPASSI="$PASSI.$EXT"
TSHADI="$SHADI.$EXT"
TGROUP="$GROUP.$EXT"
TGSHAD="$GSHAD.$EXT"

CAT="/bin/cat"
AWK="/bin/awk"
GREP="/bin/grep"
EGREP="/bin/egrep"
LN="/bin/ln"
RM="/bin/rm"
CP="/bin/cp"
SORT="/bin/sort"
CHOWN="/bin/chown"
CHMOD="/bin/chmod"
#
# Start the passwd file
# - Use the local passwd file for entries below 500
# - Ignore u70004 (its in LDAP already)
# - Ignore expired accounts
# - Sort the list by uid
$CAT /etc/passwd|$AWK -F: '{if ($3<500){print $0}}'| \
        $GREP -v u70004| \
        $GREP -v expired| \
        $GREP -v disabled| \
        $SORT -t: -n +2 > $TPASS
#
# Add in lsfadmin which is above 500
#
$GREP lsfadmin /etc/passwd >> $TPASS
$CAT /etc/passwd|$AWK -F: '{if ($4==4000){print $0}}' >> $TPASS

# This will be our new interactive passwd file
$CP $TPASS $TPASSI

# Let's create the shadow account for these entries
$CAT $TPASS|$AWK -F: '{print "^"$1":"}'|xargs -n 1 $EGREP /etc/shadow -e > $TSHAD

$CAT ldap-users.dump|./users.pl >> $TPASS

$CAT /etc/group|$AWK -F: '{if ($3<500){print $0}}'> $TGROUP

# Let's create the group shadow file for these entries
$CAT $TGROUP|$AWK -F: '{print $1":!!::"}' > $TGSHAD

$CAT ldap-groups.dump|./groups.pl >> $TGROUP


# Semi-safe copy
#
$LN -f $TPASS $PASS
$LN -f $TPASSI $PASSI
$LN -f $TGROUP $GROUP
$LN -f $TSHAD $SHAD
$LN -f $TGSHAD $GSHAD


$RM $TPASS
$RM $TPASSI
$RM $TGROUP
$RM $TSHAD
$RM $TGSHAD

$CHOWN bin.bin $SHAD
$CHOWN bin.bin $GSHAD
$CHMOD 640 $SHAD
$CHMOD 640 $GSHAD
Formatting scripts
Two add-on scripts are needed as followgroups.pl
#!/usr/bin/perl
#
# This script convert from LDAP LDIFF format to a standard UNIX group format
#
# Shane Canon
# 2005
#


while(<>){
  chop;
  if (/^$/){
  if ($dn=~/ou=PosixGroup,ou=pdsf,ou=Host,o=ldapsvc,dc=nersc,dc=gov/ ){
    createEntry();
  }
    undef $attr{homeDirectory25};
    undef $members;
  }
  else{
    ($field,$value)=split /: /;
    if ($field eq 'dn'){
      $dn=$value;
    }
    elsif($field eq 'memberUid'){
       if (defined $members){
         $members.=',';
       }
       $members.=$value;
    }
    else{
      $attr{$field}=$value;
    }
  }
}
createEntry();
foreach $id (sort {$a <=> $b} keys %groups){
   print $groups{$id}."\n";
}


sub createEntry{
  if ( $attr{gidNumber}>100 ){
     $line=sprintf "%s:x:%d:%s",
        $attr{cn},$attr{gidNumber},$members;
     $groups{$attr{gidNumber}}=$line;
  }


}
#
# Example
#
#dn: cn=m144,ou=Groups,o=ldapsvc,dc=nersc,dc=gov
#cn: m144
#gidNumber: 4883
#objectClass: top
#objectClass: PosixGroup
#memberUid: fukazawa
#structuralObjectClass: PosixGroup
#creatorsName: uid=nimrepo,ou=people,dc=nersc,dc=gov
#createTimestamp: 20040629222732Z
#modifiersName: uid=nimrepo,ou=people,dc=nersc,dc=gov
#modifyTimestamp: 20040629222732Z
#
users.pl
#!/usr/bin/perl
#
# This script convert from LDAP LDIFF format to a standard UNIX passwd format
#
# Shane Canon
# 2005
#

$SysID="";
$hdID="homeDirectory".$SysID;
$shID="loginShell".$SysID;

open(LOG,">> /var/log/ldap.log");
while(<>){
  chop;
  if (/^$/){
    if ($dn=~/people/ ){
      createEntry();
    }
    undef $attr{$hdID};
  }
  else{
    ($field,$value)=split /: /;
    if ($field eq 'dn'){
      $dn=$value;
    }
    else{
      $attr{$field}=$value;
    }
  }
}
createEntry();

foreach $id (sort {$a <=> $b} keys %users){
   print $users{$id}."\n";
}


sub createEntry{
    $id=$attr{uidNumber};
    $dir=$attr{$hdID};
    $dir=~s/\/auto\/u/\/u/;
    $shell=$attr{$shID};
    $shell=~s/\/bin\/csh/\/bin\/tcsh/;
    if ( defined $attr{$hdID} ){
      $line=sprintf "%s:x:%d:%d:%s:%s:%s",
	$attr{uid},$attr{uidNumber},$attr{gidNumber},$attr{gecos},$dir,$shell;
      print LOG "Warning: user id $id already exists! \n\t".$users{$id}."\n\t$line\n" if defined $users{$id};
      $users{$attr{uidNumber}}=$line;
#      print LOG "$id: $line\n";
    }
}
rterm
For users
rterm is a simple (well some parts are tricky) script taking advantage of either lsload or condor_status information to open an X-terminal on th least loaded available node for your group. In other words, with rterm, you do not need to know which node is overloaded / not-loaded or which one belong to your experiment: it should do the right thing for you without further knowledge. At its basic level, it uses slogin to connect to the remote processing nodes.
Basic help follows:
Syntax is
% rterm [Options] [NodeSpec] [UserName]
Currently implemented options are :
  -i         interactive mode i.e. do not open an xterm but use slogin
             directly to connect.
  -p port    use port number 'port' to connect
  -x node    Exclude 'node' from possible node to connect to. May be
             a comma separated list of nodes.
  -funky     pick a color randomly
  -bg color  pick specific color
The 'NodeSpec' argument may be a node name (specific login to a given node) or a partial node name followed by the '+' sign (wildcard). For example,
% rterm rcas6+
will open a connection on the least loaded node amongst all available rcas6* nodes. By default, this command will determine the appropriate wildcarded node specification for your GroupID. However, if this help is displayed when the command '% rterm' is used, contact the RCF support team (your group ID is probably not supported by this script).
The 'UserName' argument is also optional. If unspecified, it will revert to the current user ID.
Finally, you may modify the xterminal layout by using the following environment variables
  TERM_BKG_COLOR     sets the xterm background color
  TERM_OPTIONS       sets any other xterm options
For administrators
To make this script work, your cluster needs to- If you are using LSF: add a static resource inter to the nodes which will be accessible interactively. Of course, we assume that access is restricted/allowed to nodes on your cluster via the usual mechanism (allow/deny files)
Condor: have interactive_node matchmaking keyword in place - be sure to have the lsload (LSF) or condor_status (Condor) programs installed and configured on your gatekeeper.
- perl is used for the -funky option (random color) but is not necessary.
rterm is now accessible through STAR CVS.
Software and Libraries
This tree provides general information about STAR software and libraries, standards and conventions.
Autobuild & Code Sanity
This page will contain results from code-sanity tools i.e. tools checking for code syntax, memory leak, profiling etc ... and tips on how to correct those problems.
Most, if not all, pages here are generated automatically. If you encountered an error in the formatting, please send me a note ...
- AutoBuild compilation builds
- cppcheck and coverity dashboards (coverity not completed yet)
- Valgrind tool
- How to run: cppcheck, coverity
AutoBuild
- Official OS version (SL7.3, optimized and non-optimized, 32-bits) Linux Last AutoBuild AFS and Last AutoBuild CVMFS compilation statuses.
- Official OS version (SL7.3, optimized and non-optimized, 64-bits) Linux 64-bits AutoBuild AFS and 64-bits AutoBuild CVMFS compilation statuses.
AutoBuild is a tool which automatically builds/compiles our libraries based on what has been committed during the day. From time to time, please consult those pages and remember the following guideline for code submission into the repository :
- Code submitted to cvs must compile and run under Linux platform.
- Compilation should not give any serious warnings.
AutoBuild is self documented, just type AutoBuild.pl -h for all command line options.
AutoBuild behavior may be altered using directives. Directives are tags (key=value pairs) to be placed in a configuration file. The configuration file name is .ABrc_$^O where $^O is the string returned by the perl command % perl -e 'print $^O'. The following directives are allowed. If you have multiple values for one directive, each should be on a separate line.
- SKIP_DIRS=XXX
Excludes XXX from compilation, this directive will be passed to cons (the build system in STAR). This works only for directories.
Example:SKIP_DIRS=StEbyePool
- CO_DIRS=XXX
This directive forces the full tree to be CVS check out. Normally, AutoBuild only updates trees (which means that new sub-directories would not appear by defaults). This directive only works on directories and should not be used extensively as it is resource intensive (re-check out the entire directory).
Example:CO_DIRS=StRoot/StEEmcPool
- EX_DIRS=XXX - This directives indicates that the item XXX (already present and deployed) should be ignored from CVS UPDATE. Practically, AutoBuild will rename the item XXX to a temporary name and restore. This directive works on files or directories.
Example:EX_DIRS=StChain
- #
Not a directive per-se, this is indicate the start of a comment (the rest of the line is ignored)
Examples:SKIP_DIRS=StJetmaker # Disabled 2008/07/23 # the following lines are for blabla
Valgrind
Valgrind is a flexible tool for debugging and profiling Linux-x86 executable. The tool consists of a core, which provides a synthetic x86 CPU in software, and a series of "skins", each of which is a debugging or profiling tool.For more information valgrind, check its documentation page and the quick How to use valgrind.
Quick guide to run cppcheck
% cppcheck --force --enable=information StRoot/
In his mode, you will see all errors as it finds it.
Quickly running coverity
Nothing quick about it here as you will need to compile your code and generate the report ... But here is what you will need to do
- Add the coverity path to your PATH
% set COVPATH=/afs/rhic.bnl.gov/x8664_sl6/app/coverity-7.6.0
% set path=($COVPATH/bin $path)
% rehash
- Run a build using cov-build command. In the below command, the coverity output and results go into to a temporary directory named $MYDIR/covtmp
% cov-build --dir $MYDIR/covtmp cons -k
- "Analyze" the results (i.e. it will relate errors with one another)
% cov-analyze --dir $MYDIR/covtmp --all -j auto
- Finally, generate the HTML report
% cov-format-errors --dir $MYDIR/covtmp --filesort -x --title "Bla" --html-output $MYDIR/html
STACK_USE
Coverity uses an arbitrary limit for the checking of a single variable size allocation. This default is 10000 bytes and far too small. In C/C++ only the total number of bytes for the whole stack is relevant and this is provided by the value of stacksize (provided by the shell limit command). Our dashboard will analyze the report using a max_total_use_bytes equal to the return value stacksize from the limit command and 1/10th of that value for a single variable allocation. Any excess will be reported as a defect but may not be.
Practically, add similar options to cov-analyze command:
- --checker-option STACK_USE:max_total_use_bytes:10240000 --checker-option STACK_USE:max_single_base_use_bytes:1024000
- ...
Was also available ...
Profiling, Valgrind Results
Run-time - sorry, runtime profiling results were removed (nobody looked at them and it used lots of resources).Profiling using gprof
This section was removed as not always working and not used by out users.Library release history
Documents and information for current STAR Software releases
2007
 ---------------------
       SL02e (SL02e)    ROOT_LEVEL 3.02.07 pp and AuAu 200GeV real data production
       SL03f (SL03f)    ROOT_LEVEL 3.05.04 ppMinBias 2001/2002 rerun, pp200 Pythia
       SL03h (SL03h)    ROOT_LEVEL 3.10.01 dAu and pp data reproduction
       SL04d (SL04d)    ROOT_LEVEL 3.10.01 62 GeV production (continue with SL04e)
       SL04e (SL04e)    ROOT_LEVEL 3.10.01 AuAu 200 & 62 GeV Hijing production
       SL04f (SL04f_a)  ROOT_LEVEL 3.10.01 dAu 200GeV reproduction
       SL05a (SL05a)    ROOT_LEVEL 4.00.04 AuAu200, productionMinBias
       SL05c (SL05c)    ROOT_LEVEL 4.00.04 AuAu200 production
       SL05d (SL05d_1)  ROOT_LEVEL 4.00.04 CuCu 200&62 Gev production
       SL05e (SL05e)    ROOT_LEVEL 4.00.04 pp200 MC production
       SL05f (SL05f_3)  ROOT_LEVEL 4.04.02 pp run 2005 production
       SL05h (SL05h)    ROOT_LEVEL 4.04.02 SL 3.0.5
       SL06b (SL06b_1)  ROOT_LEVEL 4.04.02 cucu 200GeV production
       SL06d (SL06d_2)  ROOT_LEVEL 4.04.02 MC prod for SVT&SSD review
       SL06e (SL06e)    ROOT_LEVEL 4.04.02 pp 2006 production
       SL06f (SL06f_2)  ROOT_LEVEL 4.04.02 MC production for TUP
       SL06g (SL06g_2)  ROOT_LEVEL 5.12.00 MC production for TUP, SL4.4
       SL07a (SL07a_3)  ROOT_LEVEL 5.12.00 MC production, SL4.4
 old-> SL07b (SL07b_2)  ROOT_LEVEL 5.12.00 CuCu reproduction, SL4.4
 pro-> SL07c (SL07c_3)  ROOT_LEVEL 5.12.00 CuCu reproduction, pp200 pythia,SL4.4
       SL07d (SL07d_2)  ROOT_LEVEL 5.12.00 auau 200GeV, run 2007,SL4.4
 new-> SL07e (SL07e)    ROOT_LEVEL 5.12.00 auau 200GeV, run 2007,SL4.4
 dev-> DEV              ROOT_LEVEL 5.12.00 SL4.4
.dev-> .DEV             ROOT_LEVEL 5.12.00
 -------------------------------------------------
General documents
- Release organization and policy: dev -> new -> pro + frozen -> old
Release History
SL07e library
SL07d library
SL07c library
SL07b library
SL07a library
- December 21, 2007
new library SL07e (tagged as SL07e) has been created, build on SL4.4, SL3.02 and SL3.05 platforms, tested and released on January 3 to proceed with AuAu 200GeV, run 2007, production with TPC+SVT+SSD tracking.
Main features:
- final tunning of SVT/SSD calibrations and alignment and code adjustment for auau 200GeV, run 2007 production;
- triggers, daq reader, EMC and TOF codes adjustment for run 2008;
- EMC simulator completely rewritten;
Next codes have been updated:
asps/Simulation
agetof/agetof.def - definition of inch and mil added;
starsim/include/commons/agecom.inc - definition of inch and mil added;
StAnalysisMaker
summarizeEvent.cc - removed use of obsolete detector enums; job tracking messages adjusted for the new tracking schema from TxCorp;
StBFChain
StBFChain.cxx - added SetMode(1) for St_geant_Maker for embedding with PrepEmbed; added fixes for dEdx embedding; added option NoSsd to switch off SSD geometry in Sti;
BigFullChain.h - chain for run y2008 implemented;
St_base
StFileIter.cxx/h - added new files, custom version of the TFileIter to navigate the multi-TDirectrory ROOT files ;
StChain
StMaker.cxx - upgrade geometries upgr20, upgr21 & upgr14 added; y2008 geometry added;
StChain.cxx - new Db tracking schema from TxCorp implemneted;
StDaqLib
EMC/StEmcDecoder.cxx/h - added code to fix preshower swaps in 2006 and beyond;
EMC/PreshowerBug2007.txt - added code to fix preshower swaps in 2006 and beyond;
EMC/StEmcDecoder.cxx/h - added two extra support functions for TP <=> DSM module mapping; SMD crate mapping fixed for Run 7 and beyond; modified to look in EMCP first, then TrgTowerTrnfer to avoid breaking year < 2008 reading;
EMC/EMC_BarrelReader.cxx/hh, EMC_Reader.cxx/hh - updated to get tower data from TRGP in 2008++; protections against a NULL Bank_TRGP added;
modified to protect against NULL pointer dereference for data run 2008, BTOW-only data; added a version check for TTT block ;
EVP/daqFormats.h, emcReader.cxx - updated for run 2008 ;
GENERIC/DetectorReader.cxx - updated for run 2008 BEMC;
TRG/TRG_Reader.cxx/hh - modified to read rigger data 2008;
TRG/code2008.cxx, trgStructures2008.h - new files added for trigger data 2008;
StDAQMaker
StTRGReader.cxx/h - updated for trigger data 2008 ;
StDbBroker
StDbBroker.cxx/h - StDbBroker::Release added ;
StDbLib
MysqlDb.cc - fixed fallback from LoadBalancer (PDSF problem with missing Config File) ;
MysqlDb.cc/h, StDbServiceBroker.h - abstracted load balancer call from connect to own function called from reconnect, removed extraneuos methods from header ;
StDbServiceBroker.cxx - added checking Threads_running (from show status) as opposed to show processist for load balancer ;
StDbUtilities
St_svtHybridDriftVelocityC.cxx, St_svtHybridDriftVelocityC.h - modified to add new meaning for dtmin and dtmax ;
St_db_Maker
St_db_Maker.cxx/h - modified to use StDbBroker::Release;
StdEdxY2Maker
StdEdxY2Maker.cxx/h - modified to use dEdx for embedding ;
StEEmcSimulatorMaker
StEEmcSlowMaker.cxx, StEEmcSlowMaker.h - added the following features: user may specify the sampling fraction; Tower and SMD gain spreads;
StEmcADCtoEMaker
StBemcData.cxx, StEmcADCtoEMaker.cxx - added code to fix preshower swaps for 2006 and beyond;
StBemcTables mode now matched adc2e mode w.r.t. tower/prs swaps;
StEmcSimulatorMaker
rewritten version of maker, next codes are modified: StEmcPmtSimulator.cxx/h, StEmcSimpleSimulator.cxx/h, StEmcSimulatorMaker.cxx/h, StEmcVirtualSimulator.cxx/h, StPmtSignal.cxx/h - complete overhaul of the BEMC simulator; setMaximumAdc(Spread) methods allow for better simulation of BSMD ADC response;
StEmcSimulatorMaker.h - added method to access StBemcTables;
StEmcSimulatorMaker.cxx/h - modified for embedding needs; changed defaults so makeFullDetector is false and so zero suppression is turned off for BTOW;
StEmcPmtSimulator.cxx, StEmcSimpleSimulator.cxx - modified to make calibration spread only on ped-subtracted ADCs, not raw data; fixed bug so channels with zero calibrations still get a simulated pedestal;
StEmcSimulatorMaker.cxx - modified to push_back detector hits manually instead of using addHit to save time;
modified to make full pedestal simulation as default for BTOW;
StEmcRawMaker
StBemcRaw.cxx/h, StEmcRawMaker.cxx - modified to support for new BPRS swap fixes; StBemcTables now matches map fixes;
StEEmcUtil
EEmcSmdMap.h - fixed uninitialized constructor;
EEdsm/EemcTrigUtil.cxx/h - added time-dependent DSM thresholds;
StEmcUtil
database/StBemcTables.cxx/h - specified kTRUE as 2nd ctor argument to implement swapping corrections for 06/07 BPRS DB; added an optional argument to status methods to get status for calib, pedestal, and gain tables; bug fixed in trigger DB methods that used StEmcDecoder;
database/StEmcDbHandler.cxx/h - modified;
database/StBemcTablesWriter.cxx/h - added to provide common interface for inserting DB tables; modified to allow uploading of bemcTrigger* tables;
database/StBemcTablesWriter.cxx/h - modified to allow direct setting of void * table;
StEmcMixerMaker
StEmcMixerMaker.cxx - small fix to use new BEMC simulator code ;
StEmcTriggerMaker
Run2006SimuTriggerMaker.C - modified to switch order of libraries; updated StEmcSimulator gain spread conrol functions;
Run2006DataTriggerMaker.C - modified to switch order of libraries;
2006_Trigger_Map - added start and end times for each period;
StEvent
StEventSummary.h - removed obsolete method setNumberOfNegativeTracks();
StRichPidTraits.h - removed obsolete == operator ;
StPhmdDetector.cxx - added missing const version of method module();
StSvtHit.cxx/h - added new members to hold and access the number of anodes and of pixels;
StTofCell.cxx/h - added new members (mLeadingEdgeTime, mTrailingEdgeTime) and related functions;
StTpcHit.cxx/h - added several new member to hold hit length info;
StEnumerations.h, StDetectorDefinitions.h - added new enums for PXL and IST detectors;
StTrack.cxx/h, StTrackFitTraits.cxx/h - added new member to handle number of possible points for PXL and IST;
StTrackTopologyMap.cxx/h - added PXL and IST;
StEventLinkDef.h, StEventClusteringHints.cxx - added class StTriggerData2008 ;
StTriggerData2008.cxx/h - initial revision of trigger data 2008 ;
StTofRawData.cxx/h - added new data member mTray plus access functions, new overloaded constructor;
StFmsTriggerDetector.cxx/h, StTriggerData2008.cxx - fixed bug in QT decoding;
StEventDisplayMaker
StEventControlPanel.cxx, StEventDisplayMaker.cxx - added GEANT volume to represent SSD;
StEventUtilities
StuFixTopoMap.cxx - added filling from PXL and IST;
StFtpcTrackMaker
StFtpcTrackingParams.cc - added code which enables testing rotation values without changing the database;
StFtpcTrackMaker.cxx - modified to use the first primary vertex if any primary vertex exists; multiple primary vertices have been ordered in StEvent;
StFtpcTrackToStEvent.cc, StFtpcTrackingParams.cc - standardized logger messages;
StFtpcClusterMaker
StFtpcDbReader.cc - added code to mask out Ftpc East sectors 1,3 and 5, necessary for calculating rotation offset values when one sector is turned off as was the case for the 2007 RFF runs;
StFtpcClusterMaker.cxx - standardized logger messages;
St_geant_Maker
StPrepEmbedMaker.cxx - modified not to use field set from GEANT;
St_geom_Maker
GeomBrowser.ui.h, GeomBrowser.ui - changed gPAd to force 3d view update; introduced multiply selection mode; changed visibility by group;
added color/file dialog tochnage the color attributes and save the new object into the ROOT file;
StLaserEvent
StLaserEvent.h - added default AddTrack;
StLaserEventMaker
StLaserEventMaker.cxx - modified to Make laser tree splitted;
StLaserAnalysisMaker
CheckMirrors.C, LaserEvent.h, LoopOverLaserTrees.C, StLaserAnalysisMaker.cxx - modified and freez version for run VII;
LASERINO.h, Laser.C, LaserEvent.cxx/h, LoopOverLaserTrees.C, RaftMirror.C, laserino.h - modified to add Id and Log and spelling;
StJetMaker
StBET4pMaker.cxx/h - added setUse2005Cuts to reject east barrel tower hits in jet finding;
StarMagField
StarMagField.cxx/h - added mag.field in steel; removed root dependecies; removed ClassDef and ClassImp;
StMcEvent
StMcEmcHitCollection.cc, StMcEmcModuleHitCollection.cc/hh - modified to include a EMC hit collection that does not care about parent tracks, so that now there are two collections. This new collection will be useful to compare all the deposited energy in a hit tower in a given event. The information about the track parentage is still kept in the original collection unchanged ;
StMcContainers.hh, StMcEvent.cc/hh, StMcEventLinkDef.h, StMcEventTypes.hh, StMcTrack.cc/hh - modified to rename Hft => Pxl, remove Hpd, Igt and Fst ;
removed files: StMcFstHit.cc/hh, StMcFstHitCollection.cc/hh, StMcFstLayerHitCollection.cc/hh, StMcHpdHit.cc/hh, StMcHpdHitCollection.cc/hh, StMcHpdLayerHitCollection.cc/hh,StMcIgtHit.cc/hh, StMcIgtHitCollection.cc/hh, StMcIgtLayerHitCollection.cc/hh ;
StMcEventMaker
StMcEventMaker.cxx/h - modified to rename Hft => Pxl, remove Hpd, Igt and Fst ;
StMiniMcMaker
StMiniEmbed.C - modified to use bfc.C for loading shared libraries;
StMuDSTMaker
COMMON/StMuEmcTowerData.h - removed declaration of unimplemented DeleteThis function;
COMMON/StMuEmcUtil.cxx - changed to avoid 'static initialisation order fiasco';
COMMON/StMuEvent.cxx/h - added calibrated VPD info from StTofCollection (run-8 prep);
COMMON/StMuDst.cxx/h, StMuTrack.cxx/h, StMuPrimaryVertex.cxx/h - added basic printing functionality for convenience and to assist data consistency checks;
COMMON/StMuTrack.cxx/h - added Ist and Pixel hits to mNPossInner and mNFitInner ;
StPass0CalibMaker
StVertexSeedMaker.cxx/h - modified to Move valid triggers from code to DB ;
StPixelFastSimMaker
StPixelFastSimMaker.cxx - renamed Hft => Pxl, removed Hpd, Igt and Fst; modified for pileup hit read in;
digitized Pixel, removed all hit smearing, and implemented idTruth;
fixed bug causing pixel fast simulator to crash when there were no pixel and/or ist hits in the event;
fixed a bug that put hits with local x or z position between -30 and 0 microns in the pixel corresponding to local x or z position between 0 and 30 microns;
fixed problem with assigning keys and IdTruth values to StRndHits;
StPreEclMaker
StPreEclMaker.cxx - small changes to use new BEMC simulator code ;
StRTSClient
FCFMaker/FCFMaker.cxx - modified to fill size of cluster and local coordinate in StTpcHit;
StSsdDbMaker
StSsdDbMaker.cxx/h - added m_Mode to constructor;
StSsdPointMaker
StSsdPointMaker.cxx/h - modified to use m_Mode to switch between pedestals used in real data/simulation ;
StSvtClusterMaker
StSvtHitMaker.cxx - modified to save out number of pixels and hits into StEvent hits; added reject for hits for invalid drift regions;
StSvtSimulationMaker
StSvtSimulationMaker.cxx/h - added routines to move SVT hits from GEANT geometry to real geometry;
StTofCalibMaker
StTofCalibMaker.cxx - removed tdcId in tofZCorr for tofZCorr; tdcId is not defined in db, and removed from idl definition ;
StTofrMatchMaker
StTofrMatchMaker.cxx, StTofrMatchMaker.h - updated for run 2008;
StTofrMatchMaker.cxx - added trayId for vpd in StTofCell: 901 (E), 902 (W), dataIndex for vpd in StTofData: use 121 and 122 as trayId;
StTofrMatchMaker.cxx/h - changed vpd trayId definition to 121 (East) and 122 (West);
StTofUtil
StSortTofRawData.cxx/h, StTofrDaqMap.cxx/h - updated for run 2008:added trayId member in RawData; added new Daq map table for run8++; new StTofINLCorr class for inl correction ;
StTofINLCorr.cxx, StTofINLCorr.h - first release for run 2008++;
StTofrDaqMap.cxx, StTofrDaqMap.h - added ValidTrays() for multi-tray system;
StTofINLCorr.h - vpd trayId changed to 121 (East) and 122 (West);
StTriggerDataMaker
StTriggerDataMaker.cxx - updated for trigger data 2008;
StTriggerUtilities
new module implemented to proceed with L2 trigger simulation and analysis, first release;
StTpcDb
StTpcdEdxCorrection.cxx/h - added fixes for for dEdx embedding;
StTpcDb.cxx - added protection from laserDriftVelocity and cathodeDriftVelocity mixing;
St_QA_Maker
StEventQAMaker.cxx - modified to use highest rank primary vertex;
StEventQAMaker.cxx/h, StQABookHist.cxx/h, StQAMakerBase.cxx/h - modified for Run 2008, mostly silicon removal, TOF addition;
StEventQAMaker.cxx, StQAMakerBase.cxx - updated for trigger words, run 2008;
St_srs_Maker
St_srs_Maker.cxx/h - modified to syncronize srs parameters with Calibrations/tracker/svtHitError ;
StarRoot
TDirIter.cxx - error messages added;
THelixTrack.cxx/h - distance to helix & circle added;
TCFit.cxx/h - added class with Fit+Constrains; added mode TCFitV0::Test(mode);
Sti
StiHit.cxx - fixed bug related to Z rotation must change xz yz in error matrix;
StiKalmanTrack.cxx/h - member mgMaxRefiter added;
StiKalmanTrackFinder.cxx, StiTrackFinder.h - modified to change combinatorics handle;
StiKalmanTrackFinder.cxx/h - timer introduced; renamed Hft->Pxl, removed Hpd;
StiMaker
StiMaker.cxx - attribute useTreeSearch added ;
StiMaker.cxx/h - timer introduced;
StiMaker.cxx, StiStEventFiller.cxx - renamed Hft => Pxl ;
StiPixel
StiPixelDetectorBuilder.cxx, StiPixelHitLoader.cxx - renamed Hft => Pxl, removed Hpd, Igt and Fst;
removed files: StiHpdDetectorBuilder.cxx/h, StiHpdDetectorGroup.cxx/h, StiHpdHitLoader.cxx/h, StiHpdIsActiveFunctor.cxx/h ;
StiRnD
StiRnDLinkDef.h - renamed Hft => Pxl, remove Hpd, Igt and Fst ;
Hft/StiPixelDetectorBuilder.cxx, StiPixelHitLoader.cxx - renamed Hft => Pxl, removed Hpd, Igt and Fst ;
Hft/StiPixelDetectorBuilder.cxx/h - modified to activate hit errors from DB;
Hpd - code removed;
StiUtilities
StiPullEvent.cxx/h - added pull entries for Pxl and Ist ;
StStarLogger
MySQLAppender.cxx - further development; new Db tracking schema from TxCorp implemented;
DumpMessages.csh, dumpUCMDB.csh - new files added;
mysql/CreateUCMDB.sql, NetLogger.xml, StarJobs.csh, bfc_bnl.xml - further development; new Db tracking schema from TxCorp implemented;
mysql/ConsTx.csh - added script to complile Tx stuf ;
ucm/UCMBuild.csh - added script to build UCM systemn with cons;
pams
geometry/bbcmgeo/bbcmgeo.g - material ALKAP fixed;
geometry/mutdgeo/mutdgeo.g - modified;
geometry/mutdgeo/mutdgeo2.g, mutdgeo3.g - added new mtd geometries;
geometry/geometry/geometry.g - added upgr20, upgr21 & upgr14 upgrade geometries; y2008 TOFr geometry updated; y2008 geometry; btofgeo6 added; pipeFlag and Nsi==7 added;
geometry/fgtdgeo/fgtdgeo1.g, fgtdgeo.g - material ALKAP fixed;
geometry/fpdmgeo/fpdmgeo3.g - some corrections from E.Braidot;
geometry/mfldgeo/mflddat.g, mfldgeo.g, mfldmap.g - modified to hide magnetic field;
geometry/btofgeo/btofgeo5.g - updates for y2008 TOFr geometry;
geometry/btofgeo/btofgeo6.g - added;
geometry/igtdgeo/igtdgeo.g - material ALKAP fixed;
geometry/itspgeo/itspgeo.g - material ALKAP fixed;
geometry/pipegeo/pipegeo.g - material ALKAP fixed and lengths of shields swapped; MLI=3MIL mylar + 1.5MIL alum defined;
geometry/scongeo/scongeo.g - y2008 geometry implemented ;
geometry/svttgeo/svttgeo.g, svttgeo1.g, svttgeo2.g, svttgeo3.g, svttgeo10.g, svttgeo4.g, svttgeo5.g, svttgeo6.g, svttgeo7.g,svttgeo9.g - material ALKAP fixed and innermost radius increased;
tpc/idl/tcl_tphit.idl - added local coordinates;
QtRoot
qtgui/src/TQtCanvasWidget.cxx, TQtGuiFactory.cxx - adjusted qtroot interface for ROOT 5.17/05;
qtgui/inc/TQtCanvasWidget.h, TQtGuiFactory.h - adjusted qtroot interface for ROOT 5.17/05;
qtgl/qtgl/inc/TQGLViewerImp.h - modified to change the signal signature for the multithread env;
qtgl/qtcoin/src/TQtCoinViewerImp.cxx - modified to change the signal signature for the multithread env;
qtgui/Module.mk - adjusted qtroot interface for ROOT 5.17/05;
qtroot/inc/TQtRootGuiFactory.h - adjusted qtroot interface for ROOT 5.17/05;
StarDb
Calibrations/tpc/TpcLengthCorrectionB.20070321.000041.C, TpcSecRowB.20070321.000040.root, tpcPressureB.20070321.000002.C - new files added, later moved to mysql and removed from AFS; needed for runVII, FullField dE/dx calibrations;
Calibrations/tpc/TpcSecRowB.20070524.000044.root - adjusted for ReversedFullField, later moved to mysql and removed from AFS;
Calibrations/tpc/TpcLengthCorrectionB.20070321.000041.C, TpcSecRowB.20070321.000040.root, tpcPressureB.20070321.000002.C - restored these tables because in MySQL they are appeared with beginTime = 0 ;
Calibrations/tpc/TpcLengthCorrectionB.20070321.000042.C - added min/max for error estimations. later moved to Mysql and removed from AFS;
Calibrations/tpc/TpcAdcCorrectionB.20010924.000000.C, TpcdXCorrectionB.20010924.000000.C, TpcEdge.20010924.000005.C, TpcLengthCorrectionB.20010924.000004.C, tpcPressureB.20010701.000000.C, TpcSecRowB.20010924.000000.C, TpcZCorrectionB.20010924.000000.C, TpcSecRowB.20010924.000003.root - added dE/dx calibration for Run II AuAu20, later moved to Mysql;
Calibrations/tracker/PixelHitError.upgr01.C, PixelTrackingParameters.upgr01.C - added new files;
Calibrations/tracker/PrimaryVertexCuts.20011125.120000.C,PrimaryVertexCuts.20011127.000000.C - added files to open cuts for 20GeV AuAu data, and back to default after;
Calibrations/tracker/PixelHitError.upgr01.C, PixelTrackingParameters.upgr01.C - added new files;
Calibrations/tracker/hftHitError.upgr01.C hftTrackingParameters.upgr01.C, hpdHitError.20050101.000000.C - removed ;
Calibrations/tracker/tpcInnerHitError.20070524.000210.C, tpcOuterHitError.20070524.000210.C, svtHitError.20070321.000212.C - added new files with the errors for Run 2007 RFF;
Calibrations/tracker/ssdHitError.20070321.000211.C, svtHitError.20070321.000211.C, svtHitError.20070524.000211.C - added new files with the errors for run 2007;
svtHitError.20070524.000210.C - removed ;
Calibrations/svt/svtHybridDriftVelocity.20070524.000201.C - added first version of SVT drift velocity for run 2007 RFF;
Calibrations/svt/svtHybridDriftVelocity.20070524.000210.C, svtHybridDriftVelocity.20070321.000209.C - more drift velocities for Run 2007;
Geometry/svt/ShellOnGlobal.20070524.000038.C, SvtOnGlobal.20070524.000031.C - added first version of SVT alignment for run 2007 RFF;
Geometry/svt/LadderOnShell.20070524.000209.C, LadderOnShell.20070321.000206.C - added new files for SVT ladder position for Run 2007;
Geometry/svt/ShellOnGlobal.20070321.000032.C, SvtOnGlobal.20070321.000031.C - added final version for alignment, run 2007;
Geometry/ssd/SsdOnGlobal.20070524.000031.C, SsdSectorsOnGlobal.20070524.000038.C - added first version of SSD alignment for run 2007 RFF;
Geometry/ssd/SsdLaddersOnSectors.20070524.000209.C, SsdLaddersOnSectors.20070321.000207.C - added SSD ladder positions for run 2007;
Geometry/ssd/SsdSectorsOnGlobal.20070321.000032.C, SsdOnGlobal.20070321.000031.C - added last version for alignment, run 2007;
RunLog/onl/tpcRDOMasks.dev2005.C, tpcRDOMasks.upgr13.C, tpcRDOMasks.upgr14.C - added special tpcRDOMasks for upgr13, keep all other upgrade versions IDEAL;
RunLog/onl/tpcRDOMasks.20071128.13225.C - added default RDO mask for y2008;
svt/srspars/srs_direct.C - removed ;
VmcGeometry/Geometry.upgr20.C, Geometry.upgr21.C, upgr20.h upgr21.h - new upgrade geometries added;
VmcGeometry/Geometry.upgr14.C, upgr14.h - upgr14 geometry files added ;
VmcGeometry/Geometry.y2008.C, y2008.h - added files for year 2008 geometry ;
StDb
servers/dbLoadBalancerLocalConfig_BNL.xml - added dev node to analysis; modified to keep DB01 night only for all - day for developers; added db10; added a machine power reducing the general usage of db10; added db06 replacement; added additional server db11;
servers/dbLoadBalancerLocalConfig_LBL.xml - added config for PDS;
idl/tofDaqMap.idl, tofINLCorr.idl, tofTDIGOnTray.idl - added new TOF tables;
idl/vertexSeedTriggers.idl - introduced vertexSeedTriggers table;
idl/tofZCorr.idl - removed tcdId column;
idl/svtHybridDriftVelocity.idl - modified to add new meaning for dtmin and dtmax;
- December 3, 2007
SL07d library was updated with code
StPmdReadMaker
StPmdReadMaker.cxx - modified to change SMChain_GNF from MPVFactor to MeanFactor to proceed with PMD production.
Library was retagged with tag SL07d_3
- November 2, 2007
SL07d library was updated with next codes below to proceed with veterx reconstruction for UPC data and improved PMD code:
StBFChain
BigFullChain.h, StBFChain.cxx - min2trkVtx option implemented to process with min 2 trackd for vetex finding;
StGenericVertexMaker
StGenericVertexMaker.cxx/h - modified to allow 2 min tracks vertex-finding with option in bfc.c;
Minuit/StMinuitVertexFinder.cxx - modified to allow 2 min tracks vertex-finding;
StPmdClusterMaker
StPmdClusterMaker.cxx,StPmdClustering.cxx/h - modified for applying hit calibrations;
StPmdReadMaker
StPmdReadMaker.cxx - modified to store gains with hits, not applying gain calibration;
StPmdUtil
StPmdGeom.h/cxx - public GetPmdZ added to get PMD z position;
StPmdHit.h - members and setters cellgain, smchaingain, cellstatus added;
All library was retagged with tag SL07d_2
- October 12, 2007
SL07d library was updated with next codes below to fix bugs in EMC & SSD codes caused memory ovewriting and BSMD mapping bug for run 2007.
Modification to StEvent added to save number of pixels and SVT hits.
Next codes have been updated:
StDaqLib
EMC/StEmcDecoder.cxx/h;
EVP/ssdReader.cxx/h,emcReader.cxx/h, scReader.cxx/h, daqFormats.h, evpSupport.cxx;
StEvent
StSvtHit.cxx/h ;
StSvtClusterMaker
StSvtHitMaker.cxx ;
Updated SL07d library was retagged with tag SL07d_1 and rebuild.
- September 1, 2007
new library SL07d (tagged as SL07d) has been created, build on SL4.4, SL3.02 and SL3.05 platforms, tested, found bugs have been fixed.
Library was released at September 12 for AuAu 200GeV, run 2007, production.
Main features:
- last tunning, improvements, bug fixes to process with auau 200GeV, run 2007 production;
Next codes have been updated:
StBFChain
StBFChain.cxx/h - EventLoop(...) added; 2nd EventLoop() method added;
BigFullChain.h, StBFChain.cxx/h, StBFChainLinkDef.h - added options for LaserAnalysis;
modified SetGeantOptions and SetDbOptions;
BigFullChain.h, StBFChain.cxx - removed requirement to skip1row from P2007 chains, StMaker will take of it;
StBeamBackMaker
Track.cc - added include TMath.h for ROOT 5.16;
StChain
StMaker.cxx/h - added fTopChain: a pointer to TopChain (for embedding); added method GetMakerInheritsFrom;
StDaqLib
EMC/StEmcDecoder.cxx - updated to fix panitkin plot compile; scalers added;
SC/SC_Reader.cxx/hh - scalers added;
SVT/SVTV1P0_ZS_SR.cxx - scalers added;
GENERIC/DetectorReader.cxx - scalers added;
EVP/daqFormats.h, ssdReader.cxx,scReader.cxx/h - scalers added;
StDAQMaker
StDAQMaker.cxx, StDAQReader.cxx/h, StSCReader.cxx/h - scalers added;
StDbLib
StDbBuffer.cc - bug fixed for unsigned datatypes;
StDbManagerImpl.cc - modified ;
MysqlDb.cc - modified to increased the number of allowed elements in a comma delimeted text field from 100 to 1024 to allow for the 768 ssd strips;
New version of Load Balancer created, next files are modified:
ChapiDbHost.cxx/h, ChapiStringUtilities.h, Makefile, MysqlDb.cc, StDbBuffer.cc, StDbManagerImpl.cc/hh,
StDbModifier.cxx/h, StDbServiceBroker.cxx/h, StDbSql.cc, StDbTable.cc, StDbXmlReader.cc, StlXmlTree.cxx/h, rules.make
StDbUtilities
StTpcCoordinateTransform.cc/hh - modified to make TPC drift velocity dependent on West/East half;
StMagUtilities.cxx/hh - modification for StDetectorDbSpaceChargeR2;
StDetectorDbMaker
number of codes modified:
StDetectorDbBeamInfo.h, StDetectorDbClock.h, StDetectorDbFTPCGas.h, StDetectorDbFTPCVoltage.h, StDetectorDbFTPCVoltageStatus.h,
StDetectorDbGridLeak.h, StDetectorDbIntegratedTriggerID.h, StDetectorDbMagnet.h, StDetectorDbMaker.cxx/h,
StDetectorDbRichScalers.h, StDetectorDbSpaceCharge.h, StDetectorDbTpcOmegaTau.h, StDetectorDbTpcRDOMasks.h, StDetectorDbTpcVoltages.h, StDetectorDbTriggerID.h ;
new codes added:
StDetectorDbChairs.cxx, St_L0TriggerInfoC.h, St_additionalTriggerIDC.h, St_beamInfoC.h, St_defaultTrgLvlC.h,
St_dsmPrescalesC.h, St_ftpcGasOutC.h, St_ftpcGasSystemC.h, St_ftpcVoltageC.h, St_ftpcVoltageStatusC.h, St_richvoltagesC.h,
St_spaceChargeCorC.h, St_starClockOnlC.h, St_starMagOnlC.h, St_tpcGasC.h, St_tpcGridLeakC.h, St_tpcHighVoltagesC.h,
St_tpcGasC.h St_tpcGridLeakC.h St_tpcHighVoltagesC.h St_tpcOmegaTauC.h St_tpcRDOMasksC.h St_trigDetSumsC.h,
St_trigL3ExpandedC.h, St_trigPrescalesC.h, St_triggerIDC.h, t_triggerInfoC.h, St_y1MultC.h ;
to provide access to Db tables by demand only;
St_MagFactorC.h, St_TpcSecRowCorC.h, St_tpcDimensionsC.h, St_tpcDriftVelocityC.h, St_tpcEffectiveGeomC.h ;
St_tpcElectronicsC.h, St_tpcFieldCageC.h, St_tpcFieldCageShortC.h, St_tpcGainMonitorC.h, St_tpcGlobalPositionC.h;
St_tpcOSTimeOffsetsC.h,St_tpcPadPlanesC.h, St_tpcPadResponseC.h, St_tpcPedestalC.h ;
St_tpcSectorPositionC.h, St_tpcSlowControlSimC.h, St_tpcWirePlanesC.h, St_trgTimeOffsetC.h, St_tss_tssparC.h;
to make access to tables trigL3Expanded,dsmPrescales,additionalTriggerID,trigPrescales optional, i.e. if the table does not exist for this time then it is created empty table with 0 no. of rows ;
removed files:
StDetectorDbBeamInfo.cxx, StDetectorDbClock.cxx, StDetectorDbFTPCGas.cxx, StDetectorDbFTPCVoltag.cxx;
StDetectorDbFTPCVoltageStatus.cxx, StDetectorDbGridLeak.cxx, StDetectorDbIntegratedTriggerID.cxx, StDetectorDbMagnet.cxx ;
StDetectorDbRichScalers.cxx, StDetectorDbSpaceCharge.cxx, StDetectorDbTpcOmegaTau.cxx, StDetectorDbTpcRDOMasks.cxx ;
StDetectorDbTpcVoltages.cxx, StDetectorDbTriggerID.cxx;
StDbUtilities
StSvtCoordinateTransform.cc - bug fixed in local to wafer transform that meant we only ever converted hits with positions 0,0,0 rather than their true local coordinate;
StEEmcUtil
EEdsm/BemcTrigUtil.cxx, EEdsm0.cxx/h, EEdsm1.cxx/h, EEdsm3.cxx/h, EEmapTP.h - modified ;
EEdsm/BEdsm2.cxx/h, EEdsm0Tree.cxx/h, EEdsm1Tree.cxx/h, EEfeeTP.cxx/h, EEfeeTPTree.cxx - new files added for Endcap trigger simulation ;
StEmcSimulatorMaker
StEmcSimulatorMaker.cxx - modified to delete mEmcCollection if set mEmbed; fixed a logic error in logging
StEmcUtil
projection/StEmcPosition.cxx - modified to use outerGeometry() instead of geometry() for StTrack projections;
geometry/StEmcGeom.h - added projection against sub == -1 case in getId(phi,eta,softId);
database/StBemcTables.cxx/h - modified to make trigger DB tables accessible by softId; validity range of each new DB table is logged; wrapper methods using return values instead of pass-by-reference);
added methods to get beginTime / endTime of a given DB table;
StEpcMaker
StPointCollection.cxx - bug fixed;
StEstMaker
StEstMaker.cxx - added includes for ROOT 5.16;
StEvent
StEventTypes.h - added FMS and MTD trigger detector classes;
StTriggerData2007.cxx/h, StTriggerData.h - added two new members mtdAdc() and mtdTdc();
StFmsTriggerDetector.cxx/h - added new code for FMS trigger detector;
StMtdTriggerDetector.cxx/h - added new code for MTD trigger;
StTriggerDetectorCollection.cxx/h - added FMS and MTD;
StTofCollection.cxx - fixed problem in numberOfVpdEast() and numberOfVpdWest();
StEventDisplayMaker
StEventDisplayMaker.cxx/h - modified to to allow selection one event by event id;
StEventUtilities
BetheBlochFunction.hh, StEventHelper.cxx - changed includes for ROOT 5.16 ;
StFlowMaker
StFlowMaker.cxx - added includes for ROOT 5.16;
StFlowAnalysisMaker.cxx - method chi() revised to improve resolution;
StFtpcCalibMaker
StFtpcLaser.cc - added includes for ROOT 5.16;
StGenericVertexMaker
StGenericVertexMaker.cxx - modified to define initial values as 0 for local variables;
StJetMaker
StJet.cxx/h - added data members for zVertex and geometric trigger associations, plus methods for detEta (barrel only);
StJetSkimEvent.cxx - modified to reorder initializations to comply with gcc compiler;
StLaserAnalysisMaker
Laser.C, LaserEvent.cxx/h, StLaserAnalysisMaker.cxx - modified to process with data for run 2007;
CheckLasers.C, CheckMirrors.C, ConverL.C, LoopOverLaserTrees.C, laserino.h - added new files to process with data from run 2007;
StMcEventMaker
StMcEventMaker.cxx - fixed bug in assigning parents to event-generator particles;
StMuDSTMaker
EZTREE/EztEventHeader.h - added includes for ROOT 5.16 ;
COMMON/StMuProbPidTraits.h, StMuTrack.cxx - added includes for ROOT 5.16 ;
COMMON/StMuChainMaker.cxx - modified to avoid reading all input files on initialisation: if the number of events is 0'for a given file, set it to TChain::kBigNumber;
COMMON/StMuEvent.h, StMuDstMaker.cxx - modified to switch off Q-vector branhces in StMuDstMaker and increase version number in StMuEvent to avoid warning when reading P07ib data with more recent libraries;
COMMON/StMuDstMaker.cxx, StMuIOMaker.cxx - added protection against corrupted files by checking for return code -1 from TTree:GetEntry().StMuDstMaker will silently skip these events;
COMMON/StMuEvent.h, StMuEvent.cxx - added StMtdTriggerDetector info;
StPass0CalibMaker
StVertexSeedMaker.cxx- added includes for ROOT 5.16 ;
StPidAmpMaker
PIDFitter.cxx - added includes for ROOT 5.16 ;
StPmdCalibrationMaker
StPmdCalibConstMaker.cxx - added includes for ROOT 5.16 ;
StPmdClusterMaker
StPmdClustering.cxx/h - modified to set cutoff from SetAdcCutOff(); default cutoff=7;
StPmdClusterMaker.cxx/h - modified to include ReadCalibration to read PMD_MIP value from DB ;
StPmdReadMaker
StPmdCleanConstants.cxx/h - added new class to hold Badchains/BadRuns and limiting values for analysis;
StPmdReadMaker.cxx/h - added routines to read badchains,HotCells,Cell_GNF,SMChain_GNF ; modified VMEcondition&ApplyMapping; added includes for ROOT 5.16 ;
StPmdUtil
StPmdMapUtil.cxx - changed initialization of channelOR,CR,chainR to -1; added includes for ROOT 5.16 ;
StPmdGeom.cxx - removed a warning on chtemp ondate 31/08/07; added includes for ROOT 5.16 ;
StRareMaker
StL3RareTrack.h - added includes for ROOT 5.16 ;
StRichPIDMaker
StRichTrack.cxx, TreeEntryClasses.cxx - added includes for ROOT 5.16 ;
StRTSClient
FCFMaker/FCFMaker.cxx/h - modified to use Drift velocity depending on sector;
StSpinMaker
StppGeant.cxx - added includes for ROOT 5.16 ;
StSsdDaqMaker
StSsdDaqMaker.cxx - modified not to read whole database but only the table requested;
StSsdDbMaker
StSsdDbMaker.cxx - modified not to read whole database but only the table requested ;
StSsdFastSimMaker
StSsdFastSimMaker.cxx/h - new module for SSD fast simulation;
StSsdPointMaker
StSsdPointMaker.cxx/h - added method to evaluate the reconstruction efficiency;
added 0's to Timestamp which size is less than 6 digits;
added switch to read old ssdStripCalib Table and new ssdNoise Table ;
added a normalization for the reconstruction efficiency histograms;
added method to fill with default pedestal/noise values if no table is found;
modified to use ssdStripCalib table for simulation;
StSsdUtil
StSsdWafer.cc/hh - added method to remove strips which signal < 3*rms ; protection against died objects added
added protection against division 0/0;
StSsdBarrel.cc/hh - added method to decode new ssdNoise Table;
StSsdBarrel.cc/hh - added default pedestal/noise ; noise value is 60/16 = 3.75 adc ;
StSsdPoint.cc - modified to make Gain calibration using the mapping method instead of the rotating vector;
StStrangeMuDstMaker
DcaService.cxx, StStrangeControllerInclude.h - added includes for ROOT 5.16 ;
StSvtClusterMaker
StSvtClusterAnalysisMaker.cxx/h, StSvtHitMaker.cxx - modified to move initialization to IntRun from Init;
StSvtDbMaker
StSvtDbMaker.cxx/h - modified to move access of Db tables by demand; modified to make request for SvtGeometry from GetRotations;
StSvtSeqAdjMaker
StSvtSeqAdjMaker.h - added forward declaration for ROOT 5.16;
StSvtSimulationMaker
StSvtEmbeddingMaker.cxx/h,StSvtSimulationMaker.cxx - modified to read DB by demand;
StSvtOnlineSeqAdjSimMaker.cxx - modified to ensure that number of anodes and timebins is set properly;
StTableUtilities
St_dst_trackC.cxx/h - added includes for ROOT 5.16 ;
StTpcDb
StRTpcElectronics.cxx/h, StTpcDb.cxx/h, StTpcDbMaker.cxx - made drift velocity depends on TPC half, use online RHIC clock;
StRTpcElectronics.cxx, StTpcDb.cxx/h - modified to use separated East/West drift velocities only for year >= 2007, for backward compartibility;
StTpcHitFilterMaker
StTpcHitFilterMaker.cxx - added includes for ROOT 5.16 ;
StTpcHitMoverMaker
StTpcHitMoverMaker.cxx - added option to not move Simulated hits ;
StTrsMaker
StTrsMaker.cxx - modified to use StarLogger and time of flight, fixed cluster shape ;
include/StTrsDigitalSector.hh - modified to use StarLogger and time of flight;
src/StTrsFastDigitalSignalGenerator.cc, StTrsParameterizedAnalogSignalGenerator.cc, StTrsSector.cc, StTrsSlowAnalogSignalGenerator.cc - modified to use StarLogger and time of flight, fixed cluster shape ;
StVeloMaker
StVeloMaker.cxx - added includes for ROOT 5.16 ;
StUtilities
StMultiH1F.cxx - added includes for ROOT 5.16 ;
StarRoot
TAttr.cxx/h, TH1Helper.cxx, TPolinom.cxx, xTCL.cxx/h - added includes for ROOT 5.16 ;
THelixTrack.cxx/h - TCircleFitter::Fit modified logic; removed member fMax from THelixTrack;
St_db_Maker
St_db_Maker.cxx/h - added parameter currenTime (== requested time) in FindLeft ;
StPrepEmbedMaker.cxx/h - new maker for embedding added ;
St_geant_Maker.h - added includes for ROOT 5.16 ;
StPrepEmbedMaker.cxx/h - added some calls for GEANT simulation of embedded particles;
St_geom_Maker
GeomBrowser.ui, GeomBrowser.ui.h - added protection for viwer pointer ;
StGeomBrowser.h - added includes for ROOT 5.16 ;
St_l3t_Maker
St_l3t_Maker.cxx - added includes for ROOT 5.16 ;
Sti
StiTrackNodeHelper.cxx/h - modified to move hit with time of flight ;
StiKalmanTrackNode.cxx - bug fixed in getPt(); modified to use normal radius instead of layer one;
StiKalmanTrack.h, StiKalmanTrackFinder.cxx - argument added to approx();
StiKalmanTrack.cxx - new better THelix fit developed; path to hit implemented in 2dim space only;
StiKalmanTrackNode.cxx - initialization of _sinCA and _cosCA ;
StiTrackNode.cxx - wrong sign in correlation fixed;
StiTpc
StiTpcHitLoader.cxx - modified to use West/East depending drift velocity;
StTriggerUtilities
new modules created for triggers simulation study:
- Bbc;
- Bemc;
- Eemc;
- TrgEmulatorEMC;
macros/embedding
bfcMixer_P07ib.C - added macro to run embedding for P07ib production;
pams
geometry/svttgeo/svttgeo9.g - added new file as first approximation of the SVT-less configuration in year 2008 ;
geometry/svttgeo/svttgeo10.g - added newest correction from Dave Lynn -- the water channels were eventually manufactured from Carbon as opposed to the originally proposed Beryllium;
geometry/geometry/geometry.g - added the following geometry tags: Y2008, UPGR14 (UPGR13 without IST), DEV2007 (sandbox for what-if studies); modified for newest SVT geometry corrections; new tag Y2007A implemented;
StarDb
Calibrations/ftpc - added ftpcVoltage.C, ftpcVoltageStatus.C;
Calibrations/tpc - added tpcGridLeak.C, tpcOmegaTau.C;
Calibrations/rich - added richvoltages.C, spaceChargeCor.C, spaceChargeCorR2.C, trigDetSums.C;
Calibrations/tracker - added PrimaryVertexCuts.20070101.000000.C;
StMagF/steel_magfieldmap.dat - added file for mag. field map in steel;
StDb
idl/pmdSMChain_GNF.idl - added table for PMD gain normalization factor; added _factor to column names;
idl/ssdNoise.idl - ssdNoise Table added;
- October 3, 2007
SL07c library was updated with codes below to fix bugs in EMC & SSD codes caused memory ovewriting.
Next codes have been updated:
StDaqLib
EVP/ssdReader.cxx/h,emcReader.cxx/h, scReader.cxx/h, daqFormats.h, evpSupport.cxx;
SL07c librray was retagged with tag SL07c_3 and rebuild.
- August 10, 2007
SL07c library has been updated with codes below to make patches for SL4.4 platform:
- StDbBroker
StDbWrappedMessenger.cc ;
- StDetectorDbMaker
StDetectorDbClock.cxx ;
StDetectorDbMaker.cxx;
- StTpcDb
StRTpcDimensions.cxx/h, StRTpcElectronics.cxx/h, StRTpcFieldCage.cxx/h, StRTpcGlobalPosition.cxx/h,
StRTpcHitErrors.cxxh, StRTpcPadPlane.cxx/h, StRTpcSectorPosition.cxx/h, StRTpcSlowControlSim.cxx/h,
StRTpcWirePlane.cxx/h, StTpcDbMaker.cxx/h,
- StStarLogger
StLoggerManager.cxx/h;
- StJetMaker
StJetHist/StJetHistMaker.cxx;
SL07c library was rebuild and retagged with tag SL07c_2.
- August 2, 2007
library SL07c was updated with codes below to switch off Q-vector branhces in StMuDstMaker to avoid warnings when reading P07ib data which has Q-vector information stored :
- StMuDstMaker
COMMON/StMuEvent.h, StMuDstMaker.cxx
Updated codes were retagged as SL07c_1
- June 1, 2007
new library SL07c (tagged as SL07c) has been created, tested and released.
Main features:
- library has new version of pythia 6.410 will be used for pp 200GeV pythia production for SPIN group request;
- trigger 2007 data are added;
- EMC trigger code reshaped ;
- number of codes modified to replace print statements with Logger LOG_INFO/LOG_ERROR;
Next codes have been updated:
StAnalysisUtilities
StHistUtil.cxx - added SSD hits;
StBFChain
StBFChain.cxx/h - implemented StChainOpt interface to hide StBFChain dependency;
StBFChainOpt.cxx/h, StChainOpt.h - added to implement StChainOpt interface to hide StBFChain dependency ;
St_base
StTree.cxx - fixed special case basename for daq & fz;
StChain
StChain.h - modified to implement StChainOpt interface to hide StBFChain dependency;
StChain.h - removed non implemented GetChainOpt method;
StMaker.cxx/h - implemented new WhiteBoard methods; modified to reset to zero m_DataSet after deletion;
StChargeStepMaker
StChargeStepMaker.cxx - modified to remove redundant GetMaker();
StDaqLib
TRG/TRG_Reader.cxx, code2007.cxx - corrected byte swapping issue;
TRG/code2007.cxx - bug fixed for checking the last QT word; added protection against NULL pTRGP;
TRG/TRG_Reader.cxx - uninitialized pointer to class accessed to call method fixed and protected against NULL argument;
TRG/TRG_Reader.hh - added cleanup of initialized pTRGD;
GENERIC/DetectorReader.cxx, EventReader.cxx - pointer to method returns FALSE instead of NULL fixed;
StDAQMaker
StDAQReader.cxx - corrected byte swapping issue;
StDAQMaker.cxx - removed StBFChain dependency;
StDetectorDbMaker
StDetectorDbTriggerID.cxx/h - added the additionalTriggerID table;
StEEmcSmd
EEmcSmdGeom.cxx - added error handling to EEmcSmdGeom::getIntersection();
StEmcCalibrationMaker
StEmcPedestalMaker.cxx/h - updated to save crate pedestals with two digit precision only;
StEmcTriggerMaker
Run2006TriggerMaker.C - added example Macro on how to access new trigger interface for 2006;
2006_Trigger_Map - added map of triggers in time and thresholds for 2006;
StEmcTriggerMaker.cxx/h - updated new trigger interface;
StBemcTrigger.cxx/h - updated to loop over all 6 trigger periods for 2006 ; added decoder wrapper method that correlates tower and trigger patch;
StEmcTriggerMaker.cxx/h, StBemcTrigger.h, Run2006TriggerMaker.C - added decoder wrapper method that correlates tower and trigger patch;
Run2006DataTriggerMaker.C - added macro to run over data;
StBemcTrigger.cxx/h, StEmcTriggerMaker.cxx/h, Run2006DataTriggerMaker.C, Run2006SimuTriggerMaker.C - added BHT2 for 2003; new access scheme extended back to 2003+2004; removed all access to StEmcPedestal tables;
StBemcTrigger.cxx/h - updated JPSI trigger to include JP#ing from decoder - E/W thresholds set ;
StEvent
StTriggerData2007.cxx/h - fixed bug in VPD unpacking;
StBbcTriggerDetector.cxx/h - fixed bug in BBC unpacking;
StTriggerData.h - added virtual function mtdAtAddress();
StEventDstMaker
StEventDstMaker.cxxh - removed ;
StEventMaker
StEventMaker.cxx - addition of random trigger;
StJetMaker
StJetSkimEventMaker.cxx/h, StJetSkimEvent.cxx/h, StJetReader.cxx - modified to store trigger simulation info in SkimTrig; trigger prescales and thresholds saved once per run using SkimTrigHeader;
modified to save triggers that fired or should have fired in each event; various space savers (ignore TObject data members if possible, use TRef for mBestVert, etc.);
StJets.cxx/h - added Murad's dca update;
StGenericVertexMaker
Minuit/StMinuitVertexFinder.cxx - more precise Chi2 calculation; implemented slightly tighter quality cuts on tracks: npoint>=20, radial dca < 1; widened the cut on close vertices to be mDcaZMax (3 cm);
StMiniMcMaker
StMiniMcMaker.cxx - modified to hide StBFChain dependency;
StMiniMcEvent
StMiniMcEvent.h - increamented ClassDef;
StFtpcClusterMaker
StFtpcClusterMaker.cxx - modified to use the bfc option "debug" to create and fill the FTPC cluster tuning histograms;
StFtpcSlowSimMaker
StFtpcSlowSimField.cc, StFtpcSlowSimMaker.cxx - updated to be compatible with changes made to StFtpcTrackParams.cc; modified to use default microsecondsPerTimebin value from database if no RHIC clock info available ;
StFtpcTrackMaker
StFtpcTrackMaker.cxx/h - modified for FTPC vertex hists; database initialization moved from Init to InitRun; redefined m_nrec_track histogram and only fill if debug option is on;
StFtpcTrackingParams.cc/hh - replaced StMagUtilities with StarMagField ;
StLaserEventMaker
StLaserEventMaker.h - modified to unuse m_clockNominal class Data memeber;
StLaserEventMaker.cxx - fixed m_clock unu-initialized, Float_t m_clockNominal replaced class DM naming changed to l_clockNominal;
StMuDSTMaker
COMMON/StMuTrack.cxx/h - Removed Q-vector flag;
COMMON/StMuEvent.cxx/h, StMuDst.cxx - Removed Q-vector flag, added VPD info ;
COMMON/StMuDstMaker.cxx/h - removed Q-vector calculation; added protection against StEvent::triggerData() == 0 in EZTREE;
EZTREE/StMuEzTree.cxx - added protection against StEvent::triggerData() == 0 in EZTREE;
StEmcTriggerMaker
StBemcTrigger.cxx/h - modified PatchMap so that TP->Tower is accessed via StEmcDecoder; East Barrel Mapping fixed;
StEmcTriggerMaker.cxx/h - added new interface methods to get trigger thresholds and decisions based on trigId;
StPmdCalibrationMaker
StPmdCalibConstMaker.cxx - removed StBFChain dependency;
StPmdClusterMaker
StPmdAbsClustering.cxx, StPmdClusterMaker.cxx, StPmdClustering.cxx, StPmdDiscriminator.cxx, StPmdDiscriminatorMaker.cxx, StPmdSimulatorMaker.cxx - removed StBFChain dependency;
StPmdDiscriminatorMaker
StPmdDiscriminatorMaker.cxx - removed StBFChain dependency;
StPmdDiscriminatorNN.cxx - - removed StBFChain dependency;
StPmdSimulatorMaker
StPmdSimulatorMaker.cxx - removed StBFChain dependency;
StPmdReadMaker
StPmdReadMaker.cxx - removed StBFChain dependency;
Sti
StiKalmanTrackNode.cxx/h - corrected time of flight calculation, added time of flight corrrection for Laser;
StiTrackNodeHelper.cxx - added protection in assert if hitPars has not been defined;
StiMaker
StiMaker.cxx - removed StBFChain dependency; added time of flight corrrection for Laser;
StTagsMaker
StTagsMaker.cxx - removed StBFChain dependency;
StUtilities
StMultiH1F.cxx, StMultiH2F.cxx - patched for problems with limited axis ranges ;
St_db_Maker
St_db_Maker.cxx - added StMaker::Init() into Init;
St_geant_Maker
St_geant_Maker.cxx - removed StBFChain dependency; moved creation of TGiant3 in ctor; improved handling of the Pythia event header translation;
St_QA_Maker
StQAMakerBase.cxx - modified for PMD hists ;
StEventQAMaker.cxx, StQABookHist.cxx/h - added SSD hists ;
QAhlist_EventQA_qa_shift.h - added SVT plots ;
StarRoot
TTreeIter.cxx/h - Double32_t added;
THelixTrack.cxx/h,TPolinom.cxx/h - some improvements;
xTCL.cxx/h - added extended TCL class xTCL;
pams
gen/pythia_6410 - new version of pythia 6.410 added;
gen/bpythia/apytuser.age, bpythia.F, bpythia.cdf, hepevt61.inc, pyth_header.g - added;
gen/bpythia/pyth_header.g - added MSTU72, MSTU73, MSTP111;
sim/g2t/g2t_get_event.F, mheadrd.g - added MSTU72, MSTU73, MSTP111; separated error codes for the generic and Pythia-specific header read;
sim/gstar/gstar_part.g - disabled introduction of the Dalitz particle (pi0 with special decay);
sim/idl/g2t_pythia.idl - added three more Pythia variables ;
sim/g2t/g2t_get_pythia.F - added three kinematic variables to be propagated from Pythia ;
StDb/idl
pmdHotCells.idl - added new table with bit masks for pmdHotCells ;
additionalTriggerID.idl - added new trigger tables RunNumber and EventNumber ;
- August 10, 2007
SL07b library has been updated with codes below to make patches for SL4.4 platform:
- StDbBroker
StDbWrappedMessenger.cc ;
- StDetectorDbMaker
StDetectorDbClock.cxx ;
StDetectorDbMaker.cxx;
- StTpcDb
StRTpcDimensions.cxx/h, StRTpcElectronics.cxx/h, StRTpcFieldCage.cxx/h, StRTpcGlobalPosition.cxx/h,
StRTpcHitErrors.cxxh, StRTpcPadPlane.cxx/h, StRTpcSectorPosition.cxx/h, StRTpcSlowControlSim.cxx/h,
StRTpcWirePlane.cxx/h, StTpcDbMaker.cxx/h,
- StStarLogger
StLoggerManager.cxx/h;
- StJetMaker
StJetHist/StJetHistMaker.cxx;
SL07b library was rebuild and retagged with tag SL07b_2.
- May 18, 2007
library SL07b has been updated with codes below, retagged as SL07b_1 and rebuilt. Updates were needed for CuCu reproduction.
StBFChain
BigFullChain.h, StBFChain.cxx, StBFChain.h;
StGenericVertexMaker
StCtbMatcher.h;
Minuit/StMinuitVertexFinder.cxx/h;
StDetectorDbMaker
StDetectorDbTriggerID.cxx/h ;
StEventMaker
StEventMaker.cxx;
StPmdUtil
StPmdMapUtil.cxx, StPmdGeom.cxx;
StSvtDbMaker
StSvtDbMaker.cxx;
StarDb
Calibrations/tracker/PrimaryVertexCuts.C;
VmcGeometry - number of files ;
StDb/idl
svtHybridDriftVelocity.idl;
pmdHotCells.idl;
VertexCuts.idl;
- April 18, 2007
new library SL07b (tagged as SL07b) has been created, tested, and released on April 23.
Main features:
- last codes and calibrations/alignment adjustment for cucu reproduction with SVT & SSD tracking;
- codes and calibration updates for run 2007;
Next codes have been updated:
StAnalysisUtilities
StHistUtil.cxx - SVT drift velocity historamm utility added ; added Svt list, simplified hlist include files, handle StMultiH2F, stored dirName;
StBFChain
BigFullChain.h - new Corr5, the correction chain option for run 2007; new chain for run 2007;
added P2007a and P2007b for startup chains ;
StBFChainLinkDef.h - added new file to enlarge size for chain option fields, added options EvOutOnly & NoOutput , EastOff & WestOff for Sti, UseNewLDV ;
StBFChain.cxx/h - modified to enlarge size for chain option fields, added options EvOutOnly & NoOutput , EastOff & WestOff for Sti, UseNewLDV ;
StBFChain.cxx - checking for VMC input file added;
StBFChain.cxx/h - modified to move GetTFile()==>StMaker;
StBichsel
dEdxParameterization.cxx - added TMath.h;
StChain
StMaker.cxx/h - new signature of GetDataBase() added ;
StMaker.cxx/h - modified to move GetTFile()==>StMaker;
StDaqLib
EMC/StEmcDecoder.cxx - reverting back to state in revision 2.41; updated GetTowerBin to be aware of mapping bug;
StDbLib
StDbSql.cc - minor changes;
StDbServiceBroker.cxx - added machine weighting factor "machinePower" to load balancer ;
StDbManagerImpl.cc - minor changes to allow load balancer to be backward compatible with online migration code;
StDbConfigNodeImpl.cc - fixed small memory leak in removeTable ;
ChapiDbHost.cxx/h, MysqlDb.cc - Load Balancer adjustments for machinePower features;
StDaqLib
EMC/StEmcDecoder.cxx/h - added methods GetCrateFromTowerId, GetTDCFromTowerId, GetTDCFromTowerId, GetTriggerPatchFromTowerId, GetJetPatchFromTowerId, and GetTowerIdFromBin;
implemented const-correctness, modified to use meaningful argument names in method declarations to improve readability ;
SSD/SSD_Reader.cxx - modified to change the decoding LDate and add the mapping from DaqLadders to RealLadders for year2007;
TRG/TRG_Reader.cxx/hh, code2007.cxx - bug fixed for offsets;
StDetectorDbMaker
StDetectorDbRichScalers.cxx - modified to use RichScalers from data stream;
modified to use mode=1 for DB values;
StDbUtilities
StMagUtilities.cxx - added zero field = 1G;
St_svtRDOstrippedC.cxx/h - added more strict wafer definition ;
St_svtHybridDriftVelocityC.cxx/h - drift velocity definition added by Ivan Kotov;
StTpcCoordinateTransform.cc/hh - TpcCoordinate transformation via TGeoHMatrix added ;
StSvtLocalCoordinate.hh - added usage of Ivan Kotov's drift velocities ;
StSvtCoordinateTransform.cc/hh, St_svtHybridDriftVelocityC.cxx/h - added dependence of drift velocity on anode;
St_db_Maker
StValiSet.cxx/h, St_db_Maker.cxx - modified to allow request by user defined;
St_db_Maker.cxx - bypassed bug in TTable::New; assert improved;
StdEdxY2Maker
StdEdxY2Maker.cxx - modified to move GetTFile()==>StMaker;
StEEmcSimulatorMaker
StEEmcFastMaker.cxx/h, StEEmcMixerMaker.cxx - bug fixed ;
StEEmcUtil
EEdsm/BemcTrigUtil.cxx/h - new files added for run 2007;
StEvent
StEventClusteringHints.cxx - added StTriggerData2007 ;
StGlobalTrack.cxx - memory leak fixed, StDcaGeometry was not deleted ;
StTriggerData2007.cxx - new map for ZDC-SMD implemented;
StTofCollection.cxx/h - added new data members and methods in preperation for new ToF;
StTriggerData.h, StTriggerData2007.cxx/h - added access function for VPD data;
StVpdTriggerDetector.cxx/h - modified for actual VPD used in 2007;
StTriggerDetectorCollection.cxx - added setup of VPD data to constructor;
StEmcCalibrationMaker
StEmcCalibMaker.cxx/h, StEmcCalibrationMaker.cxx/h, StEmcEqualMaker.cxx StEmcMipMaker.cxx/h, StEmcPedestalMaker.cxx/h - reshaped the infrastructure, provided the setup script to install the monitoring on a fresh machine,provided the configuration file to change the settings without touching code;
fixed the DB tables handling, now uses table based containers.
StEmcRawMaker
StEemcRaw.cxx - drop token checked ;
StEmcRawMaker.cxx - disabled RawEndcap hits filtering;
StEemcRaw.cxx, StEmcRawMaker.cxx - modified to bring endcap code in default configuration;
StEmcSimulatorMaker
StEmcSimulatorMaker.cxx - fixed memory leak of StMcCalorimeterHit;
StEmcTriggerMaker
StBemcTrigger.cxx - JJSI changes for 2006 entire barrel;
StBemcTrigger.cxx/h, StEmcTriggerMaker.cxx/h - added access to L1 2x1 patch ADC for L2 emulator;
StEmcUtil
database/StBemcTables.cxx/h - added methods from Pibero to access trigger database information;
projection/StEmcPosition.cxx/h - implemented const-correctness, modified to use meaningful argument names in method decl arations to improve readability ;
geometry/StEmcGeom.cxx/h - added softId-based versions of getEta, getTheta, and getPhi; added getId(phi,eta,&softId);
implemented const-correctness, modified to use meaningful argument names in method declarations to improve readability;
others/StEmcMath.cxx - added methods GetCrateFromTowerId, GetTDCFromTowerId, GetTDCFromTowerId, GetTriggerPatchFromTowerId,GetJetPatchFromTowerId and GetTowerIdFromBin;
implemented const-correctness, modified to use meaningful argument names in method declarations to improve readability ;
StLaserAnalysisMaker
StLaserAnalysisMaker.cxx - modified to move GetTFile()==>StMaker;
StLaserEventMaker
StLaserEventMaker.cxx - modified to move GetTFile()==>StMaker;
StFlowMaker
StFlowMaker.cxx - west ZDCSMD H7 (readout as 26 in the trigger array) was swapped with LED (readout as 24 in trigger array), to avoid abnormal pedestal in the electronic channel associated with 26 in the trigger array ;
StFtpcTrackMaker
StFtpcTrackMaker.cxx - bug fixes ;
StGenericVertexMaker
StiPPVertex/StPPVertexFinder.cxx - extended validity of PPV for 2007 data taking ;
StMagF
StMagFMaker.cxx- Zero Field defined as 1G;
StMcAnalysisMaker
StMcAnalysisMaker.cxx - added keys for switch off Tpc, Svt and Ssd NTuples; GetTFile()==>StMaker;
StMcEvent
StMcCtbHit.cc - added filling of g2t_ctf_hit.ds into StMcCtbHit ;
StMiniMcMaker
StMiniMcMaker.cxx - modified to move GetTFile()==>StMaker;
StMuDSTMaker
COMMON/StMuTrack.cxx/h, StMuDstMaker.cxx/h, StMuEvent.cxx/h - added Q-vectors in StMuEvent;
StMiniMcMaker
StMiniMcMaker.cxx - removed the forcing of the Ghost loop to be "off" by checking the filename;
now the check only displays a message in the log saying that the Ghost loop is turned on;
StPixelFastSimMaker
StPixelFastSimMaker.cxx/h - Shift of HFT hits to face of ladder;
added IST simulation (digitization but no clustering);
StPmdUtil
StPmdGeom.cxx - new mapping (run7) added and DrawPmd function for viewing PMD Geometry ;
BoardDetail of access on 29/03/07 added;
StPmdGeom.cxx/h - chain19 mapping corrected, functions to return nboards in a chain/SMs added;
StMcQaMaker
StMcQaMaker.cxx/h - new maker added for side by side comparision of GEANT and VMC simulations ;
StSsdDaqMaker
StSsdDaqMaker.cxx/h - added more precise histograms for the particular status of strips: count the number of strips perwafer where pedestal = 0 or 255 (adc) and rms = 0 or 255 (adc);
StSsdDaqMaker.cxx/h - added a method to fill pedestal and noise of the strips in a tuple;
StSsdDbMaker
StSsdDbMaker.cxx/h - modified to use TGeoHMatrix for coordinate transformation, eliminate ssdWafersPostion ;
StSsdPointMaker
StSsdPointMaker.cxx/h - added a method WriteMatchedClusters instead of WriteScfTuple() method that fill all the reconstructed clusters, this one store the clusters associated to the hits;
added WriteMatchedStrips() method : fill the characteristics of the strips from matched clusters;
added a protection when ssdStripCalib is filled with empty values;
modified to use TGeoHMatrix for coordinate transformation, eliminate ssdWafersPostion;
added a switch to use the gain calibration ;
modified for GetTFile()==>StMaker;
StSsdSimulationMaker
St_sls_Maker.cxx/h, St_spa_Maker.cxx/h - modified use new StSsdBarrel;
StSsdUtil
StSsdWafer.cc - bug fixed : fill the StSsdPointList with space points with the higher configuration probability;
StSsdBarrel.cc/hh, StSsdLadder.cc/hh, StSsdWafer.cc/hh - modified to use TGeoHMatrix for coordinate transformation;
StSsdBarrel.cc/hh, StSsdPoint.cc/hh, StSsdWafer.cc/hh - added a method to use the gain calibration for the Charge Matching between pulse of p and n sides;
StSvtClusterMaker
StSvtClusterAnalysisMaker.cxx, StSvtClusterMaker.cxx, StSvtHitMaker.cxx - modified to use Ivan Kotov's drift velocities and use TGeoHMatrix for coordinate transformation;
StSvtDbMaker
StSvtDbMaker.cxx/h - modified to use Ivan Kotov's drift velocities and use TGeoHMatrix for coordinate transformation;
StSvtDbReader.cc/hh, StSvtDbWriter.cc/hh, St_SvtDb_Reader.cc/hh - removed files;
StSvtDbMaker.cxx - added StSvtGeometry to const area;
StSvtSimulationMaker
StSvtElectronCloud.cc, StSvtSimulationMaker.cxx - modified to use Ivan Kotov's drift velocities and use TGeoHMatrix for coordinate transformation;
StTagsMaker
StTagsMaker.cxx - modified to move GetTFile()==>StMaker;
StTofCalibMaker
StTofCalibMaker.cxx/h - updated for Run V CuCu calibration:
- INL correction moved in this maker
- Tot Corr and Z Corr use new tables in data base;
- pVPD calibration information modified;
StTofCalibMaker.cxx - removed breaking of failure on number of return rows during db I/O for tofTotCorr and tofZCorr;
StTofrMatchMaker
StTofrMatchMaker.cxx/h - modified to complete Run V matching;
- trailing tdc and leading tdc stored as adc and tdc in StTofCell;
- multi-hit association cases use hit position priority;
StTpcDb
StTpcDb.cxx/h, StTpcDbMaker.cxx/h, StTpcdEdxCorrection.cxx, St_tpcCorrectionC.cxx - modified to use TGeoHMatrix for coordinate transformation; change mode for switching drift velocities implemented;
StTpcDb.cxx - added drift velocity interpolation between two measurement in time;
added protection from infinit endTime ;
StTofMaker
StTofMaker.cxx - replaced with standard STAR Loggers;
StTofUtil
StTofGeometry.cxx, StTofSimParam.cxx, StTofrDaqMap.cxx, StTofrGeometry.cxx - replaced with standard STAR Loggers
StTofUtil
StTofSimMaker.cxx - replaced with standard STAR Loggers;
StTofSimMaker
StTofSimMaker.cxx - replaced with standard STAR Loggers;
StTofrMatchMaker
StTofrMatchMaker.cxx - replaced with standard STAR Loggers;
StTofpMatchMaker
StTofpMatchMaker.cxx - replaced with standard STAR Loggers;
St_trg_Maker
St_trg_Maker.cxx - added protection from use if data version > 2007;
St_QA_Maker
StEventQAMaker.cxx, StQABookHist.cxx/h - SVT drift velocity histogramm added;
QAH.cxx/h - added StMultiH2F support;
QAhlist_Svt.h - added new files;
StQABookHist.cxx/h, StEventQAMaker.cxx - added Svt Laser Diff;
St_srs_Maker
St_srs_Maker.cxx - modified to use TGeoHMatrix for coordinate transformation;
StarClassLibrary
StThreeVector.hh - added xyz() method ;
StUtilities
StMultiH2F.cxx/h - introduced StMultiH2F class ;
StSvtClassLibrary
StSvtHybridObject.cc/hh, StSvtHybridPixelsD.cc, StSvtWaferCollection.hh, StSvtWaferGeometry.cc/hh - modified to use Ivan Kotov's drift velocities, use TGeoHMatrix for coordinate transformation ;
StSvtHybrid.h - new files added;
StarRoot
TRArray.cxx/h, TRMatrix.cxx/h, TRSymMatrix.cxx/h, TRVector.h, StarRootLinkDef.h - added new method for matrix inversion;
TRDiagMatrix.cxx/h - new files added for matrix inversion ;
TAttr.cxx/h - adjusted for ROOT 5.14 ;
THelixTrack.cxx - replaced 'complex' by 'TComplex';
Sti
StiDetectorBuilder.cxx/h - added TMath.h;
StiHit.h- modified to count Time of Flight; set 30 degree hit angle limit;
StiHitLoader.h - added Riostream.h;
StiKalmanTrackNode.cxx/h - modified to add Time of Flight;
StiTrackNode.cxx - replaced 'complex' by 'TComplex';
StiHitTest.cxx, StiKalmanTrack.cxx, StiTrackFinder.h, StiTrackNodeHelper.cxx - added includes for ROOT 5.14;
Star/StiStarDetectorBuilder.cxx - added includes for ROOT 5.14;
Base/StiFactory.h - added includes for ROOT 5.14;
StiMaker
StiStEventFiller.cxx - adjusted for ROOT 5.14;
StiMaker.cxx/h - added option for EastOff and WestOff, FindDataSet for Sti Geometry;
modified to move GetTFile()==>StMaker;
StiRnD
StiRnDLinkDef.h - added LinkDef for Sti RnD;
StiSsd
StiSsdLinkDef.h - added new files to use new StSsdBarrel;
StiSsdDetectorBuilder.cxx - modified to use new StSsdBarrel;
StiTpc
StiTpcHitLoader.cxx/h - added hint for EastOff and WestOff options;
StiUtilities
StiPullEvent.cxx - adjusted for ROOT 5.14;
StiSvt
StiSvtDetectorBuilder.cxx - modified for alignment;
StiSvtLinkDef.h = new files added to adjust for alignment;
StVMCMaker
StVMCMaker.cxx - checking for input file added ;
pams/geometry
sisdgeo/sisdgeo6.g - TUP-inspired version of the SSD, the structural support parts on the rim are constructed of Carbon as opposed to Aluminum, to reflect the possible reedesign ;
geometry.g - added modifications: (a) FSTD is out (b) modified SSD with carbon parts,for R&D purposes (c) modified IST with single sided inner layer;
provided version for the thicker active Si layer in pixlgeo3, via setting the structure elements;
istbgeo/istbgeo6.g - geometry with Inner layer with sensors only on the inside ;
pixlgeo/pixlgeo3.g - added a useful diagnostic printout about the thicknesses of the Si layers;
modified backward-compatible version with (a) refactoring of the data structures for better modification support (b) switchable "thick" active layer configuration (c);
pams/sim
gstar_part.g - corrected B decay definitions;
added particle "DALITZ", which is identical to pi0 except that it goes into gamma gamma, needed for electron background simulation;
StarDb
Geometry/ssd/SsdOnGlobal.20050101.000000.C, SsdOnGlobal.20050120.000000.C, SsdOnGlobal.20050217.000000.C, SsdOnGlobal.20 050310.000000.C, SsdOnGlobal.C, SsdOnGlobal.y2005e.C ;
SsdLaddersOnSectors.20050120.000007.C, SsdLaddersOnSectors.20050217.000007.C, SsdLaddersOnSectors.20050310.000000.C, Ssd LaddersOnSectors.y2005e.C;
SsdSectorsOnGlobal.20050120.000003.C, SsdSectorsOnGlobal.20050217.000003.C, SsdSectorsOnGlobal.20050310.000000.C, SsdSectorsOnGlobal.y2005e.C;
SsdWafersOnLadders.20050101.000000.C, SsdWafersOnLadders.y2005e.C;
Geometry/svt/LadderOnSurvey.y2005e.C, ShellOnGlobal.y2005e.C, WaferOnLadder.y2005e.C;
LadderOnShell.20050101.000000.C, LadderOnShell.20050310.000000.C LadderOnSurvey.20050101.000000.C ShellOnGlobal.20050101.001001.C ShellOnGlobal.20050120.000003.C ShellOnGlobal.20050217.000003.C ShellOnGlobal.20050310.000000.C SvtOnGlobal.20050101.000000.C SvtOnGlobal.20050120.000000.C SvtOnGlobal.20050217.000000.C SvtOnGlobal.20050310.000000.C SvtOnGlobal.C WaferOnLadder.20050101.000000.C ;
StDb
idl/svtHybridDriftVelocity.idl - new Svt Drift velocity table added, combination of charge step and correction due to nonlinearity;
idl/ssdGainCalibWafer.idl - gain calibration table for ssd wafers added ;
servers/dbLoadBalancerConfig.new - xml file for db loadbalancing added ;
- August 10, 2007
SL07a library has been updated with codes below to make patches for SL4.4 platform:
- StDbBroker
StDbWrappedMessenger.cc ;
- StDetectorDbMaker
StDetectorDbClock.cxx ;
StDetectorDbMaker.cxx;
- StTpcDb
StRTpcDimensions.cxx/h, StRTpcElectronics.cxx/h, StRTpcFieldCage.cxx/h, StRTpcGlobalPosition.cxx/h,
StRTpcHitErrors.cxxh, StRTpcPadPlane.cxx/h, StRTpcSectorPosition.cxx/h, StRTpcSlowControlSim.cxx/h,
StRTpcWirePlane.cxx/h, StTpcDbMaker.cxx/h, StTpcdEdxCorrection.cxx, St_tpcCorrectionC.cxx;
- StStarLogger
StLoggerManager.cxx/h;
- StJetMaker
StJetHist/StJetHistMaker.cxx;
SL07a library was rebuild and retagged with tag SL07a_3.
- May 11, 2007
library SL07a has been updated with codes below, retagged as SL07a_2 and rebuilt.
Updates have been needed to fix the codes problems and process with production for tracking upgrades proposal;
- StPixelFastSimMaker
StPixelFastSimMaker.cxx/h ;
- StiRnD
Ist/StiIstDetectorBuilder.cxx/h, StiIstHitLoader.cxx;
Hft/StiPixelDetectorBuilder.cxx;
- StarDb
Geometry/ssd/SsdLaddersOnSectors.upgr01.C, SsdOnGlobal.upgr01.C, SsdSectorsOnGlobal.upgr01.C, SsdWafersOnLadders.upgr01.C;
Calibrations/tracker/ist2HitError.20050101.000000.C, st1HitError.20050101.000000.C;
- April 6, 2007
library SL07a has been updated with codes below, retagged as SL07a_1 and rebuilt.
Updates have been needed to process with production for tracking upgrades and remove unneeded messages from the log files;
- StAnalysisMaker
summarizeEvent.cc;
- StPixelFastSimMaker
StPixelFastSimMaker.cxx/h ;
- StMcEvent
StMcEmcHitCollection.cc, StMcCtbHit.cc;
- StiRnD
Hft/StiPixelHitLoader.cxx,StiPixelDetectorBuilder.cxx;
Ist/StiIstHitLoader.cxx;
- pams/sim
g2t_volume_id.g, g2t_pix.F, g2t_gem.F;
gstar/gstar_part.g;
- February 22, 2007
new library SL07a (tagged as SL07a) has been created, tested, found bugs fixed. Library was released on March 19 .
Main features:
- geometry for year 2007 has been set and codes updated;
- added dead material to SSD and created new geometry tags Y2005F and Y2006B;
- trigger data updated for year 2007 run;
- improved global dca values on MuDst;
- EEmc slow simulator upgraded, for detailes look at the email ;
- developed new version of the STAR "Geometry Browser" and "Offline Event display";
Next codes have been updated:
asps/Simulation/starsim
geant/gparmp.F - added magnetic monopole tracking;
geant/grktmp.F - added stepping routine for the magnetic monopole;
geant/guswmp.F - added logical switch for the magnetic field calculation;
geant/gtrack.F - added ITRTYP=9 (monopole);
geant/gtmonp.F - added tracking the monopole;
St_base
StMessMgr.h - added the new StMess abstarct interfaces GetLevel/SetLevel; modified to connect Logger and Maker debug levels;
StChain
StMaker.cxx - added geometry tags Y2007, Y2006a ;
added geometry tags: Y2005F and Y2006B needed due to the added dead area in the SSD, and also incorporating the updated Barrel EMC code;
StMaker.cxx/h - modified to connect Logger and Maker debug levels;
StDaqLib
SVT/SVTV1P0.cxx, SVTV1P0_ZS_SR.cxx - modified: zero suppressed reader no longer uses adcx, only seqd;
TRG/trgStructures2005.h - modified;
TRG/trgStructures2007.h - added for run 2007; added year for L2RESULTS_OFFSET;
TRG/TRG_Reader.cxx/h - updated reader for run 2007 data;
TRG/L2gammaResult2007.h, code2007.cxx, trgStructures2007.h - new files added for run 2007;
StDaqMaker
StTRGReader.cxx/h - updated reader for run 2007 data;
StDbLib
MysqlDb.cc/h, StDbManagerImpl.cc/hh, StDbServiceBroker.cxx/h, StlXmlTree.cxx/h - updated for load balancing;
StdEdxY2Maker
StdEdxY2Maker.cxx - time converted to GMT ;
StEEmcSimulatorMaker
StEEmcFastMaker.cxx/h - calculation of ideal gains moved into static member function getTowerGains() to allow slow simulator to access them;
StEEmcSlowMaker.cxx/h - the slow eemc simulatore upgraded. The following changes have been made:
- towers will always be masked out when a "fail" bit is set in the database;
previously this only happened if pedestals were being added, smeared;
- tower, preshower and postshower ADC values will be simulated using the GEANT energy loss stored in StEmcHit and StMuEmcHit;
previously, ADC values from the fast simulator were used and energy loss recovered using gains, resulting in roundoff errors ;
- tower simulation now accounts for the different light yields provided by the brighter scintillator and two-fiber readout in the preshower and postshower layers;
previously, only the difference in thickness was accounted for by the GEANT simulation;
SlowSimUtil.cxx/h, StEEmcFastMaker.cxx/h, StEEmcMixerMaker.cxx/h, StEEmcSlowMaker.cxx, StEEmcTrigSimuMaker.cxx - modified to use Logger;
StEEmcFastMaker.cxx - bug fixed: adc was not limitted to [0,4095], fixed for all layers;
StEEmcUtil
StEEmcSmd/EEmcSmdGeom.cxx/h, StEEmcSmdGeom.cxx/h - new simpler to use method calculating dca for track to strip;
StEEmcGeom/EEmcGeomDefs.h - new simpler to use method calculating dca for track to strip;
StEEmcSmd/EEmcSmdGeom.cxx/h - fixed applied to eliminate parralax error in the EEmcSmdGeom::getIntersection() method;
bug fixed in getDca2Strip(), make more methodhs public;
dca initialized in getDcaStripPtr();
EEmcSmdGeom::getDca2Strip(..) simplified;
StEmcADCtoEMaker
StEmcADCtoEMaker.cxx/h - modified to use Logger;
StEmcDbMaker
EEmcDbCrate.cxx/h, EEmcDbItem.cxx/h, StEEmcDbMaker.cxx - new Logger implemented ;
StEEmcDbMaker.cxx - modified to use new logger only;
StEmcCalibrationMaker
StEmcCalibMaker.cxx - modified to use Logger;
StEmcMixerMaker
StEmcMixerMaker.cxx/h - modified to use Logger;
StEmcTriggerMaker
StBemcTrigger.cxx/h, StEmcTriggerMaker.cxx/h - modified to use Logger;
StEmcRawMaker
StBemcRaw.cxx, StEmcRawMaker.cxx/h - modified to use Logger;
StEmcSimulatorMaker
StEmcPmtSimulator.cxx/h, StEmcSimpleSimulator.cxx, StEmcSimulatorMaker.cxx/h, StPmtSignal.cxx - modified to use Logger;
StEmcSimulatorMaker.cxx - added code in Init() to automatically set embedding mode controlTable flags in StEmcADCtoEMaker and/or StEmcMixerMaker;
StEpcMaker
StEpcMaker.cxx/h, StPointCollection.cxx/h - modified to use Logger;
StEmcUtil
database/StEmcDbHandler.cxx/h - modifed ::getDbTable( ) to use DB APIs instead of a whereClause; ::getTimeStampList ( ) turned off temporary due to seg-faulted during testing;
voltageCalib/LinearFit.h, PowerLawFit.h - fixed inheritance for gcc 3.4.6 compliance;
StEvent
StTriggerData2007.cxx/h - initial revision of year 2007 triggers;
StTriggerData2007.cxx - Changed L2RESULTS_... to L2RESULTS_2007_ ;
StEventClusteringHints.cxx - added StTriggerData2007;
StEventLinkDef.h - added 2007 trigger structure pragmas ;
StEnumerations.h - added l2DisplacedVertex to StL2AlgorithmId;
StEmcRawHit.cxx - changes to modEtaSub() and sub() implemented;
StEventDisplayMaker
StEventControlPanel.cxx, StEventDisplayMaker.cxx/h, StSimplePanel.cxx/h, St_PolyLine3D.cxx - added an extra control to choose between G3 and Sti detectors geometries;
StVirtualEventFilter.cxx/h - new files adde to adjust for ROOT 5.15/03 API;
StPadControlPanel.cxx, St_PolyLine3D.cxx, TEmcTower.cxx - adjusted for for ROOT 5.15/03 API;
StFlowMaker
StFlowConstants.cxx/h, StFlowCutEvent.cxx, StFlowCutTrack.cxx, StFlowEvent.cxx/h, StFlowMaker.cxx/h - introduced recentering of Q vector in Lee Yang Zeros method;
StFlowAnalysisMaker
StFlowAnalysisMaker.cxx, StFlowLeeYangZerosMaker.cxx/h, doFlowSumAll.C, minBias.C, plotCumulant.C, plotLYZ.C -introduced recentering of Q vector in Lee Yang Zeros method;
StFtpcCalibMaker
StFtpcCalibMaker.cxx, StFtpcLaser.cc, StFtpcLaserCalib.cc, StFtpcLaserTrafo.cc - replaced printf, cout, gMessMgr with Logger ;
StFtpcClusterMaker
StFtpcClusterFinder.cc, StFtpcClusterMaker.cxx, StFtpcDbReader.cc, StFtpcGasUtilities.cc - modified to move unessential output from INFO to DEBUG;
StFtpcParamReader.cc - replaced //LOG_INFO with LOG_DEBUG;
replaced printf, cout and gMesMgr with Logger in all codes;
StFtpcMixerMaker
StFtpcMixerMaker.cxx, StFtpcSequencer.cc - replaced printf, cout and gMesMgr with Logger ;
StFtpcSlowSimMaker
StFssSectorReader.cc, StFtpcRawWriter.cc, StFtpcSlowSimCluster.cc, StFtpcSlowSimLibs.cc, StFtpcSlowSimMaker.cxx, StFtpcSlowSimReadout.cc, StFtpcSlowSimulator.cc - replaced printf, cout and gMesMgr with Logger in all codes ;
StFtpcTrackMaker
StFtpcConfMapper.cc, StFtpcTracker.cc, StFtpcTrackingParams.cc - moved unessential output messages from INFO to DEBUG;
replaced printf, cout and gMesMgr with Logger in all codes;
StJetMaker
StJetReader.cxx, StJetSkimEvent.cxx/h, StJetSkimEventMaker.cxx - added storing of the MuDst filename in StJetSkimEvent;
StJetReader.cxx, StJets.cxx, StJets.h - added StMuTrack info on track charge, dedx, and hit information to StJets.h; updated exampleFastJetAna() accordingly;
Stl3Util/base
St_l3_Coordinate_Transformer.cxx - fixed for gcc4,added usage of StMultiArray class;
StMuDSTMaker/COMMON
StMuTrack.cxx/h - updated to use StDcaGeometry for global DCA and momentum; added helper functions for radial and Z component: dcaD and dcaZ; uncertainties on those are stored in sigmaDcaD and sigmaDcaZ; dcaD and dcaZ only work for the primary vertex to which the track belongs ;
StMuUtilities.h - removed templates for min() and max(), which conflict with STL;
StMuDstMaker.cxx/h - added SetEventList function to read only pre-selected events;
StMiniMcEvent
StMiniMcEvent.cxx/h, StMiniMcPair.h, StTinyMcTrack.cxx/h, StTinyRcTrack.cxx/h - modified to add Ssd and DCA ;
StMiniMcHelper.cxx, StMiniMcMaker.cxx/h, dominatrackInfo.cc - bug fixed;
StMiniMcPair.cxx - removed;
StPass0CalibMaker
StSpaceChargeEbyEMaker.cxx - GMT conversion fixed;
StPreEclMaker
StEmcOldFinder.cxx, StEmcVirtualFinder.cxx/h, StPreEclMaker.cxx/h - modified to use Logger;
StSsdDaqMaker
StSsdDaqMaker.cxx/h - modified to use new Logger instead of cout, printf;
new logger updated and addition of Finish() function done;
StSsdPointMaker
StSsdPointMaker.cxx/h - WriteStripTuple method added, WriteScmTuple method updated ; few changes for the new Logger
replaced printf,cout,gMessMgr with LOGGER statements ;
StSsdPointMaker.cxx/h - added control histograms and updated the Cluster and Point Tuple;
StSsdSimulationMaker
St_sls_Maker.cxx St_spa_Maker.cxx - replaced printf, cout statements with Logger;
StSsdUtil
StSsdClusterList.cc/h - made correction in the clusters splitting;
StarClassLibrary
StThreeVector.hh - added non-const version of xyz();
StMultiArray.cxx - added class StMultiArray;
StStarLogger
StLoggerManager.h - modified to connect Logger and Maker debug levels;
StLoggerManager.h - added the new StMess abstarct interfaces GetLevel/SetLevel ;
StTriggerDataMaker
StTriggerDataMaker.cxx - updated for run 2007 triggers ;
StUtilities
StMessageManager.cxx/h - added the new StMess abstract interfaces GetLevel/SetLevel;
modified to connect Logger and Maker debug levels;
StarRoot
TUnixTime.cxx - convertion to GMT fixed;
TDirIter.cxx - modified to fix files > 2GB;
Sti
StiMasterHitLoader.h - fixed for gcc4;
Base/StiFactory.h - fixed for gcc4;
St_dst_Maker
St_dst_Maker.cxx - GMT conversion fixed ;
St_geom_Maker
GeomBrowser.ui.h - modified to allow multiply Zebra file to be read;
GeomBrowser.ui - added new geometry tags;
pams/geometry
geometry/geometry.g - added Y2007 geometry tag ;
added steering for new code and settings for TOF, upVPD and FPD/FMS for Y2007;
added logic to include the updated SSD code for year 2007;
added Y2005F and Y2006B geometry tags which includes recent correction for the dead material in the SSD ;
IST1 tag retired;
FMS code (fpdgeo) updated to make more space at the end of the cave;
replace the IGT by the FGT in the UPGRXX tags;
added R&D geometry tag UPGR13;
removed the prototype support cone on the East side for UPGR13 geometry;
modified to put in the dead material version of SSD into UPGR13;
Corrected the steering logic for the new FGT (former IGT) to integrate the newer code;
fgtdgeo/fgtdgeo1.g - removed the hit declaration just to make sure there is no confusion downstream;
replaced a dummy version (a placeholder) of the FGT (formerly known as IGT) code with a piece that supposedly works, and has 6 GEM disks;
fgtdgeo/fgtdgeo3.g - updated ;
vpddgeo/vpddgeo2.g - added the new cut of the code, to be used in year 2007 run ;
code improvements aimed at a better code structure readability and removal of hardcoded values;
btofgeo/btofgeo5.g - updated the new cut of TOF code for Y2007 geometry;
code improvements aimed at a better code structure readability and removal of hardcoded values;
fpdmgeo/fpdmgeo3.g - code improvments aimed at eliminating the hardcoded values and better code structure;
cavegeo/cavegeo.g - changed the cave size by Akio and Ermes request to make it larger ;
sisdgeo/sisdgeo5.g - modified to make an active area in Silicon wafers smaller than the total size of the wafer, corrected;
pams/sim
gphysdata/xsneut96.dat - updated neutron cross section file to make it compatible with starsim ;
gstar/gstar_part.g - modified to bring the particle definitions up to date with new Upsilon levels and strange lambda plus ;
StarDb
VmcGeometry/Geometry.y2006b.C, Geometry.y2005f.C, Geometry.y2006a.C, Geometry.upgr13.C, y2006b.h, y2005f.h, upgr13.h - added new files;
VmcGeometry/Detectors.y2007.root, y2007.h, Geometry.y2007.C, geom.y2007.root - added new files for year 2007 geometry;
StDb
idl/tofTotCorr.idl, tofZCorr.idl - correction Values for TOF calibrations added;
StarVMC/StarVMCApplication
StarMCHit.cxx/h - a prototype of VMC hit implemented; introduced a "legacy mode" for backward compatibility ;
StarMCHits.cxx - updated the McHits class to support new way to traverse the hierarchy of volumes while collecting hits;
StarMCSimplePrimaryGenerator.cxx - added a facility to read the phase space parameters from a file and generate kinematic tracks correspondingly;
StarMCSimplePrimaryGenerator.h - added a constructor which takes a filename;
StarMCHitCollection.h - added a stub for the hit collection;
StarMCRootPrimaryGenerator.cxx/h - added header file for the ROOT-format event reader;
StarVMC/StVMCMaker
StVMCMaker.cxx/h - added new methods;
QtRoot
more development for "Geometry Browser";
2008
STAR SOFTWARE NEWS July 27, 2011
---------------------
The present release assignment:
             SL05a    (SL05a)    ROOT_LEVEL 4.00.04 AuAu200, productionMinBias
             SL05c    (SL05c)    ROOT_LEVEL 4.00.04 AuAu200 production
             SL05d    (SL05d_1)  ROOT_LEVEL 4.00.04 CuCu 200&62 Gev production
             SL05e    (SL05e)    ROOT_LEVEL 4.00.04 pp200 MC production
             SL05f    (SL05f_3)  ROOT_LEVEL 4.04.02 pp run 2005 production
             SL05h    (SL05h)    ROOT_LEVEL 4.04.02 SL 3.0.5
             SL06b    (SL06b_1)  ROOT_LEVEL 4.04.02 cucu 200GeV production
             SL06d    (SL06d_2)  ROOT_LEVEL 4.04.02 MC prod for SVT&SSD review
             SL06e    (SL06e)    ROOT_LEVEL 4.04.02 pp 2006 production
             SL06f    (SL06f_2)  ROOT_LEVEL 4.04.02 MC production for TUP
             SL06g    (SL06g_2)  ROOT_LEVEL 5.12.00 MC production for TUP, SL4.4
             SL07a    (SL07a_3)  ROOT_LEVEL 5.12.00 MC production, SL4.4
             SL07b    (SL07b_2)  ROOT_LEVEL 5.12.00 CuCu reproduction, SL4.4
             SL07c    (SL07c_3)  ROOT_LEVEL 5.12.00 CuCu reproduction, pp200 pythia,SL4.4
             SL07d    (SL07d_2)  ROOT_LEVEL 5.12.00 auau 200GeV, run 2007,SL4.4
             SL07e    (SL07e)    ROOT_LEVEL 5.12.00 auau 200GeV, run 2007, stream data,SL4.4
             SL08a    (SL08a)    ROOT_LEVEL 5.12.00 SL4.4
             SL08b    (SL08b_1)  ROOT_LEVEL 5.12.00 SL4.4
       old-> SL08c    (SL08c_5)  ROOT_LEVEL 5.12.00 run 2007 & run 2008 data production
             SL08d    (SL08d)    ROOT_LEVEL 5.12.00
       pro-> SL08e    (SL08e_2)  ROOT_LEVEL 5.12.00 continue run 2008 data production
             SL08e_embed  (SL08e_5)  ROOT_LEVEL 5.12.00
       new-> SL08f    (SL08f_3)  ROOT_LEVEL 5.12.00 last library release with EVP_READER
             SL08f_embed  (SL08e_4)  ROOT_LEVEL 5.12.00
       dev-> DEV                 ROOT_LEVEL 5.12.00 SL4.4
      .dev-> .DEV                ROOT_LEVEL 5.12.00

-------------------------------------------------
Release History
- SL08f_embed library
- SL08e_embed library
- SL08f library
- SL08e library
- SL08d library
- SL08c library
- SL08b library
- SL08a library
- June 23, 2011
library SL08f has been checked out with tag SL08f_3 and updated with codes related to magnetic field fixes needed for embedding production. Library was rebuild on SL4.4 platform, retagged with tag SL08f_4, named as SL08f_embed, tested and released.
Next codes have been updated:
StDbUtilities
StMagUtilities.cxx, r.1.82
StMagUtilities.h, r.1.45
StMagF
StMagFMaker.cxx, r.1.16
StMagFMaker.h, r.1.7
StarMagField
StarMagField.cxx, r. 1.17
StarMagField.h, r.1.8
St_geant_Maker
St_geant_Maker.cxx, r.1.135
St_geant_Maker.h, r.1.50
pams/geometry/geometry
geometry.g, r. 1.191.2.1 (tagged as SL08f_4patch) - March 18, 2009
library SL08f has been updated with geometry codes for y2009, y2005h, y2007h, rebuild on SL4.4, and SL3.05 platforms and retagged with tag SL08f_3
Next codes have been updated:
StChain
StMaker.cxx/h,StChain.cxx - geometry y2005h & y2007h timestamp; TMemStat & StMemStat handling improved
pams/geometry
geometry/geometry.g - geometry y2009, y2005h, y2007h;
tpcegeo/tpcegeo3.g - update for y2009 geometry;
tpcegeo/tpcegeo2.g - max radius added TIKA,TIAL;
sisdgeo/sisdgeo5.g, sisdgeo6.g - updated, fixed SSD hits energy; SSD shield fixed;
svttgeo/svttgeo11.g - SSD shield fix;
StarDb/ VmcGeometry/Geometry.y2005h.C, Geometry.y2007h.C, y2005h.h, y2007h.h, - new files added;
- February 12, 2009
library SL08f has been updated with R&D codes, rebuild on SL4.4, and SL3.05 platforms and retagged with tag SL08f_2
Next codes have been updated:
StiRnD/Hft
StiPixelDetectorBuilder.cxx, StiPixelHitLoader.cxx;
StiRnD/Ist
StiIstDetectorBuilder.cxx, StiIstDetectorBuilder.h, StiIstHitLoader.cxx;
StPixelFastSimMaker;
StPixelFastSimMaker.cxx, StPixelFastSimMaker.h;
StMcEvent;
StMcIstHit.cc, StMcIstHit.hh, StMcIstHitCollection.hh, StMcPixelHit.cc;
Sti;
StiKalmanTrackFinder.cxx;
pams/geometry
scongeo/scongeo.g - bug fixed;
geometry/geometry.g - fixed TOF geometry; update for upgr15;
pipegeo/pipegeo00.g - update for uprg15; ;
StarDb/Calibrations
tracker/ ist1HitError.upgr15.C, PixelHitError.upgr15.C, PixelTrackingParameters.upgr15.C;
- January 05, 2009
library SL08f has been updated with codes related to geometry y2008a & y2009 modification and timestamps, rebuild on SL4.4, and SL3.05 platforms and retagged with tag SL08f_1
Next codes have been updated:
asps/Simulation/
starsim/atmain/agdummy.age
StChain
StMaker.cxx/h;
pams/geometry
geometry/geometry.g;
btofgeo/btofgeo6.g;
scongeo/scongeo.g;
StarDb/VmcGeometry
y2009.h, Geometry.y2009.C;
y2008a.h, Geometry.y2008a.C;
- December 08, 2008
new library SL08f (tagged as SL08f) has been created, build on SL4.4, and SL3.05 platforms, tested and released on December 12.
Main features:
- geometry fixes, modifications and updates for R&D;
- last version of library with EVP_READER before moving to new RTS code for daq1000 data format;
- first release of UCM package for jobs tracking;
Next codes have been updated:
asps/Simulation/
starsim/atgeant/agrot.F - added rotation routines; changed alpha rotations in the order of usage;
renamed gvrot to gyrot to avoid clash;
starsim/atgeant/agsrotm.age - changed alpha rotations in the order of usage;
include/commons/agecom.inc - changed alpha rotations in the order of usage;
agetof/agetof.def - changed alpha rotations in the order of usage;
StBbcSimulationMaker
StBbcSimulationMaker.cxx/h - removed the redundand dependency of the StBbcSimulationMaker from StDAQMaker;
StDaqLib
EMC/EMC_Reader.cxx - modified to add initialization of mTowerPresent and mSmdPresent;
StDAQMaker
StDAQReader.cxx - modified to adjust the code to satisfy the new evpReader interface;
StDAQReader.cxx/h - fixed the CPP flags; modified to prepare StDAQMaker for DAQ_READER;
StDAQReader.cxx, StRtsReaderMaker.cxx - modified to prepare StRtsReaderMaker for DAQ_READER transition;
StRtsReaderMaker.cxx/h - modified to make the StFileName method protected to discourage its usage; modified to prepare StDAQMaker for DAQ_READER;
StEventDisplayMaker
StEventDisplayMaker.cxx - added the extra header file to define TQtRootViewer3D class;
StFilterDialog.cxx/h - modified for Qt3/Qt4 transition;
StEventControlPanel.cxx/h - added new files for for Qt3/Qt4 transition;
StFtpcClusterMaker
StFtpcClusterMaker.cxx, StFtpcTrackMaker.cxx - standardized m_Mode LOG_INFO messages;
StMuDSTMaker
COMMON/StMuEvent.cxx/h - modified to ensures StMuEvent::primaryVertexPosition() returns the position of current x (set by StMuDst::setVertexIndex(Int_t vtx_id)): previously it returned the position of best ranked vertex.;
modified to insures events with no vertex have a PVx=PYy=PYz=-999 rather than 0;
StPmdReadMaker
StPmdReadMaker.cxx, StPmdCleanConstants.cxx/h - added BadChains for dAu;
RTS
rtsmakefile.def - fixed broken HOSTDILE on vxWorks;
src/EVP_READER/evpReader.cxx - updated getlegacydata; added more DBG logs;
special.C - fixed TPC slowness;
evpReader.cxx, evpReaderClass.h - fixed padding bug; changed bytes to measure from start of datap even if datap not at start of event; simplifid writeCurrentEvent;
emcReader.cxx/h - added EMCADCD bank; modified to cleare emc struct;
sanityCheckers.cxx - added some more logging ;
trgReader32.cxx - added more DBG logs;
trgReader.cxx - bug fixed;
tpxCore.cxx - added user code;
rtsmakefile.def - changed for EVP_READER to support 2008 data formats ;
Makefile, evpReader.cxx, evpReaderClass.h, special.C - changed for EVP_READER to support 2008 data formats ;
Makefile, evpReader.hh, pp2ppReader.cxx, ppreader.C, sanityCheckers.cxx, special.C - modified to get rid of separate pp2pp reader, now it is part of standard mechinism; Replaced isevp flag;
src/SFS/Makefile, sfs_index.cxx/h - added lrhd, legacy always from datap; made fixes to daqReader to support standalone tpx sfs files;
fixed event parsing for case of pure sfs/w logfile;
sfs_index_daq.cxx - new files added; replaced isevp flag; also made IsEvp() accessor function for the purists;
fs_index.cxx, sfs_index.cxx - fixed padding bug;
include/rtsSystems.h - removed TPC from TCD stuff ; changes to EVP_READER to support 2008 data formats;
RC_Config.h - update made to config file ; modified to replace MIX -> MXQ; FPE -> BBQ;
modified to make EvbChooser chooses evenly in case of magic tokens and in case of raw_write on;
prepareGbPayload.h - changed clock_gettime() to gettimeofday() for kernel 2.4 ; format version for token 0; fixed swap problem;
daqFormats.h - added BSMD ZS and PED; changed u_short to unsigned short;
daqModes.h - added RUN_TYPE_EVB_TEST for EVB and TPX tests;
rtsSystems.h - removed mix;
include/TPX/tpx_altro_to_pad.h - modified;
trg/include/trgDataDefs.h - added new L1 crate definition in trgDataDefs.h; added add_bits;
trgConfNum.h - added definition of data objects for use with trgDataDefs.h; modified to relace MIX -> MXQ; FPE -> BBQ;
trgConfig.h, trigger.h, fpeMap.h, logmessage.h, mixMap.h, mvmeFastTickerLib.h, pmc.h, pmc_user.h, QT.h, trgenv.h, trgMap.h, trgMsg.h, trgStructures.h, bbcMap.h, DSM.h - files removed;
StEmcMixerMaker
StEmcPreMixerMaker.cxx - removed logging of timestamp in Make();
StEmcSimulatorMaker
StEmcSimpleSimulator.cxx - set BPRS sampling fraction to 1.0 so energy is just energy in scintillator;
StEmcSimulatorMaker.cxx/h - modified to store GEANT dE in MuDST raw hit energy data member and don't store GEANT dE in MuDST for embedding;
Sti
StiElossCalculator.cxx/h - Geant gdrelx_ replaced by C++ version ;
StSvtSelfMaker
StSvtSelfMaker.cxx/h, StVertexKFit.cxx - modified;
StSvtSimulationMaker
StSvtSignal.cc - changed gain as needed for tuning CuCu data;
StSvtElectronCloud.cc - initialized some variables ;
StSvtSimulationMaker.cxx - fixed some mistakes in new way of initializing variables ;
StarClassLibrary
StThreeVector.hh - set(x,y,z) added;
StarRoot
StarRootLinkDef.h - StMultiKey classes added;
TCFit.cxx/h - modified to speed up;
THelixTrack.cxx/h - flag 2d and 3d dca added ;
xTCL.cxx/h - method toEuler added;
StMultiKeyMap.cxx/h - new file (class) added ;
StTpcHitMoverMaker
StTpcHitMoverMaker.cxx - modified to ignore IdTruth > 10000 (generated by online clustering for bookkeeping purpose);
StTriggerUtilities
Bemc/StBemcTriggerSimu.cxx/h - fixed for Layer0 DSM JP trigger (J1 and J3) plus diagnostic histograms;
change ch to dsm in TriggerBank mapping; fixes for J1 and J3 added into JP sums;
updated with histograms verifying emulator with Trigger Bank Bits in addition to moving all trigger decisions to Layer 2 for 2006;
updated 2007 L0 BEMC algo;
added 2007-2008 dAu HT (only) triggers;
Bemc/StBemcTriggerDbThresholds.cxx/h - updateed 2007 L0 BEMC thresholds;
added 2007-2008 dAu HT (only) triggers;
StJanEventMaker/StJanEventMaker.cxx - modified to allow production of bin.eve files from 2008 pp data to be used by L2-algos;
L2Emulator/StGenericL2Emulator.cxx, StL2_2008EmulatorMaker.cxx, StL2_2008EmulatorMaker.h - modified to allow production of bin.eve files from 2008 pp data to be used by L2-algos;
StTrsMaker
StTrsMaker.cxx - modified to account that Z-offset is sector dependent ;
src/StTrsParameterizedAnalogSignalGenerator.cc, StTrsSlowAnalogSignalGenerator.cc - modified to account that Z-offset is sector dependent;
include/StTrsAnalogSignalGenerator.hh, StTrsParameterizedAnalogSignalGenerator.hh, StTrsSlowAnalogSignalGenerator.hh - modified to account that Z-offset is sector dependent ;
rtsLog.h - renamed DUMMY and SL3 ports ;
rtsSystems.h - added RICH to rts2name; updated for trigger nodes;
St_geant_Maker
StPrepEmbedMaker.cxx - added initialization for RNDM seeds; seeding now from the clock and the UNIX; changed default from gkine to phasespace ;
St_geant_Maker.cxx - FGSC==>FGZC; FGZD hits added;
St_geom_Maker
GeomBrowser.ui, GeomBrowser.ui.h, StGeomBrowser.cxx - modified to synchronize the combobox and macro default to reduce the confusion ; added the total number of the volumes to the list view;
StTofUtil
StTofSimParam.cxx/h, StTofrDaqMap.cxx - added MRPC-TOF simulation parameters; added TOF/VPD fast simulation parameters ;
StUCMApi
first release of UCM package for jobs tracking;
pams/geometry
geometry/geometry.g - updated upgr16 geometry for R&D ; tpcConfig==4 for upgr16;
upgr17 added; set bTofConfig=6 for y2008;
updated to correct starsim;
calbgeo/calbgeo2.g - added modification of S.Trentalange; CSZO CSZU poligons now;
btofgeo/btofgeo6.g - modified to change the tray selection to be the final tray design;
ecalgeo/ecalgeo.g - updated to correct starsim;
fgtdgeo/fgtdgeo2.g - added upgr16 geometry for R&D ; upgr16 divisions of disks added; FGSC ==> FGSD
fpdmgeo/fpdmgeo.g, fpdmgeo1.g, fpdmgeo2.g, fpdmgeo3.g - updated to correct starsim;
istbgeo/istbgeo00.g - updated;
sisdgeo/sisdgeo1.g - updated to correct starsim;
svttgeo/svttgeo.g, svttgeo1.g, svttgeo10.g, svttgeo11.g, svttgeo2.g, vttgeo3.g, svttgeo4.g, svttgeo6.g, svttgeo7.g - updated;
pixlgeo/pixlgeo00.g - updated;
vpddgeo/vpddgeo2.g - updated to correct starsim;
pams/sim
g2t/g2t_fgt.F - FGZD hits added;
pams/gen
hijing/hijing.f - added check if index is out of array;
StarDb
VmcGeometry/upgr20.h, upgr21.h - R&D geometry added; upgr15.h, upgr16.h updated;
StDb
idl/bemcMapping.idl, bprsMapping.idl, bsmdeMapping.idl, bsmdpMapping.idl - initial release of bemc mapping tables;
idl/ bemcMap.idl, bsmdeMap.idl, bsmdpMap.idl, bprsMap.idl - added to fix bemc mapping idl; update of the structure name;
- July 27, 2011
SL08e_embed library has been updated with codes below to proceed with FTPC embedding production. Library was rebuild on SL4.4 platform, retagged with tag SL08e_5, tested and released.
Next codes have been updated:
StAssociationMaker
StAssociationMaker.cxx, r. 1.50.2.1
StAssociationMaker.h, r. 1.21.2.1
StTrackPairInfo.cc, r. 1.6.2.1
StTrackPairInfo.hh, r. 1.6.2.1
StFtpcClusterMaker
StFtpcClusterMaker.cxx, r. 1.98.2.1
StFtpcSlowSimMaker
StFtpcSlowSimReadout.cc, r. 1.19.2.1
St_geant_Maker
StPrepEmbedMaker.cxx, r. 1.7.2.1
StPrepEmbedMaker.h, r. 1.3.2.1
StarDb/ftpc
ftpcSlowSimPars.C, r. 1.1
- June 23, 2011
library SL08e has been checked out with tag SL08e_3 and updated with codes related to magnetic filed fixes needed for embedding production. Library was rebuild on SL4.4 platform, retagged with tag SL08e_4, named as SL08e_embed, tested and released.
Next codes have been updated:
StDbUtilities
StMagUtilities.cxx, r.1.82
StMagUtilities.h, r.1.45
StMagF
StMagFMaker.cxx, r.1.16
StMagFMaker.h, r.1.7
StarMagField
StarMagField.cxx, r. 1.17
StarMagField.h, r.1.8
St_geant_Maker
St_geant_Maker.cxx, r.1.135
St_geant_Maker.h, r.1.50
- November 21, 2008
library SL08e has been updated with codes below to trap the faulty scalers and improve TPC distortion corrections, largest affect for high Pt trackes:
StDetectorDbMaker
StDetectorDbMaker.cxx, StDetectorDbRichScalers.h, St_spaceChargeCorC.h, St_trigDetSumsC.h - modified to handle stuck scalers with modifications in trigDetSums;
Library was retagged with tag SL08e_2 and rebuild on SL4.4, SL3.05 and SL3.02 platforms.
- November 17, 2008
library SL08e has been updated with codes below to fix swaps in BPRS (EMC) and continue pp 200GeV, run 2008 production.
Next codes have been updated:
StDaqLib
EMC/StEmcDecoder.cxx/h - fixed swaps in BPRS
StEmcRawMaker
StBemcRaw.cxx - updated to fix swaps in BPRS
SL08e librray was retagged with tag SL08e_1 and rebuild on SL4.4, SL3.05 and SL3.02 platforms.
- October 24, 2008
new library SL08e (tagged as SL08e) has been created, build on SL4.4, SL3.02 and SL3.05 platforms, tested, found bugs have been fixed. Library was released on November 10.
Main features:
- PPV vertex code logic has been improved to cut some certain pattern of hits crossing central membrane and remove pile-up tracks crossing central membrane; important eddition for run 2008 pp 200GeV data production;
- fixed mismapping in EMC(BPRS) which caused that some data from a couple channels to be overwritten during production;
- fixed bug which caused stale EMC data in MuDsts, effected BPRS and BSMD;
- SSD simulation code has been developed to calculate the quality of hits and use it in reconstruction;
Next codes have been updated:
StBFChain
BigFullChain.h, StBFChain.cxx - implemented 'usePct4Vtx' option to switch on/off PostCrossing Tracks;
StDaqLib
EMC/EMC_Reader.cxx - added initialization of mTowerPresent and mSmdPresent;
EMC/StEmcDecoder.cxx - fixed mismaping;
StEvent
StTrack.h - added track pile up flag description;
StEmcADCtoEMaker
StEmcADCtoEMaker.cxx - added option to throw out all hits in an event if any crates are corrupted;
StEmcRawMaker
StBemcRaw.cxx/h - added option to throw out all hits in an event if any crates are corrupted;
StEmcUtil
geometry/StEmcGeom.cxx - updated geometry ;
StGenericVertexMaker
StiPPVertex/StPPVertexFinder.cxx/h - cut on hit max R chanegd from 190 to 199cm implemented;
fixed logic of crossing CM for certain pattern of hits;
added a new function bool isPostCrossingTrack(); it returns true if track have 2 or more hits in wrong Z;
fit was changed to use isPostCrossingTrack();
added switch setDropPostCrossingTrack(bool) to remove PostCrossingTrack, default set to "true"
modified to store 5 unqualified vertices with negative rank;
StPPVertexFinder.h - modified to add switches for turning on/off use of Post-Crossing Tracks [default is off];
StGenericVertexFinder.cxx/h, StGenericVertexMaker.cxx/h - modified to add switches for turning on/off use of Post-Crossing Tracks [default:off];
StMuDSTMaker
COMMON/StMuDstMaker.cxx - added maximum vertex list = 100;
StarClassLibrary
StHelix.cc - fixed sign problem in seed calculation for helix-helix DCA ;
StSsdPointMaker
StSsdPointMaker.cxx - modified to use the new writePointToContainer method for the hit quality calculation;
StSsdUtil
StSsdStrip.cc/hh - modified to propagate idMcTrack used for IdTruth ;
StSsdStripList.cc - modified to fillin only one signal contribution (the higher) of GEANT hit per strip;
StSsdBarrel.cc/hh - added methods for the calculation of hit quality;
StSsdConfig.cc - initialized the SSdConfig data-member and flag the wrong configuration as an error;
StSsdConfig.hh - modified to make the copy ctor and operator = to private to spot the possible abuse;
StSvtSimulationMaker
StSvtSimulationMaker.cxx, StSvtAngles.cc - Initialized the class data-members;
StSvtElectronCloud.cc - initialized all data-members of the class StSvtElectronCloud ;
Sti
StiSortedHitIterator.cxx - fixed bug when the first detector has no hits;
StiElossCalculator.cxx/h, StiKalmanTrackNode.h, StiTrackNodeHelper.h, StiKalmanTrack.cxx - several bugs fixed ;
StiDetectorBuilder.cxx - interface changed, ionizatin**2==>ionization;
StiMaker
StiStEventFiller.cxx - added flag for pile-up track in TPC;
StTofCalibMaker
StTofCalibMaker.cxx/h - mTStart added to proceed with run 2008 data;
StTpcDb
StTpcDb.cxx/h, StTpcDbMaker.cxx - speedup TPC drift velocity, avoid expensive conversion to unix time;
- August 20, 2008
new library SL08d (tagged as SL08d) has been created, build on SL4.4, SL3.02 and SL3.05 platforms, tested, found bugs fixed and released on August 22.
Main features:
- SSD simulation code has been fixed to run simulation and embedding;
Next codes have been updated:
StBFChain
BigFullChain.h - added TpcMixer;
StBFChain.cxx - modified to turn off gain and t0 correction in StTpcRTSHitMaker for Trs or Embedding;
St_base
StAutoBrowse.cxx - fixes for ROOT version >= 5.19;
StChain
StMaker.cxx - y2007a added;
StDetectorDbMaker
StDetectorDbChairs.cxx - modified;
St_spaceChargeCorC.h - modifyed to allow for multiple rows (e.g. detectors) in determining charge;
St_TpcAltroParametersC.h St_asic_thresholdsC.h St_tpcT0C.h - added new files;
St_tpcISGainsC.h, St_tpcISTimeOffsetsC.h, St_tpcOSGainsC.h, St_tpcOSTimeOffsetsC.h - removed files;
StEmcADCtoEMaker
StEmcADCtoEMaker.cxx - modified to make status table checking default behavior for analysis level to reflect change in StBemcRaw ;
StEEmcDbMaker
StEmcAsciiDbMaker.cxx/h - new files added ; saved BTOW reative location mapping;
StEmcRawMaker
StBemcRaw.cxx - minor bug fix in StBemcRaw::createDecoder;
StEvent
StTpcRawData.cxx/h - modify operator += ;
StBbcTriggerDetector.cxx/h - modified zVertex(). Implemented calibrated BBC vertex z position code ;
StEventUtilities
StEventHelper.cxx - modified to add the explicit cast;
StFtpcClusterMaker
StFtpcClusterMaker.cxx - modified to insure that the correct microsecondsPerTimebin is used for every event;
StFtpcClusterMaker.cxx, StFtpcDbReader.cc/hh - modified to write the new value for mMicrosecondsPerTimebin back into Calibrations_ftpc/ftpcElectronics table if microsecondsPerTimebin calculated from RHIC clock;
StMiniMcMaker
StMiniMcMaker.cxx - modified to remove a cut in acceptRaw(StMcTrack*) that checked on the pseudorapidity;
StSsdDbMaker
StSsdDbMaker.cxx - fixed bug in geometry;
StSsdDbMaker.cxx/h - modifyed to use SsdLaddersOnSectors,SsdOnGlobal,SsdSectorsOnGlobal,SsdWafersOnLadders tables to calculatessdWafersPositions; added Get methods to access the tables;
StSsdSimulationMaker
St_sls_Maker.cxx/h, St_spa_Maker.cxx/h - modifyed to retrieve positions and dimensions tables using Get methods;
StiSsd
StiSsdDetectorBuilder.cxx - modified to take SSD as dead material from whatever exist in GEANT if StSsdBarrel does not exist;
StTagsMaker
StTagsMaker.cxx - added check that StTriggerIdCollection exists;
StTofUtil
StTofINLCorr.cxx - fixed a bug of empty lines in log file under no-debug mode; LOGGER print corrected with an if statement;
StTpcDb
StTpcDb.cxx/h, StTpcDbMaker.cxx, StTpcdEdxCorrection.cxx/h, St_tpcCorrectionC.cxx - modified to add new getT0;
StRTpcGain.cxx/h, StTpcGainI.h, St_tpcGainC.cxx/h, St_tpcPadResponseC.cxx/h, St_tpcPedestalC.cxx/h, - removed files;
StTpcHitMaker
StTpcHitMaker.cxx/h, StTpcRTSHitMaker.cxx - modified for TpcMixer;
StTpcRTSHitMaker.cxx - modifyed to turn off gain and t0 correction in StTpcRTSHitMaker for Trs or Embedding;
StTpcMixerMaker.cxx/h - new files added;
StTrsMaker
src/StTpcDbElectronics.cc - modified to create new interface to tpcT0;
St_geant_Maker
StPrepEmbedMaker.cxx - changed tags used to get multiplicity for calculating how many particle to embed from numberOfPrimaryTracks to uncorrectedNumberOfPrimaries;
StPrepEmbedMaker.cxx/h - modified to skip embedding events without primary vertex and flag for this behaviour;
St_geom_Maker
GeomBrowser.ui.h - added the human readable volume description to the Geometry Browser;
GeomBrowser.ui.h, QExGeoDrawHelper.cxx - fixed compilation errors;
StStarLogger
StUCMAppender.cxx/h - added the StUCMLogger;
UCMBuild.csh, UCMLogger.xml -added new version of UCM build;
macros/embedding
bfcMixer_Tpx.C - added mixer for TPX;
StJetMaker
emulator/, StPythia/, test/, base/, mudst/, misc/, tree/, trigger, vertex/ - new code development;
StarDb
VmcGeometry/Geometry.y2007a.C y2007a.h - y2007a geometry added ;
Calibrations/tpc/TpcAltroParameters.20080623.000000.C, tpcGain.20071127.151801.root,
tpcGain.20080208.174701.root, tpcGain.C, tpcT0.19970101.000000.root,
tpcT0.19990615.000000.root, tpcT0.20000501.000000.root, tpcT0.20000615.000000.root,
tpcT0.20010601.000000.root, tpcT0.20010911.000000.root, tpcT0.20010924.000000.root,
tpcT0.20011205.000000.root, tpcT0.20030101.000000.root, tpcT0.20030101.000001.root,
tpcT0.20031228.000000.root, tpcT0.20040416.145000.root, tpcT0.20050111.190700.root,
tpcT0.20050209.152800.root, tpcT0.20050311.153700.root, tpcT0.20050412.184300.root,
tpcT0.20060308.115800.root, tpcT0.20060510.150600.root, tpcT0.20070330.135100.root,
tpcT0.20070420.142400.root, tpcT0.20070503.000000.root, tpcT0.20070524.161900.root,
tpcT0.20070524.161901.root, tpcT0.20071127.151800.root, tpcT0.20071127.151801.root,
tpcT0.20080208.174700.root, tpcT0.20080208.174701.root, tpcT0.C - Add new tpcGain, tpcT0 and TpcAltroParameters, moved then to MySql;
Geometry/ssd/ - cint files moved to MySql;
Geometry/svt/ - cint files moved to MySql;
- August 4, 2008
library SL08c has been updated with code to improve primary vertex ranking for auau 200GeV, run 2007 and related bfc chain options:
StBFChain
BigFullChain.h, StBFChain.cxx - VFMinuit3 chain option for lower ranking of split vertices implemented;
StGenericVertexMaker
StGenericVertexMaker.cxx - chain option VFMinuit3 added for new vertex ranking algorithm;
Minuit/StMinuitVertexFinder.cxx/h - new vertex ranking algorithm added;
StTofCalibMaker
StTofCalibMaker.cxx - mBeamLine initialized in constructor to avoid null pointer when no calibration tables;
Updated library was retagged with tag SL08c_5;
- July 24, 2008
library SL08c has been updated with codes below to fix the bugs:
StBFChain
BigFullChain.h - chain adjustemented for 'g' geometries and added pp2006g;
StEmcRawMaker
StBemcRaw.cxx - modified to changed default status check mode to off;
StPass0CalibMaker
StSpaceChargeEbyEMaker.cxx - modified not to call to EvalCalib() if prepass runs successfully; write SpaceChargeEWRatio to prepass output table;
StTofCalibMaker
StTofCalibMaker.cxx - initialization added for global variables in StTofCollection in each event;
StTofrMatchMaker
StTofrMatchMaker.cxx/h - implemented new track track quality cuts for run 2008 data production;
Sti
StiKalmanTrack.cxx - removed 100 cm cut on hit radius to calculate DcaGeometry;
Library was retagged as SL08c_4 and rebuild on SL4.4, SL3.02 and SL3.05 platforms;
- July 18, 2008
library SL08c has been updated with codes below to fix bugs and improvement for production:
StAnalysisUtilities
StHistUtil.cxx - modified to add canvas-to-code output with .CC suffix and allow saving histograms to plain ROOT file ;
StDaqLib
SSD/SSD_Reader.cxx ;
EVP/ssdReader.cxx;
StEmcADCtoEMaker
StEmcADCtoEMaker.cxx/h - added checking of every status table for each hit; bug fixed;
StEmcRawMaker
StBemcRaw.cxx/h - added checking of every status table for each hit; bug fixed;
StFtpcClusterMaker
StFtpcClusterFinder.cc - inner cathode correction, modified to insure that the correct microsecondsPerTimebin is used for every event;
StFtpcTrackMaker
StFtpcTrack.cc - improved momentum fitting conditions: exit fit if plength >= NoSolution/2 for any hit, bug fixed ;
StMuDSTMaker
COMMON/StMuChainMaker.cxx - replaced GetEnv by HostName() ;
StPass0CalibMaker
StSpaceChargeEbyEMaker.cxx/h - added evaluation of space charge calibration performance;
StSsdPointMaker
StSsdPointMaker.cxx - calculation of hits quality removed;
StSsdSimulationMaker
St_sls_Maker.cxx - bug fixed, initialized StMcSsd hits collections ;
StSsdUtil
StSsdBarrel.cc, StSsdWafer.cc - calculation of hits quality removed ;
StStrangeMuDstMaker
StKinkI.hh, StKinkMuDst.cc/hh, StV0I.hh, StV0MuDst.cc/hh, StXiI.hh, StXiMuDst.cc/hh - modified to allow for marking of bad tracks in V0, bad secondary vertices;
StUtilities
StMultiH1F.cxx/h, StMultiH2F.cxx/h - implemented SavePrimitive functions;
macros/qa
RecoQA.C - macro to run QA for release of library;
pams/geometry
btofgeo/btofgeo6.g - tof geometry updated for phi alignment;
StarDb
Calibrations/tpc/TpcEdge.20070321.000102.C, TpcLengthCorrectionB.20071101.000015.C, TpcLengthCorrectionB.20080128.000015.C, TpcZCorrectionB.20071101.000000.C,;
tpcGasTemperature.20071101.000000.C, tpcPressureB.20071101.000011.C, tpcPressureB.20080128.000011.C, TpcSecRowB.20071101.000011.root, TpcSecRowB.20080128.000011.root;
Data have been moved to MySql;
Library was retagged as SL08c_3 and rebuild on SL4.4, SL3.02 and SL3.05 platforms;
- June 16, 2008
new library SL08c (tagged as SL08c_2) has been created, build on SL4.4, SL3.02 and SL3.05 platforms, tested, found bugs fixed and released on July 2.Main features:
- new RTS code development has been finalized to proceed with daq1000 data and to preserve the ability to proceed with daq100 and raw data;
- trigger ID and geometry for run 2008 has been updated and finalized;
- Tof code has been updated and modified for run 2008;
- Sti bug which led to loosing low Pt tracks has been fixed;
- dead material added in SVT/SSD geometry;
Next codes have been updated:
StAnalysisUtilities
StHistUtil.cxx - made changes to FTPC radial step plots/fits;
StHistUtil.cxx/h - modified to allow the use of any file for PrintList specification; allow summing over (ignoring) histogram prefixes;
StBFChain
BigFullChain.h - removed ctf, St_trg_Maker (Physics, etc) from all chain after Y2005; added dependence SsdUtil vs StEvent, and sls from McEvent for ssd embedding ; bug fixed, added the missed daq dependency for the Mixer;
BigFullChain.h - removed l0, Physics from base chains; replace TrsMini => TpcRS;
BigFullChain.h - added new chain option ToFx for TOF detector; added B2007g to use y2007g; added B2008a to use TpcX and ToFx instead of tpcI ;
StBFChain.cxx - renamed TrsMini => TpsRS, move geant initialization staff in St_geant_Maker, new scheme for StHitMakers ;
St_base
StMessMgr.h - modified to change the abstarct class return type to separate the different STAR streams;
StChain
StRtsTable.cxx/h - added ;
StChain.cxx, StMaker.cxx/h - added geometries for y2005g, y2006g and y2007g;
StDAQMaker
StRtsReaderMaker.cxx/h - added new maker to communicate with the new RTS_READER from RTS code;
StDAQMaker.cxx/h, StRtsReaderMaker.cxx - modified to synchronize old and new EVP and RTS DAQ readers;
StRtsReaderMaker.cxx - added third numeric parameter for get method ;
StDAQReader.cxx - modified to restore the DATAP summary information if needed;
StDbUtilities
StMagUtilities.cxx/h - modified previous magfield changes and set 'zero' field to ~1 gauss; Add SpaceChargeEWRatio and appropriate functions that allow us to calibrate d-au collisions;
StDbUtilitiesLinkDef.h, StMagUtilities.cxx, StTpcCoordinateTransform.cc/hh, StTpcPadCoordinate.cc/hh - modified to use TChairs, introduced sector to sector time offset;
StTpcCoordinateTransform.cc - modified to account sector t0 shift only once;
StSvtCoordinateTransform.cc - removed check that hit is on wafer;
StEEmcSimulatorMaker
StEEmcSlowMaker.cxx/h - added options to disable operation of individual slow simulaor subsystems;
StEmcADCtoEMaker
StEmcADCtoEMaker.cxx - modified;
StEmcRawMaker
StEmcRawMaker.cxx/h - utilize new BFC option for GoptEMC for controlADCtoE table;
StEmcUtil
geometry/StEmcGeom.cxx - fixed BSMDP mapping between GEANT volume ID and m-e-s space for BTOW/BPRS, eta<0;
StEvent
StTpcRawData.cxx/h - modified to keep pixel raw data as short istead of uchar; added protection for pad numbers;
StTofCollection.h - added new member vzVpd and related access methods;
StTofCollection.cxx - assigned default values in constructor;
StEventUtilities
StDraw3DEvent.cxx/h - implemented simple class to manually draw the StEvent objects; introduced the global event display pointer;
StDraw3DEvent.h - added StThreeVector signature methods;
StuDraw3DEvent.cxx/h - renamed StDraw3DEvent to StuDraw3DEvent to meet the StEventUtitilities packahe naming conventions; added StEvent track StTpcHit collection access methods; added method to see detector names;
StEventUtilitiesLinkDef.h - new file added;
StEventUtilitiesLinkDef.h, StuDraw3DEvent.cxx - new styles added;
StDraw3DEvent.cxx/h - removed the obsolete class StDraw3DEvent, it was replaced with StuDraw3DEvent;
EveDis.C - edded macro-template to create the custom classes;
StLaserAnalysisMaker
LaserEvent.cxx/h, LoopOverLaserTrees.C, StLaserAnalysisMaker.cxx - added t0 handlers for Tpx/Tpc time offsets;
StMiniMcMaker
doEmcEmbedEvent.C - first release of macro to run EMC afterburner embedding to store EMC info in StMiniMcEvent;
StMixerMaker
StMixerMaker.cxx/h - modified to change interal presentation for ADC from UChat_t to Short_t;
StFtpcCalibMaker
StFtpcCalibMaker.cxx - modified to get laser t0 from Calibrations_ftpc/ftpcElectronics offline database table;
StFtpcLaserCalib.hh - modified to replace StMagUtilities.h with StarMagField.h - necessary for HELIX_FIT ;
StFtpcCalibMaker.cxx/h,StFtpcLaserCalib.cc modified to re-activate helix fit;
StFtpcClusterMaker
StFtpcDbReader.cc/hh - added laserTZero to Calibrations_ftpc/ftpcElectronics;
StFtpcTrackMaker
StFtpcTrackMaker.cxx - modified to write FTPC calibration vertices with successful fit to StEvent;
bug fixed: if NoSolution found for MomentumFit with primary vertex, set mFromMainVertex = kFALSE for the track to avoid looping in StarMagField 3D field interpolation;
StFtpcVertex.cc - modified to set FTPC calibration vertex flag: 0 = fit successful, 1 = fit unsuccessful;
StGenericVertexMaker
StGenericVertexMaker.cxx - modified to protect from segfault if dbDataSet->FindObject("vertexSeed") fails ;
StMuDSTMaker
COMMON/StMuTrack.cxx - changed/fixed handling of DCA for global tracks without StDcaGeometry: now calculate DCA based on helix;
Changed globalDca() function to also work for globals that are attached to a different primary vertex. Used to return -999, now use helix to calculate ;
StMuEvent.cxx/h - added getter and setter for vpd z vertex position;
StMuDst.cxx - modified to get info from StEvent so vpd z vertex infomation is available in StMuEvent;
COMMON/macros/StMuDstMaker.C - added StTofCalibMaker and related libraries so vpd info is corrected filled into the MuDst;
StPass0CalibMaker
StVertexSeedMaker.cxx/h - modified to handle DB access; added cuts capability to Aggregate;
StSpaceChargeEbyEMaker.cxx - modified to reduce pileup contributions ;
StEvtVtxSeedMaker.cxx, StMuDstVtxSeedMaker.cxx, StVertexSeedMaker.cxx/h - modified to use vertex errors for weighting;
RTS/src
rtsmakefile.def - modified;
rtsplusplus.def - added new file to merge online code with StRoot;
DAQ_PP2PP/Makefile, daq_pp2pp.cxx/h - added to merge online code with StRoot;
DAQ_TOF/Makefile, daq_tof.cxx/h - added to merge online code with StRoot;
RTS_READER/Makefile, Reader.C, daq_det.cxx/h, daq_dta.cxx/h, daq_dta_structs.h, rts_reader.cxx/h, daq_dta_dict.cxx - added to merge online code with StRoot;
RTS_READER/tpx_simulation.C - added TPX simulation example;
DAQ_TPX/Makefile, daq_tpx.cxx/h, tpxFCF.cxx/h, tpxGain.cxx/h - added to merge online code with StRoot;
DAQ_TPX/daq_tpx.cxx, tpxFCF.cxx/h - simulation track_id and quality added;
DAQ_LEGACY/Makefile, daq_legacy.cxx/h - first release for daq1000 format;
DAQ_ESMD/Makefile, daq_esmd.cxx/h, emc_reader.cxx - first release for daq1000 format;
DAQ_TPC/Makefile, daq_tpc.cxx/h, tpc_reader.cxx - first release for daq1000 format;
SFS/Makefile, fs.C, fs_ex.C, fs_index.cxx/h, sfs_index.cxx/h, sfs_single.C - modified to merge online code with StRoot;
SFS/daqr_index.cxx daqr_index.h fsBankReader.cxx fsBankReader.h - removed ;
SFS/sfs_base.h - added new file;
EVP_READER/Makefile, evpReaderClass.h, evpReader.cxx, trgReader.cxx - modified to merge online code with StRoot;
EVP_READER/evpReader.cxx, evpReaderClass.h, special.C - modified to add daqbits_l1, daqbits_l2 ;
evpReader.cxx, evpReaderClass.h - added function to fix the summary values for some arbitrary externally supplied datap;
evpReaderClass.h - added daqFormats so offline can compile; modified to used forward declaration of datap to avoid conflict with struct redefinitions in StDaqLib ;
include/iccp.h, iccp2k.h, rts.h, rtsMonitor.h, rtsSystems.h, prepareGbPayload.h - modified to merge online code with StRoot;
include/rtsMonitor.h - modified EVB and GB structures;
StRTSClient
FCFMaker/FCFMaker.cxx - modified to move coordinate transformation into StTpcCoordinateTransformation from StDbUtilities;
StSsdDaqMaker
StSsdDaqMaker.h - maker renamed to be comply with StSsdPointMaker expectations;
StSsdDaqMaker.cxx - fixed the unproper STAR logger invocation;
StSsdFastSimMaker
StSsdFastSimMaker.cxx - added protection against g2t_ssd_hit == 0;
StSsdPointMaker
StSsdPointMaker.cxx - added mcEvent dependence for embedding; fixed improper STAR logger invocation
StSsdSimulationMaker
St_sls_Maker.cxx/h, St_spa_Maker.cxx - modified reading of GEANT hits, needed for embedding;
StSsdEmbeddingMaker.cxx/h - new files added for embedding;
St_sls_Maker.cxx/h, St_spa_Maker.cxx/h - removed inactive variables; fixed a potential memory leak ;
StSsdUtil
StSsdBarrel.cc/hh, StSsdWafer.cc - added a switch to use constant noise and pedestal ;
StSsdBarrel.cc/hh, StSsdStrip.hh, StSsdStripList.cc, StSsdWafer.cc - modified to calculate the quality of hits used in embedding ;
StStarLogger
MySQLAppender.cxx - added the LOW_PRIORITY option for UPDATE the reduce the dead lock probability;
StLoggerManager.cxx/h - modified to change the abstarct class return type to separate the different STAR streams;
modified to allow complex formating with several logger streams;
StTpcHitMaker
StEVPTpcCluser.cxx/h, StTpcHitMaker.cxx/h, StTpcRTSHitMaker.cxx/h, StDaqTpcClusterInterface.h - new maker to access TPC DAQ information via EVP_READER, modification for daq1000;
StTreeMaker
StTreeMaker.cxx - fixed the xrootd I/O;
StTofUtil
StSortTofRawData.cxx/h, StTofINLCorr.cxx/h, StTofrDaqMap.cxx/h, StTofrGeometry.cxx/h - updated for run 2008;
StSortTofRawData.cxx/h - updated to accomondate full barrel system; added physical hit selection for upVPD; tray number imposed in init() for Run V data;
StTofCalibMaker
StTofCalibMaker.cxx/h - updated for run 2008; reseted time values when tot/z is out of range;
modified to add filling of vzvpd into StTofCollection;
StTofrMatchMaker
StTofrMatchMaker.cxx/h - updated for run 2008; updated the HPTDC bin width to full precision; added switch for tpc track tree output;
StTofrMatchMaker.cxx - modified to store leadingEdgeTime and trailingEdgeTime with double precision in StTofCell;
vpd letime and tetime stored in double precision; modified to store letime and tetime in StTofCell in nano-seconds; fixed a bug of crashing due to potential empty track in trackNodes;
StUtilities
StMessageManager.cxx/h - modified to change the abstract class return type to separate the different STAR streams ;
Sti
StiKalmanTrackFinder.cxx - modified to remove check on approx();
StiDetectorBuilder.cxx/h, StiKalmanTrackNode.cxx, StiVMCToolKit.cxx - added dead material;
StiHitContainer.cxx/h, StiSortedHitIterator.h - bug fixed;
StiMaker
StiDetectorVolume.cxx, StiMaker.cxx - added dead material;
StiSvt
StiSvtDetectorBuilder.cxx - added dead material;
StiSsd
StiSsdDetectorBuilder.cxx - added dead material; removed all SSD endcap volumes;
StiTpc
StiTpcDetectorBuilder.cxx - added dead material;
StiRnD
Hft/StiPixelHitLoader.cxx - removed hit smearing ;
St_QA_Maker
QAhlist_Reco.h - addition of QA_reco list ;
St_geant_Maker
St_geant_Maker.cxx - modified to move creation of TGiant from ctor to Init;
St_srs_Maker
St_srs_Maker.cxx - fixed the STAR messager interface;
StTrsMaker
StTrsMaker.cxx/h - modified to move from StTrsData to StTpcRawData;
run/TPCgeo.conf, electronics.conf, example.conf, run1.cc, sc.conf val1.cc - modified to move from StTrsData to StTpcRawData;
src/StTpcDbElectronics.cc, StTrsChargeTransporter.cc, StTrsFastChargeTransporter.cc, StTrsFastDigitalSignalGenerator.cc, StTrsParameterizedAnalogSignalGenerator.cc, StTrsSlowAnalogSignalGenerator.cc, StTrsZeroSuppressedReader.cc - modified to move from StTrsData to StTpcRawData;
src/StROOTMagneticField.cc, StTpcROOTElectronics.cc, StTpcROOTGeometry.cc, StTpcROOTSlowControl.cc, StTpcSimpleSlowControl.cc, StTrsDigitalSector.cc, StTrsOldDigitalSignalGenerator.cc, StTrsRawDataEvent.cc - removed;
include/StTpcDbSlowControl.hh, StTpcSlowControl.hh, StTrsDigitalSector.hh, StTrsRawDataEvent.hh, StTrsZeroSuppressedReader.hh - modified to move from StTrsData to StTpcRawData;
include/StROOTMagneticField.hh, StTpcROOTElectronics.hh, StTpcROOTGeometry.hh, StTpcROOTSlowControl.hh, StTpcSimpleSlowControl.hh, StTrsOldDigitalSignalGenerator.hh - removed;
St_geant_Maker
StPrepEmbedMaker.cxx - modified to move access to TGiant into InitRun;
St_tpcdaq_Maker
St_tpcdaq_Maker.cxx - fixed bug in logic in dead pads accounting;
St_tpcdaq_Maker.cxx/h - modified to change interal presentation for ADC from UChat_t to Short_t;
StarClassLibrary
StTpcRawDataEvent.hh - unified TpcRaw data ;
StSvtClassLibrary
StSvtConfig.cc, StSvtHybridData.cc, StSvtHybridObject.cc - added default no. of anodes and timeBins;
StarRoot
StDraw3D.cxx/h - implemented light class to debug the STAR 3D reconstruction/simulation; added default attributes;
Introducede the global event display pointer;
added Style method and new styles;
added method to see detector names;
implemenented the Joint method; added the method Redraw;
StJetMaker
StFourPMakers - further code development;
StJetSimuUtil - updated;
StPythia - modified;
StarTrigSimuSetup/L0, L2 - added new code for trigger simulation;
StJetFinder
further code development;
QtRoot
TGuiFactory - new development in the new ROOT 5.18 format;
TVirtualViewer3D - added 3d plugins;
TVirtualPadEditor - added the TQtGedEditor plugin for TVirtualPadEditor class ;
qtroot/src/TQtRootGuiFactory.cxx/h - made forward / backward compatible;
qtgl/qtcoin/src/TQtCoinWidget.cxx/h - added the background 3d shape option;
qtgl/qtcoin/src/TQtCoinViewerImp.cxx, TQtRootCoinViewer3D.cxx - modified to activate SetDrawOption method ;
qtgl/qtgl/src/TObjectOpenGLViewFactory.cxx, TQtGLViewerImp.cxx, TQtRootViewer3D.cxx;
qtgl/qtgl/src/TCoinShapeBuilder.cxx, TQtCoinViewerImp.cxx, TQtCoinWidget.cxx - added SetDrawOptn/GetDrawOpt methods;
qtgl/qtgl/inc/TQGLViewerImp.h, TQtGLViewerImp.h, TQtRootViewer3D.h, TQtCoinViewerImp.h, TQtCoinWidget.h - added SetDrawOptn/GetDrawOpt methods;
qtgl/qtcoin/inc/TQtRootCoinViewer3D.h - modified to activate SetDrawOption method ;
further code development;
pams/geometry
geometry/geometry.g - added y2005g and y2007g geometries for SVT with latest Rene's corrections;
svttgeo/svttgeo11.g - added y2005g and y2007g geometries for SVT with latest Rene's corrections;
StarDb
Calibrations/tpc/tpcSectorT0offset.20071101.000000.C - add shift from laser run 9027013;
Calibrations/tpc/tpcSectorT0offset.20071101.000000.C, tpcSectorT0offset.20080128.000000.C - tpc sector T0 offset for for both dAu and pp, run 2008;
Calibrations/tracker/DefaultTrackingParameters.20010312.000011.C - added new default tracking parameters to reduce a factor of 10 in search windows;
Calibrations/tracker/DefaultTrackingParameters.20010312.000010.C - removed wrong files with default tracking parameters;
Calibrations/svt/svtHybridDriftVelocity.20070321.000209.C, svtHybridDriftVelocity.20050120.000001.C, svtHybridDriftVelocity.20070206.000001.C - added the array dimension to avoid the CINT bug ;
VmcGeometry/Geometry.y2005g.C, Geometry.y2006g.C, Geometry.y2007g.C, y2005g.h, y2006g.h, y2007g.h - added geometries with modified SVT weight;
StDb/idl
tofPhaseOffset.idl, tofTOffset.idl - adde new TOF tables;
ftpcElectronics.idl - added field;
- April 16, 2008
library SL08b has been updated with codes below to provide
- better DB interface to read tracking parameters from the offline DB;
- improved vertex finding and ranking for auau 200GeV run 2007 data and keep back compatibility with previous vertex finding algorithm;
- fixed problem with reading StDcaGeometry in StMuDstMaker.cxx;
Next codes have been updated:
StBFChain
StBFChain.cxx - added more handles for StTpcHitMaker, propagate deselection down to option components; set VFMinuit2 option to use new ranking mode in Minuit;
BigFullChain.h - removed ctf from all chains, Remove St_trg_Maker (Physics, etc) from all chain after Y2005; remove requirement for SvtSeqAdj to MakeEvent, to keep alive tpt chain for 2004; set VFMinuit2 option to use new ranking mode in Minuit;
StGenericVertexMaker
StGenericVertexMaker.cxx - modified to use VFMinuit2 option for new ranking mode in Minuit;
StiPPVertex/StPPVertexFinder.cxx - replaced sti->getToolkit() by StiToolkit::instance()
Minuit/StMinuitVertexFinder.cxx, St_VertexCutsC.cxx, St_VertexCutsC.h - modified to use VertexCuts Chair;
Minuit/StMinuitVertexFinder.cxx/h - changed calculation of BEMC matches based ranking to fix problems with run-7 Au+Au; old calculation can be selected with UseOldBEMCRank();
StDetectorDbMaker
StDetectorDbChairs.cxx - modified to use general definition of StarChair;
St_tpcGainC.h, St_tpcSectorT0offsetC.h - added cahirs for tpcGain and tpcSectorT0offset;
St_base
StarChairDefs.h - modified to make a general defintion of StarChair;
StSecondaryVertexMaker
StKinkMaker.cxx/h, StXiFinderMaker.cxx/h - moved parameters initialization from Init into InitRun;
StMuDSTMaker
COMMON/StMuDstMaker.cxx - removed stripping TObject from StDcaGeometry, because StDcaGeometry is inherit from StObject and this stripping brakes schema evolution;
StSsdDaqMaker StSsdDaqMaker.h - modified to be compline with StSsdPointMaker expectations (bug that caused SSD hits weren't found);
Sti
StiDetector.h, StiDetectorBuilder.cxx/h, StiHit.cxx, StiHitErrorCalculator.h, StiKalmanTrack.cxx/h, StiKalmanTrackFinder.cxx/h, StiKalmanTrackFinderParameters.h, StiKalmanTrackFitter.cxx/h, StiKalmanTrackFitterParameters.h, StiKalmanTrackNode.cxx/h, StiLocalTrackSeedFinder.cxx/h, StiLocalTrackSeedFinderParameters.h, StiTrackFinder.h, StiTrackFitter.h, StiTrackNode.h, StiTrackNodeHelper.cxx, StiTrackingParameters.h, StiVMCToolKit.cxx - modified to straighten out DB access via chairs ;
StiChairs.cxx, StiDefaultTrackingParameters.h, StiNodePars.h - added new files to straighten out DB access via chairs;
StiHitErrorCalculator.cxx, StiKalmanTrackFinderParameters.cxx, StiKalmanTrackFitterParameters.cxx,StiLocalTrackSeedFinderParameters.cxx, StiTrackFinderParameters.h, StiTrackingParameters.cxx - removed files;
StiKalmanTrack.cxx - modified: 2cm => StiKalmanTrackFinderParameters::instance()->maxDca3dVertex() in StiKalmanTrack::isPrimary() ;
Base/Parameters.h - modified to straighten out DB access via chairs; Loadable.cxx/h - removed;
StiMaker
StiDetectorVolume.h, StiMaker.cxx, StiStEventFiller.cxx - modified to straighten out DB access via chairs ;
StiMaker.cxx - remove redundant includes;
StiSsd
StiSsdDetectorBuilder.cxx/h - modified to straighten out DB access via chairs ;
StiSsdChairs.cxx, StiSsdHitErrorCalculator.h, StiSsdTrackingParameters.h - added new files for chairs ;
StiSvt
StiSvtDetectorBuilder.cxx/h - modified to straighten out DB access via chairs ;
StiSvtChairs.cxx, StiSvtHitErrorCalculator.h, StiSvtTrackingParameters.h - added new files for chairs ;
StiTpc
StiTpcDetectorBuilder.cxx/h, StiTpcHitLoader.cxx - modified to straighten out DB access via chairs ;
StiTpcChairs.cxx, StiTpcInnerHitErrorCalculator.h, StiTpcOuterHitErrorCalculator.h, StiTpcTrackingParameters.h - added new files for chairs;
StiRnD
Hft/StiPixelDetectorBuilder.cxx/h - modified to straighten out DB access via chairs ;
Hft/StiPixelChairs.cxx, StiPixelHitErrorCalculator.h, StiPixelTrackingParameters.h - added new files for chairs ;
Ist/StiIstDetectorBuilder.cxx/h - modified to straighten out DB access via chairs ;
Ist/StiIst1HitErrorCalculator.h, StiIst2HitErrorCalculator.h,StiIst3HitErrorCalculator.h, StiIstChairs.cxx - added new files for chairs ;
StiUtilities
StiDebug.cxx - modified to straighten out DB access via chairs ;
StarDb/Calibrations
tracker/ - all files with tracking parameters have been moved to database;
tracker/DefaultTrackingParameters.20010312.000010.C - added new file with default parameters for tracking;
tracker/tkf_tkfpar.20011201.000100.C, tkf_tkfpar.20050324.150000.C - new files added to make match between table and file names;
tracker/kinkTrackingParameters.20011201.000100.C, kinkTrackingParameters.20050324.150000.C - removed files;
tpc/tpcSectorT0offset.20071101.000000.C, tpcSectorT0offset.C - added tpcSectorT0offset table;
StDb/idl
tpcCorrection.idl, tpcDimensions.idl - modified to match with MySQL table definition;
tpcSectorT0offset.idl - added new table;
Library was retagged with tag SL08b_1 and rebuild on SL4.4, SL3.05, SL3.02 platforms;
- March 22, 2008
new library SL08b (tagged as SL08b) has been created, build on SL4.4, SL3.02 and SL3.05 platforms, tested and released on April 2.Main features:
- tracking code developed to allow drop 1 SSD hit in tracking if no others found in SSD or SVT ;
- new RTS code added to proceed with daq1000 data and to preserve the ability to proceed with daq100 and raw data;
Next codes have been updated:
StBFChain
BigFullChain.h - added pp2008a option with VFMinuit pending a contrary statement; removed MakeEvent from B2008 to restore TPC software monitor;
added svt1hit option; added options to proceed with daq1000 data (TPX);
StBFChain.cxx - added svt1hit option; added options to proceed with daq1000 data (TPX);
StBFChain.cxx/h - Skip method moved in base class;
St_base
StFileIter.cxx/h - modified to purge the directory to leave the latest version of the object;
StGenericVertexMaker
StGenericVertexMaker.cxx - indent changed;
StiPPVertex/StPPVertexFinder.cxx - assert of Year number removed; assert on beamLine left but added an explaination;
StChain
StChain.cxx, StMaker.cxx/h - Skip method moved in base class;
StMaker.cxx - upgr15 geometry added;
StDAQMaker
StDAQReader.cxx - implemented skip event if it's not raw data; adjust evpReaderClass header file; modified to return the correct run number with the new EVP_READER; added CPP flag to distinguish the old and new EVP_READER at the compilation time;
StDetectorDbMaker
St_spaceChargeCorC.h - added ewratio;
StEvent
StTofRawData.cxx/h - added new member mTriggerrime and related methods;
StTriggerData2008.cxx/h - new methods added: tofAtAddress() and tofMultiplicity();
StTriggerData.h - modified to add new methods tofAtAddress() and tofMultiplicity();
StTpcRawData.cxx/h - added new files to handle TPC raw data;
StTpcDedxPidAlgorithm.cxx - added protection against missing or wrong mTraits->mean();
StV0Vertex.cxx, StTrackFitTraits.cxx - added include to comply with ROOT;
StTrackFitTraits.h - added access to covariance matrix array;
StIOMaker
StIOMaker.cxx - modified to load the RTS shared lib to access the DAQ files via the new interface;
StMuDSTMaker
COMMON/StMuEvent.cxx/h - modified to include FMS data (StFMSTriggerDetector);
COMMON/StMuArrays.cxx/h, StMuDst.h, StMuDstMaker.cxx/h, StMuTrack.cxx/h, StMuPrimaryTrackCovariance.cxx/h - added two clone arrays for global and primary track covariance matrices, remove mSigmaDcaD andmSigmaDcaZ;
StRTSClient
FCFMaker/FCFMaker.cxx - added drift velocity dependence on sector ;
StSecondaryVertexMaker
StV0FinderMaker.cxx/h - changed to DB table of V0FinderParameters; improved Bfield calculation ;
StSsdFastSimMaker
StSsdFastSimMaker.cxx/h - added methods to remove hits from dead and inactive areas;
StTofHitMaker
StTofHitMaker.cxx/h - first release of TOF offline reader for data taken in Run 2008 ;
RTS/
EventTracker
FtfBaseHit.cxx/h, FtfBaseTrack.cxx/h, FtfDedx.cxx/h, FtfFinder.cxx/h, FtfGeneral.h, FtfHit.cxx/h, FtfMcTrack.cxx/h, FtfPara.cxx/h, FtfSl3.cxx/h, FtfTrack.cxx/h, FtfUtilities.cxx, Makefile, createMapHead.C, displayMap.C, eventTracker.cxx, eventTrackerLib.cxx/h, gl3EMC.cxx/h, gl3Event.cxx/h, gl3Histo.cxx/h, gl3HistoManager.cxx/h, gl3Hit.cxx/h, gl3LMV.cfg, gl3LMVertexFinder.cxx/h, gl3Sector.h, gl3Track.cxx/h, l3BankUtils.cxx/h, l3CoordinateTransformer.cxx/h, l3Coordinates.h, l3EmcCalibration.cxx/h, l3Swap.cxx/h, l3TrgReader.cxx/h, l3TrgReaderV12.cxx, l3TrgReaderV20.cxx, mapbin.h, sizes.h;
include/RC_Config.h, adcLogTable.h, cmds.h, daq100Decision.h, daqFormats.h, daqModes.h, em_nios.C, em_nios.h, ethLib.h, evbMemMap.h, evp.h, fcfClass.hh, iccp.h, iccp2k.h, iccpHeader.h, myrinet.h, platform.h, pp2ppTypes.h, rc.h, rcfEventList.h, rts.h, rtsCmds.h, rtsComLib.h, rtsErrMsg.h, rtsLog.h, rtsMonitor.h, rtsScaler.h, rtsSystems.h, segments.h, status.h, tasks.h, trg2rts.h - new includes added for RTS code;
DAQ1000/daq1000Formats.h, ddl_lib.hh, ddl_struct.h, mscript.h, rb.hh,rdo_cmds.h - new includes added for RTS code ;
include/DB/daqDB.hh, daqMonDB.h, ppDbLib.h - new includes added for RTS code ;
scaler/scaDaqScaler.h, scaLxCounts.h ;
RunLog/daqEventTag.h, daqFileTag.h, daqRunTag.h, daqsumEvtCnts.h, daqsumTrgCnts.h, daqsumTrgFiles.h ;
conditions/rtsCndDaqDetSetup.h, rtsCndDaqSubdet.h, rtsCndDataStreamNames.h, rtsCndEndRun.h, rtsCndL1Rescale.h, rtsCndLxUserFloat.h, tsCndLxUserInt.h, rtsCndPwCondition.h, rtsCndPwLink.h, rtsCndRun.h, rtsCndTasks.h, rtsCndTcdSetup.h, rtsCndTrgDictEntry.h, rtsCndTrigger.h, rtsCndTwLink.h, rtsConditions.h, rtsDbConstants.h, rtsHash.h ;
FTP/FTPC_PADKEY.h, ftpc_padkey.Dec.2000.h, ftpc_padkey.Feb.2002.h, ftpc_padkey.h, ftpc_padkey.h.1.0, new_ftpc_padkey.h, old_offsets.h, old_padfinder.h, padfinder.h, trans_table.hh ;
TPX/tpx_altro_to_pad.h, tpx_altro_to_pad_FY07.h, tpx_rdo.h;
L3/L3Algorithms-2001.h, L3Algorithms-22GeV.h, L3Algorithms.h, L3Formats.h, L3FormatsCompat.h;
RORC/ddl_def.h, physmem.h, rorc.h, rorc_lib.h;
RC/RC_HandlerThreads.h, RC_Msg.hh, RC_MsgDefs.h, RC_SysState.h ;
UNIX/CircleBuff.hh, StaticSizedDQueue.hh, ThreadsMsgQueue.hh,simpleQ.hh ;
SECTOR/msgStruct.h, plx.h, plxLib.h, sector.h, sectorMemMap.h, uniLib.h, universe.h;
TRG/cmds.h, trgSpecialMap.h, trgStructures-Jan2002.h, trgStructures_20.h, trgStructures_21.h, trgStructures_30.h, trgStructures_v22.h, fixAlloc.hh;
I386/atomic.h, i386Lib.h ;
SUNRT/clock.h, configLib.h, msgNQLib.h, msgQLib.h, msgQNLib.h, msgQPLib.h, msgQSLib.h, msgSQLib.h, objLib.h, rtsComLib.h, rtsMother.h, rtsSigLib.h, semLib.h, shmLib.h, sigLib.h, ipcQLib.hh;
TPC/fee_maps.h, fee_pin.h, fee_readout.h, key_map.h, offsets.h, padfinder.h, pads_rows.h, rdo_vs_pad.h, rowlen.h, sector.h, tpcPhysicalMaps.h, fee_default.h.save, microdaq.save, padfinder.h.26.11, tpcPhysicalMaps.save, trans_table.hh ;
SVT/key_map.h, svt_rb_map.h, key_map.h.10.05 ;
MVME/bdbLib.h, cbdCamac.h, mvmeAcro470Lib.h, mvmeFastTickerLib.h, mvmePciLib.h, ppcIOLib.h, rtsComLib.h, uniDmaLib.h, uniLib.h, universe.h ;
trg/include DSM.h QT.h, bbcMap.h, fpeMap.h, logmessage.h, mixMap.h, mvmeFastTickerLib.h, pmc.h, pmc_user.h, trgConfig.h, trgMap.h, trgMsg.h, trgStructures.h, trgenv.h, trigger.h ;
src rtsmakefile.def, rtsplus.def, Makefile, Makefile.jeff;
src/LOG Makefile, critServer.C, cursesLogBrowser.C, logBrowser.C, logTest.C, operDisplay.C, operDisplay.sh, rtsLog.C, rtsLogServer.C, rtsLogUnix.c ;
src/FCF Makefile, fcfAfterburner.cxx, fcfClass.cxx;
src/RTS_READER Makefile, Reader.C, daq_algo.h, daq_det.cxx, daq_det.h, daq_dta.cxx, daq_dta.h, dump_sfs.C, root_example.C, rts_reader.cxx, rts_reader.h, daq_dta_structs.h;
src/EVP_READER Makefile, Makefile_tar, cfgutil.cxx/h, emcReader.cxx/h, evpReader.cxx/hh, evpSupport.cxx/h, fpdReader.cxx/h, ftpReader.cxx/h, grpRates.C, l3Reader.cxx/h, msgNQLib.cxx/h, pmdReader.cxx/h, pp2ppReader.cxx/h, ppreader.C, ricReader.cxx/h, sanityCheckers.cxx, scReader.cxx/h, ssdReader.cxx/h, svtReader.cxx/h, tofReader.cxx/h, tpcFCFReader.cxx, tpcReader.cxx/h, trgReader.cxx/h, trgReader10.cxx, trgReader12.cxx, trgReader20.cxx, trgReader21.cxx, trgReader22.cxx, trgReader30.cxx, trgReader32.cxx, special.C;
src/DAQ_TOF Makefile, daq_tof.cxx/h;
src/DAQ_TPX Makefile, daq_tpx.cxx/h, tpxCore.cxx/h, tpxFCF.cxx/h, tpxGain.cxx/h, tpxPed.cxx/h, tpxStat.cxx/h, tpx_ped.cxx, sim_tester.C;
src/SFS Makefile, blastSFS.C, daqr_index.cxx/h, fs.C, fsBankReader.cxx/h, fs_ex.C, fs_index.cxx/h, get_line.cxx/h, sfsTest.C, sfs_index.cxx/h, sfs_single.C;
src/DAQ_PP2PP Makefile, daq_pp2pp.cxx/h ;
Sti
StiKalmanTrackFinder.h - implementation of setMinPrecHits() added;
StiKalmanTrackFinder.cxx/h - modified to make setMinPrecHits(..) obsolete;
StiKalmanTrackFinderParameters.cxx/h - added maxDca3dVertex & maxDca2dZeroXY; added HitSet rejecting via StiKalmanTrackFinderParameters;
StiKalmanTrack.cxx/h, StiKalmanTrackFinder.cxx, StiKalmanTrackFinderParameters.cxx - implemented HitSet rejecting via StiKalmanTrackFinderParameters;
StiKalmanTrackFinderParameters.cxx/h,StiKalmanTrackNode.cxx/h - removed field field from everythere;
StiMaker.cxx - modified to make setMinPrecHits(..) obsolete; removed field field from everythere;
Star/StiStarDetectorBuilder.cxx - added beam pipe volume;
StiMaker
StiDefaultToolkit.cxx, StiDetectorVolume.cxx, StiMaker.h - fixed unassigned variable (_trackNodeInfFactory), synchronize name with BigFullChain.h;
pams/geometry
geometry/geometry.g - upgr15 geometry added;
pipegeo/pipegeo00.g - upgr15 geometry added;
istbgeo/istbgeo00.g - upgr15 geometry added;
pixlgeo/pixlgeo00.g - upgr15 geometry added;
StarDb
Calibrations/tracker/KalmanTrackFinderParameters.20010311.000000.C - added maxDca3dVertex, maxDca2dZeroXY, mHitRegions & mHitWeights ;removed field;
Calibrations/tracker/KalmanTrackFinderParameters.20070101.000000.C - added maxDca3dVertex, maxDca2dZeroXY, mHitRegions & mHitWeights ;added dca3 < 3 Chi2Vtx < 900; removed field;
VmcGeometry/Geometry.upgr15.C, upgr15.h - upgr15 geometry added;
StarVMC
StVMCMaker/StVMCMaker.cxx/h - modified to comply Skip signuture with base class;
StDb
servers/dbLoadBalancerLocalConfig_BNL.xml - added stardb.ujf.cas.cz; changed port and machine power on .ujf.cas.cz node;
idl/V0FinderParameters.idl - added new VO tracking table;
idl/spaceChargeCor.idl - added column to idl;
idl/KalmanTrackFinderParameters.idl - added maxDca3dVertex, maxDca2dZeroXY, mHitRegions & mHitWeights; removed field field from everythere;
- February 11, 2007
new library SL08a (tagged as SL08a) has been created, build on SL4.4, SL3.02 and SL3.05 platforms, tested and released on February 14
Main features:
- tracking code developed to perform tracking using TPC+ 1 SVT hit on ;
- added functionality to DAQReader to read adc events only and skip if it's not adc; this functionality needed to process embedding for trigger data;
Next codes have been updated:
StBFChain
BigFullChain.h, StBFChain.cxx - implemented BEMC status check for raw data;
StBFChain.cxx - aded hook for TrsMini and PrepEmbded;
StBFChain.cxx - fixed GEANT geometry problem for TofUtil; added fgain;
BigFullChain.h - added fgain;
StBFChain.cxx,BigFullChain.h - added option adcOnly to process adc data only and skip events if it's not adc, this is needed for embedding of trigger data;
StChain
StMaker.cxx/h - copy attributes from maker to maker added;
StRTSBaseMaker.cxx/h, StRtsTable.h - new files to introduce the base class to access RTS raw data for daq1000;
StIOMaker
StIOMaker.cxx - copy IOMaker attributes to DAQMaker added;
StBichsel
GetdEdxResolution.cxx - added dE/dx resolution static functions for runs IV-VII;
StDaqLib
EVP/emcReader.cxx - fixed the case statement scope;
EMC/EMC_SmdReader.cxx - updated;
EMC/EMC_BarrelReader.cxx/h - important bug in byte order fixed;
SSD/SSD_Reader.cxx - introduced OLDEVP namespace to handle new RTS library for daq1000 ;
FPD/FPD_Reader.cxx - introduced OLDEVP namespace to handle new RTS library for daq1000;
FTPC/FTPV1P0.Banks.cxx, FTPV1P0.cxx, FTPV1P0_ADCR_SR.cxx, FTPV1P0_CPP_SR.cxx, FTPV1P0_ZS_SR.cxx - introduced OLDEVP namespace to handle new RTS library for daq1000;
TOF/TOF_Reader.cxx - introduced OLDEVP namespace to handle new RTS library for daq1000;
L3/L3_Banks.cxx, L3_Reader.cxx - introduced OLDEVP namespace to handle new RTS library for daq1000;
PMD/PMD_Reader.cxx - introduced OLDEVP namespace to handle new RTS library for daq1000;
TRG/TRG_Reader.cxx, code2003.cxx, code2004.cxx, code2005.cxx, code2007.cxx, code2008.cxx - introduced OLDEVP namespace to handle new RTS library for daq1000;
RICH/RICH_Reader.cxx/hh, RichEventReader.cxx - introduced OLDEVP namespace to handle new RTS library for daq1000;
SVT/SVTV1P0.Banks.cxx, SVTV1P0.cxx, SVTV1P0_ADCR_SR.cxx, SVTV1P0_CPP_SR.cxx, SVTV1P0_ZS_SR.cxx - introduced OLDEVP namespace to handle new RTS library for daq1000;
EVP/emcReader.cxx/h, evpSupport.cxx/h, scReader.cxx/h, ssdReader.cxx/h - introduced OLDEVP namespace to handle new RTS library for daq1000 ;
EMC/EMC_BarrelReader.cxx/hh, EMC_Reader.cxx, EMC_SmdReader.cxx - introduced OLDEVP namespace to handle new RTS library for daq1000 ;
EEMC/EEMC_Reader.cxx - introduced OLDEVP namespace to handle new RTS library for daq1000;
EEMC/EEMC_Reader.cxx - protection against NULL pointer added ;
GENERIC/CRC.cxx CRC.hh, DetectorReader.cxx, EventReader.cxx, RecHeaderFormats.cxx/hh, swaps.cxx/hh - introduced OLDEVP namespace to handle new RTS library for daq1000;
GENERIC/EventReader.cxx - added TRG as a part EMC;
GENERIC/DetectorReader.cxx - modified to activate EEMCreader even if no EEMC bank, TRG info added ;
SC/SC_Reader.cxx - introduced OLDEVP namespace to handle new RTS library for daq1000;
TPC/TPCV1P0.Banks.cxx, TPCV1P0.cxx, TPCV1P0_ADCR_SR.cxx, TPCV1P0_CPP_SR.cxx, TPCV1P0_ZS_SR.cxx, TPCV2P0.Banks.cxx, TPCV2P0.cxx, TPCV2P0_ADCR_SR.cxx, TPCV2P0_CPP_SR.cxx, TPCV2P0_ZS_SR.cxx, fee_pin.h - introduced OLDEVP namespace to handle new RTS library for daq1000;
StDAQMaker
StDAQReader.cxx/h - modified version to make it compatible with new/old DAQ readers related to daq1000;
implemented the shadow copy of the evp buffer for the new EVP_READER;
StDAQReader.cxx - modified to use bytes; set the correct buffer size for daq1000;
StDAQReader.cxx - added function to read adcOnly data for embedding (skip event if not adc) when option 'adcOnly' used in bfc;
StDAQReader.cxx/h - modified to move the dependency from the class desclaration to class implementation to adjust to new EVP_READER for daq1000;
StDbBroker
StDbBroker.cxx/h - modified to remove DbFill calls from StDbBroker because DbFill was removed;
DbFill.cxx - removed;
StDetectorDbMaker
StDetectorDbIntegratedTriggerID.h - added dummy implementaion of the default stor for StDetectorDbIntegratedTriggerID class;
StEmcADCtoEMaker
StEmcADCtoEMaker.h - added convenience methods to set some control table properties;
StEmcRawMaker
StEmcRawMaker.cxx - added support for "BEmcCheckStatus" attribute to suppress hot towers in fastOffline;
StEemcRaw.cxx/h - modified to remove warning if ESMD is not in the run ;
StEmcSimulatorMaker
StEmcSimulatorMaker.cxx - set MuDst's StEmcCollection pointer ;
StEventUtilities
StEventHelper.cxx - modified to ignor zero size containers;
StFtpcClusterMaker
StFtpcClusterMaker.cxx - modified to make bfc option fdbg selected if m_Mode==2;
StFtpcClusterMaker.cxx/h - created and filled the special set of Ftpc point histograms used to evaluate the Ftpc gain scan runs when bfc option fgain is in the chain;
StFtpcTrackMaker
StFtpcTrackMaker.cxx/h - created and filled the special set of Ftpc track histograms used to evaluate the Ftpc gain scan runs when the bfc option fgain is in the chain;
StJetMaker
StFourPMaker/StBET4pMaker.cxx/h;
StJets.cxx/h, StJetMaker.cxx, StJetSkimEvent.cxx/h, StJetSkimEventMaker.cxx, StJetReader.cxx - number of updates: use2006cuts function which extends tracks to SMD, and includes DCA cuts; emulated L2 results now included and data L2 results restructured; filled StJet zVertex and detEta;
StJetSkimEventMaker.cxx StJetSkimEvent.cxx/h - modified to include full trigger simulation from StTriggerUtilities;
StJetSkimEventMaker.cxx - modified to make skimTree working with either trigger simulators;
macros/RunJetFinder2.C, RunFastJetReader.C - modified to make skimTree working with either trigger simulators;
StLaserAnalysisMaker
LoopOverLaserTrees.C - modified to use average drift velocity from East and West;
Stl3RawReaderMaker
Stl3CounterMaker.cxx, Stl3RawReaderMaker.cxx - fixed the lost L3_Reader class definition ;
StMiniMcMaker
StMiniMcMaker.cxx/h - modified to store info of 3 EMC towers for each TinyRcTrack and TinyMcTrack;
StMiniMcEvent
StTinyMcTrack.cxx/h, StTinyRcTrack.cxx/h - modified to add EMC information to tracks. MC info obtained from StMcTrack, Rec Info obtained from track extrapolation to BEMC of rec track ;
StPmdReadMaker
StPmdReadMaker.cxx - if there is a HOT CELL return with error flag;
StPmdUtil
StPmdGeom.cxx - readBoardDetail updated for dAu run 2008;
StPass0CalibMaker
StSpaceChargeEbyEMaker.cxx - made fine tuning of parameters ;
StRTSClient
FCF/fcfClass.cxx - introduced OLDEVP namespace to handle new RTS library for daq1000;
include/fcfClass.hh - introduced OLDEVP namespace to handle new RTS library for daq1000;
StSsdFastSimMaker
StSsdFastSimMaker.cxx - modified to set a default value for uninitialized variable;
StSsdPointMaker
StSsdPointMaker.h - removed redundant class forward;
StSsdPointMaker.cxx/h -added method to read the Wafer configuration table ;
StSsdPointMaker.cxx - modified to set a default value for uninitialized variable ;
StSsdSimulationMaker
St_sls_Maker.cxx - modified to set a default value for uninitialized variable ;
StSsdUtil
StSsdBarrel.cc/hh, StSsdLadder.cc/hh, StSsdWafer.cc - modified to use the wafer configuration table ;
StSvtClassLibrary
StSvtHybridObject.cc - dummy implementaion of the missed StSvtHybridObject::SetName method;
StSvtSimulationMaker
StSvtSimulationMaker.cxx/h - added protection from missing geometry;
StTpcDb
StTpcDbLinkDef.h, StTpcDbMaker.h - added the TPC coordinate transformation global function to the Root/Cint dictionary;
StTpcDbLinkDef.h - remove the wrong numberOfPadsAtRow_ entry from the CintDict;
StTpcDbMaker.cxx - added function to calculate the tpc coord transfoirmation in one step;
StarRoot
TCFit.cxx - new name of TCL.h;
Sti
StiKalmanTrackFinder.cxx/h - added minPrecHits to include 1 svt hits in tracking;
StiLocalTrackSeedFinder.h, StiTrackFinder.h - modified;
StiMaker
StiMaker.cxx - added minPrecHits to include 1 svt hits in tracking; removed setMCS() call;
St_QA_Maker
StEventQAMaker.cxx - modified for new physics triggers working;
St_srs_Maker
St_srs_Maker.cxx - bug fixed in hit error setting;
St_tcl_Maker
St_tcl_Maker.cxx/h - modified to split tcl and tfs Makers;
St_tfs_Maker.cxx/h - modified to split tcl and tfs Makers;
StTriggerUtilities
L2Emulator,Bemc - further development of code for trigger simulation;
pams/geometry
geometry/geometry.g - TOF weight corrected;
btofgeo/btofgeo6.g - TOF weight corrected;
StarDb/global
vertices/ev0par2.20071125.000000.C,exipar.20071125.000000.C - added new files for run 2008;
VmcGeometry/y2008.h - TOF weight corrected;
StDb
servers/dbLoadBalancerLocalConfig_BNL.xml - added new server "bogart" to Analysis ;
idl/ssdWaferConfiguration.idl - added new Wafer table for ssd - will use 320 rows per/timestamp;
QtRoot
qt/inc/TQtClientFilter.h, TQtClientWidget.h, TQtRootSlot.h - merged with ROOT svn;
qt/inc/TQMimeTypes.h - get rid of the Q3support for TQtMimeTypes class;
qt/src/TQMimeTypes.cxx - get rid of the Q3support for TQtMimeTypes class;
Lidia Didenko
2009
STAR SOFTWARE NEWS December 24, 2009
---------------------
The present release assignment:
       SL06e  (SL06e)             ROOT_LEVEL 4.04.02 pp 200&62GeV run 2006 production
       SL06g  (SL06g_2,SL06g_SL5) ROOT_LEVEL 5.12.00 SL4.4, MC production for TUP
       SL07a  (SL07a_3,SL07a_SL5) ROOT_LEVEL 5.12.00 MC production
       SL07b  (SL07b_2,SL07b_SL5) ROOT_LEVEL 5.12.00
       SL07c  (SL07c_3,SL07c_SL5) ROOT_LEVEL 5.12.00 CuCu 200&62GeV run 2005,TPC+SVT+SSD tracking
       SL07d  (SL07d_2,SL07d_SL5) ROOT_LEVEL 5.12.00 auau 200GeV stream data run 2007, TPC tracking
       SL07e  (SL07e,SL07e_SL5)   ROOT_LEVEL 5.12.00
       SL08a  (SL08a,SL08a_SL5)   ROOT_LEVEL 5.12.00
       SL08b  (SL08b_1,SL08b_SL5) ROOT_LEVEL 5.12.00
       SL08c  (SL08c_5,SL08c_SL5) ROOT_LEVEL 5.12.00 auau 200GeV run 2007,TPC+SVT+SSD tracking
       SL08d  (SL08d,SL08d_SL5)   ROOT_LEVEL 5.12.00
 old-> SL08e  (SL08e_2,SL08e_SL5) ROOT_LEVEL 5.12.00 pp 200GeV & dAu 200GeV, run 2008
 pro-> SL08f  (SL08f_3,SL08f_SL5) ROOT_LEVEL 5.12.00 last version with EVP_READER, MC production
       SL09a  (SL09a,SL09a_SL5)   ROOT_LEVEL 5.12.00
       SL09b  (SL09b,SL09a_SL5)   ROOT_LEVEL 5.12.00
       SL09c  (SL09c,SL09c_SL5)   ROOT_LEVEL 5.12.00
       SL09d  (SL09d,SL09d_SL5)   ROOT_LEVEL 5.22.00
       SL09e  (SL09e)             ROOT_LEVEL 5.22.00 built on SL5, last version with pams codes;
 new-> SL09g  (SL09g)             ROOT_LEVEL 5.22.00 production library for run 2009 data
 dev-> DEV                        ROOT_LEVEL 5.22.00
.dev-> .DEV                       ROOT_LEVEL 5.22.00

-------------------------------------------------
Release History
SL09a library
SL09b library
SL09c library
SL09d library
SL09e library
SL09g library
- December 24, 2009
new library SL09g has been updated with codes below and rebuild on SL4.4, and SL5.3 platforms. Library was retagged with the same tag.
Next codes have been updated:
StBFChain
BigFullChain.h, StBFChain.cxx
StBTofHitMaker
StBTofINLCorr.cxx,StBTofINLCorr.h
StBTofUtil
StBTofINLCorr.cxx,StBTofINLCorr.h
StDbLib
StDbSql.cc, StDbManagerImpl.cc
StDbUtilities
StMagUtilities.cxx, StMagUtilities.h
StDetectorDbMaker
StDetectorDbChairs.cxx, St_tpcAcChargeC.h
StdEdxY2Maker
StdEdxY2Maker.cxx
StarMagField
StarMagField.cxx, StarMagField.h
StEmcSimulatorMaker
StEmcSimpleSimulator.cxx
StEEmcSimulatorMaker
StEEmcFastMaker.cxx, StEEmcFastMaker.h
StEmbeddingUtilities
new maker for embedding QA
StEvent
StBTofPidTraits.cxx, StBTofPidTraits.h
StMuDSTMaker
COMMON/StMuBTofPidTraits.cxx, StMuBTofPidTraits.h, StMuTrack.h
StFtpcCalibMaker
StFtpcCalibMaker.cxx, StFtpcLaserCalib.cc, StFtpcLaserTrafo.cc
StFtpcClusterMaker
StFtpcClusterFinder.cc, StFtpcDbReader.cc
St_pp2pp_Maker
pp2ppHit_Cluster.h,St_pp2pp_Maker.cxx,St_pp2pp_Maker.h,St_pp2pp_MakerLinkDef.h
StTpcDb
StTpcDb.cxx,StTpcDb.h,StTpcDbLinkDef.h,StTpcDbMaker.cxx,StTpcDbMaker.h
pams/geometry
tpcegeo/tpcegeo3.g
calbgeo/calbgeo2.g
ecalgeo/ecalgeo6.g
geometry/geometry.g
pams/gen
Pythia6_4_22 - new version of PYTHIA
StDb/idl
TpcAltroParameters.idl, tpcAcCharge.idl
StarDb/Calibraions/tpc
tpcAcCharge.*.C, tpcPadGainT0.y2010.C, tpcPressureB.C, tpcPressureB.y2010.C, tpcPressureB.C, tpcPressureB.y2010.C, TpcAdcCorrectionB.y2010.C, TpcAltroParameters.y2010.C, TpcLengthCorrectionB.C, TpcSecRowB.y2010.C, asic_thresholds_tpx.y2010.C
StarDb/VmcGeometry
y2005h.h, y2006h.h, y2007h.h, y2009a.h
- December 7, 2009
new library SL09g (tagged as SL09g) has been created, build on SL4.4, and SL5.3 platforms, tested and released om December 10.
Main features:
- old pams codes retired and all makers adjusted; retirring of codes suggested in the presentaion ; motivation and historical note posted in the email .
- BTOF and VPD calibrations codes finalized for run 2009 production;
- StEvent updated for RPS collection;
- new StFilterMaker added for simulation with filterring;
- new TOF simulation code added;
- year 2009 geometry finalized; year 2006 geometry corrected with TPC material and EEMC fixes;
- several bugs fixed;
Next codes and tables have been removed:
StClusterDisplayMaker
StEbye2ptMaker
StEbyeDSTMaker
StEbyeScaTagsMaker
StEmcUtil/daq
StEmcUtil/hadBackground
StEmcUtil/neuralNet
StEstMaker
StEventDisplayMaker
StLaserEvent
StLaserEventMaker
StMiniDstMaker
StMuDSTMaker/RICHTOF
StPCollTagMaker
StppSpin
StRchMaker
StRichDisplayMaker
StRichMixerMaker
StRichSpectraMaker
StRichPIDMaker
StRichPool
StRrsMaker
StSpectraTagMaker
StSvtAlignMaker
StTableUtilities/StDstPointChair.cxx, StDstPointChair.h, StTclHitChair.cxx, StTclHitChair.h, St_dst_trackC.cxx, St_dst_trackC.h;
StTpcHitFilterMaker
StTpcTagMaker
St_dst_Maker
St_ems_Maker
St_ebye_Maker
St_l3Clufi_Maker
St_l3t_Maker
St_mwc_Maker
St_stk_Maker
St_tpt_Maker
St_tptsts_Maker
pams/ctf/ctc
pams/ctf/cte
pams/ctf/cpi
pams/ctf/dst
pams/ctf/idl/cpe_eval.idl, cpe_mkine.idl, cpi_para.idl, ctc_ctrl.idl, ctc_histos.idl, cte_extra.idl, cte_para.idl, dst_tof_evt.idl, dst_tof_trk.idl
pams/ebye/idl
pams/ebye/sca
pams/emc/cal
pams/emc/ems
pams/emc/jet
pams/emc/util
pams/geometry/idlbtof_btog.idl, btof_ctbb.idl, btof_modr.idl, btof_toff.idl, btof_tray.idl, ecal_eetr.idl, ecal_elgg.idl, ecal_elgm.idl, ecal_emcg.idl, ecal_emcs.idl, ecal_emxg.idl, ecal_esec.idl, ecal_exse.idl, geom_gdat.idl, ftpc_ffcc.idl, ftpc_frbd.idl, ftpc_fssd.idl, ftpc_ftpg.idl, g2tm_dete.idl, g2tm_gttc.idl, magp_magg.idl, magp_mbar.idl, magp_mend.idl, mick_miky.idl, svtt_selc.idl, svtt_serg.idl, svtt_sfpa.idl, svtt_ssup.idl, svtt_svtl.idl, svtt_swam.idl, tpce_tecw.idl, tpce_tpcg.idl, tpce_tprs.idl, vpdd_vpdg.idl, cave_cave.idl, pipe_pipg.idl, svtt_svtg.idl, svtt_swca.idl
pams/global/dst
pams/global/egr
pams/global/evr
pams/global/exi
pams/global/idl/dst_dedx.idl, dst_event_summary.idl, dst_mon_soft_ctb.idl, dst_mon_soft_emc.idl, dst_mon_soft_ftpc.idl, dst_mon_soft_glob.idl, dst_mon_soft_l3.idl, dst_mon_soft_rich.idl, dst_mon_soft_svt.idl, dst_mon_soft_tpc.idl, dst_point.idl, dst_rch_pixel.idl, dst_run_summary.idl, dst_summary_param.idl, dst_tkf_vertex.idl, dst_track.idl, dst_v0_vertex.idl, dst_vertex.idl, dst_xi_vertex.idl, egr_egrpar.idl, egr_globtrk.idl, egr_globtrk_eval.idl, egr_propagate.idl, epi_epipar.idl, epi_glob_pid_eval.idl, epi_global_pid.idl, epi_hypo_pid.idl, est_ctrl.idl, est_ev.idl, est_match.idl, ev0_aux.idl, ev0_cov.idl, ev0_ev0out.idl, ev0_ev0par.idl, ev0_ev0par2.idl, ev0_eval.idl, ev0_track.idl, ev0_track2.idl, ev0_track3.idl, evr_evrpar.idl, exi_aux.idl, exi_exiout.idl, point_track_index.idl, scs_svt_spt.idl, stk_svt_ctrack.idl, stk_svt_track.idl, svm_ctrl.idl, svm_effic.idl, svm_eval_par.idl, svm_eval_strk.idl, svm_eval_svt.idl, svm_eval_tpc.idl, svm_evt_match.idl, svm_match.idl
pams/global/inc/
gr_track_pointers.inc, global_prototypes.h, math_constants.inc, phys_constants.inc
pams/global/svm
pams/global/ev0
pams/l3/gl3
pams/l3/l3Clufi
pams/l3/gl3Modules
pams/l3/idl
pams/l3/incFtfBaseHit.h, FtfBaseTrack.h, FtfDedx.h, FtfFinder.h, FtfGeneral.h, FtfHit.h, FtfMcTrack.h, FtfPara.h, FtfSl3.h, FtfTrack.h, gl3Analysis.h, gl3Conductor.h, gl3Event.h,,gl3GammaGamma.h, gl3GeneralHistos.h, gl3HighPt.h, gl3Histo.h, gl3Hit.h, gl3JPsi.h, gl3MomRes.h, gl3Residuals.h, gl3Sector.h, gl3Svt.h, gl3Track.h, gl3dEdx.h, l3GeneralHeaders.h, l3List.h, lists.hpp, sl3CoordinateTransform.h, sl3MPTrack.h, sl3UPTrack.h, sl3USTrack.h
pams/l3/ftf/FtfBaseHit.cxx, FtfBaseTrack.cxx, FtfDedx.cxx, FtfFinder.cxx, FtfHit.cxx, FtfPara.cxx, FtfSl3.cxx, FtfTrack.cxx, FtfUtilities.cxx, sl3Swap.cxx;
pams/mwc/mwu
pams/mwc/idl
pams/mwc/mws
pams/mwc/mwg
pams/mwc/mwu
pams/sim/idl/g2t_run.idl
pams/sim/g2t/g2t_comb.F, g2t_comb.idl, g2t_print.F, g2t_print.idl
pams/svt/idl/sal_geom.idl, sal_rotran.idl, sal_spt.idl, sal_vrtx.idl, sce_ctrl.idl, sce_dspt.idl, scf_ctrl.idl, sci_bad_anodes.idl, sci_clus.idl, sci_inj.idl, sci_par.idl, sci_raw.idl, scm_ctrl.idl, scp_bad_anodes.idl, scp_par.idl, scp_ped.idl, scp_pedm.idl, scp_raw.idl, scs_cluster.idl, scs_merge.idl, scs_par.idl, sgr_groups.idl, sgr_pixmap.idl, sls_ctrl.idl, sls_spt.idl, spr_sprpar.idl, srs_activea.idl, srs_direct.idl, srs_result.idl, ssf_8to10map.idl, ssf_adc.idl, ssf_map.idl, ssf_mv.idl, ssf_seq.idl, ssf_zero_par.idl, ste_teff.idl, ste_teval.idl, stk_ctrack.idl, stk_filler.idl, stk_hlx.idl, stk_kine.idl
pams/svt/inc/RanGauss.hh, Random.hh
pams/svt/sal
pams/svt/sgr
pams/svt/spa
pams/svt/srs
pams/svt/stk
pams/tpc/idlbad_channels.idl, readout_map.idl, tcc_morphology.idl, tcl_calib_fee.idl, tcl_calib_general.idl, tcl_calib_padrow.idl, tcl_calib_rdo.idl, tcl_calib_sec.idl, tcl_sector_index.idl, cl_tclpar.idl, tcl_tp_seq.idl, tcl_tpc_index.idl, tcl_tpc_index_type.idl, tcl_tpcluster.idl, tdeparm.idl, tdi_fit_pars.idl, tdi_rdi_pars.idl, tdi_residual.idl, tdi_strack.idl, tfc_adcxyz.idl, tfc_delta.idl, tfc_fmtpar.idl, tfc_native_gain.idl, tfc_native_map.idl, tfc_native_pedestal.idl, tfc_pedstab.idl, tfc_pedstab_pars.idl, tfc_tpc_gain.idl, tfc_valid.idl, tfs_fsctrl.idl, tfs_fspar.idl, tpc_pedestal.idl, tpg_cathode.idl, tpg_field_cage.idl, tpg_pad.idl, tpg_sector.idl, tpg_tptarget.idl, tpg_transform.idl, tpg_wire_plane.idl, tpipar.idl, tpt_pars.idl, tpt_res.idl, tpt_spars.idl, tpt_strack.idl, tpt_track.idl, tpt_track_pointers.idl, tss_tpmcpix.idl, tss_tppad.idl, tss_tppixel.idl, tstpar.idl, tte_control.idl, tte_eval.idl, tte_mctrk.idl, type_begrun_str.idl, type_bytedata.idl, type_config.idl, type_floatdata.idl, type_gain_bad.idl, type_index.idl, type_sc_global.idl, type_sc_readout.idl, type_structtbl.idl, type_timestamp.idl, type_tmprcv0.idl
pams/trg/idl
pams/trg/inc
pams/trg/rl1
pams/trg/rl0
pams/tls/wrk
pams/tls/inc
pams/tls/src
pams/tpc/idl/tcl_calib_badpixels.idl, tcl_calib_global.idl, tcl_calib_pad.idl
pams/tpc/tcl
pams/tpc/tfc
pams/tpc/tfs
pams/tpc/tpg
pams/tpc/tpt
pams/tpc/tte
pams/vpd/vps
pams/vpd/idl
pams/vpd/vpv
Next codes have been modified and updated:
StAssociationMaker
StAssociationMaker.cxx/h - modifed to change default to ITTF; clean-up est tracks;
summarizeEvent.cc - clean-up est tracks;
StBFChain
BigFullChain.h, StBFChain.cxx - modified due to pams cleanup; added chains for BTOF; reshaped TOF options to allow early VPD but later TofMatch; added 'FiltGamma' option for simulation with filtering; inroduced 'BAna' option;
BFC2.C - removed;
StBichsel
Bichsel.h, GetdEdxResolution.cxx - modified to add one more GetdEdxResolution in order to simplify access to it in TF1;
StBTofCalibMaker
StBTofCalibMaker.cxx, StBTofCalibMaker.h - modified to make Database readout more robust, static const moved to .cxx file;
modified to split original StTofCalibMaker into dedicated StVpdCalibMaker and BTOF-specific StBTofCalibMaker;
StBTofSimMaker
new package for TOF simulation;
StChain
StMaker.cxx - modified to keep only geometry tags which were used in production;
StEvtHddr.h - created the safe interface to access the value of he TDatime objects;
StMaker.cxx/h - fixed the signature of the StMaker::GetDate... methods; modified to make the TDatime const interfaces; added y2009a geometry tag and inherited from it y2010 geometry; added y2006h geometry tag
St_ctf_Maker
St_ctf_Maker.cxx - modified due to pams cleanup;
StdEdxY2Maker StDAQMaker
StRtsReaderMaker.cxx - removed token leak ;
StTRGReader.cxx - fixed the broken broken logic for the DAQ file with NO trigger data;
StDbBroker
StDbBroker.cxx - modified to use SafeDelete;
StDbLib
StDbManagerImpl.cc, StDbTable.cc - modified to use SafeDelete;
StDbServiceBroker.cxx - changed balancer connect timeout to 30sec; reshuffled lb host list;
MysqlDb.cc - modified to enabled SSL + compression, if server supports it ;
StDbManagerImpl.cc - added proper wrapper to provide StDbLib could use SafeDelete;
St_db_Maker
St_db_Maker.cxx, St_db_Maker.h - modified to make the TDatime const interfaces;
StDetectorDbMaker
StDetectorDbChairs.cxx - corrected gain dependence from y2009 Voltage scan; added St_tpcAcChargeC to modify gain dependence on Voltage;
St_spaceChargeCorC.h - moved getSpaceChargeCoulombs from the header to St_spaceChargeCorC.cxx;
St_spaceChargeCorC.cxx - added new file to move getSpaceChargeCoulombs in from header;
St_tpcAcChargeC.h - added new file to modify gain dependence on Voltage ;
StdEdxY2Maker
StdEdxY2Maker.cxx, StdEdxY2Maker.h - added dE/dx for prompt hits, improve dE/dx calculations; switched from St_tpcAnodeHVavgC to St_tpcAnodeHVC to modify gain dependence on Voltage;
StEEmcSimulatorMaker
StEEmcMixerMaker.cxx, StEEmcSlowMaker.cxx - modified for the embedding infrastructure ;
StEEmcUtil
database/EEmcDbItem.cxx - fixed compilation warnnings;
EEfeeRaw/RootWrapper.cxx - fixed compilation warnnings;
EEmcSmdMap/EEmcSmd2SmdMapItem.h, EEmcSmdMap.h - fixed compilation warnnings;
StEmcCalibrationMaker
StEmcCalibMaker.cxx, StEmcCalibrationMaker.cxx, StEmcEqualMaker.cxx, StEmcMipMaker.cxx, StEmcPedestalMaker.cxx - fixed bunch of warnings;
StEmcRawMaker
StBemcRaw.cxx, StEmcRawMaker.cxx - fixed a bunch of warnings;
StEmcTriggerMaker
StBemcTrigger.cxx - modified to clarify subtraction versus bit shift operator precedence;
StEvent
StTrackPidTraits.cxx, StTrackPidTraits.h - moved definition of dst_dedx_st from pams/global/idl in;
StDedxPidTraits.cxx - removed St_dst_dedx_Table;
StEvent.h - removed reference to event_header_st;
StBbcTriggerDetector.cxx, StCalibrationVertex.cxx/h, StEvent.cxx/h, StEventInfo.cxx/h, StEventSummary.cxx/h, StEventTypes.h StFtpcHit.cxx/h, StFtpcSoftwareMonitor.cxx/h, StGlobalTrack.cxx/h, StHelixModel.cxx/h, StHit.cxx, StKinkVertex.cxx/h, StMwcTriggerDetector.cxx, StPrimaryTrack.cxx/h, StPrimaryVertex.cxx/h, StRichHit.cxx, StRichSoftwareMonitor.cxx/h, StSoftwareMonitor.cxx/h, StSsdHit.cxx/h, StSvtHit.cxx/h, StTpcHit.cxx/h, StTpcHitCollection.cxx/h, StTpcRawData.cxx, StTpcSectorHitCollection.cxx/h, StTptTrack.cxx/h, StTrack.cxx/h, StTrackDetectorInfo.cxx/h, StTrackFitTraits.cxx/h, StTrackGeometry.cxx/h, StTriggerData2008.cxx, StV0Vertex.cxx/h, StVertex.cxx/h, StXiVertex.cxx/h - removed dependences on old dst tables;
StCtbSoftwareMonitor.cxx/h, StEmcSoftwareMonitor.cxx/h, StEstGlobalTrack.cxx/h, StEstPrimaryTrack.cxx/h, StGlobalSoftwareMonitor.cxx/h, StL3SoftwareMonitor.cxx/h, StSvtSoftwareMonitor.cxx/h, StTofSoftwareMonitor.cxx/h, StTofSoftwareMonitor.cxx/h, StTpcSoftwareMonitor.cxx/h - removed ;
StRpsCluster.cxx, StRpsCluster.h, StRpsCollection.cxx, StRpsCollection.h, StRpsPlane.cxx, StRpsPlane.h, StRpsRomanPot.cxx, StRpsRomanPot.h - new files added for RPS collection, initial revision;
StPrimaryTrack.h, StSsdHit.cxx/h, StSvtHit.cxx/h, StTpcHit.h, StTpcPixel.h, StTpcRawData.cxx/h, StBTofHeader.cxx - fixed compiler warnings;
StContainers.cxx/h, StDetectorDefinitions.h, StEnumerations.h, StEvent.cxx/h, StEventClusteringHints.cxx, StEventLinkDef.h - hooks for RPS added;
StPrimaryVertex.cxx/h - added new member mNumMatchesWithBTOF and related access functions;
StBTofHeader.cxx - fixed order of operator precedence in removeVpdHit();
StBTofPidTraits.cxx, StBTofPidTraits.h - updated to fix the problem which causes the crash running TOF calibration on MuDst afterburner;
StEventCompendiumMaker
StEventCompendiumMaker.cxx - modified to use TChair;
StEventMaker
StEventMaker.cxx/h, StEventManager.hh, StRootEventManager.cc/hh - clean-up due to pams retirring; fixed problem with bunch crossing information in StEventInfo and StHddr;
StFilterMaker
StGammaFilterMaker.cxx, StGammaFilterMaker.h - new code for gamma filtering in simulation;
StFtpcCalibMaker
StFtpcCalibMaker.cxx - added USE_LOCAL_DRIFTMAP instructions;
StFtpcClusterMaker
StFtpcClusterMaker.cxx - added USE_LOCAL_DRIFTMAP instructions;
StFtpcClusterFinder.cc/hh, StFtpcClusterMaker.cxx - removed all references to StFtpcSoftwareMonitor;
StFtpcTrackMaker
StFtpcTrackMaker.cxx, StFtpcVertex.cc/hh - removed dependences on dst_vertex_st table;
StFtpcTrackMaker.cxx/h - removed all references to StFtpcSoftwareMonitor;
StGenericVertexMaker
StGenericVertexFinder.cxx/h - reorder the vertices upon filling StEvent;
StiPPVertex/StPPVertexFinder.cxx - fixed compiler warning about operator order precedence;
StJetMaker
StJetSimuUtil/StJetSimuReader.cxx - fixed compilation warnning;
tracks/StjTrackCutDcaPtDependent.h - fixed compilation warnning;
treeStjJetListReader.h, StjJetListWriter.cxx, StjTreeIndexListCreator.cxx, StjTreeReader.cxx, StjTreeReader.h, StjTreeReaderTwoTrees.cxx, StjTreeReaderTwoTrees.h - fixed compilation warnings;
StMagF
StMagFMaker.cxx/h - modified to switch to TChair ;
StarMagField
StarMagField.cxx/h - modified to use local fMap variable; moved size definition from #define to enumerations;
StMuDSTMaker/COMMON
StMuDst.cxx, StMuTrack.cxx, StMuTrack.h - fixed small bug in StMuDst::fixTrackIndices and StMuDst::fixTofTrackIndices(), added StMuTrack::primaryTrack() and ensured StMuTrack::vertexIndex() returns the primary track pointer for a global track;
StMuDstMaker.cxx, StMuHelix.cxx/h, StMuTrack.cxx/h - patches made eliminating some redundant operations;
StuDraw3DMuEvent.cxx - fixed compilation warnings; added StMuTrack::globalTrack rendering;
StMuBTofPidTraits.cxx, StMuBTofPidTraits.h, StMuTrack.h - fixed the problem which causes the crash running TOF calibration from MuDst;
StSvtClassLibrary
StSvtHybridPixelsD.cc - adjusted to ROOT 5.22.00;
StPass0CalibMaker
StSpaceChargeEbyEMaker.cxx, StVertexSeedMaker.cxx - modified;
StTpcT0Maker.cxx, StTpcT0Maker.cxx.h - removed;
StSpaceChargeEbyEMaker.cxx/h - modified to return loosen nDaughters cut, added BEMCmatch cut and PCT hits cut, enable padrow 13 for Runs 2009+; fixed compiler warning about unsigned comparison;
StVertexSeedMaker.cxx/h - phased out usage of old tables; fixed problems with memory-resident TNtuple by using a temporary disk file;
St_QA_Maker
St_QA_Maker.cxx, St_QA_Maker.h - removed codes using old tables;
StEventQAMaker.cxx/h, StQAMakerBase.cxx/h - removed Event Summary;
St_srs_Maker
St_sfs_Maker.cxx, St_sfs_Maker.h - added files;
St_srs_Maker.cxx, St_srs_Maker.h - removed;
St_tcl_Maker
StTpcFastSimMaker.cxx, StTpcFastSimMaker.h - added files;
St_tcl_Maker.cxx/h, St_tfs_Maker.cxx/h - removed ;
Sti
StiStarVertexFinder.cxx - small consolidation;
StiTpc
StiTpcDetectorBuilder.cxx - St_tpcAnodeHVavgC => St_tpcAnodeHVC until tpcAnodeHVavg table will be fixed;
StSvtAnalysedHybridClusters.cc, StSvtHitMaker.cxx, StSvtHitMaker.h - modified to remove dependences on old tables;
StSvtVertexFinderMaker.cxx, StSvtVertexFinderMaker.h, SvtVertFind.cc, SvtVertFind.h - removed;
StiUtilities
StiPullEvent.cxx - added assert.h;
StSvtClusterMaker
StSvtAnalysedHybridClusters.cc, StSvtHitMaker.cxx, StSvtHitMaker.h - removed references to tables;
StSvtSimulationMaker
StSvtOnlineSeqAdjSimMaker.cxx - modified to make hard code masking to OFF until database is fixed;
StTagsMaker
GlobalTag.idl, StTagsMaker.cxx - modified to add primary vertex position errors;
StTpcDb
StTpcdEdxCorrection.cxx, StTpcdEdxCorrection.h - added handle for TPX ADC corrections;
StTriggerUtilities
StTriggerSimuMaker.cxx - updated for Run 9 to work on simulation;
Emc/StEmcTriggerSimu.cxx/h - updated for Run 9 to work on simulation;
Bemc/StBemcTriggerSimu.cxx - updated to clear the number of masked towers; add call to StEmcDecoder::SetDateTime()
Eemc/EemcTrigUtil.cxx, EemcTrigUtil.h, StEemcTriggerSimu.cxx - added Endcap FEE pedestals for all years;
EEfeeTPTree.cxx - fixed memory leak;
StEemcTriggerSimu.cxx - modified to mask out faulty EEMC towers;
EEfeeTP.cxx, EEfeeTP.h, EEmapTP.h - - added (char*) to many strings to make SL5 happy;
L2Emulator/L2algoUtil/L2VirtualAlgo2009.cxx L2VirtualAlgo2009.h - modified to add (char*) to many strings to make SL5 happy;
L2Emulator/L2wAlgo/L2wBemc2009.cxx, L2wEemc2009.cxx - modified to add (char*) to many strings to make SL5 happy;
L2Emulator/L2upsilon/L2upsilon2006.cc - added (char*) to many strings to make SL5 happy;
L2Emulator/L2hienAlgo/L2hienAlgo08.cxx - added (char*) to many strings to make SL5 happy;
L2Emulator/L2pedAlgo/L2pedAlgo.cxx - added (char*) to many strings to make SL5 happy;
L2Emulator/L2jetAlgo/ L2adc2energyAlgo.cxx, L2jetAlgo2006.cxx, L2jetResults2006.h - added (char*) to many strings to make SL5 happy;
StarRoot
TRArray.cxx, TRSymMatrix.h - added more methods;
StDraw3D.cxx, StDraw3D.h - added STL based method;
StTrackMateMaker
StTrackMateMaker.cxx/h, StTrackPing.cc/hh - replace cout to logger;
StDraw3D.h - removed the astary entry TettaDeg;
StTpcHitMaker
StTpcHitMaker.cxx, StTpcRTSHitMaker.cxx/h - added attributes for sector and pad row selections;
StTpcRTSHitMaker.cxx/h - modified to make cluster finder not running if there is no pixels; replaced daqReader by daq_tpx;
StTpcHitMoverMaker
StTpcHitMoverMaker.cxx - modified due to pams cleanup;
StVpdCalibMaker
StVpdCalibMaker.cxx - modified to use the new calibration table vpdTotCorr; vzVpdFinder() updated to use a cut on timing diff to remove outliers;
RTS
include/rtsSystems.h - fixed PMD; added detector groups for 2010; fixed ESMD in rts2grp;
src/rtsmakefile.def - added support for for -m32 on 64 bit machines;
src/DAQ_ESMD/daq_esmd.cxx - added more event checks; fixed word bug in get_l2;
src/DAQ_TOF/daq_tof.cxx - added more event checks;
src/DAQ_BSMD/daq_bsmd.cxx - added SFS readout for nonZS, ZS and PEDRMS;
bsmdPed.cxx - fixed pedestal bug in pulser runs;
src/DAQ_READER/daqReader.cxx - fixed the sense of RTS_ONLINE;
daq_det.cxx - hacked up the FY2000 DATAP feature;
src/DAQ_TPX/tpxFCF.cxx, tpxFCF.h - added FY10 features;
daq_tpx.cxx, daq_tpx.h - added fcf run compatibility; fixed gains in InitRun;
pams
geometry/ecalgeo/ecalgeo6.g, ecalgeo.g - modified due to pams rettiring:
- fixed several material / medium relationship problems;
- fixed issue where SMD strips extruded their mother volumes;
- expanded the SMD gap from 34mm to 36mm as built;
- added SMD spacer layers;
- added material to front and back of SMD strips;
- defined and used PbAlloy and Steel mixtures, to better match material in calorimeter;
- thickness of preshower layers reduced to 4.75mm as built;
geometry/geometry/geometry.g - added logic to support multiple ecalgeoX files; ecalgeo6 set as default version for y2009a tag ;
Y2009A production tag added:
- includes the new model of the EEMC;
- revert to old model of EEMC in Y2009 tag for compat w/ W preproduction;
- removed the y2006dev tag;
- added y2006h tag, which is y2006g + new model of the endcap;
added y2010 geometry inherited from y2009a;
gen/hijing_382/hijing.F - fixed bug in ran() in gfortran;
global/idl/dst_dedx.idl - removed, moved dst_dedx_st definition to StEvent/StTrackPidTraits;
sim/gstar/gstar_part.g - modified due to retirring pams;
sim/idl/g2t_tpc_hit.idl - modified due to retirring pams;
sim/g2t/g2t_tpc.F, g2t_volume_id.g - modified due to retirring pams;
StarDb
Calibrations/tpc/TpcAdcCorrectionB.20090301.000106.C - correction for for y2009 Tpx added;
added tpcAcCharge files to account of accumulated Charge for Y2009;
TpcLengthCorrectionB.C, tpcPressureB.C - added default tables;
asic_thresholds_tpx.y2010.C, TpcAdcCorrectionB.y2010.C, TpcAltroParameters.y2010.C, tpcPadGainT0.y2010.C, tpcPressureB.y2010.C, TpcSecRowB.y2010.C - added starting values for y2010;
VmcGeometry/y2010.h,Geometry.y2009a.C y2009a.h - added y2009a geometry and inherited from it y2010;
Geometry.y2006h.C, y2006h.h - added y2006h geometry with latest latest version of the TPC geometry and fixed EEMC;
removed old root geometry files;
StDb/idl
pp2ppZ.idl - new pp2pp table added ;
pvpdCalib.idl, toft0Calib.idl, toftotCalib.idl, tofzCalib.idl - added new TOF tables;
TpcAltroParameters.idl - fixed spelling;
tpcAcCharge.idl - added table for accumulated charge in TPC;
- November 9, 2009
new library SL09e (tagged as SL09e) has been created, build on SL4.4, and SL5.3 platforms, tested and released on November 10.
Main features:
- completed adjustment to SL5.3 platform;
- several patches to ROOT 5.22.00 version has been done;
- new BTOF calibration and VPD code;
- new FMS DB code;
- RTS reader added capability to read trigger data files in format .dat;
- new TPX response simulator;
- last version with old pams codes; - several bugs were fixed;
Next codes have been updated:
asps/Jprof
Jprof.cxx/h, bfd.cxx, coff.cxx, config.h, elf.cxx, intcnt.cxx/h, jprof.h, leaky.h, libmalloc.cxx/h, strset.cxx/h - removed becuase not functional since gcc4;
exe/leaky.cxx - removed becuase not functional since gcc4;
StAnalysisMaker
StAnalysisMaker.cxx/h - added static method to print StEvent;
StBbcSimulationMaker
StBbcSimulationMaker.cxx - removed operator [];
StBFChain
BigFullChain.h - added StiVMC, modified TpcRS to prepare to clean up tcl,tpcdaq and fcf options;
StBTofCalibMaker
StBTofCalibMaker.cxx/h - new maker added for combined BTOF & VPD calibrations;
StBTofHitMaker
StBTofHitMaker.cxx - added the VPD delay in the StBTofSortRawHit;
StBTofMatchMaker
StBTofMatchMaker.cxx/h - added the functionality to perform the matching with MuDst directly;
made several updates on the track cuts used for matching: flag<1000 was added and nHits>15 cut was removed;
created a new StBTofPidTraits for any primary track;
local Z window cut set to symmetric (fabs(localz)<3.05);
StBTofUtil
StBTofGeometry.cxx - corrected the calculation for tray alignment parameters in X-Y;
StBTofSortRawHit.cxx/h - implemented the VPD delay subtraction in trigger window cut;
StChain
StRTSBaseMaker.cxx/h, StRtsTable.cxx/h - modified to make the global daqReader to be the static data-member to fix the bug; ;
StMaker.cxx/h - modified to improve WhiteBoard ; y2010 timestamp added;
St_base
StTree.cxx - added the new raw format to read the trigger data files with extension .dat;
StStreamFile.cxx/h, StStreamFileFactory.cxx/h - added STAR iostream-base file interface; added the method to provide the error message;
StDaqLib
EVP/emcReader.cxx - fixed the old emcReader; added header file algorithm and assigned the proper namespace to make both SL4/64bit and SL4/32bits compilation ok;
SVT/SVTV1P0.Banks.cxx/hh - fixed pointer arithmetics and cpu type;
TRG/TRG_Reader.cxx - fixed pointer arithmetics and cpu type;
StDAQMaker
StDAQMaker.cxx/h, StDAQReader.cxx/h, StRtsReaderMaker.cxx/h - moved daqReader instantiation from StDAQMaker to StDAQReader to switch between input files properly;
StDAQMaker.cxx/h, StDAQReader.cxx/h - moved StRtsReaderMaker instantiation from StDAQReader to StDAQMaker;
StRtsReaderMaker.cxx/h - removed redundant components ;
StDAQReader.cxx/h, StRtsReaderMaker.cxx/h - modified to activate the new DAT file format;
StRtsReaderMaker.cxx - fDatReader initialized to zero at class ctor to fix a bug;
StDAQReader.cxx, StTRGReader.cxx/h - modified to be able to read .dat file in 1999-2008 format;
StDbLib
StString.h - modified to check for empty string, useful in standalone mode where environmental variables are not defined ;
rules.make - modified to use mysql_config in place of static dir locations;
StDbManagerImpl.cc, StDbTable.cc, StDbTableDescriptor.cc/h, StTableDescriptorI.h - struct alignment fixed to keep runtime align calculation ;
StDbDefs.hh, StDbManagerImpl.cc - added FMS to the domain list;
MysqlDb.cc - LB timer fixed;
StDbSql.cc - modified to reset number of rows to fetched number of rows if it is less than total indexed number;
StDbTableDescriptor.cc/hh - modified to make row size not static, tables have different row sizes;
StDbDefs.hh, StDbManagerImpl.cc - added new domain: pp2pp;
StDbSql.cc - modified to restore missing endTime check;
StDbUtilities
StTpcCoordinateTransform.cc/hh - removed defaults in Tpc Coordinate transformations ;
StDetectorDbMaker
StDetectorDbChairs.cxx - modified to introduce TPC slewing corrections;
St_tpcSlewingC.h - added new file to introduce TPC slewing corrections;
StDetectorDbChairs.cxx, St_tpcAnodeHVC.h - modified to make tpcAnodeHV better handles with different neighboring voltages;
St_tpcGainC.h - modified;
St_tpcAnodeHVC.h, St_tpcPadGainT0C.h, StDetectorDbChairs.cxx - modified to use St_tpcPadGainT0C instead of St_tpcGainC and St_tpcT0C;
St_tpcAnodeHVavgC.h - added new file ;
St_tpcGainC.h, St_tpcT0C.h - removed ;
St_tss_tssparC.h - moved gain calculations to .cxx file ;
StDbUtilities
StTpcCoordinateTransform.hh - fixed StThreeVector invoke;
StMagUtilities.cxx/h - updated grid spacing for UndoShort and prepared for other future gridding upgrades to achieve higher resolution results; improved execution speed of many algorithms: especially GridLeak;
updated scheme for pad row numbering in Predict Space Charge;
StMagUtilities.cxx/h - modified to set GetMagFactor();
StEEmcUtil
EEdsm/BEdsm2.cxx/h, BemcTrigUtil.cxx/h, EEdsm0.cxx/h, EEdsm0Tree.cxx/h, EEdsm1.cxx/h, EEdsm1Tree.cxx/h, EEdsm2.cxx/h, EEdsm3.cxx/h, EEfeeTP.cxx/h, EEfeeTPTree.cxx/h, EEmapTP.hh EMCdsm2Tree.cxx/h, EemcTrigUtil.cxx/h - EEMC DSM emulator moved over to StTriggerUtilities/Eemc;
StEmcUtil
database/StBemcTables.h - added StBemcTable to use in StEmcDecoder;
projection/ StEmcPosition.cxx/h - added getNextId(det,softId,nEta,nPhi) method;
StEvent
StTpcRawData.cxx/h - fixed relation npad from pad row;
StDcaGeometry.cxx/h - modified to add set from double;
StEventUtilities
StuDraw3DEvent.h - added link to pdf file and acrobat 9; modified to promote the virtial inheritance for StDraw3D subclasses;
StuDraw3DEvent.cxx - fixed eta sign;modified to adjust tresholds;
StuDraw3DEvent.cxx/h - added EmsHit method to the StuDraw3DEvent ;
StFmsDbMaker
StFmsDbMaker.cxx/h - new FMS DB code ;
StFtpcCalibMaker
StFtpcLaserCalib.cc - modified to exit laser fit to avoid FPE if either <=2 hits on track or if helix fit fails to converge;
StFtpcCalibMaker.cxx/h, StFtpcLaser.hh, StFtpcLaserCalib.cc/hh - modified to write out all gas temperature, air pressure info to Run branch of FTPC debug root file;
modified to be able to vary the gas temperature in addition to varying t0 and gas composition;
StFtpcClusterMaker
StFtpcClusterDebug.cc - modified to initilize the class data-members and add some protection against of zero pointers;
added protection against of the nonexisting debug.ini; modified to use default values;
StFtpcClusterDebug.cc/hh, StFtpcClusterFinder.cc/hh, StFtpcClusterMaker.cxx - modified to write out all gas temperature, air pressure info to Run branch of FTPC debug root file;
StGammaMaker
StGammaCandidateMaker.cxx - modified to Utilize new StEmcPosition methods to speed up SMD strip collection;
StTrgDatFileReader
StDatFileFactory.cxx/h, StTrgDatReader.cxx/h - added .dat file format reader;
Sti
StiKalmanTrack.cxx/h, StiKalmanTrackFinder.cxx, StiTrack.h - added primary vertex number ;
StiKalmanTrackFinder.cxx - modified to reset primarity after refit ;
StiKalmanTrack.cxx, StiKalmanTrackNode.cxx - removed STAR LOG in print();
StiMaker
StiStEventFiller.cxx - added primary vertex number and charge(GVB);
StiMaker.cxx, StiStEventFiller.cxx - set assert instead of skip event;
StiTpc
StiTpcDetectorBuilder.cxx - modified not to use padrows with no gain; modified to replace St_tpcGainC to St_tpcPadGainT0C
StiUtilities
StiPullEvent.h - added primary vertex number and charge(GVB); removed redundante definition of StiPullEvent::~StiPullEvent();
StiPullEvent.cxx/h - modified to propagate primary info into globals(Finish());
StHbtMaker
Infrastructure/StHbtPair.cc - fixed for StThreeVector and StLorentzVector ctor;
St_geom_Maker
GeomBrowser.cxx/h, StarGeomTreeWidget.cxx/h - added refs to the mother volumes; connected DepthControl and lookup depth; added I/O prototype;
StGeomHighlighter.cxx/h - added new files for motran syntax highlighter;
TextEdit.cxx/h - modified to add motran syntax highlighter;
StQtDelayRedrawTimer.cxx, StQtDelayRedrawTimer.h - added new files to delay re-drawing;
StIOMaker
StIOMaker.cxx - modified to initialize the pointer at ctor; added the new raw format to read the trigger data files with extension .dat; loaded StTrdFileReader shared lib to back DAT format;
StJetMaker
StBET4pMaker.vxx/h - updated for BEMC calibration systematics;
StPythiaFourPMaker.cxx - modified to add tower info into jet tree;
StJetMaker.cxx/h - fixed getStJets();
emulator/ StjBEMCSockeVariation.cxx/h, StBET4pMakerImpBuilder.cxx/h - updated for BEMC calibration systematics;
StMuTrackFourVec.h, StjeTowerEnergyListToStMuTrackFourVecList.cxx/h, StjeTrackListToStMuTrackFourVecList.cxx - midified to add tower info into jet tree;
StjeDefaultJetTreeWriter.cxx - modified to add tower info into jet tree; added tracks and towers references to jet;
StMuTowerEmu.h - new file to add tower info into jet tree;
StMuTrackEmu.h, StjeDefaultJetTreeWriter.cxx/h - added track flag, nSigmaElectron, nSigmaKaon and nSigmaProton;
StMuTrackEmu.h, StjeTrackListToStMuTrackFourVecList.cxx - added detectorId to tracks; added nSigmaKaon, nSigmaProton and nSigmaElectron; added exitTowerId and exitDetectorId;
StjeJetEventTreeWriter.h - added new file with implementaion of Tree writer for class StJetEvent; modified to use include "StSpinPool/StJetEvent/StJetEventTypes.h";
StjeJetEventTreeWriter.cxx - removed dependencies of StSpinPool/StJetEvent on StJetMaker;
mudst/StjTPCMuDst.cxx - added nSigmaKaon, nSigmaProton and nSigmaElectron;
tracks/StjTrackList.h - added nSigmaKaon, nSigmaProton and nSigmaElectron;
StMcEvent
StMcFgtHit.cc/hh, StMcFgtHitCollection.cc/hh - modified for FGT;
StMuDSTMaker
COMMON/StuDraw3DMuEvent.h - modified to promote the virtial inheritance for StDraw3D subclasses;
RTS
src/DAQ_READER/cfgutil.cxx/h, daqReader.cxx - fixed the compilation problem under SL5/64-bit;
daqReader.h - added u_int;
daqReader.cxx - first attempt to force rtsLog to STDERR for ROOT;
src/SFS/sfs_index.cxx/h - fixed the compilation problem under SL5/64-bit;
src/DAQ_TPX/tpxCore.cxx/h, tpxPed.cxx, tpxStat.cxx/h - updated;
tpxFCF.cxx - fixed quality asignment bug in simulated data;
daq_tpx.cxx/h, tpxStat.cxx - modified for misc monitoring ;
tpxPed.cxx - adjusted special runs;
src/DAQ_BSMD/daq_bsmd.cxx/h, bsmdPed.cxx/h - added pedestal subtraction routines;
bsmdPed.cxx, daq_bsmd.cxx - modified for run 2010 support; added RAW SFS;
src/RTS_EXAMPLE/rts_example.C - added RAW SFS bank;
StRTSClient
include/rts.h - added __x86_64 ;
rtsSystems.h - fixed compilation error on SL5/64-bit machine;
include/DAQ1000/ddl_struct.h - added heartbeat msc event;
FCFMaker/FCFMaker.cxx - fixed pointer arithmetics;
FCF/fcfClass.cxx - fixed pointer arithmetics;
StRichPIDMaker
StRichArea.cxx - bug fixed ;
StStarLogger
StLoggerConfig.h, StarOptionFilter.h - added Configure header to take in account the different log4cxx versions ;
StLoggerConfig.h - fixed wrong declaration - change int to class;
MySQLAppender.cxx/h, StLoggerConfig.h, StLoggerManager.cxx/h, StUCMAppender.cxx/h, StarOptionFilter.cxx - modified to merge log4cxx version 9 and 10;
StUCMAppender.cxx - fixed the obsolete dependency;
logging/TxUCMCollector.cxx - added Configure header to take in account the different log4cxx versions ;
StarClassLibrary
StLorentzVector.hh - added extra ctor;
StThreeVector.hh - Introduced the dedicated default ctor for StThreeVector;
StarRoot
StDraw3D.cxx/h - added Print method; fixed the image file name; modified to eliminate the TRotMatrix leak and implement the negative lambda for EndCap style; fixed eta sign; added EmsHit method to the StuDraw3DEvent;
THelixTrack.cxx - workaround to define the method `TCircleFitter::FitZ()';
StArchInfo.cxx/h - added new class to return CPU/OS Architecture related info; added new method to calculate the alignment and padding;
StCheckQtEnv.cxx, StDraw3D.cxx - removed the redundant Coin test;
StSsdUtil
StSsdBarrel.cc/hh - fixed FindMcHit signature;
StSsdWafer.cc - changed Char_t *xyz type to be const;
StSvtSimulationMaker
StSvtOnlineSeqAdjSimMaker.cxx/h - added boolean variable mRunSvtOnlineSeqAdj to toggle function on and off;
StTpcDb
StTpcDb.cxx/h, StTpcDbMaker.cxx, StTpcdEdxCorrection.cxx/h, St_tpcCorrectionC.cxx/h - modified to use directly field from StarMagField; replaced St_tpcGainC and St_tpcT0C by St_tpcPadGainT0C; removed defaults in coordinate transformations;
StTpcHitMaker
StTpcHitMaker.cxx - introduced TPC slewing corrections;
StTpcRTSHitMaker.cxx/h - modified to replace the obsolete rts_reader with the new daqReader;
StTriggerDataMaker
StTriggerDataMaker.cxx/h - added debug option;
StTriggerUtilities
StTriggerSimuMaker.cxx/h - updated for run 2009 data; removed dependencies on ROOT MySQL; modified for migration of ROOT MySQL to STAR DB API; modified to move StEEmcUtil/EEdsm to StTriggerUtilities/Eemc;
StTriggerSimuResult.cxx - added missing header file;
Bemc/StBemcTriggerSimu.cxx/h - updated for run 2009 data; removed dependencies on ROOT MySQL; modified for migration of ROOT MySQL to STAR DB API;
Emc/StEmcTriggerSimu.cxx/h - updated for run 2009 data; removed dependencies on ROOT MySQL; modified for migration of ROOT MySQL to STAR DB API;
Eemc/StEemcTriggerSimu.cxx/h - updated for run 2009 data; removed dependencies on ROOT MySQL; modified for migration of ROOT MySQL to STAR DB API;
BEdsm2.cxx/h, EEdsm0.cxx/h, EEdsm0Tree.cxx/h, EEdsm1.cxx/h, EEdsm1Tree.cxx/h, EEdsm2.cxx/h, EEdsm3.cxx/h, EEfeeTP.cxx/h, EEfeeTPTree.cxx/h, EEmapTP.h, EMCdsm2Tree.cxx/h, EemcTrigUtil.cxx/h - added new files to move StEEmcUtil/EEdsm to StTriggerUtilities/Eemc;
StDSMUtilities/DSMLayer.hh - modified to add missing algorithm header file;
DSMLayer_B101_2009.cc, DSMLayer_E001_2009.cc, DSMLayer_E101_2009.cc, DSMLayer_EM201_2009.cc, DSMLayer_LD301_2009.cc, TCU_2009.cc - fixed wrong pointer arithmetics;
StDSM2009Utilities.hh - modified for migration of ROOT MySQL to STAR DB API;
TCU.cc/hh - added new files for run 2009 data;
L2Emulator/StGenericL2Emulator.cxx - modified to move StEEmcUtil/EEdsm to StTriggerUtilities/Eemc;
StJanEventMaker/JanEvent.cxx - added missing cstring header file;
StTrsMaker
StTrsMaker.cxx - removed default in zFromTB ;
src/StTrsDeDx.cc - modified to fix some comparison;
src/StTpcDbSlowControl.cc, StTrsChargeSegment.cc, StTrsFastChargeTransporter.cc, StTrsParameterizedAnalogSignalGenerator.cc, StTrsSlowAnalogSignalGenerator.cc, StTrsWireHistogram.cc - modified to remove default in zFromTB;
include/StTpcDbSlowControl.hh, StTrsChargeTransporter.hh - modified to remove default in zFromTB;
pams
emc/jet/emc_cl_finder.F - 64bit correction ;
geometry/geometry/geometry.g - fixed bug pipe14==>pipe12 in y2008 & y2009; changed BTOFc6 <== BTOFc7 for TOF in y2009 geometry; first attempt to implement year 2010 geometry: y2009+Full BTOF;
geometry/tpcegeo/tpcegeo3.g - prompt hits implemented; prompt hits moved from GateGrid==>PadPlane; reduced cuts from 1 MeV to 100 keV;
geometry/calbgeo/calbgeo2.g - removed redundant sensitives ;
global/evo/v0userfit.F - fixed sign;
global/egr/userimpfit.F - fixed sign;
sim/g2t/g2t_volume_id.g - bug fixed in TOF g2t_volume_id;
tpc/tpt/tpt_find_outlier.F - set dsxy <= 1;
StarDb
Calibrations/tpc/tpcRDOMasks.upgr15.C - removed, moved to RunLog/onl;
tpcPadGainT0.C - added default tpcPadGainT0 table;
Calibrations/tracker/DefaultTrackingParameters.C, KalmanTrackFitterParameters.C, LocalTrackSeedFinder.C, tkf_tkfpar.C, tpcInnerHitError.C, tpcOuterHitError.C, tpcTrackingParameters.C - added default tracking parameters for year 2000 data for ITTF chain;
RunLog/onl/tpcRDOMasks.upgr15.C - added, moved from Calibrations/tpc;
VmcGeometry/y2008.h, y2008a.h, y2009.h - fixed bug pipe14==>pipe12 in y2008 & y2009;
y2009.h - corrected dead zone;
Geometry.y2010.C, y2010.h - first version of year 2010 geometry: y2009+Full BTOF;
StDb
idl/fmsPatchPanelMap.idl, fmsQTMap.idl - added FMS mapping tables;
trgDsmReg.idl - added new dsm registers for EMCAL team;
tpcSlewing.idl - added tpc slewing struct;
fmsMap.idl - fixed channel ids;
fmsGain.idl fmsGainCorrection.idl - new files added for Gain and Gain corrections tables;
fmsChannelGeometry.idl, fmsDetectorPosition.idl, fmsMap.idl - add more tables for FMS, improved schema;
tpcChargeStepCalib.idl - removed after removing StChargeStepMaker;
pp2ppPedestal.idl - added new pedestal table for pp2pp;
tpcAnodeHVavg.idl - added new tables with average voltages instead of exact voltages;
vpdTotCorr.idl - added new table for VPD;
StarVMC
StarVMCApplication/StarMCStack.cxx - assert.h added to define assert();
QtRoot
qt/src/TGQt.cxx/h, TQtPen.h, TVirtualX.interface.h - modified to adjust ROOT interface;
qtgui/inc/TEmbeddedPad.h - removed CPP macro to make the CINT happy;
qtgui/src/ TQtCanvasImp.cxx - removed Coin test;
qtgl/qtcoin/qtcoin.pro - modified to get rid of the SmallChange Coin package;
qtgl/qtgl/src/TQtGLViewerImp.cxx, TQtRootViewer3D.cxx - implemented Print interface;
qtgl/qtcoin/inc/TQtCoinViewerImp.h, TQtCoinWidget.h - implemented Print interface;
SbList.h, SmAxisKit.h, SmallChange.h, SoText2Set.h - modified to get rid of the SmallChange Coin package;
qtgl/qtgl/inc/TQGLViewerImp.h. TQtGLViewerImp.h. TQtRootViewer3D.h - implemented Print interface;
qtgl/qtcoin/InstallCoin3D/installCoin3D.sh - modified to get rid of SmallChange Coin package; disabled the Quater package;
installCoin3D3.sh - added new script to install Coin-3 suite; modified to define the numner of CPUs to use;
download.new.sh - added new version of the Coin download script; added the local tar option; added CREATE_TAR variable;
qtgl/qtcoin/src/TQtCoinViewerImp.cxx, TQtCoinWidget.cxx - implemented Print interface;
TQtCoinWidget.cxx, SmAxisKit.cxx, SmallChangeInit.cxx, SoText2Set.cxx - added new files to get rid of the SmallChange Coin package;
TQtInspectImp.cxx - set the correct pad symbol for HEX constant;
StUCMApi
removed obsolete codes, moved to StarLogger;
- October 26, 2009
all libraries starting from SL06g to SL09d has been updated with patches for SL5.3 platform and retagged with tags like SL0Xy_SL5.
Updated codes:
StRoot/macros/LoadLogger.C, bfc.C - removed using liblog4cxx.so ;
- September 3, 2009
new library SL09d (tagged as SL09d) has been created, build on SL4.4, and SL3.05 platforms, tested and released on September 8.
Main features:
- new ROOT 5.22.00 version;
- updated FTPC calibration code;
- several updates related to new BTOF code;
- year 2009 geometry fixes;
- fixed problem reading run 2009 trigger data with new DAQ1000 reader code;
- number of codes adjustment for 64-bits SL5 platform (not final);
- new Qt4 version consistent with ROOT 5.22.00;
- several bugs have been fixed;
Next codes have been updated:
asps/rexe
Conscript - modified for gfortran support ;
asps/Simulation
agetof/nxtcrd.F, raw.F, rw.F - modified ICHAR size;
agetof/Conscript - modified for gfortran support;
starsim/atmain/dblib.cxx - added string.h needed for gcc 4;
starsim/geant/grktmp.F - modified to gfortran compiler;
StBFChain
BigFullChain.h, StBFChain.cxx - changes for FTPC for laser run; moved all TOF options before VTX ;
St_base
StFileIter.h - modifed to stop warnings; added the empty inpl for the dummy methods;
StObject.cxx, StTree.cxx - fixed for SL5 64 bits platform;
StBichsel
Bichsel.cxx, GetdEdxResolution.cxx, dEdxParameterization.cxx - fixed for SL5 64 bits platform;
StBTofMatchMaker
StBTofMatchMaker.h - fixed for SL5 64 bits platform;
StBTofMatchMaker.cxx/h - geometry initialization moved to Init() function;
StBTofUtil
StBTofINLCorr.cxx - modified to correct the total # of rows read-in for the TDIGOnTray table;
StBTofGeometry.cxx/h - fixed for SL5 64 bits platform;
StBTofTables.h,StBTofTables.cxx - added new files;
StDaqLib
GENERIC/EventReader.hh - basic fix for gcc 4 ;
EventReader.cxx - modified to create the fired detector mask;
StDAQMaker
StDAQReader.cxx - modified to add event/run number to error message;
StDbBroker
StDbWrappedMessenger.cc - fixed for SL5 64 bits platform;
StDbLib
ChapiStringUtilities.cxx, MysqlDb.cc, StDbServiceBroker.cxx, StlXmlTree.cxx - fixed for SL5 64 bits platform;
StDbUtilities
StMagUtilities.cxx - updates for Undo3DGridLeakDistortion; faster and more reliable near pad row 13;
StDetectorDbMaker
St_tpcGainC.h, St_tpcPadrowT0C.h, St_tpcT0C.h - fixed for SL5 64 bits platform;
St_asic_thresholds_tpxC.h, St_tpcPadGainT0C.h - added new files for chairs;
StDetectorDbChairs.cxx - modified for new chairs;
StiChairs.cxx - modified to make temporary prompt hit error *=10;
StEEmcUtil
StEEmcSmd/EEmcSmdGeom.cxx - fixed for SL5 64 bits platform;
EEmcSmdMap/EEmcSmdMap.h - fixed for SL5 64 bits platform;
database/StEEmcDb.cxx, StEEmcDb.h - fixed for SL5 64 bits platform;
StEmcUtil
neuralNet/NeuNet.cxx, NeuNet.h - fixed for SL5 64 bits platform;
StEstMaker
StEstProjection.cxx - fixed for SL5 64 bits platform;
StEvent
StTriggerData2009.cxx/h - added checks of trigger data banks;
StTriggerData.cxx/h - implemented new data member mErrorFlag and referring access fct;
StTriggerData2009.cxx/h -implemented flag corruption in new member mErrorFlag;
StBTofRawHit.h - fixed for SL5 64 bits platform;
StEventDisplayMaker
StGlobalFilterTest.cxx - modified to remove the obsolete interface, use the new one;
StEventMaker
StEventMaker.cxx - added checks for corruption in StTriggerData;
StEventUtilities
StEventHelper.cxx/h - modified to derive StTrackHelper from the brand-new StarClassLibrary StHelixHelper; fixed for SL5 64 bits platform;
StFtpcClusterMaker
StFtpcClusterMaker.cxx/h, StFtpcDbReader.cc/hh - modified to use the 'perfect' gain table and adjustAverageWest = adjustAverageEast = 0.0 for laser run calibration (the 'flaser' option is used in the bfc);
StFtpcCalibMaker
StFtpcCalibMaker.cxx - modified to use the 'perfect' gain table and adjustAverageWest = adjustAverageEast = 0.0 for laser run calibration;
macros/lasertest.C, lasertest_single.C modified to use the 'perfect' gain table and adjustAverageWest = adjustAverageEast = 0.0 for laser run calibration;
Db_LoadTable.C, Db_ReadTable.C - added domainName argument to be able to edit both Calibrations_ftpc and Geometry_ftpc database tables;
ftpc_sqldraw.C - added macro to histogram FTPC extra temperatures from the MySQL database ;
StFtpcTrackMaker
StFtpcDisplay.cc, StFtpcTrackingParams.cc - fixed for SL5 64 bits platform;
StGammaMaker
StGammaEEmcLeakage.cxx - fixed for SL5 64 bits platform;
StGenericVertexMaker
StCtbUtility.cxx - fixed for SL5 64 bits platform;
macros/rdMuDst2print.C;
StiPPVertex/EemcHitList.h - fixed for SL5 64 bits platform;
StGridCollector
StGridCollector.cxx - fixed for SL5 64 bits platform;
StHbtMaker
Base/StHbtParticleCut.h, StHbtTripletCut.h - fixed for SL5 64 bits platform;
StJetMaker
StPythiaFourPMaker.h - removed unused arguments in constructor; removed cut on MC particle status code; modified to save only Pythia final state particles;
StBET4pMaker.cxx/h - modified to implement methods for doing tower energy correction for tracks;
mudst/ StjTPCMuDst.cxx - modified to change BEMC radius where to extrapolate TPC tracks from BEMC_RADIUS+5=230.405 cm to 238.6 cm; added protection against null pointers;
StjBEMCMuDst.cxx - added protection against null pointers;
StjMCMuDst.cxx - modified to save only Pythia final state particles;
StJetSimuUtil/StJetSimuReader.cxx - added branch->SetAutoDelete(true) to properly read jet trees;
StJetSimuUtil/macros/RunJetSimuSkimFinder.C - added Endcap simulator and switched to new trigger simulator; modified names of some variables; modified to implement methods for doing tower energy correction for tracks;
emulator/StBET4pMakerImp.cxx/h, StBET4pMakerImpBuilder.cxx/h - modified to implement methods for doing tower energy correction for tracks ;
towers/StjAbstractTowerEnergyCorrectionForTracks.cxx/h, StjTowerEnergyCorrectionForTracksFraction.cxx/h, StjTowerEnergyCorrectionForTracksMip.cxx/h - added new methods of doing tower energy correction for tracks;
Stl3Util
ftf/FtfBaseTrack.cxx/h - modified to eliminate the compilation warnings;
FtfTrack.cxx - fixed for SL5 64 bits platform;
base/St_l3_Coordinate_Transformer.cxx - fixed for SL5 64 bits platform;
StMcEvent
StMcBTofHitCollection.cc, StMcEmcHitCollection.cc - fixed for SL5 64 bits platform;
StMCFilter
StG3Particle.cxx, StGENParticle.cxx, StHepParticle.cxx, StMCFilter.cxx - fixed for SL5 64 bits platform;
StMiniMcEvent
StMiniMcEvent.cxx - fixed for SL5 64 bits platform;
StMuDSTMaker
COMMON/StuDraw3DMuEvent.cxx, StuDraw3DMuEvent.h - added new files with class-helper to generate 3D view of the StMuEvent object;
StMuEvent.h, StMuPrimaryTrackCovariance.cxx - fixed for SL5 64 bits platform;
StMuDst.h - modified to change tofArrays to btofArrays returned objects in numberOfBTofHit() and numberOfBTofRawHit(); fixed a bug for setBTofPidTraits;
StuDraw3DMuEvent.cxx, StuDraw3DMuEvent.h - modified to add tracks method to draw all tracks from event;
StRchMaker
StRichSinglePixelCollection.cxx - fixed for SL5 64 bits platform;
StRichPIDMaker
StRichAreaSegment.cxx, StRichPIDTraits.cxx - fixed for SL5 64 bits platform;
StRrsMaker
StRichGeometryDb.cxx, StRichPadPlane.cxx - fixed for SL5 64 bits platform;
Sti
StiKalmanTrackNode.cxx/h - modified to make getTime() a const;
Base/Factory.h - fixed for SL5 64 bits platform;
StiMaker
StiStEventFiller.cxx - modified to calculate time of flight for StiPulls;
StStrangeMuDstMaker
StStrangeMuDstMaker.cxx/h, DcaService.cxx/h, StStrangeCuts.cc, StStrangeMuDstPlayer.cxx - fixed pointer and string conversions; some fixes for SL5 64_bits platform;
StSvtDaqMaker
StSvtHybridDaqData.cc - fixed for SL5 64 bits platform;
StSvtSimulationMaker
StSvtElectronCloud.cc - modified to fix minor axis of initial electron cloud Size ;
StSvtSignal.cc - modified to adjust mPasaGain to initial cloud size;
StarClassLibrary
StHelixHelper.cxx, StHelixHelper.h - added new files to convert the helix-based object into the plain array of 3D points;
StHelixHelper.h - modified to change StHelixHelper interface to be virtual and public;
StTriggerDataMaker
StTriggerDataMaker.cxx - modified to adjust to new daq format;
StTriggerUtilities
StDSMUtilitie/DSMLayer_B001_2009.cc - fixed for SL5 64 bits platform;
Eemc/StEemcTriggerHisto.cxx - fixed for SL5 64 bits platform;
L2Emulator/L2algoUtil/L2DbConfig.cxx, L2VirtualAlgo2008.h, L2VirtualAlgo2009.cxx - fixed for SL5 64 bits platform;
L2Emulator/L2upsilon/L2upsilon2006.cc - fixed for SL5 64 bits platform;
StUtilities
StMessageCounter.cxx - fixed for SL5 64 bits platform;
RTS
EventTracker/FtfFinder.cxx, eventTrackerLib.cxx, FtfMcTrack.cxx, gl3HistoManager.cxx - fixed for SL5 64 bits platform;
include/rtsSystems.h - modified to shuffle FGT trigger group and FPD;
rts.h - added _x86_64 flag to support 64 bits platform;
include/DB/conditions/detsDictionary.h - addded new file;
src/rtsmakefile.def - fixed for 64 bits platform;
src/DAQ_BSMD/bsmd_reader.cxx, daq_bsmd.cxx - fixed for 64 bits platform;
src/DAQ_ESMD/daq_esmd.cxx - fixed for 64 bits platform;
src/DAQ_BTOW/daq_btow.cxx - fixed for 64 bits platform;
src/DAQ_ETOW/daq_etow.cxx - fixed for 64 bits platform;
src/DAQ_EMC/emc_reader.cxx - fixed for 64 bit platform;
src/DAQ_FTP/daq_ftp.h - modified to separate dependences;
src/DAQ_READER/daqReader.cxx, msgNQLib.cxx - fixed for 64 bits platform;
src/DAQ_PMD/daq_pmd.cxx, daq_pmd.h, pmd_reader.cxx - added SFS PMD support;
src/DAQ_TPC/tpc_FCFReader.cxx - fixed for 64 bits platform;
src/DAQ_TPX/tpxGain.cxx/h - modified for support run and date in the file;
tpxGain.cxx, tpxPed.cxx - modified for new pulser style;
src/DAQ_TRG/trg_reader.cxx - fixed for 64 bits platform;
src/SFS/fs_index.h - fixed for 64 bits platform;
src/FCF/fcfClass.cxx - fixed for 64 bits platform;
src/RTS_EXAMPLE/tpx_read_gains.C - added new file to read TPX gains;
tpx_gains.C - added run number ;
StarClassLibrary
StMCTruth.cxx - fixed for SL5 64 bits platform;
StStarLogger
mysql/StarJobs.csh, StartSql.csh - modified to start the logger Db faster; replace the deprecated A option with the modern --skip-auto-rehash;
StarRoot
TRArray.cxx/h, TRSymMatrix.cxx/h, TRVector.cxx/h - added AdoptA method which preserved ownership;
THelixTrack.cxx/h - modified to add full error matrix + derivatives matrix; operator =() added;
StDraw3D.cxx, StMemStat.cxx, THelixTrack.cxx, TPolinom.cxx, xTCL.cxx - fixed for SL5 64 bits platform;
StDraw3D.cxx - adjusted for Qt4;
St_geom_Maker
GeomBrowser.cxx/h, QExGeoDrawHelper.cxx, StGeomBrowser.cxx/h, StGeomDepthControl.ui, StarGeomTreeWidget.cxx/h,
TQtRangeControl.cxx/h, TextEdit.cxx/h - new files added to be consistent with new ROOT version and Qt4 ;
GeomBrowser.ui, GeomBrowser.ui.h, QExObjectListItem.h, QtGBrowserInspect.h, QtGBrowserObjectListItem.h, St_geom_image_collection.cxx - removed;
icons/St_geom_Maker.qrc, FileNew.xpm, FileOpen.xpm, FilePrint.xpm, FileSave.xpm, arrow_left.xpm, arrow_right.xpm, connect.xpm,
fileopen.xpm, hdisk_t.xpm, printer.xpm, printer_s.xpm, qglviewer.icon.xpm, quit.xpm,reload.xpm, save.xpm, saveas.xpm,
snapshot.xpm, starlogo_1.xpm, update.xpm, view3d.xpm, wirebox.xpm - icons images moved to icons directory;
pams
geometry/geometry/ geometry.g - modified to remove Cone in upgr16 geometry;
modified TOF geometry for run 2009;
modified to make thinner beam pipe for upgr16;
modified to take PMD off the geometry y2009 ;
modified to take pixel off for upgr16 ;
geometry/ecalgeo/ecalgeo.g - modified to fix BIRK3 constant; fixed Air;
modified to make special stra(gling) aluminium workaround for geant3;
geometry/fpdmgeo/fpdmgeo.g, fpdmgeo1.g, fpdmgeo2.g, fpdmgeo3.g - modified to fix BIRK3 constant;
fpdmgeo.g - stra_Air added;
geometry/btofgeo/btofgeo6.g - modified TOF geometry for run 2009;
geometry/fpdmgeo/fhcmgeo.g - cleanup of write(*,*);
geometry/fpdmgeo/fpdmgeo.g - fixed Air; remove redundant Isvol=0;
geometry/pipegeo/pipegeo.g - modified to make thinner beam pipe for upgr16;
geometry/tpcegeo/tpcegeo3.g - wrong TPAD shift fixed; fixed FEEA (Front End Electronics Assembly) position;
gen/hijing_382/Conscript - modified for gfortran support;
StarVMC
geant3/added/dummies.c - modified to eliminate the compilation warning;
g2Root/Conscript - modified for gfortran support;
StarDb
VmcGeometry/y2009.h - PMD taken off for geometry y2009; wrong TPAD shift fixed; fixed FEEA (Front End Electronics Assembly) position;
StDb/idl
HitError.idl, bsmdeMap.idl, bsmdpMap.idl - modified to add tpcPadGainT0 table;
tpcPadGainT0.idl - added new table;
asic_thresholds_tpx.idl - added new asic thresholds table for TPX;
QtRoot
new Qt4 version installed;
qtroot/src/TQtContextMenuImp.cxx, TQtObjectDialog.cxx - new files added;
qtroot/inc/TQtObjectDialog.h, TQtContextMenuImp.h - new files added;
qtgl/qtgl/inc/TGLIncludes.5.22.h - added new file;
qtgl/qtgl/src/TQtGLViewerImp.cxx/h - modified to remove some qt3 support modules;
qtgui/inc/TEmbeddedPad.cxx/h - new ROOT 5.24 interface added;
qtgui/inc/TEmbeddedPad.h - modified to add ROOT header to make class backward compatibleqt/inc/TQtBrush.h;
qt/inc/TQtBrush.h, TQtUtil.h - modified to add ROOT header to make class backward compatible qt/inc/TQtBrush.h;
qtgui/src/TEmbeddedPad.cxx - modified to add ROOT header to make class backward compatible qt/inc/TQtBrush.h;
qtthread/inc/LinkDef.h, TQtCondition.h, TQtMutex.h, TQtThreadFactory.h, TQtThreadImp.h - modified to adjust interface to fix ROOT bug;
qtthread/src/TQtCondition.cxx, TQtMutex.cxx, TQtThreadFactory.cxx, TQtThreadImp.cxx - - modified to adjust interface to fix ROOT bug;
- July 31, 2009
new library SL09c (tagged as SL09c) has been created, build on SL4.4, and SL3.05 platforms, tested and released on August 3.
Main features:
- new StBTofMatchMaker code added;
- new code for MC filterring added;
- SVT simulator tuning updated;
- TPC prompt hits for geometry year 2009 implemented;
- several bugs have been fixed;
Next codes have been updated:
asps/Simulation/starsim/
geant/gdecay.F - removed;
atutil/aranlux.F - updated to supress redundant prints ;
StBFChain
StBFChain.cxx - modified to create a calib mode for StGenericVertex when using VtxSeedCalG;
St_base
StMessMgr.cxx/h - modified to add new dedicated UCM logger;
StArray.cxx, StTree.cxx - fixed the compilation warnning and error for 64-bits platform ;
StBTofMatchMaker
StBTofMatchMaker.cxx/h - new TOF match maker code;
StChain
StChain.cxx - modified to replace QA logger with the dedicated UCM one;
StRTSBaseMaker.cxx/h, StRtsTable.h - added DAQ event header to pass;
StDaqLib
GENERIC/EventReader.cxx - modified to generate the EventInfo from the daqReader rather from the DATAP structure because DATAP bank was not written in run 2009;
StDAQMaker
StRtsReaderMaker.cxx/h - added DAQ event header to pass;
StDetectorDbMaker
St_spaceChargeCorC.h - modified to use factor for powers for 2009+;
StDetectorDbMaker.cxx - modified to delete trigDetSums before creating a new one (bug fixes);
StEvent
StTriggerData2009.cxx - modified pp2ppDSM() due to changes in DSM structure ;
StTriggerData.cxx/h, StTriggerData2009.cxx/h - added fmsADC() method;
StEventUtilities
StuDraw3DEvent.cxx - modified to remove the redundant StTrackPointsand, replace it with StTrackHelper;
StEventUtilities
StEventHelper.cxx/h - hits iterator added;
StGenericVertexMaker
StGenericVertexFinder.h, StGenericVertexMaker.cxx/h - modified to create a calib mode for StGenericVertex when using VtxSeedCalG ; modified to move CalibBeamLine call from InitRun to Init;
StiPPVertex/StPPVertexFinder.cxx/h, TrackData.cxx/h - modified to allow export of prim tracks for 3D beam line fit (use VtxSeedCalG option), oneTrack vertex thresholds was lowered form 15 to 10 GeV/c;
Vertex3D.cxx - modified to narrow extrapolation range to prevent crashes;
StJetMaker
StJetSkimEventMaker.cxx - modified to drop events without vertices;
emulator/StjeDefaultJetTreeWriter.cxx - modified to drop events without vertices;
St_geant_Maker
StPrepEmbedMaker.cxx/h - updated with codes for strangeness embedding;
StMcEventMaker
StMcEventMaker.cxx/h - Btof added;
StMcEvent
StMcEvent.hh - modified to increase version in ClassDef;
StMcContainers.hh, StMcEvent.cc/hh, StMcEventLinkDef.h, StMcEventTypes.hh, StMcFgtHitCollection.hh, StMcFgtLayerHitCollection.hh, StMcFtpcHitCollection.hh,
StMcFtpcPlaneHitCollection.hh, StMcIstHitCollection.hh, StMcIstLayerHitCollection.hh, StMcPixelHitCollection.hh, StMcPixelLayerHitCollection.hh,
StMcRichHitCollection.hh, StMcSsdWaferHitCollection.hh, StMcSvtBarrelHitCollection.hh, StMcSvtHitCollection.hh, StMcSvtLadderHitCollection.hh, StMcSvtHitCollection.hh, StMcSvtLadderHitCollection.hh, StMcSvtWaferHitCollection.hh, StMcTofHitCollection.hh,
StMcTpcHitCollection.hh, StMcTpcPadrowHitCollection.hh, StMcTpcSectorHitCollection.hh - modified;
StMcBTofHit.cc, StMcBTofHit.hh, StMcBTofHitCollection.cc, StMcBTofHitCollection.hh - added new files for Btof hits collection ;
StMcEvent - modified to supress I/O for serice words;
StMCFilter
StExampleFilter.cxx/h, StG3Particle.cxx/h, StGenParticle.cxx/h, StHepParticle.cxx, StMCFilter.cxx/h, StGENParticle.cxx/h, StHepParticle.h - new codes to proceed with MC filterring simulation;
StMuDSTMaker
COMMON/StMuHelix.cxx/h - helix() method added;
StPass0CalibMaker
StMuDstVtxSeedMaker.cxx, StEvtVtxSeedMaker.cxx - modified to match mult for MuDst and StEvent;
RTS
src/DAQ_FTP/ daq_ftp.h- modified to separate dependency and provide proper reading FTPC detector info;
src/DAQ_TPX/tpxPed.cxx/h - added support for run in ped_sum;
daq_tpx.cxx, tpxFCF.cxx/h - fixed bug in the afterburner; added row8 afterburner;
src/RTS_EXAMPLE/daqFileChopper.C - added new macro to chop files up;
src/DAQ_PP2PP/daq_pp2pp.h - modified;
pp2pp.h - added new file to separate DAQ pp2pp data and DAQ Reader dependency to integrate pp2ppp with offline framework;
include/daqModes.h - added some super special run types;
StStarLogger
StLoggerManager.cxx - modified for UCM appender; added new dedicated UCM logger; added the mandatory UCM filters; replaced QA logger with the dedicated UCM one;
StUCMAppender.cxx/h - new files to add UCM appender to the StStarLogger; removed the redundant logStart/logEnd invocation; set UCM technology as default; modified to fix task size;
StLoggerManager.cxx - modified to pick the UCM technology from the LOGGING var;
logging/TxEventLog.cpp, TxEventLog.h, TxEventLogFactory.cxx/h, TxEventLogFile.cpp/h, TxEventLogMain.C, TxEventLogWeb.cpp/h, TxLogEventCmd.C, TxUCMConstants.h, TxUCMUtils.h, ucmlogging.properties - new files to add UCM appender to the StStarLogger;
TxUCMCollector.cxx/h - added new file for C++ version of the TxUCMCollector.java; fixed db parameters; modified to fix the recordExists method;
modified to recreate the job/event table by pattern;
TxEventLogCollector.cpp/h - added new files for UCM collector factory;
TxEventLogFactory.cxx - modified to add UCM collector factory;
TxEventLogFile.cpp, TxUCMCollector.cxx - fixed task size parser;
TxUCMCollector.cxx - initialized log4cxx appender for UCM collector if needed;
logging.i - added new file for SWIG description; added TxEventLogFactory SWIG interface;
TxEventLog.cpp, TxEventLog.h - modified to add consty char * interface to adjust SWIG;
txLoggingTest.java - added new file to test the SWIG interface;
mysql/UCMLogger.xml - added new config file to acrivate the StUCMLogger;
StarRoot
THelixTrack.cxx/h - bug fixed; method PatX(helx,,,) added;
StSvtSimulationMaker
StSvtElectronCloud.cc - modified to increase initial hit sizes and add projection to tSigMaj in function setInitWidths;
fixed angular dependencies;corrected SDD thickness;
modified several formula to better account for non-infinitesimal initial hit sizes;
StSvtElectronCloud.hh - added new variable, mInitHitSize;
StSvtSignal.cc - modified to increase of mPasaGain during tune; fixed angular dependencies; updated to compensate of addition of angular dependence in StSvtElectronCloud.cc; increased mPasaGain to compensate for edge effects subtraction in StSvtElectronCloud.cc;
StSvtSimulationMaker.cxx - modified to decrease of cTrapConst to reflect proper time evolution of hits;
modified to increase of trapping constant to compensate for changes in electron cloud shape;
Sti
StiHit.cxx - replaced LOG_DEBUG ==> LOG_FATAL; replaced FATAL ==> WARN for TPC dead RDO;
StiUtilities
StiDebug.cxx/h - FpeOn added;
StTofHitMaker
StTofHitMaker.cxx/h - bug fixed;
StTofrMatchMaker
StTofrMatchMaker.cxx/h - bug fixed; modified to make it compiled on 64-bit platform; replaced the deprecated API of the STAR messenger;
StTofrMatchMaker.cxx - made explicit initialization of mStrobeTdcMin, mStrobeTdcMax, and mPedTOFr;
StTrsMaker
StTrsMaker.cxx - commented out cut on TPC fiducial volume;
StUtilities
StMessageManager.cxx/h - modified to add new dedicated UCM logger;
StVeloMaker
StVeloMaker.cxx/h, StVeloMakerLinkDef.h - removed ;
StUCMApi
logging/TxEventLogMain.cpp - remove the main TxEventLogMain.cpp from shared lib;
TxEventLogMain.C - added the header file to define sleep function;
TxLogEventCmd.C - modified to change the default factory from file to UCM;
TxUCMCollector.cxx - modified to create the new table by the pattern;
TxUCMCollector.h - added header ;
pams
gen/starlight/src//sigmadelta.f - bug fixed;
geometry/geometry/geometry.g - modified to increase interaction/decay volume;
geometry/tpcegeo/tpcegeo3.g - modified to add prompt hits;
sim/g2t/g2t_volume_id.g - modified to add prompt hits;
StarDb
VmcGeometry/y2009.h - added prompt hits;
StDb
idl/tofTotbCorr.idl, tofZbCorr.idl - added new files to convert tofZCorr and tofTotCorr tables to bin ary storage format;
- June 29, 2009
SL09b has been updated with StGammaMaker, user's code
- June 09, 2009
new library SL09b (tagged as SL09b) has been created, build on SL4.4, and SL3.05 platforms, tested and released on June 12.
Main features:
- updated trigger data for run 2009;
- implemented Dalitz decays in starsim;
- few sofware bugs fixed;
Next codes have been updated:
asps/Simulation/starsim/
agzio/agzkine.age - modified for MC filter ;
atmain/qnext.age - modified for MC filter ;
geant/gdecay.F - modified to implement Dalitz decays;
geant/helios.age - new file added for Dalitz decays;
StAnalysisUtilities
StHistUtil.cxx - inlarged arrays for more trigger type hists; added Anode guide lines in TPC Sector plots; modified to draw TPC sector boundaries and labels; fixed for ROOT 5.22; added RDO boundary lines in TPC Sector plots;
StChain
StRTSBaseMaker.cxx - modified to downgrade the message level from INFO to DEBUG;
StDAQMaker
StRtsReaderMaker.cxx - modified to downgrade the message level from INFO to DEBUG;
StDbUtilities
StTpcCoordinateTransform.cc/hh - introduced tpcPadrowT0 time offsets;
StDetectorDbMaker
StDetectorDbChairs.cxx - modified to add tpcAnodeHV Chair;
St_tpcAnodeHVC.h - added to introduce of tpcAnodeHV Chair;
St_tpcRDOMasksC.h - modified;
St_tss_tssparC.h - changed counting of TPC anode Voltage for gas gain;
StDetectorDbChairs.cxx, St_tpcPadrowT0C.h - introduced tpcPadrowT0 time offsets;
StEEmcUtil
EEmcMC/EEmcMCData.cxx - fixed bug;
StEmcRawMaker
StEemcRaw.cxx - changed threshold in EEMC;
StEmcUtil
StEmcMappingDb.cxx - fixed case statements so that we can compile SL305;
StEvent
StCtbTriggerDetector.cxx - fixed bug in reading old data;
StEnumerations.h - updated PWG enumerations;
StTriggerData2009.cxx - updated for run 2009 triggers;
StTrack.cxx - checking for big length added;
StTriggerData.cxx/h, StTriggerData2009.cxx/h - updated for MTD; updated for pp2pp and ToF;
StEventUtilities
StuDraw3DEvent.cxx - check for track->bad() added;
StuDraw3DEvent.cxx/h - added Hits for Track method and track attribute;
StJetMaker
trigger/StjTrgDisableTower.h, StjTrgDisableTowerHT.h, StjTrgDisableTowerJP.h - added constructer;
StMuDSTMaker
EZTREE/EztEmcRawData.h - added const to isCrateVoid function;
COMMON/StMuDstMaker.cxx - changed type of DataSet;
COMMON/StMuDstFilterMaker.cxx, StMuDstMaker.cxx, StMuIOMaker.cxx, StMuMomentumShiftMaker.cxx - modified to test I/O errors after filling the TTree;
StPass0CalibMaker
StEvtVtxSeedMaker.cxx, StMuDstVtxSeedMaker.cxx, StVertexSeedMaker.cxx/h - modified for BEMC matches;
RTS
src/rtsplusplus.def - added l3 support;
src/DAQ_TPX/tpxPed.cxx, daq_tpx.cxx - modified;
tpxCore.cxx - added overflow protection in data_test; updated new FPGA version;
tpxGain.cxx - changed default to window and relaxed t0 cut;
tpxCore.cxx, tpxPed.cxx/h - modified to improve pedestals and RDO work matching;
src/DAQ_L3/daq_l3.cxx, l3_reader.cxx - added workaround to enable reading l3_gtd from HLT files;
daq_l3.h, l3_reader.cxx - modified to add run 2009 sequence; added l3 as a valid sfs bank name;
src/DAQ_PP2PP/daq_pp2pp.cxx/h - added bunch xing to the structure; fixed mask of bunch xing; added not_sparsebr;
include/daq100Decision.h - removed allADC from laser runs;
iccp2k.h - modified to change EVBFLAGS for l25 abort due to conflict with hlt from daq100formats.h; added L2 release;
rtsLog.h - added L3 log;
rtsMonitor.h - added rtsMonL1Counters;
tasks.h - added TRG_SCA_MON_TASK;
rtsSystems.h - updated DAQ1000 dets to include L3 ;
DB/conditions/rtsCndPwCondition.h - added additions onbits & offbits to support new TCU;
StarRoot
THack.cxx/h - added new method "IsTreeWritable"; activated MuDST I/O output error;
StDraw3D.cxx - added new padless 3d view and test StDraw3D::ShowDetectorTest;
Sti
StiKalmanTrackNode.cxx - GetTime defence sin <1 added ;
StiTpc
StiTpcDetectorBuilder.cxx - modified to account padrow anode Voltage status ;
StTofHitMaker
StTofHitMaker.cxx/h - modified to prevent chain on running this maker on Run2009+ data ;
StTpcDb
StTpcDbMaker.cxx - modified to generate EoF when TPC trips;
StTriggerUtilities
Bemc/StBemcTriggerSimu.cxx - added L0 Upsilon triggers;
pams/geometry
fhcmgeo/fhcmgeo.g, oneTrack.kumac - added new files for Forward Hadron Detector geometry;
geometry/geometry.g - added FHD geometry for tag upgr22;
pams/gen/bpythia
apytuser.age - added filter for Pythia;
StarVMC
StVMCMaker/StVMCMaker.cxx - added StarVMCDetectorSet;
StarDb
Calibrations/tracker/ - svtTrackingParameters.20010312.000011.C,tpcTrackingParameters.20010312.000011.C - modified to reduce a factor of 10 search window, moved to DB;
StDb/idl
tpcAnodeHV.idl - added new file;
tpcPadrowT0.idl - added new file with new tpcPadrowT0 table;
StUCMApi
StUCMAppender.cxx - added Web factory to set the network logging; modified to introduce TxEventLog abstract interface;
logging/TxUCMUtils.h - modified to replace the error prone const char * with std::string;
TxEventLog.h, TxEventLogFile.cpp, TxEventLogFile.h - added logTask API;
TxEventLogFile.cpp - implemented logTask method; added the taskRemainSize to the logTask method;
TxEventLogWeb.cpp - modified to adjust TxEventLogWeb module;
TxUCMConstants.h - added the meta-API to manage the tasks/jobs;
TxEventLogFactory.cxx - added Web factory to set the network logging;
TxEventLogWeb.cpp/h - added new files for Network based implementaion of the TxLogEvent interface;
TxEventLogFactory.cxx/h, TxEventLogFile.cpp/h, TxEventLogMain.cpp - added new files to introduce TxEventLog abstract interface;
logging/.svn/props/TxEventLogFile.cpp.svn-work - added new files with SVN properties;
logging/.svn/prop-base/TxEventLogFile.cpp.svn-base - added new files with SVN properties;
logging/.svn/prop-base/TxEventLogFactory.cxx.svn-base, TxEventLogFactory.h.svn-base, TxEventLogFile.h.svn-base - new files to introduce TxEventLog abstract interface;
logging/.svn/props/TxEventLogFactory.cxx.svn-work, TxEventLogFactory.h.svn-work, TxEventLogFile.h.svn-work, TxEventLogMain.cpp.svn-work, ucmlogging.properties.svn-work - added new files to introduce TxEventLog abstract interface;
logging/.svn/wcprops/TxEventLogFactory.cxx.svn-work, TxEventLogFactory.h.svn-work, TxEventLogFile.cpp.svn-work, TxEventLogFile.h.svn-work - added new files to introduce TxEventLog abstract interface;
TxEventLog.cpp.svn-work, TxEventLog.h.svn-work, TxEventLogMain.cpp.svn-work - modified;
logging/.svn/text-base/TxEventLogFactory.cxx.svn-base, TxEventLogFactory.h.svn-base, TxEventLogFile.cpp.svn-base, TxEventLogFile.h.svn-base TxUCMConstants.h.svn-base - added new files to introduce TxEventLog abstract interface;
TxEventLog.cpp.svn-base, TxEventLog.h.svn-base, TxEventLogMain.cpp.svn-base - modified;
QtRoot
qtgl/qtgl/src/TGLViewerImp.cxx, TQtGLViewerWidget.cxx, TQtRootViewer3D.cxx - modified to add new padless 3D view ;
qtgl/qtcoin/src/TQtCoinViewerImp.cxx, TQtCoinWidget.cxx, TQtRootCoinViewer3D.cxx - modified to add new padless 3D view ;
TQtCoinViewerImp.cxx - added Qt4 header file;
- June 29, 2009
SL09a has been updated with StGammaMaker, user's code.
- April 13, 2009
new library SL09a (tagged as SL09a) has been created, build on SL4.4, and SL3.05 platforms, tested and released on April 16.
Main features:
- new DAQ Reader for daq1000 & daq100; modifed EMC, TOF, FTPC, L3 and other DAQ readers to be compatible with 2009 DAQ format;
- new trigger ID for run 2009 implemented;
- new TOF code & geometry for run 2009;
- new StUCMApi package for job tracking, first release;
- fixed scaler information in MuDST - blue versus yellow for data 2009; before 2009 MuDst has REVERSED info for scaler from blue & yellow rings;
Next codes have been updated:
StAnalysisUtilities
StHistUtil.cxx/h - introduced analyses with reference histograms; added Jet Patch trigger histograms;
St_base
GenericFile.h - moved to St_base from muEztPanitkin/EEqaPresenter;
StFileIter.cxx/h - fixed the wrong string comparison; modified to make the NextEventKey method public;
StBFChain
StBFChain.cxx - modified to rename TMemStat => StMemStat due clash with new ROOT 5.22.00 class;
BigFullChain.h - modified to rename minicern => StarMiniCern to avoid clash with new ROOT 5.22.00 class; added BTOF chains; added pp2009a for run 2009 data; changed pp2009a to use Minuit; added pp2009b with PPVF; removed Silicon from LanaDV and LanaDVtpx, reshaped geant3 for StarVMC;
StBTofHitMaker
StBTofHitMaker.cxx/h - first release of offline TOF new DAQ reader; added BTofHit filling functions;modified for changes in StBTofSortRawHit intialization; BTofHeader filling moved prior to the fillBTofHit; vpd trayId hard-code removed, set by data directly;
StBTofUtil
StBTofDaqMap.cxx/h - first release of barrel TOF daq mapping for run 2009; mNValidTrays set by the tofTrayConfig in db;
StBTofGeometry.cxx/h - first release of TOF Barrel geometry for run 2009; tray geometry alignment implemented; optimized the geometry initialization function, reduced the CPU time use; optimized the HelixCrossCellIds() function;
StBTofHitCollection.cxx/h - first release for TOF data, run 2009;
StBTofRawHitCollection.cxx/h - first release for TOF data, run 2009;
StBTofSortRawHit.cxx/h - first release for TOF data, run 2009; trigger window cuts moved to db; added protection from reading-in wrong trayId/chan/fiber numbers;
StBTofINLCorr.cxx/h - first release for Barrel TOF INL correction functions; new tofINLSCorr table for full barrel system for Run 2009 and further; modified to return the INL corr from the first element in db in case of missing INL tables in db; INL arrays changed from float to short;
tofPathLength.cc, tofPathLength.hh - first release of path length calculation functions for TOF hit;
StChain
StChain.cxx - modified to rename TMemStat => StMemStat due clash with new ROOT 5.22.00 class;
StMaker.cxx/h - modified to rename TMemStat => StMemStat due clash with new ROOT 5.22.00 class;
GetDBTim() added; upgr16a geomeytry tag added;
StRtsTable.cxx - fixed StRtsTable descriptor;
StIOInterFace.cxx, StIOInterFace.h - modified to make StIOInterFace to be StRTSBaseMaker;
StDaqLib
EVP/ssdReader.h - added ssd_t into OLDEVP namespace to spot the possible declaration clas;
scReader.h - modified to adjust to new daqReader;
EMC/StEmcDecoder.cxx - fixed calculation of the path in GetCrateAndSequenceFromTriggerPatch ;
StEmcDecoder.cxx/h, StEmcMappingDb.h - modified to use default date==20330101 like St_db_Maker to suppress spurious error messages ; allow setting timestamp using a TDatime directly;
StEmcDecoder.cxx, StEmcMappingDb.cxx/h - removed, moved to StEmcUtil/database;
PreshowerBug2007.txt, TowerBug2004.txt, TowerBug2005.txt - moved to StEmcUtil/database ;
GENERIC/EventReader.cxx - added protection against of crash for the new DAQ files witho DATAP structure;
EventReader.hh - modified to adjust to new daqReader;
EEMC/EEMC_Reader.cxx - modified for new daqReader;
SC/SC_Reader.cxx/hh - modified to adjust to new daqReader; corrected flipped BBC background scalers; disabled SC_Reader class;
SSD/SSD_Reader.cxx - modified to adjust to new daqReader;
TRG/trgStructures2009.h - added new files for run 2009 data; updated for L2 OFFSETs;
StDaqMaker
StEMCReader.cxx, StRtsReaderMaker.cxx - replaced daq_dta_dict with get_size_t(); modified for new DAQ READER;
StRtsReaderMaker.cxx - modified to preserve/accumulate the copy the DAQ table to avoid the dead data access ;
StDAQReader.cxx/h - modified to adjust to daqReader pointer; fillin the Event Header from the new daqReader if available; removed the redundant devReader type; fixed L1/L2/L3 summary;
StDAQMaker.cxx, StDAQReader.cxx, StSCReader.cxx/h - modified to pickup the SC data using new DAQ_READER ;
StDbLib
MysqlDb.cc - fixed reporting of port numbers to what is actually used ;
StDbServiceBroker.cxx - changed path specification to avoid side effects;
StdEdxY2Maker
StdEdxY2Maker.cxx - modified to rename TMemStat => StMemStat;
StDbUtilities
StTpcCoordinateTransform.cc - modified to use tpcT0 chair, use sector/row in global => local transformation ; modified to use StDetectorDb chairs for TpcGlobalPosition and TpcSectorPosition;
StDetectorDbMaker
St_trigDetSumsC.h - added math.h;
StDetectorDbChairs.cxx, St_tpcGlobalPositionC.h, St_tpcSectorPositionC.h - added assert for Clock <= 0;
StSsdSurveyC.h, StSvtSurveyC.h, St_SurveyC.h - added new files;
StiChairs.cxx, StiDefaultTrackingParameters.h, StiHitErrorCalculator.h, StiIst1HitErrorCalculator.h, StiIst2HitErrorCalculator.h, StiIst3HitErrorCalculator.h, StiIstChairs.cxx, StiKalmanTrackFinderParameters.h, StiKalmanTrackFitterParameters.h, StiLocalTrackSeedFinderParameters.h, StiPixelChairs.cxx, StiPixelHitErrorCalculator.h, StiPixelTrackingParameters.h, StiSsdChairs.cxx, StiSsdHitErrorCalculator.h, StiSsdTrackingParameters.h, StiSvtChairs.cxx, StiSvtHitErrorCalculator.h, StiSvtTrackingParameters.h, StiTpcChairs.cxx, StiTpcInnerHitErrorCalculator.h, StiTpcOuterHitErrorCalculator.h, StiTpcTrackingParameters.h, StiTrackingParameters.h - moved from Sti;
StDetectorDbChairs.cxx - set assert for clock frequency if not in range [0,1e7] Hz;
StEmcRawMaker
StBemcRaw.cxx/h, StEemcRaw.cxx/h, StEmcRawMaker.cxx/h - modified to be compatible with 2009 DAQ Format;
StBemcRaw.cxx/h - put back some obsolete methods to satisfy StBemcData; fixed a bug in getting CAP;
StEmcRawMaker.cxx - fixed behavior for older data;
StBemcRaw.cxx/h, StEemcRaw.cxx/h, StEmcRawMaker.cxx/h - modified for new location of StEmcDecoder;
StBemcRaw.cxx/h, defines.h - added token check to BTOW header check;;
StBemcRaw.cxx, StEemcRaw.cxx - updated default BPRS ZS handling and fix EEMC minor bug;
StEEmcDbMaker
StEEmcDbMaker.cxx/h, StEmcAsciiDbMaker.cxx/h, - modified to moved the EEMC database functionality from StEEmcDbMaker to StEEmcUtil/database ;
StEEmcDbMaker.cxx - Initialize all 12 sectors;
EEmcDbCrate.cxx/h, EEmcDbItem.cxx/h, Makefile, mklinkdef.pl - removed files;
StEmcAsciiDbMaker.cxx - modified to mask from DB;
EEmcGeom/EEmcGeomSimple.cxx/h - fixed the sectors initialization; removed exceptions from the geom code;
EEmcMC/EEmcMCData.cxx - modified to remove asserts & exceptions;
EEmcException.cxx/h - removed;
StEEmcSimulatorMaker
StEEmcMixerMaker.cxx/h, StEEmcSlowMaker.cxx/h - modified to change StEEmcDbMaker -> StEEmcDb ;
StEEmcUtil
database/cstructs/eemcConstDB.hh, eemcDbADCconf.hh, eemcDbBoxconf.hh, eemcDbCWchar.hh, eemcDbHVsys.hh, eemcDbHVtemp.hh, eemcDbPIXcal.hh, eemcDbPIXname.hh, eemcDbPMTcal.hh, eemcDbPMTchar.hh, eemcDbPMTconf.hh, eemcDbPMTname.hh, eemcDbPMTped.hh, eemcDbPMTstat.hh, eemcDbXMLdata.hh, kretConstDB.hh, kretDbBlobS.hh - new files to move the EEMC database functionality from StEEmcDbMaker to StEEmcUtil/database;
StEEmcDb.cxx - fixed the sectors initialization; removed exceptions from the geom code;
EEdsm/EemcTrigUtil.cxx/h - updated for 2009 DSM thresholds; initialize non-existent thresholds to -1;
BEdsm2.cxx/h, EEdsm0.cxx/h, EEdsm0Tree.cxx/h, EEdsm1.cxx/h, EEdsm1Tree.cxx/h, EEdsm2.cxx/h, EEdsm3.cxx/h, EEfeeTP.cxx/h, EEfeeTPTree.h, EMCdsm2Tree.cxx/h - modified;
StEmcADCtoEMaker
StBemcData.cxx - added missing include;
StEmcUtil
database/StEmcMappingDb.cxx/h - modified to use StMaker::GetChain() instead of the hucker approach ;
StEmcDecoder.cxx/h, StEmcMappingDb.cxx/h - optimization; fixed bug in GetTowerIdFromTDC;
StBemcTables.cxx - modified to use StMaker::GetDBTime() instead of GetDateTime();
StEmcDecoder.cxx/h, StEmcMappingDb.cxx/h - moved from StDaqLib/EMC to StEmcUtil/database ;
PreshowerBug2007.txt, TowerBug2004.txt, TowerBug2005.txt - files moved from StDaqLib/EMC;
StEvent
StBbcTriggerDetector.cxx - includes added ;
StBTofCollection.cxx/h, StBTofHeader.cxx/h, StBTofHit.cxx/h, StBTofPidTraits.cxx/h, StBTofRawHit.cxx/h - initial revesion for new TOF code ;
StContainers.h, StEvent.cxx/h, StEventClusteringHints.cxx - modified for new TOF code;
StContainers.cxx - added implementaion for BTof containers ;
StFmsTriggerDetector.cxx/h - fixed problem when running over 2009 data ;
StTriggerData.cxx/h, StEventLinkDef.h - modified to cooperate with necessary changes for 2009;
StTriggerData2009.cxx/h - initial revision for run 2009 data ; modified to provide new ZDC access functions; updated to use in Online QA (P) plots; updated for new VPD access functions;
StTriggerData.h - updated to use in Online QA (P) plots ; updated for new VPD access functions;
StTriggerData.h, StTriggerData2003.h, StTriggerData2004.h, StTriggerData2005.h, StTriggerData2007.h, StTriggerData2008.h, StTriggerData2009.cxx/h - modifications by Akio to support getDsm0_BEMCE and getDsm0_BEMCW as well as getDsm1_BEMC;
StTriggerData.cxx/h, StTriggerData2009.cxx/h - modified to provide new access functions for ZDC DSM layer-1 and layer-2 data;
StTriggerData2007.cxx/h, StTriggerData2008.cxx/h, StTriggerData2009.cxx/h, StTriggerData.cxx/h - modified to add 2nd argument (pre/post) to vpdEarliestTDC();
StBTofHeader.cxx/h - modified to make mTriggerTime as array, setVpdVz() to get default argument;
StBTofHit.cxx/h - changed tray() to int;
StBTofRawHit.cxx/h - mLeTeFlag changed to mFlag; tray(), module(), cell() changes to return int;
StEnumerations.h, StDetectorDefinitions.h, StDetectorId.inc - added detector Ids for FPD East/West and FMS;
StLaserAnalysisMaker
LoopOverLaserTrees.C - modified to increase acceptable drift velocity interval from [5.5,5.9] to [5.2,5.9];
StLaserAnalysisMaker.cxx - removed hits not beloging to primary tracks;
StGenericVertexMaker
StiPPVertex/EemcHitList.cxx/h, StPPVertexFinder.cxx/h - modified due to replacing StEEmcDbMaker to StEEmcDb ;
StHbtMaker
ThCorrFctn/StHbtSmearedHiddenInfo.cxx - added missing (in ROOT 5.22) includes;
Fit/dFitter3d.cxx - added include ;
StMcEvent
StMcIstHitCollection.hh, StMcIstHit.hh, StMcPixelHit.cc - decoding for upgr15 geometry ;
StMuAnalysisMaker
StMuScalerCutter.cxx/h - introduced class to determine events with bad RICH scalers ;
StMuDSTMaker
COMMON/StMuTrack.cxx - added more pointer protection in dcaGlobal(int) and dca(int);
StMuEvent.cxx/h - added global tracks with DCA < 3cm, >= 10 TPC fit hits and |eta| < 0.5;
StMuTrack.h - iterated Class Def by 1 to accommodate new BTOF data member;
StMuDstFilterMaker.cxx, StMuDstMaker.cxx, StMuIOMaker.cxx - set tree size to max size;
StPass0CalibMaker
StTpcT0Maker.cxx - modified to account the fact that drift velocities are different for East and West part of TPC ;
StMuArrays.cxx/h, StMuDst.cxx/h, StMuDstMaker.cxx/h, StMuTrack.cxx/h - added classes to accommodate Barrel TOF hits;
StMuBTofHitCollection.cxx/h, StMuBTofHit.cxx/h, StMuBTofPidTraits.cxx/h, StMuBTofUtil.cxx/h - added new files to accommodate barrel TOF hit collection;
StPixelFastSimMaker
StPixelFastSimMaker.cxx/h - updated for UPGR15 geometry version;
RTS
src - new DAQ reader codes:
src/DAQ_BSMD/bsmd_reader.cxx, daq_bsmd.cxx/h - new BSMD daq reader code;
src/DAQ_BTOW/daq_btow.cxx/h - new BTOW daq reader code;
src/DAQ_EMC/daq_emc.cxx/h, emcReader.cxx/h, emc_reader.cxx, emc_single_reader.cxx - new EMC daq reader code;
src/DAQ_ESMD/daq_esmd.cxx/h - modified to adjust to new DAQ_READER;
src/DAQ_ETOW/daq_etow.cxx/h - new ETOW daq reader code;
src/DAQ_FGT/daq_fgt.cxx/h - new FGT daq reader code;
src/DAQ_FPD/daq_fpd.cxx/h, fpdReader.cxx/h, fpd_reader.cxx - new FPD daq reader code;
src/DAQ_FTP/daq_ftp.cxx/h, ftpReader.cxx/h, ftp_reader.cxx - new FTPC daq reader code;
src/DAQ_L3/daq_l3.cxx/h, l3Reader.cxx/h, l3Reader.cxx/h - new L3 daq reader code;
src/DAQ_PMD/daq_pmd.cxx/h, pmdReader.cxx/h, pmd_reader.cxx - new PMD daq reader code;
src/DAQ_PP2PP/daq_pp2pp.cxx/h - modified version to support new DAQ_READER;
pp2ppReader.cxx/h - new pp2pp daq reader codes;
src/DAQ_READER/cfgutil.cxx/h, daqConfig.h, daqReader.cxx, daq_det.cxx/h, daq_dta.cxx/h, daq_dta_structs.h, evpReaderClass.h, msgNQLib.cxx/h, - new DAQ reader;
src/DAQ_SC/daq_sc.cxx/h, sc.h, scReader.cxx/h, sc_reader.cxx - new code added;
src/DAQ_SSD/daq_ssd.cxx/h, ssdReader.cxx/h, ssd_reader.cxx - new SSD daq reader code;
src/DAQ_SVT/daq_svt.cxx/h, svtReader.cxx/h, svt_reader.cxx - new SVT daq reader code;
src/DAQ_TOF/daq_tof.cxx/h - modified version to support new DAQ_READER;
tofReader.cxx/h, tof_reader.cxx - new codes added;
src/DAQ_TPC/daq_tpc.cxx/h, tpc_reader.cxx - modified to support new DAQ_READER;
tpcReader.cxx/h, tpc_FCFReader.cxx - new codes added;
src/DAQ_TPX/daq_tpc.cxx/h, tpcCore.cxx/h, tpx_FCF.cxx/h, tpxGain.cxx/h, tpxPed.cxx/h, tpxStat.cxx/h - modified to support new DAQ_READER;
src/DAQ_TRG/daq_trg.cxx/h, trgReader.cxx/h, trgReader10.cxx, trgReader12.cxx, trgReader20.cxx, trgReader21.cxx, trgReader22.cxx, trgReader30.cxx, trgReader32.cxx, trg_reader.cxx - new TRG daq reader code;
src/LOG/ - new RTS repository log files;
src/SFS/fs.C, fs_ex.C, fs_index.cxx/h, get_line.cxx/h, sfs_base.h, sfs_index.cxx/h, sfs_index_daq.cxx, sfs_single.C - modified to support RTS repository;
sfs_header.C - added new file;
include/ - number of new includes created and modified to support new DAQ_READER;
EventTracker/ FtfSl3.cxx, Makefile, eventTracker.cxx, eventTrackerLib.cxx/h, gl3EMC.cxx/h, gl3Event.cxx/h - modified to support new DAQ_READER and EventDisplay;
eventTracker.cxx, eventTrackerLib.cxx/h - moved copy_l3 to a EventTracker member function;
trg/include/trgDataDefs.h - updated version of trgDataDefs for 2009 run;
StSecondaryVertexMaker
StKinkMaker.cxx - modified to rename TMemStat => StMemStat due to clash with ROOT 5.22.00 class;
StSsdFastSimMaker
StSsdFastSimMaker.cxx - modification for sector numbers packed in volume Id;
StSsdSimulationMaker
St_sls_Maker.cxx St_spa_Maker.cxx - modification for sector numbers packed in volume Id ;
StSsdUtil
StSpaListNoise.cc, StSpaListNoise.hh, StSsdBarrel.cc, StSsdWafer.cc/hh - modified to increase NSaturationSignal to reflect the energy increase of the GEANT hit ;
StSvtCalibMaker
StSvtBadAnodesMaker.h - added missing in ROOT 5.22 forward declaration;
StSvtSelfMaker
StSelfEvent.cxx/h, StSvtSelfMaker.cxx/h, StVertexKFit.cxx/h - removed the Maker;
StSvtSimulationMaker
StSvtSimulationMaker.cxx - changed trapping const to better reproduce data;
StSvtSignal.cc - changed gain to better reproduce data; fixed to make different Rykov and Selemon methods have same gain; updated mPasaGain to reflect new tune;
StSvtOnlineSeqAdjSimMaker.cxx - turned off minTimebucket checks to better reproduce data;
StTofHitMaker
StTofHitMaker.cxx/h - modified to adjust for new DAQ_READER (daq1000) ;
StTofUtil
StTofrGeometry.cxx - renamed TMemStat => StMemStat due to clash with new ROOT 5.22.00 class;
StTpcD
StTpcdEdxCorrection.cxx/h - added method to reset dE/dx corrections;
StTpcDb.cxx/h - modified to use StDetectorDb chairs for TpcGlobalPosition and TpcSectorPosition;
StRTpcGlobalPosition.cxx/h, StRTpcSectorPosition.cxx/h, StTpcGlobalPositionI.h StTpcSectorPositionI.h - removed ;
StTpcHitMaker
StTpcRTSHitMaker.cxx - added protection for dta == 0; adjusted for new DAQ_READER;
StEVPTpcCluser.cxx, StTpcHitMaker.cxx/h, StTpcRTSHitMaker.cxx/h - modified to adjust with new DAQ_READER (daq1000);
StTpcHitMaker.cxx/h - modified to get access two different detectors tpx/tpc ; sort out the tps/tpc data handling; restored access to TPX; modified to adjust to Valery's interface for adc values;
StTpcHitMakerLinkDef.h, St_daq_adc_tb.h, St_daq_cld.h, St_daq_sim_adc_tb.h, St_daq_sim_cld.h, St_tpc_cl.h - new files added to switch new scheme for TPX cluster reading;
StDaqTpcClusterInterface.h, StEVPTpcCluser.cxx, StEVPTpcCluser.h - removed codes;
StTriggerDataMaker
StTriggerDataMaker.cxx/h - updated for run 2009 data; corrected GetNextRaw() logic;
StTriggerUtilities
StTriggerSimuMaker.cxx/h - updated mSimulators structure to accomodate with 2009 EMC simulator modifications; changed includes for StEmcDecoder; initial version of EMC DSM algorithms for data 2009;
StDSMUtilities/ DSM.hh, DSMAlgo.hh, DSMAlgo_BC101_2009.cc/hh, DSMAlgo_BE001_2009.cc/hh, DSMAlgo_BE003_2009.cc/hh, DSMAlgo_BW001_2009.cc/hh, DSMAlgo_BW003_2009.cc/hh, DSMAlgo_EE001_2009.cc/hhh, DSMAlgo_EE002_2009.cc/hh, DSMAlgo_EE101_2009.cc/hh, DSMAlgo_EE102_2009.cc/hh, DSMAlgo_EM201_2009.cc/hh, DSMAlgo_LD301_2009.cc/hh, DSMLayer.hh, DSMLayer_B001_2009.cc/hh, DSMLayer_B101_2009.cc/hh, DSMLayer_E001_2009.cc/hh, DSMLayer_E101_2009.cc/hh, DSMLayer_EM201_2009.cc/hh, DSMLayer_LD301_2009.cc/hh, StDSM2009Utilities.hh, TCU_2009.cc/hh, sumTriggerPatchChannels.cc/hh, trgUtil_2009.hh - initial reversion of EMC DSM algorithms for 2009;
Eemc/StEemcTriggerHisto.cxx - added missing in ROOT 5.22 includes;
StEemcTriggerSimu.cxx - changed includes for StEmcDecoder; updated to match changes in EemcTrigUtil;
StEemcTriggerSimu.h - updated for StEemcDbMaker;
L2Emulator/StGenericL2Emulator.h - added missing in ROOT 5.22 includes; updated class StEemcDb;
StGenericL2Emulator.cxx - updated include for StEmcDecoder as well as access to StEEmc ;
L2Emulator/L2algoUtil/L2VirtualAlgo2009.cxx/h, L2eventStream2009.h, L2btowCalAlgo09.cxx/h - added new files for run 2009 data;
L2Emulator/L2wAlgo/L2wBemc2009.cxx/h, L2wEemc2009.cxx/h, L2wResult2009.h - added new files for run 2009 data;
Bemc/StBemcTriggerSimu.cxx - changed to old BEMCDecoder->SetDateTime() signature ; changed includes for StEmcDecoder;
StBemcTriggerDbThresholds.cxx/h - updated with 2009 thresholds;
StBemcTriggerSimu.cxx/h, StBemcTriggerDbThresholds.cxx - updated for 2008 pp algo; added 2008 ppProduction DSMlayer 2 algo; EMC DSM algorithms added for run 2009 data;
StBemcTriggerSimu.cxx - modified to change DB access to GetDBTime; changed initialization of HT6ibt_adc array; removed swaps for 2007 AuAu, 2008 dAu, 2008 pp for offline status set adc10==0 if ad10-ped < 0; added 2008 triggers to the GetHTTowersAboveThreshold list;
Emc/StEmcTriggerSimu.cxx/h - initial version of EMC DSM algorithms for data 2009 added; updated triggerDecision to communicate with StTriggerSimuMaker;
St_geant_maker
StPrepEmbedMaker.cxx - updated with declaration of Jpsi particle ;
St_QA_Maker
StEventQAMaker.cxx - added protection for missing event->info(); added Jet Patch trigger histograms;
StEventQAMaker.cxx/h - updated with BTOF classes; added weight the TPC xy hit hists;
StQAMakerBase.cxx - added Jet Patch trigger histograms;
StZdcVertexMaker
StZdcVertexMaker.cxx - modified to cleanup access to Calibrations/trg/ZdcCalPars table;
Sti
SChairs.cxx, StiIsActiveFunctor.h, StiKalmanTrackNode.cxx - enlarge fitting volume from 200 => 250 cm;
StiChairs.cxx, StiDefaultTrackingParameters.h, StiHitErrorCalculator.h, StiKalmanTrackFinderParameters.h, StiKalmanTrackFitterParameters.h, StiLocalTrackSeedFinderParameters.h, StiTrackingParameters.h - removed from Sti and moved to StDetectorDbMaker;
StiDetectorFinder.cxx/h - removed;
StiDetectorBuilder.cxx/h, StiDetector.h, StiHit.h, StiKalmanTrackFitter.h,StiKalmanTrack.cxx, StiKalmanTrackFinder.cxx, StiKalmanTrackNode.cxx/h, StiTrackNodeHelper.cxx, StiVMCToolKit.cxx, StiLinkDef.h, StiLocalTrackSeedFinder.h - modified due to moving all Sti Chairs into StDetectorDbMaker;
StiDetectorTreeBuilder.cxx/h, StiHitLoader.h, StiLinkDef.h, StiToolkit.h - modified to remove StiDetectorFinder class;
StiMaker
StiMaker.cxx - renamed TMemStat => StMemStat due to clash with new ROOT 5.22.00 class ;
StiMaker.cxx, StiStEventFiller.cxx - modified ;
StiDefaultToolkit.cxx/h - removed StiDetectorFinder class;
StiSsd
StiSsdDetectorBuilder.cxx/h - modified due to moving all Sti Chairs into StDetectorDbMaker;
StiSsdChairs.cxx, StiSsdHitErrorCalculator.h, StiSsdTrackingParameters.h - removed;
StiSsdHitLoader.cxx - modified to remove StiDetectorFinder class;
StiSvt
StiSvtDetectorBuilder.cxx/h - modified to move Sti Chairs to StDetectorDbMaker;
StiSvtChairs.cxx, StiSvtHitErrorCalculator.h, StiSvtTrackingParameters.h - removed;
StiSvtHitLoader.cxx - modified to remove StiDetectorFinder class;
StiTpc
StiTpcDetectorBuilder.cxx, StiTpcHitLoader.cxx, StiTpcIsActiveFunctor.h - modified to remove cut of pad row dZ ;
StiTpcIsActiveFunctor.cxx - removed files;
StiTpcDetectorBuilder.cxx/h - modified due to moving all Sti Chairs into StDetectorDbMaker;
StiTpcChairs.cxx, StiTpcInnerHitErrorCalculator.h, StiTpcOuterHitErrorCalculator.h, StiTpcTrackingParameters.h - removed;
StiRnD/Ist
StiIstDetectorBuilder.cxx/h,StiIstHitLoader.cxx - updated for UPGR15 geometry version ;
StiIstDetectorBuilder.cxx/h - modified due to moving all DSti Chairs to StDetectorDbMaker;
StiIst1HitErrorCalculator.h, StiIst2HitErrorCalculator.h, StiIst3HitErrorCalculator.h, StiIstChairs.cxx - removed ;
StiRnD/Hft
StiPixelDetectorBuilder.cxx/h - updated for UPGR15 geometry version ;
StiPixelDetectorBuilder.cxx/h - modified due to movind all Sti Chairs into StDetectorDbMaker;
StiPixelChairs.cxx, StiPixelHitErrorCalculator.h, StiPixelTrackingParameters.h - removed ;
StStarLogger
MySQLAppender.cxx/h - modified to remove redundant ODBC dependency;
StarMagField
StarMagField.cxx/h - added missing in ROOT 5.22.00 include ; modified to controll magnetic field from starsim;
StarRoot
StMemStat.cxx/h - added new files to rename TMemStat => StMemStat due clash with new ROOT 5.22.00 class ;
TMemStat.cxx/h - removed files to replace TMemStat => StMemStat ;
StarRootLinkDef.h - modified to rename TMemStat => StMemStat;
TRSymMatrix.cxx/h - modified to add conversion from Upper to Lower triangular form;
TDirIter.cxx - added handle for xrootd files;
StppSpin
StppTrigMaker.cxx - removed mwc ;
asps/Simulation/starsim
comis/csjcax.F - bug fixed;
atmain/agxinit.F, agxinit.cdf, agxuser.age, gutrev.age, uglast.age - gfilter added to proceed with filterring MC production;
filtAction.cxx - added interface to filter ;
atutil/agukine.F - added for filter before Geant tracking;
pams
sim/gstar/gstar_part.g - hypertriton added ;
geometry/geometry/geometry.g - updated upgr16a == upgr16 + tpc2009;
geometry/svttgeo/svttgeo.g, svttgeo1.g, svttgeo10.g, svttgeo2.g, svttgeo3.g, svttgeo4.g, svttgeo5.g, svttgeo6.g, svttgeo7.g, svttgeo9.g - fixed bug in SVTT.SRDA ;
StarDb
Calibrations/tpc/tpcSectorT0offset.20080623.000000.C - added sector 16 (tpx) offset from 2008 pp-run to whole TPC;
TpcAltroParameters.20080624.000000.C, - added Altro paramters for run 2009;
TpcLengthCorrectionB.20090301.000001.C, TpcSecRowB.20090301.000001.root - added preliminary dE/dx calibration for run 2009; later moved to DB;
VmcGeometry/Geometry.upgr16a.C, upgr16a.h - added files for modified UPGR16 geometry;
VmcGeometry/y2005.h, y2005b.h, y2005c.h, y2005d.h, y2005e.h, y2005f.h, y2005h.h, y2005x.h, y2006.h, y2006b.h, y2006g.h, y2007.h, y2007a.h, y2007g.h, y2007h.h, y2003a.h, y2003b.h, y2003c.h, y2003x.h, y2004.h, y2004a.h, y2004b.h, y2004c.h, y2004d.h, y2004x.h, y2004y.h - fixed bug in SVTT.SRDA;
StarVMC
geant3/ - GEANT3 codes updated to adjust with new ROOT 5.22.00 version;
StarVMCApplication/StarMCHits.cxx,StarVMCApplication.cxx - added includes;
StarMCHit.h - added Riostream.h include;
StVMCMaker/StVMCMaker.cxx/h, TGeoDrawHelper.cxx/h - modified;
minicern/ rndm.cxx - added include ;
StDb
idl/Survey.idl - expanded definitions;
tofGeomAlign.idl, tofStatus.idl, tofINLSCorr.idl, tofTrgWindow.idl, - added TOF new tables;
bemcMap.idl, bprsMap.idl, bsmdeMap.idl, bsmdpMap.idl - removed comments for field;
St_geom_Maker
StGeomBrowser.cxx/h, TextEdit.cxx/h - modified to make consistent with Qt4 version of the geombrowser;
GeomBrowser.cxx, GeomBrowser.h, StarGeomTree.ui, StarGeomTreeWidget.cxx/h - added new files;
GeomBrowser.ui.h, QExObjectListItem.h, QtGBrowserInspect.h, QtGBrowserObjectListItem.h St_geom_image_collection.cxx - removed;
QExGeoDrawHelper.cxx/h - corrected name of the TGeoComposite shapes; modified to draw the TGeoCompoisteShapes; modified for take into account an Assembly volumes;
St_geom_Maker.cxx - modified to draw the TGeoCompoisteShapes;
FileNew.xpm, FileOpen.xpm, FilePrint.xpm, FileSave.xpm, St_geom_Maker.qrc, connect.xpm, fileopen.xpm, hdisk_t.xpm, printer.xpm, printer_s.xpm, quit.xpm, save.xpm, saveas.xpm, starlogo_1.xpm, update.xpm, qglviewer.icon.xpm - added icons and resource files;
StUCMApi
first release of job tracking package;
QtRoot
qt/inc/TGQt.cxx/h,GQtGUI.cxx - modified for ROOT 5.12;
qtgui/inc/TQtContextMenuImp.h - added object pointer to Clipboard to the ROOT ContextMenu ;
qtgui/src/TQtContextMenuImp.cxx - added object pointer to Clipboard to the ROOT ContextMenu ;
qtgl/qtgl/src/TObject3DViewFactory.cxx - fixed ELTU shape;
TObject3DView.cxx - modified tp draw TGeoCompoisteShapes;
qtgl/qtgl/inc/TObject3DView.h - modified tp draw TGeoCompoisteShapes;
scripts/qt4/setupQt4.csh - set the new Qt 4.4.3 location;
2010
STAR SOFTWARE NEWS  April 11, 2011
---------------------
The present release assignment:
             SL06g    (SL06g_2)  ROOT_LEVEL 5.12.00 SL4.4, MC production for TUP
             SL07c    (SL07c_3)  ROOT_LEVEL 5.12.00 CuCu 200&62GeV run 2005,TPC+SVT+SSD tracking
             SL07d    (SL07d_2)  ROOT_LEVEL 5.12.00 auau 200GeV stream data run 2007, TPC tracking
             SL08b    (SL08b_1)  ROOT_LEVEL 5.12.00
             SL08c    (SL08c_5)  ROOT_LEVEL 5.12.00 auau 200GeV run 2007,TPC+SVT+SSD tracking
             SL08e    (SL08e_2)  ROOT_LEVEL 5.12.00 pp 200GeV & dAu 200GeV, run 2008
             SL08f    (SL08f_3)  ROOT_LEVEL 5.12.00 last version with EVP_READER, MC production
             SL09b    (SL09b)    ROOT_LEVEL 5.12.00 pp 500GeV W preproduction
             SL09d    (SL09d)    ROOT_LEVEL 5.12.00
             SL09e    (SL09e)    ROOT_LEVEL 5.22.00 SL5, last library with old pams
             SL09g    (SL09g_1)  ROOT_LEVEL 5.22.00 run 2009 pp 500GeV data production
             SL10a    (SL10a)    ROOT_LEVEL 5.22.00
             SL10b    (SL10b)    ROOT_LEVEL 5.22.00
             SL10c    (SL10c_2)  ROOT_LEVEL 5.22.00 run 2009 pp 200GeV production
             SL10d    (SL10d)    ROOT_LEVEL 5.22.00
             SL10e    (SL10e)    ROOT_LEVEL 5.22.00
             SL10f    (SL10f)    ROOT_LEVEL 5.22.00
             SL10g    (SL10g)    ROOT_LEVEL 5.22.00
       old-> SL10h    (SL10h_2)  ROOT_LEVEL 5.22.00 run 2010 auau 7.7-39GeV production
             SL10h_embed  (SL10h_3) ROOT_LEVEL 5.22.00 auau 7.7-39GeV embedding production
             SL10i    (SL10i_2)  ROOT_LEVEL 5.22.00
       pro-> SL10j    (SL10j_2)  ROOT_LEVEL 5.22.00
       new-> SL10k    (SL10k)   ROOT_LEVEL 5.22.00
       dev-> DEV                 ROOT_LEVEL 5.22.00
      .dev-> .DEV                ROOT_LEVEL 5.22.00

-------------------------------------------------
Release History
SL10a library
SL10b library
SL10c library
SL10d library
SL10e library
SL10f library
SL10g library
SL10h library
SL10i library
SL10j library
SL10k library
- December 18 , 2010
new library SL10k tagged as SL10k has been created and built on SL5.3 and SL4.4 platforms. Library was tested and released on December 20.
gcc version 4.3.2 20081007 (Red Hat 4.3.2-7)
Next codes have been updated:
asps
Simulation/starsim/atmain/agdummy.age - subroutine gcalor micset added;
Simulation/starsim/atgeant/agrot.F - modified to switch off AGROTF_TEST;
StChain
StMaker.cxx - added y2008c, y2009b, y2010b geometry tags;
StEmcADCtoEMaker
StBemcData.cxx, StEmcADCtoEMaker.cxx - patched for BSMDe mapping problem in P10ih and P10ij productions;
StEmcRawMaker
StBemcRaw.cxx, StBemcRaw.h, StEmcRawMaker.cxx - patched for BSMDe mapping problem in P10ih and P10ij productions;
StEmcUtil
database/StEmcDecoder.cxx, StEmcDecoder.h - patched for BSMDE mapping problem in P10ih and P10ij productions;
StEmcSimulatorMaker
StEmcSimulatorMaker.cxx - modified to make the energy assignments of the newly created strips happen before they are added to the mEmcMcHits collection; the cross talk leakage is now proportional to the difference of energies of two neighbor strips;
StGammaMaker
StGammaPythiaEventMaker.cxx - modified to move the StMcEvent check to the beginning of Make() to avoid crashing when the instance is not present ;
StGammaRawMaker.h - added mutator to exclude BEMC towers; set excluded BEMC towers in StGammaRawMaker;
StGammaRawMaker.cxx - excluded desired BEMC towers; bug fixed in tower exclusion code;
pams
/geometry/geometry/geometry.g - defined TPCE04r (reduced TPC envelope radius) and BTOF67 (btof sensitive volume size fix) and incorporated them into Y2011 tag; added tags:Y2008c, Y2009c, y2010b;
/geometry/geometry/btofgeo/gbtofgeo7.g - reverted to previous version of btofgeo6 code; fixes in TOF geometry are applied now in btofgeo7 ;
/geometry/geometry/tpcegeo/tpcegeo3.g - reverted max radius to previous value; reduced radius is set by TPCE04r flag in geometry.g;
StarDb
VmcGeometry/y2011.h - modified MUTD geometry: 27 backlegs changed with 28 backlegs ;
Geometry.y2008c.C, Geometry.y2009c.C, Geometry.y2010b.C, Geometry.y2008b.C, Geometry.y2009b.C, Geometry.y2010a.C, y2008c.h, y2009c.h, y2010b.h - added new files for tags y2008b, y2008c, y2009b, y2009c, y2010a and y2010b;
- November 22, 2010
SL10j library has been updated with codes below to fix the bug and code updates needed to proceed with MC and embedding production.
Next codes have been updated:
StBFChain
StBFChain.cxx - modified for embedding chain to use GetTopChain() to check existance of db-makers ; StEvent
StTpcDedxPidAlgorithm.cxx - bug fixed nSigma definition;
StChain
StMaker - added y2008b geometry tag;
StTpcRSMaker
StTpcRSMaker.cxx, TpcRS.C - removed special treatment for delta-electrons, this will cause that IdTruth for cluster will be degradated because charge from delta-electrons will be accounted with delta-electons track Id but not with original particle Id as was before;
pams
geometry/geometry/geometry.g - added y2008b geometry tag with most recent models of the TPC, ECAL and CALB;
sim/gstar/gstar_part.g - added omega(728) w/ 100% decay to e+e ;
StarDb
VmcGeometry/y2008b.h - latest version of TPC, ECAL, CALB
SL10j library has been retagged with tag SL10j_2 .
- November 3, 2010
SL10j library has been updated with codes below needed to proceed with auau 200GeV run 2010 production.
Updates includes:
- updates for usage of GG Voltage Error and tpcHVPlanes position;
- updates for TOF cell-based TOF calibrations;
- fixes for SVT related material for years 2009 & year2010;
- fixes for TPX response simulatator needed for run 2009, run 2010 embedding productions (proper t0 offset for Altro chip);
- updates for year 2011 geometry;
Library was retagged with tag SL10j_1 and rebuilt on SL5.3 and SL4.4 platforms.
gcc version 4.3.2 20081007 (Red Hat 4.3.2-7)
Next codes have been updated:
StBFChain
BigFullChain.h, StBFChain.cxx - introduced GG Voltage Error switch;
StBTofCalibMaker
StBTofCalibMaker.h - fixed array dimensions to accomodate cell-based calibrations;
StBTofCalibMaker.cxx - fixed module index range for read in loop for BOARD (TDIG) based calibration;
StDbUtilities
StMagUtilities.cxx, StMagUtilities.h - modified to provide usage of tpcHVPlanes positions and GG Voltage Error;
StDetectorDbMaker
St_TpcResponseSimulatorC.h - set proper t0 offset for Altro chip;
StDetectorDbChairs.cxx - introduced tpcHVPlanes;
St_tpcHVPlanesC.h - added new table to introduce tpcHVPlanes;
Sti
StiDetectorBuilder.cxx, StiMasterDetectorBuilder.cxx - modified to move SROD and SBSP from StiSvtDetectorBuilder to StiStarDetectorBuilder to set proper configurations without SVT detector installed;
Star/StiStarDetectorBuilder.cxx - modified to move SROD and SBSP from StiSvtDetectorBuilderto StiStarDetectorBuilder to set proper configurations without SVT detector installed;
StiRnD
Ist/StiIstDetectorBuilder.cxx - modified to move SROD and SBSP from StiSvtDetectorBuilder to StiStarDetectorBuilder to set proper configurations configurations without SVT detector installed;
StiSvt
StiSvtDetectorBuilder.cxx - modified to move SROD and SBSP from StiSvtDetectorBuilder to StiStarDetectorBuilder to set proper configurations without SVT detector installed;
StTpcDb
StTpcDbMaker.cxx - introduced GG Voltage Error switch;
StTpcRSMaker
StTpcRSMaker.cxx - set proper t0 offset for Altro chip; bug fixed for embedding;
StVpdCalibMaker
StVpdCalibMaker.cxx - modified to apply outlier truncation to all energies, keep at 20% level;
pams/geometry
geometry/geometry.g - modified to switch PHMD on and to add last version of MUTD configuration for run 2011;
mutdgeo/mutdgeo4.g - MUTD geometry modified to set 28 backlegs and 118 trays for run 2011;
StarDb/Calibrations/tpc
TpcResponseSimulator.C, TpcResponseSimulator.y2009.C, TpcResponseSimulator.y2010.C, TpcResponseSimulator.y2011.C - modified to set proper t0 offset for run 2009, 2010 and 2011;
StDb/idl
TpcResponseSimulator.idl - modified to set proper t0 offset for Altro chip;
tpcHVPlanes.idl - new table added for
- October 13, 2010
new library SL10j tagged as SL10j has been created and built on SL5.3 and SL4.4 platforms. Library was tested and released on October 15.
gcc version 4.3.2 20081007 (Red Hat 4.3.2-7)
Next codes have been updated:
asps
Simulation/starsim/atmain/dblib.cxx - added stdio.h for gcc 4.5 ;
StAssociationMaker
StAssociationMaker.cxx - removed 'find_if' due to bug in logic;
StBFChain
StBFChain.cxx - fixed DbV with Sdt timestamps;
BigFullChain.h, StBFChain.cxx - added useBTOF4Vtx chain option for inclusion of BTOF in vertex ranking;
StarClassLibrary
StParticleTable.cc - modified to provide LambdaBar(1520) in particle table with Geant ID=996;
StBTofUtil
StBTofGeometry.cxx, StBTofGeometry.h - modified to include methods in StBTofNode and StBTofGeometry that calculate local theta;
StBTofMatchMaker
StBTofMatchMaker.cxx, StBTofMatchMaker.h - modified to include local theta calculation in CellHit structure. Pass LocalTheta info on to TOF PID traits;
StBTofSimMaker
StBTofSimMaker.cxx, StBTofSimMaker.h - modified to look for geant data in bfc ("geant") or geant.root ("geantBranch"); Protect storing BTofMcHitCollection in case McEvent is NULL;
StBTofUtil
StBTofGeometry.cxx - modified to protect Init() and InitFromStar() against non-initialized database/geant ;
StChain
StMaker.cxx - added y2011 geometry tag;
StDbUtilities
St_svtRDOstrippedC.cxx - added const to Char_t*;
StDetectorDbMaker
St_tss_tssparC.h, StiHitErrorCalculator.h, StDetectorDbChairs.cxx - modified to add new chairs;
St_TpcPadCorrectionC.h St_tpcGainCorrectionC.h - added new chairs;
StdEdxY2Maker
StTpcdEdxCorrection.cxx, StTpcdEdxCorrection.h, StdEdxY2Maker.cxx - added more histograms for calibrations;
StEmcRawMaker
StEmcRawMaker.cxx - modified;
StEEmcSimulatorMaker
StEEmcSlowMaker.cxx, StEEmcSlowMaker.h - modified to give access to MIP dE/dx to other makers;
StEEmcUtil
database/ StEEmcDb.cxx, StEEmcDb.h - modified to improve constness ;
EEmcGeom/EEmcGeomSimple.cxx, EEmcGeomSimple.h - modified to improve constness ;
EEmcMC/EEmcMCData.cxx, EEmcMCData.h - modified to improve constness ;
StEEmcSmd/EEmcSmdGeom.cxx, EEmcSmdGeom.h, StEEmcSmdGeom.cxx, StEEmcSmdGeom.h - modified to improve constness ;
EEmcSmdMap/EEmcSmdMap.cxx, EEmcSmdMap.h - modified to improve constness ;
StEvent
StEvent.cxx, StEvent.h - modified to remove SoftwareMonitors ;
StFtpcSoftwareMonitor.cxx, StFtpcSoftwareMonitor.h, StRichSoftwareMonitor.cxx, StRichSoftwareMonitor.h, StSoftwareMonitor.cxx, StSoftwareMonitor.h - removed;
StEventClusteringHints.cxx, StEventTypes.h, StEventScavenger.cxx, StEventScavenger.h - modified to remove SoftwareMonitors ;
StTrack.cxx, StTrack.h - modified to add mSeedQuality;
StTpcHit.h - modified to fix no. of padsInHit;
StDcaGeometry.cxx - fixed format ;
StTpcDedxPidAlgorithm.cxx, StTpcDedxPidAlgorithm.h - cleanup;
StMCFilter
StFmsPi0Filter.h, StFmsPi0Filter.cxx - added filter for neutral pions incident on the FMS;
StGammaMaker
StGammaScheduleMaker.h - added accessor for total number of timestamps;
StGammaEventMaker.cxx - modified to overwrite event number only if timestamps have been added to the StGammaScheduleMaker instance;
StGammaCandidate.cxx, StGammaCandidate.h - added thresholds to most sum methods;
StGenericVertexMaker
StGenericVertexFinder.cxx, StGenericVertexFinder.h - added function UseBOTF and bool mUseBtof to switch the use of the TOF on and off in vertex finding, default value is off (false);
StGenericVertexMaker.cxx, StGenericVertexMaker.h - modified to add useBTOF4Vtx chain option for inclusion of BTOF in vertex ranking;
StiPPVertex/StPPVertexFinder.cxx, StPPVertexFinder.h, TrackData.cxx, TrackData.h, Vertex3D.cxx, VertexData.h - modified to add function UseBOTF and bool mUseBtof to switch the use of the TOF on and off in vertex finding; default value is off (false);
BtofHitList.cxx, BtofHitList.h - added functions, and variables necessary to use the TOF in PPV for vertex finding;
St_geant_Maker
St_geant_Maker.cxx, St_geant_Maker.h - added initialization of starsim parameter tables after opening zebra-file;
StJetMaker
StJetMaker2009.cxx - added neutral jets for events with no good TPC vertex, i.e. ranking <= 0, using (0,0,0) as vertex;
StAnaPars.h - fixed setTowerEnergyCorrection() bug; updated destructor;
mudst/StjBEMCMuDst.cxx, StjBEMCMuDst.h, StjEEMCMuDst.cxx, StjEEMCMuDst.h - added neutral jets for events with no good TPC vertex, i.e. ranking <= 0, using (0,0,0) as vertex;
StMagF
StMagFMaker.cxx - removed dependence on St_geant_Maker;
StMcEventMaker
StMcEventMaker.cxx, StMcEventMaker.h - replaced 'useBtof' with 'useTof';
StMiniMcEvent
StTinyMcTrack.cxx, StTinyRcTrack.cxx - fixed format;
StTinyRcTrack.cxx - added track seedQuality;
StMiniMcMaker.cxx, StMiniMcMaker.h - added track seedQuality;
StMuDSTMaker
COMMON/StMuEmcCluster.cxx/h, StMuEmcCollection.cxx/h, StMuEmcHit.cxx/h, StMuEmcPoint.cxx/h, StMuEmcTowerData.cxx/h, StMuEmcUtil.cxx/h - modified to insure const correctness;
StPixelFastSimMaker
StPixelFastSimMaker.cxx - cleanup unused variables;
StSsdDbMaker
StSsdDbMaker.cxx - modified to disable sim flavor, now sim parameters is coming via DB associated with simulation time stamp;
StSvtDbMaker
StSvtDbMaker.cxx - modified to disable sim flavor, now sim parameters is coming via DB associated with simulation time stamp;
StSvtSimulationMaker
StSvtSimulationMaker.cxx - modified to add iteration to transformation routines so local -> wafer followed by wafer->local come to same point needed because of dirft velocity assumptions;
StTpcDb
StTpcDbMaker.cxx - modified to use Mag.field flavor besides simu flag ;
StTpcHitMaker
StTpcHitMaker.cxx - fixed format;
StTpcHitMaker.cxx, StTpcRTSHitMaker.cxx - modified to add codes for S-shape correction (disactivated);
StTpcHitMaker.cxx StTpcRTSHitMaker.cxx - slightly better arrangement for limiting excessive TPC events;
StTpcHitMoverMaker
StTpcHitMoverMaker.cxx - added debug print outs;
StTpcRSMaker
StTpcRSMaker.cxx - modified to take out __ClusterProfile__ ;
StTriggerUtilities
StTriggerDefinition.h, StTriggerThreshold.h - added support structures for migration from online to offline DB for trigger definitions and thresholds; added inline to avoid multiple definitions of print() by linker;
StTriggerSimuMaker.cxx - changed back to checking decision of individual simulators;
StTriggerSimuResult.cxx/h - modified to change the PIG+2 address from BEMC to EEMC based on structure in StTriggerData2005::isL2Trigger();
StTriggerSimuMaker.h, StTriggerSimuMaker.cxx - modified to move from online to offline DB; added onbits1-3 and offbits1-3;
StTriggerSimuMaker.cxx - modified to change trigger DB query for more appropiate "select max(idx_rn) from triggers where beginTime <='%s'", which selects the begin time right before the time stamp and hence the actual current run;
StTriggerSimuMaker.h, StTriggerSimuMaker.cxx - modified to include ability to test if trigger is defined in trigger code ;
StDSMUtilities/ TCU.cc, TCU.hh, TriggerDefinition.hh - modified to add onbits1-3 and offbits1-3;
DSM.hh - added stdio.h for ROOT > 4.26 ;
Eemc/StEemcTriggerSimu.cxx - modified to revert to 'kDontCare';
L2Emulator/StL2_2006EmulatorMaker.cxx - modified to add PIG+2 to EEMC mL2algo;
StarMagField
StarMagField.cxx - modified to lock mag.field if it was initialized from GEANT;
St_tcl_Maker
StTpcFastSimMaker.cxx - modified to save coordinates in TpcLocalCoordinate;
Sti
StiNodePars.h - fixed problem with parameters alignment for gcc 4.5.1; fixed union; removed GNUC dependence;
StiKalmanTrack.cxx, StiKalmanTrack.h, StiKalmanTrackFinder.cxx, StiKalmanTrackFinder.h, StiKalmanTrackFitter.cxx, StiKalmanTrackFitter.h, StiKalmanTrackNode.cxx, StiKalmanTrackNode.h, StiTpcSeedFinder.cxx, StiTpcSeedFinder.h, StiTrackFinderFilter.cxx, StiTrackFinderFilter.h, StiTrackNode.cxx, StiTrackNodeHelper.cxx - modified to add TPCCATracker;
StiTPCCATrackerInterface.cxx, StiTPCCATrackerInterface.h - added new files for TPCCATracker;
StiMaker
StiStEventFiller.cxx - modified to switch from direct access to public members to methods;
StiRootSimpleTrackFilter.cxx - removed;
Star/StiStarDetectorBuilder.cxx - modified to move out StiVMCToolKit::GetVMC() from assert, protected from NDEBUG cpp-flag;
StiRnD
Hft/StiPixelDetectorBuilder.cxx - modified to get rid off access to specfic detector tracking parameters which usage has been disable since 2008/06/11;
Ist/StiIstDetectorBuilder.cxx - modified to get rid off access to specfic detector tracking parameters which usage has been disable since 2008/06/11;
StiSsd
StiSsdDetectorBuilder.cxx - modified to get rid off access to specfic detector tracking parameters which usage has been disable since 2008/06/11;
StiSvt
StiSvtDetectorBuilder.cxx - modified to get rid off access to specfic detector tracking parameters which usage has been disable since 2008/06/11;
StiTpc
StiTpcDetectorBuilder.cxx - modified to get rid off access to specfic detector tracking parameters which usage has been disable since 2008/06/11;
StStarLogger
logging/Main.cxx TxUCMCollector.cxx - added stdio.h for gcc4.5; improved query;
TxEventLog.h, TxEventLogFile.h, TxEventLogWeb.h, TxUCMCollector.cxx, TxUCMCollector.h - added method to query job id by broker task and job id provided;
TxEventLogCollector.cpp, TxEventLogCollector.h, testUcm.csh, testUcm.java - fixed Java Collector interface;
TxEventLog.h, TxEventLogCollector.cpp, TxEventLogCollector.h, TxEventLogFile.h, TxEventLogWeb.h, TxUCMCollector.cxx, TxUCMCollector.h, testUcm.csh, testUcm.java - added the requester name to the getJobId interface, fix the Db init;
TxEventLogFactory.cxx - modified to use REG_EXTENDED syntax;
Main.cxx, Makefile, TxEventLogFactory.cxx, TxEventLogFactory.h - added TxEventLogFactory::main method and stand-alone ulog utitility;
StarRoot
KFParticleBase.h, KFParticle.h, KFParticleBase.cxx, KFParticle.cxx - updates for CA from ALICE;
StarRootLinkDef.h - modified to make KFParticleBase and KFParticle to be TObject;
TRDiagMatrix.h, TRMatrix.cxx, TRMatrix.h, TRSymMatrix.cxx, TRSymMatrix.h, TRVector.cxx, TRVector.h - added interface to TVector3;
KFParticleBase.cxx, KFParticleBase.h - added ID;
TTreeIter.h - added accessor to Tree;
RTS
include/rtsSystems.h- added MTD; added Checkpoint;
src/DAQ_READER/daqReader.cxx, daqReader.h - added detector size functions;
src/DAQ_TPX/tpxFCF.cxx - modified to add protection that the cluster charge > 0, it happens sometimes in simulation; small optimization in fcf_decode; added CHOPPED flag;
tpxFCF.h - removed u_int for easier inclusion ;
tpxFCF.cxx - added Checkpoint;
tpxFCF_flags.h - added to move flag to a separate include;
tpxGain.cxx, tpxGain.h - added more clock features ;
src/DAQ_MTDdaq_mtd.cxx, daq_mtd.h - added new code for MTD daq reader;
src/SFS/fs.C, fs_index.cxx, fs_index.h, sfs_index.cxx, sfs_index.h - added detector size functions;
pams
ctf/cts/cts.cc - disabled consistency check on volume ids, fixed bug #1715;
gen/Pythia6_2_20/pythia-6.2.20.F - added new version of Pythia;
pytune.F - added dummy pytune to resolve dependency in bpythia;
geometry/calbgeo/calbgeo2.g - modified to inserte an ENDFILl statement required by AgML;
ecalgeo6.g - modified to remove stray comma from EMCS fill statement;
geometry/geometry/geometry.g - added development/baseline y2011 geometry tag;
geometry/mutdgeo/mutdgeo4.g - added 4th version of the muon telescope detector;
geometry/tpcegeo/tpcegeo3.g - increased size of array to prevent an out-of-bounds condition ;
tpcegeo3.g - modified to reduce size of TPC envelope to accommodate TOF;
geometry/wallgeo/wallgeo.g - modified to make the cave walls invisible so the detector can be more easily viewed;
sim/g2t/g2t_volume_id.g - fixed unknown TOFr choice for year2007 (btog_choice=10); fixed wrong TOFr tray position ID for run 5 (btog_choice=8);
sim/gstar/gstar_part.g - modified to increase the precision of the lambda and lambdabar masses in gstar_part.g; added XiMinus, XiMinusBar, XiZero and XiZeroBar;
StarDb
Calibrations/tracker/PrimaryVertexCuts.20100424.040001.C - added parameters for Run 2010 AuAu 7.7 and AuAu 11; files moved to DB;
PrimaryVertexCuts.y2011.C - added provisional set of parameters for year 2011;
Calibrations/ftpc/ftpcTemps.y2011.C - added new files with provisional values for year 2011;
Calibrations/tpc/tpcGas.y2011.C, TpcSecRowB.y2011.C, tpcPressureB.y2011.C, TpcResponseSimulator.y2011.C, tpcPadGainT0.y2011.C, TpcAdcCorrectionB.y2011.C, TpcLengthCorrectionB.y2011.C, tpcAnodeHVavg.y2011.C, tpcGasTemperature.y2011.C, TpcdXCorrection.y2011.C, tpcMethaneIn.y2011.C, TpcMultiplicity.y2011.C, TpcPhiDirection.y2011.C, tpcWaterOut.y2011.C, TpcZCorrectionB.y2011.C, TpcdCharge.y2011.C, TpcdEdxCor.y2011.C, tpcAnodeHV.y2011.C, TpcDriftDistOxygen.y2011.C, TpcPadCorrection.y2011.C, tpcSlewing.y2011.C, tpcDriftVelocity.y2011.C, tpcAltroParams.y2011.C - added new files with provisional values for year 2011;
TpcPadCorrection.C - added new default pad correction table ;
tpcGainCorrection.20100101.000028.C, tpcGainCorrection.C, TpcAvCurrent.C, TpcPadCorrection.y2010.C, TpcZDC.C - added new table;
TpcAdcCorrectionB.20100101.000012.C, TpcLengthCorrectionB.20100101.000033.C, TpcLengthCorrectionB.20100103.000033.C,
TpcLengthCorrectionB.20100204.180033.C, TpcLengthCorrectionB.20100318.200033.C, TpcLengthCorrectionB.20100409.000033.C,
TpcLengthCorrectionB.20100424.040033.C, TpcLengthCorrectionB.20100527.020033.C,
TpcRowQ.20100101.000032.C, TpcRowQ.20100103.000032.C, TpcRowQ.20100204.180032.C, TpcRowQ.20100318.200032.C,
TpcRowQ.20100409.000032.C, TpcRowQ.20100424.040032.C, TpcRowQ.20100527.020032.C, TpcSecRowB.20100101.000032.root,
TpcSecRowB.20100103.000032.root, TpcSecRowB.20100103.000032.root, TpcSecRowB.20100318.200032.root, TpcSecRowB.20100409.000032.root, TpcSecRowB.20100424.040032.root, TpcSecRowB.20100527.020032.root,
TpcZCorrectionB.20100101.000030.C, TpcZCorrectionB.20100103.000032.C, TpcZCorrectionB.20100204.180030.C,
TpcZCorrectionB.20100318.200030.C, TpcZCorrectionB.20100409.000030.C, TpcZCorrectionB.20100424.040030.C,
TpcZCorrectionB.20100527.020030.C, TpcZDC.20100103.000025.C,TpcZDC.20100204.180025.C, TpcZDC.20100318.200025.C, TpcZDC.20100409.000025.C TpcZDC.20100424.040025.C - updated dEdx calibartions for run 2010;
Geometry/tpc/tpcGlobalPosition.y2011.C - added provisional values for y2011;
Sector_01 to Sector_24/tpcSectorPosition.y2011.C - added provisional values for y2011 for each sector;
RunLog/onl/starClockOnl.y2011.C, tpcRDOMasks.y2011.C - added provisional values for y2011;
VmcGeometry/Geometry.y2011.C y2011.h - added year 2011 geometry tag;
StDb
idl/TpcPadCorrection.idl - added table for correction to reconstructed cluster position in pads;
triggerDefinition.idl, triggerThreshold.idl - added new trigger simulator tables; modified to add size parameter;
QtRoot
qt/src/TQtWidget.cxx - fixed ROOT Bug #4319;
GQtGUI.cxx, TGQt.cxx - fixed small memory leak for QFont object;
- September 2, 2010
SL10i library has been updated with codes limited number of TPC hits used for tracking to skip events with excessive hit occupancy. Library was retagged with tag SL10i_2 and rebuilt on SL5.3 and SL4.4 platforms.
Next codes have been updated:
StDetectorDbMaker
St_tpcMaxHitsC.h - new file to limit max number of TPC hits for tracking;
StDetectorDbChairs.cxx - modified to introduce hit maxima for tracking;
StTpcHitMaker
StTpcHitMaker.cxx, StTpcHitMaker.h, StTpcRTSHitMaker.cxx, StTpcRTSHitMaker.h - modified to introduce hit maxima for tracking;
StTpcRTSHitMaker.cxx, StTpcRTSHitMaker.h - implemented Lower bound on reduced hit maxima;
macrosbfc.C
StDb
idl/tpcMaxHits.idl - new table to limit max number of TPC hits for tracking;
- August 11, 2010
SL10i library has been updated with MC Filter codes to proceed with EemcGammaFilter simulation production. Library was retagged with tag SL10i_1 and rebuilt on SL5.3 and SL4.4 platforms.
Next codes have been updated:
StBFChain
BigFullChain.h - added FiltEemcGamma option to proceed with Eemc gamma filter in reconstruction;
StFilterMaker
StGammaFilterMaker.h, StGammaFilterMaker.cxx - updated with final 2009 parameters and utilities;
StEemcGammaFilterMaker.cxx, StEemcGammaFilterMaker.h, eemcGammaFilterMakerParams.idl - added new files to implement original Endcap EMC gamma-filter; modified to get sampling fraction from Fast simulator, db settings movied to Init;
StMCFilter
StEemcGammaFilter.cxx, StEemcGammaFilter.h - new code added to implement original Endcap EMC gamma-filter;
StEEmcSimulatorMaker
StEEmcFastMaker.cxx, StEEmcFastMaker.h, StEEmcSlowMaker.h, StEEmcSlowMaker.cxx - updated Eemc fast and slow simulattion codes; sampling fraction changed to 4.8%;
StMiniMcMaker
StMiniMcMaker.cxx - modified to change the check on valid towers during clustering to suppress the non-error issued by StEmcGeom;
- July 19, 2010
new library SL10i tagged as SL10i has been created and built on SL5.3 and SL4.4 platforms. Library was tested and released on July 21.
gcc version 4.3.2 20081007 (Red Hat 4.3.2-7)
Next codes have been updated:
asps
Simulation/geant321/gcons/gppart.F - modified to allow geant IDs > 9999 will be displayed ;
Simulation/starsim/geantgpdcay.F - added the ids of the decay daughters to the output;
StAssociationMaker
EMC/StEmcAssociationMaker.cxx, StEmcAssociationMaker.h - modified to remove the compile-time redundant dependency;
StBTofHitMaker
StBTofHitMaker.cxx - removed explicit call to mBTofSortRawHit->setVpdDelay(runnumber). This is now part of mBTofSortRawHit->Init();
StBTofHitMaker.cxx, StBTofHitMaker.h - modified to intoduce GetNextRaw(int sec) ;
StBTofMatchMaker
StBTofMatchMaker.cxx, StBTofMatchMaker.h - introduced switch to enable ideal MC geometry, without alignment updates. Default: disabled;
StBTofMatchMaker.cxx - modified to initialize mUseIdealGeometry to be kFALSE in ctor;
StBTofSimMaker
StBTofSimMaker.cxx, StBTofSimMaker.h - removed geometry initialization (not used); corrected application of vpd resolution smearing: the original values in the db (or ParSim) are in ps [Xin];
StBTofUtil
StBTofSortRawHit.cxx, StBTofSortRawHit.h - modified to retrieve VPD delay parameters from database; removed explicit setVpdDelay() and integrate its functionality with Init();
StBTofGeometry.cxx, StBTofGeometry.h - StBTofGeometry.cxx, StBTofGeometry.h - introduced switch to enable ideal MC geometry, without alignment updates. Default: disabled;
StDbUtilities
StMagUtilities.cxx, StMagUtilities.h - modified for GridLeak studies: more knobs to adjust GL and SC in Predict() functions;
StDetectorDbMaker
St_TpcResponseSimulatorC.h - added parameterization for sigma ver row;
StEmbeddingUtilities
StEmbeddingQAUtilities.cxx - modified to use TString::KIgnoreCase;
StEmbeddingQADraw.h - added particle name functions;
StEmbeddingQADraw.cxx - added legend for each page;
StEvent
StTriggerData.h, StTriggerData.cxx - modified to change member debug to mDebug;
StGammaMaker
StGammaEvent.h - added primary vertx rank member/mutator/accessor ;
StGammaEventMaker.cxx - added store of primary vertex rank;
St_geant_Maker
St_geant_Maker.cxx, St_geant_Maker.h - modified to synchronize magnetic field, can use now InitRun for mag. field;
Embed/StPrepEmbedMaker.h - modified to set rapidity +/-10 in gkine/phasespace for spectrum option in order to avoid acceptance cuts;
StPrepEmbedMaker.cxx - implemented spectrum option by gstar_micky;
StHbtMaker
Reader/StHbtAssociationReader.cxx - fixed StMcTrack usage ;
Cut/ParityEventCut.cxx, ParityEventCut.h - modified to get rid of the compilation warnings;
StJetFinder
StProtoJetCut.h, StProtoJetCutEta.h, StProtoJetCutPt.h, StProtoJetListCut.cxx,,StProtoJetListCut.h - added new files to support run 2009 production version;
StConeJetFinder.cxx, StConeJetFinderBase.cxx, StEtaPhiGrid.cxx, StEtaPhiGrid.h - fixed memory leak;
StProtoJet.h - modified to proceed with run 2009 production;
StJetMaker
StAnaPars.h, StJetMaker2009.cxx, StJetMaker2009.h - new files added to support run 2009 jet production version;
StjBEMCTowerMaker.cxx, StjTPCTrackMaker.cxx - modified to proceed with run 2009 production;
StJetMaker.cxx, StJetMaker.h - added getStJetEvent() ;
StJetSkimEventMaker.cxx - added protection against null pointer ;
emulator/StBET4pMakerImpBuilder.cxx, StjeBemcEnergySumCalculatorBuilder.cxx, StjeDefaultJetTreeWriter.cxx, StjeJetEventTreeWriter.cxx- modified to proceed with run 2009 production;
mudst/StjBEMCMuDst.cxx, StjBEMCMuDst.h, StjEEMCMuDst.cxx, StjEEMCMuDst.h, StjTPCMuDst.cxx, StjTPCMuDst.h, StjTPCRandomMuDst.cxx - modified to proceed with run 2009 production;
StjBEMCMuDst.cxx/h - modified for simulation;
towers/StjAbstractTowerEnergyCorrectionForTracks.h, StjTowerEnergyCorrectionForTracksFraction.cxx, StjTowerEnergyCorrectionForTracksFraction.h, StjTowerEnergyCorrectionForTracksMip.cxx, StjTowerEnergyCorrectionForTracksMip.h - modified to proceed with 2009 production ;
StjTowerEnergyCorrectionForTracksNull.h - added new file;
StjAbstractTowerEnergyCorrectionForTracks.cxx, StjAbstractTowerEnergyCorrectionForTracks.h, StjTowerEnergyCorrectionForTracksFraction.cxx, StjTowerEnergyCorrectionForTracksFraction.h, StjTowerEnergyCorrectionForTracksMip.cxx, StjTowerEnergyCorrectionForTracksMip.h, StjTowerEnergyCorrectionForTracksNull.h - added new files with alternative classes for tower energy correction for tracks;
tracks/StjTrackCutPt.h - added to support run 2009 jet production version;
StjTPC.h - modified for run 2009;
StjTrackCutDcaPtDependent.h - bug fixed;
vertex/StjPrimaryVertex.h - added to support run 2009 jet production version;
StMcAnalysisMaker
StMcAnalysisMaker.cxx - implemented the correct const StMcTarck * pointer cast;
StMCFilter
StBemcGammaFilter.h, StBemcGammaFilter.cxx - BEMC Photon Filter implemented;
StMuDSTMaker
COMMON/StMuEvent.cxx - added pointer protection to StTriggerData member ;
StMuTrack.cxx - fixed bug to fill properly global tracks with pt and eta in case if vertex has not been found;
StMcEvent
StMcEvent.hh - fixed bug which had eprsCollection returning btow hits if called using the const version;
StStarLogger
logging/TxEventLogWeb.cpp - modified to allow the wget log message to trace the cybersecurity issue; added timestampt t diagnostic to trace the cybersecurity case;
TxUCMCollector.cxx - modified to count events of the selected job only;
TxEventLog.cpp, TxEventLog.h, TxUCMCollector.cxx - modified to dicrement the job counter for the finished tasks;
StarMagField
StarMagField.cxx - set assert when magnetic field is not initialized;
StarRoot
THelixTrack.cxx - modified to acount HZ correlation;
THelixTrack.h, THelixTrack.cxx - added TestMtx;
TRandomVector.h, TRandomVector.cxx - added multydimensioane random vector;
StBiTree.cxx - modified to reduce the test suite;
StPass0CalibMaker
StSpaceChargeEbyEMaker.cxx, StSpaceChargeEbyEMaker.h - modified interface to allow EMC and TOF matching requirements; added TOF matching;
StVertexSeedMaker.cxx, StVertexSeedMaker.h - added option for using all triggers;
StRTSClient
FCFMaker/FCFMaker.cxx - implement new interface for pad t0;
StTpcDb
StTpcDb.cxx, StTpcDb.h, StTpcDbMaker.cxx - modified to take out flavoring by 'sim' for tpcGlobalPosition,tpcSectorPosition and starClockOnl tables; removed usage of tpcISTimeOffsets and tpcOSTimeOffsets tables;
StRTpcT0.cxx, StRTpcT0.h, StTpcT0I.h - removed;
StTpcDbMaker.cxx - modified to discontinue usage of FullMagF geometry flavors, now just use 'ofl' with appropriate timestamp;
StTpcRSMaker
StTpcRSMaker.cxx, StTpcRSMaker.h - modified ;
TF1F.cxx, TF1F.h - added new files;
St_tcl_Maker
StTpcFastSimMaker.cxx - modified to adjust for new TpcDb interface; removed pseudo pad rows;
StTriggerUtilities
StTriggerSimuMaker.cxx, StTriggerSimuMaker.h - added hooks to overwrite DSM thresholds from the database ;
Bbc/StBbcTriggerSimu.cxx - modified to set year from DB maker to StBbcTrigggerDetector container;
Bemc/StBemcTriggerSimu.cxx - added Run 6 jpsi-mb trigger;
StBemcTriggerSimu.cxx, StBemcTriggerSimu.h - modified to get J/psi topology trigger candidates; A=added more access functions for J/psi candidates;
added hooks to overwrite DSM thresholds from the database;
modified to fill trigger simulator in the StEmcTriggerDetector structure same as data for MC;
StBemcTriggerSimu.h - fixed HT6bit to TP6bit;
Eemc/StEemcTriggerSimu.cxx, StEemcTriggerSimu.h - added hooks to overwrite DSM thresholds from the database;
modified to fill trigger simulator in the StEmcTriggerDetector structure same as data for MC;
added a bunch of eemc-http triggers ; modified to change triggerDecision from kDoNotCare to kNo;
Emc/StEmcTriggerSimu.cxx, StEmcTriggerSimu.h - added hooks to overwrite DSM thresholds from the database;
pams
geometry/geometry/geometry.g - modified geometry.g so that seperate particle transport cuts can be used in the BEMC and EEMC, this is needed for the spin/dijet simulation ;
defined the Y2009b tag to apply the 10keV default tracking cuts in the BEMC, and revert the EEMC to the 80kev/1MeV (photon/electron) cuts;
added y2005i tag to provide up-to-date version of ecal in y2005 geometry and to provide 10 keV transport cuts in calorimeters;
geometry/btofgeo/tofgeo2.g, btofgeo3.g, btofgeo4.g, btofgeo5.g, btofgeo6.g - fixed minor bug in the cooling tubes for the tofThe inner radii of the cooling tubes are passed to the block creating the water volume, but the shape operator indicated that it should inherit its parameters from the mother volume. This resulted in the outer radius of the water volume being set equal to the outer radius of the cooling tube;
gen/Pythia6_4_23/pystar-6.4.22.F, pythia-6.4.23.F - added latest version of pythia, with bug fixes for the perugia tunes;
sim/gstar/gstar_part.g, gstar_part.kumac - added Geant id's for 100% Phi to K+K- and to e+e- decay channels;
corrected mistake in Omega+- definition and forced daughter lamda to decay to specific channel; got rid of Mortran90 definition;
StarDb
Calibrations/tpc/tpcEffectiveGeom.y2006.C, tpcEffectiveGeom.y2007.C, tpcEffectiveGeom.y2008.C, tpcEffectiveGeom.y2009.C, tpcEffectiveGeom.y2010.C - removed;
tpcEffectiveGeom.y2005.C - replaced 'sim' value with 'ofl';
tpcElectronics.y2006.C, tpcElectronics.y2007.C, tpcElectronics.y2008.C - moved tZero from -1.05995 us (used to be in simulation) to real data value = 0 us;
TpcResponseSimulator.C, TpcResponseSimulator.y2009.C, TpcResponseSimulator.y2010.C - modified;
Calibrations/tracker/DefaultTrackingParameters.20010312.000011.C - decreased hits gates; set max Xi2=20 to be the same as in the original;
StDb
idl/TpcResponseSimulator.idl - added parameterization for sigma versus row;
QtRoot
qt4ged/src/TQtLineEditor.cxx - modified to replace the obsolete interface with the standard Qt4; removed error prone Qt3 CPP flags;
qt/qt.pro - merged with CERN version; added TQtCanvasPainter.h to the list of depedencies;
qt/src/TQtWidget.cxx - modified to merge with ROOT CERN SVN trunk 5.27;
qt/inc/ TQtCanvasPainter.h - added new file to merge with ROOT CERN SVN trunk 5.27;
TQtWidget.h - modified to merge with ROOT CERN SVN trunk 5.27;
qtgui/src/TQtCanvasImp.cxx - fixed the ambiguous shortcut overload;
- April 7, 2011
new library SL10h_embed tagged as SL10h_3 has been created to fix the problem in P10ih embedding production. Library was tested and released on April 11.
Next codes have been updated:
StAssociationMaker
StAssociationMaker.cxx, r.1.54;
StAssociationMaker.h, r.1.24;
StTrackPairInfo.cc, r.1.8;
StTrackPairInfo.hh, r.1.8;
EMC/StEmcAssociationMaker.cxx, r.1.13;
StEmcAssociationMaker.h, r.1.10;
StBFChain
BigFullChain.h, r.1.125; StBFChain.cxx, r.1.570;
StChain
StMaker.cxx, r.1.234;
StDetectorDbMaker
StDetectorDbChairs.cxx, r.1.24; St_TpcPadCorrectionC.h, r.1.1; St_TpcResponseSimulatorC.h, r.1.3; St_tpcGainCorrectionC.h, r.1.1; St_tpcHVPlanesC.h, r.1.1; St_tss_tssparC.h, r.1.5;
StTpcHitMaker
StTpcHitMaker.cxx, r. 1.39;
StTpcRTSHitMaker.cxx, r. 1.25;
StTpcRSMaker
StTpcRSMaker.cxx, r. 1.44; StTpcRSMaker.h, r.1.18; TF1F.cxx, r. 1.3; TF1F.h, r.1.3; TpcRS.C, r.1.21;
StarRoot
StCloseFileOnTerminate.h,r.1.6; TPolynomial.cxx, r.1.2;
St_geant_Maker
St_geant_Maker.h, r. 1.50;
St_geant_Maker.cxx, r. 1.135;
StMagF
StMagFMaker.cxx, r. 1.16;
StarMagField
StarMagField.cxx r. 1.17;
StarDb
Calibrations/tpc TpcRowQ.20090301.000102.C
TpcRowQ.20090415.000057.C
tpcAnodeHV.y2011.C
tpcAnodeHVavg.y2011.C
Calibrations/tracker
DefaultTrackingParameters.20010312.000011.C
- September 3, 2010
SL10h library has been updated with codes limited number of TPC hits used for tracking to skip events with excessive hit occupancy. Library was retagged with tag SL10h_2 and rebuilt on SL5.3 and SL4.4 platforms.
Next codes have been updated:
StDetectorDbMaker
St_tpcMaxHitsC.h - new file to limit max number of TPC hits for tracking;
StDetectorDbChairs.cxx - modified to introduce hit maxima for tracking;
StTpcHitMaker
StTpcHitMaker.cxx, StTpcHitMaker.h, StTpcRTSHitMaker.cxx, StTpcRTSHitMaker.h - modified to introduce hit maxima for tracking;
StTpcRTSHitMaker.cxx, StTpcRTSHitMaker.h - implemented Lower bound on reduced hit maxima;
macrosbfc.C
StDb
idl/tpcMaxHits.idl - new table to limit max number of TPC hits for tracking;
- July 7, 2010
SL10h library was updated with StRoot/StPmdReadMaker fixes to read old daq data and proceed with run 2010 calibrations
Library was retagged with tag SL10h_1
- May 26, 2010
new library SL10h tagged as SL10h has been created and built on SL4.4 and SL5.3 platforms. Library was tested found bugs fixed, library was released on June 1 and will be used for run 2010 production.
gcc version 4.3.2 20081007 (Red Hat 4.3.2-7)
Next codes have been updated:
StarClassLibrary
StParticleTable.cc, StKaonZeroMode0809.cc, StKaonZeroMode0809.hh - added StKaonZeroMode0809 to represent the k0 --> pi+ pi- w/ 100% br in gstar_part.g ;
StBFChain
BigFullChain.h, StBFChain.cxx - modified to allow to switch off main Star Cint Db by NoStarCintDb option; removed the logger destruction side effect;
BigFullChain.h - modified to put StBTofSimMaker before StBTofMatchMaker;
StBTofCalibMaker
StBTofCalibMaker.cxx, StBTofCalibMaker.h - implemented self-calibration method; improved database handling and reduced log output; modified to pick up the default primary vertex (for mUseEventVertex); additional cuts in selecting the vertex for tstart() have been removed;
StBTofHitMaker
StBTofHitMaker.cxx - improved database handling and reduced log output;
StBTofMatchMaker
StBTofMatchMaker.cxx - modified to keep BTofMatchMaker from crashing ungracefully when no mEvent or BTOF Collection is found; improved database handling and reduced log output;
StBTofUtil
StBTofSortRawHit.cxx - updated vpd delay settings for run 2010;
StBTofDaqMap.cxx, StBTofGeometry.cxx, StBTofINLCorr.cxx, StBTofSortRawHit.cxx - improved database handling and reduced log output;
StChain
StChain.cxx, StMaker.cxx - removed the logger destruction side effect;
StMaker.cxx - bug #1911 fixed, implemented protection against of the died pointer; alias time stamp for y2010 moved from 20091214 to 20091215;
added y2009b and y2010a geometry tags to support simulation requests:
StDetectorDbMaker
StDetectorDbChairs.cxx, St_tpcPadGainT0C.h, St_tpcAltroParamsC.h, St_tpcAvCurrentC.h - added new files for St_tpcPadGainT0C;protection;
St_db_Maker
St_db_Maker.cxx, St_db_Maker.h - implemented new method to save snapshot+one subsequent dataset for each table in db; refactored snapshot code to include saving of .root files; modified to save single datasets; fixed check for db broker in file mode;
StEEmcSimulatorMaker
StEEmcSlowMaker.cxx, StEEmcSlowMaker.h - code cleanup;
SlowSimUtil.cxx, SlowSimUtil.h - removed;
StEEmcUtil
EEmcMC/EEmcMCData.h - removed the redundant dependancy;
StEvent
StBTofHeader.cxx, StBTofHeader.h - added member mNTzero and access methods;
StFtpcTrackMaker
StFtpcTrackToStEvent.cc - fixed extrapolation of momentum vector to last point on track;
StFtpcConfMapper.cc, StFtpcConfMapper.hh - fixed bug #1939 - variables with the same name were defined twice; the names of the StFtpcConfMapper variables have been changed to make them unique;
St_geant_Maker
Embed/StPrepEmbedMaker.h - modified to set rapidity +/-10 in gkine/phasespace for spectrum option in order to avoid acceptance cuts;
StPrepEmbedMaker.cxx - implemented spectrum option by gstar_micky;
St_geom_Maker
GeomBrowser.cxx - adjusted to meet the new ROOT requerement;
QExGeoDrawHelper.cxx - modified to pick up material from TGeoMedium rather from TGeoMaterial ;
StarGeomTreeWidget.cxx - added std prefix for vector;
StJetMaker
StJetReader.cxx, StJetSkimEventMaker.cxx - modified to preserve backward compatibility with reading of Run 6 skim trees;
StBET4pMaker.cxx - modified to save current vertex index before vertex loop and restore current vertex index after vertex loop;
StBET4pMaker.h, StFourPMaker.h, StPythiaFourPMaker.h - updated simulation tools;
mudst/StjTPCMuDst.cxx - added cut on radius of last TPC point on track (125 cm);
emulator/StBET4pMakerImpBuilder.cxx - added cut on radius of last TPC point on track (125 cm);
StjeJetEventTreeWriter.cxx - modified to calculate nBTOFMatch for year >= 2009;
tracks/StjTrackList.h, StjTrackCutLastPoint.h - added cut on radius of last TPC point on track (125 cm);
StMcAnalysisMaker
StMcAnalysisMaker.cxx - added CPP macro to separate McTracks; fixed bug #1932 ;
StMcEvent
StEventObject.h, StMcHitC.cxx, StMcHitC.hh, StMcHitI.cxx, StMcHitI.h, StMcHitT.cxx, StMcHitT.hh - implemented new OO model for Mc event components;
StMcVertexC.cxx, StMcVertexC.h - added Mc vertex, and EMC models;
StMuDSTMaker
COMMON/StMuTrack.cxx, StMuTrack.h - added extra functions for matching BEMC towers to TPC tracks;
StMuArrays.cxx, StMuArrays.h, StMuDst.cxx, StMuDst.h, StMuDstMaker.cxx, StMuDstMaker.h, StMuEvent.cxx, StMuEvent.h - modified to add StTriggerData arrays in muevent and fixed an issue with PMD arrays being read;
StPmdClusterMaker
StPmdClusterMaker.cxx, StPmdClustering.cxx, StPmdClustering.h - added a call to new clustering routines in StPmdClustering;
StPmdClustering.cxx - modified to use Edep() instead of Adc() of PmdHit in new clustering routine; mOptCalibrate Flag set to kTRUE;
StPmdReadMaker
StPmdReadMaker.cxx - modified to hold calibrated ADC by Edep of Pmdhit;
StPmdUtil
StPmdMapUtil.cxx - fixed an array for nSmChainBoards;
StPmdHit.cxx, StPmdHit.h - added sorting routine;
StPmdDetector.cxx - modified to return correct number of Hits in a module;
StPmdCluster.cxx - added initialization of mCluSigma in constructor;
StTriggerUtilities
StTriggerSimuMaker.cxx - changed absolute path for mysql.h to relative path; mysql.h include path fixed;
StTriggerSimuResult.cxx, StTriggerSimuResult.h - modified to preserve backward compatibility with reading of Run 6 skim trees;
Emc/StEmcTriggerSimu.cxx - removed mysql.h include;
StTpcRSMaker
StTpcRSMaker.cxx, TpcRS.C - returned back to time simulation for each pad, organized parameters into TpcResponseSimulator table;
RTS
include/RC_Config.h - RHIC TRG updated ;
src/SFS/fs_index.cxx, fs_index.h, sfs_index.cxx - removed some statics to make thread safe, at least for separate instances of the readers ;
Makefile, fs_index.h, sfs_index.cxx, sfs_index.h, daq_test.C - added support for readahead ;
src/DAQ_READER/cfgutil.cxx, daqReader.cxx, daqReader.h - added support for readahead, removed some statics to make thread safe, at least for separate instances of the readers ;
src/DAQ_SSD/ssd_reader.cxx - removed some statics to make thread safe, at least for separate instances of the readers ;
src/DAQ_SVT/svt_reader.cxx - removed some statics to make thread safe, at least for separate instances of the readers;
StVpdCalibMaker
StVpdCalibMaker.cxx, StVpdCalibMaker.h - removed slower hits (outliers) in VPD timing calculations; implemented self-calibration method; improved database handling and reduced log output;
StStarLogger
StLoggerManager.cxx - removed the logger destruction side effect ;
MySQLAppender.h - fixed include path for mysql.h ;
logging/TxUCMCollector.h - fixed include path for mysql.h ;
StarRoot
StDraw3D.cxx - added delay to animate 3D under gdb and get rid of 100 CPU consumption;
pams
geometry/geometry/geometry.g - y2010a geometry tag added.Tag is identical to y2010, except dependency on y2009a is removed
sim/gstar/gstar_part.g - added K0S->Pi+ Pi;
sim/idl/g2t_tpc_hit.idl - added adc, pad and timebucket data member to allow tuning up digitization;
StarDb
Calibrations/ftpc/ftpcTemps.y2010.C - added default (ideal) parameters;
Calibrations/tpc/TpcLengthCorrectionB.20100409.000000.C, TpcRowQ.20100409.000000.C, TpcSecRowB.20100409.000000.root - dEdx calibrations for auau 39GeV run 2010;
TpcResponseSimulator.y2010.C - fixed ;
tpcAnodeHVavg.y2001.C tpcAnodeHVavg.y2002.C, tpcAnodeHVavg.y2003.C, tpcAnodeHVavg.y2004.C, tpcAnodeHVavg.y2005.C, tpcAnodeHVavg.y2006.C, tpcAnodeHVavg.y2007.C, tpcAnodeHVavg.y2008.C, tpcAnodeHVavg.y2009.Cl tpcAnodeHVavg.y2010.C - added default tables;
tpcAnodeHV.C tpcAnodeHV.y2010.C - added default (ideal) parameters ;
tpcDriftVelocity.C, tpcDriftVelocity.y2001.C, tpcDriftVelocity.y2003.C, tpcDriftVelocity.y2004.C, tpcDriftVelocity.y2005.C, tpcDriftVelocity.y2006.C, tpcDriftVelocity.y2007.C, tpcDriftVelocity.y2008.C, tpcDriftVelocity.y2009.C, tpcDriftVelocity.y2010.C - added default (ideal) parameters for TPC drift velocity;
tpcEffectiveGeom.C, tpcEffectiveGeom.y2001.C, tpcEffectiveGeom.y2003.C, tpcEffectiveGeom.y2004.C, tpcEffectiveGeom.y2005.C, tpcEffectiveGeom.y2006.C, tpcEffectiveGeom.y2007.C, tpcEffectiveGeom.y2008.C, tpcEffectiveGeom.y2009.C, tpcEffectiveGeom.y2010.C - added default (ideal) parameters for TPC;
tpcElectronics.C, tpcElectronics.y2001.C, tpcElectronics.y2003.C, tpcElectronics.y2004.C, tpcElectronics.y2005.C, tpcElectronics.y2006.C, tpcElectronics.y2007.C, tpcElectronics.y2008.C - added default (ideal) parameters for TPC electronics;
tpcSlewing.C tpcSlewing.y2009.C tpcSlewing.y2010.C - added default (ideal) parameters for TPC ;
tpcAvCurrent.C - added initail tabel with default parameters for average anode inner/outer currents;
tpcPadGainT0.y2009.C - added ideal version;
TpcAdcCorrectionB.y2009.C, TpcDriftDistOxygen.y2009.C, TpcLengthCorrectionB.y2009.C, TpcLengthCorrectionB.y2010.C,
TpcMultiplicity.y2009.C, TpcMultiplicity.y2010.C, TpcPhiDirection.y2009.C, TpcPhiDirection.y2010.C,
TpcSecRowB.y2009.C, TpcZCorrectionB.y2009.C, TpcZCorrectionB.y2010.C, TpcdCharge.y2009.C, TpcdCharge.y2010.C,
TpcdEdxCor.y2009.C, TpcdEdxCor.y2010.C, TpcdXCorrection.y2009.C, TpcdXCorrection.y2010.C, tpcAltroParams.20080219.143436.C;
tpcAltroParams.C, tpcAltroParams.y2008.C, tpcAltroParams.y2009.C, tpcAltroParams.y2010.C, tpcAnodeHV.y2009.C,
tpcAnodeHVavg.y2009.C, tpcGasTemperature.y2009.C, tpcGasTemperature.y2010.C, tpcMethaneIn.y2009.C,
tpcMethaneIn.y2010.C, tpcPressureB.y2009.C, tpcWaterOut.y2009.C, tpcWaterOut.y2010.C - added default dE/dx calibration tables, replaced TpcAltroParameters and asic_thresholds_tpx by tpcAltroParam;
tpcGas.C, tpcGas.y2003.C, tpcGas.y2004.C, tpcGas.y2005.C, tpcGas.y2006.C, tpcGas.y2007.C, tpcGas.y2008.C, tpcGas.y2009.C, tpcGas.y2010.C - added nominal gas tables;
tpcAnodeHVavg.y2001.C, tpcAnodeHVavg.y2002.C, tpcAnodeHVavg.y2003.C ,tpcAnodeHVavg.y2004.C, tpcAnodeHVavg.y2005.C, tpcAnodeHVavg.y2006.C, tpcAnodeHVavg.y2007.C, tpcAnodeHVavg.y2008.C, tpcAnodeHVavg.y2009.C - removed;
TpcAltroParameters.20071115.000000.C,TpcAltroParameters.20080128.000000.C,TpcAltroParameters.20080623.000000.C, TpcAltroParameters.20080624.000000.C, TpcAltroParameters.C,TpcAltroParameters.y2010.C, TpcLengthCorrection.C, TpcdXCorrection.C, asic_thresholds_tpx.y2008.C, asic_thresholds_tpx.y2009.C, asic_thresholds_tpx.y2010.C, tpcGain.C - removed files;
Geometry/svt/LadderOnShell.C, LadderOnShell.y2005.C, LadderOnShell.y2006.C, LadderOnShell.y2007.C, WaferOnLadder.y2001.C, WaferOnLadder.y2005.C, WaferOnLadder.y2006.C, WaferOnLadder.y2007.C,ShellOnGlobal.y2001.C, ShellOnGlobal.y2005.C, ShellOnGlobal.y2006.C ShellOnGlobal.y2007.C, LadderOnSurvey.y2001.C, LadderOnSurvey.y2005.C, LadderOnSurvey.y2006.C, LadderOnSurvey.y2007.C, SvtOnGlobal.y2001.C, SvtOnGlobal.y2005.C, SvtOnGlobal.y2006.C, SvtOnGlobal.y2007.C - added default (ideal) simulation position for SVT;
Geometry/ssd/SsdLaddersOnSectors.C, SsdLaddersOnSectors.y2005.C, SsdLaddersOnSectors.y2006.C SsdLaddersOnSectors.y2007.C, SsdOnGlobal.C SsdOnGlobal.y2005.C SsdOnGlobal.y2006.C, SsdOnGlobal.y2007.C SsdSectorsOnGlobal.C, SsdSectorsOnGlobal.y2005.C SsdSectorsOnGlobal.y2006.C, SsdSectorsOnGlobal.y2007.C, SsdWafersOnLadders.C, SsdWafersOnLadders.y2005.C, SsdWafersOnLadders.y2006.C, SsdWafersOnLadders.y2007.C - added default (simulation) tables for SSD;
Geometry/tpc/tpcGlobalPosition.C, tpcGlobalPosition.y2001.C, tpcGlobalPosition.y2003.C, tpcGlobalPosition.y2004.C, tpcGlobalPosition.y2005.C, tpcGlobalPosition.y2006.C, tpcGlobalPosition.y2007.C, tpcGlobalPosition.y2008.C, tpcGlobalPosition.y2009.C, tpcGlobalPosition.y2010.C - added default (ideal) global parameters TPC;
Geometry/tpc/Sector_01/ tpcSectorPosition.C, tpcSectorPosition.y2001.C, tpcSectorPosition.y2003.C, tpcSectorPosition.y2004.C, tpcSectorPosition.y2005.C, tpcSectorPosition.y2006.C, tpcSectorPosition.y2007.C, tpcSectorPosition.y2008.C, tpcSectorPosition.y2009.C, tpcSectorPosition.y2010.C - added default (ideal) parameters for each TPC sector;
... up to Sector 24
Geometry/tpc/Sector_24 tpcSectorPosition.C, tpcSectorPosition.y2001.C, tpcSectorPosition.y2003.C, tpcSectorPosition.y2004.C, tpcSectorPosition.y2005.C, tpcSectorPosition.y2006.C, tpcSectorPosition.y2007.C, tpcSectorPosition.y2008.C, tpcSectorPosition.y2009.C, tpcSectorPosition.y2010.C - added default (ideal) parameters for each TPC sector;
VmcGeometry/ y2009b.h y2010a.h - added new geometry versions to support simulation requests;
RunLog/onl/
starClockOnl.y2001.C, starClockOnl.y2003.C, starClockOnl.y2004.C, starClockOnl.y2005.C, starClockOnl.y2006.C, starClockOnl.y2007.C, starClockOnl.y2008.C, starClockOnl.y2009.C, starClockOnl.y2010.C - added default (ideal) parameters for TPC starClock;
tpcRDOMasks.C, tpcRDOMasks.y2003.C, tpcRDOMasks.y2004.C, tpcRDOMasks.y2005.C, tpcRDOMasks.y2006.C, tpcRDOMasks.y2007.C, tpcRDOMasks.y2008.C, tpcRDOMasks.y2009.C, tpcRDOMasks.y2010.C - added default (ideal) parameters for TPC RDO masks;
StDb
idl/tpcAvCurrent.idl - added table for average anode inner/outer currents and accumulated charge;
tpcAltroParams.idl - added new file to reformat Altro parameters;
QtRoot
qtgui/Module.mk, qtgui.pro - merged with the ROOT CERN version;
qtgui/inc/TQtRootCommandCombo.h - modified to adjust RootCommand to meet the new ROOT requerement;
TQtRootCommandCombo.h - set the horizontal size policy to Ignore;
TQtCommandPlugin.h, TQtRedirectOutputGuard.h, TQtTextEditor.h, TRedirectGuardInterface.h - added files to merge with ROOT CERN version;
qtgui/src/TQtRootCommandCombo.cxx - modified to adjust RootCommand to meet the new ROOT requirement;
TQtRootCommandCombo.cxx - set the horizontal size policy to Ignore;
TQtCanvasImp.cxx, TQtGui.cxx, TQtRootAction.cxx - modified to merge with the ROOT CERN version;
TQtCommandPlugin.cxx, TQtRootCommand.ui, TQtTextEditor.cxx, TRedirectGuardInterface.cxx - added new files to merge with the ROOT CERN version;
qt/inc/TQtRootSlot.h - added end-of-line method;
qt/src/TQtRootSlot.cxx - added end-of-line method;
trunk/qt/ Module.mk Module.root.5.11.mk - modified to merge BNL SVN and STAR CVS;
trunk/qt/inc/LinkDef.h, TGQt.h, TGQtGL.h, TObjectExecute.h, TQMimeTypes.h, TQtApplication.h, TQtBrush.h, TQtClientFilter.h, TQtClientGuard.h, TQtClientWidget.h, TQtEmitter.h, TQtEvent.h, TQtEventQueue.h, TQtLock.h, TQtMarker.h, TQtPadFont.h, TQtPen.h, TQtRConfig.h, TQtRootApplication.h, TQtRootSlot.h, TQtSymbolCodec.h, TQtTimer.h, TQtUtil.h, TQtWidget.h, TVirtualX.interface.h, TWaitCondition.h, rootcint.pri - modified to merge BNL SVN and STAR CVS;
trunk/qt/src/GQtGUI.cxx, TGQt.cxx, TGQtDummy.cxx, TGQtGL.cxx, TQMimeTypes.cxx, TQtApplication.cxx, TQtBrush.cxx, TQtClientFilter.cxx, TQtClientGuard.cxx, TQtClientWidget.cxx, TQtEvent.cxx, TQtEventQueue.cxx, TQtMarker.cxx, TQtPadFont.cxx, TQtPen.cxx, TQtRootApplication.cxx, TQtRootSlot.cxx, TQtSymbolCodec.cxx, TQtTimer.cxx, TQtWidget.cxx - modified to merge BNL SVN and STAR CVS;
- April 27, 2010
new library SL10g tagged as SL10g has been created and built on SL4.4 and SL5.3 platforms. Library was tested and released on April 28.
Next codes have been updated:
StAnalysisUtilities
StHistUtil.cxx - modified to use hobj pointer to ensure proper handling with reference hists; fixed bug with AddHists when some files are missing hists;
StBFChain
BigFullChain.h, StBFChain.cxx - added option UseEventVertex in order to use primary vertex in StBTofCalibMaker; replaced UseEventVertex to UseProjectedVertex for StBTofCalibMaker;
StBFChain.cxx - modified to close the local logger at Finish, bug fixed #1911;
StBTofCalibMaker
StBTofCalibMaker.cxx - modified to change the default to use event vertex for start position for Run10 AuAu;
introduced "UseProjectedVertex" maker attribute to allow selection of the standard event vertex or one determined by track extrapolation;
StBTofUtil
StBTofGeometry.cxx - modified to include X0 (radial offset) in the tray alignment;
StChain
StMaker.cxx - shift y2010 tag from 20091215 to 20091214 because beginTime for the first tpcPadGainT0 for run 2010 was set 20091214.215645;
dst_bfc_status.idl - removed;
StChain.cxx, StMaker.cxx - modified to close the local logger at Finish, bug #1911 fixed;
StDbLib
StDbServiceBroker.cxx/h - modified to break infinite loop if happenes; corrected propagation of error status for StDbServiceBroker;
St_db_Maker
St_db_Maker.h - method 'drop' added ; set time StMaker::SetDateTime;
StdEdxY2Maker
StdEdxY2Maker.cxx - modified to expand time for Run 2010;
StEvent
StEventClusteringHints.cxx - added StTriggerData2009;
StTriggerData2009.cxx, StTriggerData2009.h - added streamer and new access function for BBC large tile earliest TAC;
StTriggerData.cxx, StTriggerData.h - added new access function for BBC large tile earliest TAC;
StEventLinkDef.h - changed for Trigger Data;
StEventUtilities
StuDraw3DEvent.cxx, StuDraw3DEvent.h - added ftpcHits method to render Ftpc hos from StEvent;
StFtpcClusterMaker
StFtpcClusterFinder.cc, StFtpcClusterMaker.cxx, StFtpcDbReader.cc/hh - modified to swap data for RDO6,RDO7 FTPC East when Calibrations_ftpc/ftpcElectronics->swapRDO6RDO7East=1;
StFtpcGasUtilities.cc - modified to use the default temperatures for all runs taken in the period of time from "2010-04-13 00:20:01" to "2010-04-19 20:39:00";
StJetMaker
StBET4pMaker.cxx/h - added DCAx, DCAy, chi2, chi2prob, and vertex;
StJetSkimEventMaker.cxx - added nBTOFMatch ; modified to calculate nBTOFMatch for year >= 2009;
StJetReader.h, StJetReader.cxx - reshaped; added sanity checks;
StBET4pMaker.cxx, StBET4pMaker.h, StFourPMaker.h, StJetMaker.cxx, StJetMaker.h - modified to return multiple vertices all with positive rank and pass associated tracks and towers to jet finder to build jets;
mudst/StjEEMCMuDst.cxx - corrected calculation of EEMC tower IDs;
StjTPCMuDst.cxx - added DCAx, DCAy, chi2, chi2prob, and vertex;
StjTPCMuDst.cxx, StjTPCMuDst.h - modified to return multiple vertices all with positive rank and pass associated tracks and towers to jet finder to build jets;
emulator/StjeJetEventTreeWriter.cxx - corrected tower momentum for z-vertex;
StBET4pMakerImpBuilder.cxx, StBET4pMakerImpBuilder.h, StMuTrackEmu.h, StjeJetEventTreeWriter.cxx, StjeTrackListToStMuTrackFourVecList.cxx - added DCAx, DCAy, chi2, chi2prob, vertex and use2009Cuts() for chi2 cut;
StBET4pMakerImp.cxx/h, StMuTrackEmu.h, StjeDefaultJetTreeWriter.cxx/h, StjeJetEventTreeWriter.cxx/h, StjeParticleCollector.cxx/h, StjeTrackListToStMuTrackFourVecList.cxx, StjeTreeWriter.h - modified to return multiple vertices all with positive rank and pass associated tracks and towers to jet finder to build jets;
StjeJetEventTreeWriter.cxx - added pointer to parent vertex in jets ;
tracks/StjTrackCut.h, StjTrackCutDca.h, StjTrackCutDcaPtDependent.h, StjTrackCutEta.h, StjTrackCutFlag.h, StjTrackCutNHits.h, StjTrackCutPossibleHitRatio.h, StjTrackList.h - added DCAx, DCAy, chi2, chi2prob, and vertex;
StjTrackCutChi2.h - added new file ;
StjTrackList.h - modified to return multiple vertices all with positive rank and pass associated tracks and towers to jet finder to build jets;
StGammaMaker
StGammaMaker.cxx - added EEMC cluster maker cuts;
St_geant_Maker
Embed/ StPrepEmbedMaker.cxx, StPrepEmbedMaker.h - moved from St_geant_Maker for embedding;
StMCFilter
dijet.cnf - added dijet filter configuration file;
StDijetFilter.cxx, StDijetFilter.h - new dijet filter code ;
StMiniMcMaker
StMiniMcMaker.cxx, StMiniMcMaker.h - added corrections for AppendMCDaughterTrack ;
StPmdClusterMaker StPmdClustering.h, StPmdClustering.cxx, StPmdClusterMaker.h, StPmdClusterMaker.cxx - implemented Clustering with option to turn calibration refineclustering on/off;
StPmdClustering.cxx - removed refinedcluidet2.dat; no refined clusters in 2010 data;
StPmdReadMaker
StPmdReadMaker.cxx, StPmdReadMaker.h - modified for new DAQ;
StPmdUtil
StPmdGeom.h, StPmdGeom.cxx - introduced functions to draw XY and eta/phi coverage & modifcations to mapping;
StarClassLibrary StAntiLambda1520.cc, StLambda1520.cc, StParticleTable.cc, StarPDGEncoding.hh - redefined the geant ID of the lambda(1520) from 706 to 995, to make consistent with usage in embedding group ;
StStarLogger
StUCMAppender.cxx - modified to add the extra protection and remove the redundant variable; turned on Web service for the nightly library jobs; fixed bug #1911;
StLoggerManager.cxx, StLoggerManager.h, StUCMAppender.h - fixed bug #1911, improved interface for log4cxx;
logging/Makefile, TxEventLog.cpp/h, TxEventLogCollector.cpp/h, TxEventLogFile.cpp/h, TxEventLogMain.C, TxEventLogWeb.cpp/h, TxUCMCollector.cxx/h, testUcm.C, testUcm.csh - modified to add Web service interface ;
TxEventLogFactory.cxx - bug fixed;
TxEventLogWeb.cpp - added newtask message delay ;
TxEventLogFile.cpp - added assert to watch the wrong method;
TxEventLogCollector.cpp, TxEventLogFile.cpp, TxEventLogWeb.cpp, TxUCMCollector.cxx, TxUCMConstants.h - added 240 msec delay to record the task;
StarRoot
KFParticleBase.cxx, KFParticleBase.h, KFParticle.cxx, KFParticle.h, KFParticleLinkDef.h, KFVertex.cxx, KFVertex.h, MTrack.cxx, MTrack.h, MVertex.cxx, MVertex.h, VVertex.cxx, VVertex.h - added new files for cellular automation tack seeding codes, KFParticle;
StarRootLinkDef.h - modified for implemented KFParticle;
TPolynomial.cxx, TPolynomial.h - added TPolynomial ;
THelixTrack.cxx, THelixTrack.h - added method 'Move' with derivatives ;
StMultiKeyMap.cxx, StMultiKeyMap.h - added method 'Update', random_shuffle used now;
Sti
StiTrackNode.cxx - modified to make minimal error for ptin =0 ;
StiTrackNodeHelper.cxx, StiKalmanTrackNode.cxx, StiKalmanTrack.cxx, StiNodePars.h - modified for mag filed = 0;
StSvtSimulationMaker
StSvtOnlineSeqAdjSimMaker.cxx - fixed an improper if-statement to turn off sequence adjusting; added Pedestal adjustment variable;
StSvtElectronCloud.cc - fixed a problem for SVT hits near eta=0;
StTreeMaker
StTreeMaker.cxx, StTreeMaker.h - modified to move table dst_bfc_status from StChain to StTreeMaker;
StTreeMakerLinkDef.h - new file added;
StTriggerUtilities
StTriggerSimuMaker.cxx, StTriggerSimuMaker.h - included triggers before 2009; modified;
Bemc/StBemcTriggerSimu.h - implemented barrelHighTowerAdc(); included triggers before 2009;
Eemc/StEemcTriggerHisto.cxx, StEemcTriggerSimu.cxx, StEemcTriggerSimu.h - included triggers before 2009;
L2Emulator/StGenericL2Emulator2009.h, StGenericL2Emulator2009.cxx, StL2_2009EmulatorMaker.cxx, StL2_2009EmulatorMaker.h- added new files for run 2009 jet tree production;
StL2TriggerSimu.cxx, StL2TriggerSimu.h - modified for for run 2009 jet tree production;
L2Emulator/L2algoUtil/ L2VirtualAlgo2009.h, L2VirtualAlgo2009.cxx, L2EmcGeom.h, L2Histo.cxx, L2Histo.h, L2btowCalAlgo09.cxx, L2btowCalAlgo09.h - updated for run 2009 jet tree production;
L2etowCalAlgo09.cxx, L2etowCalAlgo09.h - added new files;
L2Emulator/L2jetAlgo/L2jetAlgo2009.h, L2jetAlgo2009.h-1D, L2jetResults2009.h, L2jetAlgo2009.cxx, L2jetAlgo2009.cxx-1D added new files for run 2009 jet tree production ;
L2pedAlgo09.cxx, L2pedAlgo09.h, L2pedResults2009.h - added new files ;
StTpcRSMaker
StTpcRSMaker.cxx, TpcRS.C modified to use eV now; switched off __ClusterProfile__;
pams
sim/gstar/gstar_micky.g - modified to add uniform Y;
gstar_part.g - redefined the geant ID of the lambda(1520) from 706 to 995, to make consistent with usage in embedding group;
geometry/geometry/geometry.g - added PHMD to y2010 geometry ; restored code to save geometry tag and field setting in the FZD file;
StarDb
Calibrations/tpc/TpcResponseSimulator.C,TpcResponseSimulator.y2009.C,TpcResponseSimulator.y2010.C - added Row Correction;
TpcDriftDistOxygen.y2010.C, TpcLengthCorrectionB.20100101.000000.C, TpcRowQ.20100101.000000.C TpcSecRowB.20100101.000000.root, tpcPressureB.20100101.000000.C - added preliminary dEdx calibrations for run 2010 based on HLT sample;
TpcResponseSimulator.C, TpcResponseSimulator.y2009.C, TpcResponseSimulator.y2010.C - added for TPC response simulator;
StDb
idl/vpdTotCorr.idl - added algoritm flag to differentiate between vpd and non-vpd algos;
servers/Catalog.xml - removed;
dbLoadBalancerLocalConfig_BNL.xml, dbLoadBalancerLocalConfig_LBL.xml - removed, moved to STAR_PATH/conf;
dbLoadBalancerConfig.new - removed;
OnlTools
StOnlineDisplay/ TEmcSizeProvider.cxx, gl3Data.cxx - fixed compilation warnings;
OnlinePlots/HistogramGroups/BESHistogramGroup.cxx, BESHistogramGroup.h - added new code for Beam Energy Scan plots;
L2UpsilonMassHistogramGroup.cxx, L2UpsilonTowersHistogramGroup.cxx - initialized L2UpsilonResult;
BESHistogramGroup.cxx, FMSHistogramGroup.cxx, L2UpsilonCountsHistogramGroup.cxx, MTDtriggerinfoHistogramGroup.cxx, TOFL0HistogramGroup.cxx, pp2ppHistogramGroup.cxx - modified to use linear for plots with no entries;
BESHistogramGroup.cxx - histogram range and legend updated;
OnlinePlots/Infrastructure/GroupCollection.cxx - inroduced plots for Beam Energy Scan;
EvpUtil.cxx - modified to use linear for plots with no entries;
OnlinePlots/Scripts/EndOfRunScript, ServerLoop - updated scripts for Qt4 ;
QtRoot
qt/inc/TVirtualX.interface.h - modified to synchronize TVirtualX interface with ROOT;
TQtMarker.h - added the connected marker option;
qt/src/GQtGUI.cxx - modified to synchronize TVirtualX interface with ROOT;
TQtWidget.cxx - modified to eliminate the Q3SUPPORT depricated API ;
TQtMarker.cxx - added the connected marker option; reduced lineFactor to 10000 to fit Short_t type;
GQtGUI.cxx - fixed compilation warnings;
qtgl/qtcoin/ qtcoin.pro - added qtgui header path;
qtgui/inc/TQtMarkerSelectButton.h, TQtObjectListItem.h, TQtTabValidator.h - fixed compilation warnings;
qtgui/src/TQtBrowserImp.cxx, TQtCanvasImp.cxx, TQtRootBrowserImp.cxx, TQtToolBar.cxx, TQtZoomPadWidget.cxx, TQtCanvasImp.cxx, TQtRootBrowserImp.cxx - fixed compilation warnings;
- April 2, 2010
new library SL10f tagged as SL10f has been created and built on SL4.4 and SL5.3 platforms. Library was tested and released on April 5.
Next codes have been updated:
asps
Simulation/starsim/geant/gdecay.F - bug fixed;
Simulation/starsim/atmain/qnext.age - modified to move guoute after filter; account number of events by filter;
gukine.age, guout.age, qnext.age - modified to set max rejects to 1e6;
StBTofMatchMaker
StBTofMatchMaker.cxx - fixed bug in setting index2Primary in processMuDst;
StDetectorDbMaker
StDetectorDbChairs.cxx, St_TpcResponseSimulatorC.h - modified to add chair for table with TpcRS parameters;
StEvent
StTpcHit.cxx, StTpcHit.h - added methods to modify hit content;
St_geant_Maker
St_geant_Maker.cxx - fixed the geometry leak;
St_geom_Maker
GeomBrowser.cxx - fixed bug ;
StJetMaker
tracks/StjTrackCutDcaPtDependent.h - fixed bug in pt-dependent DCA cut logic;
RTS
include/RC_Config.h, iccp2k.h - added extended payloads;
StStarLogger
logger/StDataException.cxx/h, StDbFieldI.cxx/h, StRecord.cxx/h, StUCMException.cxx/h,
TxEventLog.cpp/h, TxEventLogCollector.cpp/h, TxEventLogFactory.h, TxEventLogFile.cpp/h, TxEventLogWeb.cpp/h,
TxUCMCollector.cxx/h, TxUCMConstants.h, logging.i, txLoggingTest.java - modified to propagate new version of UCM;
FieldList.cxx/h, RecordList.cxx/h, StDbFieldIIterator.cxx/h, StRecordIterator.cxx/h, StUcmEvent.cxx/h, StUcmEvents.cxx/h, StUcmJob.cxx/h, StUcmTask.cxx/h, testUcm.C, testUcm.csh, testUcm.java added new files for ne version of UCM;
StarRoot
StBiTree.cxx, StBiTree.h, StDraw3D.cxx - fixe the vector population bug;
Sti
StiKalmanTrackNode.cxx - fixed zero field problem;
StSvtSimulationMaker
StSvtOnlineSeqAdjSimMaker.cxx - modified to turn online sequence adjusting back on in anticipation of setting up a database;
StTpcDb
StTpcDbLinkDef.h - added to restore export of gStTpcDb to Cint;
StTpcHitMaker
StTpcHitMaker.cxx, StTpcHitMaker.h, StTpcRTSHitMaker.cxx - added AfterBurner;
StTpcRSMaker
StTpcRSMaker.cxx, StTpcRSMaker.h, TpcRS.C - modified due to implemented new parameters table; added checking for TPC if it is switched off at all;
StarDb
Calibrations/tpc/TpcResponseSimulator.C, TpcResponseSimulator.y2009.C - added parameters for TpcRS ;
TpcResponseSimulator.y2009.C - modified ;
TpcResponseSimulator.y2010.C - added new file ;
TpcSecRowX.C, TpcSecRowX.y2005.C, TpcSecRowX.y2009.C - removed;
tpcAnodeHVavg.C - added nominal anode voltages for old runs;
StDb
idl/TpcResponseSimulator.idl - added new table with TpcRS parameters;
idl/ftpcElectronics.idl - added flag to determine if RDO6,RDO7 in Ftpc East should be swapped;
OnlTools
OnlinePlots/QEvpClient/PresenterConnect.h/cxx, PresenterGui.h/cxx - bug fixed to adjust to Q4 API application;
ServerInfo.h, ServerInfoUi.ui - adjust ServerInfo panel to Q4 API;
TriggerDetectorBitsInfo.h, TriggerDetectorBitsInfoUi.ui - modified to make TriggerDetectorBitsInfoUi.ui Qt4 API compliant;
EventInfoUi.ui.qt3, ServerInfoUi.ui.qt3, uilink.qt3, uilink.qt4 - removed;
EventInfoUi.ui.Qt4, PresenterGui.h.Qt4, PresenterGui.h.qt3, ServerInfoUi.ui.Qt4, TriggerDetectorBitsInfoUi.ui.Qt4, TriggerDetectorBitsInfoUi.ui.qt3 - removed;
PresenterGui.cxx, PresenterGui.h - modified to adjust to Q4 API; corrected tooltip API; added stretch space above the progress bar;
PresenterConnect.cxx, PresenterGui.cxx - added Qt4 compliant ascii interface;
- March 21, 2010
new library SL10e tagged as SL10e has been created and built on SL4.4 and SL5.3 platforms. Library was tested and released on March 23.
Next codes have been updated:
asps
Simulation/starsim/geant/gdecay.F - for year < 2009 added PI0 Daltz decay switches;
StAnalysisUtilities
StHistUtil.cxx - modified to Include analysis score/result on plots;
StHistUtil.cxx/h - added additional capability for saving images of each pad;
StBFChain
BigFullChain.h - modified to add StDetectorDbMaker in StTpcDb due to changes in StDetectorDbMaker; added tag for StUtilities; added dependence StTpcRSMaker on StdEdxY2Maker;
StBTofCalibMaker
StBTofCalibMaker.cxx/h - added cleanup for PID variables in MuBTofPidTraits when processing MuDst:
StBTofMatchMaker
StBTofMatchMaker.cxx - modified to remove primary check for globals at projection in accessing MuDst function to improved speed of processing; addition in the initial clean up for the primary tracks;
StBTofMatchMaker.h/cxx - added getBTofGeom() function for outside use; removed AddConst(btofGeometry) to avoid crash due to duplication; TOT selection window opened to 40 ns; added CPU timer printouts for processStEvent() function;
StChain
StChain.cxx - modified to terminate StChain::EventLoop with the extrenal TERM 15 signal; simplified to Close/Terminate interface;
StRTSBaseMaker.cxx - fixed bug #1880;
StDetectorDbMaker
St_tpcRDOMasksC.h, St_TpcSecRowCorC.h, StDetectorDbChairs.cxx - modified ;
St_tpcCorrectionC.h, St_TpcdChargeC.h, St_TpcdEdxCorC.h, St_TpcDriftDistOxygenC.h, St_TpcdXCorrectionBC.h, St_tpcGasTemperatureC.h, St_TpcLengthCorrectionBC.h, St_tpcMethaneInC.h, St_TpcMultiplicityC.h, St_TpcPhiDirectionC.h, St_tpcPressureBC.h, St_TpcRowQC.h, St_tpcSecRowBC.h, St_TpcSecRowBC.h, St_tpcSecRowCC.h, St_TpcSecRowCC.h, St_tpcSecRowXC.h, St_TpcSecRowXC.h, St_TpcSpaceChargeC.h, St_tpcWaterOutC.h, St_TpcZCorrectionBC.h, St_TpcZDCC.h, St_tpcWaterOutC.h, St_TpcZCorrectionBC.h, St_TpcZDCC.h - new files added;
StDbUtilities
StMagUtilities.cxx/h - modified to use sector number for better handle of post-membrane hits, preparation for sector-by-sector GL, and GGVoltage errors;
StdEdxY2Maker
StdEdxY2Maker.cxx, StdEdxY2Maker.h, StdEdxY2MakerLinkDef.h, dEdxTrackY2.h - modified to move StTpcdEdxCorrection to StdEdxY2Maker to avoid dependence of StTpcDb on StDetectorDbMaker ;
StTpcdEdxCorrection.cxx, StTpcdEdxCorrection.h - added new files ;
StEmbeddingUtilities
StEmbeddingQA.cxx,StEmbeddingQADraw.cxx/h - modified to add constraint on z-vertex cut, MC vertices QA plots separated into 2 pages;
StEvent
StTpcHit.cxx - added hit id;
StFlowMaker
StFlowMaker.h, StFlowSelection.h - adjusted to ROOT 5.22 ;
StFlowMaker.cxx, StFlowTrack.h, StFlowConstants.h - modified to add StFlowDirectCumulantMaker ;
StFlowAnalysisMaker
StFlowDirectCumulantMaker.h, StFlowDirectCumulantMaker.cxx - added new files;
StGammaMaker
StGammaScheduleMaker.cxx - fixed default behavior when no timestamp is given;
St_geant_Maker
St_geant_Maker.cxx - fixed bug #1860 by replacing skip => trig;
StJetMaker
StJetSkimEventMaker.cxx - updated for run 2009 ; addeded protection against null pointers: trigSimu->bemc, trigSimu->eemc and trigSimu->emc;
StJetReader.cxx, StJetSkimEventMaker.cxx - updated for L2;
emulator/StjeDefaultJetTreeWriter.cxx, StjeJetEventTreeWriter.cxx - updated for run 2009;
mudst/StjEEMCMuDst.cxx - updated;
StjTPCMuDst.cxx - added dcaX and dcaY;
tracks/StjTrackList.h - added dcaX and dcaY;
tree/StjTrackListReader.cxx, StjTrackListReader.h, StjTrackListWriter.cxx, StjTrackListWriter.h - added dcaX and dcaY;
StarClassLibrary
StAntiLambda1520.cc, StAntiLambda1520.hh, StLambda1520.cc, StLambda1520.hh - added the Lambda 1520 and antiparticle;
StAntiLambda1520.cc, StLambda1520.cc, StParticleTable.cc - added set the pdg ID to geant ID mapping;
Sti
StiTpcSeedFinder.cxx - added EXTRAPOLATION_CUT, OVERLAP_REJECTION and KINK_REJECTION flags;
StiTpc
StiTpcDetectorBuilder.cxx, StiTpcDetectorBuilder.h - replaced St_tpcAnodeHVC by St_tpcAnodeHVavgC;
StStrangeMuDstMaker
StStrangeControllerBase.cxx - fixed bug#1869; remove ROOT 3.x related workaround;
StTpcHitMaker
StTpcHitMaker.cxx/h, StTpcRTSHitMaker.cxx - added hit Id;
StTpcDb
StTpcDbMaker.cxx - modified to switch from St_tpcAnodeHVC => St_tpcAnodeHVavgC ;
St_tpcCorrectionC.cxx, St_tpcCorrectionC.h - removed;
StTpcdEdxCorrection.cxx, StTpcdEdxCorrection.h - modified to eliminate double TpcSecRowB;
StTpcDbMaker.cxx - modified to move StTpcdEdxCorrection to StdEdxY2Maker to avoid dependence of StTpcDb on StDetectorDbMaker;
StTpcDbLinkDef.h, StTpcdEdxCorrection.cxx, StTpcdEdxCorrection.h - removed files ;
StTpcHitMoverMaker
StTpcHitMoverMaker.cxx - modified to pass sector number to StMagUtilities;
StTpcRSMaker
StTpcRSMaker.cxx, StTpcRSMaker.h, TpcRS.C - modified to take longitudinal Diffusion from Laser track fit, added Gating Grid; modified to make aware about TpcRDOMasks; moved diffusion and sec/row correction in DB;
StTpcRSMaker.h - StTpcdEdxCorrection moved to StdEdxY2Maker to avoid dependence of StTpcDb on StDetectorDbMaker;
StTriggerUtilities
StTriggerSimuMaker.cxx/h, StTriggerSimuResult.cxx/h - updated for run 2009;
Bemc/StBemcTriggerSimu.cxx/h - updated for run 2009; fixed jet patch id bug;
Eemc/EemcTrigUtil.cxx, StEemcTriggerSimu.cxx/h - updated for run 2009;
Emc/StEmcTriggerSimu.cxx/h - updated for run 2009;
StDSMUtilities/DSMLayer.hh, StDSM2009Utilities.hh, TCU.cc, TCU.hh, TriggerDefinition.hh - updated for run 2009;
StMuDSTMaker
COMMON/StMuDst.cxx, StMuDst.h, StMuDstMaker.cxx, StMuTrack.cxx - modified to fill global tracks with an index to primary at birth; added StMuDst::fixTrackIndicesG(), which is used for matching the primary track indices to global tracks;
StMuDst.cxx - added null point protection in StMuDst::fixTrackIndicesG(int mult);
StPass0CalibMaker
StSpaceChargeEbyEMaker.cxx - modified to reduce positional biases in GridLeak measurement; modified to pass sector number to StMagUtilities, corrected unsigned int usage;
StPmdUtil
StPmdGeom.cxx - modified to include year 2011 as year number and also changed in mapping after day 48;
RTS
src/DAQ_BSMD/daq_bsmd.cxx/h - added online version checking;
src/DAQ_TPX/tpxCore.cxx, tpxStat.cxx, tpxStat.h - modified;
src/DAQ_PMD/daq_pmd.h, pmd.h - modified to make DAQ_PMD offline framework compilant with new DAQ reader;
StarRoot
StDraw3D.cxx - modified to hide the redundant TCanvas; cleanup the ROOT matrix list to improve performance; fixed the memory leak;
StDraw3D.cxx, StDraw3D.h - changed gdb option;
StCloseFileOnTerminate.cxx/h - new class created to close all open ROOT files as soon as job is about to be killed by batch; modified to terminate StChain::EventLoop with the extrenal TERM 15 signal; Simplified Close/Terminate interface;
StBiTree.cxx/h, StBiTreeIter.cxx/h - added new files to implement Binary Tree container for quick space point sorting/searching; modified quick bi-tree for multi-dimensional points sorting
pams
gen/herwig/herwig6507_tupl.mk - modified to compile herwig using gfortran;
sim/gstar/gstar_part.g - Lambda1520 added;
StarDb
Calibrations/tpc/TpcSecRowX.C, TpcSecRowX.y2005.C, TpcSecRowX.y2009.C - added new tables for simulation;
TpcSecRowB.y2010.C, TpcSecRowB.C - modified;
QtRoot
qtRoot.pro - modified to get rid of the Q3 support option;
qt/inc/TQtMarker.h - added the capability to draw the bold markers;
qt/src/TGQt.cxx, TQtMarker.cxx - added the capability to draw the bold markers;
qtgl/qtgl/qtgl.pro - modified to get rid of the Q3 support option;
qtgl/qtgl/src/TQtGLViewerWidget.cxx, TQtGLViewerImp.cxx - modified to get rid of the Q3 support option;
qtgl/qtcoin/src/TQtCoinWidget.cxx - added method to scale the geometry by demand;
TQtCoinViewerImp.cxx - added gROOT->Interrupt menu; fixed signal name;
qtgl/qtcoin/inc/TQtCoinWidget.h - added method to scale the geometry by demand;
TQtCoinViewerImp.h - added gROOT->Interrupt menu;
qtExamples/HelloOpenGL/HelloOpenGL.pro - modified to get rid of the Q3 support option;
OnlTools
StOnlineDisplay/OnlineDisplay.C, StDataReadModule.cxx/h, StSteeringModule.cxx - added some optimization;
StSteeringModule.cxx - changed the delay default;
StDataReadModule.cxx, StSteeringModule.cxx/h - added SetDrawOption ;
- February 18, 2010
new library SL10d tagged as SL10d has been created and built on SL4.4 and SL5.3 platforms. Library was tested and released on February 19.
Next codes have been updated:
BFChain
BigFullChain.h - added dependence of tpcDB on magF ;
StBFChain.cxx - added options accumulation for siglenton makers; modified to ignore request for 2-nd St_geant_Maker call to fix embedding chain bfcMixer_TpcSvtSsd.C ;
StBbcSimulationMaker
StBbcSimulationMaker.cxx - bug #1819 causes missing bbc info was fixed;
StChain
StMaker.cxx/h - modified to remove GetValidity; replaced with St_db_Maker::GetValidity();
StRTSBaseMaker.cxx, StRTSBaseMaker.h - modified to add method GetNextLegacy(int);
StDbLib
MysqlDb.cc - indirect log info added;
StDetectorDbMaker
StDetectorDbChairs.cxx - modified to make GetValidity static;
St_db_Maker
St_db_Maker.cxx, St_db_Maker.h - modified to make GetValidity static;
StEEmcSimulatorMaker
StEEmcMixerMaker.cxx - modified to use "Form" to get around deprecated conversion from string constant to char *;
StEEmcSlowMaker.cxx, StEEmcSlowMaker.h - added an option to shift EEMC gains in the slow simulator;
StEmbeddingUtilities
Added eventid, runid and number of particles per event for event-wise QA; fixed bugs for delta pt vs pt histogram ;
StEmbeddingQAUtilities.cxx - added TStyle date attributes;
StEmbeddingQATrack.h, StEmbeddingQATrack.cxx, StEmbeddingQA.h, StEmbeddingQA.cxx - added parent-parent geantid ;
StEmbeddingQADraw.h, StEmbeddingQADraw.cxx - modified to print PDF file only for all QA plots;
StEmcUtil
database/StBemcTables.cxx, StEmcMappingDb.cxx - modified to make GetValidity static;
StBemcTablesWriter.cxx, StEmcDbHandler.cxx, StEmcDbHandler.h, StEmcDecoder.cxx, StEmcMappingDb.cxx - updated to protect against NULL pointers ;
StEventUtilities
StEventHelper.cxx/h - StEventHitIter development;
StFlowAnalysisMaker
StFlowAnalysisMaker.cxx - modified to change mHistCTBvsZDC2D from filling with ZDC_e + ZDC_e to filling with ZDC_e + ZDC_w;
StGammaMaker
StGammaCandidateMaker.cxx - modified to protect against StEmcPosition::getNextId returning 0 for non-existent strips;
St_geant_Maker
StPrepEmbedMaker.cxx/h - modified to change default setting of mSpreadMode to kFALSE; modified logic when looking up vertex errors; added backward compatibility for embedding mode;
StMuDSTMaker
COMMON/StuDraw3DMuEvent.cxx/h - added EmcHit method; removed the redundant header files; added the default parameter; added EmcHits;
RTS
include/iccp2k.h, prepareGbPayload.h - updated for for evbx;
src/DAQ_READER/daqReader.cxx/h - added trigger ids to daqFileChopper; fixed bug where reading from directory never got EOR if no token 0;
src/LOG/rtsLogUnix.c - added buffer overflow protection in cmd;
StarClassLibrary
StWMinusBoson.cc/hh, StWPlusBoson.cc/hh, StZZeroBoson.cc/hh - added the W and Z bosons to the particles in the StarClassLibrary; this makes the particles available by name and by PDG id from the StParticleTable;
StAntiDStarMesonZero.cc/hh, StDStarMesonMinus.cc/hh, StDStarMesonPlus.cc/hh, StDStarMesonZero.cc/hh - added the D* mesons (D^{*\pm} and D^{0}/\bar{D^{0}}^{*}; this makes the particles available in the StParticleTable;
StUpsilon.cc/hh, StUpsilon2S.cc/hh, StUpsilon3S.cc/hh - added the upsilon resonances to the StarClassLibrary; this makes the particles available by name and by PDG id in StParticleTable;
StHyperTriton.hh/cc, StDalitz.hh/cc, StarPDGEncoding.hh - added two 'STAR' particle classes; the (fake) Dalitz particle, which is really just a pi0 with its Dalitz decay branch at 100%; tt is added so the embedding team can access it by the geant ID defined in gstar_part.g; the hypertriton is also added;
StParticleTable.cc - modified to add the 'new' particle classes described above to the table; add the existing J/Psi and B mesons to the table;
StAntiSigmaMinus1385.cc/hh, StAntiSigmaPlus1385.cc/hh, StSigmaMinus1385.cc/hh, StSigmaPlus1385.cc/hh - added the Sigma(1385) baryons;
StStarLogger
StUCMAppender.cxx - fixed the logger v.10 append interface;
logging/StDbFieldI.cxx, StDbFieldI.h - modified to generilize list of data-types ; fixed the missed global variable; added StRecord class;<
StRecord.cxx, StRecord.h - added StRecord class;
StarRoot
StDraw3D.cxx/h - added const/non-const style method;
Sti
StiKalmanTrackFinder.cxx/h - added _nPrimTracks for case of fit err;
StiDetectorContainer.cxx - fixed for 64bit;
StiTpcSeedFinder.cxx, StiTpcSeedFinder.h -added TPC seed finder;
StiKalmanTrack.cxx/h, StiKalmanTrackFinder.cxx/h, StiTrack.h, StiTrackFinder.h - added seed quality information;
StiMaker
StiMaker.cxx/h, StiStEventFiller.cxx - added _nPrimTracks;
StiUtilities
StiPullEvent.cxx - initialization fixed ;
StTpcDb
StTpcDb.cxx, StTpcdEdxCorrection.cxx - modified to make GetValidity static;
StTpcEvalMaker
StTpcEval.C, StTpcEvalEvent.cxx/h, StTpcEvalHistograms.cxx/h, StTpcEvalMaker.cxx/h, StTpcEvalOutput.cxx/h - removed;
StTpcRSMaker
StTpcRSMaker.cxx, TpcRS.C - modified to speed up by a factor 3.5 by ignoring individual pad T0;
StTriggerUtilities
Bemc/StBemcTriggerSimu.h - added access functions to get 6-bit DSM ADC for each tower and 6-bit DSM ADC patch sum for each trigger patch ;
StTrsMaker
StTrsMaker.cxx - modified to account prompt hits;
pams
geometry/cavegeo/cavegeo.g - new version of the CAVE is implmented;
shape changed to 4-sided PGON; size of the PGON corresponds to the distance from the beam pipe to the most distant wall in the cave or tunnel;
geometry/wallgeo/wallgeo.g - added new file for walls implementaion, ceiling and floor of the cave and beam tunnels; also implemented a *draft* of the shielding blocks in the beam tunnels;
geometry/fpdmgeo/fpdmgeo.g - modified to define all material locally, so that changes to medium properties do not affect other detectors;
StarDb
Calibrations/tracker/tpcInnerHitError.20090301.000001.C, tpcInnerHitError.20090415.000001.C, tpcOuterHitError.20090301.000001.C,tpcOuterHitError.20090415.000001.C, svtHitError.C - added run 2009 hit errors for pp 500 & 200GeV ; later moved to MySql;
tpcInnerHitError.C, tpcOuterHitError.C, tpcTrackingParameters.C - removed from CVS, moved to MySql;
VmcGeometry/ y2010.h - further development;
StarVMC
geant3/gbase/gzebra.F - added compile time switch so that zebra initializes silently;
QtRoot
qtgl/qtcoin/src/TQtCoinWidget.cxx - fixed the tray rotation from the keyboard; modify to make the decoartion mode unpickable; added the selected 3D point coordinate to the system clipboard; added AutoRedraw to boos the ControlRoom display performance; modified to replace the immediate render with the scheduleRedraw;
qtgl/qtcoin/inc/TQtCoinWidget.h - modify to make the decoration mode unpickable;
qt/inc/TQtClientFilter.h, TQtTimer.h - fixed bug #1852;
qt/src/TQtClientFilter.cxx, TQtTimer.cxx - fixed bug #1852;
OnlTools
OnlinePlots/local/ListOfHistograms.txt - restored PMD histograms;
OnlinePlots/Infrastructure/GroupCollection.cxx - modified to skip testBits;
EvpUtil.cxx - updates for different default account;
OnlinePlots/HistogramGroups/TOFL0HistogramGroup.cxx, TOFtrayHistogramGroup.cxx, TOFupvpdHistogramGroup.cxx, VPDHiHistogramGroup.cxx, VPDHiHistogramGroup.h, VPDHistogramGroup.cxx, VPDHistogramGroup.h - TOF updates;
OnlinePlots/Scripts/CompileOnlinePlots.csh, ServerLoop, memstat.pl - updates for different default account;
- March 1, 2010
SL10c has been updated with StBTofMatchMaker/StBTofMatchMaker.cxx code to move geometry initalization from Init() to InitRun() in order to provide correct TOF DB calibrations data reading;
Library was retagged with tag SL10c_2 .
- February 7, 2010
new library SL10c has been updated with codes below, retagged with tag SL10c_1, and rebuilt on SL4.4 and SL5.3 platforms.Next codes have been updated:
StEvent
StRpsCollection.cxx, StRpsCollection.h - added new member mSiliconBunch and referring access methods;
St_pp2pp_Maker
St_pp2pp_Maker.cxx, St_pp2pp_Maker.h - added functionality to read silicon_bunch data from StEvent;
StMuDSTMaker
COMMON/StMuEvent.cxx, StMuEvent.h - added StMuEvent::btofTrayMultiplicity() to return only TOF hits from trays. Should be looked at instead of ctbSum for run 9 and beyond;
added function StMuEvent::nearestVertexZ(int vtx_id) which returns the z distance of the nearest vertex in relation to vertex vtx_id;
StMuRpsCollection.cxx, StMuRpsCollection.h - added StMuRpsCollection::siliconBunch();
- January 28, 2010
new library SL10c tagged as SL10c has been created and built on SL4.4 and SL5.3 platforms. Library was tested, missing codes and bug fixes updated. Library was released on February 4 .
Main features:
- pp2pp code added to processed with writing pp2pp data in MuDst;
- new FMS code added;
- code updates for dEdx calibrations for pp 200GeV run 2009;
- implemented dEdx and distorsion correction for embedding simulation;
Next codes have been updated:
StAnalysisMaker
StAnalysisMaker.cxx - modified to use dca print out ;
St_base
StStreamFile.h - removed redundant RecordSize method;
StBFChain
StBFChain.cxx - modified to use attributes instead of bit masks; restored fcf for tpcI option;
StBbcSimulationMaker
StBbcSimulationMaker.cxx - bug #1819 fixed caused missing BBC infor in MuDst in simulation;
StDAQMaker
StDAQReader.cxx - removed redundant RecordSize method;
StDbUtilities
StDbUtilitiesLinkDef.h - added enum;
StDetectorDbMaker
StDetectorDbChairs.cxx - modified to switch back St_tpcAnodeHVC => St_tpcAnodeHVavgC for gain versus Voltage dependence;
StdEdxY2Maker
StdEdxY2Maker.cxx, StdEdxY2Maker.h - added new tables;
StEmbeddingUtilities
StEmbeddingQAUtilities.h - added runid function;
StEmbeddingQA.h, StEmbeddingQA.cxx - added histograms for eventid, runnumber, and number of particles;
StEmbeddingQADraw.cxx - modified to fix geantidFound to match the correct geant id; added QA for eventid, runid and number of particles per event;
StEvent
StFmsTriggerDetector.cxx - modified;
StTriggerData2009.cxx - fixed for 64 bit;
StDcaGeometry.cxx/h - added conversion from DCA to x,y,z,px,py,pz;
StEventUtilities
StEventHelper.cxx - modified to use LongKey_t to avoid dependence on ROOT version ;
StGenericVertexMaker
StGenericVertexMaker.cxx/h, StppLMVVertexFinder.cxx/h - modified to switch from bit mask to attributes;
Minuit/StMinuitVertexFinder.cxx/h - modified to switch from bit mask to attributes; fixed vertex bracket;
StFmsHitMaker
StFmsHitMaker.cxx, StFmsHitMaker.h - first release of FMS code;
StMuDSTMaker
COMMON/StMuArrays.cxx/h, StMuDst.cxx/h, StMuDstMaker.cxx/h, StMuEvent.h - modified to add FMS and Roman pot arrays;
StMuFmsCollection.cxx/h, StMuFmsHit.cxx/h, StMuFmsUtil.cxx/h - added new files to proceed with FMS data;
StMuRpsCollection.cxx, StMuRpsCollection.h - added new files to proceed with pp2pp data ;
StMuTypes.hh - added pp2pp and FMS headers;
StPass0CalibMaker
StSpaceChargeEbyEMaker.cxx - modified to use StMagUtilities::Instance instead of using tpcHitMoverMaker; eliminate access to StTpcDbMaker, use directly gStTpcDb;
St_pp2pp_Maker
St_pp2pp_Maker.cxx/h - modified to set the status of Roman Pot to be ~ [ silicon_bunch - bunchId7Bit() ];
StTpcRSMaker
StTpcRSMaker.cxx, StTpcRSMaker.h, TpcRS.C - implemented dE/dx calibration and distortion correction for the embedding simulation;
StTpcDb
StTpcDb.cxx, StTpcDbMaker.cxx, StTpcdEdxCorrection.cxx/h - added new dE/dx calibration tables: TpcRowQ, tpcMethaneIn, tpcWaterOut, TpcZDC;
StTpcHitMoverMaker
StTpcHitMoverMaker.cxx/h - modified for new StMagUtilities;
StVpdCalibMaker
StVpdCalibMaker.cxx - fixed bug in vzVpdFinder outlier bookkeeping;
StStarLogger
logging/StDataException.cxx, StDataException.h, StDbFieldI.cxx, StDbFieldI.h, StUCMException.cxx, StUCMException.h - added ucm components;
StarRoot
TAttr.cxx - removed duplication of tags;
pams
tpc/idl/tpg_detector.idl, tpg_pad_plane.idl, tss_tsspar.idl - removed, moved to StDb/idl;
StarDb
Calibrations/tpc/TpcDriftDistOxygen.20090301.000058.C, TpcDriftDistOxygen.20090415.000057.C, TpcLengthCorrectionB.20090301.000060.C, TpcLengthCorrectionB.20090415.000059.C, TpcRowQ.20090301.000060.C, TpcRowQ.20090415.000057.C, TpcRowQ.C, TpcSecRowB.20090301.000060.root, TpcSecRowB.20090415.000057.root, TpcZCorrectionB.20090301.000051.C, TpcZCorrectionB.20090415.000056.C, TpcZCorrectionB.C, TpcZDC.C, tpcMethaneIn.20090301.000047.C, TpcLengthCorrectionB.20090301.000102.C, TpcRowQ.20090301.000102.C, TpcSecRowB.20090301.000102.root - added new tables for run 2009 dEdx calibration; moved to MySql later;
tpcPressure.20030601.000000.C, tpcPressure.C - removed tables used by dead StdEdxMaker;
TpcZDC.C, tpcPressureB.C - removed from CVS, moved to MySql;
StDb
idl/ tpg_detector.idl, tpg_pad_plane.idl, tss_tsspar.idl - added files, moved from pams/tpc/idl;
QtRoot
qtgl/qtcoin/src/TQtCoinWidget.cxx - modified;
OnlTools
OnlinePlots/HistogramGroups/TOFcheckHistogramGroup.cxx - modified to skipp checking the errors of first event; updated for TOF;
- January 22, 2010
new library SL10b Tagged as SL10b has been created and built on SL4.4 and SL5.3 platforms. Library was tested and released on January 25 .
Next codes have been updated:
StAnalysisUtilities
StHistUtil.cxx/h - modified to fix ROOT quirk with 1 page print; fixed string/char conversions; protected LOG calls;
StBFChain
StBTofHitMaker
StBTofHitMaker.cxx - temporary fixes to allow MTD data to be decoded in StBTofRawHits;
StBTofUtil
StBTofSortRawHit.h - temporary fixes to allow MTD data to be decoded in StBTofRawHits;
St_base
StStreamFile.h - fixed for bug #1816;
StDaqLib
GENERIC/EventReader.cxx - fixed bug #1803;
TRG/L2jetResults2006.h - fixed for get rid of compilation warnings;
StDAQMaker
StDAQMaker.cxx - fixed bug #1803;
StDAQReader.cxx - fixed for bug #1816;
StEvent
StFmsTriggerDetector.cxx/h - new clearFlag() for mudst reading implemented;
StTriggerData.h, StTriggerData2009.cxx, StTriggerData2009.h - modified for better mErrorFlags, abort, and debug flag handling; updated MTD DSM access function for run 2010;
StEventUtilities
StuDraw3DEvent.cxx - fixed for bug #1813 related to emc data not present in the file;
StFmsDbMaker
StFmsDbMaker.cxx/h - added reversed map and other minor updates;
StFtpcCalibMaker
StFtpcLaserCalib.cc - improved LOG_DEBUG output;
StFtpcLaserTrafo.cc - modified to change padtrans so that the code is the same as StFtpcClusterFinder::padtrans;
StFtpcClusterMaker
StFtpcDbReader.cc - modified for laser run to be reconstructed with the laser tZero;
St_geom_Maker
QExGeoDrawHelper.cxx - fixed for bug #1817; added Material name from TGeo objects to browse;
StMuDSTMaker
COMMON/StMuDstMaker.cxx, StMuDstMaker.h - modified to fix bug #1803; restored the broken MakeRead/MakeWrite interface to fix Skip event method;
RTS
src/DAQ_PMD/pmd_reader.cxx - added some initializers ;
src/DAQ_READER/daqReader.cxx - fixed for evp ;
src/DAQ_TPX/tpxPed.cxx/h - modified for RDO caching ;
tpxCore.cxx, tpxStat.cxx - updated;
StTpcHitMaker
StTpcHitMaker.cxx - propagate flags from online clustering into StEvent;
StTpcRTSHitMaker.cxx/h - added minimum cluster charge in ADC for <= 20090101;
StTriggerDataMaker
StTriggerDataMaker.cxx - new clearFlag() for mudst reading implemented ;
StTrgDatFileReader
StTrgDatReader.cxx/f - fixed for bug #1816;
OnlTools
OnlinePlots/Infrastructure/GroupCollection.cxx - updated for TOF ;
OnlinePlots/HistogramGroups/TOFL1multHistogramGroup.cxx/h, TOFL0HistogramGroup.cxx/h - updated for TOF ;
OnlinePlots/QEvpClient/PresenterGui.cx - updated for TOF ;
QtRoot
qtgl/qtcoin/inc/TObjectCoinViewFactory.h, TQtCoin3DDefInterface.h - modified to restore STAR Control animation;
qtgl/qtcoin/src/TObjectCoinViewFactory.cxx, TQtCoin3DDefInterface.cxx, TQtCoinWidget.cxx - modified to restore STAR Control animation;
- January 11, 2010
new library SL10a Tagged as SL10a has been created and built on SL4.4 and SL5.3 platforms. Library was tested and released on January 12 .
Next codes have been updated:
StBFChain
BigFullChain.h - added 'trgd' to 'B2010' chain and corrected issue with EmbeddingShortCut (renamed EmbedShortCut) formatting; added P2010a and pp2010a as startup chains for Year 2010;
StBFChain.cxx - corrected logic for for laser treatment and corrected output file name;
St_base
StStreamFile.h - added RunNumber method to the StStreamFile interface to fix the bug; introduced closeFileSignal to process several DAT files at once
StDAQMaker
StDAQReader.cxx - added RunNumber method to the StStreamFile interface to fix the bug ;
StDbLib
StDbServiceBroker.cxx/h - fixed uninitialized std::vector::iterator in Load Balancer;
StDetectorDbMaker
St_spaceChargeCorC.h - modified to reduce dependencies; trap corrupted scalers for skipping events;
St_trigDetSumsC.h - modified to trap corrupted scalers for skipping events;
StEvent
StFmsCollection.cxx, StFmsCollection.h, StFmsHit.cxx, StFmsHit.h - added new files for FMS hits collection;
StContainers.cxx, StContainers.h, StEvent.cxx, StEvent.h, StEventClusteringHints.cxx, StEventLinkDef.h, StEventTypes.h - updated to add StFmsCollection and related classes;
StFmsTriggerDetector.cxx, StFmsTriggerDetector.h, StTriggerData.cxx, StTriggerData.h, StTriggerData2009.cxx, StTriggerData2009.h - updated to add StFmsCollection and related classes;
StGammaMaker
StGammaEvent.cxx/h - added simulation trigger mutators;
StGammaMaker.cxx/h, StGammaEventMaker.cxx/h - stored simulated triggers ;
St_geant_Maker
St_geant_Maker.cxx/h, navigate.g - mArgs for agvolume was set to 9; added material name to the volume name;
St_geom_Maker
GeomBrowser.cxx/h - added the ctor with the extrernal viewer ;
St_QA_Maker
QAhlist_EventQA_qa_shift.h - removed V0s from QA shift set, revert to large multiplicity ranges;
StJetMaker
StBET4pMaker.cxx, StBET4pMaker.h, StFourPMaker.h, StPythiaFourPMaker.cxx/h - modified to to remove dependency of Pythia jets on MuDst;
StJetSkimEventMaker.h - added missing implementation of function tree(); added access function event();
StPythiaFourPMaker.cxx/h - moved #include from .h to .cxx;
St_pythia_Maker.cxx/h - added new files to run jet finder on Pythia record;
mudst/StjMCMuDst.cxx - modified to remove dependency on MuDst, use GEANT record only;
several updates to remove dependency of Pythia jets on MuDst;
emulator/StjeJetEventTreeWriter.cxx/h - changed use of const string& to const char* and string to TString;
StMuTrackFourVec.h, StjeJetEventTreeWriter.cxx/h, StjeTowerEnergyListToStMuTrackFourVecList.cxx, StjeTrackListToStMuTrackFourVecList.cxx, StMcTrackEmu.h - modified to remove dependency of Pythia jets on MuDst;
mcparticles/StjMC.h - modified to remove dependency of Pythia jets on MuDst;
StMuDSTMaker
COMMON/StMuPrimaryVertex.cxx StMuPrimaryVertex.h - added StMuPrimaryVertex::nBTOFMatch();
StPmdUtil
StPmdGeom.cxx - made year 2010 mapping;
StTpcHitMaker
StTpcRTSHitMaker.cxx - modified to require that pad gain strictly > 0, use whole sector for cluster recnstruction ; added switch for Run 2010;
StTpcHitMoverMaker
StTpcHitMoverMaker.cxx - modified to trap corrupted scalers for skipping events;
StTrgDatFileReader
StTrgDatReader.cxx/h - added RunNumber method to the StStreamFile interface to fix the bug ; adjusted file pattern;
introduced closeFileSignal to process several DAT files at once; fixed regexp to match the Akio filename format;
StTriggerUtilities
StVirtualTriggerSimu.cxx/h - added ability to set input source (MuDst or StEvent) for BBC trigger simulator;
modified to set default input source to "MuDst" for all subdetectors;
Bbc/ StBbcTriggerSimu.cxx/h - added ability to set input source (MuDst or StEvent) for BBC trigger simulator;
modified to set default input source to "MuDst" in constructor, for all subdetectors;
Bemc/StBemcTriggerSimu.cxx/h - added support to set thresholds manually for Run 9 and overwrite those from the database;
Eemc/StEemcTriggerSimu.cxx - removed dependency on hard-coded maker's name;
StEemcTriggerSimu.cxx/h - added support for StEvent when running in BFC ;
added support to set thresholds manually for Run 9 and overwrite those from the database;
added ability to set input source (MuDst or StEvent) for BBC trigger simulator;
modified to set default input source to "MuDst" in constructor, for all subdetectors;
Emc/StEmcTriggerSimu.cxx/h - modified to provide access to output of EMC layer 2 DSM;
added support to set thresholds manually for Run 9 and overwrite those from the database;
StTrsMaker src/StTrsParameterizedAnalogSignalGenerator.cc - modified to count proper he space between anode wires and pad plane;
RTS
src/rtsmakefile.def, iccp.h - modified for 64 bits ;
rtsmakefile.def - modified to provide easier user option USRCCFLAGS USRCXXFLAGS and USRCFLAGS;
src/DAQ_BSMD/daq_bsmd.cxx - adeed Misc tweaks for realtime; increased temp buff space for ZS to account for bad ZS;
bsmdPed.cxx, daq_bsmd.cxx - added the chaser event;
src/DAQ_TPX/daq_tpx.cxx - added interspersed laser as allowed;
tpxStat.cxx - Added stripes check;
tpxGain.cxx - modified for run 2010;
tpxPed.cxx/h - added rhic clock and shortened the pedestal format ;
src/DAQ_HLT/daq_hlt.cxx/h - added new FY2010+ HLT data format; fixed of the double destructor; added mod to gl3 reader;
hlt_gl3.h - added new file to make DAQ_HLT STAR offline compliant;
src/DAQ_READER/daqReader.cxx, daq_det.cxx - added support for HLT;
daqReader.cxx - fixed lack of detector destructors and memory leak;
include/rtsSystems.h - added GL3_NODE_COUNT;
daq100Decision.h - moved HLT decision around;
rtsSystems.h - increased GL3_NODE_COUNT to 5; moved TCD_SSD to TCD_MTD;
include/DAQ1000/ddl_lib.hh, rb.hh - added new get_priority;
include/SUNRT/clock.h - modified for evb;
StarClassLibrary
StMCTruth.cxx/h - adjusted to signature changes in root 5.24;
StarRoot
StDraw3D.cxx/h - fixes the coordinate vector size; modified to allow TPad-less view; added the ctor with the extrernal viewer;
StMultiKeyMap.cxx/h - modified to simplify all the logic into shuffle;
StarDb
VmcGeometry/y2009.h y2010.h - modified to fix the bug #1807;
Geometry.y2000.C, Geometry.y2001.C, Geometry.y2002.C, Geometry.y2003.C, y2000.h, y2001.h, y2002.h, y2003.h - added new files;
Geometry.year2000.C, Geometry.year2001.C, Geometry.year2002.C, Geometry.year2003.C, year2000.h, year2001.h, year2002.h, year2003.h - removed files ;
StDb/idl
pvpdCalib.idl, toftotCalib.idl, tofzCalib.idl - modified for HLT;
QtRoot
qtgl/qtcoin/src/TQtCoinWidget.cxx - modified to store the last selected volume with the Widget tool tip;
TQtCoinWidget.cxx - introduced psedio-stylesheet; modified to provide better start from control room; added Select3DPoint signal;
qtgl/qtcoin/inc/TQtCoinWidget.h - added Select3DPoint signal;
OnlinePlots
first release of module for online data QA;
2011
STAR SOFTWARE NEWS  May 1, 2012
---------------------
The present release assignment:
             SL06g    (SL06g_2)  ROOT_LEVEL 5.12.00 SL4.4, MC production for TUP
             SL07c    (SL07c_3)  ROOT_LEVEL 5.12.00 CuCu 200&62GeV run 2005,TPC+SVT+SSD tracking
             SL07d    (SL07d_2)  ROOT_LEVEL 5.12.00 auau 200GeV stream data run 2007, TPC tracking
             SL08b    (SL08b_1)  ROOT_LEVEL 5.12.00
             SL08c    (SL08c_5)  ROOT_LEVEL 5.12.00 auau 200GeV run 2007,TPC+SVT+SSD tracking
             SL08e    (SL08e_2)  ROOT_LEVEL 5.12.00 pp 200GeV & dAu 200GeV, run 2008
             SL08e_embed (SL08e_5) ROOT_LEVEL 5.12.00
             SL08f    (SL08f_3)  ROOT_LEVEL 5.12.00 last version with EVP_READER, MC production
             SL08f_embed (SL08f_4) ROOT_LEVEL 5.12.00
             SL09b    (SL09b)    ROOT_LEVEL 5.12.00 pp 500GeV W preproduction
             SL09e    (SL09e)    ROOT_LEVEL 5.22.00 SL5.3, last library with old pams (tpt)
             SL09g    (SL09g_1)  ROOT_LEVEL 5.22.00 run 2009 pp 500GeV data production
             SL09g_embed (TBC)   ROOT_LEVEL 5.22.00
             SL10c    (SL10c_2)  ROOT_LEVEL 5.22.00 run 2009 pp 200GeV production
             SL10c_embed    (SL10c_embed_v1)  ROOT_LEVEL 5.22.00
             SL10d    (SL10d)    ROOT_LEVEL 5.22.00
             SL10e    (SL10e)    ROOT_LEVEL 5.22.00
             SL10f    (SL10f)    ROOT_LEVEL 5.22.00
             SL10g    (SL10g)    ROOT_LEVEL 5.22.00
             SL10h    (SL10h_2)  ROOT_LEVEL 5.22.00 run 2010 auau 7.7-39GeV production
             SL10h_embed (SL10h_3) ROOT_LEVEL 5.22.00
             SL10i    (SL10i_2)  ROOT_LEVEL 5.22.00
             SL10j    (SL10j_2)  ROOT_LEVEL 5.22.00 run 2010 auau 200GeV production (removed)
       old-> SL10k    (SL10k)    ROOT_LEVEL 5.22.00 run 2010 auau 39-200GeV production
             SL10k_embed (SL10k_embed_v3) ROOT_LEVEL 5.22.00
             SL11a    (SL11a)    ROOT_LEVEL 5.22.00
             SL11b    (SL11b)    ROOT_LEVEL 5.22.00
             SL11c    (SL11c_1)  ROOT_LEVEL 5.22.00 auau 19.6Gev run 2011 preproduction
       pro-> SL11d    (SL11d_1)    ROOT_LEVEL 5.22.00 run 2011 pp & auau production
       new-> SL11e    (SL11e)    ROOT_LEVEL 5.22.00
       dev-> DEV                 ROOT_LEVEL 5.22.00
      .dev-> .DEV                ROOT_LEVEL 5.22.00

-------------------------------------------------
Release History
SL11a library
SL11b library
SL11c library
SL11d library
SL11e library
- November 21, 2011
new library SL11e tagged as SL11e has been created and built on SL5.3 (32bits & 64bits platforms) and SL4.4 . Library was tested and released on November 23.
gcc version 4.3.2 20081007 (Red Hat 4.3.2-7)
Main features:
- few important bugs have been fixed;
- added TOF modifications for alignment calibrations;
- added MTD to geant g2t hit table and McEvent;
- added Geant id for anti-hypertriton, antideuteron, and antitriton;
- added more decays modes for K+/- and Geant Id's for embedding;
- initial revision of year 2012 geometry ;
- trigger code was updated for trigger data run 2012;
Next codes have been updated:
asps
Simulation/starsim/agzio/agsvert.age - added capability to provide a slope in the x,y vertex;
Simulation/starsim/atmain/agxinit.F, agxinit.cdf, agxuser.age - added capability to provide a slope in the x,y vertex;
Simulation/starsim/include/commons/agckine.inc - added capability to provide a slope in the x,y vertex;
Simulation/starsim/include/atlsim/agckine.inc - added capability to provide a slope in the x,y vertex;
StarClassLibrary
StParticleTable.cc, StarPDGEncoding.hh - added anti-hypertriton; mapped hypertriton and anti-hypertriton to geant IDs 6[12]053 and 6[12]054, with two decay modes:
H3(lambda) --> He3 pi- 61053 antiparticle=61054;
H3(lambda) --> d p pi- 62053 antiparticle=62054;
StAntiHyperTriton.cc, StAntiHyperTriton.hh - added anti- hypertriton.
StParticleTable.cc - added decays: K+ --> e+ pi0 nu and K- --> e- pi0 nu to satisfy an embedding requests;
St_base
StObject.cxx - added assert for dead object;
StBFChain
BFC.C, BigFullChain.h, StBFChain.cxx - added combination for tracking with Sti, Sti+CA, Stv, StvCA code versions;
BigFullChain.h - added depnedence of Sti and StiCA on svtDb and ssdDb; some modifications needed for new trackers to process;
BigFullChain.h, StBFChain.cxx - introduced sector alignment distortion corrections;
added options for AgML VMC Geometry;
added 'mtin' option to read MuDst for GEANT kinematics; added StvPulls; added MTD options;
BigFullChain.h - initial chain for FGT ;
StBTofMatchMaker
StBTofMatchMaker.cxx, StBTofMatchMaker.h - modifications for alignment calibrations: modified to open the local Z window cut to determine the z offset; variables mZLocalCut, mCalculateAlign and mAlignFileName added; functions setCalculateAlign and setAlignFileName added;
StBTofUtil
StBTofGeometry.cxx, StBTofGeometry.h - modifications for alignment calibrations: added mAlignFile and SetAlignFile for use in StBTofMatchMaker; phi0, x0, z0 made mNTrays dependent;
StBTofCalibMaker
StBTofCalibMaker.cxx - bug fixed: mProjVtxZ does not get initialized when mUseEventVertex is false;
StChain
StMaker.cxx - added year 2012; y2011a tag added;
StDaqLib
TRG/trgStructures2012.h - added new version of trigger structure for run12 including a new DSM for TPC daq10k sector mask
StDbUtilities
StMagUtilities.cxx, StMagUtilities.h - introduced sector alignment distortion corrections and big speed improvements to Poisson relaxations; minor fixes for sector misalignment: outermost radius;
StDetectorDbMaker
StDetectorDbChairs.cxx, St_TpcResponseSimulatorC.h, St_TpcAvgCurrentC.h - added new chair;
StdEdxY2Maker
StdEdxY2Maker.cxx - modification for run 2011;
StTpcdEdxCorrection.cxx - added rotection against wrong Adc correction;
StTpcdEdxCorrection.cxx, StTpcdEdxCorrection.h, StdEdxY2Maker.cxx - replaced TpcAvCurrent by kTpcCurrentCorrection;
StEvent
StEmcModule.cxx - fixed bug in getEnergy();
StEventClusteringHints.cxx - FGT added;
StTrack.cxx, StTrack.h - added IdTruth from the hits;
StEvent.cxx, StEvent.h, StHit.cxx, StHit.h, StTpcHit.cxx, StTpcHit.h, StTrack.cxx, StVertex.cxx, StVertex.h - modified to handle IdTruth info;
StEventClusteringHints.cxx, StEventLinkDef.h - added StTriggerData2012 for run 2012;
StTriggerData.h, StTriggerData.cxx - addeed tpcMaskDSM();
StTriggerData2012.cxx, StTriggerData2012.h - initial revision of trigger data for run 2012;
StEventUtilities
StEventHelper.cxx, StEventHelper.h - minor fixes to account events with no hits;
StFtpcClusterMaker
StFtpcClusterMaker.cxx - modified;
StFtpcTrackMaker
StFtpcTrackToStEvent.cc - modified to ignore tracks with zero momentum;
Sti
StiMasterDetectorBuilder.cxx - modified to remove deleting of gGeomanaget;
StiMaker
StiMaker.cxx, StiMaker.h, StiStEventFiller.cxx - modified to move handle of IdTruth to StEvent;
StJetFinder
StFastJetPars.h, StFastJetPars.cxx, StjFastJet.h, StjFastJet.cxx - added new files to support fastJet;
St_geant_Maker
St_geant_Maker.cxx - added mtd to the geant maker;
St_geant_Maker.cxx, St_geant_Maker.h - added kinematics definition via MuDst;
St_QA_Maker
StEventQAMaker.cxx - fixed improper initialization of event classes affecting future simulations;
StMcEvent
StMcContainers.hh, StMcEvent.cc, StMcEvent.hh, StMcEventLinkDef.h, StMcEventTypes.hh, StMcHit.hh, StMcHit.cc, StMcTrack.cc, StMcTrack.hh - modified to add MTD ;
StMcMtdHit.cc, StMcMtdHit.hh, StMcMtdHitCollection.cc, StMcMtdHitCollection.hh - added new files for MTD hits collection;
StMcHitC.cxx, StMcHitC.hh, StMcHitT.cxx - removed files;
StMcCtbHit.cc, StMcCtbHit.hh, StMcEventLinkDef.h, StMcFgtHit.cc, StMcFgtHit.hh, StMcFtpcHit.cc, StMcFtpcHit.hh, StMcHit.cc,
StMcHit.hh, StMcIstHit.cc, StMcIstHit.hh, StMcPixelHit.cc, StMcPixelHit.hh, StMcRichHit.cc, StMcRichHit.hh, StMcSsdHit.cc, StMcSsdHit.hh
StMcSsdLadderHitCollection.hh, StMcSvtHit.cc, StMcSvtHit.hh, StMcTofHit.cc, StMcTofHit.hh, StMcTpcHit.cc, StMcTpcHit.hh - modified to add time of flight for hits;
StMcEventMaker
StMcEventMaker.cxx, StMcEventMaker.h - MTD added ;
StMCFilter
StDijetFilter.cxx, StDijetFilter.h - modified ;
StMuDSTMaker
COMMON/StMuDstFilterMaker.cxx, StMuDstMaker.cxx, StMuIOMaker.cxx - set max tree size = 100GB ;
StMuEvent.cxx - modified to keep DAQ time for the event unchanged;
StMuTrack.h, - modified to make idTruth public;
StMuArrays.cxx, StMuArrays.h, StMuDst.cxx, StMuDstMaker.cxx, StMuMcTrack.h, StMuMcVertex.h, StMuPrimaryVertex.cxx, StMuPrimaryVertex.h, StMuTrack.cxx, StMuTrack.h - modified to handle of IdTruth;
StMuMcTrack.cxx, StMuMcVertex.cxx - added new files;
StPass0CalibMaker
StSpaceChargeEbyEMaker.cxx - modified to avoid floating point exception in Loglikelihood fits of gaussian peaks;
StPmdReadMaker
StPmdReadMaker.cxx, StPmdCleanConstants.cxx, StPmdCleanConstants.h - updated for year 2012;
RTS
EventTracker/FtfSl3.cxx, FtfSl3.h, eventTracker.cxx, eventTrackerLib.cxx, eventTrackerLib.hh, gl3EMC.cxx, gl3EMC.h, gl3Event.h, gl3Hit.h, gl3Track.h, l3BankUtils.h, l3TrgReader.cxx - removed TRG_VERSION 0x32 from daqFormats;
include/DAQ1000/ddl_lib.hh, rb.hh - added emulation;
include/rtsSystems.h - added GMT and other new detectors;
iccp2k.h, rtsSystems.h - btow updated;
src/DAQ_BTOW/daq_btow.cxx, daq_btow.h - addition for DAQ;
src/DAQ_ETOW/daq_etow.cxx, daq_etow.h - addition for DAQ;
src/DAQ_GMT/Makefile, daq_gmt.cxx, daq_gmt.h - added first version of DAQ for GMT;
src/DAQ_FGT/daq_fgt.cxx, Makefile - updated;
src/DAQ_TOF/daq_tof.cxx - addition for DAQ;
src/DAQ_TPX/daq_tpx.cxx, tpxCore.cxx, tpxFCF.cxx, tpxGain.cxx, tpxGain.h - - addition for DAQ; small bug fixes;
src/DAQ_TRG/trgReader10.cxx, trg_reader.cxx - removed TRG_VERSION 0x32 from daqFormats;
src/DAQ_READER/daqReader.cxx - updated for Jevp ;
trg/include/trgDataDefs.h - added include to avoid non defined UINT32;
StTpcDb
StTpcDbMaker.cxx - introduced sector alignment distortion corrections;
StTpcRSMaker
StTpcRSMaker.cxx, StTpcRSMaker.h, TpcRS.C - extended dE/dx table to fix bugs #2174 and #2181;
StTpcRSMaker.cxx - restored K3IP parameter;
StTriggerDataMaker
StTriggerDataMaker.cxx - added support for StTriggerData2012;
StTriggerUtilities
StTriggerSimuMaker.cxx - modified to specify online database for each year;
Bemc/StBemcTriggerSimu.cxx - modified to clear number of masked towers before summing;
BEMC_DSM_decoder.cxx, BEMC_DSM_decoder.h - new codes added;
StBemcTriggerSimu.h - modified to get pointers to BEMC decoder and tables;
StBemcTriggerSimu.cxx, StBemcTriggerSimu.h - added functions to test for data corruption in calorimeters;
mask out tower 1907 becuase it has huge pedestal;
StBemcTriggerSimu.cxx, StBemcTriggerSimu.h - modified to simulate hardware failure;
Eemc/StEemcTriggerSimu.cxx, StEemcTriggerSimu.h - added support for using EEMC offline pedestals; added EEMC pedestal modes; added RDO and status;
kOnline = use online pedestals;
kOffline = use offline pedestals;
kLocal = use pedestals from a local file (format: crate channel pedestal ped4);
EemcTrigUtil.cxx - changed path for getting EEMC online ped4 files; added timestamp; modified to use SQL date/time format;
StEemcTriggerSimu.cxx - modified to make sure there are 720 towers in EEMC; set timestamp for BEMC decoder;
StEemcTriggerSimu.cxx, StEemcTriggerSimu.h - added functions to test for data corruption in calorimeters;
EEfeeTP.cxx, EEfeeTP.h, EEfeeTPTree.cxx, EEfeeTPTree.h, EemcTrigUtil.cxx, EemcTrigUtil.h, StEemcTriggerSimu.cxx, StEemcTriggerSimu.h - implemented EEMC FEE HT & TP masks;
EemcTrigUtil.cxx, EemcTrigUtil.h, StEemcTriggerSimu.cxx - implemented EEMC FEE boards HT masks;
StEemcTriggerSimu.cxx, StEemcTriggerSimu.h - added getters for output of EEMC FEEs for backward-compatibility;
L2Emulator/fakeRtsLog.h - added to turn log statements into printfs;
L2Emulator/L2hienAlgo/L2hienAlgo09.cxx, L2hienAlgo09.h, L2hienResult2009.h - added new files;
L2Emulator/L2upsilon/L2Upsilon2009.cxx, L2Upsilon2009.h, L2UpsilonResult2009.h, read_in_geog.h - added new files;
L2Emulator/L2gammaAlgo/L2bemcGamma2012.cxx - added fakeRtsLog.h to turn log statements into printfs;
L2Emulator/L2algoUtil/L2VirtualAlgo2012.cxx, L2btowCalAlgo12.cxx - added fakeRtsLog.h to turn log statements into printfs;
pams
gen/bpythia/apytuser.age, bpythia.F, bpythia.cdf - added capability to run pythia with asymmetric beam energies;
geometry/geometry/geometry.g - added DEV13 geometry; removed PMD from y2012; added PIXL to complete;
sim/gstar/gstar_part.g - added anti-hypertriton; mapped hypertriton and anti-hypertriton to geant IDs 6[12]053 and 6[12]054, with two decay modes:
H3(lambda) --> He3 pi- 61053 antiparticle=61054;
H3(lambda) --> d p pi- 62053 antiparticle=62054;
added antideuteron (gid=53) and antitriton (gid=54) to enable inclusion in hypertriton decays.
added decays K+ --> e+ pi0 nu and K- --> e- pi0 nu to satisfy an embedding request;
Also added the other top 6 decay modes as 10011 -- 15011 and 10012 -- 15012;
10011 : K+ --> m+ nu;
11011 : K+ --> pi+ pi0;
12011 : K+ --> pi+ pi+ pi-;
13011 : K+ --> e+ nu pi0;
14011 : K+ --> m+ nu pi0 ;
15011 : K+ --> pi+ pi0 pi0;
and similar for K- decay modes;
sim/g2t/g2t_volume_id.g, g2t_mtd.F, g2t_mtd.idl - added MTD to the g2t hit tables;
g2t_volume_id.g - added FGT two numbers id;
sim/idl/g2t_track.idl, g2t_mtd_hit.idl - added MTD to the g2t hit tables;
StarDb
Calibrations/tpc/ TpcLengthCorrectionB.20110101.000341.C, TpcLengthCorrectionB.20110421.000239.C, TpcRowQ.20110101.000340.C, TpcRowQ.20110421.000206.C,
TpcSecRowB.20110101.000340.root, TpcSecRowB.20110421.000206.root, TpcZCorrectionB.20110421.000206.C, TpcZDC.20110101.000237.C,
tpcPadGainT0.20100212.121259.root, tpcPressureB.20110101.000320.C, TpcZCorrectionB.20110101.000206.C - added new files for dE/dx calibration for Run XI (pp500 and AuAu19)
TpcLengthCorrectionB.20110620.000101.C, TpcLengthCorrectionB.20110624.150001.C, TpcRowQ.20110620.000103.C, TpcRowQ.20110624.150002.C, TpcSecRowB.20110620.000103.root, TpcSecRowB.20110624.150002.root - added calibration files for Y2011 AuAau27;
TpcCurrentCorrection.C - created new TpcCurrentCorrection;
TpcAvgCurrent.C - added deafult table;
TpcCurrentCorrection.20110503.000001.C, TpcLengthCorrectionB.20110503.000001.C, TpcRowQ.20110503.000002.C, TpcSecRowB.20110503.000002.root, tpcPressureB.20110503.000001.C - added new tables for Run 2011 AuAu200 RFF dE/dx calibrations;
TpcCurrentCorrection.20110602.000000.C, TpcDriftDistOxygen.20110503.000001.C, TpcDriftDistOxygen.20110602.000001.C, TpcLengthCorrectionB.20110503.000002.C, TpcLengthCorrectionB.20110602.000001.C, tpcPressureB.20110602.000001.C, TpcRowQ.20110503.000003.C, TpcRowQ.20110602.000002.C, TpcDriftDistOxygen.20110620.150000.C, TpcSecRowB.20110503.000003.root, TpcSecRowB.20110602.000002.root - added new dE/dx calibrations files for Run 2011 AuAu 200GeV;
ftpc/ftpcSlowSimPars.C - change adcConversion from 1000 to 2100 for better agreement with real data;
VmcGeometry was renamed with AgiGeomtry;
AgiGeometry/CreateGeometry.h - deployed AgML VMC Geometry;
dEdxModel/dNdx_Bichsel.root - extended dNdx table to beta*gamma range [1e-2,1e4];
StDb
idl/fgtMapping.idl, fgtStatus.idl, fgtGain.idl, fgtPedestal.idl - new tables for FGT;
idl/fgtElosCutoff.idl - new FGT table added;
idl/TpcAvgCurrent.idl - added TpcAvgCurrent with Tpc channel current average over run;
idl/TpcResponseSimulator.idl - added two more fields for SigmaJitterXI and SigmaJitterXO;
OnlTools
Jevp/StJevpBuilders/baseBuilder.cxx, tpxBuilder.cxx - updated;
mtdBuilder.cxx, mtdBuilder.h, tofBuilder.cxx, tofBuilder.h, tpxBuilder.cxx - updated for tof/mtd;
Jevp/StJevpPlot/JevpPlotSet.cxx, JevpPlotSet.h, RunStatus.cxx, RunStatus.h - updated;
Jevp/StJevpServer/JTMonitor.cxx, JTMonitor.h, JevpServer.cxx, JevpServer.h - updated;
- May 1, 2012
SL11d library was updated with next code:
StRoot/StBFChain/BigFullChain.h to add year 2009 chain with ry2009d geometry option to reprocess run 2009 data with updated geometry. Library was retagged with SL11d_1 tag.
- July 22, 2011
new library SL11d tagged as SL11d has been created and built on SL5.3 (32bits & 64bits platforms) and SL4.4 . Library was tested, found problem fixed, released on August 2.
gcc version 4.3.2 20081007 (Red Hat 4.3.2-7)
Main features:
- few important bugs have been fixed;
- new version of event generator code HERWIG 6.5.20 was added;
- new schema for SubSectors alignment implemented;
- new geometry for FSC (Forward Spaghetti Calorimeter) detector added;
Next codes have been updated:
StAnalysisUtilities
StHistUtil.cxx, StHistUtil.h - modified to allow limited graphics file printing ;
StAssociationMaker
StAssociationMaker.cxx - set FtpcHit, IdTruth and QA;
StarClassLibrary
StAntiDeuteron.cc, StParticleTable.cc - updated StParticleTable to provide access to anti-nuclei via the "geant" ID, fixes for bug #2157;
StarMagField
StarMagField.cxx - modified to comment correction which broke B3DField;
StarRoot
StCloseFileOnTerminate.cxx - modified to use gROOT->CloseFiles(); modified to make Instantiate public;
TRArray.cxx, TRArray.h, TRSymMatrix.cxx, TRSymMatrix.h - added fIsNotOwn;
StMultiKeyMap.h, StMultiKeyMap.cxx - modified to cleanup ;
THelixTrack.cxx, THelixTrack.h - modified to set hh & zz errors ;
St_base
StObject.h, StObject.cxx - modified to do more accurate counter handling;
StChain
StChain.cxx, StMaker.cxx, StMaker.h, StRTSBaseMaker.cxx - modified to force call 'Finish' with 'SIGTERM' signal obtained from condor_vacate_job after time limit reached;
StMaker.cxx - fixed definition of geometries y2009d and y2010c, bug #2155;
StDetectorDbMaker
StDetectorDbChairs.cxx, StDetectorDbMaker.cxx, St_SurveyC.h - modified to implement new schema for SubSectors alignment;
StTpcSurveyC.h - new file added for new schema of SubSectors alignment;
StDbLib
StDbDefs.hh, StDbManagerImpl.cc - added new domain: FGT;
St_geant_Maker
St_geant_Maker.cxx - FSC added;
St_QA_Maker
QAhlist_EventQA_qa_shift.h - modified ;
StEventQAMaker.cxx, StEventQAMaker.h, StQAMakerBase.cxx - modified to cleanup in destructors;
StEventQAMaker.cxx, StQABookHist.cxx, StQABookHist.h - added time bucket distribution of hits;
StPmdReadMaker
StPmdReadMaker.cxx, StPmdCleanConstants.cxx,StPmdCleanConstants.h - year 2012 BadChain entered;
StIOMaker
StIOMaker.cxx - cleanup ;
StiMaker
StiStEventFiller.cxx - removed previous tracks & vertices in StEvent added ;
StiTpc
StiTpcHitLoader.cxx - implemented use of TPC hits sanity flag;
Sti
StiTrackNode.cxx - fixed bug #2098;
StiMasterDetectorBuilder.cxx - modified to replace Geometry clone by reinitialization;
RTS
src/DAQ_FGT/daq_fgt.cxx, daq_fgt.h, fgtPed.cxx, fgtPed.h - modified for pedestal work;
src/DAQ_TPX/tpxFCF_flags.h - introduced sanity flag for TPC hits;
src/DAQ_TPX/daq_tpx.cxx - added reset command skip and L1 accept;
include/ rtsSystems.h - modified to increase GL3 node count ;
rtsMonitor.h - added more fields to rtsMonDET;
include/DAQ1000/ddl_lib.hh - added param to write;
rb.hh - added param to write;
StMcEvent
StMcTrack.cc, StMcTrack.hh, StMcEvent.hh - FSC added;
StMcEventMaker
StMcEventMaker.cxx, StMcEventMaker.h - FSC added;
StMiniMcEvent
StMiniMcPair.h - modified to cleanup code;
StMiniMcMaker.cxx, StMiniMcMaker.h - modified to fix errors handling;
StTinyRcTrack.h - mDca00 added;
StTpcDb
StTpcDb.cxx, StTpcDb.h - modified to implement new schema for SubSectors alignment: SuperSectror position (defined by inner sub sector) and Outer sector position wrt SuperSectror position;
StTpcHitMaker
StTpcHitMaker.cxx, StTpcHitMaker.h, StTpcRTSHitMaker.cxx - set sanity flag for TPC hits;
StTriggerUtilities
StTriggerSimuMaker.cxx, StTriggerSimuMaker.h - updated meaning of mMCflag variable: 0=data, 1=simulation, 2=embedding;
Bemc/StBemcTriggerSimu.cxx - updated meaning of mMCflag variable: 0=data, 1=simulation, 2=embedding;
StTrsMaker
src/StTrsChargeSegment.cc - modified to unify GEANT PID discrimination to StarClassLibrary, fixes for bug #2157;
pams
gen/Herwig6_5_20/herwig6520.F, herwig6520.inc - added new version of HERWIG 6.5.20;
geometry/geometry/geometry.g - defined upgr2012a: 2-disk FGT; reverted to single FGT "upgr2012" geometry;
Upgr23 tag defined with FSC geometry and FMS in open position;
geometry/fscegeo/fscegeo.g - added new file for FSC (Forward Spaghetti Calorimeter); medium added;
sim/g2t/g2t_volume_id.g, g2t_fsc.F, g2t_fsc.idl - added FSC detector;
sim/idl/g2t_track.idl - added FSC detector;
StarDb
Calibrations/tpc/ TpcDriftDistOxygen.20110101.000114.C, TpcDriftDistOxygen.20110421.000119.C, TpcLengthCorrectionB.20110101.000115.C, TpcLengthCorrectionB.20110421.000119.C, TpcRowQ.20110101.000113.C, TpcRowQ.20110421.000119.C, TpcSecRowB.20110101.000113.root, TpcSecRowB.20110421.000119.root, TpcZDC.20110101.000110.C, TpcZDC.20110421.000000.C, tpcAvCurrent.20110101.000101.C, tpcPressureB.20110101.000109.C, tpcPressureB.20110421.000114.C - added mew files for TPC preliminary corrections for run 2011 pp 500GeV and AuAu 19GeV data;
TpcAdcCorrectionB.y2011.C - modified to step back to 2010.09.10 version;
TpcAdcCorrectionB.y2009.C - modified to update 20090301.000106 => y2009;
TpcAdcCorrectionB.y2010.C - modified to move 20100101.000012 => y2010;
TpcMultiplicity.C - modified to remove multiplicity dependence ;
tpcEffectiveGeom.C ,tpcEffectiveGeom.y2001.C, tpcEffectiveGeom.y2003.C, tpcEffectiveGeom.y2004.C, tpcEffectiveGeom.y2005.C - removed files ;
TpcMultiplicity.y2009.C, TpcMultiplicity.y2010.C, TpcMultiplicity.y2011.C - removed;
TpcRowQ.C - modified to shift default for all 48 rows;
ftpc/ftpcSlowSimPars.C - modified to change adcConversion from 1000 to 2100 for better agreement with real data;
Geometry/tpc/TpcOuterSectorPosition.20000501.000005.C, TpcOuterSectorPosition.20070101.000001.C, TpcOuterSectorPosition.20070626.154000.C, TpcOuterSectorPosition.20070811.000009.C, TpcOuterSectorPosition.20090101.000000.C, TpcOuterSectorPosition.20090527.160000.C, TpcOuterSectorPosition.20091225.000002.C, TpcOuterSectorPosition.20100204.140002.C, TpcOuterSectorPosition.20101220.000001.C, TpcOuterSectorPosition.C, TpcSuperSectorPosition.20000501.000005.C, TpcSuperSectorPosition.20070101.000001.C, TpcSuperSectorPosition.20070626.154000.C, TpcSuperSectorPosition.20070811.000009.C, TpcSuperSectorPosition.20090101.000000.C, TpcSuperSectorPosition.20090527.160000.C, TpcSuperSectorPosition.20091225.000002.C, TpcSuperSectorPosition.20100204.140002.C, TpcSuperSectorPosition.20100204.140003.C, TpcSuperSectorPosition.20101220.000001.C, TpcSuperSectorPosition.C - added files for new schema of SubSectors alignment: SuperSectror position (defined by inner sub sector) and Outer sector position wrt SuperSectror position;
Geometry/tpc/Sector_01 to
Geometry/tpc/Sector_24
tpcSectorPosition.C, tpcSectorPosition.y2001.C, tpcSectorPosition.y2003.C, tpcSectorPosition.y2004.C, tpcSectorPosition.y2005.C, tpcSectorPosition.y2006.C, tpcSectorPosition.y2007.C, tpcSectorPosition.y2008.C, tpcSectorPosition.y2009.C, tpcSectorPosition.y2010.C, tpcSectorPosition.y2011.C - removed files due to new schema for SubSectors alignment implemented;
StDb
idl/fgtMapping.idl, fgtStatus.idl - addde new files for FGT status and mapping;
- May 27, 2011
SL11c has been updated with bug fix patches and retagged as SL11c_1.Library was rebuilt on SL5.3 (32bits & 64bits platforms) and SL4.4
gcc version 4.3.2 20081007 (Red Hat 4.3.2-7)
Next codes have been updated:
BFChain
BigFullChain.h - magnetic filed initialization ;
StBeamBackMaker
StBeamBackMaker.cxx - updated to propagate StTrack::key => Int_t (bug fix #2131);
StFtpcClusterMaker
StFtpcClusterFinder.cc - made corrections to save correct ChargeSum for ftpc clusters;
StFtpcTrackMaker
StFtpcTrackToStEvent.cc - updated to propagate StTrack::key => Int_t (bug fix #2131);
StLaserAnalysisMaker
LaserEvent.h - updated to propagate StTrack::key => Int_t (bug fix #2131);
StMuDSTMaker
COMMON/StMuMtdHeader.cxx - added pointer protection for empty MTD data;
StStrangeMuDstMaker
StKinkI.hh, StKinkMuDst.hh, StV0I.hh, StV0MuDst.hh, StXiI.hh, StXiMuDst.hh - updated to propagate StTrack::key => Int_t (bug fix #2131);
StiMaker
StiStEventFiller.cxx - updated to propagate StTrack::key => Int_t (bug fix #2131);
StTofCalibMaker
StTofCalibMaker.cxx - updated to propagate StTrack::key => Int_t (bug fix #2131);
- May 13, 2011
new library SL11c tagged as SL11c has been created and built on SL5.3 (32bits & 64bits platforms) and SL4.4 platform.
Library was tested and released on May 16.
gcc version 4.3.2 20081007 (Red Hat 4.3.2-7)
Main features:
- new code for MTD detector ;
Next codes have been updated:
StBFChain
BigFullChain.h - added options 'NoStrangeMuDst', 'NoDisplay' to remove Strange branch and St_geom_Maker; added option 'noRunco' to suppress runco branch ; introduced P2011a; modified to allow phys_off and hadr_off options to pass to geant maker; added basic MTD chain;
StBFChain.cxx, StBFChain.h - droped old branches; added action for norunco and nohistos options;
StBFChain.cxx - modified to restore loading of geant for BTofUtil;
St_base
StArray.cxx, StArray.h - ls() implemented;
StBTofCalibMaker
StBTofCalibMaker.cxx - modified to use an appropriate log level for debug messages;
StEmbeddingUtilities
StEmbeddingQADraw.cxx, StEmbeddingQAUtilities.h, StEmbeddingQAUtilities.cxx - added gamma geantid check;
StEvent
StMtdCollection.cxx, StMtdCollection.h, StMtdHeader.cxx, StMtdHeader.h, StMtdHit.cxx, StMtdHit.h, StMtdRawHit.cxx, StMtdRawHit.h - initial revision of new MTD code;
StContainers.cxx, StContainers.h - added containers for MTD;
StDetectorDefinitions.h, StEnumerations.h, StEvent.cxx, StEvent.h - modified to hold MTD data;
StEventClusteringHints.cxx, StEventTypes.h - added MTD;
StTrack.cxx, StTrack.h - modified to make mKey Int_t instead of UShort_t (because no.of tracks might be more that 64k);
StHit.h, StTpcHit.h - modified to restore hit errors as persistent, added sort to TpcHit;
St_geant_Maker
St_geant_Maker.cxx - updated to handle pile-up events;
St_QA_Maker
StEventQAMaker.cxx - bug fixed;
StMtdHitMaker
StMtdHitMaker.cxx, StMtdHitMaker.h - new code for MTD;
StMuDSTMaker
COMMON/StMuDstFilterMaker.cxx, StMuDstMaker.cxx, StMuIOMaker.cxx - modified to use default size of TTree (100 GB) for ROOT >= 5.26.0;
COMMON/StMuArrays.cxx, StMuArrays.h, StMuDst.cxx, StMuDst.h, StMuDstMaker.cxx, StMuDstMaker.h, StMuTypes.hh - modified to add MTD information ;
COMMON/StMuMtdCollection.cxx, StMuMtdCollection.h, StMuMtdHeader.cxx, StMuMtdHeader.h, StMuMtdHit.cxx, StMuMtdHit.h, StMuMtdRawHit.cxx, StMuMtdRawHit.h - added new files to store MTD data ;
StPass0CalibMaker
StSpaceChargeEbyEMaker.cxx - modified to expand range for SC hists;
StPmdReadMaker
StPmdReadMaker.cxx - mVmeCond,BadChain info changed for run 2012 data; bug fixed for run 2011 data;
StPmdCleanConstants.cxx, StPmdCleanConstants.h - calibration initialization setup for run 2012 data;
StPmdUtil
StPmdGeom.cxx - year = 2012 inserted for new mapping; bug fixed for run 2011 data;
RTS
include/rtsSystems.h - added GMT detector;
l1Algorithm.h - added new file;
iccp2k.h - added future protection commands;
include/SUNRT/clock.h - updated;
src/DAQ_READER/daqReader.cxx - changed delay;
StiSsd
StiSsdDetectorBuilder.cxx - modified to get rid of warning messages;
StiRnD
Hft/ StiPixelDetectorBuilder.cxx, StiPixelHitLoader.cxx - modified to remove warning messages;
pams
geometry/geometry/geometry.g - introduced UPGR2012 geometry as y2011 with inner detectors (FGT, SSD) and supports removed; added code to pass configuration of the MTD to the mutdgeo4 module;
definition of upgr2012 geometry modified to include IdsmGeo1 and FgtdGeo3 by default;
geometry/fgtdgeo/ fgtdgeo3.g - added dummy routines for pams/geometry to facilitate integration of AgML;
geometry/mutdgeo/mutdgeo4.g - major revision to the geometry hierarchy, bug fixes, new sensitve MTD volumes implemented;
- April 13 , 2011
new library SL11b tagged as SL11b has been created and built on SL5.3 (32bits & 62bits platforms) and SL4.4 platform. Library was tested and released on April 15.
gcc version 4.3.2 20081007 (Red Hat 4.3.2-7)
Main features:
- new code for hlt ;
- few bug fixes and code improvements for embedding;
- added new geometry tags with bug fixes in SVT support cone geometry;
- added anti-nuclei (deuteron, triton, alpha and helium3) to the table;
- modifications for offline QA for run 2011;
- updates of TOF simu and VPD calibration codes;
- added branches in MuDst for MC tracks and vertices;
Next codes have been updated:
asps
Simulation/starsim/geant/gthion.F -- modified such that the effective charge used in dE/dx generation depends on |Q| rather than Q to prevent Q**(2/3) generating a NaN condition;
gltrac.F -- modified to initialize decay of unstable (hyper) nuclei;
StAnalysisUtilities
StHistUtil.cxx, StHistUtil.h - modified to allow for limiting detectors; modified to allow for specification of histogram usage by the required detector sets; implemented default to general histograms for references in absence of trig typed; added TPC hit phi sector labels;
StEventQAMaker.cxx - adjusted MB for Run 11;
StAssociationMaker
StAssociationMaker.cxx, StAssociationMaker.h, StTrackPairInfo.cc,StTrackPairInfo.hh - modified;
St_base
StTree.cxx - modified to define keys of 1st file for others; fixed bug for parallel files reading;
StarClassLibrary
StParticleTable.cc - added Omega+/- and Xi+/- embedding definitions; 1st attempt at improving the Doxygenization of the particle table;
added anti-nuclei (deuteron, triton, alpha and helium3) to the table;
StAntiAlpha.cc, StAntiAlpha.hh, StAntiDeuteron.cc, StAntiDeuteron.hh, StAntiHelium3.cc, StAntiHelium3.hh, StAntiTriton.cc, StAntiTriton.hh, StCerenkov.cc, StCerenkov.hh, StGeantino.cc, StGeantino.hh, StHelium3.cc, StHelium3.hh - added new files to include all particles dacays defind in gstar_part.g; added few anti-nuclei in anticipation of future needs; added the geantino for completeness;
StBFChain
BigFullChain.h - initial versions of 2011 chain; added StTableUtilities library for StiMaker; restored dependence of StiMaker versus StiSvtLib,StiSsdLib,StiRnDLib;
StBFChain.cxx, StBFChain.h, StBFChainOpt.h, StBFChainOpt.cxx - added GetGeometry method; modified to ignore blacklist for embedding;
BigFullChain.h, StBFChain.cxx - added blacklist of detector for St_db_Maker to bypass Db configuration for them; added Tpc, Eemc, Fms to blacklist; modified to separate blacklisting cases when it is required Svt and Ssd geometry only;
BigFullChain.h - added SvtDb and SsdDb for base configurations when the detectors were present in the run;
StBFChain.cxx - added more requirement for blacklisting of a detectors;
StBTofSimMaker
StBTofSimMaker.cxx, StBTofSimMaker.h - introduced option to switch writing simulated hits to StEvent, default behavior is set to OFF;
StChain
StChainOpt.h - added GetGeometry method;
StMaker.cxx - added new geometry tags y2008d, y2009d, y2010c implemented for improved model of the SVT support cone as carbon-fiber nomex sandwich;
StIOInterFace.cxx - modified to write automatically branch name in the form
StDbBroker
StDbBroker.cxx, StDbBroker.h - added an option to blacklist domains;
StDbLib
StDbManager.hh, StDbManagerImpl.cc, StDbManagerImpl.hh - added an option to blacklist domains;
MysqlDb.cc, StDbServiceBroker.cxx - modified to connect error messages converted to more user-frienly format;
MysqlDb.cc, StDbManagerImpl.cc - fixed to blacklist Calibrations only;
St_db_Maker
St_db_Maker.cxx, St_db_Maker.h - blacklist added;
StDetectorDbMaker
St_tpcMaxHitsC.h - added maxBinZeroHits;
StDetectorDbChairs.cxx, StiChairs.cxx - modified to add chairs for vertexSeed and tpcStatus tables;
St_tpcStatusC.h, St_vertexSeedC.h - added new files;
StHbtMaker
Reader/StHbtAssociationReader.cxx - adjusted to changed made in StStAssociationMaker;
StEmbeddingUtilities
StEmbeddingQAUtilities.cxx - bug fixed for e+ and e- ;
StEmbeddingQATrack.h - added missing functions getNSigma...();
StEmbeddingQATrack.cxx - added missing charge check in isNSigmaOk(), and error check for GEANT id;
StEvent
StHltBEmcTowerHit.h, StHltBTofHit.h, StHltDiElectron.h, StHltEvent.h, StHltHeavyFragment.h, StHltHighPt.h, StHltTrack.h, StHltTrackNode.h,
StHltTriggerReasonCapable.h, StHltTriggerReason.h, StHltVpdHit.h, StHltBEmcTowerHit.cxx, StHltBTofHit.cxx, StHltDiElectron.cxx,
StHltEvent.cxx, StHltHeavyFragment.cxx, StHltHighPt.cxx, StHltTrack.cxx, StHltTrackNode.cxx, StHltTriggerReasonCapable.cxx, StHltTriggerReason.cxx, StHltVpdHit.cxx - new code for hlt;
StContainers.cxx, StContainers.h, StEvent.h, StEvent.cxx, StEventScavenger.cxx, StEventScavenger.h, StEventTypes.h, StEventClusteringHints.cxx - added new branch for hlt;
StTriggerId.cxx, StTriggerId.h - extended to 64 bit; switched data member type of mask from uint64_t to ULong64_t ;
StTriggerData2009.cxx - modified: MTD code only for runs after 12003001; fixed bug in vpdEarliestTDCHighThr;
StTpcHit.cxx, StTpcHit.h - modified to keep ADC values for clusters;
StTpcRawData.cxx, StTpcRawData.h - modified for pixel data;
StTrack.cxx, StTrack.h, StVertex.h - added IdTruth information for tracks and vertices;
StEventMaker
StEventMaker.cxx - modifyed to be consistent due to mofidication in StTriggerId (32 -> 64 bit);
StEventUtilities
StEventHelper.cxx, StEventHelper.h - modified to add remove method;
Stl3Util
ftf/FtfBaseTrack.h, FtfSl3.cxx - introduced compression scheme for large ratios to solve bug #1550;
gl3/gl3Track.h - - introduced compression scheme for large ratios to solve bug #1550;
StGammaMaker
StGammaMaker.h - added mutator to set gain variation in StGammaRawMaker;
StGammaRawMaker.h, StGammaRawMaker.cxx - added functionality to emulate gain variation;
StHltMaker
HLTFormats.h, StHltMaker.h, StHltMakerLinkDef.h, StHltMaker.cxx - new code for hlt;
StMcEvent
StMcEvent.cc - removed redundant zeroing;
StMcTrack.cc - modified to set mGeantId>=0 && mGeantId<=0; removed redundant zeroing;
StMiniMcEvent
StTinyMcTrack.cxx, StTinyMcTrack.h - modified to set GEANt id 'ushort';
StMiniMcMaker.cxx, StTinyMcTrack.h - mPdgId added;
StMiniMcMaker.cxx,StMiniMcEvent.cxx, StMiniMcEvent.h - added impact, phi impact & trigger time;
StTinyMcTrack.h - changed IO version;
StContamPair.h, StMiniMcMaker.cxx - added int mParentParentGeantId;
StContamPair.h - removed redundant mParentGeantId;
StMiniMcMaker
StMiniMcMaker.cxx, StMiniMcMaker.h - IdTruth part rewritten;
StMuDSTMaker
COMMON/StMuArrays.cxx, StMuArrays.h, StMuDst.cxx, StMuDst.h, StMuDstFilterMaker.cxx, StMuDstFilterMaker.h, StMuDstMaker.cxx, StMuDstMaker.h, StMuMomentumShiftMaker.cxx, StMuMomentumShiftMaker.h, StMuPrimaryVertex.cxx, StMuPrimaryVertex.h, StMuTrack.cxx, StMuTrack.h - added branches for MC tracks and vertices, added IdTruth to tracks and vertices, reserved a possiblity to remove Strange MuDst;
StMuMcTrack.h, StMuMcVertex.h - added new files for MC trackes branch;
St_QA_Maker
StEventQAMaker.cxx - modified to replace firsthit position-to-padrow with minimum padrow in topo map;
QAhlist_EventQA_qa_shift.h - modified to specify subsystems; modified to allow for specification of histogram usage by the required detector sets; remove some unused EmcCat4 plots;
StEventQAMaker.cxx, StEventQAMaker.h - modified for Pile-up cuts;
StEventQAMaker.cxx - modified for PCT check and dcaGeom only for TPC tracks;
StJetMaker
StJetSkimEventMaker.cxx - removed manual calculation of number of BTOF hits per primary vertex, get it from MuDst now;
StAnaPars.h, StJetMaker2009.cxx, StJetMaker2009.h, StPythiaFourPMaker.cxx - added support for Run 9 simulations;
StAnaPars.h, StJetMaker2009.cxx, StJetMaker2009.h - added support for StRandomSelector in StJetMaker2009;
vertex/StjPrimaryVertex.h - added support for Run 9 simulations;
mcparticles/StjMC.h, StjMCParticleToStMuTrackFourVec.h - added support for Run 9 simulations;
emulator/StMcTrackEmu.h - added support for Run 9 simulations;
StjeJetEventTreeWriter.cxx - removed manual calculation of number of BTOF hits per primary vertex, get it from MuDst now;
mudst/StjMCMuDst.cxx, StjMCMuDst.h - added support for Run 9 simulations;
RTS
EventTracker/ - FtfBaseTrack.h, FtfSl3.cxx, gl3Track.h - introduced compression scheme for large ratios,to solve bug #1550;
include/rts.h - modified;
RC_Config.h, rtsMonitor.h - modified rtsMonL1Counters;
iinclude/DAQ1000/ddl_lib.hh, rb.hh - added get_free_fifos;
include/DB/conditions/rtsDbConstants.h - updated number of of triggers;
include/DB/RunLog/daqEventTag.h - modified;
src/DAQ_BTOW/daq_btow.cxx - modified ;
src/DAQ_TPX/tpxGain.cxx, tpxGain.h, tpxPed.cxx, tpxStat.cxx - modified;
tpxCore.cxx, tpxCore.h, tpxFCF.cxx - updated for misc logging ;
src/DAQ_READER/daqReader.cxx - modified;
StarRoot
TAttr.cxx - removed removing same name attribute;
TTreeIter.cxx - modified to account Case with zero length array;
THelixTrack.cxx - added check for array with 0 size;
StMultiKeyMap.h, StMultiKeyMap.cxx - added GetNInst() for debuging;
Sti
StiNodePars.h - fixed zero curvature: 1e-6==>1e-9;
StiMaker
StiMaker.cxx, StiMaker.h, StiStEventFiller.cxx - modified to propagate IdTruth to StEvent;
StiStEventFiller.cxx - modified to enlarge array for possible candidates, add requirement that dominant track should have > 2 good hits;
StiMaker.cxx - added check that the corresponding Db maker has been instantiated before adding the detector; modify to move intialization of detectors in InitRun; remove alloc/free;
StMcAnalysisMaker
StMcAnalysisMaker.cxx - adjusted for changes in StAssociationMaker;
StStrangeMuDstMaker
StKinkController.cxx, StV0Controller.cxx, StXiController.cxx - adjusted to StAssociationMaker;
StTableUtilities
StG2TrackVertexMap.cxx, StG2TrackVertexMap.h - added new files to eliminate short live particles from track to vertex association;
StTpcHitMaker
StTpcHitMaker.cxx, StTpcHitMaker.h, StTpcRTSHitMaker.cxx, StTpcRTSHitMaker.h - set limit on number of hits starting at time bin 0;
StTpcHitMaker.cxx, StTpcRTSHitMaker.cxx - added ADC to Tpc hit;
StTpcRSMaker
StTpcRSMaker.cxx - added hack to avoid sqrt(-); fixed betaMin calculations;
StTpcRSMaker.cxx, TpcRS.C - replaced step function by interpolation for dN/dx versus beta*gamma ;
StTpcRSMaker.cxx, StTpcRSMaker.h, TpcRS.C - added extrapolation in region beta*gamma < 0.3;
TpcRS.C - removed hits and ranco for output;
StTreeMaker
StTreeMaker.cxx - fixed bug in parallel reading files;
StVpdCalibMaker
StVpdCalibMaker.cxx, StVpdCalibMaker.h - modified to change MaxBin for ToT arrays from 60 to 128 (in agreement with the IDL definition of vpdTotCorr);
StiUtilities
StiPullEvent.cxx - fixed numbering;
StTriggerUtilities
StDSMUtilities/DSMAlgo_EM201_2009.cc - added JP0 bit for EM201;
Emc/StEmcTriggerSimu.h - added more access functions;
L2Emulator/StL2_2009EmulatorMaker.cxx - added L2gamma; changed name f L2JetHigh algo from "jet" to "jetHigh" to get correct parameters from L2 setup files;
StL2TriggerSimu.h - fixed nontrivial constructors ;
StL2_2009EmulatorMaker.cxx - modified to get names of 2009 L2 algos to match names in config file;
StGenericL2Emulator2009.cxx - implemented full vector of L2 triggers; modified to use fakeToken2;
StL2_2009EmulatorMaker.cxx - modified to change header file for L2 offset;
L2Emulator/L2gammaAlgo/L2bemcGamma2009.cxx, L2bemcGamma2009.h, L2eemcGamma2009.cxx, L2eemcGamma2009.h, L2gammaResult2009.h, Makefile.2009 - added L2gamma2009;
L2Emulator/L2algoUtil/L2VirtualAlgo2009.h - Initialize array of pointers to null; fixed call to memset;
l2Algorithm.h - added newfile to chenge header file for L2 odffsets;
L2VirtualAlgo2009.cxx - initialized mRunNumber to -1;
pams
geometry/geometry/geometry.g - added y2008d, y2009d, y2010c and updated y2011 geometry tags. These tags now contain an improved model of the SVT support cone, specifically the support rods. Previous geometry assumed solid carbon, now a carbon-fiber nomex sandwich is implemented; introduced UPGR2012 geometry as y2011 with inner detectors (FGT, SSD) and supports removed;
geometry/bbcmgeo/bbcmgeo.g - added "ENDFILL" statements where needed;
geometry/btofgeo/btofgeo2.g, btofgeo3.g, btofgeo4.g, btofgeo5.g, btofgeo6.g, btofgeo7.g - cosmetic changes needed for AgML translation;
geometry/calbgeo/calbgeo.g, calbgeo1.g - added parentheses around expression in IF statements;
geometry/fpdmgeo/fpdmgeo.g, fpdmgeo1.g, fpdmgeo2.g, fpdmgeo3.g - switched from fortran-style to mortran-style continuation lines;
geometry/ftpcgeo/ftpcgeo1.g - removed redundant positioning of FKWI (ignored in AgSTAR);
geometry/ftro/ftrogeo.g - renamed "raddeg" => "myraddeg" to prevent name clash with standard starsim constant;
geometry/ecalgeo/ecalgeo.g - syntax fix: EndFILL added to terminate fill sections;
geometry/quadgeo/quadgeo.g - modified for AgML syntax matching;
geometry/scongeo/scongeo.g - an improved model of the SVT support cone, specifically the support rods is implemented. Previous geometry assumed solid carbon, now a carbon-fiber nomex sandwich is implemented;
geometry/shldgeo/shldgeo.g - modified for AgML syntax matching;
geometry/sisdgeo/sisdgeo.g, sisdgeo1.g, sisdgeo2.g, sisdgeo3.g, sisdgeo4.g, sisdgeo5.g, sisdgeo6.g - modified for AgML syntax matching;
geometry/tpcegeo/tpcegeo3a.g - added new file with significant changes, mainly to remove equivalence statements which are not permitted in AgML;
tpcegeo3.g, tpcegeo3a.g - changes positioning of TBRW volume so that it is positioned as an ONLY volume to remove ambiguity in geant tracking, currently volumes TBRW (Aluminum) and TWAS (Air) overlap;
tpcegeo.g, tpcegeo1.g - added "EndFILL" statements where required;
geometry/wallgeo/wallgeo.g - minor changes to system of units;
geometry/zcalgeo/zcalgeo.g - minor syntax changes;
sim/gstar/gstar_part.g - corrected mistakes in the Omega_plus, Omega_minus and XiMinus and XiPlus definitions of particles; removed pdg ID from all embedding versions of particles, as these conflict with pythia simulations;
StarDb
VmcGeometry/y2011.h, Geometry.y2008d.C, Geometry.y2009d.C, Geometry.y2010c.C, y2008d.h, y2009d.h, y2010c.h - added new files for improved model of the SVT support cone. Previous geometry assumed solid carbon, now a carbon-fiber nomex sandwich is implemented;
Calibrations/tpc/tpcStatus.C - adde new TPC status table;
tpcAnodeHVavg.y2011.C, tpcAnodeHV.y2011.C - set default sector anode voltage to 1100 V for year 2010;
StDb
idl/tpcStatus.idl - added new TPC status table ;
tpcMaxHits.idl - updated max hits table;
OnlTools
Jevp/StJevpBuilders/daqBuilder.cxx, bemcBuilder.cxx, l3Builder.cxx, tofBuilder.cxx, upcBuilder.cxx - updated;
Jevp/StJevpPlot/JevpPlot.cxx, JevpPlotSet.cxx - updated;
Jevp/StJevpPresenter/EvpMain.cxx, JevpGui.cxx, JevpGui.h, evpPresenterBaseScript.C - updated;
Jevp/StJevpServer/DisplayDefs.cxx, DisplayDefs.h, JevpServer.cxx, JevpServer.h - updated;
JTMonitor.cxx JTMonitor.h - added new files;
OnlinePlots/HistogramGroups/TOFcheckHistogramGroup.cxx, TOFcheckHistogramGroup.h - TOF check updated; modified seperate to separate real TOF bunchdid errors from missing bunchid errors; missing trays can now be well identified;
MTDtriggerinfoHistogramGroup.cxx - mapping for MTD 1 was corrected according to the changes on the MTD detector, LE and TE are drawn in a compact way;
MTDtriggerinfoHistogramGroup.cxx, MTDtriggerinfoHistogramGroup.h - more unique defined name: ntray -> nMTDtrays;
MTDhitsHistogramGroup.cxx, MTDhitsHistogramGroup.h - modified for MTD; modified to make sure all hists are addressed in reset() and destructor;
- January 27 , 2010
new library SL11a tagged as SL11a has been created and built on SL5.3 (32bits & 64bits platforms) and SL4.4 platform. Library was tested, found bugs fixed and library was released on February 1.
gcc version 4.3.2 20081007 (Red Hat 4.3.2-7)
Main features:
- implemented RTS code for new detectors: FGT and MTD;
- implemented default initialization for TOF database table and new module for V0 TOF correction;
- implemented g2t hits for FMS;
- added high-pT charged hadron filter;
Next codes have been updated:
StAnalysisUtilities
StHistUtil.cxx - added Kolmogorov maximum distance as default;
StHistUtil.cxx, StHistUtil.h - modified to allow plain ROOT files with hists, and individual plot generation from 1 file;
StBFChain
BigFullChain.h - switched order of loading DbUtil and tpcDb ;
StBTofUtil
StBTofSortRawHit.cxx - implemented default initialization of database table in case dataset is not found ;
StV0TofCorrection.cxx, StV0TofCorrection.h - new module for V0 TOF Correction;
StDAQMaker
StRtsReaderMaker.cxx - modified to use LOG_DEBUG only in maker's Debug modes;
StDbBroker
StDbWrappedMessenger.cc - fixed pseudo-leaks in c-string and xml-string assignments ;
StDbUtilities
StGlobalCoordinate.cc/hh, StSvtCoordinateTransform.cc, StTpcCoordinate.cxx/h, StTpcCoordinateTransform.cc/hh, StTpcLocalSectorAlignedCoordinate.hh StTpcLocalSectorAlignedDirection.hh - modified TpcDb interfaces and Tpc coordinate transformation ;
StDetectorDbMaker
StDetectorDbRichScalers.h, St_trigDetSumsC.h - introduced corrected coincidences;
St_trigDetSumsC.h - coincidence correction made public and static;
StTpcHitErrors.h - added new file: place holder for new Tpc hit errors;
StDetectorDbChairs.cxx, St_tpcDimensionsC.h, St_tpcElectronicsC.h, St_tpcFieldCageC.h, St_tpcPadPlanesC.h, St_tpcWirePlanesC.h, St_trgTimeOffsetC.h - modified TpcDb interfaces and Tpc coordinate transformation;
St_starClockOnlC.h - modified to add sampling Frequency method;
StDbLib
MysqlDb.cc - enabled automatic reconnect via mysql option; added define guard (mysql version) to enable automatic reconnect in mysql 5.0.44+, excluding mysql 4;
MysqlDb.cc, StlXmlTree.cxx - fixed pseudo-leaks in c-string and xml-string assignments;
StEmcRawMaker
StEemcRaw.cxx, StEemcRaw.h - added event time to EEMC header check;
StEvent
StTpcHit.h - modified to add reference to FCF flag definition; fixed location of FCF_flags include;
StHit.h - changed mFlag type from UChar_t to UShort_t (bug #2058);
StHit.cxx - modified to change mFlag type from UChar_t to UShort_t ;
StFmsDbMaker
StFmsDbMaker.cxx - fixed bug in function nRow and nColumn;
StGammaMaker
StGammaEventMaker.cxx/h - modified to fill spin/bunch crossing information;
StGammaStrip.cxx - modified to zero data members in constructor ;
StGammaStrip.h - added ADC to public members;
StGammaRawMaker.cxx - modified to fill StGammaStrip::adc and cut on strips within 3 rms of pedestal;
modified to save ADC of BSMDP strips;
StGenericVertexMaker
Minuit/StMinuitVertexFinder.h - increased maximum number of possible seeds;
StLaserAnalysisMaker
LaserEvent.cxx - modified to use sector/padrow in global => local transformation;
StJetMaker
emulator/StjeDefaultJetTreeWriter.cxx - updated for particle jets;
StMcEvent
StMcEvent.hh, StMcTrack.cc, StMcTrack.hh - modified to add FMS data;
StMcEventMaker
StMcEventMaker.cxx, StMcEventMaker.h - modified to add FMS data;
StMCFilter
StFmsPi0Filter.cxx - modified to switch RejectEG and RejectGT, so that filter will work for hijing events;
StHighPtFilter.h StHighPtFilter.cxx - implemented high-pt charged hadron filter;
StPass0CalibMaker
StSpaceChargeEbyEMaker.cxx - included corrected coincidence rates in ntuple;
StRTSClient
FCFMaker/FCFMaker.cxx - modified TpcDb interfaces and Tpc coordinate transformation;
StiMaker
StiStEventFiller.cxx - added track id into StiPull ;
StTpcDb
StTpcDb.cxx StTpcDb.h StTpcDbMaker.cxx StTpcDbMaker.h - modified TpcDb interfaces and Tpc coordinate transformation;
StRTpcDimensions.cxx/h, StRTpcElectronics.cxx/h, StRTpcFieldCage.cxx/h, StRTpcPadPlane.cxx/h, StRTpcSlowControlSim.cxx/h, StRTpcWirePlane.cxx/h, StTpcDimensionsI.h, StTpcElectronicsI.h, StTpcFieldCageI.h, StTpcPadPlaneI.h, StTpcSlowControlSimI.h, StTpcWirePlaneI.h - removed files;
StTpcHitMaker
StTpcHitMaker.cxx - added FCF_flags include, and exclude any flagged hit from AfterBurner();
changed flag type from UChar_t to UShort_t ;
StTpcRSMaker
StTpcRSMaker.cxx - added fix for AuAu7 2010 embdedding; modified to cut hits outside time buckets range;
StTrsMaker
StTrsMaker.cxx - modified TpcDb interfaces and Tpc coordinate transformation;
include/StTrsChargeSegment.hh - modified TpcDb interfaces and Tpc coordinate transformation;
src/StTrsChargeSegment.cc - modified TpcDb interfaces and Tpc coordinate transformation;
StVpdCalibMaker
StVpdCalibMaker.cxx - implemented default initialization of database table in case dataset is not found;
modified to apply VPD outlier correction in StEvent mode (bug fixed);
StVpdCalibMaker.cxx/h - modified to allow user to "force" VPD-start or startless mode, regardless of dbase setting;
St_geant_Maker
St_geant_Maker.cxx - modified for FMS simulation;
St_QA_Maker
TpcHitUtilities.cxx - modified TpcDb interfaces and Tpc coordinate transformation;
St_tcl_Maker
StTpcFastSimMaker.cxx - added pile-up;
RTS
EventTracker/ eventTrackerLib.cxx, gl3Event.cxx - modified;
include/daqModes.h - added checkpoint ;
rtsSystems.h - added future dets. Removed HFT_ID; changed RP2 to RPII;
RC_Config.h - upgraded for 64 trigger; modified to distinguish between number of triggers configurable and actually in play;
rtsMonitor.h - upgraded for 64 trigger;
prepareGbPayload.h - upgraded for 64 trigger;
rts.h, tasks.h - updated;
iccp2k.h - added evb summary;
include/RC/RC_MsgDefs.h - updated;
src/DAQ_FGT/daq_fgt.cxx, daq_fgt.h - added new code for FGT detector ;
fgtPed.cxx, fgtPed.h - added FGT pedestal routines ;
daq_fgt.cxx, daq_fgt.h - modified for FGT pedestal routines ;
src/DAQ_READER/daqReader.cxx, daqReader.h - added 64 trigger extensions ;
daq_dta.cxx, daq_dta.h - changed char to const char ;
daqReader.cxx daqReader.h - added environment variable EVP_HOSTNAME; added evb summary;
evp.h - implemented new points for proper reader;
src/DAQ_TPX/tpxFCF.cxx, tpxFCF.h, tpxPed.cxx, tpxPed.h - added checkpoint ;
daq_tpx.cxx, tpxCore.cxx, tpxCore.h, tpxGain.cxx, tpxGain.h, tpxStat.cxx, tpxStat.h - added checkpoint ;
src/DAQ_MTD/daq_mtd.cxx,daq_mtd.h - added new codes for MTD detector;
src/SFS/daq_test.C, fs.C, sfs_index.cxx, sfs_index.h - fast read added;
Sti
StiVMCToolKit.cxx, StiVMCToolKit.h - added TGeoShape::kGeoEltu shape for SROD ;
StiTpcSeedFinder.cxx - suppressed seed print outs ;
StiTpc
StiTpcHitLoader.cxx - bug fixed related to FCF_flags ;
StiTpcDetectorBuilder.cxx, StiTpcDetectorBuilder.h - modified TpcDb interfaces and Tpc coordinate transformation;
StarClassLibrary
StHelix.hh, StThreeVector.hh, StarClassLibraryLinkDef.hh - modified to avoid warning for gcc 4.5.1 compiler ;
StarRoot
THelixTrack.cxx, THelixTrack.h - inversion of derivative matrix added;
TRandomVector.cxx, TRandomVector.h - added automatic creation non zero correlation;
TMDFParameters.cxx, TMDFParameters.h - added new files to handle multidimensional parameterization;
pams
gen/hijing_382/hijev.F - added additional (but optional) line to configuration file to specify whether shadowing should be used or not;
sim/g2t/g2t_volume_id.g - modified for FMS simulation;
g2t_fpd.F, g2t_fpd.idl - added new files;
sim/idl/g2t_track.idl - modified for FMS g2t hits;
OnlTools
Jevp/ - first release of new module for online monitoring histos;
2012
STAR SOFTWARE NEWS  December 7, 2012
---------------------
The present release assignment:
             SL06g    (SL06g_2)  ROOT_LEVEL 5.12.00 SL4.4, MC production for TUP
             SL07c    (SL07c_3)  ROOT_LEVEL 5.12.00 CuCu 200&62GeV run 2005,TPC+SVT+SSD tracking
             SL07d    (SL07d_2)  ROOT_LEVEL 5.12.00 auau 200GeV stream data run 2007, TPC tracking
             SL08c    (SL08c_5)  ROOT_LEVEL 5.12.00 auau 200GeV run 2007,TPC+SVT+SSD tracking
             SL08e    (SL08e_2)  ROOT_LEVEL 5.12.00 pp 200GeV & dAu 200GeV, run 2008
             SL08e_embed (SL08e_5) ROOT_LEVEL 5.12.00
             SL08f    (SL08f_3)  ROOT_LEVEL 5.12.00 last version with EVP_READER, MC production
             SL08f_embed (SL08f_4) ROOT_LEVEL 5.12.00
             SL09b    (SL09b)    ROOT_LEVEL 5.12.00 pp 500GeV W preproduction
             SL09e    (SL09e)    ROOT_LEVEL 5.22.00 SL5.3, last library with old pams (tpt)
             SL09g    (SL09g_1)  ROOT_LEVEL 5.22.00 run 2009 pp 500GeV data production
             SL09g_embed (SL09g_2Embed_v7)   ROOT_LEVEL 5.22.00
             SL10c    (SL10c_2)  ROOT_LEVEL 5.22.00 run 2009 pp 200GeV production
             SL10c_embed (SL10c_embed_v3)  ROOT_LEVEL 5.22.00
             SL10d    (SL10d)    ROOT_LEVEL 5.22.00
             SL10h    (SL10h_2)  ROOT_LEVEL 5.22.00 run 2010 auau 7.7-39GeV production
             SL10h_embed (SL10h_3) ROOT_LEVEL 5.22.00
             SL10i    (SL10i_2)  ROOT_LEVEL 5.22.00
             SL10k    (SL10k)    ROOT_LEVEL 5.22.00 run 2010 auau 39-200GeV production
             SL10k_embed (SL10k_embed_v8) ROOT_LEVEL 5.22.00
             SL11a    (SL11a)    ROOT_LEVEL 5.22.00
             SL11b    (SL11b)    ROOT_LEVEL 5.22.00
             SL11c    (SL11c_1)  ROOT_LEVEL 5.22.00 auau 19.6Gev run 2011 preproduction
             SL11d    (SL11d_1)  ROOT_LEVEL 5.22.00 run 2011 pp 500GeV & auau 19-200GeV production
             SL11d_embed (SL11d_embed_v3) ROOT_LEVEL 5.22.00
             SL11e    (SL11e)    ROOT_LEVEL 5.22.00
             SL12a    (SL12a)    ROOT_LEVEL 5.22.00
             SL12a_embed    (SL12a_embed_v1)    ROOT_LEVEL 5.22.00
             SL12b    (SL12b)    ROOT_LEVEL 5.22.00
       old-> SL12c    (SL12c)    ROOT_LEVEL 5.22.00 UU 193GeV run 2012 preproduction
       pro-> SL12d    (SL12d)    ROOT_LEVEL 5.22.00 UU 193GeV run 2012 production
       new-> SL12e    (SL12e)    ROOT_LEVEL 5.22.00
       dev-> DEV                 ROOT_LEVEL 5.22.00
      .dev-> .DEV                ROOT_LEVEL 5.22.00

-------------------------------------------------
Release History
SL12a library
SL12b library
SL12c library
SL12d library
SL12e library
- December 3, 2012
new library SL12e tagged as SL12e has been created and built on SL5.3 (32bits & 64bits platforms) and SL4.4 . Library was tested and released on December 7.
gcc version 4.3.2 20081007 (Red Hat 4.3.2-7)
Main features:
- first release of event generator framework StarGenerator ;
- added Pepsi event generator for ep collisions;
- added UrQMD v.3.3.1 event generator ;
- added new versions of PYHIA v.8.1.62 and HIJING v.1.383 event generators ;
- code modifications for TPC upgrade, iTpx version;
- RTS DAQ code updated for GMT & IST detectors;
- added RTS DAQ code for PXL ;
- further development of FGT related codes & geometry;
- several bugs fixed;
Next codes have been updated
asps
Simulation/gcalor/neutron/morini.F - added STAR location for xsneut96.dat;
StAnalysisMaker
StAnalysisMaker.cxx, StAnalysisMaker.h - modified to compress print out; added print out for ToF and Emc hits; added PMD to summary print;
StAnalysisMaker.cxx - added separators for summary;
StarLogger
StLoggerManager.cxx - modified to add color by demand for '_GNUC_';
StWsAppender.cxx, StWsAppender.h, StWsLogger.cxx, StWsLogger.h, picojson.h - added new code, initial revision of WebService logger;
StarGenerator
BASE/AgStarReader.cxx, StarGenerator.cxx, StarParticleStack.cxx, StarPrimaryMaker.cxx, AgStarReader.h, StarGenerator.h, StarParticleStack.h, StarPrimaryMaker.h - added new code for event generator framework;
EVENT/StarGenAAEvent.cxx, StarGenEPEvent.cxx, StarGenEvent.cxx, StarGenParticle.cxx, StarGenPPEvent.cxx, StarGenAAEvent.h, StarGenEAEvent.h, StarGenEPEvent.h, StarGenEvent.h, StarGenParticle.h, StarGenPPEvent.h - added new code for event generator framework;
Herwig6_5_20/Herwig6.cxx, Herwig6.h, SetBeams.F, StarHerwig6.cxx, StarHerwig6.h, StarHerwig6LinkDef.h, address.F, herwig6520.F, herwig6520.inc - HERWIG event generator moved from pams to new framework;
Hijing1_383/address.F, hijing1.383.F, hipyset1.35.F, Hijing.cxx, Hijing.h, StarHijing.cxx, StarHijing.h - added new version v.1.383 of HIJING event generator;
Kinematics/ StarKinematics.cxx, StarKinematics.h - added simple "particle gun" type event generator. Allows users to:
- add single particles to the event;
- throw particles flat;
- throw particles according to pt, eta and phi distribution;
- multiple sets of particles may be added per event with different kinematic ranges and/or individual particles added to the event;
Pepsi/- added new event generator for ep collisions;
Pythia6_4_23/ - PYTHIA version v.6.4.23 moved from pams to new event generator framework;
Pythia8_1_62/ - added new version v.8.1.62 of PYTHIA event generator;
StarLight/ - starlight event generator moved from pams to new framework;
TEST/StTruthTestMaker.cxx, StTruthTestMaker.h - added new maker for test of ID truth;
UrQMD3_3_1/ - 1fluid.F, RunFunction.F, StarUrQMD.cxx, StarUrQMD.h, UrQMD.cxx, UrQMD.h, addpart.F, address.F, angdis.F, anndec.F, baryons.patch, bessel.F, blockres.F, boxinc.inc, boxprg.F, cascinit.F, colltab.inc, coload.F, comnorm.inc, comres.inc, coms.inc, comstr.inc, comwid.inc, dectim.F, defs.inc, delpart.F, detbal.F, dwidth.F, dwidth.o, erf.F, error.F, freezeout.inc, getmass.F, getspin.F, hepchg.F, hepcmp.F, hepnam.F, init.F, input.F, inputs.inc, intirefs.txt, iso.F, ityp2pdg.F, itypdata.inc, jdecay2.F, make22.F, newpart.inc, numrec.F, options.inc, outcom.inc, output.F, paulibl.F, proppot.F, pythia6409.F, risctime.F, saveinfo.F, scatter.F, script.py, siglookup.F, string.F, tabinit.F, uhmerge.F, upmerge.F, urqmd.,F whichres.F - initial revision of UrQMD code;
UrQMD3_3_1/eosfiles/chiraleos.dat, chiralmini.dat, chiralsmall.dat, hadgas_eos.dat, hg_eos_mini.dat hg_eos_small.dat - initial revision of UrQMD code;
UrQMD3_3_1/eosfiles/qgpeos/qgpn00.dat, qgpn05.dat, qgpn10.dat, qgpn100.dat, qgpn105.dat, qgpn110.dat, qgpn115.dat, qgpn15.dat, qgpn20.dat, qgpn25.dat, qgpn30.dat, qgpn35.dat, qgpn40.dat, qgpn45.dat, qgpn50.dat, qgpn55.dat qgpn60.dat, qgpn65.dat, qgpn70.dat, qgpn75.dat, qgpn80.dat, qgpn85.dat, qgpn90.dat, qgpn95.dat - initial revision of UrQMD code;
UrQMD3_3_1/unedited_src/1fluid.f, addpart.f, alpharanf.f, angdis.f, anndec.f, bessel.f, blockres.f, boxinc.f, boxprg.f, cascinit.f, colltab.f, coload.f, comnorm.f, comres.f, coms.f, comstr.f, comwid.f, dectim.f, defs.f, delpart.f, detbal.f, dwidth.f, erf.f, error.f, freezeout.f, genranf.f, getmass.f, getspin.f, gnuranf.f, hepchg.f, hepcmp.f, hepnam.f, init.f, input.f, inputs.f, intranf.f, iso.f, ityp2pdg.f, itypdata.f, jdecay2.f, make22.f, newpart.f, numrec.f, options.f, outcom.f, output.f, paulibl.f, proppot.f, pythia6409.f, ri6000ranf.f, risctime.f, saveinfo.f, scatter.f, siglookup.f, string.f, tabinit.f, uhmerge.f, upmerge.f, urqmd.f, whichres.f - initial revision of UrQMD code;
UTIL/StarParticleData.cxx, StarParticleData.h, StarRandom.cxx, StarRandom.h - added new code for event generator framework;
StBFChain
BigFullChain.h - added dependence tpcDB on StEvent; changed fgt option ordering; modified to make 'StAnalysisMaker' the last maker in the chain;
Bfc.h, BigFullChain.h, StBFChain.cxx, StBFChain.h - modified to use Attribute instead of m_Mode; added options: RunG, flux, pythia and PythiaEmbed;
StBFChain.cxx - modified to propagate option 'Wenu';
StChain
StMaker.cxx - added geometries y2011b, y2012b, devT (iTpx upgrade);
StDaqLib
GENERIC/EventReader.cxx - fixed some SSD issue;
StDAQMaker
StDAQReader.cxx, StDAQReader.h, StRtsReaderMaker.cxx, StSCReader.cxx - modified to use Jeff's method "skip_then_get";
StSCReader.cxx, StSCReader.h - added accessor functions for more SC table elements, and set time offset;
StDbLib
StDbServiceBroker.cxx, StHyperCacheFileLocal.cpp - added unistd.h for gcc 4.7;
StHyperCacheFileLocal.cpp, StHyperCacheFileLocal.h, StHyperUtilFilesystem.cpp - added an option to remove all pre-cached data upon job start;
StHyperLock.cpp, StHyperLock.h - added new files for locking support, required for a cache management facility;
StDbUtilities
StTpcCoordinateTransform.hh, StTpcCoordinateTransform.cc - made corrections for iTpx (TPC upgrade);
StDbUtilitiesLinkDef.h - modified to correct signature;
StTpcCoordinateTransform.cc, StTpcCoordinateTransform.hh - modified to move xFromPad from h- to cxx-file;
StMagUtilities.cxx, StMagUtilities.h - modified to switch from hardcoded to DB for several values, and fix a bug with east-west-asymmetric 3DGridLeak since r.1.82; modified to store row radii in arrays of doubles;
StDetectorDbMaker
StDetectorDbChairs.cxx, StTpcSurveyC.h, St_tpcPadGainT0C.h, St_tpcRDOMasksC.h, St_tpcStatusC.h - modification added for TPC upgrade iTpx; St_tpcPadGainT0BC.h - added new file for iTpx modification;
StDetectorDbChairs.cxx - modified to retire tpcHitErrors;
St_tpcHitErrorsC.h - removed to retire tpcHitErrors;
StDetectorDbChairs.cxx, St_tpcAnodeHVC.h, St_tpcAnodeHVavgC.h - added fixes for upgraded iTpx;
StDetectorDbChairs.cxx, St_tpcAnodeHVavgC.h, St_tpcCorrectionC.h - changes related to low down Anode Voltage;
StDetectorDbMakerLinkDef.h, StDetectorDbRichScalers.h - modified to eliminate StDetectorDbRichScalers.h and replace it by typedef;
StdEdxY2Maker
StTpcdEdxCorrection.cxx, StTpcdEdxCorrection.h, StdEdxY2Maker.cxx, StdEdxY2Maker.h - modification made for iTpx;
StdEdxY2Maker.cxx - modified to get rid of hardcoded no.of pad rows;
StTpcdEdxCorrection.cxx - removed queue for whole Calibrations/tpc;
StEvent
StEmcCluster.cxx, StEmcCluster.h, StEmcRawHit.cxx, StEmcRawHit.h - added print out;
StEnumerations.h - added Tpc West Only and East Only bits;
StDetectorName.cxx, StDetectorName.h - added detector names for detector enumerations;
StTrack.h - added handler for Tpc West Only and East Only bits;
StPrimaryVertex.cxx, StPrimaryVertex.h - modified to add no.of Tpc West Only and East Only tracks;
StTpcRawData.cxx - modified not to use empty ADC;
StTpcHit.h - modified to allow more than 64 pad rows;
StEmcPoint.cxx, StEmcPoint.h, StHit.cxx, StPrimaryTrack.cxx - added/modified print out;
StEnumerations.h - added 3 new members to StFgtClusterSeedType;
StEventTypes.h - added includes for Fgt;
StFgtHit.h - major revision, various new methods and member added;
StEventUtilities
StRedoTracks.cxx - modified to reduce some overhead DB queries by being more specific about needed tables;
StEventHelper.h - modified to remove warning messages;
StEventHelper.cxx - modified to account changes of signature for ShowMembers;
StRedoTracks.cxx - added holder for new StMagUtilities;
StFgtA2CMaker
StFgtA2CMaker.cxx, StFgtA2CMaker.h - modified to split seedTypes3 into raising (kFgtSeedTypes3) and falling (kFgtSeedTypes4); added new seed Type (kFgtSeedTypes5) with 3 timebins in row above 3 sigma; modified to adjust charge uncertainty factor by setPedSigFactor4Charge(); added option to read ped & status from text file, default is reading from DB;
StFgtClusterMaker
StFgtSeededClusterAlgo.cxx, StFgtSeededClusterAlgo.h - updated to fillin NStrip/SeedType/MaxTimebin/EvenOddChargeAsy in StFgtHit;
modified to accept kFgtSeedTypes4 & 5 for clustring ;
modified to set kFgtClusterTooBig instead of kFgtClusterNo into strips when cluster is too big;
added setThreshold2AddStrip() (proposed default 2 ~ 3 from cosmic data);
slightly changed to make trying different weight for getting R/PHI easy; slightly changed phi/even strip logic;
StFgtSimulatorMaker
StFgtSlowSimuMaker.cxx - modified to get fgtDb automatically without setting by hand; default changed to do pedestal (switch_addPeds=1 in constructor); bug fixed in logic flaw when creating timebin distribution causing "flat" hit; bug fix which causes a event to take forever when there is a hit but no signal in a quadrant; bug fixed for cut_2DampCutoff becoming 0 for empty quadrant digitization, causing taking forever to finish; bug fix in exportStripPlane2StEvent() which account for ROOT histo first bin is at index=1 TWICE;
StFgtUtil
StFgtConsts.h - made FgtSlowSimu related fixes for r/phi consistency & speed up ;
geometry/StFgtGeom.cxx - made FgtSlowSimu related fixes for r/phi consistency & speed up;
StFtpcSlowSimMaker
StFtpcSlowSimMaker.cxx - modified to supress warning;
StFtpcTrackMaker
StFtpcConfMapper.cc, StFtpcTrackMaker.cxx, StFtpcTrackingParams.cc, StFtpcTrackingParams.hh - modified to supress warning;
St_geant_Maker
St_geant_Maker.cxx, St_geant_Maker.h - added flux histograms; modified to use Attributes intead of m_Mode;
modified for for new generator framework ;
StGenericVertexMaker
StGenericVertexMaker.cxx - modified to reduce some overhead DB queries by being more specific about needed tables;
StiPPVertex/StPPVertexFinder.cxx - removed second addition of btofGeom to db maker ;
StMuDSTMaker
StMuDSTMakerLinkDef.h - added new file for MuDst enumerations to dictionary ;
COMMON/StMuArrays.h, StMuPrimaryVertex.cxx, StMuPrimaryVertex.h - modified to use of Tpc West and East Only no. of tracks;
StMuMomentumShiftMaker.cxx - added const to Char_t;
StMuPrimaryTrackCovariance.cxx - fixed return;
StMuArrays.cxx, StMuArrays.h, StMuDst.cxx, StMuDst.h, StMuDstMaker.cxx, StMuDstMaker.h, StMuMtdCollection.h - modified to change array stucture of MTD upon request of the TOF group. MTD arrays now on top level, rather than within __NARRAYS__; added structure for FGT; fixed bugs in array offsets for the MTD;
StMuDstMaker.cxx - added protection for empty EMC raw data;
StMuFgtCluster.cxx, StMuFgtCluster.h, StMuFgtStrip.cxx, StMuFgtStrip.h, StMuFgtStripAssociation.h - added for FGT clustering;
StMuMcTrack.cxx - fixed print out, bug #2442;
StMuDst.cxx, StMuDst.h, StMuEmcCollection.cxx, StMuEvent.cxx, StMuFmsCollection.cxx, StMuPmdCollection.cxx, StMuPrimaryVertex.cxx - modified to replace GetEntries() by GetEntriesFast(); fixed print out;
StarRoot
TF1Fitter.h, TF1Fitter.cxx - added simple TF1 fitter;
StiMaker
StKFVertexMaker.cxx, StPhiEtaHitList.cxx, StPhiEtaHitList.h, StiStEventFiller.cxx - modified to use Tpc West Only and East Only tracks;
StTrack2FastDetectorMatcher.cxx - fixed bug #2436 with misplacement of TObjectSet;
StPhiEtaHitList.cxx - fixed CTB eta limits;
StiStEventFiller.cxx, StiStEventFiller.h - developed for fillpull;
StiSvt
StiSvtDetectorBuilder.cxx, StiSvtHitLoader.cxx, StiSvtHitLoader.h - modified due to removing StiSvtHitLoader.h;
StiSvtLayerLadder.h - removed;
StiTpc
StiTpcDetectorBuilder.cxx, StiTpcHitLoader.cxx - added corrections for iTpx;
StiUtilities
StiPullEvent.h - Errors added;
StPass0CalibMaker
StSpaceChargeDistMaker.cxx, StSpaceChargeEbyEMaker.cxx - added corrections for iTpx;
StSpaceChargeEbyEMaker.cxx, StVertexSeedMaker.cxx - modified to reduce some overhead DB queries by being more specific about needed tables;
StVertexSeedMaker.cxx - modified to protect against zero entries, and a more unique entry list name;
StEvtTrigDetSumsMaker.cxx, StEvtTrigDetSumsMaker.h - added new files to introduce StEvtTrigDetSumsMaker;
StSpaceChargeDistMaker.cxx, StSpaceChargeDistMaker.h - modified to include distortion corrections, which must be evenly sampled per event (per hit);
modified to use TPC dE/dx correction code, and introduce de-smearing;
removed de-smearing bias in z and treat z more differentially;
StSsdPointMaker
StSsdPointMaker.cxx - removed check for .histos;
StTpcDb
StTpcDb.cxx, StTpcDb.h, StTpcDbMaker.cxx - added rotation for Half Tpc;
StTpcHitMaker
StTpcHitMaker.cxx, StTpcHitMaker.h, StTpcRTSHitMaker.cxx, StTpcRTSHitMaker.h - modification made for iTpx;
StTpcAvClusterMaker.cxx, StTpcAvClusterMaker.h - added new files for TPC upgrade, iTpx;
StTpcHitMaker.cxx, StTpcRTSHitMaker.cxx - modified to increase no. of pad rows; modified to set the same cuts for online clusters as used for offline data;
StTpcRTSHitMaker.cxx - modified not to include cluters with flags FCF_DEAD_EDGE or FCF_ROW_EDGE; added FCF_BROKEN_EDGE flag to reject clusters; added fake track_id >= 10000;
StTpcHitMoverMaker
StTpcHitMoverMaker.cxx - modified to retire StTpcLocalSectorAlignedCoordinate;
StTpcRSMaker
StTpcRSMaker.cxx, TpcRS.C - modification made for iTpx, (TPC upgrade); added corrections for iTpx upgrade;
StTpcRSMaker.cxx - modified to replace elsif by else and if; fixed missing declaration;
TF1F.cxx - modified to adjust bin center position;
TpcRS.C - modified not to use xgeom for devT configurations;
StTpcRSMaker.cxx - added wider Voltage range for accepted clusters (-500V) than used for dEdx calculation;
RTS
EventTracker/FtfFinder.cxx - added changes for apple;
include/rtsSystems.h - removed PMD detector and added PXL;
fcfClass.hh, myrinet.h, platform.h, rts.h, rtsErrMsg.h - added changes for apple;
RC_Config.h, cmds.h, iccp.h, rtsSystems.h - updated for L4_SUPPORT;
daqModes.h - added new file;
include/UNIX/ThreadsMsgQueue.hh - added changes for apple;
include/SUNRT/clock.h - added changes for apple;
include/DAQ1000/mscript.h - added changes for apple;
include/RC/RC_MsgDefs.h - updated for L4_SUPPORT;
src/rtsmakefile.def - removed ENABLE_CROSS_COMPILER for non-daqman nodes;
rtsplusplus.def - added eck in;
src/DAQ_READER/daqReader.cxx, daq_dta_structs.h, msgNQLib.cxx - added changes for apple;
daq_dta.cxx, daq_dta.h - added meta data pointer;
src/DAQ_FGT/daq_fgt.cxx, daq_fgt.h, fgtPed.cxx - modified to include GMT and IST; changed for extended timebin count; FGT_TB_COU changed; added APV metadata;
src/DAQ_TPX/tpxCore.cxx - modified for ETTIE;
src/DAQ_GMT/daq_gmt.cxx, daq_gmt.h - removed files because DAQ_GMT is replaced by the already existing DAQ_FGT;
src/DAQ_ETOW/daq_etow.cxx - modified to fix trg and daq cmd in the data;
src/DAQ_ESMD/daq_esmd.cxx - modified to fix trg and daq cmd in the data;
src/DAQ_BTOW/daq_btow.cxx - modified to fix trg and daq cmd in the data;
src/DAQ_PP2PP/daq_pp2pp.h - added changes for apple;
src/DAQ_PMD/daq_pmd.h - added changes for apple;
pmd_reader.cxx - modified do cut off extensive error print outs ;
src/DAQ_PXL/daq_pxl.cxx, daq_pxl.h - first version of DAQ for PXL;
src/SFS/sfs_index.cxx, sfs_index_daq.cxx - added changes for apple;
src/FCF/fcfClass.cxx - added changes for apple;
src/LOG/rtsLogUnix.c - added changes for apple;
StRTSClient
FCFMaker/FCFMaker.cxx - added fixes for no.of pad rows > 64 ;
pams
gen/bpythia/closeDecays.F - added new file;
gen/Herwig6_5_20/ - removed from pams and moved to new StarGenerator framework;
gen/StarLight/ - removed from pams and moved to new StarGenerator framework;
gen/Pythia6_4_23/ - removed from pams and moved to new StarGenerator framework;
sim/flux/agustep.cxx - added new file for flux calculation;
geometry/geometry/geometry.g - fixed format statement for SL4.4; added TOF_MAX configuration option;
geometry/fgtdgeo/fgtdgeo3.g - added px,py,pz to hit declaration for FGT disks ;
StarDb
Calibrations/tpc/
tpcPadGainT0B.20000615.000000.root, tpcPadGainT0B.20010601.000000.root, tpcPadGainT0B.20010701.000000.root, tpcPadGainT0B.20010911.000000.root, tpcPadGainT0B.20010924.000000.root, tpcPadGainT0B.20011205.000000.root, tpcPadGainT0B.20021105.000000.root, tpcPadGainT0B.20030101.000001.root, tpcPadGainT0B.20030513.000001.root, tpcPadGainT0B.20031228.000000.root, tpcPadGainT0B.20040122.120000.root, tpcPadGainT0B.20040209.203000.root, tpcPadGainT0B.20040416.145000.root, tpcPadGainT0B.20041024.000000.root, tpcPadGainT0B.20050111.190700.root, tpcPadGainT0B.20050209.152800.root, tpcPadGainT0B.20050311.153700.root, tpcPadGainT0B.20050412.184300.root, tpcPadGainT0B.20060308.115800.root, tpcPadGainT0B.20060510.150600.root, tpcPadGainT0B.20070330.135100.root, tpcPadGainT0B.20070420.142400.root, tpcPadGainT0B.20070503.000000.root, tpcPadGainT0B.20070524.161901.root, tpcPadGainT0B.20071127.151802.root, tpcPadGainT0B.20080101.000002.root, tpcPadGainT0B.20080115.093301.root, tpcPadGainT0B.20080208.174703.root, tpcPadGainT0B.20080218.001712.root, tpcPadGainT0B.20080219.094315.root, tpcPadGainT0B.20080219.102708.root, tpcPadGainT0B.20080222.070008.root, tpcPadGainT0B.20080223.182619.root, tpcPadGainT0B.20080223.194538.root tpcPadGainT0B.20080224.054959.root, tpcPadGainT0B.20080225.203804.root, tpcPadGainT0B.20080228.034753.root, tpcPadGainT0B.20080228.164558.root, tpcPadGainT0B.20080228.235924.root, tpcPadGainT0B.20080229.203905.root, tpcPadGainT0B.20080301.030910.root, tpcPadGainT0B.20080302.102648.root, tpcPadGainT0B.20080302.194942.root, tpcPadGainT0B.20081211.000000.root, tpcPadGainT0B.20081215.000000.root, tpcPadGainT0B.20090209.000000.root, tpcPadGainT0B.20090304.000000.root, tpcPadGainT0B.20090314.203028.root, tpcPadGainT0B.20090318.011857.root, tpcPadGainT0B.20090327.021535.root, tpcPadGainT0B.20090331.022222.root, tpcPadGainT0B.20090405.144414.root, tpcPadGainT0B.20090409.103638.root, tpcPadGainT0B.20090415.000000.root, tpcPadGainT0B.20090607.084356.root, tpcPadGainT0B.20090611.170234.root, tpcPadGainT0B.20090623.133633.root, tpcPadGainT0B.20090629.052714.root, tpcPadGainT0B.20091214.215645.root, tpcPadGainT0B.20091216.000001.root, tpcPadGainT0B.20100212.121258.root, tpcPadGainT0B.20100212.121259.root, tpcPadGainT0B.20110204.182524.root, tpcPadGainT0B.20111210.000100.root, tpcPadGainT0B.20111215.000000.root, tpcPadGainT0B.20111220.000000.root, tpcPadGainT0B.20111220.000100.root, tpcPadGainT0B.20120123.184245.root, tpcPadGainT0B.20120209.142820.root, tpcPadGainT0B.20120308.182506.root, tpcPadGainT0B.C, tpcPadGainT0B.devE.C, tpcPadGainT0B.devT.C, tpcPadGainT0B.y2009.C, tpcPadGainT0B.y2010.C, tpcPadGainT0B.y2011.C - added table extension for iTpx;
TpcAdcCorrectionB.devT.C, tpcAltroParams.devT.C, tpcAnodeHV.devT.C, TpcdCharge.devT.C, TpcdEdxCor.devT.C, TpcDriftDistOxygen.devT.C, tpcDriftVelocity.devT.C, tpcGainCorrection.devT.C, tpcGas.devT.C, tpcGasTemperature.devT.C, TpcLengthCorrectionB.devT.C, tpcMethaneIn.devT.C, TpcPadCorrection.devT.C, TpcPhiDirection.devT.C, tpcPressureB.devT.C, TpcResponseSimulator.devT.C, TpcRowQ.devT.C, TpcSecRowB.devT.C, tpcSlewing.devT.C, tpcWaterOut.devT.C, TpcZCorrectionB.devT.C, TpcZDC.devT.C - added default tables for devT R&D geometry;
Geometry/tpc/TpcHalfPosition.C - added new default file;
RunLog/onl/starClockOnl.y2012.C - added default frequency for run 2012;
StarVMC
Geometry/Geometry.cxx - modified to switch tpcx geometry off by default otherwise two versions of TPC are instantiated simulataneously;
xgeometry.xml - modified to force recompilation to add TOF_MAX configuration option; fixed format statement for SL4.4, force xgeometry recompile;
FgtdGeo/FgtdGeo3.xml, FgtdGeoV.xml - added px,py,pz to hit declaration for FGT disks ;
StarAgmlLib/Mortran.h, AgStructure.cxx, AgStructure.h - modified to add std:: to ostream;
AgBlock.cxx, AgBlock.h, AgPlacement.cxx, AgPlacement.h, StarAgmlStacker.h, StarTGeoStacker.cxx, StarTGeoStacker.h - added support for volume groups ;
Mortran.h - added virtual destructor to Array_t ;
StDb
idl/tpcPadGainT0B.idl - added new file to replace tpcPadGainT0 => tpcPadGainT0B for iTpx, in order to avoid problems with schema evolution;
TpcSecRowCor.idl, tpcPadPlanes.idl, tpcPadrowT0.idl, tpcPedestal.idl, tpcStatus.idl - modification for TPC upgrade iTpx, up to 50 inner rows and up to 50 outer rows;
Geometry.idl, tpg_detector.idl, tpg_pad_plane.idl - removed files;
tpcHitErrors.idl - removed to retire tpcHitErrors;
fmsLed.idl, fmsLedRef.idl, fmsPi0Mass.idl - added new FMS tables;
fgtAlignment.idl - added fgt alignment table;
- September 5, 2012
new library SL12d tagged as SL12d has been created and built on SL5.3 (32bits & 64bits platforms) and SL4.4 . Library was tested and released on September 6.
gcc version 4.3.2 20081007 (Red Hat 4.3.2-7)
Main features:
- added StFgtSimulatorMaker code;
- further development and updates of FGT code;
- added DEV14 geometry version for HFT studies;
- added FGT/vFGT upgrade geometry;
- several bugs fixed;
Next codes have been added
StFgtSimulatorMaker
StFgtSlowSimuMaker.h, StFgtSlowSimu_histo.cxx, StFgtSlowSimuMaker.cxx, StFgtSlowSimu_response.cxx -code for GT simulation
macros/fgtEve.kumac, mat.kumac, plEveMovie.kumac, plFgtGallery.kumac, plFgt.kumac, ppQCD.kumac, ppWprod.kumac, plFgtSSim.C, plMatEta.C, plMatPhi.C, rdMu2FgtShort.C, rdMu2Print.C, rdSt2print.C, simRad.sh;
Next codes have been updated:
asps
Simulation/starsim/atmain/agxinit.F, agxinit.cdf, agxuser.age, filtAction.cxx - added KUIP interface to configuration parameters of the filters;
Simulation/gcalor/gcalor/calini.F - modified;
StAssociationMaker
StAssociationMaker.cxx - modified to ignore tracks without detectorInfo;
StBFChain
BigFullChain.h - added chains pp2012b and P2012b which used geometry y2012a; added 'fmsSim' option for FGT simulation;
added agregate chain fgt turning on fgtDat+fgtClu+fgtAtoC;
StBeamBackMaker
Line.cc, StBeamBackMaker.cxx - added std namespace;
StBichsel
Bichsel.cxx - added std namespace;
St_base
StArray.cxx, StAutoBrowse.cxx, StFileI.h, StFileIter.h, StObject.cxx, StObject.h, StTree.cxx, StarChairDefs.h, Stiostream.h, table_header.h, table_header.inc - added std namespace;
StChain
StMaker.cxx, StMaker.h - added y2012a and devT geometry tags; synchronized tag and geometry version for y2006h, bug fix #2374; added DEV14 geometry;
StDaqLib
GENERIC/EventReader.cxx, RecHeaderFormats.hh - added std namespace;
TOF/TOF_Reader.hh - added std namespace;
StDbBroker
DbUse.cxx - added std namespace;
StDbLib
StDbBuffer.cc, StDbDefaults.cc, StDbManagerImpl.cc, StDbManagerImpl.hh, StDbXmlReader.cc, parseXmlString.cc - added std namespace;
StDetectorDbMaker
St_spaceChargeCorC.cxx - added VPD possibilities;
StEmbeddingUtilities
StEmbeddingQAUtilities.cxx - added std namespace;
StEmcUtil
voltageCalib/GainVoltCoeffCalculator.cxx, GainVoltCoeffCalculator.h, LinearFit.h - added std namespace;
StEpcMaker
StPi0Candidate.h - added std namespace;
StEtrFastSimMaker
StEtrFastSimMaker.cxx - added IdTruth ;
StEvent
StTpcSectorHitCollection.h - modified to increment version to account change in max. no. of pad rows;
StDcaGeometry.cxx - updated;
StGlobalTrack.cxx - adjusted format;
StEnumerations.h - modified to increase Track Range 300=>500; added 2 new variables to enum StFgtClusterSeedType;
StFgtHit.h, StFgtPoint.h - fixed bug in define detector();
StTrackDetectorInfo.h, StTrackDetectorInfo.cxx - added other hits;
StEventUtilities
StEventHitIter.cxx - added FGT hits;
StFgtDbMaker
StFgtDb.h, StFgtDbMaker.cxx, StFgtDbMaker.h - added access to fgtSimuParam table;
StFgtDbMaker.cxx, StFgtDbMaker.h - modified to remove 'virtual' and fix the name;
StFgtDb.cxx - modified for csv format fixed cout for quadrant;
macros/read_fgtSimuParams.C, read_fgt_eloscutoff.C, write_fgtSimuParams.C, write_fgt_eloscutoff.C - added new macros to provide access to fgtSimuParam table;
StFgtA2CMaker
StFgtA2CMaker.cxx, StFgtA2CMaker.h - modified to add flag to allow long pulses; modified to set accept long pulses as default; modified to make maker compatible with running in bfc chain;
StFgtClusterMaker
StFgtSeededClusterAlgo.cxx - added one sigma strips to clusters; updated cluster algo to find even p clusters;
StFgtClusterMaker.cxx, StFgtClusterMaker.h - Misc reshaped;
StFgtRawMaker
StFgtRawMaker.cxx, StFgtRawMaker.h - modified to remove virtual + add InitRun to get Db point;
StFgtUtil
geometry/StFgtGeom.h, StFgtGeom.cxx - fixed bug in getGlobalPhysicalCoordinate by pnord, computation now done by computeGlobalPhysicalCoordinate; modified to make 'getQuad' compatible with angles between 0 and 2*pi;
StFtpcTrackMaker
StFtpcTrack.cc - modified to resolve ambiguity in TMath::Power;
StGridCollector
StGridCollector.cxx - added std namespace;
St_geant_Maker
Embed/StPrepEmbedMaker.h, StPrepEmbedMaker.cxx - added a switch to cut on the ranking of primary vertex;
StHbtMaker
Fit/dFitter3d.cxx - added std namespace;
Infrastructure/StExceptions.hh - added std namespace;
StJetMaker
tracks/StjTrackCutTdcaPtDependent.h - modified to switched pt2=1.0 GeV/c to pt2=1.5 GeV/c;
Sti
StiDetectorBuilder.h - added std namespace ;
Star/StiStarDetectorBuilder.cxx - added FGT as dead material;
StiMaker
StKFTrack.cxx, StKFTrack.h, StKFVertex.cxx, StKFVertex.h, StKFVerticesCollection.cxx, StKFVerticesCollection.h, StMuDstVtxT.cxx, StMuDstVtxT.h, StPhiEtaHitList.h, StiMaker.cxx - added std namespace;
StiMaker.cxx - modified to check that vertex fitter exist before getting vertex postion;
StMcEvent
StMcEmcHitCollection.hh - added std namespace;
StMcEventMaker
StMcEventMaker.cxx - modified;
StMCFilter
StMCFilter.cxx, StMCFilter.h, loadlibs.kumac - added KUIP interface to configuration parameters of the filters;
StMCCaloFilter.cxx, StMCCaloFilter.h - added (new files) general "Calorimeter" filter covering both B & EEMC (plus FMS and future calorimeters);
StMCCaloFilter.cxx - added 'HadronEfract' keyword to list of configurable parameters ;
StMtdHitMaker
StMtdHitMaker.cxx, StMtdHitMaker.h - modified to generate StMtdHit objects, apply trigger window, apply INL correction. StMtdHitMaker can now also run as afterburner on MuDSTs;
StPass0CalibMaker
StSpaceChargeDistMaker.cxx, StSpaceChargeDistMaker.h - introduced StSpaceChargeDistMaker;
StEvtVtxSeedMaker.cxx, StMuDstVtxSeedMaker.cxx, StVertexSeedMaker.cxx, StVertexSeedMaker.h - modified to include BEMC+EEMC+BTOF+CM to detmap; added mean zdc to log output; modified ZDC sum rate -> ZDC coincidence rate;
StVertexSeedMaker.cxx, StVertexSeedMaker.h - added missing mean ZDC for aggregation; added BeamLine parameter ntuples to output;
StEvtVtxSeedMaker.h, StMuDstVtxSeedMaker.h, StVertexSeedMaker.cxx, StVertexSeedMaker.h - added index of vertex within event to ntuple;
StSpaceChargeEbyEMaker.cxx - modified to expand SC hist ranges; added VPD to ntuple ;
StPeCMaker
StPeCPair.cxx, StPeCPair.h - added tof information to both tracks;
StPeCTrigger.cxx - added topo and main triggers for different run periods;
StPeCEvent.cxx, StPeCEvent.h, StPeCMaker.cxx, StPeCMaker.h - added flags to include TOF and Vertex branches in tree;
StPeCEnumerations.h - modified to control the number of tracks for UPC selection;
StPeCTrack.cxx, StPeCTrack.h - modified to overload constructor and set method to pass vertex information in StMuEvent;
StPeCEvent.h, StPeCPair.h, StPeCTrigger.h, StPeCMaker.h, StPeCTrack.h, - modified to raise ClassDef from 1 to 2;
RTS
EventTracker/gl3Hit.cxx - updated;
src/DAQ_READER/daqReader.cxx, daqReader.h - added daqReader.h;
src/RTS_EXAMPLE// - updated;
StarClassLibrary
DRand48Engine.cc, JamesRandom.cc, PhysicalConstants.h, RandEngine.cc, RanecuEngine.cc, RanluxEngine.cc, StLorentzVector.hh, StMatrix.hh, StMemoryInfo.cc, SystemOfUnits.h - - added std namespace;
StParticleTable.cc - modified to add Xi0(1530);
StXiZero1530.cc, StXiZero1530.hh - added new files for Xi0(1530);
StStarLogger
StLoggerManager.cxx - added std namespace;
StarRoot
KFParticleBase.cxx, KFParticleBase.h, TMDFParameters.cxx, TPolynomial.cxx, TRArray.cxx, TRArray.h, TRDiagMatrix.cxx, TRMatrix.cxx, TRMatrix.h, TRSymMatrix.cxx, TRSymMatrix.h - added std namespace;
TTreeIterLinkDef.h - removed ;
THelixTrack.cxx, THelixTrack.h - fixed KFit::Test; method MaxCorr() added;
StSsdUtil
StSsdBarrel.hh - added std namespace;
StTpcCalibrationMaker
StTpcCalibSector.cxx, StTpcCalibSetup.cxx - added std namespace;
StTpcBadChanMaker.cxx, StTpcBadChanMaker.h, StTpcCalibSector.cxx, StTpcCalibSector.h, StTpcCalibSetup.cxx, StTpcCalibSetup.h, StTpcDeadChanMaker.cxx, StTpcDeadChanMaker.h, StTpcFEEGainCalibMaker.cxx, StTpcFEEGainCalibMaker.h - removed;
StTpcHitMoverMaker
StTpcHitMoverMaker.cxx - fixed bug #2387;
StTriggerUtilities
StTriggerSimuMaker.cxx - added LOG_INFO;
StTriggerSimuMaker.cxx, StTriggerSimuMaker.h - modified to allow users to specify database to use for trigger definitions and thresholds;
Bemc/StBemcTriggerSimu.cxx - modified to allow BEMC trigger simulator to work for year > 2009; StMCfixed fillStTriggerDetector();
Emc/StEmcTriggerSimu.cxx - added printing of EM201 output bits;
Eemc/StEemcTriggerSimu.cxx - fixed fillStTriggerDetector();
StEemcTriggerSimu.cxx, StEemcTriggerSimu.h - added logging of EEMC gains from DB;
StTrsMaker
include/StSimpleMagneticField.hh, StTpcDbGeometry.hh, StTpcSimpleGeometry.hh, StTrsChargeSegment.hh, StTrsDeDx.hh, StTrsSector.hh - added std namespace;
src/StSimpleMagneticField.cc, StTpcSimpleElectronics.cc, StTpcSimpleGeometry.cc, StTrsDeDx.cc, StTrsWireHistogram.cc - added std namespace;
StTpcRSMaker
StTpcRSMaker.cxx - restored old hack for dN/dx table to fix bug #2347;
StUtilities
StMessTypeList.cxx, StMessage.cxx, StMessageCounter.cxx, StMessageManager.cxx, StMessageStream.h, StMultiH1F.h, StMultiH2F.h - added std namespace;
pams
geometry/geometry/geometry.g - added y2012a production tag; added DEV14 geometry tag for HFT studies; added VPD and PXST to dev14 geometry; added vfgt to definition of the estar development geometry;
added estar1 and tpciv1 geometry tags;
geometry/fgtdgeo/fgtdgeo3.g - added stub for the vfgt geometry implented in AgML;
geometry/istdgeo/istdgeo0.g - added ISTDGEO0 stub for AgML geometry;
geometry/sisdgeo/sisdgeo7.g - added SISDGEO7 stub for AgML geometry;
geometry/pixlgeo/PxstGeo1.g - added Pixel support tube stub for AgML geometry;
sim/gstar/gstar_part.g - added Xi0(1530);
StarVMC
AgiGeometry/Geometry.devT.C, devT.h - added devT geometry tag;
Geometry/Geometry.cxx - modified to eliminate dependency on fstream ;
Geometry.cxx, Geometry.h - added DEV14 geometry tag for HFT studies;
Geometry.cxx - added vfgt (module FgtdGeoV) to the eStar development geometry
Geometry/Compat/xgeometry.xml - added vfgt (module FgtdGeoV) to the eStar development geometry;
Geometry/FgtdGeo/FgtdGeoV.xml - added 12-disk FGT upgrade geometry;
StarAgmlLib/AgMath.h, AgStructure.h, Mortran.h - added stl namespace;
AgMath.h - modified to remove min/max due to ambguity with std ones;
AgMath.h, Mortran.h, StarTGeoStacker.cxx - removed some unecessary changes to Mortran.h and StarTGeoStacker.cxx;
Geometry/IstdGeo/IstdGeo0.xml - added DEV14 geometry tag for HFT studies;
Geometry/Compat/xgeometry.xml - added y2012a production tag; added DEV14 geometry tag for HFT studies;
Geometry/macros/StarGeometryDb.C - added y2012a production tag; added DEV14 geometry tag for HFT studies;
Geometry/PixlGeo/PixlGeo4.xml, PxstGeo1.xml - added DEV14 geometry for tag for HFT studies; added misalignment variables;
Geometry/SisdGeo/SisdGeo7.xml - added DEV14 geometry tag for HFT studies;
Geometry/VpddGeo/VpddGeo2.xml - modified IBSS --> IBST to prevent conflict with sensitve detector in the IST geometry;
GeoTestMaker/StMCConstructGeometry.cxx, StMCSimplePrimaryGenerator.cxx - added stl namespace;
StarDb
AgMLGeometry/Geometry.y2012a.C - added y2012a production tag;
Geometry/tpc/TpcOuterSectorPosition.devE.C, TpcOuterSectorPosition.devT.C, TpcSuperSectorPosition.devE.C, TpcSuperSectorPosition.devT.C, tpcGlobalPosition.devT.C, tpcPadPlanes.devT.C - added default values for devE and devT;
Calibrations/tracker/StvKonst.C - added new file for tablization of StvConst ;
Calibrations/tpc/tpcAnodeHVavg.dev13.C, tpcAnodeHVavg.devT.C, tpcAnodeHVavg.y2012.C - added default tpcAnodeHVavg for dev13 and devT geometries;
StDb
idl/fgtSimuParams.idl - added new file for FGT slow simulator;
StvKonst.idl - added new file for tablization of StvConst ;
QtRoot
qtgl/qtcoin/src/TCoinShapeBuilder.cxx - added std namespace;
TCoinShapeBuilder.cxx - added stl namespace ;
qtgui/inc/TQtColorSelect.h, TQtColorSelectButton.h, TQtPatternSelect.h - added std namespace;
qtgui/src/TQtColorSelect.cxx, TQtColorSelectButton.cxx, TQtPatternSelect.cxx, TQtPixmapBox.cxx, TQtTabValidator.cxx - added std namespace;
TQtTabValidator.cxx - modified to account change of TTabCom signature in ROOT >= (5.26.0);
- May 30, 2012
new library SL12c tagged as SL12c has been created and built on SL5.3 (32bits & 64bits platforms) and SL4.4 . Library was tested and released on June 4.
gcc version 4.3.2 20081007 (Red Hat 4.3.2-7)
Main features:
- first library release with FGT code;
- initial revisison of HyperCache support for offline DB;
- modification for vertex finder code;
- production geometry y2012a for run 2012; - several bugs fixed;
Next FGT makers have been added:
StFgtA2CMaker
StFgtA2CMaker.cxx, StFgtA2CMaker.h - convert the ADC value to charge and optionally removes strips with status not passing the mask;
StFgtDbMaker
StFgtDb.cxx, StFgtDb.h, StFgtDbMaker.cxx, StFgtDbMaker.h;
StFgtClusterMaker
StFgtClusterMaker.cxx, StFgtClusterMaker.h, StFgtIClusterAlgo.h, StFgtMaxClusterAlgo.cxx, StFgtSeededClusterAlgo.cxx, StFgtSeededClusterAlgo.h, StFgtSimpleClusterAlgo.cxx, StFgtSimpleClusterAlgo.h;
StFgtRawMaker
StFgtRawMaker.cxx, StFgtRawMaker.h;
StFgtUtil
StFgtConsts.h;
geometry/StFgtGeom.cxx, StFgtGeom.h;
Next codes have been updated:
StAnalysisMaker
StAnalysisMaker.cxx, StAnalysisMaker.h - modified to reshape printout for primary vertices;
countPrimaryPions.cc, countPrimaryTracks.cc, summarizeEvent.cc - removed;
StarRoot
TRandomVector.cxx - added normalisation before and Renormalisation after addedTRandomVector.cxx;
THelixTrack.cxx, THelixTrack.h - Helix Kalman fitter added;
StBFChain
BigFullChain.h - added detDb to be used in StEvent; added dependence StiLibs versus BTofUtil to fix bug #2356;
StBFChain.cxx, BigFullChain.h - added options to handle StKFVertexMaker code;
StBFChain.cxx - modified to move call of StChain::Init() to the end;
BigFullChain.h - temporary added use xgeometry flag(YF);
Bfc.h - increased size of arrays;
StBichsel
Bichsel.h,dEdxParameterization.cxx, dEdxParameterization.h - modified to switch interpolation to TH1/TH2 from home made version;
StBTofHitMaker
StBTofHitMaker.cxx - modified to fill BTof hit Id;
StBTofMatchMaker
StBTofMatchMaker.cxx, StBTofMatchMaker.h - modified to keep btofGeometry in const area for future use;
StBTofSimMaker
StBTofSimMaker.cxx - modified to write hits to StEvent, set kBTofId for hits;
StChain
StMaker.cxx - added y2012a and devT geometry tags;
St_db_Maker
St_db_Maker.cxx - added test for unrecognized files; modified to ignore wrong timing for RunLog tables;
StDbLib
StHyperCacheConfig.cpp, StHyperCacheConfig.h, StHyperCacheFactory.cpp, StHyperCacheFactory.h, StHyperCacheFileLocal.cpp, StHyperCacheFileLocal.h, StHyperCacheI.cpp, StHyperCacheI.h, StHyperCacheManager.cpp, StHyperCacheManager.h, StHyperCacheWebservice.cpp, StHyperCacheWebservice.h, StHyperHashMd5.cpp, StHyperHashMd5.h, StHyperHashSha256.cpp, StHyperHashSha256.h, StHyperSingleton.h, StHyperUtilFilesystem.cpp, StHyperUtilFilesystem.h, StHyperUtilGeneric.cpp, StHyperUtilGeneric.h, StHyperUtilPlatform.cpp, StHyperUtilPlatform.h, picojson.h - initial revision of code for HyperCache support ("Local File Cache" and "Web Service Cache" parts);
MysqlDb.cc, MysqlDb.h, StHyperCacheFileLocal.cpp, StHyperCacheManager.cpp, StHyperCacheManager.h - modified for integration of Hyper Cache; HyperCache added to workflow;
StDbUtilities
StTpcCoordinateTransform.cc, StTpcCoordinateTransform.hh - removed hardcoded separation between Inner and Outer Sectors;
StMagUtilities.cxx, StMagUtilities.h - modified to use more realistic geometry model in PredictSpaceCharge;
StDetectorDbMaker
St_tpcPadPlanesC.h - fixed padsPerRow;
StDetectorDbChairs.cxx, St_tpcPadPlanesC.h - modified to add new chaires;
St_bemcMapC.h, St_bprsMapC.h, St_bsmdeMapC.h, St_bsmdpMapC.h, St_emcCalibC.h, St_emcGainC.h, St_emcPedC.h, St_emcStatusC.h, St_emcTriggerLUTC.h, St_emcTriggerPedC.h, St_emcTriggerStatusC.h, St_smdCalibC.h, St_smdGainC.h, St_smdPedC.h, St_smdStatusC.h, St_tofGeomAlignC.h, St_tofStatusC.h, St_tofTrayConfigC.h, StiBTofChairs.cxx, StiBTofHitErrorCalculator.h- added new files for more chaires;
StdEdxY2Maker
StTpcdEdxCorrection.cxx, StTpcdEdxCorrection.h, StdEdxY2Maker.cxx, StdEdxY2Maker.h - modified;
StEvent
StFgtCollection.cxx, StFgtCollection.h, StFgtHitCollection.cxx, StFgtHitCollection.h, StFgtHit.cxx, StFgtHit.h, StFgtPointCollection.cxx, StFgtPointCollection.h, StFgtPoint.cxx, StFgtPoint.h, StFgtStripCollection.cxx, StFgtStripCollection.h, StFgtStrip.cxx, StFgtStrip.h - initial revision of FGT code;
StEventClusteringHints.cxx, - added FGT hit collection;
StContainers.cxx, StContainers.h, StEnumerations.cxx, StEnumerations.h, StEvent.cxx StEvent.h - modified to add FGT package ;
StTpcRawData.cxx, StTpcRawData.h - removed hardcoded separation between Inner and Outer Sectors;
StTpcRawData.cxx StTpcSectorHitCollection.h - replaced StDigitalPair by its reference;
StBTofHit.cxx, StBTofHit.h, StDcaGeometry.h, StEmcCluster.h, StEnumerations.h, StEventTypes.h, StGlobalTrack.cxx, StGlobalTrack.h, StPrimaryTrack.cxx, StPrimaryTrack.h, StPrimaryVertex.cxx, StPrimaryVertex.h, StVertex.cxx, StVertex.h, StTpcDedxPidAlgorithm.cxx, StTpcSectorHitCollection.h, StTrack.cxx, StTrack.h, StTrackPidTraits.h, StTriggerData.h - added new code to handle tracks matching to fast detector;
StTrackFitTraits.cxx, StTrackFitTraits.h - added new logic for total numbers of fit points, StTriggerData.cxx, StTriggerData.h, StTriggerData2009.cxx, StTriggerData2009.h, StTriggerData2012.cxx, StTriggerData2012.h - added acc ess function for l2sum;
StDedxPidTraits.cxx, StDedxPidTraits.h - added field for log2;
StEnumerations.h - added tracking for TRD;
StEventCompendiumMaker
StEventCompendiumMaker.cxx, StEventCompendiumMaker.h - modified to adjust to new vertex finder code;
fillEventSummary.cc - removed;
StEventMaker
StEventMaker.cxx - modified to provide hit for StTpcDb about TroggerId;
StEventUtilities
StuDraw3DEvent.cxx - modified;
StEventHitIter.cxx, StEventHitIter.h - completely rewritten;
StGenericVertexMaker
StiPPVertex/StPPVertexFinder.cxx, Vertex3D.cxx, Vertex3D.h - modified to convert many LOG_INFO to LOG_DEBUG to make PPV more silent;
StJetMaker
trackes/StjTrackCutTdcaPtDependent.h - added new file to implemenet pt-dependent 3-D DCA cut;
StMiniMcMaker
StMiniMcMaker.cxx - fixed bug #2362 related to global DCA;
StMcEvent
StMcEvent.cc - modified;
StMcTpcSectorHitCollection.hh - modified to increase number of possible row to 100;
StMuDSTMaker
COMMON/StMuDstMaker.cxx, StMuMcTrack.cxx, StMuMcTrack.h, StMuMcVertex.cxx, StMuMcVertex.h, StMuPrimaryTrackCovariance.cxx, StMuPrimaryTrackCovariance.h, StMuPrimaryVertex.cxx, StMuPrimaryVertex.h,
StMuProbPidTraits.h, StMuTrack.cxx, StMuTrack.h - modified to handel tracks matching to fast detector;
Sti
StiTPCCATrackerInterface.cxx, StiTpcSeedFinder.cxx,StiTpcSeedFinder.h - removed hard coded TPC parameters;
StiMaker
StiMaker.cxx, StiMaker.h, StiStEventFiller.cxx, StiStEventFiller.h - modified to adjust to new vertex finder code StKFVertexMaker;
MuPrmVtx.C, StAnneling.cxx, StAnneling.h, StKFEvent.cxx, StKFEvent.h, StKFTrack.cxx, StKFTrack.h, StKFVertex.cxx, StKFVertex.h, StKFVertexMaker.cxx, StKFVertexMaker.h, StKFVerticesCollection.cxx, StKFVerticesCollection.h, StMuDstVtxT.cxx, StMuDstVtxT.h, StPhiEtaHitList.cxx, StPhiEtaHitList.h, StTrack2FastDetectorMatcher.cxx, StVertexP.h, StTrack2FastDetectorMatcher.h StVertexT.h - added new codes for vertex finder;
StTpcDb
StTpcDb.cxx, StTpcDb.h - modified to set interpolation for one week only, fixed sign of interpolation, added TriggerId;
StTpcHitMaker
StTpcMixerMaker.cxx - modified to remove requirement to have only 2 inputs; fixed bug #2351;
StTpcRTSHitMaker.cxx, StTpcRTSHitMaker.h - added Tonko's interface for variable no.of pad rows (adjusted to daq_tpx.cxx updates) ;
StTpcRSMaker
TF1F.cxx, TpcRS.C - updated to fix bug #2342;
St_tcl_Maker
StTpcFastSimMaker.cxx - added printout;
St_geant_Maker
Embed/StPrepEmbedMaker.cxx, StPrepEmbedMaker.h - added switch to choose between the two kinematic variables: rapidty or pseudo-rapdity;
St_QA_Maker
StEventQAMaker.cxx - modified to reduce pile-up contributions in impact parameter plots ;
QAhlist_EventQA_qa_shift.h - modified list of BEMC hists for QA shift; made correction on required detectors for EmcCat4 plots;
StPass0CalibMaker
StSpaceChargeEbyEMaker.cxx - added pointing angle near vertex to improved PredictSpaceCharge
RTS
src/DAQ_READER/daqReader.cxx,daqReader.h, daq_det.h - added FY12 future-protection bug check ;
src/DAQ_TPX/daq_tpx.cxx - added FY12 future-protection bug check ;
src/DAQ_TRG/daq_trg.cxx - fixed to remove WARN about lack of legacy banks;
pams
gen/bpythia/apytuser.age - modified to increase size of BEAM and TARG strigs to allow more complicated options in pythia eSTAR simulations ;
gen/starlight/src/ Breakup.inc, D2LParam.inc, Ftable.in, PofB.f, bw.inc, const.inc, decayEvent.f, diffLum_2gamma.f, diffLum_vm.f, flux.f, formf.f, global.inc, hadronbreakup.f, hencken.f, heptup.f, input.f, inputp.inc, jtog.f, ludat1.inc, lujets.inc, momenta.f, newparam.f, nofe.f, nrbw.f, photonbreakup.f, pickw.f, pickwy_vm.f, picky.f, pp.f, pperpdist.f, ptconv.f, pttable.inc, pttablegen.f, radmul.F, range.inc, readDiffLum.f, rws.f, setConst.f, sig.in,c sigma2.f, sigma_A.f, sigmacalc.f, sigmadelta.f, sigmagp.f sigmavm.f sigmavmw.f sigmui.f starlight.f t.f tablecalc.f tables.inc taudecay.f thephi.f thetalep.f threedecay.f, transform.f, twodecay.f, vladimir.f, vmomenta.f, vmpt.f, vmsigmapt.f, writeGSTARtext.f, writeNtuple.f, writeText.f, writejetsetGSTARtext.f, writejetsetNtuple.f writejetsetText.f - removed an old version of starlight event generator;
gen/starlight/src/bin/ jet.dat, starlight.in - removed;
geometry/tpcegeo/tpcxgeo1.g - added stub to handle the tpcxgeo1 symbol;
geometry/geometry/geometry.g - added 'devT' geometry tag for TPC upgrade study; added y2012a production tag;
StarVMC
Geometry/Geometry.cxx, Geometry.h - added "devT" geometry tag for TPC upgrade study;
StarDb
AgiGeometry/Geometry.devT.C, devT.h - added devT geometry for TPC upgrade;
AgMLGeometry/Geometry.devT.C - added "devT" geometry for TPC upgrade study;
Geometry.devE.C, devE.h - added "devE" geometry version for R&D ;
Geometry.y2012a.C - added y2012a production geometry;
Calibrations/ftpc/ftpcTemps.devE.C - added new file for R&D;
Calibrations/tpc/TpcdXCorrection.devE.C, TpcdXCorrection.y2009.C, TpcdXCorrection.y2010.C, TpcdXCorrection.y2011.C - removed;
tpcGlobalPosition.devE.C, TpcAdcCorrectionB.devE.C, tpcAltroParams.devE.C, tpcAnodeHVavg.devE.C, tpcAnodeHV.devE.C, TpcdCharge.devE.C, TpcdEdxCor.devE.C, TpcDriftDistOxygen.devE.C, tpcDriftVelocity.devE.C, TpcdXCorrection.devE.C, tpcGainCorrection.devE.C, tpcGas.devE.C, tpcGasTemperature.devE.C, TpcLengthCorrectionB.devE.C, tpcMethaneIn.devE.C, TpcPadCorrection.devE.C, tpcPadGainT0.devE.C, TpcPhiDirection.devE.C, tpcPressureB.devE.C, TpcResponseSimulator.devE.C, TpcSecRowB.devE.C, tpcSlewing.devE.C, tpcWaterOut.devE.C, TpcZCorrectionB.devE.C - added new files for "devE" geometry for R&D;
RunLog/onl/starClockOnl.devE.C, tpcRDOMasks.devE.C - added new files for "devE" geometry for R&D;
StDbLib
idl/StHyperUtilFilesystem.cpp - addedto fix MacOS issue with PATH_MAX;
OnlTools
Jevp/StJevpBuilders/tofBuilder.cxx - blocked display of some stats boxes; fixed VPD triggered-crossing gating ; fixed zdc hardware sum;
tofBuilder.cxx, tofBuilder.h - added labels for bad trays;
trgBuilder.cxx - fixed zdc hardware sum;
upcBuilder.h, upcBuilder.cxx - modified plots for run 12 U+U;
- April 12, 2012
new library SL12b tagged as SL12b has been created and built on SL5.3 32bits & 64bits platforms . Library was tested and released on April 18.
gcc version 4.3.2 20081007 (Red Hat 4.3.2-7)
Main features:
- first library release with VMC geometry model;
- several bugs fixed;
Next codes added for VMC geometry model:
StarVMC
Geometry/Geometry.cxx, Geometry.h, geometryStats.cc, geometryStats.hh, Helpers.h;
BbcmGeo/, BtofGeo/, CalbGeo/, CaveGeo/, Compat/, EcalGeo/, EiddGeo/, FgtdGeo/, FpdmGeo/, FsceGeo/, FtpcGeo/, FtroGeo/, IdsmGeo/, MagpGeo/, MutdGeo/, PhmdGeo/, PipeGeo/, PixlGeo/, QuadGeo/, SconGeo/, ShldGeo/, SisdGeo/, SupoGeo/, SvttGeo/, TestGeo/, TpceGeo/, TpcxGeo/, TutrGeo/, UpstGeo/, VpddGeo/, ZcalGeo/ - new modules;
StarAgmlLib/AgAttribute.cxx/h, AgBlock.cxx/h, AgCreate.cxx/h, AgDetp.cxx/h, AgMaterial.cxx/h, AgMath.cxx/h, AgMedium.cxx/h, AgModule.cxx/h, AgPlacement.cxx/h, AgShape.cxx/h, AgSTAR.cxx/h, AgStructure.cxx/h, AgVolume.cxx/h, Mortran.cxx/h, StarAgmlLibLinkDef.h, StarAgmlStacker.cxx/h, StarTGeoStacker.cxx/h;
StarGeometry/BbcmGeo.cxx/h, BtofGeo1.cxx/h, BtofGeo2.cxx/h, BtofGeo3.cxx/h, BtofGeo4.cxx/h, BtofGeo5.cxx/h, BtofGeo6.cxx/h, BtofGeo7.cxx/h, CalbGeo1.cxx/h, CalbGeo2.cxx/h, CalbGeo.cxx/h, CaveGeo.cxx/h, EcalGeo6.cxx/h, EcalGeo.cxx/h, EiddGeo.cxx/h, FgtdGeo3.cxx/h,FpdmGeo1.cxx/h, FpdmGeo2.cxx/h, FpdmGeo3.cxx/h, FsceGeo.cxx/h, FtpcGeo1.cxx/h, FtpcGeo.cxx/h, FtroGeo.cxx/h, IdsmGeo1.cxx/h, MagpGeo.cxx/h, MutdGeo2.cxx/h, MutdGeo3.cxx/h, MutdGeo4.cxx/h, MutdGeo.cxx/h, PhmdGeo.cxx /h,PipeGeo00.cxx/h, PipeGeo1.cxx/h, PipeGeo.cxx/h, PixlGeo3.cxx/h, PixlGeo4.cxx/h, QuadGeo.cxx/h, SconGeo.cxx/h, ShapGeo.cxx/h, ShldGeo.cxx/h, SisdGeo1.cxx/h, SisdGeo2.cxx/h, SisdGeo3.cxx/h, SisdGeo4.cxx/h, SisdGeo5.cxx/h, SisdGeo6.cxx/h, SisdGeo.cxx/h, SupoGeo1.cxx/h, SupoGeo.cxx/h, SvttGeo10.cxx/h, SvttGeo11.cxx/h, SvttGeo1.cxx/h, SvttGeo2.cxx/h, SvttGeo3.cxx/h, SvttGeo4.cxx/h, SvttGeo5.cxx/h, SvttGeo6.cxx/h, SvttGeo7.cxx/h, SvttGeo9.cxx/h, SvttGeo.cxx/h, TestGeo1.cxx/h, TpceGeo1.cxx/h, TpceGeo2.cxx/h, TpceGeo3a.cxx/h, TpcxGeo1.cxx/h, TutrGeo1.cxx/h, TutrGeo2.cxx/h, TutrGeo3.cxx/h, TutrGeo4.cxx/h, UpstGeo.cxx/h, VpddGeo1.cxx/h, VpddGeo2.cxx/h, VpddGeo.cxx/h, ZcalGeo.cxx/h, ;
xgeometry/BbcmGeo.age, BtofGeo1.age, tofGeo2.age, BtofGeo3.age, BtofGeo4.age, BtofGeo5.age, BtofGeo6.age, BtofGeo7.age, CalbGeo1.age, CalbGeo2.age, CalbGeo.age, calbpar.age, CaveGeo.age, dummgeo.age, EcalGeo6.age, EcalGeo.age, EiddGeo.age, etsphit.age, ffpdstep.age, FgtdGeo3.age, fgtdgeo.age, fhcmgeo.age, FpdmGeo1.age, FpdmGeo2.age, FpdmGeo3.age, fpdmgeo.age, FsceGeo.age, fstdgeo.age, FtpcGeo1.age, FtpcGeo.age, FtroGeo.age, gembgeo.age, hpdtgeo.age, IdsmGeo1.age, igtdgeo.age, istbego.age, itspgeo.age, MagpGeo.age, MutdGeo2.age, MutdGeo3.age, MutdGeo4.age, MutdGeo.age, PhmdGeo.age, PipeGeo00.age, PipeGeo1.age, PipeGeo.age, PixlGeo3.age, PixlGeo4.age, pixlgeo.age, QuadGeo.age, richgeo.age, SconGeo.age, ShapGeo.age, ShldGeo.age, SisdGeo1.age, SisdGeo2.age, SisdGeo3.age, SisdGeo4.age, SisdGeo5.age, SisdGeo6.age, SisdGeo.age, SupoGeo1.age, SupoGeo.age, SvttGeo10.age, SvttGeo11.age, SvttGeo1.age, SvttGeo2.age, SvttGeo3.age, SvttGeo4.age, SvttGeo5.age, SvttGeo6.age, SvttGeo7.age, SvttGeo9.age, SvttGeo.age, TestGeo1.age, TpceGeo1.age, TpceGeo2.age, TpceGeo3a.age, tpcegeo3.age, tpcegeo.age, TpcxGeo1.age, TutrGeo1.age, TutrGeo2.age, TutrGeo3.age, TutrGeo4.age, UpstGeo.age, VpddGeo1.age, VpddGeo2.age, VpddGeo.age, wallgeo.age, xgeometry.age, ZcalGeo.age;
Next codes have been updated:
StAnalysisMaker
StAnalysisMaker.cxx, StAnalysisMaker.h, summarizeEvent.cc - modified to compress output for Event summary;
StBFChain
BigFullChain.h - removed option TpxRaw from TpcMixer which creates 3-rd instance of it;
St_db_Maker
St_db_Maker.cxx - fix bug #2303;
StEmcUtil
geometry/StEmcGeom.cxx - added protection against zero size table;
StEvent
StEtrHit.h, StEtrHit.cxx - added section;
StEtrHitCollection.cxx - assert() instead of memory leak added ;
StJetFinder
StFastJetPars.cxx, StFastJetPars.h, StjFastJet.cxx, StjFastJet.h - added support for fastjet plugins;
StFastJetPars.cxx, StFastJetPars.h - added destructor for StCDFMidPointPlugin;
StJetMaker
StJetMaker2009.cxx - modified to add to jet trees event timestamp, position of first and last points on TPC track;
emulator/StMuTrackEmu.h, StjeJetEventTreeWriter.cxx, StjeTrackListToStMuTrackFourVecList.cxx - modified to add to jet trees event timestamp, position of first and last points on TPC track;
mudst/StjEEMCMuDst.cxx - modified to drop EEMC towers with saturated ADC;
mcparticles/StjMCParticleCutParton.h - implemented better selection criteria for parton jets;
towers/StjTowerEnergyCorrectionForTracksFraction.cxx - hacked to keep around towers killed by hadronic correction;
St_QA_Maker
StEventQAMaker.cxx - modified to include eemcMatch,btofMatch,crossCM in looking for good vertices;
StMiniMcEvent
StMiniMcEvent.cxx, StMiniMcEvent.h, StMiniMcMaker.cxx, StMiniMcMaker.h - added uncorrected globals tracks ;
StMcEvent
StMcBTofHitCollection.hh, StMcCtbHitCollection.hh, StMcEmcHitCollection.hh, StMcEmcModuleHitCollection.hh, StMcFgtHitCollection.hh, StMcFgtLayerHitCollection.hh, StMcFtpcHitCollection.hh, StMcFtpcPlaneHitCollection.hh, StMcIstHitCollection.hh, StMcIstLayerHitCollection.hh, StMcMtdHitCollection.hh, StMcPixelHitCollection.hh, StMcPixelLayerHitCollection.hh, StMcRichHitCollection.hh, StMcSsdLadderHitCollection.hh, StMcSsdWaferHitCollection.hh, StMcSvtBarrelHitCollection.hh, StMcSvtHitCollection.hh, StMcSvtLadderHitCollection.hh, StMcSvtWaferHitCollection.hh, StMcTofHitCollection.hh, StMcTpcHitCollection.hh, StMcTpcPadrowHitCollection.hh, StMcTpcSectorHitCollection.hh, StMcSsdHitCollection.hh - changed private => protected;
StMcContainers.hh - added Etr hits;
StMcEvent.cc, StMcEvent.hh, StMcEventLinkDef.h, StMcEventTypes.hh, StMcTrack.hh, StMcEtrHit.cc, StMcEtrHitCollection.cc, StMcEtrHit Collection.hh, StMcEtrHit.hh - added Etr;
StMcHitIter.cxx, StMcHitIter.h - added new files;
StMcEventMaker
StMcEventMaker.h, StMcEventMaker.cxx - Etr added;
StTpcHitMaker
StTpcMixerMaker.cxx - fixed bug #2299;
StTriggerUtilities
StTriggerSimuMaker.cxx - fixed for embedding;
L2Emulator/StL2_2009EmulatorMaker.cxx - added L2upsilon; added L2jet for 2009 pp 500GeV ;
L2Emulator/L2wAlgo/L2wEemc2012.cxx, L2wEemc2012.h - modified to write L2weResult to the L2Result array so we can differentiate random and real accepts; updated plots to have some monitoring;
StTpcRSMaker
StTpcRSMaker.cxx, StTpcRSMaker.h, TpcRS.C - modified to speed up calculation;
StarClassLibrary
StHelixHelper.h - modified;
pams
sim/g2t/g2t_volume_id.g - modified to to support reconfiguration of the inner TPAD volumes for inner TPC upgrade studies;
geometry/geometry/geometry.g - modified to switch pipe12 (old beam pipe) to pipev1 (new narrow beam pipe) for dev13 geometry with the HFT;
geometry/pipegeo/pipegeo1.g - added new file AgML pipe geometry module;
StarDb
AgiGeometry/CreateGeometry.h - modified to remove static, errorprone in Cint;
AgMLGeometry/CreateGeometry.h, Geometry.C, Geometry.dev13.C, Geometry.devE.C, Geometry.y2004.C, Geometry.y2004c.C,Geometry.y2004d.C, Geometry.y2005b.C, Geometry.y2005.C, Geometry.y2005c.C, Geometry.y2005d.C, Geometry.y2005e.C, Geometry.y2005f.C, Geometry.y2005g.C, Geometry.y2005h.C, Geometry.y2005i.C, Geometry.y2006a.C, Geometry.y2006b.C, Geometry.y2006.C, Geometry.y2006g.C, Geometry.y2006h.C, Geometry.y2007a.C, Geometry.y2007.C, Geometry.y2007g.C, Geometry.y2007h.C, Geometry.y2008a.C, Geometry.y2008b.C, Geometry.y2008.C, Geometry.y2008c.C, Geometry.y2008d.C, Geometry.y2008e.C, Geometry.y2009a.C, Geometry.y2009b.C, Geometry.y2009.C, Geometry.y2009c.C, Geometry.y2010a.C, Geometry.y2010b.C, Geometry.y2010.C, Geometry.y2010c.C, Geometry.y2011a.C, Geometry.y2011.C, Geometry.y2012.C, loadStarGeometry.Cxx;
Calibrations/tpc/TpcResponseSimulator.C, TpcResponseSimulator.y2009.C,TpcResponseSimulator.y2010.C TpcResponseSimulator.y2011.C - modified to speed up TpcRS processing;
TpcResponseSimulator.y2012.C - added new files for year 2012;
TpcResponseSimulator.y2011.C - fixed T0offset from comparison with AuAu 27GeV;
OnlTools
Jevp/StJevpBuilders/tofBuilder.cxx - fixed bug in hitpattern and VPD plots due to lack of trigger window for upVPD;
- March 8, 2012
new library SL12a tagged as SL12a has been created and built on SL5.3 (32bits & 64bits platforms) and SL4.4 . Library was tested, found bugs fixed and released on March 13.
gcc version 4.3.2 20081007 (Red Hat 4.3.2-7)
Main features:
- few important bugs have been fixed;
- implemented DbV overide support to use different DbV timestamp for subsystems;
- MTD code modified to adjust for run 2012;
- created MTD hits collection and Browse() method in StMcEvents for MC events;
- added ETR detector in StEvent and geometry;
- added new versions of PYTHIA event generator: PYTHIA 6.2.05 & PYTHIA 6.4.26;
- added new StarLight event generator integrated with starsim framework ;
- added FGT detector in OnLineTool and set new trigger windows for run 2012;
Next codes have been updated:
asps
Simulation/starsim/atmain/guphad.age, guhadr.age - modified to use ipart%100 for interface with geisha,fluka and gcalor;
Simulation/starsim/agzio/heperead.age - modified to ignore unlnown geant PID ;
Simulation/starsim/atutil/CommonBlocks.cxx, CommonBlocks.h - added new files to implement helper class/functions to store and retrieve address of common blocks by name;
StAnalysisUtilities
StHistUtil.cxx, StHistUtil.h - optimized for AutoQA Browser for QA shift run 2012;
StBFChain
Bfc.h, StBFChain.cxx, StBFChain.h - implemented parsinf of {DBV}SDT}_ _[ ] to use for susbsytem timestamp;
BigFullChain.h - fixed bug #2285; added a default chain options P2012a for run 2012; added MC to MuDst; added TpxAvLaser;
St_base
StArray.cxx, StObject.cxx - bug #2281 fixed;
StObject.h - I/O mode flag added;
StBTofUtil
StBTofINLCorr.cxx, StBTofINLCorr.h - modified to allow direct access to INL corrections given TDIG-Id;
StChain
StMaker.cxx - added dev13 geometry; added devE geometry;
StRTSBaseMaker.cxx - move StMaker name logic before StMaker instantiation;
StDbBroker
StDbBroker.cxx, StDbBroker.h - implemented DbV override support to use different timestamp for subsystems;
StDbLib
StDbConfigNode.cc, StDbConfigNode.hh, StDbConfigNodeImpl.cc, StDbConfigNodeImpl.hh - implemented DbV override support to use different timestamp for subsystems;
St_db_Maker
St_db_Maker.cxx, St_db_Maker.h - implemented DbV override support to use different timestamp for subsystems; error check added
StDbUtilities
StMagUtilities.cxx - modified to catch small/zero primary E field;
St_geant_Maker/Embed/
StPrepEmbedMaker.h - fix for ticket #2097;
St_geant_Maker.cxx - ETR detector added;
St_geom_Maker
StGeomBrowser.cxx, GeomBrowser.cxx - added direct loading TGeo cint file ;
StEmbeddingUtilities
StEmbeddingQA.cxx, StEmbeddingQA.h, StEmbeddingQAUtilities.cxx, StEmbeddingQAUtilities.h - functions added to cut on refMult ;
StEvent
StEvent.h - added IsMain() related to I/O;
StEnumerations.h - added KFVertexFinder; modified to set max number of detector's ID = 40;
StMtdHit.cxx - tof() implementaion added;
StMtdCollection.cxx, StMtdCollection.h - Browse() method added;
StTriggerData.h, StTriggerData.cxx, StTriggerData2009.cxx, StTriggerData2012.cxx, StTriggerData2012.h - fixed bug concerning seg failt when MIX DSM not in run and added new arg to MtdVpdTacDiff();
StEventLinkDef.h - added new pragmas for 2012 trigger structures;
StContainers.h, StContainers.cxx, StDetectorDefinitions.h, StDetectorId.inc, StEnumerations.h, StEvent.h, StEvent.cxx, StEventClusteringHints.cxx, StEtrHit.cxx, StEtrHit.h, StEtrHitCollection.cxx, StEtrHitCollection.h - ETR detector added;
StEnumerations.cxx - added new method detectorIdByName;
StEventUtilities
StEventHelper.cxx, StEventHelper.h - modified;
StEventHitIter.cxx, StEventHitIter.h - added new files to keep ETR hits separately;
StuDraw3DEvent.h, StuDraw3DEvent.cxx - modified to draw StHit by iterator ;
StJetMaker
StAnaPars.h, StJetMaker2009.cxx - added support for parton jets;
St_pythia_Maker.cxx - modified to load PYTHIA record from file;
mcparticles/StjMCParticleCutParton.cxx, StjMCParticleCutParton.h - added support for parton jets;
StjMCParticleCutParton.h - modified cut: require parent line number <= MSTU(72) and particle status code != 51 and particle pt > 0.0001 GeV and particle eta between -5 and 5;
mudst/StjMCMuDst.cxx - added support for parton jets;
StMcEvent
StMcMtdHit.cc,StMcMtdHit.hh - added MTD hits ;
StMcBTofHitCollection.cc, StMcBTofHitCollection.hh, StMcCtbHitCollection.cc, StMcCtbHitCollection.hh, StMcEmcModuleHitCollection.cc, StMcEmcModuleHitCollection.hh, StMcEvent.cc, StMcEvent.hh, StMcFgtLayerHitCollection.cc, StMcFgtLayerHitCollection.hh, StMcFtpcPlaneHitCollection.cc, StMcFtpcPlaneHitCollection.hh, StMcHit.hh, StMcIstLayerHitCollection.cc, StMcIstLayerHitCollection.hh , StMcMtdHitCollection.cc, StMcMtdHitCollection.hh, StMcPixelLayerHitCollection.cc, StMcPixelLayerHitCollection.hh, StMcRichHitCollection.cc, StMcRichHitCollection.hh, StMcSsdWaferHitCollection.cc, StMcSsdWaferHitCollection.hh, StMcSvtHit.hh, StMcSvtWaferHitCollection.cc, StMcSvtWaferHitCollection.hh, StMcTofHitCollection.cc, StMcTofHitCollection.hh, StMcTpcHit.hh, StMcTpcPadrowHitCollection.cc, StMcTpcPadrowHitCollection.hh - added method Browse();
StMcEventLinkDef.h - added MTD collection dictionary;
StMcEventMaker
StMcEventMaker.cxx - modified to ignore tracks with wrong geant ID; added MTD Creation;
StMtdHitMaker
StMtdHitMaker.cxx, StMtdHitMaker.h - modified for run 2012; added tdc-channel to global (backleg) strip coordinate mapping; modified to redefine global tdc channel; MTD decoding updated;
StMtdSimMaker
StMtdSimMaker.cxx, StMtdSimMaker.h - rewritten new provisional version;
Sti
StiKalmanTrack.cxx, StiKalmanTrackNode.cxx, StiKalmanTrackNode.h - corrected no.of possible points for tracking with CA seed finder algorithm; StiKalmanTrackFinder.cxx, StiKalmanTrackFinder.h - set limit for number of permutations kMaxEventPerm=10M ;
StiMaker
StiMaker.cxx - set limit for number of permutations;
StTriggerDataMaker
StTriggerDataMaker.cxx - fixed bug #2251;
StTriggerUtilities
StTriggerSimuMaker.cxx, StTriggerSimuMaker.h - added function to set LD301 registers;
Emc/StEmcTriggerSimu.cxx, StEmcTriggerSimu.h - added defineTrigger() function;
StTpcHitMoverMaker
StTpcHitMoverMaker.cxx - modified to recalculate hit positions from the original cluster;
StTpcRSMaker
StTpcRSMaker.cxx, StTpcRSMaker.h, TpcRS.C - removed YXTProd, added WIREHISTOGRAM and WIREMAP, modified to use particle definition from StarClassLibrary;
StTpcRSMaker.cxx, TF1F.h, TF1F.cxx - modified to change defaults: shark measurements: old default => 46.6%, wire histograms => 38.9%, wire map => 12.5 +10.2, pad block => 15% ; added protection for underflow bins;
StTpcRSMaker.cxx - removed __DEBUG__ and __ClusterProfile__ from default, reduced arrays and added check for bounds;
StarRoot
TTreeIter.cxx, - modified to check that TTree exists and TFile is not Zombie;
KFParticle.h, KFParticleBase.cxx, KFParticleBase.h - changed type of particles;
KFParticleLinkDef.h - removed;
StCloseFileOnTerminate.cxx - added check that TFile is writable;
THelixTrack.cxx, THelixTrack.h - modified to improve errors;
St_QA_Maker
StEventQAMaker.cxx, StEventQAMaker.h, StQABookHist.cxx, StQABookHist.h - modified for run 2012; removed FTPC histograms for run 2012;
QAhlist_EventQA_qa_shift.h - modifeid to place TPC sector plots in QA Shift;
StEventQAMaker.cxx, StQABookHist.cxx, StQABookHist.h, StQAMakerBase.cxx, StQAMakerBase.h - modified to remove TPC XY dist, add TPC RPhi charge:
StPass0CalibMaker
StSpaceChargeEbyEMaker.cxx - added code for EMC match, set default to required;
RTS
include/cmds.h,daqFormats.h - updated trigger formats to version 41;
daqModes.h - cleanup daq_cmd;
cmds.h - cleanup;
prepareGbPayload.h - update for vxworks;
rtsLog.h - changed _FILE_ to _BASE_FILE_;
rtsMonitor.h - added rtsMonSC for the scDeamon.C;
rtsSystems.h - renamed SS2 to final SST;
include/SUNRT/clockClass.h - new file added;
src/ rtsplus.def, rtsplusplus.def - updated;
src/DAQ_READER/daqReader.cxx - fixed bug with file/directory reading at the end of file;
daq_det.cxx, daq_det.h, daq_dta.cxx - added global event number function ;
src/DAQ_TOF/daq_tof.cxx - modified to remove L2;
src/DAQ_TPX/daq_tpx.cxx, tpxGain.h - removed L2;
src/DAQ_BSMD/daq_bsmd.cxx - removed L2;
src/DAQ_BTOW/daq_btow.cxx - removed L2;
src/DAQ_ESMD/daq_esmd.cxx - removed L2;
src/DAQ_ETOW/daq_etow.cxx - removed L2;
src/DAQ_FGT/daq_fgt.cxx - fixed to get_l2; changed for 7to5timebin;
trg/include/trgDataDefs.h - updated;
pams
geometry/eiddgeo/eiddgeo.g - added stub for eStar development detector EIDD;
geometry/geometry/geometry.g - added devE tag for eStar development;
geometry/fgtdgeo/fgtdgeo3.g - modifeid to incorporate FGT and IDSM into AgSTAR geometry for y2012 run;
gen/StarLight/ - StarLight event generator integrated with starsim framework, added next files:
PythiaStarlight.h, StarLightInterface.F, StarLightInterface.cdf, beam.cpp, beam.h, beambeamsystem.cpp, beambeamsystem.h, bessel.cpp, bessel.h, eventchannel.cpp, eventchannel.h, eventfilewriter.cpp, eventfilewriter.h, filewriter.cpp, filewriter.h, gammaaluminosity.cpp, gammaaluminosity.h, gammaavm.cpp, gammaavm.h, gammagammaleptonpair.cpp, gammagammaleptonpair.h, gammagammasingle.cpp,gammagammasingle.h, hepevt61.inc, inputParameters.cpp, inputParameters.h, inputParser.cpp, inputParser.h, lorentzvector.cpp, lorentzvector.h, nBodyPhaseSpaceGen.cpp, nBodyPhaseSpaceGen.h, narrowResonanceCrossSection.cpp, narrowResonanceCrossSection.h, nucleus.cpp, nucleus.h, photonNucleusCrossSection.cpp, photonNucleusCrossSection.h, psifamily.cpp, psifamily.h, pushTrack.age, randomgenerator.cpp, randomgenerator.h, readinluminosity.cpp, readinluminosity.h, reportingUtils.h, starlight.cpp, starlight.h, starlightconstants.h, starlightlimits.h, starlightparticle.cpp, starlightparticle.h, starlightparticlecodes.cpp, starlightparticlecodes.h, twophotonluminosity.cpp, twophotonluminosity.h, upcevent.cpp,upcevent.h, vector3.cpp, vector3.h, wideResonanceCrossSection.cpp, wideResonanceCrossSection.h; StarLightUser.cc - added interface for the event generator machinery;
gen/Pythia6_2_05/pystar-6.4.22.F, pythia6205.F, pytune.F - added new version of PYTHIA 6.2.05;
gen/Pythia6_4_26/pystar-6.4.22.F, pythia-6.4.26.F - added new version of PYTHIA 6.4.26;
sim/g2t/g2t_volume_id.g - modified;
g2t_etr.F, g2t_etr.idl - added new files for ETR detector;
sim/idl/g2t_track.idl - modified;
g2t_etr_hit.idl - added new files for ETR detector;
StarDb
Calibrations/tpc/TpcLengthCorrectionB.20110503.000003.C, TpcLengthCorrectionB.20110620.000102.C, TpcLengthCorrectionB.20110624.150002.C - removed doubled sigma for dEdx;
TpcLengthCorrectionB.20110620.150001.C - added new file;
TpcResponseSimulator.C - modified for TpcRS 2005;
TpcResponseSimulator.y2010.C - fixed parameters from TpcRS 2010;
TpcResponseSimulator.y2009.C - fixed parameters from TpcRS 2009;
TpcResponseSimulator.y2011.C - updated to freeze parameters for y2011 based TpcRS; adjusted T0offset from Run 11 AuAu 27 & 19.6 GeV embedding;
OnlTools
Jevp/level.source - added new file; updated for trigger version 0x41;
Jevp/JevpEdit/JevpEdit.java - updated for trigger version 0x41;
Jevp/StJevpServer/DisplayDefs.cxx, DisplayDefs.h, JevpServer.cxx, JevpServer.h, JTMonitor.cxx - updated;
EvpConstants.h, JevpServer.cxx, JevpServer.h - modified to save root files ;
Jevp/StJevpBuilders/fgtBuilder.cxx, fgtBuilder.h - added fgt detector;
bbcBuilder.cxx/h, bemcBuilder.cxx/h, daqBuilder.cxx/h, eemcBuilder.cxx/h, fgtBuilder.cxx/h, fpdBuilder.cxx/h,
l3Builder.cxx/h, mtdBuilder.cxx/h, ppBuilder.cxx/h, tofBuilder.cxx/h, tpxBuilder.cxx/h, trgBuilder.cxx/h, upcBuilder.cxx/h;
eemcBuilder.cxx, tpxBuilder.cxx, baseBuilder.cxx, baseBuilder.h, LaserReader.cxx - updated;
mtdBuilder.cxx/h - modified to skip triggers if zero; MTD error checking plots added ;
tofBuilder.cxx, tofBuilder.h - set new trigger windows for run 2012;
Jevp/StJevpPlot/JevpPlotSet.cxx - fixed bug for run #=0;
JevpPlotSet.cxx - updated for trigger version 0x41;
JevpPlot.cxx/h, BuilderStatus.cxx/h, JevpPlotSet.cxx/h - updated ;
PdfFileBuilder.cxx, PdfFileBuilder.h - added new files;
Jevp/StJevpPresenter/EvpMain.cxx, JevpGui.cxx, JevpGui.h, evpPresenterBaseScript.C - modified;
ZoomWidget.cxx, ZoomWidget.h - added new files for zoom;
JevpGui.cxx, JevpGui.h - added zoom;
OnlinePlots/Infrastructure/ EvpUtil.cxx, EvpUtil.h - modified for better variable name (no conflicts) for generic files;
Lidia Didenko
2013
STAR SOFTWARE NEWS  December 11, 2013
---------------------
The present release assignment:
             SL07c    (SL07c_3)  ROOT_LEVEL 5.12.00 CuCu 200&62GeV run 2005,TPC+SVT+SSD tracking
             SL07d    (SL07d_2)  ROOT_LEVEL 5.12.00 auau 200GeV stream data run 2007, TPC tracking
             SL08c    (SL08c_5)  ROOT_LEVEL 5.12.00 auau 200GeV run 2007,TPC+SVT+SSD tracking
             SL08e    (SL08e_2)  ROOT_LEVEL 5.12.00 pp 200GeV & dAu 200GeV, run 2008
             SL08e_embed (SL08e_5) ROOT_LEVEL 5.12.00
             SL08f    (SL08f_3)  ROOT_LEVEL 5.12.00 last version with EVP_READER, MC production
             SL08f_embed (SL08f_4) ROOT_LEVEL 5.12.00
             SL09e    (SL09e_2)  ROOT_LEVEL 5.22.00 SL5.3, last library with old pams (tpt)
             SL09g    (SL09g_4)  ROOT_LEVEL 5.22.00 run 2009 pp 500GeV data production
             SL09g_embed (SL09g_2Embed_v10) ROOT_LEVEL 5.22.00
             SL10c    (SL10c_4)  ROOT_LEVEL 5.22.00 run 2009 pp 200GeV production
             SL10c_embed (SL10c_embed_v5)  ROOT_LEVEL 5.22.00
             SL10h    (SL10h_5)  ROOT_LEVEL 5.22.00 run 2010 auau 7.7-39GeV production
             SL10h_embed (SL10h_embed_v6)  ROOT_LEVEL 5.22.00
             SL10i    (SL10i_4)  ROOT_LEVEL 5.22.00
             SL10k    (SL10k_4)  ROOT_LEVEL 5.22.00 run 2010 auau 39-200GeV production
             SL10k_embed (SL10k_embed_v11) ROOT_LEVEL 5.22.00
             SL11b    (SL11b_2)  ROOT_LEVEL 5.22.00
             SL11c    (SL11c_3)  ROOT_LEVEL 5.22.00 auau 19.6Gev run 2011 preproduction
             SL11d    (SL11d_3)  ROOT_LEVEL 5.22.00 run 2011 pp 500GeV & auau 19-200GeV production
             SL11d_embed (SL11d_embed_v6)  ROOT_LEVEL 5.22.00
             SL11e    (SL11e_2)  ROOT_LEVEL 5.22.00
             SL12a    (SL12a_2)  ROOT_LEVEL 5.22.00
             SL12a_embed  (SL12a_embed_v3) ROOT_LEVEL 5.22.00
             SL12b    (SL12b_2)  ROOT_LEVEL 5.22.00
             SL12c    (SL12c_2)  ROOT_LEVEL 5.22.00 UU 193GeV run 2012 preproduction
       old-> SL12d    (SL12d_2)  ROOT_LEVEL 5.22.00 UU 193GeV, pp 200GeV run 2012 production
             SL12d_embed (SL12d_embed_v4) ROOT_LEVEL 5.22.00
             SL12e    (SL12e_2)  ROOT_LEVEL 5.22.00
             SL13a    (SL13a_3)  ROOT_LEVEL 5.22.00
       pro-> SL13b    (SL13b_2)  ROOT_LEVEL 5.22.00 pp 500GeV run 2012 production
             SL13c    (SL13c_2)  ROOT_LEVEL 5.22.00
       new-> SL13d    (SL13d)    ROOT_LEVEL 5.34.09
       dev-> DEV                 ROOT_LEVEL 5.34.09
      .dev-> .DEV                ROOT_LEVEL 5.34.09

-------------------------------------------------
Release History
SL13a library
SL13b library
SL13c library
SL13d library
- December 3, 2013
new library SL13d tagged as SL13d has been created and built on SL6.4 (32bits & 64bits) and SL5.3 platforms;
default compiler on SL6.4 is gcc 4.4.7 . Library was tested, found problem fixed and library was released on December 11.
Main features:
- first library release on SL6.4 platform;
- new ROOT version 5.34.09;
- eSTAR2 geometry implemented;
- geometry modifications for beam pipe, PXL and IST;
- added new database support for PXL & IST detectors;
- first version of year 2014 geometry;
- updates of new event generator framework;
- new version of PPV vertex finder with StEvent dependency only, could be used both in Sti & Stv tracking;
- new version of QtRoot;
- several bugs fixed;
Next codes have been updated:
asps
Simulation/starsim/atmain/guhadr.age, guphad.age - modified do not segregate He3;
rexe/MAIN_rmain.cxx - fixed number of arguments;
StRoot
StarGenerator
BASE/AgStarReader.cxx, AgStarReader.h - added support for user-defined particles;
StarPrimaryMaker.cxx - made fixes to unfiltered event generation; enabled filter to skip events, rather than continue trials until it passes;
AgStarReader.cxx, StarPrimaryMaker.cxx - fixed issue with geant3 particle ID not being propagated into the fTrackingCode member of TParticlePDG; StarParticleData now clones TDatabasePDG;
EVENT/StarGenParticle.h - added correction to StarGenParticle documentation;
StarGenEvent.cxx - made fixes to unfiltered event generation;
Hijing1_383/StarHijing.cxx, hijing1.383.F, hipyset1.35.F - modified to make sure that event generators map to common StarGenerator RNG;
StarHijing.cxx - implemeted fixed taget; fixed isotope of Cu used in beam for Cu running; fixed bug with saving hijing header information;
Pepsi/jetseten.F, lazimu.F, lepto.F, leptox.F, lflav.F, lprikt.F, lqqbev.F, lremh.F, lscale.F, lsci.F, lsmall.F, lwbb.F, lxp.F, lyspli.F, lysspa.F, lzp.F, pollazimu.F, polleptox.F, pollzp.F, pystfu.F - modified to make sure that event generators map to common StarGenerator RNG;
Pythia6_4_23/ StarPythia6.cxx, StarPythia6.h - modified to expose PyStat and PyList calls in StarPythia6;
Pythia6.h, StarPythia6.cxx, StarPythia6.h, address.F - modified to add StarGenStats to the pythia6 event record;
StarPythia6.cxx, pythia-6.4.23.F - modified to make sure that event generators map to common StarGenerator RNG;
UrQMD3_3_1/StarUrQMD.cxx, angdis.F, anndec.F, boxprg.F, cascinit.F, coload.F, dectim.F, dwidth.F, getmass.F, getspin.F, init.F, input.F, iso.F, jdecay2.F, make22.F, pythia6409.F, string.F, uhmerge.F, upmerge.F - modified to maker sure that event generators map to common StarGenerator RNG ;
UTIL/StarParticleData.cxx, StarParticleData.h - added support for user-defined particles;
StarParticleData.cxx - fixed issue with geant3 particle ID not being propagated into the fTrackingCode member of TParticlePDG; StarParticleData now clones TDatabasePDG;
macros/starsim.addparticle.C - added example of a macro for adding a particle;
starsim.filter.C, starsim.pythia8.C - added vertexing;
starsim.hijing.C - modified to maker sure that event generators map to common StarGenerator RNG ;
starsim.filter.C - enabled filter to skip events, rather than continue trials until it passes;
StarRoot
THelixTrack.cxx - added fabs(eigen) + TComplex &x;
KFParticleBase.cxx, KFParticle.cxx, KFParticleBase.h, KFParticle.h, KFVertex.h, KFParticleBase.h - added bookkeeping;
KFParticleBase.h - added renamed method;
StMultiKeyMap.cxx, StMultiKeyMap.h - removed recursion to speedup ;
StDraw3D.cxx - modified angle name;
StBFChain
BigFullChain.h - modified to move ITTF,UseXgeom out of the B2013_cX options, added bare pp2013;
pp500_production_2012_ReversedFullField_P12ic_st_W_13078060_raw_1360001 StBFChain.cxx - changed StMaker::Finish() => StChain::Finish();
StBFChain.h, StBFChain.cxx - added more Database entries, retiered GC;
BigFullChain.h, StBFChain.cxx - implemented new vertex finder options 'VFPPVEv' & 'VFPPVEvNoBtof' ;
replace Pythia6_4_23 => Pythia6_4_26 ;
StBTofSimMaker
StBTofSimMaker.cxx - modified to improve log message for inefficiency cuts;
StChain
StChain.cxx - added y2014 firtst cut geometry;
StMaker.cxx - added eStar2 geometry definition; updated timestamp for eStar2 simulation; modified to move GeometryDbAliases into separate h-file;
GeometryDbAliases.h - added new file; modified to print hidden maker;
StChallenger
StChallenger.cxx, StChallenger.h - retiered;
StDaqLib
GENERIC/RecHeaderFormats.hh - added missing header;
StDbLib
StHyperCacheFileLocal.cpp, StHyperCacheFileLocal.h - modified for filesystem cache watermarking, configuration support;
StHyperCacheFileLocal.cpp, StHyperCacheFileLocal.h, StHyperUtilFilesystem.cpp, StHyperUtilFilesystem.h - file cache cleanup using watermarking boundaries and FIFO/LRU policies;
StDbDefs.hh, StDbManagerImpl.cc - modified for new database support: IST;
MysqlDb.cc - modified to override for mysql user autodetect functionality, needed for SL6.4 platdorm;
StDbUtilities
StMagUtilities.cxx - modified to return code for Predict...();
St_db_Maker
St_db_Maker.cxx, St_db_Maker.h - modified to expand no. of possible databases from 4 to 10;
StdEdxY2Maker
StTpcdEdxCorrection.cxx - added test for ADC==0; hacked;
StEvent
StPxlHit.h - modified layer() method; changed order of XX,XY,YY;
StVpdTriggerDetector.cxx, StVpdTriggerDetector.h - added ADCmxq(), TDCmxq() and referring data member;
StDcaGeometry.cxx - supressed warning;
StGenericVertexMaker
StGenericVertexFinder.cxx, StGenericVertexFinder.h, StGenericVertexMaker.cxx - modified for new PPV vertex finder with StEvent dependency only;
StGenericVertexMaker.cxx - implemented new options 'VFPPVEv' & 'VFPPVEvNoBtof' for new PPV vertex finder;
StiPPVertex/ScintHitList.cxx, ScintHitList.h, StPPVertexFinder.cxx, StPPVertexFinder.h - modified for new PPV with StEvent dependency only;
StvPPVertex/BemcHitList.cxx, BemcHitList.h, BtofHitList.cxx, BtofHitList.h, CtbHitList.cxx, CtbHitList.h, EemcHitList.cxx, EemcHitList.h, ScintHitList.cxx, ScintHitList.h, StEventToolkit.cxx, StEventToolkit.h, StPPVertexFinder.cxx, StPPVertexFinder.h, TrackData.cxx, TrackData.h, Vertex3D.cxx, Vertex3D.h, VertexData.cxx, VertexData.h - implemented new version of PPV vertex finder for Stv tracking with StEvent dependency only;
StPPVertexFinder.cxx - check for DCA geo added;
StMagF
StMagF.h - cleanup;
StMcEvent
StMcMtdHit.cc - modified to change numberring;
StMtdMatchMaker
StMtdMatchMaker.cxx - modified to include protection against zero triggerIdCollection() pointers. This is relevant when using simulated data as input;
StMtdMatchMaker.h, StMtdMatchMaker.cxx - added name;
StMtdMatchMaker.cxx - removed AddHist for uninitialized histogram;
StMtdSimMaker
StMtdSimMaker.cxx, StMtdSimMaker.h - bug fixed; corrected mapping based on GEANT volume_id;
StMtdUtil
StMtdGeometry.h, StMtdGeometry.cxx - updated strip gap dimension from old to current MRPC design; included CVS Id and Log tags;
StMuDSTMaker
COMMON/StMuTrack.h - mID modified from Short_t to Int_t;
StMuDst.cxx, StMuDst.h, StMuDstMaker.cxx, StMuMtdHit.h, StMuTrack.cxx, StMuTrack.h - MTD specific updates for MuDst;
StMuMtdPidTraits.cxx, StMuMtdPidTraits.h - added new code for Mtd PidTraits;
StPass0CalibMaker
StEvtVtxSeedMaker.cxx, StMuDstVtxSeedMaker.cxx, StVertexSeedMaker.cxx, StVertexSeedMaker.h - introduced time offsets, noclobber toggle, more matched-tracks controls;
StSpaceChargeEbyEMaker.cxx, StSpaceChargeEbyEMaker.h - modified to allow use of multiple PPVF vertices, introduce EmcOrTofMatch, keep track of Predict...() cuts;
StPeCMaker
StPeCMaker.cxx - added 'returnValue' in StEvent input mode;
StPeCTrigger.cxx, StPeCTrigger.h - added arrays to handle bbc and zdc information;
StPxlSimMaker
StPxlFastSim.cxx - adjusted to StMcPxlHit changes to be on local coordinated; no longer transfor from global to local before smearing;
StPreEclMaker
StEmcOldFinder.cxx - modified to replace TTableSorter by TMath::Sort;
StSsdSimulationMaker
St_sls_Maker.cxx - implemented corrections for %d format used for long int;
Sti
StiMasterDetectorBuilder.cxx - created clone of Geometry and left it undeleted; added some LOG_INFO for better tracing; updated to check that TGeoManager exists; modified to check non-NULL gGeoManager before accessing;
StiLocalTrackSeedFinder.cxx - replaced assert to return false to prevent job crashes due to some wrong hits on track;
Star/StiStarDetectorBuilder.cxx, StiStarDetectorBuilder.h - added new beam pipe;
StTriggerUtilities
StTriggerSimuMaker.h - modified to add member mTrigName and function askTrigger() to request trigger definition;
StTriggerSimuMaker.cxx - added functionality to get2009DsmRegistersFromOnlineDatabase(int) to get trigger definition for run11 and run12 from database based on requested triggers;
StTriggerDefinition.h - changed onbits/offbits type from int to unsigned int;
StTriggerSimuMaker.cxx - added getpwuid to get user name to access database;
StDSMUtilities/DSMAlgo_EM201_2009.cc - implemented new AJP algorithm for run12 by adding new register R3 in ajpBarrel and ajpEndcap;
TCU.cc - modified to return false for isTrigger and isOnBits if onbits == 0;
TCU.hh - modified to change defineTrigger(const TriggerDefinition& triggerDef) to defineTrigger(TriggerDefinition&triggerDef) TriggerDefinition.hh - added onbits0 and offbits0 and changed onbits/offbits type from int to unsigned int;
Emc/StEmcTriggerSimu.h - added defineTrigger2012() to manually set up triggers;
Emc/StEmcTriggerSimu.cxx - added defineTrigger(TriggerDefinition & trigdef, int year) to define trigger based on year and added defineTrigger2012 to manually set up trigger;
RTS
include/rtsSystems.h - updated FY13 checkpoint; swapped IST and FGT TCD; added TOKEN_MANAGER; GRP cleanup; defined RPII_GRP; fixed bug in tcd2rts;
RC_Config.h, cmds.h - added TokenManagerChooser;
iccp2k.h, prepareGbPayload.h, tasks.h, rtsLog.h - updated;
prepareGbPayload.h - fixed LOG message for vxWorks;
tasks.h - added token manager;
rtsMonitor.h - modified; fixed IST-related bug in rts2tcd; added clock to TCD monitoring;
include/TPC/trans_table.hh - updated FY13 checkpoint;
include/TPX/tpx_altro_to_pad.h - updated FY13 checkpoint;
include/UNIX/simpleQ2.hh - added new file;
include/DAQ1000/rb.hh - added fifo length for emulation;
include/RORC/rorc_lib.h, added physmemCheck; added fixes for 64bit;
src/rtsplusplus.def - updated; TokenManager added;
src/DAQ_BSMD/daq_bsmd.cxx - updated FY13 checkpoint;
src/DAQ_BTOW/daq_btow.cxx - removed check for trg_cmd=4;
src/DAQ_ESMD/daq_esmd.cxx - removed check for trg_cmd=4;
src/DAQ_ETOW/daq_etow.cxx - removed check for trg_cmd=4;
src/DAQ_FGT/daq_fgt.cxx, fgtPed.cxx - updated FY13 checkpoint; added sector checking; added external tb count to fgtPed; minor logging fix to daq_fgt.cxx;
fgtPed.cxx, fgtPed.h - updated misc IST;
src/DAQ_PXL/daq_pxl.cxx - updated FY13 checkpoint;
src/DAQ_SST/daq_sst.cxx - added get_l2 ala PXL;
src/DAQ_TPX/tpxFCF_2D.cxx, tpxFCF_2D.h - updated;
daq_tpx.cxx - minor logging tweaks;
tpxPed.cxx - updated FY13 checkpoint; added special ped setup;
tpxFCF.cxx - modified;
src/DAQ_SST/daq_sst.cxx - updated FY13 checkpoint;
src/LOG/rtsLogUnix.c - updated;
rtsLogServer.C - removed;
src/SFS/sfs_header.C - updated;
sfs_base.h - added calcfileheader as a convenience;
sfs_index.cxx - updated;
pams
geometry/geometry/geometry.g - added support to eStar2 model; defined a CONSTRUCT keyword in geometry.g; CONSTRUCT calls a geometry module using comis; if the subroutine is not linked with the program, it will not be called and a warning will be issued; for the case where one or more moduels are missing, a fortran STOP will be issued to prevent invalid geometries from being used;
added improved definitions for y2013a, new beam pipe module and new ist module;
added case statements to enable y2013a geometries;
modified to move IDS construction before beam pipe;
updated with fixes for IDSM / PIPE ; added y2014 first cut geometry;
geometry/istdgeo/istdgeo1.g - added stub for the AgML istdgeo1 module;
geometry/pipegeo/pipegeo3.g - added stub for the AgML pipegeo3 module;
geometry/tpcegeo/tpcxgeo1.g - added support to eStar2 model;
sim/gstar/gstar_part.g - added Lambda Xi dibaryon; fixed decay modes; improved properties of lambda xi hyperon; changed lifetime, previous values were the width of the particle in GeV, no in sec;
sim/g2t/g2t_volume_id.g - modified to detect tpadconfig from TPCG structure instead of relying on versioning of the TPC;
g2t_pix.F - modified to store local rather than global quantities w/in the g2t tables;
StarDb
AgMLGeometry/Geometry.eStar2.C - added support for eStar2 tag;
CreateGeometry.h - modified to fix bug #2684: previous version of CreateGeometry added include path and loaded a second macro; it appears that ROOT 5.34.09 is having problems unloading this second macro, leading to a crash in loading the TFile. All logic has been moved into CreateGeometry.h to avoid loading of second macro;
Geometry.y2014.C - added first cut of y2014 geometry;
Calibrations/tracker/KalmanTrackFinderParameters.y2013.C - added new file to change mHitWeights from 2111 to 2222 for pixel;
StvTpcInnerHitErrs.20081215.000000.C, StvTpcOuterHitErrs.20081215.000000.C - hit errors fitted for pp 500GeV year 2009;
Calibrations/tpc/tpcWaterOut.eStar2.C, tpcSlewing.eStar2.C, tpcPressureB.eStar2.C, tpcPadGainT0B.eStar2.C, tpcMethaneIn.eStar2.C, tpcGridLeak.eStar2.C, tpcGasTemperature.eStar2.C, tpcGas.eStar2.C, tpcGainCorrection.eStar2.C, tpcGainCorrection.eStar2.C, tpcDriftVelocity.eStar2.C, tpcAnodeHVavg.eStar2.C, tpcAnodeHV.eStar2.C, tpcAltroParams.eStar2.C, TpcdEdxCor.eStar2.C, TpcdCharge.eStar2.C, TpcZDC.eStar2.C, TpcZCorrectionB.eStar2.C, TpcSecRowB.eStar2.C, TpcRowQ.eStar2.C, TpcResponseSimulator.eStar2.C, TpcPhiDirection.eStar2.C, TpcPadCorrection.eStar2.C, TpcLengthCorrectionB.eStar2.C, TpcDriftDistOxygen.eStar2.C, TpcAdcCorrectionB.eStar2.C, spaceChargeCorR2.eStar2.C - added new eSTAR2 geometry parameters;
TpcCurrentCorrection.20120423.112404.C, TpcdXCorrectionB.20120423.112405.C, TpcdXCorrectionB.20120423.112410.C, tpcGainCorrection.20120423.112401.C, TpcLengthCorrectionB.20120423.112401.C, TpcLengthCorrectionMDF.20120423.112415.C, tpcPressureB.20120423.112403.C, TpcRowQ.20120423.112413.C, TpcSecRowB.20120423.112413.root, TpcZCorrectionB.20120423.112412.C - updated dEdx calibrations for run 2012 UU 193GeV;
TpcResponseSimulator.y2012.C - updated for run 2012;
tpcAnodeHV.y2010.C - modified default anode voltage;
Calibrations/ftpc/ftpcTemps.eStar2.C - added new eSTAR2 geometry parameters;
Geometry/tpc/TpcOuterSectorPosition.eStar2.C, TpcSuperSectorPosition.eStar2.C, tpcGlobalPosition.eStar2.C, tpcPadPlanes.eStar2.C - added new eStar2 geometry parameters;
RunLog/onl/tpcRDOMasks.eStar2.C, tpcRDOMasks.y2012.C, tpcRDOMasks.y2013.C - add ideal RDO mask;
StarVMC
geant3/TGeant3/TGeant3TGeo.h, TGeant3f77.h - modified to adjust TVirtualMC interface to new ROOT version 5.34.09;
Geometry/Geometry.cxx - added support for eSTAR2 model;
Geometry.h, Geometry.cxx - added code to accumulate list of detector modules;
added improved definition for y2013a, new beam PIPE module and new IST module;
modified to switch to latest version of IDSM; added y2014 first cut geometry;
Geometry/Compat/xgeometry.xml - added support for eSTAR2 model; modified to force rebuilding of xgeometry;
modified to move IDSM construction before beam pipe;
modified to switch to latest version of IDSM;
updated with fixes for IDSM / PIPE; added y2014 first cut geometry;
Geometry/BbcmGeo/BbcmGeo.xml - modified to place BBCM in cave as a MANY volume, to prevent overlap with new modules ;
Geometry/IdsmGeo/IdsmGeo1.xml - modified placement of IDSM in CAVE to make it explicit;
IdsmGeo2.xml - added new file for updated IDSM w/ electrostatic shroud, inner radius to accept beam pipe;
updated with fixes for IDSM / PIPE;
Geometry/IstdGeo/IstdGeo1.xml - added improved IST module;
Geometry/PipeGeo/PipeGeo.xml - modified for better approximation of the beam pipe;
PipeGeo3.xml - added improved beam pipe with positioning inside of the IDSM; fixed beam pipe "hole" (vaccuum);
Geometry/PixlGeo/PxstGeo1.xml - added more accurate description of materials and structures;
PixlGeo5.xml - modified to add PXLW data structure so it can be set from the steering geometry,g and Geometry.cxx;
Geometry/TpcxGeo/TpcxGeo2.xml - added new file to support eSTAR2 model; TpcxGeo2.xml - modified to set default to devTF geometry;
Geometry/macros/StarGeometryDb.C, viewStarGeometry.C - added support for eSTAR2 model;
StarGeometryDb.C - added a few older geometries; corrections to geometries with mfldgeo called; fake versions of upgrade geometries setup; added y2014 first cut geometry;
StarAgmlLib/StarTGeoStacker.cxx - minor fixes to ensure that gGeoManager has been created;
StarNoStacker.h, StarNoStacker.cxx - added new files with NULL geometry engine, i.e. one which allows us to go through the steering process w/out generating a geometry;
StarTGeoStacker.h - few methods made virtual to allow for subclass; added y2014 first cut geometry;
AgPlacement.cxx - modified to fix the bug reported in ticket #2684;
StDb
idl/pxlRowColumnStatus.idl, pxlSensorStatus.idl - added calibrations/pxl status tables;
pxlRowColumnStatus.idl - removed four characters to leave comment with number of characters less than 80 becuase stic can not handle longer lines;
eemcTriggerPed.idl - added EEMC trigger pedestal table;
istGain.idl, istPedNoise.idl - added new calibrations tables for IST;
OnlTools
Jevp/StJevpServer/JevpServer.cxx - updated;
QtRoot
- new version;
- November 19, 2013
all old libraries from SL13c to SL11b built on SL5.3 platform with ROOT 5.22.00 have been updated with patched code StRoot/StDbLib/MysqlDb.cc and further down up to SL09e with codes StRoot/StDbLib/MysqlDb.cc, MysqlDb.h to provide username for MySQL connection login. The problem occurred on SL6.4 platform that MySql failed automatically detect username and took default 'root' name which brook MySQL connection login. This was reported and discussed in ticket #2702. Each library has been patched with branch revision and retagged, list of libraries and new tags are posted below:Library release
Patch tag for MysqlDb.cc
Patch tag for MysqlDb.h
Revisions
Library new tag
SL09e
dblib_150patch
dblib_153patch
r.1.50.2.1; r.1.27.4.1
SL09e_2
SL09g
dblib_152patch
dblib_153patch
r.1.52.2.1; r.1.27.4.1
SL09g_4
SL09g_embed
dblib_152patch
dblib_153patch
r.1.52.2.1; r.1.27.4.1
SL09g_2Embed_v9
SL10c
dblib_152patch
dblib_153patch
r.1.52.2.1; r.1.27.4.1
SL10c_4
SL10c_embed
dblib_152patch
dblib_153patch
r.1.52.2.1; r.1.27.4.1
SL10c_embed_v5
SL10h
dblib_153patch
dblib_153patch
r.1.53.2.1; r.1.27.4.1
SL10h_5
SL10h_embed
dblib_153patch
dblib_153patch
r.1.53.2.1; r.1.27.4.1
SL10h_embed_v6
SL10i
dblib_153patch
dblib_153patch
r.1.53.2.1; r.1.27.4.1
SL10i_4
SL10k
dblib_153patch
dblib_153patch
r.1.53.2.1; r.1.27.4.1
SL10k_4
SL10k_embed
dblib_153patch
dblib_153patch
r.1.53.2.1; r.1.27.4.1
SL10k_embed_v11
SL11b
dblib_160patch
-
r.1.60.2.1
SL11b_2
SL11c
dblib_160patch
-
r.1.60.2.1
SL11c_3
SL11d
dblib_160patch
-
r.1.60.2.1
SL11d_3
SL11d_embed
dblib_160patch
-
r.1.60.2.1
SL11d_embed_v6
SL11e
dblib_160patch
-
r.1.60.2.1
SL11e_2
SL12a
dblib_160patch
-
r.1.60.2.1
SL12a_2
SL12a_embed
dblib_160patch
-
r.1.60.2.1
SL12a_embed_v3
SL12b
dblib_160patch
-
r.1.60.2.1
SL12b_2
SL12c
dblib_161patch
-
r.1.61.2.1
SL12c_2
SL12d
dblib_161patch
-
r.1.61.2.1
SL12d_2
SL12d_embed
dblib_161patch
-
r.1.61.2.1
SL12d_embed_v4
SL12e
dblib_161patch
-
r.1.61.2.1
SL12e_2
SL13a
dblib_162patch
-
r.1.62.2.1
SL13a_3
SL13b
dblib_162patch
-
r.1.62.2.1
SL13b_2
SL13c
-
-
r.1.65
SL13c_2
- June 14, 2013
all old libraries built on SL5.3 platform have been updated with patched code StRoot/StDbLib/StDbManagerImpl.cc to prevent libraries from crashing when new DB for new detectors is implemented.
Each library has been patched with branch revision and retagged, see list of libraries tages below:
Library release
Patch tag
Revision
Library new tag
SL09e
SL09e_dbpatch
r.1.33.2.1
SL09e_1
SL09g
SL09g_dbpatch
r.1.35.2.1
SL09g_3
SL09g_embed
SL11d_dbpatch2
r.1.38.4.1
SL09g_2Embed_v8
SL10c
SL09g_dbpatch
r.1.35.2.1
SL10c_3
SL10c_embed
SL11d_dbpatch2
r.1.38.4.1
SL10c_embed_v4
SL10h
SL09g_dbpatch
r.1.35.2.1
SL10h_4
SL10h_embed
SL11d_dbpatch2
r.1.38.4.1
SL10h_embed_v5
SL10i
SL09g_dbpatch
r.1.35.2.1
SL10i_3
SL10k
SL09g_dbpatch
r.1.35.2.1
SL10k_3
SL10k_embed
SL11d_dbpatch2
r.1.38.4.1
SL10k_embed_v10
SL11b
SL11b_dbpatch
r.1.37.2.1
SL11b_1
SL11c
SL11b_dbpatch
r.1.37.2.1
SL11c_2
SL11d
SL11d_dbpatch2
r.1.38.4.1
SL11d_2
SL11d_embed
SL11d_dbpatch2
r.1.38.4.1
SL11d_embed_v5
SL11e
SL11d_dbpatch2
r.1.38.4.1
SL11e_1
SL12a
SL11d_dbpatch2
r.1.38.4.1
SL12a_1
SL12a_embed
SL11d_dbpatch2
r.1.38.4.1
SL12a_embed_v2
SL12b
SL12b_dbpatch
r.1.40.2.1
SL12b_1
SL12c
SL12b_dbpatch
r.1.40.2.1
SL12c_1
SL12d
SL12d_dbpatch
r.1.41.2.1
SL12d_1
SL12d_embed
SL12d_dbpatch
r.1.41.2.1
SL12d_embed_v3
SL12e
SL12d_dbpatch
r.1.41.2.1
SL12e_1
SL13a
SL12d_dbpatch
r.1.41.2.1
SL13a_2
SL13b
SL12d_dbpatch
r.1.41.2.1
update on pending
for production to finish - June 27, 2013
SL13c library was updated with next codes:
StRoot/St_geant_Maker/St_geant_Maker.cxx, r.1.147;
pams/sim/g2t/g2t_mtd.F, r.1.2;
to make MTD geometry changes consistent in geant description.
SL13c library was retaged with tag SL13c_1 and rebuilt on SL5.3 & SL44 platforms.
- June 4, 2013
new library SL13c tagged as SL13c has been created and built on SL5.3 (32bits & 64bits platforms) and SL4.4 . Library was tested and released on June 6.
gcc version 4.3.2 20081007 (Red Hat 4.3.2-7)
Library unique ID for source codes is: 15904-iywgCJgYJMIrMsrjPsyRB
for objects : 7700-bFQEMz+CkS+3RU3CtEZRyA
Main features:
- first release of StMtdMatchMaker & StMtdUtil codes;
- first release of StPxlSimMaker code;
- added pixel hit collections to StMcEvent maker;
- further development of FGT code;
- first release of event generator filtering framework;
- added PXL event builder to OnlTools;
- retired next packages: St_tpcdaq_Maker, StRTSClient & StMixerMaker;
- several bugs fixed;
Next codes have been updated:
StRoot
StBFChain
BigFullChain.h - removed dependancy in StMtdUtil; fixed bug #2497;
BigFullChain.h, StBFChain.cxx - added MTD chain; modified due to retirement of StRTSClient/FCFMaker & St_tpcdaq_Maker codes; adde d option for reading MuDst; added 'KeepFgtHit' option; added options for StPxlSimMaker;
StBichsel
dEdxParameterization.cxx - fixed memory leak ;
StBTofHitMaker
StBTofHitMaker.cxx - bug fixed: corrected handling of the GMT in the upper half of the TOF trays;
StDaqLib
EMC/EMC_BarrelReader.cxx - modified due to removing St_tpcdaq_Maker and StRTSClient/FCFMaker;
StDbLib
StDbDefs.hh, StDbManagerImpl.cc - added new domains: PXL, MTD;
StDbServiceBroker.cxx, StDbServiceBroker.h - added feature to call external script when db is not available for XXX seconds; external networked script replaced with direct mail call; modified to send out debug emails only when STAR_DEBUG_DB_RETRIES_ADMINS variable is set; added process id and time difference to email notification;
MysqlDb.cc - implemented simple hook to use database with login/pass when really needed ;
StEmcUtil
PMT-Base-spreadsheet-11-12.xls - added new files;
PMT-Base spreadsheet 11-12.xls - removed due to renaming;
StEmbeddingUtilities
StEmbeddingQADraw.cxx - modified to compare mu- and pi- mesons;
StEvent
StFgtHit.h, StFgtPoint.h - added new methods and members for FGT;
StEnumerations.h - modified;
StEventCompendiumMaker
StEventCompendiumMaker.cxx - added check for existing global track;
StFgtClusterMaker
StFgtSeededClusterAlgo.cxx - modified ;
StFgtPointMaker
StFgtPointMaker.cxx, StFgtPointMaker.h, StFgtSimplePointAlgo.cxx - modified to fill in StHit with xyz, error on xyz and detectorId; added option to return kStSkip if max number of disc hit per quad is less than setSkipEvent (default 0);
StFgtSimplePointAlgo.cxx - added same quad check;
StFgtRawMaker
StFgtRawMaker.cxx - added check for maximum allowed timebin; changed return code from fatal to warning if #tb is too high in meta data;
StGenericVertexMaker
StiPPVertex/BemcHitList.cxx, CtbHitList.cxx, EemcHitList.cxx, ScintHitList.cxx - fixed a few deprecated conversion from string constant to 'char*';
StHitFilterMaker
StHitFilterMaker.cxx, StHitFilterMaker.h - modified HitFilter takes a WestEta cut to keep hits in the FGT direction;
StJetMaker
StAnaPars.h, StJetMaker2009.cxx - modified to change track pT and tower energy by a certain fraction prior to jet reconstruction;
towers/StjAbstractTower.h, StjTowerEnergyFraction.cxx, StjTowerEnergyFraction.h - added new files to change tower energy by a certain fraction prior to jet reconstruction;
tracks/StjAbstractTrack.h StjTrackPtFraction.cxx StjTrackPtFraction.h - added new files to change tower energy by a certain fraction prior to jet reconstruction;
St_QA_Maker
QAhlist_EventQA_qa_shift.h, StEventQAMaker.cxx - adjusted for run 2013;
StMcEvent
StMcPxlHit.cc, StMcPxlHit.hh, StMcPxlHitCollection.cc, StMcPxlHitCollection.hh, StMcPxlLadderHitCollection.cc, StMcPxlLadderHitCollection.hh, StMcPxlSectorHitCollection.cc, StMcPxlSectorHitCollection.hh, StMcPxlSensorHitCollection.cc, StMcPxlSensorHitCollection.hh - added new files for PXL;
StMcVertexC.cxx, StMcTrack.hh, StMcTrack.cc, StMcHitIter.cxx, StMcEventTypes.hh, StMcEventLinkDef.h, StMcEvent.hh, StMcEvent.cc, StMcContainers.hh - modifications to include PXL;
StMcPixelLayerHitCollection.hh, StMcPixelLayerHitCollection.cc, StMcPixelHitCollection.hh, StMcPixelHit.hh, StMcPixelHit.cc - removed;
StMcEventMaker
StMcEventMaker.h, StMcEventMaker.cxx - modified for PXL;
StMiniMcMaker
StMiniMcMaker.cxx - the only MC pairs added;
StMixerMaker
StMixerMaker.cxx, StMixerMaker.h - retired together with St_tpcdaq_Maker & StRTSClient;
StMtdHitMaker
StMtdHitMaker.cxx - minor adjustment to fix SL44 compiler warnings;
StMtdMatchMaker
StMtdMatchMaker.cxx, StMtdMatchMaker.h - first release for MTD; bug #2575 fixed (protection against events that have tracks, but no vertex);
StMtdUtil
StMtdGeometry.cxx, StMtdGeometry.h - fisrt release for MTD;
StPass0CalibMaker
StSpaceChargeEbyEMaker.cxx - set protection against 0 entry histos for EvalCalib();
StPixelFastSimMaker
StPixelFastSimMaker.cxx, StPixelFastSimMaker.h - removed;
StPxlSimMaker
StPxlFastSim.cxx, StPxlSimMaker.cxx, StPxlFastSim.h, StPxlISim.h, StPxlSimMaker.h - first release of PXL simulation maker;
StRTSClient
include/includes_for_export.flg, fcfClass.hh, rts.h, rtsSystems.h - removed;
include/TPC/padfinder.h rowlen.h - removed;
FCF/fcfAfterburner.cxx, fcfClass.cxx - removed;
FCFMaker/FCFMaker.cxx, FCFMaker.h, fcfPixel.idl - removed;
St_tpcdaq_Maker
St_tpcdaq_Maker.cxx, St_tpcdaq_Maker.h - removed;
StTriggerUtilities
StTriggerSimuMaker.cxx - modified to remove usage of current online db;
Bemc/StBemcTriggerSimu.cxx, StBemcTriggerSimu.h - modified to implement option to use bemcStatus.txt file;
StarClassLibrary
StPhi.cc- updated mass and lifetime of the phi to more recent PDG values;
StDiBaryon.hh - removed;
StParticleTable.cc - fixed bug #2574, wrong Omega/Anti-Omega Geant ID;
StarGenerator
BASE/StarPrimaryMaker.cxx, StarPrimaryMaker.h - modified to enable the primary event to be distributed along the beamline, using the beamline constraint obtained from the database;
StarGenerator.h, StarPrimaryMaker.cxx, StarPrimaryMaker.h - modified to make first integration of event filtering;
StarPrimaryMaker.cxx - fixed bug in unfiltered event generation;
Pythia8_1_62/StarPythia8.h - updated documentaion;
EVENT/StarGenEvent.cxx, StarGenEvent.h - updated to support event filter information;
StarGenStats.cxx, StarGenStats.h - added new files to track event generator statistics; fixed bug in unfiltered event generation;
FILT/StDijetFilter.cxx, StDijetFilter.h, StarFilterMaker.cxx, StarFilterMaker.h - first release of event generator filtering framework;
macros/starsim.herwig6.C, starsim.hijing.C, starsim.kinematics.C, starsim.pythia6.C, starsim.pythia8.C, starsim. starlight.C updated example of default macros for using xgeometry/agml;
StarRoot
TPolinom.cxx - fixed 'delete' to 'delete []' ;
THelixTrack.cxx - updated for more accurate fast track estimation; improved some pre fit analysis; added protection against straight track along X axis;
THelixTrack.cxx, THelixTrack.h - method TCirleFitter::Show added;
Sti
StiHit.h - modified to change private: ==>protected ;
StiMaker
StTrack2FastDetectorMatcher.cxx - initialized mTotEve to zero ;
StiSsd
StiSsdDetectorBuilder.cxx - updated ;
StiRnD
Ist/StiIstHitLoader.cxx - removed dependancy from StPixelFastSimMaker due to maker has been removed;
RTS
include/rtsSystems.h - updated ;
include/HLT/HLTFormats.h - updated ;
include/TPC/rowlen.h - added attribute-unused so that code doesn't warn all the time;
tpxGain.h - commented some dev code so it doesn't generate warnings;
include/SUNRT/rtsMother.h, shmLib.h - updated;
src/rtsplusplus.def - updated;
src/DAQ_READER/msgNQLib.cxx, daqReader.cxx - modified;
src/DAQ_TPX/tpxCore.cxx - added some logging;
src/DAQ_FGT/daq_fgt.cxx, fgtPed.cxx, fgtPed.h - fixed bug in ZS in last APV;
macros/embedding
bfcMixer_FullPythia.C, bfcMixer_P07ib.C, bfcMixer_P07ic.C, bfcMixer_TpcOnly.C, bfcMixer_TpcSvt.C, bfcMixer_TpcSvtSsd.C, bfcMixer_TpcSvtSsd2005.C, bfcMixer_Unified.C, bfcMixer_v4.C, bfcMixer_v4_noFTPC.C, bfcMixer_v4_svt.C, bfcMixer_v5.C - updated due to retirement of St_tpcdaq_Maker, StRTSClient and StMixer; bug #2580 fixed;
pams
geometry/geometry/geometry.g - added new version of the CAVE as CAVE05; implemented better dimensions, walls, platform,crates; modified y2013x (asymptotic) STAR geometry to use CAVE05;
sim/gstar/gstar_part.g - updated mass and lifetime of the phi to more recent PDG values;
tpc/idl/daq100cl.idl, raw_pad.idl, raw_row.idl, raw_sec_m.idl, raw_seq.idl, tcl_tphit.idl, type_shortdata.idl - removed;
StarDb
Calibrations/tpc/tpcPadGainT0B.20110204.182524.root - removed;
TpcCurrentCorrection.20120313.140022.C, TpcDriftDistOxygen.20120313.140000.C, tpcGainCorrection.20120313.140025.C, TpcLengthCorrectionB.20120313.140000.C, TpcLengthCorrectionMDF.20120313.140025.C, tpcPressureB.20120313.140022.C, TpcRowQ.20120313.140025.C, TpcSecRowB.20120313.140025.root, TpcZCorrectionB.20120313.140026.C, TpcZDC.20120313.140000.C - updated files for run 2012 TPC calibrations;
Calibrations/tracker/ tpcInnerHitError.20100101.000000.C, tpcInnerHitError.C, tpcInnerHitError.y2009c.C, tpcInnerHitError.y2010c.C, tpcInnerHitError.y2011c.C, tpcOuterHitError.20100101.000000.C, tpcOuterHitError.C, tpcOuterHitError.y2009c.C, tpcOuterHitError.y2010c.C, tpcOuterHitError.y2011c.C - added Sti fitted ideal hit errors;
StarVMC
StarAgmlLib/AgStructure.cxx - updated to print out the value(s) being set during runtime config;
Geometry/Geometry.cxx - added new version of the CAVE as CAVE05; implemented better dimensions, walls, platform, crates; modified y2013x (asymptotic) STAR geometry to use CAVE05; first cut geometry remains at CAVE04;
Geometry/CaveGeo/CaveGeo.xml - removed logic placing walls and selecting different shape cave+hall;
CaveGeo2.xml - added new version of the CAVE to implement reasonable dimensions for walls, tunnels, shape of the cave (no longer a cylinder!), electronics crates, etc..; added floor to the cave;
Geometry/Compat/xgeometry.xml - updated to force recompilation;
Geometry/FgtdGeo/FgtdGeo3.xml - updated z-positions of disks for y2013 geometry using y2012 surveyed values; added 1cm offset to account for 1st FGT cooling tube; offset applies to first cut of y2013 geometries;
Geometry/MagpGeo/MagpGeo.xml - modified to flag MAGP as many due to overlap with MTD;
Geometry/MutdGeo/MutdGeo4.xml - updated to flag volume MIGC (RPC gas) as sensitive;
Geometry/PipeGeo/PipeGeo2.xml - minor correction for pipe geometry; full specification of radlen, abslen density in vacuum;
Geometry/PixlGeo/PixlGeo5.xml - modified PXSI volume from MANY to (default) ONLY; updated to instrumented sectors of the pixel detector with minor modifications to the material budget;
Geometry/macros/StarGeometryDb.C - added new version of the CAVE as CAVE05; implemented better dimensions, walls, platform,crates; modified y2013x (asymptotic) STAR geometry to use CAVE05;
StDb/idl/
pxlSensorTps.idl - added new table for PXL;
mtdTDIGOnBackleg.idl - added new table for MTD;
StvHitErrs.idl - added new Tpc hit error parametrization;
tpcGas.idl - fixed description of imported channels;
QtRoot
qtgui/src/TQtTabValidator.cxx - change RootVers (5,34,4)==> (5,34,3);
OnlTools
Jevp/JevpEditJevpEdit.java - updated;
Jevp/StJevpBuilders/daqBuilder.cxx, daqBuilder.h, hltBuilder.cxx, hltphiBuilder.cxx, tpxBuilder.cxx tpxBuilder.h - mofidied to reduce some histo sizes;
l4Builder.cxx - modified;
l4Builder.h, trgBuilder.cxx, trgBuilder.h - updated;
bemcBuilder.cxx - modified to switch on number of entries for bemc histograms;
pxlBuilder.cxx, pxlBuilder.h - added PXL event builder;
pxlBuilder.cxx, pxlBuilder.h - modified to remove PerEvent plots; fixed string comparisons and few other bugs ;
Jevp/StJevpServer/JevpServer.cxx - mofidied to reduce some histo sizes;
JevpServer.h, WritePDFToDB.C - updated;
- May 6, 2013
SL13b library was updated with codes to proceed with dEdx correction for pp 500GeV, run 2012. SL13b library was retagged with tag SL13b_1 and rebuilt on SL5.3 and SL44 platforms.Next code have been updated:
StRoot
StDetectorDbMaker
StDetectorDbChairs.cxx, r.1.37;
St_MDFCorrectionC.h, r.1.1;
St_TpcAvgCurrentC.h, r.1.4;
St_TpcLengthCorrectionMDF.h, 1.1;
StdEdxY2Maker
StTpcdEdxCorrection.cxx, r.1.10;
StTpcdEdxCorrection.h, r.1.6;
StdEdxY2Maker.cxx, 1.79;
StDb/idl/
MDFCorrection.idl;
StarDb/Calibrations/tpc/
TpcLengthCorrectionMDF.C;
- April 11, 2013
SL13b library was updated with modification for vertex finder to make it more efficient (presented at the 2012-12-19 S&C meeting by Justin Stevens). The note is here.
Also library was updated with patches to fix the bug in offline triggerID.
Updated codes have been retaged with the same tag SL13b. Library was rebuilt on SL5.3 & SL4.4 platforms and tested.Next codes have been updated;
StRoot
StGenericVertexMaker
Minuit/St_VertexCutsC.h, r.1.2;
StiPPVertex/StPPVertexFinder.h, r.1.18;
StPPVertexFinder.cxx, r.1.44;
StBFChain
StBFChain.cxx, r. 1.600;
BigFullChain.h, r.1.192;
StEventMaker
StEventMaker.cxx, r.2.94;
StDb/idl/VertexCuts.idl, r.1.2 ;
- March 20, 2013
new library SL13b tagged as SL13b has been created and built on SL5.3 (32bits & 64bits platforms) and SL4.4 platforms. Library was tested, found bugs patched and library was released on April 3.
gcc version 4.3.2 20081007 (Red Hat 4.3.2-7)
Main features:
- finalized year 2013 geometry for HFT;
- new StFgtPointMaker added; further development of FGT clustering;
- added MTD pid traits to StEvent;
- added PXL hits to StEvent;
- OnlTools updated for FGT & GMT event builder;
- several bugs fixed;
StRoot
StAnalysisUtilities
StHistUtil.cxx - added FMS/FPD histograms for Run 2013+;
StBFChain
StBFChain.cxx - added FgtPointMaker on chain; set run 2013 basic chain;
St_base
StArray.cxx - modified to handle killed objects; fixed bug #2553 regarding StTrackDetectorInfo missing in event.root files;
StChain
StRtsTable.h - added modification for meta data, bug #2452;
StMaker.cxx - defined first cut geometries with and without pixel detector ;
StDaqLib
SC/SC_Reader.cxx, SC_Reader.hh - modified to make available the 'NoKiller' ZDC rates, via unused CTB members of trigDetSums;
StDAQMaker
StRtsReaderMaker.cxx - added modification for meta data, bug #2452;
StSCReader.cxx, StSCReader.h - modified to make available the 'NoKiller' ZDC rates, via unused CTB members of trigDetSums;
StDbUtilities
StMagUtilities.h - modified to add accessor functions for Const_n parameters;
StMagUtilities.cxx - fixed bug #2529, and some array copying optimzation via memcopy;
StDetectorDbMaker
St_spaceChargeCorC.cxx - modified to allow 'NoKiller' ZDC rates;
St_starClockOnlC.h, St_tpcElectronicsC.h - replaced -1 => 0 ;
StEvent
StTrackFitTraits.cxx - fixed double counting of fitpoints;
StFgtPoint.cxx - modified charge asymmetry calculation ;
StMtdPidTraits.cxx, StMtdPidTraits.h - added new files (initial revision) for Mtd pid traits;
StEventTypes.h - added StMtdPidTraits ;
StPxlHitCollection.cxx, StPxlHitCollection.h, StPxlHit.cxx, StPxlHit.h, StPxlLadderHitCollection.cxx, StPxlLadderHitCollection. h, StPxlSectorHitCollection.cxx, StPxlSectorHitCollection.h, StPxlSensorHitCollection.cxx, StPxlSensorHitCollection.h - added pixel hits collection to StEvent, initial revision;
StEvent.cxx, StEvent.h ,StContainers.cxx, StContainers.h, StEventTypes.h, StEventClusteringHints.cxx, StEventLinkDef.h - modifi ed to add PXL hits and Containers;
StPxlHit.cxx - modified to set correct detector ID kPxlId in constructors;
StEventUtilities
StEventHelper.cxx - updated;
StuFixTopoMap.cxx - modified to change StRnDHit to StPxlId in detector==kPxlId if case;
StFgtA2CMaker
StFgtA2CMaker.cxx, StFgtA2CMaker.h - fixed some kStFgtNumTimebins -> dynamic local mMaxTimeBin from StFgtCollection; seed type 3 & 4 changed, and 5 gone;
StFgtClusterMaker
StFgtClusterMaker.cxx, StFgtIClusterAlgo.h, StFgtSeededClusterAlgo.cxx, StFgtSeededClusterAlgo.h, StFgtSimpleClusterAlgo.cxx, StFgtSimpleClusterAlgo.h - updated;
StFgtMaxClusterAlgo.cxx, StFgtMaxClusterAlgo.h - updated signature of max cluster algo to conform with interface;
StFgtClusterMaker.cxx, StFgtClusterMaker.h, StFgtIClusterAlgo.h, StFgtMaxClusterAlgo.cxx, StFgtMaxClusterAlgo.h, StFgtSeededClusterAlgo.cxx, StFgtSeededClusterAlgo.h - added n strips before and after cluster;
StFgtClusterMaker.cxx, StFgtSeededClusterAlgo.cxx - added strips on both sides of the cluster;
StFgtSeededClusterAlgo.cxx, StFgtSeededClusterAlgo.h - fixed bug ith ZS data and phi-even strip clustering logic; removed some kStFgtNumTimebins and modified to use dynamic local mMaxTimeBin from StFgtCollection; modified to check seed before overwriting w/ next to cluster flag;
StFgtPointMaker
StFgtIPointAlgo.h, StFgtPointMaker.cxx, StFgtPointMaker.h, StFgtSimplePointAlgo.cxx, StFgtSimplePointAlgo.h - new FGT maker, initial revision;
StFgtRawMaker
StFgtRawMaker.cxx, StFgtRawMaker.h - added getting timebin from meta data, and also support for zero suppressed data;
StFtpcTrackMaker
StFtpcTrackingParams.cc - replaced gufld => agufld;
StiRnD
Hft/StiPixelDetectorBuilder.cxx, StiPixelHitLoader.cxx - set StiRnD for Y2013;
StiPixelHitLoader.cxx - StPxlHit navigation to retrieve hits;
St_QA_Maker
QAhlist_EventQA_qa_shift.h, StEventQAMaker.cxx, StEventQAMaker.h, StQABookHist.cxx, StQAMakerBase.cxx, StQAMakerBase.h - added FMS/FPD histograms for Run 2013;
StMtdHitMaker
StMtdHitMaker.cxx, StMtdHitMaker.h - modified to scale-up handling of more THUBs (fibers), and backlegs for Run 2013+ :
StPass0CalibMaker
StSpaceChargeEbyEMaker.cxx - added print out the SC and GL correction formulas; modified to improve FindPeak(), particularly fo r sc hists at high lumi, and add StMagUtil:const0,1 to ntuple; added 'NoKiller' ZDC data to ntuple;
RTS
src/DAQ_READER/daq_det.h - moved rts_id to public;
src/DAQ_FGT/daq_fgt.cxx - removed some logging;
src/DAQ_TPX/tpxCore.cxx - set checkpoint before 36 sectors;
daq_tpx.cxx, daq_tpx.h, tpxCore.cxx, tpxCore.h, tpxFCF.cxx, tpxFCF.h, tpxFCF_D.cxx, tpxFCF_2D.h, tpxFCF_flags.h, tpxGain.cxx,tpxGain.h, tpxPed.cxx, tpxPed.h, tpxStat.cxx, tpxStat.h - fixed bug; set checkpoint with mostly changes for 36 Sector Brokers and FCF2D;
StSecondaryVertexMaker
StV0FinderMaker.cxx - removed reference to gufld, which is not used;
StarMagField
StarMagField.cxx - replaced gufld => agufld;
StarClassLibrary
StParticleTable.cc - added pi0 --> e+e- gamma 100% gid=10007; added K0long --> nu e- pi+ 100% gid=10010; added K0long --> nu e+ pi- 100% gid=10110;
StarRoot
TUnixTime.h, TUnixTime.cxx - changed UInt_t ==> ULong_t;
THelixTrack.h, THelixTrack.cxx - modified;
KFParticleBase.cxx - adjusted format in print out;
pams
geometry/geometry/geometry.g - defined pixel detector in and out geometries; updated to the Y2013 first cut an d asymptotic tags; modified to have pixel support tube remains in place when pixel detector is removed;
sim/gstar/gstar_part.g - added pi0 --> e+e-gamma 100% gid=10007; added K0long --> nu e- pi+ 100% gid=10010; added K0long --> nu e+ pi- 100% gid=10110;
StarDb
AgMLGeometry
Geometry.y2013_1.C, Geometry.y2013_2.C - added y2013_1 (pixel in) and y2013_2 (pixel out) geometries;
Geometry.y2013_1x.C, Geometry.y2013_2x.C - addeed asymptotic geometries to Db;
StarVMC
StarAgmlLib/AgBlock.cxx, AgBlock.h - implemented reference groups in AgML for y2013x;
AgMaterial.cxx - added debug output on missing material during copy;
Geometry/Geometry.cxx, Geometry.h - implemented reference groups in AgML for y2013x;
Geometry/BtofGeo/BtofGeo8.xml - implemented reference groups in AgML for y2013x;
Geometry/CaveGeo/CaveGeo.xml - implemented reference groups in AgML for y2013x;
Geometry/Compat/xgeometry.xml - modified to force xgeometry recreation; updated to the Y2013 first cut and asy mptotic tags; modified to have pixel support tube remains in place when pixel detector is removed;
Geometry/IdsmGeo/IdsmGeo1.xml - implemented reference groups in AgML for y2013x;
Geometry/TpceGeo/TpceGeo3a.xml - implemented reference groups in AgML for y2013x;
Geometry/macros/StarGeometryDb.C - implemented reference groups in AgML for y2013x; defined pixel detector in and out geometries; updated to the Y2013 first cut and asymptotic tags; modified to have pixel support tube remains in place when pixel detector is removed; modified to enable TPC ref sys in first cut geometry y2013;
OnlTools
Jevp/StJevpBuilders/fgtBuilder.cxx - updated mapping; modified to change axis range on visible apv plot; fixed disk indexing error; changed label;
fgtBuilder.cxx, fgtBuilder.h - added FGT adc vs tb and event size plots; modified to change adc vs tb to z log scale;
gmtBuilder.cxx, gmtBuilder.h - updated;
tofBuilder.cxx, vpdBuilder.cxx - modified to update TOF tray trigger windows, and VPD hist names; updated masked trays;
tofBuilder.cxx - updated trigger windows after TCPU firmware update;
Jevp/StJevpPresenter/JevpGui.cxx - added some logging;
Jevp/StJevpServer/JevpServer.cxx- added some logging;
- February 13, 2013
SL13a library was updated with last minutes code updates listed below to make it ready to proceed with online data for run 2013:
OnlTools
Jevp/StJevpBuilders/gmtBuilder.cxx - changed 2d histo to use 200x200 bins; updated to fix 7 vs 15 timebin error;
mtdBuilder.cxx, mtdBuilder.h - changed for run 2013 MTD;
fgtBuilder.cxx, fgtBuilder.h - changed mapping for run 2013 FGT;
gmtBuilder.cxx, gmtBuilder.h, mtdBuilder.cxx - modified to use new MXQ access methods in updated StEvent/StTriggerData2013;
Jevp/StJevpServer/JevpServer.cxx - change 2d histo to use 200x200 bins;
Jevp/StJevpPlot/JevpPlotSet.cxx - fixed trigger;
StRoot
StEvent/StTriggerData.cxx, StTriggerData.h, StTriggerData2013.cxx, StTriggerData2013.h - added two new methods: mxqAtSlotAddress and mtd3AtAddress;
RTS src/DAQ_FGT/daq_fgt.cxx, daq_fgt.h, fgtPed.cxx, fgtPed.h - added PED & ZS support; added pedestal subtraction for GMT and misc fixes;
include/rtsSystems.h - fixed bug with GMT; modified to increase EVB count;
daqModes.h - added FGT daq_cmd;
src/RTS_EXAMPLE/rts_example.C, tpc_rerun.C - added FGT & GMT PED & ZS;
src/DAQ_READER/daqReader.cxx, daq_det.cxx - modified to make L4 a real detector;
src/DAQ_MTD/daq_mtd.cxx - fixed bug with DEADCODE;
src/DAQ_L4/daq_l4.cxx - modified to make L4 a real detector;
StarVMC/Geometry/PixlGeo/DtubGeo1.xml, PixlGeo5.xml, PxstGeo1.xml - added fixes to pixel detector and support structures;
SL13a library was retaged with tag SL13a_1, and rebuilt on SL53 and SL44 platforms.
- February 8, 2013
new library SL13a tagged as SL13a has been created and built on SL5.3 (32bits & 64bits platforms) and SL4.4 . Library was tested and released on February 11.
gcc version 4.3.2 20081007 (Red Hat 4.3.2-7)
Main features:
- implemented trigger data structure for run 2013 ;
- year 2013 geometry, first revision setup;
- further updates and modifications of FGT and related codes;
- updates of Hft & Ist codes for year 2013 geometry;
- changed global database calls to direct table access for TOF;
- added FMS and GMT event builder to OnlTools;
- added daq_l4 in RTS code;
- few bugs fixed;
Next codes have been updated
StRoot
StAnalysisMaker
StAnalysisMaker.cxx, StAnalysisMaker.h - added PrintVertex;
StarClassLibrary
StMemoryInfo.cc, StMemoryInfo.hh - updated for APPLE;
StParticleTable.cc - modified to add the H Dibaryon;
StDiBaryon.hh, StHDibaryon.cc, StHDibaryon.hh - added new files to include H- Dibaryon;
StarGenerator
BASE/StarPrimaryMaker.cxx - set streamer asserts when writing StarParticleData; write list of particles instead;
modified to append particle DB to user information of TTree for bookkeeping;
UTIL/StarParticleData.cxx, StarParticleData.h, StarRandom.cxx, StarRandom.h - set streamer asserts when writing StarParticleData; write list of particles instead; implemented method to set two 16-bit seeds (instead of one 32-bit seed) in StarRandom;
StarMagField
StarMagField.cxx, StarMagField.h - modified to proper handle of ROOT and non ROOT versions of StarMagField;
StarRoot
THelixTrack.h, THelixTrack.cxx - updated;
KFParticleBase.h, KFParticleBase.cxx - developed new version of KFParticle;
StBbcSimulationMaker
StBbcSimulationMaker.cxx - added sys/types.h include for APPLE;
StBFChain
StBFChain.cxx - modified to disable loading geometry and geomNoField if xgeometry is used;
BigFullChain.h - modified to derive ROOT version of StarMagField from TVirtualMagField; modified to make no effect on changes of options positions in the chain;
St_base
StMem.cxx - added malloc.h for APPLE;
StBTofHitMaker
StBTofHitMaker.cxx, StBTofHitMaker.h - modified to correct TDIG-Id swap with UnpackTofRawData() for the GMT/TOF trays (Run 2013+);
StBTofUtil
StBTofDaqMap.cxx, StBTofINLCorr.cxx, StBTofTables.cxx - changed global database calls to direct table access and/or removed depre cated database access code;
StChain
StMaker.cxx - added year 2013 geometry tag with date/time 20121215/0 for run 2013; added y2012b geometry tag to properly include the MTD geometry;
StDaqLib
TRG/trgStructures2013.h - added new trigger structure for Run 2013 with 3 new DSM in MIX DSM crate
StDAQMaker
StEEMCReader.h - added sys/types.h include for APPLE;
StDbLib
StHyperCacheFileLocal.cpp, StHyperLock.h, StHyperUtilFilesystem.cpp - modified to integrate locking into FileLocal caching adapte r - prerequisite for cache management strategies;
MysqlDb.cc, StDbTable.cc - added check for HAVE_CLOCK_GETTIME flag and for APPLE;
StDbServiceBroker.cxx - added to support for the interactive attribute for LB;
StDbUtilities
StMagUtilities.cxx, StMagUtilities.h - modified to handle multiple runs by reinitialization at reinstantiation, introduce correct ions modes, enable iterative UndoDistortions; fixed reinitialization for PredictSpaceCharge functions;
StDetectorDbMaker
St_tpcOmegaTauC.h - modified for inclusion of distortionCorrectionsMode;
St_tpcAnodeHVavgC.h - modified to use ROOT types;
St_spaceChargeCorC.cxx, St_spaceChargeCorC.h - modified to add correction as a string;
St_tofStatusC.h, StDetectorDbChairs.cxx - added status(Int_t trayId, Int_t moduleId, Int_t cellId);
St_TpcResponseSimulatorC.h - modified to handle the separatiof Inner and Outer sectors time offset;
StEEmcDbMaker
StEmcAsciiDbMaker.cxx - added sys/types.h include for APPLE;
StEEmcSimulatorMaker
StEEmcTrigSimuMaker.cxx - added sys/types.h include for APPLE;
StEmcRawMaker
StEEmcPrint.cxx - added sys/types.h include for APPLE;
StEEmcUtil
St2eemcFeeRawMaker.cxx - added sys/types.h include for APPLE;
database/macros/upload/src/ EEmcDbIO.C, EEmcDbIO.h, EEmcDbIOsolo.C, Makefile, aa.tcl, dbase.tcl, eemcDb.C, eemcDb.h, eemcDbADCconf.xml, eemcDbBoxconf.xml, eemcDbCWchar.xml, eemcDbFunctions.C, eemcDbHVsys.xml, eemcDbHVtemp.xml, eemcDbPIXcal.xml, eemcDbPIXname.xml, eemcDbPMTcal.xml, eemcDbPMTchar.xml, eemcDbPMTconf.xml, eemcDbPMTname.xml, eemcDbPMTped.xml, eemcDbPMTstat.xml, eemcDbXMLdata.xml, help.tcl, kretDbBlobS.xml, rules.make, setHVsys.C, sxml.tcl - added scripts to upload EEMC tables to DB;
StEvent
StTriggerData2013.cxx, StTriggerData2013.h - added trigger data structure for run 2013, initial revision;
StEventLinkDef.h - added trigger data pragmas for run 2013;
StEventClusteringHints.cxx - added trigger data hints for run 2013;
StEnumerations.h - changed value of kFgtNumTimeBins; added more bits for track quality matching to EMC;
StFgtStripCollection.h - changed in streamer;
StFgtPoint.cxx, StFgtPoint.h - added comparison operators;
StFgtCollection.cxx, StFgtCollection.h - added mNumTimeBins and access functions;
StPrimaryVertex.cxx - modified to make soft requirement for matching to EMC;
StDcaGeometry.cxx, StEmcCluster.cxx, StEmcPoint.cxx, StEmcRawHit.cxx, StGlobalTrack.cxx, StPrimaryTrack.cxx, StTrack.cxx, StTrac k.h - updated to improve print out;
StTriggerData2012.cxx, StTriggerData2009.cxx, StTriggerData2013.cxx - improved code to avoid compiler warning when shifting bits;
StEventUtilities
StEventHitIter.h, StEventHitIter.cxx - added documentation;
StFgtDbMaker
StFgtDb.cxx, StFgtDb.h, StFgtDbMaker.cxx, StFgtDbMaker.h - modified to add alignment table and getStarXYZ();
StFgtClusterMaker
StFgtClusterMaker.cxx, StFgtClusterMaker.h, StFgtIClusterAlgo.h, StFgtSeededClusterAlgo.cxx, StFgtSeededClusterAlgo.h - modified to merged cluster finder;
StFgtUtil
StFgtConsts.h - updated number of tb;
geometry/StFgtGeom.cxx, StFgtGeom.h - added getQuadCenterXYZ;
StGenericVertexMaker
StppLMVVertexFinder.h - added trigger data hints for run 2013;
StiPPVertex/StPPVertexFinder.h, Vertex3D.h - added sys/types.h include for APPLE;
St_geant_Maker
St_geant_Maker.cxx - modified to add handle for setting runG; more careful setting of magnetic field; added attribute hadr_off;
Embed/StPrepEmbedMaker.cxx - modified to remove starsim make, which destroys virtual function tables, bug #2487; add missing call to gstar;
StHbtMaker
Base/StHbtCorrFctn.hh - modified to add PairCut for CFs that share same cuts;
CorrFctn/StHbtCorrFctnDirectYlm.cxx, StHbtCorrFctnDirectYlm.h, StHbtDirectYlm.cxx, StHbtDirectYlm.h, StHbtYlm.cx x, StHbtYlm.h - added new files to create utilities for SHD of CF;
StHbtDirectYlm.cxx, StHbtDirectYlm.h - removed;
Infrastructure/StHbtHisto.hh - uncommented #ifndef ROOT_TH3;
StHltMaker
StHltMaker.cxx - added sys/types.h include for APPLE;
Sti
StiMasterDetectorBuilder.cxx - modified to step back and avoid a mess with geometry versions;
StiTrackNodeHelper.cxx - added sanity check; StiHit.cxx - modified to increase scale due to large distortions;
StiKalmanTrackNode.cxx - modified to set Bz = 0 for laser tracks;
StiMasterDetectorBuilder.cxx - modified to avoid creation of 2-nd instance of TGeoManager for root4star;
StiTpcSeedFinder.h - cleaned up unused variables;
StiTPCCATrackerInterface.cxx - added laser, some hooks for new TPC CA with variable no. of pad rows;
StiMaker
StKFVertexMaker.cxx, StPhiEtaHitList.cxx, StPhiEtaHitList.h, StTrackFastDetectorMatcher.cxx, StTrack2FastDetectorMatcher.h, StiStEventFiller.cxx - modified for better handle of debugging;
StTrack2FastDetectorMatcher.cxx, StTrack2FastDetectorMatcher.h, StiStEventFiller.cxx - modified to fix TrackData data name clash with StiPPVertexFinder;
StKFVertexMaker.cxx, StiStEventFiller.cxx - modified to correct vertex ranking;
StiRnD
Hft/StiPixelDetectorBuilder.cxx, StiPixelDetectorBuilder.h,StiPixelHitLoader.cxx - updated for DEV13 geometry; < br> Ist/StiIstDetectorBuilder.cxx StiIstHitLoader.cxx - updated for DEV13 geometry;
StJetMaker
StJetMaker2009.cxx - modified to use StjTrackCutRandomAccept class; added mothers and daughters;
emulator/StMcTrackEmu.h - added mothers and daughters;
mcparticles/StjMCParticleToStMuTrackFourVec.h - added mothers and daughters;
mudst/StjTPCMuDst.cxx - fixed magnetic field;
tracks/StjTrackCutRandomAccept.h - added new file to accept randomly only a fraction of TPC tracks to mock-up tracking efficiency;
StMcEvent
StMcIstHit.hh, StMcIstHit.cc, StMcIstHitCollection.hh - updated for Ist development;
StMcPixelHitCollection.hh - updated for pixel development;
StMCFilter
StMCCaloFilter.cxx - added stdio.h;
StMtdHitMaker
StMtdHitMaker.cxx, StMtdHitMaker.h - fixed bug; introduced explicit tray parameter for TDIG lookup;
StMuDSTMaker
COMMON/StMuDstMaker.cxx, StMuFgtCluster.cxx, StMuFgtCluster.h - modified to merge in updated StMuFgtCluster cla ss format;
StMuMtdCollection.cxx - added sys/types.h include for APPLE;
StMuArrays.cxx, StMuArrays.h, StMuDstMaker.cxx, StMuFgtStrip.cxx, StMuFgtStrip.h - modified to merge in FGT changes allowing for a variable number of timebins to be read out for each strip;
StMuFgtAdc.h - added new file;
StMuPrimaryVertex.cxx - fixed print out;
StPass0CalibMaker
StSpaceChargeEbyEMaker.cxx, StSpaceChargeEbyEMaker.h - modified to store used calibrations in histogram files; improve chances of fits succeeding;
StPeCMaker
StPeCEvent.cxx, StPeCEvent.h, StPeCMaker.cxx, StPeCMaker.h - modified to add more flags to choose input or output tracks ;
StPeCTrigger.cxx, StPeCTrigger.h - added ZDC shower max information to output tree and bbc small tubes individual ADC; returned UPC_Main trigger;
StPixelFastSimMaker
StPixelFastSimMaker.cxx - updated for DEV13 geometry; remove FGT codes;
RTS
include/rtsSystems.h - updated for run 2014;
rts.h - fixed for RTS_LITTLE_ENDIAN;
daqFormats.h - updated for trigger files ;
cmds.h, iccp.h - updated for run 2014;
rtsMonitor.h - updated for l4 system monitoring;
trgDataDefs_41.h - added new file ;
src/rtsplusplus.def - modified runControlClass;
src/DAQ_READER/daqReader.cxx, daqReader.h - updated for run 2014; updated reader;
daqReader.cxx, daq_det.cxx - added daq_l4 for run 2014;
src/DAQ_TPX/tpxFCF_2D.cxx, tpxFCF_2D.h - added 2D cluster finder, first revision;
Makefile, daq_tpx.cxx, daq_tpx.h, tpxCore.cxx, tpxFCF.cxx, tpxFCF.h, tpxGain.h - added new style FCF and FCF2D clustering;
src/DAQ_L4/daq_l4.cxx, daq_l4.h, l4_gl3.h - added DAQ_L4;
src/SFS/sfs_index.h - updated for reader;
fs_ex.C - updated;
sfs_header.C - added daq_l4;
StStrangeTagsMaker
StStrangeTagsMaker.h - modified to suppress warning;
StTofCalibMaker
StTofCalibMaker.cxx - changed global database calls to direct table access and/or removed deprecated database access code;
StTofpMatchMaker
StTofpMatchMaker.cxx - changed global database calls to direct table access and/or removed deprecated database access code;
StTofrMatchMaker
StTofrMatchMaker.cxx - changed global database calls to direct table access and/or removed deprecated database access code; fixed bugs #2456/#2457;
StTofUtil
StTofINLCorr.cxx, StTofrDaqMap.cxx - changed global database calls to direct table access and/or removed deprecated database access code; fixed bugs #2456/#2457;
StStarLogger
StLoggerManager.cxx - modified to replace GNUC by STAR_LOG4CXX_VERSION for consistency;
St_tcl_Maker
StTpcFastSimMaker.cxx - modified to extend no.of pad rows; modified to move cluters to global coordinatate system;
StTpcHitMaker
StTpcHitMaker.cxx, StTpcRTSHitMaker.cxx - modified to keep only clusters with flag == 0 or FCF_ONEPAD | FCF_MERGED | FCF_BIG_CHARGE (from Tonko);
StTpcHitMaker.cxx - modified to simplify loop over clusters;
StTpcRSMaker
StTpcRSMaker.cxx - modified to handle the separation of Inner and Outer sectors time offset;
StTriggerDataMaker
StTriggerDataMaker.cxx - implemented trigger data structure for run 2013;
StTriggerUtilities
L2Emulator/L2algoUtil/L2DbConfig.cxx - added sys/types.h include for APPLE;
L2VirtualAlgo2012.cxx - updated logging;
Eemc/EEdsm1.h - added include for APPLE;
StVpdCalibMaker
StVpdCalibMaker.cxx - changed global database calls to direct table access and/or removed deprecated database access code;
pams
geometry/geometry/geometry.g - updated for run 2013 geometry; updated to support year 2013 version of MTD; updated definition of y2013 and y2013x geometry tags; corrected double placement of volume in PixlGeo5; added y2012b geometry tag to properly include the MTD;
updated to support improved magnet model, improved trim coil description; defined y2013x geometry ;
geometry/btofgeo/btofgeo8.g - added AgML stub in pams/geometry;
geometry/mutdgeo/mutdgeo4.g - modified to convert MutdGeo4.xml to AgSTAR format, for compatability with previous geometry releases;
geometry/pipegeo/pipegeo2.g - added AgML stub in pams/geometry;
geometry/pixlgeo/DtubGeo1.g, PixlGeo5.g - added AgML stub in pams/geometry;
sim/g2t/g2t_volume_id.g - updated BTOF volume id's to support GMT in y2013;
sim/gstar/gstar_part.g - updated to add H- Dibaryon;
StarDb
AgMLGeometry/loadStarGeometry.Cxx - modified to prevent ROOT from deleting existing geometry when geometry is restored from ROOT file; added logic to handle filelist syntax as basename; fixed bug #2463;
Geometry.dev14.C - added dev14 geometry version for reconstruction;
Geometry.y2012b.C - added y2012b geometry tag to properly include the MTD geometry;
Geometry.y2013.C - defined y2013 geometry;
AgiGeometry/Geometry.devTA.C, Geometry.devTB.C, Geometry.devTC.C, Geometry.devTD.C, Geometry.devTE.C, devTA.h, devTB.h, devTC.h, devTD.h, devTE.h - added new files for iTpx geometries upgrade;
Calibrations/ftpc/ftpcCoordTrans.C, ftpcTemps.devT.C - added new files for iTpx upgrade;
Calibrations/rich/spaceChargeCorR2.devT.C - added new file for iTpx upgrade;
Calibrations/tof/tofStatus.C - added default tof status table;
Calibrations/tpc/TpcResponseSimulator.y2010.C - set T0offset from Xianglei Zhu from SL10k_embed_Kplus_AuAu62;
TpcResponseSimulator.devTA.C, TpcResponseSimulator.devTB.C, TpcResponseSimulator.devTC.C, TpcResponseSimulator.devTD.C, TpcResponseSimulator.devTE.C, TpcResponseSimulator.devTF.C, tpcElectronics.devT.C, tpcGridLeak.devT.C, tpcPadrowT0.C - added new files for iTpx upgrade ;
TpcRowQ.devT.C - modified for iTpx upgrade;
tpcPadGainT0.devE.C, tpcPadGainT0.y2009.C, tpcPadGainT0.y2010.C, tpcPadGainT0.y2011.C - removed files;
tpcAnodeHVavg.y2013.C, tpcAnodeHV.y2012.C, tpcAnodeHV.y2013.C - added default TpcAnode Voltages for y2012 - y2013 ;
tpcPadGainT0B.y2012.C, tpcPadGainT0B.y2013.C - added new default files;
tpcPadGainT0B.200XXXXX.*.root - put to mysql and removed from AFS;
TpcResponseSimulator.y2011.C - corrected T0offset from run 11 AuAu 19.6GeV data;
TpcResponseSimulator.y2009.C - set T0offset for run 2009 pp 200GeV data;
TpcResponseSimulator.y2010.C, TpcResponseSimulator.y2011.C, TpcResponseSimulator.y2012.C - modified to handle of separate Inner and Outer sector time off set;
Geometry/ftpc/ftpcAsicMap.C, ftpcClusterGeom.C,ftpcInnerCathode.C - added default parameters ;
Geometry/tpc/tpcPadPlanes.devT.C - modified;
tpcPadPlanes.devTA.C, tpcPadPlanes.devTB.C, tpcPadPlanes.devTC.C, tpcPadPlanes.devTD.C, tpcPadPlanes.devTE.C, tpcPadPlanes.devTF.C, tpcPadPlanes.upgr01.C - added new files for iTpx geometry upgrade;
TpcSuperSectorPosition.devE.C, TpcSuperSectorPosition.devT.C - removed files;
tpcGlobalPosition.y2012.C, tpcGlobalPosition.y2013.C - added default positions;
TpcOuterSectorPosition.y2001.C, TpcOuterSectorPosition.y2002.C, TpcOuterSectorPosition.y2003.C, TpcOuterSectorPosition.y2004.C, TpcOuterSectorPosition.y2005.C, TpcOuterSectorPosition.y2006.C, TpcOuterSectorPosition.y2007.C, TpcOuterSectorPosition.y2008.C, TpcOuterSectorPosition.y2009.C, TpcOuterSectorPosition.y2010.C, TpcOuterSectorPosition.y2011.C, TpcOuterSectorPosition.y2012.C, TpcOuterSectorPosition.y2013.C, TpcSuperSectorPosition.devE.C, TpcSuperSectorPosition.devT.C, TpcSuperSectorPosition.y2001.C, TpcSuperSectorPosition.y2002.C, TpcSuperSectorPosition.y2003.C, TpcSuperSectorPosition.y2004.C, TpcSuperSectorPosition.y2005.C, TpcSuperSectorPosition.y2006.C, TpcSuperSectorPosition.y2007.C, TpcSuperSectorPosition.y2008.C, TpcSuperSectorPosition.y2009.C, TpcSuperSectorPosition.y2010.C, TpcSuperSectorPosition.y2011.C, TpcSuperSectorPosition.y2012.C, TpcSuperSectorPosition.y2013.C - added default positions;
StarVMC
Geometry/Geometry.cxx, Geometry.h - updated for run 2013 geometry; updated to support new year 2013 version of MutdGeo4; updated to support improved magnet model; defined Y2013x geometry tags; correction made to y2013 and y2013x to pickup correct TPC subversion; updated definition of Y2013 and Y2013x geometry tags;
Geometry/BtofGeo/BtofGeo8.xml - added new version of BTOF geometry with GMT detectors; fixed multiple placement of volumes in BTOF/GMT;
Geometry/Compat/xgeometry.xml - updated for run 2013 geometry; defined y2013x geometry tag; modifed to force recompilation of xgeometry;
Geometry/macros/StarGeometryDb.C, viewStarGeometry.C - added definitions for the Y2013 geometry;
Geometry/MagpGeo/MagpGeo.xml - updated to support improved magnet model, improved trim coil description;
Geometry/MutdGeo/MutdGeo4.xml - added year 2013 configuration of the MTD, and backwards compatible with previous releases;
Geometry/macros/StarGeometryDb.C - updated to support magnet model, improved trim coil description; defined Y2012x geometry;
Geometry/TpceGeo/TpceGeo3a.xml - defined Y2013x geometry; version 3.1 increases the dead zone in front of the gating grid, and the max TOF range stored in the hit ;
Geometry/PipeGeo/PipeGeo2.xml - added new version of the beam pipe;
Geometry/PixlGeo/DtubGeo1.xml, PixlGeo5.xml - added pixel detector for y2013 geometry; corrected double placement of volume in PixlGeo5;
StDb
idl/tpcOmegaTau.idl - updated table schema;
TpcResponseSimulator.idl - modified to handle the separation of Inner and Outer sector time offset;
OnlTools
Jevp/StJevpBuilders/fmsBuilder.h, fmsBuilder.cxx - added fmsBuilder to Jevp;
gmtBuilder.cxx, gmtBuilder.h - added gmtBuilder to Jevp;
2014
STAR SOFTWARE NEWS  May 20 2015
---------------------
The present release assignment:
             SL07c    (SL07c_3)  ROOT_LEVEL 5.12.00 CuCu 200&62GeV run 2005,TPC+SVT+SSD tracking
             SL07d    (SL07d_2)  ROOT_LEVEL 5.12.00 auau 200GeV stream data run 2007, TPC tracking
             SL08c    (SL08c_5)  ROOT_LEVEL 5.12.00 auau 200GeV run 2007,TPC+SVT+SSD tracking
             SL08e    (SL08e_2)  ROOT_LEVEL 5.12.00 pp 200GeV & dAu 200GeV, run 2008
             SL08e_embed (SL08e_5) ROOT_LEVEL 5.12.00
             SL08f_embed (SL08f_4) ROOT_LEVEL 5.12.00
             SL09g    (SL09g_4)  ROOT_LEVEL 5.22.00 run 2009 pp 500GeV data production
             SL09g_embed (SL09g_2Embed_v10) ROOT_LEVEL 5.22.00
             SL10c    (SL10c_4)  ROOT_LEVEL 5.22.00 run 2009 pp 200GeV production
             SL10c_embed (SL10c_embed_v5)  ROOT_LEVEL 5.22.00
             SL10h    (SL10h_5)  ROOT_LEVEL 5.22.00 run 2010 auau 7.7-39GeV production
             SL10h_embed (SL10h_embed_v6)  ROOT_LEVEL 5.22.00
             SL10k    (SL10k_4)  ROOT_LEVEL 5.22.00 run 2010 auau 39-200GeV production
             SL10k_embed (SL10k_embed_v11) ROOT_LEVEL 5.22.00
             SL11b    (SL11b_2)  ROOT_LEVEL 5.22.00
             SL11d    (SL11d_3)  ROOT_LEVEL 5.22.00 run 2011 pp 500GeV & auau 19-200GeV production
             SL11d_embed (SL11d_embed_v6)  ROOT_LEVEL 5.22.00
             SL12a    (SL12a_2)  ROOT_LEVEL 5.22.00
             SL12a_embed  (SL12a_embed_v3) ROOT_LEVEL 5.22.00
             SL12d    (SL12d_2)  ROOT_LEVEL 5.22.00 UU 193GeV, pp 200GeV run 2012 production
             SL12d_embed (SL12d_embed_v5) ROOT_LEVEL 5.22.00
             SL13b    (SL13b_2)  ROOT_LEVEL 5.22.00 pp 500GeV run 2012 production
             SL13c    (SL13c_2)  ROOT_LEVEL 5.22.00
             SL13d    (SL13d)    ROOT_LEVEL 5.34.09
       old-> SL14a    (SL14a_2)  ROOT_LEVEL 5.34.09 pp 500GeV run 2013 production. days 76-126
             SL14b    (SL14b)    ROOT_LEVEL 5.34.09
             SL14c    (SL14c)    ROOT_LEVEL 5.34.09
             SL14d    (SL14d)    ROOT_LEVEL 5.34.09 auau 15GeV run 2014 preview production
             SL14e    (SL14e)    ROOT_LEVEL 5.34.09
             SL14f    (SL14f)    ROOT_LEVEL 5.34.09
       pro-> SL14g    (SL14g_3)  ROOT_LEVEL 5.34.09 pp 500GeV run 2013 production, days 129-161
             SL14h    (SL14h_1)  ROOT_LEVEL 5.34.09
       new-> SL14i    (SL14i_2)  ROOT_LEVEL 5.34.09
       dev-> DEV                 ROOT_LEVEL 5.34.09
      .dev-> .DEV                ROOT_LEVEL 5.34.09

-------------------------------------------------
Release History
SL14a library
SL14b library
SL14c library
SL14d library
SL14e library
SL14f library
SL14g library
SL14h library
SL14i library
- April 30, 2015
SL14i library was updated with next codes needed for embedding production:
StRoot/StMiniMcMaker/StMiniMcMaker.cxx, r.1.44 - to provide correct dEdx information in MiniMc ;
StRoot/StEmbeddingUtilities/StEmbeddingQADraw.cxx, r.1.35 - to fix wrong particle name;
StRoot/macros/embedding/get_embedding_xml_rcf.pl, get_embedding_xml.pl
StarVMC/Geometry/MutdGeo/MutdGeo4.xml, MutdGeo5.xml - updated hit definition for MTD, to improve timing resolution (update was done on May 20);
Library was retagged as SL14i_2 and rebuilt on SL6.4 and SL5.3 platforms.
- November 18, 2014
SL14i library was updated with geometry corrections, bug fixing codes and new implementation for StarGenerator codes. Library was retagged as SL14i_1 and rebuilt on SL6.4 and SL5.3 platforms.
Library was tested and released on November 20.
Next codes have been updated:
StRoot
StarGenerator
DECAY/AgUDecay.cxx, AgUDecay.h, StarDecayManager.cxx, StarDecayManager.h - added new interface between starsim (or VMC) and user-specified decay handlers;
Pythia8_1_62/StarPythia8Decayer.cxx, StarPythia8Decayer.h - added new implementation of Pythia 8.162 decayer;
StarLight/gammaavm.cpp, randomgenerator.cpp - modified to ensure that generator uses StarRandom;
STEP/AgUStep.cxx, AgUStep.h - modified to save accumulated number of steps in each tracking step;
UTIL/StarParticleData.cxx, StarParticleData.h - added method to retrieve particle by Geant 3 id;
macros/starsim.decayer.C - added example of custom decayer in starsim ;
StBFChain
BigFullChain.h - added options for full IST hits reconstruction;
StMtdQAMaker
StMtdQAMaker.cxx - modified to check the validity of the matched MTD hit;
StIstDbMaker
StIstDbMaker.cxx - replaced 'endl' in STAR Logger messages with 'endm';
StIstDbMaker.cxx, StIstDbMaker.h - modified do not destruct StIstDb object as the ownership is passed to the framework;
coding style clean-up; removed unconstructive comments;
modified to return fatal if database tables are not found;
modified to use flags to indicate DbMaker readiness;
StIstDbMaker.h - updated to set class version to 0 in order to avoid IO dictionary generation by ROOT's CINT;
StPxlDbMaker
StPxlDbMaker.cxx, StPxlDbMaker.h - modified to use flags to indicate DbMaker readiness;
StMtdMatchMaker
StMtdMatchMaker.cxx - modified to cleanup the matching information when running on StEvent in afterburner mode;
Sti
StiKalmanTrack.cxx, StiKalmanTrackNode.cxx, StiNodePars.h, StiTrackNode.cxx - fixed problem with zero magnetic filed, bug #2940;
StarVMC
Geometry/SisdGeo/SisdGeo7.xml - added fixes to the SSD geometry; changed SFLM to tube seg; removed one unneeded level; fixed overlaps;
StDb
idl/fpsChannelGeometry.idl, fpsConstant.idl, fpsGain.idl, fpsMap.idl, fpsPosition.idl, fpsSlatId.idl - changed all 'uchars' to 'ushorts' for FPS tables;
- November 4, 2014
new library SL14i tagged as SL14i has been created and built on SL6.4 and SL5.3 platforms;
default compiler on SL6.4 is gcc 4.4.7 . Library was tested and released on November 6.
Main features:
- improved energy loss calculations in the detector's material;
- implemented methods to calculate weight and volume size of detectors in Sti;
- optimized Sti tracking for HFT;
- first release of StMtdQAMaker for MTD QA analysis;
- first release of StMtdCalibMaker for MTD calibrations;
- updated and improved IST code and geometry;
- PXL & SSD geometry corrected to eliminate overlaps and extrusions;
- improved Sti description of PXL, SSD & IST volumes;
- few bugs fixed;
Next codes have been updated:
asps
Simulation/starsim/atmain/agxuser.age - added warning when user invokes GEXE in such a way that inconsistent library may be linked/compiled;
StRoot
StarGenerator
STEP/AgUStep.cxx, AgUStep.h - added material density (dens), atomic mass and number (A&Z) at each tracking step;
increased default rmin,rmax; added zmax; track is stopped when exiting ROI; added verbose option;
Hijing1_383/ starsim.hijing.pHe3.C - new macro: added He3 to hijing interface;
StarLight/StarLight.cxx - added He3 to StarLight interface;
UrQMD3_3_1/StarUrQMD.cxx - added He3 to UrQMD interface;
StBFChain
StBFChain.cxx - modified to let SpaceCharge code know about EastOff and WestOff;
BigFullChain.h - added 'MtdCalib' option; removed redundant option dependancies for PXL by taking advantage of chain options; the options depend on each other like this: PxlHit -> PxlCluster -> PxlRaw -> pxlDb -> PxlUtil;
StDbLib
StDbDefs.hh, StDbManagerImpl.cc - added FPS to the database domain list;
Sti
StiTrackNodeHelper.cxx - fixed old bug related to double counting of density; fixed ELoss bug; dEdX(density) ==> dEdX(density,material); saved calculated ELoss in StiNode for technical analisys; added cosCA = cos() when |cosCA| > 1 ;
fixed bug #2903; x0,x0o,x0Gas initialized to 1e11; fabs(cos()) added to avoid rare negative length;
StiShape.h, StiPlanarShape.h, - comments added;
StiNodePars.h - added methods 'phi()' & 'rxy()'; 'operator=()' added; numerical constants ==> enum;
auxiliary StiELoss class is added, to keep ELoss info for tests;
StiMasterDetectorBuilder.cxx, StiDetectorBuilder.h - removed never used input file in StiXXXDetectorGroup;
StiKalmanTrackNode.h - modified to save calculated ELoss in StiNode for technical analisys; added StELoss class to keep ELoss info;
StiKalmanTrackNode.cxx - fixed old bug double counting of density; fixed ELoss bug: dEdX(density) ==> dEdX(density,material); saved calculated ELoss in StiNode for technical analisys; added print of rxy and direction of track, outside +ve, inside -ve; bug fixed in printing global coordinates; added StELoss class to keep ELoss info;
modified to use new 'cylCross()' method; fixed bug #2903; x0,x0p,x0Gas initialized to 1e11;
for zero field defined minimum non zero field, fixes for bug #2937;
StiMaterial.h, StiDetectorGroup.h, StiGenericDetectorGroup.cxx, StiDetectorBuilder.cxx, StiDetector.h, StiDetector.cxx - modified to make StiElossCalculator created in material;
StiElossCalculator.cxx - temporary added flag to set energy loss =0 for debug;
StiDetector.cxx - deleted detector replaced by 'Factory::free' ; replaced floats in loop to integers to avoid calculation inaccuracy; added sanity check 'originalWeight = nSplit*splitedWeight';
StiDetectorBuilder.h - added method 'del()' for removing old detector;
StiDetectorBuilder.cxx - removed switch for assert() of clash of detectors;
modified to make StiDetectorAver calls split for all shapes;
eigen2 bug fixed and assert inside added;
StiHit.cxx - updated ;
StiPlacement.cxx - added tolerance in method 'setLayerRadius()' to avoid two objeck with slightly different layer radius to be in different layers; modified to decrease step in 'setLayerRadius' by 10 times; fixed min radius; granularity back to 1/1000;
StiPlacement.h - modified due to implementation of 'setLayerRadius()' moved to StiPlacement.cxx;
StiCylindricalShape.h - added method to calculate volume;
StiDetector.h, StiDetector.cxx - methods 'getVolume()' & 'getWeight()' added; 'insideL()' method added;
StiPlanarShape.h - modified to make 'getHalfWidth()' & 'getOpeningAngle()' accessible for base class; 'getVolume()' added;
StiPlanarShape.cxx - method 'getVolume()' added;
StiShape.h - methods 'getOpeningAngle()' & 'getOuterRadius()' added;
StiTrackNode.cxx - function 'recov()' rewritten and simplified; introduced more accurate selection the correct solution in 'cylCross';
StiTrackNode.h, StiTrackNode.cxx - 'cylCross' rewritten & interface changed; updated to avoid sign() overflow;
StiKalmanTrack.cxx, StiTrackNodeHelper.cxx - modified to replace check cos>=1 to cos>=.99;
StiKalmanTrack.cxx, StiKalmanTrackNode.cxx, StiKalmanTrackNode.h - methods 'insideL()' & 'nudge()' added, method 'locate()' rewritten;
StiMaterial.h, StiMaterial.cxx - modified to remove not used 'radLength', made to use X0 instead;
Star/StiStarDetectorBuilder.h, StiStarDetectorBuilder.cxx, StiStarDetectorGroup.cxx, StiStarDetectorGroup. h - removed never used input file in StiXXXDetectorGroup;
StIstDbMaker
StIstDb.h - cleaned up;
StIstUtil
StIstRawHit.cxx, StIstRawHit.h - cleaned up;
StIstCluster.cxx, StIstCluster.h, StIstClusterCollection.cxx, StIstClusterCollection.h, StIstRawHit.cxx, StIstRawHit.h, StIstRawHitCollection.cxx, StIstRawHitCollection.h - added Print() methods to print out properties of StIstCluster and StIstRawHit objects and their respective collections;
StIstRawHit.cxx, StIstRawHit.h - modified to make methods accessing static data member static;
StIstCluster.cxx, StIstCluster.h, StIstClusterCollection.cxx, StIstClusterCollection.h, StIstCollection.cxx, StIstCollection.h, StIstRawHit.cxx, StIstRawHit.h, StIstRawHitCollection.cxx, StIstRawHitCollection.h - all unsgined char was updated to integer type;
StiIst
StiIstDetectorBuilder.h, StiIstDetectorBuilder.cxx - modified to make StiElossCalculator created in material;
StiIstDetectorGroup.cxx, StiIstDetectorGroup.h - removed never used input file;
StiIstDetectorBuilder.cxx - added delete (del()) of replaced detectors; added print of of size of TGeo and Sti volumes; removed useless assignments;
StiMaker
StiMaker.cxx - removed never used input file in StiXXXDetectorGroup; fixed StiSsdDetectorGroup ==> StiSstDetectorGroup;
StiPxl
StiPxlDetectorBuilder.h, StiPxlDetectorGroup.h, StiPxlDetectorGroup.cxx - removed never used input file;
StiPxlDetectorBuilder.cxx - modified to make StiElossCalculator created in material;
StiSsd
StiSstDetectorGroup.cxx, StiSstDetectorGroup.h, StiSstDetectorBuilder.h, StiSsdDetectorGroup.cxx, StiSsdDetectorGroup.h, StiSsdDetectorBuilder.h - removed never used input file;
StiSstDetectorBuilder.cxx, StiSsdDetectorBuilder.cxx - modified to make StiElossCalculator created in material;
StiSstDetectorBuilder.cxx - update thickness of STI ladder shape the same size of sensitive silicon;
StiSvt
StiSvtDetectorBuilder.h, StiSvtDetectorGroup.cxx, StiSvtDetectorGroup.h - removed never used input file;
StiSvtDetectorBuilder.cxx - modified to make StiElossCalculator created in material;
StiTpc
StiTpcDetectorGroup.cxx, StiTpcDetectorGroup.h, StiTpcDetectorBuilder.h - removed never used input file;
StiTpcDetectorBuilder.cxx - modified to make StiElossCalculator created in material;
StiRnD/Hft
StiPixelDetectorBuilder.h, StiPixelDetectorBuilder.cxx, StiPixelDetectorGroup.h, StiPixelDetectorGroup.cxx - removed never used input file;
StiRnD/Ist
StiIstDetectorBuilder.cxx, - modified to make StiElossCalculator created in material;
StiIstDetectorBuilder.h, StiIstDetectorGroup.h, StiIstDetectorGroup.cxx - removed never used input file;
StiUtilities
StiDebug.cxx, StiDebug.h - added method Count() for technical histograms;
StLaserAnalysisMaker
StLaserAnalysisMaker.cxx, laserino.h - activated CORRECT_RAFT_DIRECTION;
StLaserAnalysisMaker.cxx - fixed bug in fit logic, bug #2901;
StMtdCalibMaker
StMtdCalibMaker.cxx, StMtdCalibMaker.h - first revision of calibration code for MTD;
StMtdHitMaker
StMtdHitMaker.cxx - modified to read both MC hits and real hits during embedding;
StMtdHitMaker.cxx, StMtdHitMaker.h - modified to use the constants from StMtdUtil/StMtdConstants.h; applied trigger time window cuts; removed automatic print out hit information to log file when running on muDst;
StMtdQAMaker
StMtdQAMaker.cxx, StMtdQAMaker.h - added new maker for MTD QA analysis; added histograms for LocalY, LocalZ, DeltaY, DeltaZ;
StMtdMatchMaker
StMtdMatchMaker.cxx - added assert() statement to abort if the loaded geometry is wrong; removed default geometry tag;
modified to assign matching information to all the primary tracks;
StMtdMatchMaker.cxx, StMtdMatchMaker.h - modified to fill the expected time-of-flight calculated via track extrapolation;
StMtdSimMaker
StMtdSimMaker.cxx - updated to initialize data members in the default constructor;
StMtdUtil
StMtdConstants.h - added header file to contain MTD constants; added gMtdNModulesAll;
StMtdGeometry.cxx - disabled retrieving table geant2backlegID for year 2012 and before; the default geometry tag is set to yYYYYa ; fliped localY for cells in modules 4 and 5;
StMuDSTMaker
COMMON/StMuDstMaker.cxx - removed recovery of pt tracks;
StPass0CalibMaker
StSpaceChargeEbyEMaker.cxx, StSpaceChargeEbyEMaker.h - added GridLeak-by-sector codes, East/WestOff handling, and some code reformatting;
StPxlDbMaker
StPxlDb.cxx, StPxlDb.h, StPxlDbMaker.cxx, StPxlDbMaker.h - changeed pxlRowColumnStatus to pxlBadRowColumns to decrease DB szie; modified to collect all debugging print statements into a single Print();
StSsdFastSimMaker
StSsdFastSimMaker.cxx, StSsdFastSimMaker.h - modified to remove pointer to StSsdDbMaker; use of StSsdBarrel instead;
StTpcRSMaker
fixed bug found by gcc 4.8.2 ;
RTS
include/rtsSystems.h - fixed some FPS things;
RC_Config.h - updated;
include/UNIX/ThreadsMsgQueue.hh - updated;
src/DAQ_FGT/fgtPed.cxx - fixed bug which causes the wrong pedestal to be saved during pedestal runs if the channel was dynamically bad;
src/DAQ_PP2PP/daq_pp2pp.cxx - fixed endianess issue for LE data; added some more checks for 2014 run;
pams
geometry/geometry/geometry.g - updated y2014 tag w/ MTD y2014 configuration;
StarDb
Calibrations/tracker/tpcTrackingParameters.20010312.000011.C - added new file which is copy of DefaultTrack ingParameters.20010312.000011.C;
Calibrations/tpc/tpcEffectiveGeomB.20091215.000000.C, tpcEffectiveGeomB.20101215.000000.C, tpcEffectiveGeom B.20101315.000000.C - added new files to change from db aliases to exact time stamp ;
tpcEffectiveGeomB.y2010.C, tpcEffectiveGeomB.y2011.C, tpcEffectiveGeomB.y2014.C - removed files;
Conditions/trg/trgTimeOffset.20000601.000001.C - added file to increment time stamp by 1 second in order to put in MySQL;
Geometry/tpc/TpcHalfPosition.20021115.000000.C, TpcHalfPosition.20031120.000000.C, TpcHalfPosition.20041030.000000.C, TpcPosition.20021115.000000.C, TpcPosition.20031120.000000.C, TpcPosition.20041030.000000.C - added new files to change from db aliases to exact time stamp ;
TpcHalfPosition.y2003.C, TpcHalfPosition.y2004.C, TpcHalfPosition.y2005.C, TpcPosition.y2003.C, TpcPosition.y2004.C, TpcPosition.y2005.C - removed files;
StDb
idl/mtdModuleToQTmap.idl, mtdSlewingCorr.idl, mtdT0Offset.idl, mtdTriggerTimeCut.idl - added new files for MTD calibrations and initial tables;
tpcElectronicsB.idl - added new TPC table;
fpsChannelGeometry.idl, fpsConstant.idl, fpsGain.idl, fpsMap.idl, fpsPosition.idl, fpsSlatId.idl - added new FPS tables;
StarVMC
Geometry/Compat/xgeometry.xml - updated y2014 tag w/ MTD y2014 configuration;
updated to force recompile of xgeometry to pickup changes to pixel and pixel support eliminating overlaps and extrusions; updated to eliminate overlaps in SisdGeo7;
Geometry/macros/StarGeometryDb.C - updated y2014 tag w/ MTD y2014 configuration;
Geometry/IstGeo/IstdGeo1.xml - volumes IBAT, IECW, IECE, ISCM, IBRS, ICFA..C, IRSA,B,L placed with MANY to avoid overlap issues shadowing approx 300g of material;
IBMO mother volume inner radius was set too large at 11.84 cm, this clipped part of the ladder volumes IBAM and may cause material discrepancies;
inner radius of IBMO moved to avoid overlap with PTSM/APTS ;
reorganized IBAM to simplify and reduce overlap issues; verified that daughters of IBAM are placed at the same position, w/in roundoff errors;
IBMO shape changed to PCON to avoid overlap / tighter integration;
Geometry/PixlGeo/PixlGeo5.xml - corrected error in pixel geometry which resulted in backing material extruding the ladder mother volume;
PsupGeo.xml - eliminated overlaps and extrusions in pixel support geometry;
PixlGeo6.xml - updated to eliminate overlaps in PixlGeo6;
PixlGeo6.xml, PxstGeo1.xml - removed small overlaps and extrusions ;
Geometry/SisdGeo/SisdGeo7.xml - updated to eliminate overlaps;
g2Root/g2Root.F - introduced TpcRefSys;
OnlTools Jevp/StJevpBuilders/ppBuilder.cxx - fixed memory leak;
- August 7, 2014
new library SL14h tagged as SL14h_1 has been created and built on SL6.4 and SL5.3 platforms;
default compiler on SL6.4 is gcc 4.4.7 . Library was tested and released on August 11.
Main features:
- added new TPC alignment schema and corrections due to new TPC survey;
- added new Pythia versions : Pythia v.8.1.62; v.8.1.86;
- more modifications to MTD code;
- updated Ist DB method and code;
- added SST code to StSsdDbMaker and StiSsd;
- added MTD plots for offline QA;
- compilation options switched to use the C++11 standard; codes updated;
- several bugs fixed;
Next codes have been updated:
StRoot
StarGenerator
BASE/AgStarReader.cxx, StarPrimaryMaker.cxx - fixed type conversion error thrown by c++11 compiler in AgSTAR reader and removed unused variable in primary maker;
Pythia8_1_62/ - added new Pythia version 8.1.62;
Pythia8_1_86/ - added new Pythia version 8.1.86;
STEP/AgUStep.cxx, AgUStep.h - updated to save the ROOT/TGeo path in each tracking step. i.e, it saves the volume and copy numbers in the arrays vnums and cnums; rmin and rmax static members added to restrict range where steps are saved ;
AgUStep.cxx - fixed order of arguments in initialization list; removed unused variable;
StarMagField
StarMagField.cxx, StarMagField.h - modified for new TPC alignment and added switch between new and old schema;
StarMagField.cxx - added cast for c++11 option;
St_base
StarChairDefs.h - added alternative (B) table for new TPC alignment;
StBFChain
BFC.C, Bfc.h, BigFullChain.h, StBFChain.cxx - added flag for new TPC alignment; removed 'fpd' and 'l0' options;
BigFullChain.h - added option 'CorrX' to switch to new TPC alignment schema; fixed sstDb option;
StDbBroker
StDbBroker.cxx - fixed templated call to make it compliant with gcc 4.8.2;
StDbLib
StHyperCacheManager.cpp - fixed templated call to make it compliant with gcc 4.8.2;
St_db_Maker
St_db_Maker.cxx - fixed templated call to make it compliant with gcc 4.8.2;
StDbUtilities
StDbUtilitiesLinkDef.h, StMagUtilities.cxx, StMagUtilities.h, StTpcCoordinateTransform.cc, StTpcCoordinateTransform.hh - m odified for new TPC alignment model and added switch between new and old schema;
StMagUtilities.cxx, StMagUtilities.h - fixed old correction with 2D and 3D magnetic field ;
StMagUtilities.cxx - added extra cast for CXX11;
StDetectorDbMaker
St_tpcDimensionsC.h, St_tpcDriftVelocityC.h, St_tpcEffectiveGeomC.h, St_tpcGlobalPositionC.h, St_trgTimeOffsetC.h - modified for new TPC alignment;
St_tpcTimeBucketCorC.h - added new file to switch between new and old schema of alignment;
StDetectorDbChairs.cxx - modified to add St_tpcTimeBucketCorC.h;
St_spaceChargeCorC.cxx - modified to add no-killer detectors;
StDetectorDbChairs.cxx, StTpcSurveyC.h - added alternative (B) table for new TPC alignment;
StEvent
StMtdPidTraits.cxx, StMtdPidTraits.h - added residuals (dz,dy) between matched track-hit pairs nd access functions;
StEventUtilities
StuFixTopoMap.cxx - modified to get rid of compiler warning;
StFtpcTrackMaker
StFtpcTrack.cc - fixed for C++11 compliance;
StGammaMaker
StGammaCandidateMaker.cxx - modified to return TVector3 instead of integer;
StGenericVertexMaker
StppLMVVertexFinder.cxx - added cast for c++11 option;
StIstDbMaker
StIstDbMaker.cxx, StIstDbMaker.h - updated to improve doxygen documentation; modified to separate IST DB dataset from ISTDb maker
c++ format style improvements; virtual keyword added for destructor;
added destructor and deallocated the mIstDb; c++ formatting style improved and formatted with astyle -s3 -p -H -A3 -k3 -O -o -y -Y -f ;
updated to primt out mIstDb geometry matrices when Debug2 enabled;
StIstDb.cxx, StIstDb.h - added new files; modified to make class getters const; removed unused header includes; reduced the scope of the using namespace;
added several simple getters and data members for sub-level geometry matrices obtain; added Print() function which print out all IST geometry matrices;
StIstDb.cxx - replaced LOG_INFO with LOG_DEBUG to slim the log file; minor updates on the ladder/sensor ID check;
StIstDb.h, StIstDbMaker.h - modified to set class version to 1 as version 0 has a special meaning in root cint world;
StIstDb.cxx, StIstDb.h, StIstDbMaker.cxx - updated Print() function to PrintGeoHMatrices(); modified to replace assert statement for gStTpcDb with normal variable check;
Sti
StiKalmanTrack.cxx - fixed wrong Xi2 for 5-hits short tracks;
StiDetectorTreeBuilder.cxx - fixed bug #2882 to avoid clash of detectors with the same Rxy & Phi ; hangWhere() parameter added;
StiHit.cxx - modified to improve hit test;
StiMaker
StiStEventFiller.cxx - updated with c++11 fix;
StiIst
StiIstDetectorBuilder.cxx, StiIstDetectorBuilder.h - updated to switch to the new way of accessing DB information for IST, instead of using the maker we access an object filled by the maker with data from DB;
added extra protection for a valid pointer;
adjusted indentation with astyle -s3 -p -H -A3 -k3 -O -o -y -Y -f;
StiIstDetectorBuilder.cxx - updated to reoder variable initialization; updated StIstDb method;
StiPxl
StiPxlDetectorGroup.h - modified to switch default to non-ideal positioning of PXL volumes (currently this affects active layers only); this change assumes that the user runs StPxlDbMaker to create the dataset with appropriate transformations;
StiSsd
StiSstDetectorBuilder.cxx, StiSstDetectorBuilder.h, StiSstDetectorGroup.cxx StiSstDetectorGroup.h - adde Sst code to SSD directory;
StiSsdLinkDef.h - adjusted to Sst ;
StMcEvent
StMcHit.cc, StMcTrack.cc - updated to get rid of compiler warning;
StMiniMcMaker
StMiniMcMaker.cxx - added explicit casts from (double) to (float) to satisfy c++ 11 compiler;
StMtdMatchMaker
StMtdMatchMaker.cxx - modified to use mMtdGeom->SetLockBField(); initialized trgTime;
StMtdMatchMaker.cxx, StMtdMatchMaker.h - updated to set DeltaY and DeltaZ in PidTraits;
StMtdMatchMaker.cxx - modified to remove dependency on "StarGenerator/StarLight/starlightconstants.h";
StMtdSimMaker
StMtdSimMaker.cxx, StMtdSimMaker.h - modified to move the initialization of the GEANT-to-Backleg map using the database to InitRun(); added return value for function FastCellResponse();
StMtdUtil
StMtdGeometry.cxx, StMtdGeometry.h - added an option to lock bfield to FF; added protection for reading magnetic field in case of track projection position is (nan,nan,nan);
fixed a minor inconsistency in using the fNExtraCells;
StMuDSTMaker
COMMON/StMuMtdPidTraits.cxx, StMuMtdPidTraits.h - added changes to StMuMtdPidTraits;
StPass0CalibMaker
StSpaceChargeEbyEMaker.cxx - modified for new TPC alignment;
StSpaceChargeEbyEMaker.cxx, StSpaceChargeEbyEMaker.h - implemented machinery for sector-by-sector Gaps (GridLeak) measurements;
StPxlDbMaker
StPxlDb.cxx, StPxlDb.h, StPxlDbMaker.h - updated for minor style changes;
StPxlSimMaker
StPxlSimMaker.cxx, StPxlSimMaker.h - fixed bug in creating a new StPxlHitCollection; random seed is set to default; DB geometry is set to default;
StSsdDbMaker
StSstDbMaker.cxx, StSstDbMaker.h, StSsdLinkDef.h - updated; set positions of TGeoHMatrix;
StTpcDb
StTpcDb.cxx, StTpcDb.h, StTpcDbMaker.cxx - modified for new TPC alignment schema and added switch between new and old schema;
StTpcDb.cxx - added alternative (B) table for new TPC alignment schema;
StTpcHitMaker
StTpcHitMaker.cxx, StTpcHitMaker.h, StTpcMixerMaker.cxx, StTpcRTSHitMaker.cxx - modified for new TPC alignment schema;
StTpcHitMoverMaker
StTpcHitMoverMaker.cxx, StTpcHitMoverMaker.h - modified for new TPC alignment model and added switch between new and old schema;
StTpcHitMoverMaker.cxx, StTpcHitMoverMaker.h - added cast for c++11 option;
StTpcRSMaker
StTpcRSMaker.cxx, TpcRS.C - added cast for c++11 option;
St_geant_Maker
St_geant_Maker.cxx - modified to read in HCAL hits;
St_QA_Maker
QAhlist_EventQA_qa_shift.h, QAhlist_Reco.h, StEventQAMaker.cxx, StEventQAMaker.h, StQABookHist.cxx, StQABookHist.h, StQAMakerBase.cxx, StQAMakerBase.h - added MTD plots for offline QA;
St_tcl_Maker
StTpcFastSimMaker.cxx, StTpcFastSimMaker.h - added cast for c++11 option;
pams
sim/gstar/gstar_part.g - added J/Psi --> mu+mu- 100% branching ratio with geant ID 168;
sim/g2t/g2t_hca.F - modified to enable saving of x,y,z in HCAL g2t hits;
g2t_volume_id.g - updated HCAL geometry and volume IDs (affects y2014b,dev15b);
sim/idl/g2t_emc_hit.idl - modified to extend EMC hit to include hit position ;
StarDb
AgMLGeometry/CreateGeometry.h - fixed bug #2894 which caused overwriting daq file by the cached geometry file;
Calibrations/tpc/tpcTimeBucketCor.C, tpcPadrowT0B.C, tpcEffectiveGeomB.y2012.C, tpcEffectiveGeomB.C, tpcEffectiveGeomB.y2010.C, tpcEffectiveGeomB.y2011.C, tpcEffectiveGeomB.y2014.C, tpcElectronicsB.C - added new file for new TPC alignment schema;
Conditions/trg/trgTimeOffsetB.20140101.001107.C, trgTimeOffsetB.20140210.001107.C, trgTimeOffsetB.20140219.001107.C, trgTimeOffsetB.20140305.001107.C, trgTimeOffsetB.20140311.001107.C, trgTimeOffsetB.20140101.000715.C, trgTimeOffsetB.20140210.000715.C, trgTimeOffsetB.20140219.000715.C, trgTimeOffsetB.20140305.000715.C, trgTimeOffsetB.20140311.000715.C, trgTimeOffsetB.20140101.000115.C, trgTimeOffsetB.20140210.000115.C, trgTimeOffsetB.20140219.000115.C, trgTimeOffsetB.20140220.000115.C, trgTimeOffsetB.20140305.000115.C, trgTimeOffsetB.20140311.000115.C, trgTimeOffsetB.20000601.000000.C - added new files for new TPC alignment schema;
Geometry/tpc/TpcHalfPosition.y2003.C, TpcHalfPosition.y2004.C, TpcHalfPosition.y2005.C, TpcInnerSectorPositionB.C, TpcOuterSectorPositionB.20140101.000631.C, TpcOuterSectorPositionB.C, TpcPosition.C, TpcPosition.y2003.C, TpcPosition.y2004.C, TpcSuperSectorPositionB.20140101.000421.C, TpcSuperSectorPositionB.C, TpcOuterSectorPositionB.20050101.000631.C, TpcOuterSectorPositionB.20050101.001107.C - added new files to proceed with new TPC alignment and updated TPC survey;
TpcOuterSectorPositionB.20140101.001107.C, TpcSuperSectorPositionB.20120101.000956.C, TpcSuperSectorPositionB.20140101.000956.C, TpcSuperSectorPositionB.20140101.001112.C, TpcPosition.y2005.C - added new files to proceed with new TPC alignment schema and updated TPC survey;
TpcPosition.C, TpcPosition.y2003.C, TpcPosition.y2004.C - modified for new TPC alignment schema;
TpcPosition.20140101.000300.C - removed;
StMagF/MagFieldRotation.y2013.C, MagFieldRotation.y2014.C, StarFieldZ.root - added new magnetic filedcorrection;
StarVMC
Geometry/Compat/xgeometry.xml - modified to force recompilation of xgeometry to pickup y2014b definition;
Geometry/HcalGeo/HcalGeo.xml, HcalGeo1.xml - updated HCAL geometry and volume IDs (affects y2014b,dev15b);
StDb
idl/ Survey.idl, tpcElectronics.idl - modified, added comments;
tpcEffectiveGeom.idl, trgTimeOffset.idl - added extra offset for West TPC;
pxlBadRowColumns.idl - added new Pixel table for bad columns;
- April 30, 2015
SL14g library was updated with next codes needed for embedding production:
StRoot/StMiniMcMaker/StMiniMcMaker.cxx, r.1.44 - to provide correct dEdx information in MiniMc ;
StRoot/StEmbeddingUtilities/StEmbeddingQADraw.cxx, r.1.35 - to fix wrong particle name;
StRoot/macros/embedding/get_embedding_xml_rcf.pl, get_embedding_xml.pl
StarVMC/Geometry/MutdGeo/MutdGeo4.xml, MutdGeo5.xml - updated hit definition for MTD, to improve timing resolution;
Library was retagged as SL14g_3 and rebuilt on SL6.4 and SL5.3 platforms.
- September 5, 2014
SL14g library has been updated with geometry correction for year 2013 data and MTD code to make it ready for pp 500GeV run 2013 second part production. Library was retagged with tag SL14g_2, rebuilt on SL6.4 and SL5.3 platforms.
Next codes have been updated:
StRoot
StMtdHitMaker/
StMtdHitMaker.cxx, r.1.18; StMtdHitMaker.h, r.1.10;
StMtdSimMaker/
StMtdSimMaker.cxx, r.1.9; StMtdSimMaker.h, r.1.8;
StMtdMatchMaker/
StMtdMatchMaker.cxx, r.1.20; StMtdMatchMaker.h, r.1.9;
StMtdUtil/
StMtdGeometry.cxx, r.1.7; StMtdGeometry.h, r.1.6;
StMuDSTMaker/COMMON/
StMuMtdPidTraits.h, r.1.4; StMuMtdPidTraits.cxx, r.1.3;
StEvent/StMtdPidTraits.h, r.2.3; StMtdPidTraits.cxx, r.2.3;
StarVMC/Geometry/Compat/xgeometry.xml, r.1.38;
StarVMC/Geometry/PixlGeo/PixlGeo5.xml, r.1.9;
StarVMC/Geometry/PixlGeo/PsupGeo.xml, r.1.7;
- July 11, 2014
new library SL14g tagged as SL14g has been created and built on SL6.4 (32bits & 64bits) and SL5.3 platforms;
default compiler on SL6.4 is gcc 4.4.7 . Library was tested and released on July 18.
Main features:
- added modifications for PXL & IST Sti geometry code;
- added Psi(2s)->e+e- decay channel to gstar;
- made few modifications to MTD code;
- removed flush() destroying IO performance in number of codes ;
- added zerobias triggers and updated event summary in StPeCMaker code;
- further updates of OnlTools event builder for eemc, tof & ist detectors;
- several bugs fixed;
Next codes have been updated:
asps
Simulation/starsim/geant/gdecay.F - removed restriction for the decay products of a particle with geant ID <= 99 or <= 999 ;
StRoot
StAssociationMaker
StAssociationMaker.cxx - removed flush();
StDaqLib
FTPC/FTPV1P0_ZS_SR.cxx - removed flush();
GENERIC/EventReader.cxx, RecHeaderFormats.cxx - removed flush();
PMD/PMD_Reader.cxx - removed flush() ;
SVT/SVTV1P0_ZS_SR.cxx - removed flush() ;
TPC/TPCV1P0_ZS_SR.cxx - removed flush() ;
examples/client_svt.cxx - removed flush() ;
StDbLib
MysqlDb.cc - removed DELAYED keyword in the INSERT command in DB API;
StHyperCacheManager.cpp - added missing const attribute to fix -std=c++0x error;
StFtpcSlowSimMaker
StFssSectorReader.cc - mandatory removed fflush();
StMCFilter
StGenParticle.cxx - removed cout and flush from StGenParticle; fixed compiler warning in a for loop which was using a non-obvious termination condition;
StMtdMatchMaker
StMtdMatchMaker.cxx, StMtdMatchMaker.h - fixed an issue of reading SL12d production data; added expTof for MTD pidtraits;
changed 'dca < 10' to 'dca2Beam_R < 10' ;
modified to use new MTD geometry class created to load geometry volume from GEANT ; choose closest one for multi-tracks which associated with same hit;
implemented multi-tracks to 1 hit matching algorithm; set neighbour module matching and 3 extra cells as default;
StMtdHitMaker
StMtdHitMaker.cxx - modified to process Run 2012 UU muDst where only the muMtdCollection is stored;
StMtdSimMaker
StMtdSimMaker.cxx, StMtdSimMaker.h - modified to set the timing for MC hits according to time-of-flight and z posistion;
StMtdUtil
StMtdGeometry.cxx, StMtdGeometry.h - created new geometry class for MTD to load geometry volume from GEANT, needed gGeoManager;
StMuDSTMaker
COMMON/StMuDst.cxx - updated StMuDst::setMtdArray() and reset the MTD header, needed for Run12 UU data where only the muMtdCollection is available;
StPeCMaker
StPeCTrigger.cxx - added zerobias trigger; reset trg_... for every event;
StPeCEvent.cxx, StPeCEvent.h - added more variables to event summary;
StPeCMaker.cxx - modified to ignore flag from StPeCEvent and writes all events with a summary;
StPxlSimMaker
StPxlSimMaker.cxx - PXL DB dataset name has been changed to pxl_db;
StPxlFastSim.cxx, StPxlSimMaker.cxx, StPxlSimMaker.h - updated in accordance with the nee pileup trees stucture;
modified to revert the changes made for the pikeup adder;
StPxlSimMaker.cxx - Check if StPxlHitCollection exists in StEvent and add simulated hits to it. Otherwise, create a new collection.
StarClassLibrary
StPsi2s.cc, StPsi2s.hh - added new files for Psi(2s) -> e+e- decay channel;
StParticleTable.cc, StParticleTypes.hh - modified to add Psi(2s) -> e+e- decay channel;
StarGenerator
StarLight/StarLight.cxx - removed unused dependency on TDatabasePDG; fixed logic for defining event record;
StarLight.cxx, StarLight.h - modified to make StarLight setters public;
STEP/AgUStep.cxx, AgUStep.h - added custom AgUStep class, which saves a TTree containing the particle navigation history; specifically, the energy lost in each tracking step is saved for each track; the idTruth of the track is also saved, so that comparisons with track reconstruction software can be performed; by default there is a cut which terminates history at R=50 cm from the beamline;
macros/starsim.stepper.C - added new macro to handle custom AgUStep class;
StarRoot
TMDFParameters.cxx - removed flush() ;
Sti
StiDetectorBuilder.cxx, StiDetectorBuilder.h, StiDetector.cxx, StiDetector.h - implemented auto-segmentation of radially oriented volumes;
Sti/Star/StiStarDetectorBuilder.cxx - fixed bug in energy loss;
StiIst
StiIstDetectorBuilder.cxx, StiIstDetectorBuilder.h - modified to add flag for ideal IST geometry;
modified to set the current gGeometry path before extracting any info about current volume position;
StiPxl
StiPxlDetectorBuilder.cxx - added some more inactive material close to the silicon layers;
set protection not to proceed if DB information is not available:
modified to get rid of redundant char array holding the volume's name; it also helped to have Sti volume names as close to the original TGeo ones as possible;
implemented averaging procedure that can create separate Sti volumes for all volume occupancies in TGeo;
StTriggerUtilities
StTriggerSimuMaker.cxx - added conditions to read none-NULL onbits and offbits in database, compatible with early run9 trigger definitions;
L2Emulator/L2gammaAlgo/L2gammaAlgo.cxx - removed flush();
pams
sim/gstar/gstar_part.g - added Psi(2s) -> e+e- decay channel; added (pnXi-) "dibaryon" and it's antiparticle to gstar_part.g ; required modification of gdecay.F in order to accept arbitrary geant IDs for decay;
StDb
idl/istChipConfig.idl - added new IST table;
vpdTriggerToTofMap.idl - added new TOF/VPD table ;
OnlTools
Jevp/StJevpBuilders/istBuilder.cxx - updated vertex selection for IST builder; corrected errors of fit to MIP data;
eemcBuilder.cxx, istBuilder.cxx - updated to stop crashing in cosmic run;
l4Builder.cxx - modified to change the AxisX range of hVertexZ;
tofBuilder.cxx, tofBuilder.h - modified setting of ranges for tofmult hists, it's now set in tofconfig/TOF_HistConfig.txt;
tofBuilder.h, tofBuilder.cxx - modified to set ranges of tofmult hists in tofconfig/TOF_HistConfig.txt;
JevpServer.cxx - updated;
- June 6, 2014
new library SL14f tagged as SL14f has been created and built on SL6.4 (32bits & 64bits) and SL5.3 platforms;
default compiler on SL6.4 is gcc 4.4.7 . Library was tested and released on June 7.
Main features:
- added geometry prototype for HCAL (test) for run 2014 and geometry for proposed HCAL upgrade for run 2015;
- added geometry for proposed FMS preshower upgrade for run 2015;
- few modifications of MTD codes;
- several bugs fixed;
Next codes have been updated:
StRoot
StBFChain
BigFullChain.h - updated year 2013 geometry options ;
StBFChain.cxx - bug fixed ;
StEvent
StMtdPidTraits.cxx, StMtdPidTraits.h - added new member mExpTimeOfFlight and referring access methods;
StMtdHitMaker
StMtdHitMaker.cxx - added cvs tag;
StMtdHitMaker.cxx, StMtdHitMaker.h - modified to obtain the Tdig <-> Tray <-> Tdigboard map from the database;
modified to obtain the MTD hits directly from the muDst instead of the hit array;
added capability to run on muDst in afterburner mode;
automatically swaped backlegs 25 & 26 when running bfc chain; a flag with default value of "kFALSE" is added to control the s wapping in the afterburner mode when running on muDst ;
StMuDSTMaker
COMMON/StMuDst.cxx, StMuDst.h - modified to add setMtdArray function;
StMuMtdPidTraits.cxx, StMuMtdPidTraits.h - added a new data member (mExpTimeOfFlight) to store the expected time-of-flight obtained from track extrapolation;
StPass0CalibMaker
StSpaceChargeEbyEMaker.cxx - modified TrackInfo mode;
StPxlRawHitMakerr
StPxlRawHitMaker.cxx - updated to print error messages for wrong rows / columns and deserialization errors only when debug > 2;
StarRoot
THelixTrack.cxx - modified to check XX and YY for non zero error matrix;
Sti
StiKalmanTrackNode.cxx - reduced visibility of inactive materials;
StiDetectorBuilder.cxx - modified to avoid name truncation;
RTS
include/iccp2k.h - updated;
include/HLT/HLTFormats.h - added MTD;
src/rtsplusplus.def - updated;
src/DAQ_READER/daqReader.cxx, daqReader.h - updated; implemented flags into daq reader;
src/DAQ_FPS/daq_fps.cxx, daq_fps.h - updated;
src/DAQ_SST/daq_sst.cxx - removed misc;
src/DAQ_TPX/tpxCore.cxx, tpxCore.h, tpxPed.cxx - modified;
src/RTS_EXAMPLE/rts_example.C - implemented flags into daq reader;
pams
geometry/geometrygeometry.g - modified to add support for FMS preshower in dev15a; support for HCAL test iny2014b; support for HCAL proposal in dev15b;
geometry/hcalgeo/HcalGeo.g - added AgSTAR stub HCAL prototype for run 2014;
sim/g2t/g2t_fpd.F, g2t_volume_id.g - modified for HCAL prototype and FMS preshower support;
g2t_hca.F, g2t_hca.idl - addde new files to provide HCAL prototype support;
sim/idl/g2t_track.idl - modified to provide HCAL and FMS preshower support;
StarVMC
StarAgmlLib/StarAgmlStacker.h, StarAgmlStacker.cxx - modified to expose method to obtain real name from nickname, and made it static;
Geometry/Geometry.cxx, Geometry.h - modified to provide support for proposed FMS upgrade for run 2015 (dev15 a); HCAL prototype for run 2014 (y2014b) and HCAL upgrage for run 2015 (dev15b);
Geometry/Compat/xgeometry.xml - modified for proposed FMS upgrade (dev15a), propsed HCAL upgrade (dev15b) and HCAL prototype (y2014b);
Geometry/HcalGeo/HcalGeo.xml - new module added for HCAL for run 2014;
HcalGeo1.xml - added new module for proposed HCAL upgrade for run 2015;
Geometry/FpdmGeo/FpdmGeo4.xml - added new module for proposed FMS plus preshower upgrade for run 2015;
Geometry/macros/StarGeometryDb.C - corrected bug which set vpddgeo instead of vpddgeo2 module in y2007;
modified to provide support for proposed FMS upgrade (dev15a), propsed HCAL upgrade (dev15b) and HCAL prototype (y2014b);
StarDb
AgMLChecksum/y2006/ChecksumSet.y2006.root - added y2006 geometry checksum for nightly test;
AgMLChecksum/y2006h/ChecksumSet.y2006h.root - added y2006h geometry checksum for nightly test;
AgMLChecksum/y2006g/ChecksumSet.y2006g.root - added y2006g geometry checksum for nightly test;
AgMLChecksum/y2006c/ChecksumSet.y2006c.root - added y2006c geometry checksum for nightly test;
AgMLChecksum/y2007g/ChecksumSet.y2007g.root - added y2007g geometry checksum for nightly test;
AgMLChecksum/y2007h/ChecksumSet.y2007h.root - added y2007h geometry checksum for nightly test;
StDb
idl/mtdTrayToTdigMap.idl - modified to change data type from char to short;
OnlTools
Jevp/StJevpBuilders/
istBuilder.cxx, istBuilder.h - updated setting for MIP non-ZS and max time bin fraction;
updated fit range for MIP MPV distribution of center sections;
l4Builder.cxx, l4Builder.h - added plots for for dimuon trigger; added MTD plots;
ssdBuilder.cxx, ssdBuilder.h - improved display setting;
- May 7, 2014
new library SL14e tagged as SL14e has been created and built on SL6.4 (32bits & 64bits) and SL5.3 platforms;
default compiler on SL6.4 is gcc 4.4.7 . Library was tested and released on May 9.
Main features:
- improved PXL & IST geometry implementaion;
- first release of StPxlClusterMaker and StPxlHitMaker codes ;
- few modifications for StMtdMatchMaker code and MTD hits array in MuDst;
- first release of StFmsFastSimulatorMaker code;
- added AgML checksums for different geometres to perform nightly library test;
- several bugs fixed;
Next codes have been updated:
StRoot
StBFChain
BigFullChain.h - added 'fmsSim' option; added pxl's options;
StFmsDbMaker
StFmsDbMaker.h - changed default name to fmsDb to match BFC;
StFmsFastSimulatorMaker
StFmsFastSimulatorMaker.cxx, StFmsFastSimulatorMaker.h - released of first version for FMS fast simulator;
StiMaker
StiMaker.cxx - inverted ssd <-> sst now corrected; removed RnD as old approach;
StiPxl
StiPxlDetectorBuilder.cxx, StiPxlHitLoader.cxx - modified to switch to PXL sensitive layer geometry with one Sti volume per ladder centered at z=0; the loop over sensors removed and the indexing of the volumes changed accordingly;
inner loop indentation adjusted;
StiPxlDetectorBuilder.cxx - added two more cylindrical volumes from the pixel support tube mother volume (PSTM)y;
added some material between the PXL layers;
modified to reduce the number of LOG_DEBUG statements to mitigate possible slowdown due to unnecessary conditional checks
StiPxlDetectorBuilder.h - added virtual keyword to methods;
StiPxlDetectorGroup.cxx - modified to append includes with explicitly specified sub-directories for easier reference; added a check to make sure DB transformations exist when user requests a DB-base geometry;
StiPxlDetectorBuilder.cxx, StiPxlDetectorBuilder.h, StiPxlDetectorGroup.cxx, StiPxlDetectorGroup.h - added option to StiPixelDetectorBuilder/Group to switch between ideal and DB-based geometries;
StiIst
StiIstDetectorBuilder.cxx - modified to reduce the number of LOG_DEBUG statements to mitigate possible slow down due to unnessary conditional checks; modified to decrease thickness of inactive material tube, and enable sensitive silicon layers;
StiIstDetectorBuilder.h - added virtual keyword to methods;
StIstUtil
StIstDigiHit.cxx, StIstDigiHit.h - modified to hide static member inherited from StIstHit base class and assign a new value relevant for StIstDigiHit; redefined static operators new and delete "inherited" from the base StIstHit class;
StMtdMatchMaker
StMtdMatchMaker.cxx, StMtdMatchMaker.h - fixed a bug of un-initialized variable nDedxPts in MtdTrack construction function;
reorganized project2Mtd function, made it more readable; saved pathlengths of extrapolated tracks;
added hits <-> track index association in mMuDstIn=true mode;
StMtdSimMaker
StMtdSimMaker.cxx - modified to automatically correct Backleg ID from GEANT hits by using mtdGeant2BacklegIDMap in DB;
StMuDSTMaker
COMMON/StMuDst.cxx - modified to change mtdArray[muBTofHit] to mtdArrays[muMTDHit] in StMuDst.cxx in function fixMtdTrackIndices;
StPass0CalibMaker
StSpaceChargeEbyEMaker.cxx, StSpaceChargeEbyEMaker.h - modified to get TrackInfo mode with pile-up tracks too;
StPeCMaker
StPeCTrigger.h, StPeCTrigger.cxx - added more triggers for run 2014;
StPxlClusterMaker
StPxlClusterCollection.cxx, StPxlClusterCollection.h, StPxlCluster.cxx, StPxlCluster.h, StPxlClusterMaker.cxx, StPxlClusterMaker.h - added new code for pixel raw hits clustering;
StPxlDbMaker
StPxlDbMaker.h - changed pxl_db -> pxlDb;
StPxlHitMaker
StPxlHitMaker.cxx, StPxlHitMaker.h - maker to add PxlHitCollection of hits in the event to be used in tracking algorithms;the hits are formed from the clusters containing in the event's StPxlClusterCollection;
StPxlRawHitMaker
StPxlRawHitMaker.cxx - updated to rename PXL DB dataset to avoid conflict with StPxlDbMaker's name;
RTS
include/rc.h, rtsLog.h, rtsSystems.h - modified to prepare states. New TRG_TCD_NEW - inptroduced;
RC_Config.h - updated;
rtsMonitor.h, rtsSystems.h - added stuff for TCD_LX;
src/rtsplusplus.def - updated;
src/DAQ_FGT/fgtPed.cxx - updated for checkpoint;
src/DAQ_SST/daq_sst.cxx, daq_sst.h, sstPed.cxx - updated for checkpoint;
src/LOG/Makefile - updated;
src/DAQ_TPX/Makefile, tpxPed.cxx - updated for checkpoint;
src/DAQ_TOF/daq_tof.cxx - updated for checkpoint;
StarVMC
Geometry/Geometry.cxx - AgML library info/warn/error messages modified now to use StMessMgr; some user I/O redirected to StMessMgr;
Geometry/EcalGeo/EcalGeo6.xml - modified to compute p[ositions and lengths of SMD strips in double precision, though still will be returned in single precision; this was implemented to reduce roundoff errors in the results which are introduced by the compiler under different compiler optimizations;
Geometry/macros/loadStarGeometry.C - AgML library info/warn/error messages modified now to use StMessMgr;
loadStarGeometry.C, viewStarGeometry.C - updated to use standard geometry loader;
StarAgmlChecker/StarAgmlChecker.cxx - introduced a decimal-point shift and truncation for mate rial/mixture paramters, to make checksum algorithm less sensitive to compiler optimization; updated for normalization;
updated to proper handle of negative numbers in decimal normalization;
implemented roundoff scheme; all values which go into the checksum are first normalized, then rounded off to a given precision;
added asserts on assumed data type sizes; added blacklist for volumes in checksum dataset, entire tree beneath specified volumes will be skipped;
StarAgmlLib/AgStructure.cxx, StarTGeoStacker.cxx- cleanup compiler warning;
AgAttribute.cxx, AgBlock.cxx, AgBlock.h, AgCreate.cxx, AgMaterial.cxx, AgMedium.cxx, AgModule.cxx, AgShape.cxx, AgStructure.cxx, StarNoStacker.h, StarTGeoStacker.cxx - AgML library info/warn/error messages modified now to use StMessMgr;
AgMath.h - updated to compute sin, cos, tan, and exp with highest precision possible in order to minimize introduction of round off error in results;
StarDb
AgMLChecksum/y2008a/ChecksumSet.y2008a.root - added AgML checksums for nightly regression test;
AgMLChecksum/y2008b/ChecksumSet.y2008b.root - added AgML checksums for nightly regression test;
AgMLChecksum/y2008c/ChecksumSet.y2008c.root - added AgML checksums for nightly regression test;
AgMLChecksum/y2008d/ChecksumSet.y2008d.root - added AgML checksums for nightly regression test;
AgMLChecksum/y2008e/ChecksumSet.y2008e.root - added AgML checksums for nightly regression test;
AgMLChecksum/y2009/ChecksumSet.y2009.root - added AgML checksums for nightly regression test;
AgMLChecksum/y2009a/ChecksumSet.y2009a.root - added AgML checksums for nightly regression test;
AgMLChecksum/y2009b/ChecksumSet.y2009b.root - added AgML checksums for nightly regression test;
AgMLChecksum/y2009c/ChecksumSet.y2009c.root - added AgML checksums for nightly regression test;
AgMLChecksum/y2009d/ChecksumSet.y2009d.root - added AgML checksums for nightly regression test;
AgMLChecksum/y2010/ChecksumSet.y2010.root - added AgML checksums for nightly regression test;
AgMLChecksum/y2010a/ChecksumSet.y2010a.root - added AgML checksums for nightly regression test;
AgMLChecksum/y2010b/ChecksumSet.y2010b.root - added AgML checksums for nightly regression test;
AgMLChecksum/y2010c/ChecksumSet.y2010c.root - added AgML checksums for nightly regression test;
AgMLChecksum/y2011/ChecksumSet.y2011.root - added AgML checksums for nightly regression test;
AgMLChecksum/y2011a/ChecksumSet.y2011a.root - added AgML checksums for nightly regression test;
AgMLChecksum/y2012/ChecksumSet.y2012.root - added AgML checksums for nightly regression test;
AgMLChecksum/y2012a/ChecksumSet.y2012a.root - added AgML checksums for nightly regression test;
AgMLChecksum/y2012b/ChecksumSet.y2012b.root - added AgML checksums for nightly regression test;
AgMLChecksum/y2013_1/ChecksumSet.y2013_1.root - added AgML checksums for nightly regression test;
AgMLChecksum/y2013_2/ChecksumSet.y2013_2.root - added AgML checksums for nightly regression test;
AgMLChecksum/y2013_1a/ChecksumSet.y2013_1a.root - added AgML checksums for nightly regression test;
AgMLChecksum/y2013_1b/ChecksumSet.y2013_1b.root - added AgML checksums for nightly regression test;
AgMLChecksum/y2013_1c/ChecksumSet.y2013_1c.root - added AgML checksums for nightly regression test;
AgMLChecksum/y2013_2/ChecksumSet.y2013_2.root - added AgML checksums for nightly regression test;
AgMLChecksum/y2013_2a/ChecksumSet.y2013_2a.root - added AgML checksums for nightly regression test;
AgMLChecksum/y2013_2b/ChecksumSet.y2013_2b.root - added AgML checksums for nightly regression test;
AgMLChecksum/y2013_2c/ChecksumSet.y2013_2c.root - added AgML checksums for nightly regression test;
AgMLChecksum/y2014/ChecksumSet.y2014.root - added AgML checksums for nightly regression test;
AgMLChecksum/y2014a/ChecksumSet.y2014a.root - added AgML checksums for nightly regression test;
StDb
idl/mtdTdigIdMap.idl, mtdTrayIdMap.idl, mtdTrayToTdigMap.idl, mtdGeant2BacklegIDMap.idl - added new MTD tables to DB
OnlTools
Jevp/StJevpBuilders/
pxlBuilder.cxx, pxlBuilder.h - modified to separate decoder from builder code; several bugs fixed;
pxl_decoder.cxx, pxl_decoder.h - added new files to separate decoder from builder code;
pxlBuilder.cxx, pxlBuilder.h, pxl_decoder.cxx, pxl_decoder.h - updated to use bitset2D for the pixel data container; added additional histogram for Serdes Errors;
l4Builder.cxx - few plots updated;
istBuilder.cxx, istBuilder.h - added hit map for ZS data and fix missing chip trigger alarm issue; set minimum statistics for MIP trigger alarm set-off; updated trigger alarm for IST builder;
Jevp/StJevpPlot/
RunStatus.cxx - updated;
Jevp/StJevpServer/
JevpServer.cxx - updated;
- April 11, 2014
new library SL14d tagged as SL14d has been created and built on SL6.4 (32bits & 64bits) and SL5.3 platforms;
default compiler on SL6.4 is gcc 4.4.7 . Library was tested and released on April 14.
Main features:
- released production geometry y2014a for run 2014 data;
- added production chain for run 2014 and options to process data for PXL, IST & SST detectors;
- added new PXL module StPxlRawHitMaker to read pixel raw hits from daq format and create hits collec tion;
- added next new modules for PXL & IST detectors: StiPxl, StiIst, StIstDbMak er, StIstUtil ;
- added Sti geometry for new detectors PXL, IST, SST (first release) ;
- added IST hits collection and structure to StEvent;
- added new StarAgmlChecker module to produce detector's material plots in (eta,phi)-space;
- several bugs fixed;
Next codes have been updated:
StRoot
StBFChain
StBFChain.cxx, BigFullChain.h - introduced P2014a option with production geometry y2014a;
added StiPxl, StiIst, PxlIT, IstIT and SstIT options for PXL, IST & SST detectors;
StChain
GeometryDbAliases.h - updated to setup y2014a production geometry;
StDAQMaker
StDAQMaker.cxx - modified to check that TPCReader exists before accessing it;
StEvent
StEnumerations.h - added IST constants;
StContainers.cxx, StContainers.h, StEvent.cxx, StEvent.h, StEventClusteringHints.cxx, StEventLinkDef.h, StEventTypes.h, StPxlHit.h - updated to include IST structure;
StIstHit.h, StIstHit.cxx, StIstHitCollection.cxx, StIstHitCollection.h - added hits collection for IST;
StIstLadderHitCollection.cxx, StIstLadderHitCollection.h, StIstSensorHitCollection.cxx StIstSensorHitCollection.h - added new files to include IST hits and structure;
StEventUtilities
StEventHitIter.cxx - modified to include IST structure;
St_geant_Maker
St_geant_Maker.cxx - added code to support reading new MTD active layers;
StPxlDbMaker
StPxlDb.cxx, StPxlDb.h, StPxlDbMaker.cxx - added single hot pixel masking;
StPxlRawHitMaker
StPxlRawHitCollection.cxx, StPxlRawHitCollection.h, StPxlRawHitMaker.cxx, StPxlRawHit.h, StPxlRawHit.cxx, StPxlRawHitMa ker.cxx, StPxlRawHitMaker.h - added new PXL maker to read pixel raw hits from daq files and create hit collection;
StPxlRawHitMaker.cxx, StPxlRawHitMaker.h - added Jtag file version print-out and some more warnings for data format errors;
Sti
StiDetectorBuilder.cxx, StiDetectorBuilder.h - modified to protect resetting to default tracking parameters, if these parameters have been already set;
StiDetector.cxx StiDetectorBuilder.cxx StiMaterial.cxx, StiPlacement.h, StiPlacement.cxx, StiShape.cxx - updated to inc lude geometry and material for new detectors PXL, IST, SST;
StiMaker
StiMaker.cxx, StiDetectorVolume.cxx - added PXL, IST & SST detectors;
Sti/Star/
StiStarDetectorBuilder.cxx, StiStarDetectorBuilder.h - changed TpcRefSys to TpcRefSys_1 in path;
StiStarDetectorBuilder.cxx - updated to include geometry and material for new detectors PXL, IST & SST;
StiIst
StiIstDetectorBuilder.cxx, StiIstDetectorBuilder.h, StiIstDetectorGroup.cxx, StiIstDetectorGroup.h, StiIstHitLoader.cxx , StiIstHitLoader.h, StiIstIsActiveFunctor.cxx, StiIstIsActiveFunctor.h - added new code to process IST detector data;
StIstDbMaker
StIstDbMaker.cxx, StIstDbMaker.h - added new code to handle IST offline database;
StIstUtil
StIstClusterCollection.cxx,StIstClusterCollection.h, StIstCluster.cxx, StIstCluster.h, StIstCollection.cxx, StIstCollec tion.h, StIstConsts.h, StIstDigiHit.cxx, StIstDigiHit.h, StIstRawHitCollection.cxx, StIstRawHitCollection.h, StIstRawHit.cxx, St IstRawHit.h - added new code for IST detector;
StiPxl
StiPxlChairs.cxx, StiPxlDetectorBuilder.cxx, StiPxlDetectorBuilder.h, StiPxlDetectorGroup.cxx, StiPxlDetectorGroup.h, S tiPxlHitErrorCalculator.h, StiPxlHitLoader.cxx, StiPxlHitLoader.h, StiPxlIsActiveFunctor.cxx, StiPxlIsActiveFunctor.h, StiPxlTrac kingParameters.h - added new code to process PXL detector data;
RTS
include/cmds.h, iccp.h - updated;
src/rtsmakefile.def - added REAL_DAQMAN;
src/LOG/rtsLog.C - added few more arguments;
src/DAQ_SST/sstPed.cxx - added some logging;
src/DAQ_PXL/daq_pxl.cxx - added some logging;
src/DAQ_FGT/daq_fgt.cxx, daq_fgt.h, fgtPed.cxx, fgtPed.h - added canonical pedestal handling;
pams
geometry/geometry/geometry.g - updated to setup y2014a production geometry;
sim/idl/g2t_mtd_hit.idl - modified to save MTD local and gloal coordinates;
sim/g2t/g2t_mtd.F - updated to setup y2014a production geometry; modified to save MTD local and global coordinates;
StarVMC
Geometry/Geometry.cxx - updated to setup production geometry y2014a ;
Geometry/Compat/xgeometry.xml - updated to setup y2014a production geometry;
Geometry/MutdGeo/MutdGeo5.xml - added new file to setup y2014a production geometry;
Geometry/PixlGeo/PsupGeo.xml - renamed structure MTB --> MTBP to conform to starsim standards;
Geometry/macros/StarGeometryDb.C - modified to setup y2014a production geometry for run 2014;
StarAgmlChecker/StarAgmlChecker.cxx, StarAgmlChecker.h - initial revision of code to produce material plots in (eta,phi)-space and volume checksums (md5) which can be used to detect changes in geometry;
fixed bug which ignores children of assemblies, reduce sensitivity to parameter changes;
modified to make checksum sensitive to shape type as well as parameters;
StarDb
AgMLGeometry/CreateGeometry.h, Geometry.y2014a.C - updated to release y2014a production geometry;
OnlTools
Jevp/ level.source - updated;
Jevp/StJevpBuilders/istBuilder.cxx - minor updates on IST builder to get the real number of time bin;
bbcBuilder.cxx, trgBuilder.cxx - updated;
istBuilder.cxx, istBuilder.h - added alarm and major updates;
pxlBuilder.cxx, pxlBuilder.h - modified to get proper filling of runlength histos, minor fixes;
tofBuilder.cxx, tofBuilder.h - added TRG TF00X plots;
l4Builder.cxx, l4Builder.h - updated plots for AuAu 200GeV, run 2014; modified to make a new directory in client;
ssdBuilder.cxx, ssdBuilder.h - fixed few bugs; solved some plots display problem;
Jevp/StJevpServer/JevpServer.cxx - updated;
- March 18, 2014
new library SL14c tagged as SL14c has been created and built on SL6.4 (32bits & 64bits) and SL5 .3 platforms;
default compiler on SL6.4 is gcc 4.4.7 . Library was tested and released on March 20.
Main features:
- OnlTools - more updates for new detectors: PXL, MTD, IST, SSD;
- added base chain for run 2014 data;
- StMuDSTMaker modified for MTD trackes;
- updated run 2014 geometry for PXL;
- defined reference geometry tags for run 2013;
- added new files for DAQ_FPS & DAQ_SST;
- several bugs fixed;
Next codes have been updated:
StRoot
StarGenerator
BASE/StarGenerator.cxx, StarGenerator.h - added Al as a possible target; modified lab frame cod e to respect the blue/yellow beam direction convention defined in StarGenerator;
Hijing1_383/StarHijing.cxx - added Al as a possible target; modified lab frame code to respect the blue/yellow beam direction convention defined in StarGenerator;
macros/starsim.beampipe.C - added example of macro for generating fixed-target Hijing events fro m an arbitrary vertex distribution... in this case, the beam pipe;
StarRoot
StMultiKeyMap.h, StMultiKeyMap.cxx - fixed bug;
xTCL.cxx xTCL.h - modified to add eigen2 copy of THelix one;
StBFChain
BigFullChain.h - added base chain options for run 2014;
StChain
GeometryDbAliases.h - defined y2013_1a, _1b, _1c, _2a, _2b, _2c geometry tags; the tags y2013_1c and y2013_2c fre eze the y2013_1x and y2013_2x geometry tags as they exist in SL14a, they are equivalent to the geometries used in y2013 dat a production;
StdEdxY2Maker
StdEdxY2Maker.cxx, StdEdxY2Maker.h - added two gaus fit for Oxygen monitoring histograms;
StEvent
StTrackTopologyMap.cxx, StTrackTopologyMap.h - updated for HFT;
StEventUtilities
StuFixTopoMap.cxx - updated for HFT;
StLaserAnalysisMaker
LaserEvent.cxx, LaserEvent.h, StLaserAnalysisMaker.cxx - added protection against cycling in fitting;
added cluster position in Local Sector Coordinate System;
StHistUtil.cxx, StHistUtil.h - adjusted dEdx slope hist range, handled ROOT change for 2D polar plots;
StMtdHitMaker
StMtdHitMaker.cxx - introduced run 2014 map; this mapping allows fastoffline to run while the database implementa tion continues;
StMtdMatchMaker
StMtdMatchMaker.cxx - modified to protect against potentially non-existing primary vertex in StEvent ; corrected primary vertex retrieval in StEvent environment;
StMuDSTMaker
COMMON/StMuMtdPidTraits.h, StMuTrack.h - modified StMuTrack; added setMtdPidTraits, StMuMtdPidTr aits; removed mtdHit(), MtdHit(), setMtdHit();
StMuDst.cxx, StMuMtdHit.cxx, StMuMtdHit.h - modified to get the actual pointer to the MTD matched track with more convenient method;
St_QA_Maker
StEventQAMaker.cxx - added check on ssd_hits.size();
StPxlSimMaker
StPxlFastSim.cxx, StPxlFastSim.h, StPxlISim.h, StPxlSimMaker.cxx, StPxlSimMaker.h - modified to implement methods to switch between ideal geometry and DB geometry; the default is ideal;
modified to switch on random seed for StRandom generatos in simulators;
StTriggerDataMaker
StTriggerDataMaker.cxx - modified to change returning error to warnning;
RTS
include/iccp2k.h - updated;
rtsSystems.h - added FPS;
RC_Config.h, prepareGbPayload.h - updated;
src/rtsplusplus.def - updated;
rtsmakefile.def - added RTS_HOST_NAME; added RTS_REAL_DAQMAN define;
src/DAQ_FGT/fgtPed.cxx, fgtPed.h - added bad channels from the files;
src/DAQ_FPS/daq_fps.cxx, daq_fps.h - added new files for FPS;
added reserved & meta;
src/DAQ_PXL/daq_pxl.cxx - added RTS_HOST_NAME;
src/DAQ_READER/daq_dta.cxx, daq_dta.h - added RTS_HOST_NAME;
src/DAQ_SST/daq_sst.cxx, daq_sst.h - modified to add pedestal calculation; added RTS_HOST_NAME; added ZS data checker & reader; added pedestal handling;
sstPed.cxx, sstPed.h - added new files for pedestal calculation; added pedestal handling;
src/DAQ_SFS/sfs_index.cxx - fixed retries;
src/RTS_EXAMPLE/rts_example.C - added helper functions for IST 7 SST pedestal; added FPS; added meta printouts for FPS;
pams
geometry/geometry/geometry.g - modified to replace kOnly --> konly;
defined y2013_1a, _1b, _1c, _2a, _2b, _2c geometry tags; the tags y2013_1c and y2013_2c freeze the y2013_1x and y 2013_2x geometry tags as they exist in SL14a; they are equivalent to the geometries used in y2013 data production;
geometry/pixlgeo/PsupGeo.g - added stub for pixel support;
StarVMC
Geometry/Geometry.cxx - modified to make sure that v2 cave geometry creates TPC reference system ; added option for test TpceGeo4 geometry;
Geometry/CaveGeo/CaveGeo2.xml - modified to make sure that v2 cave geometry creates TPC reference system;
Geometry/Compat/xgeometry.xml - modified to force recompelation to pickup correct y2014 definiti on; defined y2013_1a, _1b, _1c, _2a, _2b, _2c geometry tags; the tags y2013_1c and y2013_2c freeze the y2013_1x and y2013_2 x geometry tags as they exist in SL14a;
Geometry/FgtdGeo/FgtdGeo3.xml, FgtdGeoV.xml - replaced kOnly --> konly;
Geometry/IstdGeo/IstdGeo1.xml - replaced kOnly --> konly;
Geometry/PixlGeo/DtubGeo1.xml PsupGeo.xml - replaced kOnly --> konly;
PixlGeo6.xml - modified to change positions of subvolumes at the single micron level;
Geometry/TpceGeo/TpceGeo4.xml - added new TpceGeo4 module reorganized the TPC volumes; TPC padro ws moved down into a TPMV (TPAD mother volume); G10 layer and some AL supports moved into the TPMV, allowing to make a clea n separation between the active TPC gas volume and the TPC support wheel. This enables to flag the active gas volume as co mpletely non overlapping;
Geometry/macros/StarGeometryDb.C - implemented asymptotic geometries for y2010 to present use th e test TpceGeo4 geometry in AgML (e.g. y2010x). AgSTAR asymptotic geometries are unchanged ;
defined y2013_1a, _1b, _1c, _2a, _2b, _2c geometry tags ;
pixel support was taken OFF in y2013_2* geometries;
modified to ensure that inner detectors show up in all 2013 geometries where needed;
StarAgmlLib/AgBlock.cxx, AgBlock.h, StarTGeoStacker.cxx - modified to change AgBlock and stacker to permit declaration of assembly volumes;
StarAgmlViewer/StarAgmlChecker.cxx - replaced kOnly --> konly;
StarAgmlChecker.cxx, StarAgmlChecker.h - added R and Z cuts to enable simple way to plot material budget "in fron t of" detectors;
mkBudgetSet.C - added example macro for plotting material budget in front of the TPC;
StarAgmlViewer/macros/viewAgml.C - replaced kOnly --> konly;
StarDb
AgMLGeometry/Geometry.y2013_1a.C, Geometry.y2013_1b.C, Geometry.y2013_1c.C, Geometry.y2013_2a.C, Geometry.y2013_2b.C, Geometry.y2013_2c.C - added definitions for 1a, 1b, 1c, 2a, 2b, 2c geometries;
Geometry.y2010x.C - new test geometry added;
Calibrations/tpc/tpcDriftVelocity.20140215.132748.C, tpcDriftVelocity.20140215.150916.C, tpcDrif tVelocity.20140216.042002.C, tpcDriftVelocity.20140216.103202.C, tpcDriftVelocity.20140216.195307.C, tpcDriftVelocity.20140 216.224730.C, tpcDriftVelocity.20140217.014847.C, tpcDriftVelocity.20140217.040929.C, tpcDriftVelocity.20140217.084236.C, t pcDriftVelocity.20140217.113342.C, tpcDriftVelocity.20140217.142449.C, tpcDriftVelocity.20140217.160900.C, tpcDriftVelocity .20140217.203531.C, tpcDriftVelocity.20140217.230053.C, tpcDriftVelocity.20140218.010413.C, tpcDriftVelocity.20140218.03385 6.C, tpcDriftVelocity.20140218.063552.C, tpcDriftVelocity.20140218.092131.C, tpcDriftVelocity.20140218.133013.C, tpcDriftVe locity.20140218.154508.C, tpcDriftVelocity.20140218.174945.C, tpcDriftVelocity.20140218.224107.C, tpcDriftVelocity.20140219 .022051.C, tpcDriftVelocity.20140219.074415.C, tpcDriftVelocity.20140219.092332.C, tpcDriftVelocity.20140219.120531.C, tpcD riftVelocity.20140219.170855.C, tpcDriftVelocity.20140219.172943.C, tpcDriftVelocity.20140220.053153.C, tpcDriftVelocity.20 140220.120923.C, tpcDriftVelocity.20140220.143113.C, tpcDriftVelocity.20140220.155822.C, tpcDriftVelocity.20140221.035015.C - added new TPC drift velocity files;
StDb
idl/pxlHotPixels.idl - added new hot pixel table;
OnlTools
Jevp/StJevpBuilders/l4Builder.cxx, l4Builder.h - added plots for besMonitor, FixedTarget and Fix edTargetMonitor ; added tabs for RunControl; added two more plots for BesGood; added a new table for HLTGood2 trigger and three plots for the FixedTarget and FixedTargetMonitor; modified to store the paras data file in the l4evp;
tofBuilder.h, tofBuilder.cxx - added VPD mapping and trigger windows for Run 2014; updated TOFmult range and adde d two 1Ds; updated windows and plot ranges for Run14 AuAu 200;
mtdBuilder.cxx, mtdBuilder.h - updated for run 2014; modified to reads tray masks from config file;
pxlBuilder.cxx, pxlBuilder.h - updated for run 2014;
tpxBuilder.cxx, tpxBuilder.h - modified to save lasers for l4;
istBuilder.cxx, istBuilder.h - updated IST mapping table and added a new plot: ladder vs. chip;
ssdBuilder.cxx, ssdBuilder.h - first version added for SSD event builder;
Jevp/StJevpPlot/JevpPlotSet.cxx - fixed bug with tags;
Jevp/StJevpServer/JevpServer.cxx - updated indexing; fixed bug with tags;
l4HistoMother, jevpHistoMother - added new files;
WritePDFToDB.C - updated;
- February 6, 2014
new library SL14b tagged as SL14b has been created and built on SL6.4 (32bits & 64bits) and SL5.3 platforms;
default compiler on SL6.4 is gcc 4.4.7 . Library was tested and released on February 7.
Main features:
- added extra HFT dead material to y2013b geometry near east poletip;
- y2014 geometry updated with latest versions for IST & SSD;
- added HFT support structures;
- first release of new HFT codes: StPxlDbMaker, StPxlUtil ;
- OnlTools modified to add IST event builder;
- several bugs have been fixed;
Next codes have been updated:
StRoot
StAnalysisUtilities
StHistUtil.cxx - modified to add TPC histogram for monitoring gas contamination;
StBFChain
BigFullChain.h - added Pxl base makers chains;
StarClassLibrary
StParticleTable.cc - added D_star_plus (minus) --> D0 (bar) pi+ (-) 100% BR;
StarGenerator
BASE/StarPrimaryMaker.cxx - modified to set z-vertex prior to beamline retation;
Hijing1_383/StarHijing.cxx - updated for K0/K0bar;
macros/starsim.hijing.hypertriton.C - added example of macro for generating a particle (e.g. hypernucleus) and adding it to a minbias hijing event;
StarRoot
StMultiKeyMap.cxx - fixed size of stack increasing ;
StCloseFileOnTerminate.cxx - added (printed) warning when StCloseFileOnTerminate is created;
StPxlDbMaker
StPxlDb.cxx, StPxlDb.h, StPxlDbMaker.cxx, StPxlDbMaker.h - new code for Pxl DB;
StPxlUtil
StPxlConstants.h, StThinPlateSpline.cxx, StThinPlateSpline.h - new PXL code;
St_QA_Maker
QAhlist_EventQA_qa_shift.h, StQAMakerBase.cxx, StQAMakerBase.h - added TPC histograms for monitoring gas contamination;
RTS
include/rtsLog.h - added user specific log level;
include/SUNRT/ipcQLib.hh - added queue remove function;
src/rtsmakefile.def - modified to use canononical update.sh;
src/DAQ_BSMD/daq_bsmd.cxx - added hack for RD06;
src/DAQ_FGT/fgtPed.cxx, fgtPed.h - added Misc features for IST; added misc pedestal and timebin hacks;
src/DAQ_SST/daq_sst.cxx - modified to take out some checks;
daq_sst.cxx, daq_sst.h - added SST ADC reader and more checks in get_l ;
src/LOG/rtsLogUnix.c - added handling of U_;
src/RTS_EXAMPLE/rts_example.C - fixed RDO count bug for IST example;
StTpcHitMoverMaker
StTpcHitMoverMaker.cxx - modified to fill SpaceCharge info in StRunInfo;
macros/embedding/bfcMixer_Tpx.C - added chain for run 2012 pp 200GeV to process embedding data;
pams
geometry/geometry/geometry.g - added y2013b production geometry with extra HFT dead material near eastpoletip; modified y2014 first cut; reverted to CaveGeo for y2014 geometry;
sim/g2t/g2t_ist.F - updated to use local coordinates for IST g2t structures;
sim/gstar/gstar_part.g - corrected charge states for two hypernuclei; added D_star_plus (minus) --> D0(bar) pi+ (-) 100% BR;
StarVMC
Geometry/Geometry.cxx, Geometry.h - added HFT support structures ;
Geometry/Compat/xgeometry.xml - modified to force recompilation of y2013b & y2014; reverted to CaveGeo for y2014 geometry;
Geometry/IstdGeo/IstdGeo1.xml - updated for latest version of IST;
Geometry/SisdGeo/SisdGeo7.xml - updated for latest version of SSD for HFT;
Geometry/PixlGeo/PsupGeo.xml - added support for HFT; removed failed debugging attempt;
Geometry/macros/StarGeometryDb.C - modified to define y2013b production series with extra dead material in new east poletip; defined y2014 geometry first cut;
StarAgmlLib/AgMaterial.cxx - added debugging output; code will now report which module/volume is at fault when an undeclared material has been referenced;
StarDb
Calibrations/tpc/TpcAdcCorrectionB.y2014.C, tpcAltroParams.y2014.C, TpcdCharge.y2014.C, TpcdEdxCor.y2014.C, TpcDriftDistOxygen.y2014.C, tpcDriftVelocity.y2014.C, tpcGainCorrection.y201.C, tpcGasTemperature.y2014.C, tpcGas.y2014.C, TpcLengthCorrectionB.y2014.C, tpcMethaneIn.y2014.C, TpcPadCorrection.y2014.C, tpcPadGainT0B.y2014.C, TpcPhiDirection.y2014.C, tpcPressureB.y2014.C, TpcResponseSimulator.y2014.C, TpcRowQ.y2014.C, TpcSecRowB.y2014.C, tpcSlewing.y2014.C, tpcWaterOut.y2014.C, TpcZCorrectionB.y2014.C - added y2014 calibrations tables for TPC simulation (ideal);
tpcDriftVelocity.20140131.222231.C, tpcDriftVelocity.20140201.000826.C, tpcDriftVelocity.20140201.001047.C, tpcDriftVelocity.20140201.044318.C, tpcDriftVelocity.20140202.010902.C, tpcDriftVelocity.20140202.061700.C, tpcDriftVelocity.20140202.103224.C, tpcDriftVelocity.20140202.144248.C, tpcDriftVelocity.20140202.185546.C, tpcDriftVelocity.20140202.185646.C,tpcDriftVelocity.20140202.230511.C, tpcDriftVelocity.20140203.032113.C, tpcDriftVelocity.20140203.074422.C, tpcDriftVelocity.20140203.104950.C, tpcDriftVelocity.20140203.144647.C, tpcDriftVelocity.20140203.210036.C, tpcDriftVelocity.20140204.020127.C, tpcDriftVelocity.20140204.060636.C - added drift velocities files for Run 2014 cosmics;
Geometry/tpc/tpcGlobalPosition.y2014.C, TpcOuterSectorPosition.y2014.C, TpcSuperSectorPosition.y2014.C - added y2014 TPC geometry tables for simulation(ideal);
RunLog/MagFactor.y2011.C, MagFactor.y2012.C, MagFactor.y2013.C, MagFactor.y2014.C - added new files for TPC;
RunLog/onl/tpcRDOMasks.y2014.C - added new file for y2014 TPC simulation (ideal);
starClockOnl.y2013.C, starClockOnl.y2014.C - added new files as default local clock for year 2013 & 2014;
StDb
idl/pxlControl.idl, istControl.idl, istMapping.idl - added new Geometry_pxl & IST tables;
istControl.idl - added extra column;
OnlTools
Jevp/level.source - modified for IST;
Jevp/StJevpBuilders/istBuilder.cxx, istBuilder.h - added new IST event builder files;
hltBuilder.h - small modification;
Jevp/StJevpServer/JevpServer.cxx - modified for IST builder;
- April 30, 2015
SL14a library was updated with next codes needed for embedding production:
StRoot/StMiniMcMaker/StMiniMcMaker.cxx, r.1.44 - to provide correct dEdx information in MiniMc ;
StRoot/StEmbeddingUtilities/StEmbeddingQADraw.cxx, r.1.35 - to fix wrong particle name;
StRoot/macros/embedding/get_embedding_xml_rcf.pl, get_embedding_xml.pl
StarVMC/Geometry/MutdGeo/MutdGeo4.xml, MutdGeo5.xml - updated hit definition for MTD, to improve timing resolution (update was done on May 20);
Library was retagged as SL14a_2 and rebuilt on SL6.4 and SL5.3 platforms.
- May 21, 2014
library SL14a has been updated with geometry codes to defined reference geometry tags for run 2013. Library was retagged with tag SL14a_1, rebuilt on SL6.4 (32bits & 64bits) and SL5.3 platforms and tested with standard tests suite.
Next codes have been updated:
StRoot
StBFChain
BigFullChain.h, r.1.201.2.1 ;
Sti/StiDetectorBuilder.cxx, r.2.25; StiDetectorBuilder.h, r.2.20;
Sti/Star/StiStarDetectorBuilder.cxx, r.2.26; StiStarDetectorBuilder.h, r.2.7 ;
pams
geometry/geometry/geometry.g, r. 1.275;
geometry/pixlgeo/PsupGeo.g, r. 1.1 :
StarVMC
Geometry/Geometry.cxx, r. 1.46 ;
Geometry/Geometry.h, r. 1.16 ;
Geometry/CaveGeo/CaveGeo2.xml, r.1.4 ;
Geometry/Compat/xgeometry.xml, r. 1.32;
Geometry/macros/StarGeometryDb.C, r. 1.53 ;
Geometry/PixlGeo/PsupGeo.xml, r. 1.4 ;
Geometry/TpceGeo/TpceGeo4.xml, r.1.1 ;
StRoot
StChain/GeometryDbAliases.h, r.1.4 ;
StarDb
AgMLGeometry/Geometry.y2013_1b.C, Geometry.y2013_1a.C, Geometry.y2013_2c.C, Geometry.y2013_2b.C, Geometry.y2013_1c.C, Geometry.y2010x.C - all r. 1.1;
- January 16, 2014
new library SL14a tagged as SL14a has been created and built on SL6.4 (32bits & 64bits) and SL5.3 platforms;
default compiler on SL6.4 is gcc 4.4.7 . Library was tested and released on January 21.
Main features:
- implemented event filtering by trigger ID for reconstruction processing;
- added new schema for dX calculation in dEdX for large distortions in TPC for pp 500GeV, run 2013;
- added new method to calculate nSigma for fitted dE/dx; the values added in MuDst; the default values calculated using truncated mean are saved in MuDst as well;
- StPeCMaker modified to add track extrapolation to TOF for peripheral events;
- StMagUtilities.cxx/h modified to account for GG voltage errors; improved speed of data processing for Space Charge corrections;
- several bugs have been fixed;
Next codes have been updated:
StRoot
StarGenerator
macros/standalone.pythia6.C, starsim.addparticle.C, starsim.filter.C, starsim.herwig6.C, starsim.hijing.C, starsim.kinematics.C, starsim.pythia6.C, starsim.pythia8.C, starsim.starlight.C - modified to add RNG seed to example macros;
StarRoot
StMultyKeyMap.cxx, StMultyKeyMap.h - added new files; modified to speedup;
KFParticleBase.h - modified to promote fID to Int; increment class version;
StBFChain
StBFChain.cxx, StBFChain.h - introduced chain options FiltTrg* for filtering by trigger ID;
St_base
StarChairDefs.h - added MakeChairOptionalInstance2;
StBTofUtil
StV0TofCorrection.cxx, StV0TofCorrection.h - fixed memory leak; modified to switch from a custom closest-points-of-approach-finder to the StHelix::pathLengths(); added a public helper function calcM2() to calculate mass^2 after TOF correction;
StDbUtilities
StMagUtilities.cxx, StMagUtilities.h - modified to account for GG voltage error + shifts in UndoGGVoltErrorDistortion(); improved speed of data processing for Space Charge corrections by reducing calls to DB; avoided unnecessary cartesian/cylindrical coordinate conversions;
StDetectorDbMaker
StTpcSurveyC.h, St_SurveyC.h - added new rotation matrices for TPC;
St_trigDetSumsC.h - added new instance from StEvent;
StDetectorDbChairs.cxx - added new set of TPC rotation matrices (B), St_trigDetSumsC::instance constractor from StEvent; modified to move chair under top maker;
StDetectorDbMaker.cxx - modified to keep St_trigDetSumsC in .data; modified to move chair under top maker;
StdEdxY2Maker
StTpcdEdxCorrection.cxx, StdEdxY2Maker.cxx, StdEdxY2Maker.h - modified to implement new schema for dX calculation for large distortions;
StPidStatus.cxx, StPidStatus.h - new files added to implement new schema for dX calculation for large distortions;
StEvent
StTpcHit.h - added transient data members for upper and lower pad positons;
StProbPidTraits.h, StPidParticleDefinition.h - modified to take out StPidParticleDefinition in a separate h-file;
StTpcDedxPidAlgorithm.cxx - added numberOfSigma() for kLikelihoodFitId method;
StEventMaker
StEventMaker.cxx - copied trigDetSums table to StEvent; added event filtering by trigger ID (offline id) for reconstruction;
modified to move St_trigDetSumsC under the top maker for consistency with StDetectorDbMaker;
StFgtClusterMaker
StFgtSeededClusterAlgo.cxx - modified to remove unnecessary writing histos/objects, bug #2750;
StFgtRawMaker
StFgtRawMaker.cxx - updated for run 2013;
StMuDSTMaker
COMMON/StMuTrack.cxx, StMuTrack.h - added nSigma values calculated for fitted dEdx;
StPeCMaker
StPeCMaker.cxx, StPeCMaker.h - added extrapolation of tracks to TOF, StBTofGeometry and St_geant_Maker;
StPeCEvent.cxx, StPeCEvent.h - added a set method setTOFgeometry to pass pointer to StBTofGeometry;
StPeCPair.cxx, StPeCPair.h - added a input argument StBTofGeometry to fill method (StMuDst + StEvent) and x y z coordinates of intercept to TOF cylinder;
StPeCTrigger.cxx, StPeCTrigger.h - added a set method to select a trigger;
RTS
include/tasks.h, iccp.h, iccp2k.h, rtsSystems.h - updated;
src/rtsplusplus.def - updated;
src/SFS/fs.C, fs_index.cxx, fs_index.h - updated directory sizes
sfs_header.C - updated;
src/DAQ_BSMD/bsmdPed.cxx, bsmdPed.h - modified to add phase scanning support; more info in pedestal runs;
src/DAQ_FGT/daq_fgt.cxx, fgtPed.cxx, fgtPed.h - added more logging, pedestal support;
src/DAQ_PP2PP/Makefile - clean target;
src/DAQ_TPX/tpxPed.cxx - modified pedestal file comments;
StTpcHitMaker
StTpcRTSHitMaker.cxx - removed restriction that track_id >= 10000'
StTpcHitMoverMaker
StTpcHitMoverMaker.cxx, StTpcHitMoverMaker.h - modified to add transformations for Upper and Lower tpc hits postions (new dX calculation in dE/dx);
StTriggerUtilities
StTriggerSimuMaker.cxx - modified to use new database node "db04.star.bnl.gov"
StarDb
Calibrations/tracker/StvKonst.C - modified tracking volume to 220x220; set max radius before TOF;
Calibrations/tpc/tpcAnodeHVavg.y2014.C, tpcAnodeHV.y2014.C - added default TPC Anode Voltages for y2014;
TpcLengthCorrectionB.20130305.000000.C, TpcLengthCorrectionB.y2012.C, TpcLengthCorrectionB.y2013.C, TpcLengthCorrectionMDF.20130305.000013.C, TpcCurrentCorrection.20130305.000011.C, TpcDriftDistOxygen.20130305.000000.C - added new files for run 2013 TPC calibrations;
TpcAdcCorrectionB.y2012.C, TpcAdcCorrectionB.y2013.C - added default ADC corrections;
TpcDriftDistOxygen.y2012.C, TpcDriftDistOxygen.y2013.C - added default correction;
TpcPadCorrection.y2012.C, TpcPadCorrection.y2013.C, TpcPhiDirection.y2012.C, TpcPhiDirection.y2013.C,TpcResponseSimulator.y2013.C, TpcRowQ.20130305.000014.C, TpcRowQ.y2012.C, TpcRowQ.y2013.C, TpcSecRowB.20130305.000014.root, TpcSecRowB.y2012.C, TpcSecRowB.y2013.C, TpcZCorrectionB.20130305.000013.C, TpcZCorrectionB.y2012.C, TpcZCorrectionB.y2013.C, TpcdCharge.20130305.000000.C, TpcdCharge.y2012.C, TpcdCharge.y2013.C, TpcdEdxCor.20130305.000000.C, TpcdEdxCor.y2012.C, TpcdEdxCor.y2013.C, tpcAltroParams.20130305.000000.C, tpcAltroParams.y2012.C, tpcAltroParams.y2013.C, tpcDriftVelocity.20130305.000000.C, tpcDriftVelocity.y2012.C, tpcDriftVelocity.y2013.C, tpcGainCorrection.20130305.000008.C, tpcGainCorrection.y2012.C, tpcGainCorrection.y2013.C, tpcGas.20130305.000000.C, tpcGas.y2012.C tpcGas.y2013.C, tpcGasTemperature.20130305.000000.C, tpcGasTemperature.y2012.C, tpcGasTemperature.y2013.C, tpcMethaneIn.20130305.000000.C, tpcMethaneIn.y2012.C, tpcMethaneIn.y2013.C, tpcPressureB.20130305.000009.C, tpcPressureB.y2012.C, tpcPressureB.y2013.C, tpcSlewing.20130305.000000.C, tpcSlewing.y2012.C, tpcSlewing.y2013.C, tpcWaterOut.20130305.000000.C, tpcWaterOut.y2012.C, tpcWaterOut.y2013.C - added new files for run 2013 TPC data calibrations;
TpcLengthCorrectionMDF.C - modified;
StarVMC
CaveGeo2.xml - modified for better definition of concrete;
StDb
idl/Survey.idl - added comments;
tpcCorrection.idl - added description;
tpcGlobalPosition.idl - added comments;
trgOfflineFilter.idl - added new file for trigger ID filterring;
Lidia Didenko
2015
STAR SOFTWARE NEWS December 10, 2015
---------------------
The present release assignment:
             SL09g    (SL09g_4)  ROOT_LEVEL 5.22.00 run 2009 pp 500GeV data production
             SL09g_embed (SL09g_2Embed_v10) ROOT_LEVEL 5.22.00
             SL10c    (SL10c_4)  ROOT_LEVEL 5.22.00 run 2009 pp 200GeV production
             SL10c_embed (SL10c_embed_v5)  ROOT_LEVEL 5.22.00
             SL10h    (SL10h_5)  ROOT_LEVEL 5.22.00 run 2010 auau 7.7-39GeV production
             SL10h_embed (SL10h_embed_v6)  ROOT_LEVEL 5.22.00
             SL10k    (SL10k_4)  ROOT_LEVEL 5.22.00 run 2010 auau 39-200GeV production
             SL10k_embed (SL10k_embed_v11) ROOT_LEVEL 5.22.00
             SL11b    (SL11b_2)  ROOT_LEVEL 5.22.00 MC & st_W pp 500GeV, run 2009
             SL11d    (SL11d_3)  ROOT_LEVEL 5.22.00 run 2011 pp 500GeV & auau 19-200GeV production
             SL11d_embed (SL11d_embed_v6)  ROOT_LEVEL 5.22.00
             SL12a    (SL12a_2)  ROOT_LEVEL 5.22.00 pp 62GeV year 2006 reproduction
             SL12a_embed  (SL12a_embed_v3) ROOT_LEVEL 5.22.00
             SL12d    (SL12d_2)  ROOT_LEVEL 5.22.00 UU 193GeV, pp 200GeV run 2012 production
             SL12d_embed (SL12d_embed_v5) ROOT_LEVEL 5.22.00
             SL13b    (SL13b_2)  ROOT_LEVEL 5.22.00 pp 500GeV run 2012 production
             SL14a    (SL14a_2)  ROOT_LEVEL 5.34.09 pp 500GeV run 2013 production, days 76-12
             SL14g    (SL14g_3)  ROOT_LEVEL 5.34.09 pp 500GeV run 2013 production, days 129-161
             SL14h    (SL14h_1)  ROOT_LEVEL 5.34.09 AuHe3 200GeV st_hcal data run 2014 preview production
             SL14i    (SL14i_2)  ROOT_LEVEL 5.34.09 AuAu 14.6GeV run 2014 production
             SL15b    (SL15b_1)  ROOT_LEVEL 5.34.09 AuHe3 & AuAu 200GeV run 2014 preview production
       old-> SL15c    (SL15c)    ROOT_LEVEL 5.34.09 AuAu 200GeV run 2014 data production with HFT
             SL15d    (SL15d)    ROOT_LEVEL 5.34.09
       pro-> SL15e    (SL15e)    ROOT_LEVEL 5.34.09 AuAu 200GeV run 2014 st_mtd data production
             SL15e_embed  (SL15e_embed_v1) ROOT_LEVEL 5.34.09
             SL15f    (SL15f)    ROOT_LEVEL 5.34.09
             SL15g    (SL15g)    ROOT_LEVEL 5.34.09
             SL15h    (SL15h)    ROOT_LEVEL 5.34.30
             SL15i    (SL15i)    ROOT_LEVEL 5.34.30
             SL15j    (SL15j)    ROOT_LEVEL 5.34.30
             SL15k    (SL15k_1)  ROOT_LEVEL 5.34.30 pp 200GeV run 2015 st_fms & st_rp stream data production
       new-> SL15l    (SL15l)    ROOT_LEVEL 5.34.30
       dev-> DEV                 ROOT_LEVEL 5.34.30
      .dev-> .DEV                ROOT_LEVEL 5.34.30

-------------------------------------------------
Release History
SL15a library
SL15b library
SL15c library
SL15d library
SL15e library
SL15f library
SL15g library
SL15h library
SL15i library
SL15j library
SL15k library
SL15l library
- December 8, 2015
new library SL15l tagged as SL15l has been created and built on SL6.4 (32bits & 64bits );
default compiler is gcc 4.8.2 . Library was tested, found bugs fixed, library was released on December 10.
Main features:
- added new version of PYTHIA v. 6.4.28;
- StSstDaqMaker, added pedestal subtraction and CMN suppression algorithm;
- added new version of trigger structure for run 2016;
- added y2016 base geometry version for run 2016;
- few bugs fixed ;
Next codes have been updated:
StRoot
StarGenerator
macros/starsim.hijing.dalitz.C - added example macro for adding single pi0 dalitz decay to a hijing event;
StBFChain
BigFullChain.h - added Akio correction to bypass instantiation of StTpcDb maker in MakeEvent;
StChain
GeometryDbAliases.h - added y2016 geometry initial version for run2016;
StDaqLib
TRG/trgStructures2016.h - added new version of trigger structure for run 2016;
StEvent
StTriggerData2016.cxx, StTriggerData2016.h - added new files for trigger data run 2016;
StEventClusteringHints.cxx, StEventLinkDef.h - added fields for StTriggerData2016;
StFmsDbMaker
StFmsDbMaker.cxx, StFmsDbMaker.h - modified to add fmsTimeDepCorr for LED gain correction based on event number;
fixed backward compatbility; fixed logic ;
getCellPosition2015pA.cxx, getCellPosition2015pp.cxx - added missing break statement;
StFmsHitMaker
StFmsHitMaker.cxx - added extra protection against token=0 event;
StGenericVertexMaker
StFixedVertexFinder.h - added method 'IsFixed()' ;
StGenericVertexFinder.h - added method 'IsFixed()' ;
StGenericVertexMaker.cxx - added 0,0,0 fixed vertex ;
St_geant_Maker
St_geant_Maker.cxx - updated to remove unnecessary printout of number of FTS hits;
StHbtMaker
CorrFctn/MinvLikeSignCorrFctn_Minv_vs_Phi.cxx, StHbtCorrFctnDirectYlm.cxx - updated for gcc 4.8.2 compiler;
Infrastructure/StHbtParticle.cc - updated for gcc 4.8.2 compiler;
Reader/StHbtAssociationReader.cxx - updated for gcc 4.8.2 compiler;
StiMaker
StiStEventFiller.cxx - removed redundant message: 'GTrack error: mFlag is Negative' ;
StIstClusterMaker
StIstSimpleClusterAlgo.h - added destructor to comply with new compiler ;
StMCFilter
StGenParticle.cxx - removed ROOT dependences on library intended to be loaded into starsim;
StMtdQAMaker
StMtdQAMaker.cxx - modified to add a new data member: mMaxVtxDz ;
StMtdSimMaker
StMtdSimMaker.cxx - modified to insert the MC MTD hits into the MtdCollection after real hits are reconstructed ;
StMuDSTMaker
COMMON/StMuFilter.cxx, StMuFilter.h - added changable constants and FTS data;
StMuFilter.h - adjusted to new members;
StSstDaqMaker
StSstDaqMaker.cxx, StSstDaqMaker.h - added pedestal subtraction and CMN suppression algorithm;
StSstUtil
StSstWafer.cc - reverted back the cut on signal strip: using DB entry, not constants;
StSstBarrel.cc - modified, move cout to LOG_DEBUG;
StTriggerDataMaker
StTriggerDataMaker.cxx - added new trigger data for run 2016;RTS
include/daqFormats.h - updated for run 2016;
include/SUNRT/clock.h - updated;
src/DAQ_READER/daqReader.cxx - updated for run 2016;
src/DAQ_TRG/trgReader10.cxx - updated for run 2016;
trg/include/trgDataDefs.h - updated for run 2016; updated to change 'ifdef' to 'ifndef' linux;
trgDataDefs_42.h, trgDataDefs_43.h - added new files for trigger data, run 2016;pams
geometry/geometry/geometry.g - added y2016 first geometry version for run 2016;
gen/Pythia6_4_28s/pystar-6.4.22.F, pythia-6.4.28.F - added Pythia version 6.4.28 for starsim;
StarDb
AgMLGeometry/Geometry.y2016.C - added y2016 first geometry version for run 2016;StarVMC
StarAgmlLib/AgPlacement.cxx, AgPlacement.h - added support for specifying rotation matrix;
AgParameterList.h, AgTransform.cxx, AgTransform.h - added new files to support for general transformation in AgML (multiple translations / rotations per placement);
AgParameterList.cxx - added parameter list (and block, mother, group, ...) to support AgBlock, AgModule, AgShape;
StarAgmlLib/macros/TestAgTransform.C - support for general transformation in AgML ;
Geometry/Compat/xgeometry.xml - added y2016 first geometry version for run 2016;
Geometry/FtsdGeo/FtsdGeo.xml - updated active layer thickness to 0.03744cm ;
Geometry/macros/loadStarGeometry.C - added support for general transformation in AgML (multiple translations/rotations per placement);
StarGeometryDb.C - added y2016 first geometry version for run 2016;
StDb/idl/TpcAvgPowerSupply.idl - added new MySQL table;
tofTotbCorr.idl, tofZbCorr.idl, vpdTotCorr.idl - added number of used array elements;
tpcDriftVelocity.idl - updated;mgr/Dyson/Export/AgROOT.py, Mortran.py - added support for specifying rotation matrix;
OnlTools
Jevp/StJevpBuilders/ssdBuilder.cxx, ssdBuilder.h - updated online plots for Run 2016; changed the binning of onloine plots; fixed jevpplots setting bug, and removed some useless histograms;
ssdBuilder.cxx - removed global display settings; added OFFSET and keep the y-axis scale in Run 2016 the same as Run 2014 and Run 2015; fixed Y axias scale error; - November 7, 2015
SL15k library has been updated with FMS & Roman Pot codes to fix the bugs and MuDst structure. Also year 2015 geometry has been updated with corrected MTD geometry (tag y2015b).
Library was retagged with tag SL15k_1 and rebuilt on SL6.4 platform;
Next codes have been updated:
StRoot
StBFChain
BigFullChain.h - added production chain for run 2015 data with geometry option 'ry2015b';
StChain
GeometryDbAliases.h - added y2015b geometry tag with corrected MTD geometry;
StEvent
StFmsCollection.h - added 4 new inline functions;
StFmsFastSimulatorMaker
StFmsFastSimulatorMaker.cxx - adjusted debug prints;
StFmsPointMaker
StFmsPointMaker.cxx - fixed small scale differebce for small cells when converting coordinates while mMergeSmallToLarge is on;
fixed overwrting detectorId for some StFmsPoint near large/small gap when top cell in the cluster and the photon are in different detector;
StFmsPointMaker.cxx, StFmsPointMaker.h - added setScaleShowerShape() option for scaling up shower shape function for large cell;
StFmsUtil
StFmsClusterFinder.cxx, StFmsClusterFinder.h, StFmsClusterFitter.cxx, StFmsClusterFitter.h, StFmsEventClusterer.cxx, StFmsEventClusterer.h - increased max number of clusters; fixed bug in valley tower association;
fixed parameters initialization; added new cluster categorization method;
StFmsClusterFitter.cxx, StFmsClusterFitter.h, StFmsEventClusterer.cxx, StFmsEventClusterer.h - added option to scale up shower shape function for large cells;
StMuDSTMaker
COMMON/StMuRpsCollection.cxx, StMuRpsCollection.h - fixed StMuRpsCollection double writing StMuRpsTrackPoints;
fixed the 'StMuRpsTrack::type' from being always undefined, added helpher methods to StMuRpsCollection to return number of Tracks/TrackPoints;
modified StMuRpsCollection to write TrackPoints and Tracks without writing the TrackPoints more than once;
StMuFmsInfo.cxx, StMuFmsInfo.h - added StMuFmsInfo.{h,cxx} as a new branch for storing event-by-event FMS paramters;
StMuArrays.cxx, StMuArrays.h, StMuDstMaker.cxx, StMuFmsCollection.cxx, StMuFmsCollection.h, StMuFmsUtil.cxx, StMuTypes.hh - modified to adjust to adding new branch;
St_pp2pp_Maker
St_pp2pp_Maker.cxx, St_pp2pp_Maker.h - corrected a couple of bugs in readSkewParameter to read skew parameters into the mSkew_param[s][ipmt][ipar] correctly; added Rafal's latest code with multi-track algorithm; modified to use Bogdan's alignment constants;
minor addition to StRpsHit structure (mPlanesUsed variable added); corrected bug which resulted in reconstructing too many track-points (and therefore also tracks) for some particular combination of cluster multiplicity;
corrected formula for \theta_{x}, \theta_{y} and \xi to properly account for alignment parameters like e.g. tilt of the beam;
refined calculation of the z coordinate of hits;
pams
geometry/geometry/geometry.g - added y2015b production geometry tag to use latest MTD geometry;
StarVMC
Geometry/Geometry.cxx - added MutdGeo7 module with corrected radii; defined y2015b production geometry tag to use latest MTD geometry;
Geometry/Compat/xgeometry.xml - added MutdGeo7 module with corrected radii; defined y2015b production geometry tag to use latest MTD geometry;
Geometry/MutdGeo/MutdGeo7.xml - added MutdGeo7 module with corrected radii; defined y2015b production geometry tag to use latest MTD geometry;
Geometry/macros/StarGeometryDb.C - added MutdGeo7 module with corrected radii; defined y2015b production geometry tag to use latest MTD geometry;
StarDb/AgMLGeometry/Geometry.y2015b.C - adeded MutdGeo7 module with corrected radii; defined y2015b production geometry tag to use latest MTD geometry;
StDb/idl/fmsTimeDepCorr.idl - added new FMS table;
- October 23, 2015
new library SL15k tagged as SL15k has been created and built on SL6.4 (32bits & 64bits );
default compiler is gcc 4.8.2 . Library was tested, found bugs fixed, library was released on October 27.
Main features:
- further development of FMS code; initial revision of FMS point pair code;
- StEvent was updated with new files and containers for RPS tracks and points;
- St_pp2pp_Maker code updated to use StRpsTrackPoint and StRpsTrack objects;
- StMinuitVertexFinder modified to use new vertex-finding parameters ZMin, ZMax ;
- implemented initial version of dev2020 geometry tag with Forward Tracking System (prototype);
- few bugs fixed ;
Next codes have been updated:
StRoot
StChain
GeometryDbAliases.h - added dev2020 geometry tag;
StEvent
StFmsPointPair.cxx, StFmsPointPair.h - initial revision of FMS point pair; added methods x() and y();
StFmsCollection.cxx, StFmsCollection.h - added StFmsPointPair collection; added new member and methods;
StEnumerations.h - added items for StFmsDetectorId enumeration;
StEventLinkDef.h - added pragma for vector ;
StFmsPoint.cxx, StFmsPoint.h - added comments and modified print out;
StFpsSlat.h - modified to move 7 members out of the schema ;
StRpsTrack.cxx, StRpsTrack.h, StRpsTrackPoint.cxx, StRpsTrackPoint.h - added new files for RPS tracks and points ;
StContainers.cxx, StContainers.h - modified to add RPS tracks and points;
StRpsCluster.cxx, StRpsCluster.h - added mPositionRMS and accessors;
StRpsCollection.cxx, StRpsCollection.h - added containers for tracks and points;
StRpsTrack.cxx, StRpsTrack.h, StRpsTrackPoint.h - modified to change 'const' to 'enums' and related changes;
StHit.cxx, StHit.h, StMtdHit.cxx, StMtdHit.h, StTpcPixel.cxx, StTpcPixel.h, StTrack.h, StVertex.cxx, StVertex.h, StEvent.cxx - changed type of mIdTruth from 'ushort' to 'int' ;
StTrackFitTraits.h - fixed schema evolution;
StFmsDbMaker
StFmsDbMaker.cxx, StFmsDbMaker.h - added 'getStarXYZfromColumnRow()' to convert from local grid space [cell width unit, not cm];
added protection for fmsGain and fmsGainCorrection when table length get shorter and can be overwritten by old values;
added 'distanceFromEdge()' for fiducial volume cut; added 'readRecParamFromFile()';
StFmsFastSimulatorMaker
StFmsFastSimulatorMaker.cxx, StFmsFastSimulatorMaker.h - modified to use StEnumeration;
modified setFmsZS(int v) and if ADC < v, drop the hit (default=2); added poisson distribution for FPS, with setFpsNPhotonPerMIP(float v);
StFmsFastSimulatorMaker.cxx - set default for mFpsNPhotonPerMIP to 100.0;
StFmsPointMaker
StFmsPointMaker.cxx, StFmsPointMaker.h - modified to move energy sum check for killing LED tail event to whole FMS; make it not dependent on beam energy, so that it runs on simulation as well;
added 3 options to control how reconstruction works: setGlobalRefit(int v=1); setMergeSmallToLarge(int v=1); setTry1PhotonFit(int v=1);
StFmsPointMaker.cxx - fixed small scale difference for small cells when converting coordinates while mMergeSmallToLarge is on ;
StFmsHitMaker
StFmsHitMaker.cxx - changed some LOG_INFO to LOG_DEBUG;
StFmsUtil
StFmsEventClusterer.cxx - added warning if removing cluster with too many towers;
StFmsTowerCluster.cxx, StFmsTowerCluster.h - modified ;
StFmsClusterFinder.cxx, StFmsClusterFinder.h, StFmsClusterFitter.cxx, StFmsClusterFitter.h, StFmsEventClusterer.cxx, StFmsEventClusterer.h, StFmsTower.cxx, StFmsTower.h, StFmsTowerCluster.cxx, StFmsTowerCluster.h - modified to speed up code (~x2) by optimizing minimization fuctions and showershape function; added option to merge small cells to large, so that it finds cluster at border; added option to perform 1 photon fit when 2 photons fit failed; added option to turn on/off global refit; modified to get moment analysis done without ECUTOFF when no tower in cluster exceed ECUTOFF=0.5GeV ;
StFmsClusterFinder.cxx, StFmsClusterFinder.h, StFmsClusterFitter.cxx StFmsClusterFitter.h, StFmsEventClusterer.cxx - modified to increase max number of clusters; fixed bug in valley tower association ;
StGenericVertexMaker
StGenericVertexMaker.cxx - updated to make VFPPVev == VFPPV with StEvent input;
Minuit/StMinuitVertexFinder.cxx, StMinuitVertexFinder.h, St_VertexCutsC.h - modified to use new vertex-finding parameters ZMin, ZMax ;
StMtdMatchMaker
StMtdMatchMaker.cxx, StMtdMatchMaker.h - modified to remove filling trees;
StMtdQAMaker
StMtdQAMaker.cxx, StMtdQAMaker.h - added histogram for global T0 alignment calibration using primary tracks;
added mMaxVtxDz to cut on vz difference between TPC and VPD;
StMuDSTMaker
COMMON/StMuFmsCollection.h, StMuFmsPoint.h - updated for StMuFmsCollection and StMuFmsPoint;
StMuRpsTrack.cxx, StMuRpsTrack.h, StMuRpsTrackPoint.cxx, StMuRpsTrackPoint.h - added new files to handle the new pp2pp tracks;
StMuRpsCollection.cxx, StMuRpsCollection.h - updated StMuRpsCollection to copy it from StEvent version;
StPeCMaker
StPeCTrigger.cxx - added 2E trigger;
Sti
StiToolkit.h, StiTrackFinder.h - added virtual dtors to StiToolkit and StiTrackFinder to fix compilation warning;
StiTrackNode.cxx - removed Vector3 from cylCross to save cost of ctor/dtor;
StTpcRSMaker
StTpcRSMaker.cxx - added requirement for Check Plots for TTree file;
St_geant_Maker
St_geant_Maker.cxx - added HCAL preshower to readout in St_geant_Maker;
added hit definition and starsim to root interface for Forward Tracking System;
St_pp2pp_Maker
St_pp2pp_Maker.cxx, St_pp2pp_Maker.h - added 'positionRMS' to each cluster;
changed: Int_t MakeTracks(const StRpsCollection &RpsColl) -> Int_t MakeTracks( StRpsCollection &RpsColl, float blue_beamenergy, float yellow_beamenergy);
created 3 private constant pitch_4svx, pitch_4svx2 and pitch_6svx so that both MakeClusters and MakeTracks can use;
updated to set the xy position for each cluster according to Bogdan's offset scheme/constants and reading LVDT position ;
added Rafal's new code in forming StRpsTrackPoint and StRpsTrack objects;
added two functions/variables related to reading from database the AcceleratorParameters and PMTSkewConstants;
added 'mconversion_TAC_time' ;
corrected a couple bugs in readSkewParameter to read skew parameters into the mSkew_param[s][ipmt][ipar] correctly;
updated Rafal's latest code with multi-track algorithm;
modified to use Bogdan's alignment constants ;
St_pp2pp_Maker.cxx - modified to use: DB = GetDataBase("Calibrations/pp2pp/pp2ppPMTSkewConstants") instead of
DB = GetDataBase("Calibrations/pp2pp");
RTS
src/DAQ_SST/daq_sst.cxx, daq_sst.h - added the CM mode;pams
geometry/geometry/geometry.g - initial revision of dev2020 geometry tag including Forward Tracking System;
sim/g2t/g2t_hca.F, g2t_volume_id.g - g2t updated to readout preshower in HCAL;
g2t_fts.F, g2t_fts.idl - added new files for Forward Tracking System;
sim/idl/g2t_fts_hit.idl - added new file for Forward Tracking System;
g2t_track.idl - modified to add hit definition and starsim to root interface for Forward Tracking System;
StarDb
AgMLGeometry/Geometry.dev2020.C - added dev2020 geometry tag;
Calibrations/tpc/TpcLengthCorrectionB.20150131.000008.C, TpcLengthCorrectionMDF.20150131.000008.C, tpcPressureB.2 0150131.000002.C TpcRowQ.20150131.000007.C, TpcSecRowB.20150131.000007.root - added the first version of dE/dx calibrations for run 2015 pp 200GeV data;
TpcCurrentCorrection.20150131.000013.C, TpcLengthCorrectionMDF.20150131.000016.C, TpcRowQ.20150131.000015.C, TpcSecRowB.20150131.000015.root - added next verison of dE/dx calibrations for run 2015 pp 200GeV data;
Calibrations/tracker/KalmanTrackFinderParameters.y2014.C - updated tracking parameters for run 2014: allowed any 3-layer combination of HFT hits to be classified as an HFT track, otherwise hits are stripped and track is fit as TPC only;
KalmanTrackFinderParameters.y2015.C - updated tracking parameters for run 2015: allowed any 3-layer combination of HFT hits to be classified as an HFT track, otherwise hits are stripped and track is fit as TPC only;
Conditions/trg/trgTimeOffsetB.20150101.000000.C, trgTimeOffsetB.20150609.063000.C - added trigger T0 for run 2015;
StDb/idl/VertexCuts.idl - added ZMin, ZMax fields for vertex cut ;
pp2ppPMTSkewConstants.idl, pp2ppAcceleratorParameters.idl - added new Roman Pots tables;
StarVMC
Geometry/Geometry.cxx, Geometry.h - added initial revision of dev2020 geometry tag including Forward Tracking System;
Geometry/Compat/xgeometry.xml - added initial revision of dev2020 geometry tag including Forward Tracking System;
added hit definition and starsim to root interface for Forward Tracking System;
Geometry/HcalGeo/HcalGeo.xml, HcalGeo1.xml - updated for HCAL study geometry;
Geometry/FtsdGeo/FtsdGeo.xml - added Forward Tracking System prototype geometry;
added hit definition and starsim to root interface for Forward Tracking System;
implemented version 3 for Forward Tracking System: first 4 disks are at same positions as version 1; next two disks evenly spaced;
Geometry/macros/StarGeometryDb.C - added initial revision of dev2020 geometry tag including Forward Tracking System;
OnlTools
Jevp/StJevpServer/DisplayDefs.cxx, DisplayDefs.h - updated;
Jevp/StJevpPresenter/JevpGui.cxx - updated;
- September 10, 2015
new library SL15j tagged as SL15j has been created and built on SL6.4 (32bits ) and SL5.3 platforms; default compiler is gcc 4.8.2 .
Library was tested, found bugs fixed, library was released on September 1.
Main features:
- first release of StFmsPointMaker & StFmsUtil makers to process with FMS data ;
- StEvent & StMuDstMaker updated to process FMS & FPS data;
- few bugs fixed ;
Next codes have been updated:
StRoot
StarGenerator
Hijing1_383/StarHijing.cxx - modified to use an unsigned 'int' in the loop if compiler under optimization;
StarRoot
StMultyKeyMap.cxx - removed unused variables;
St_base
StObject.cxx, StObject.h - added specific copy constructor to StObject; this constructor set to zero for bit 1<<22 to fix the bug #3134;
StBFChain
BigFullChain.h - corrected options for FMS/FPS ;
StEtrFastSimMaker
StEtrFastSimMaker.h - updated to adjust to gcc 4.8.2 compiler;
StEvent
StFmsPoint.cxx, StFmsPoint.h - major updates for FMS detector;
StFmsCluster.cxx, StFmsCluster.h, StFmsCollection.cxx, StFmsCollection.h - added print out function and operator;
StFpsSlat.cxx, StFpsSlat.h - initial revision of codes for FPS slats;
StContainers.cxx, StContainers.h, StEnumerations.h, StEventTypes.h, StFmsCluster.cxx, StFmsCollection.cxx, StFmsCollection.h, StFmsPoint.cxx, StFmsPoint.h - modified due to adding StFpsSlat and interconnection between slats and points;
StFmsCollection.cxx, StFmsCollection.h, StFmsHit.cxx, StFmsPoint.cxx, StFmsPoint.h - changed in naming of data members;
StFlowAnalysisMaker
StFlowLeeYangZerosMaker.cxx - adjusted to new compiler (::isnan);
StFmsDbMaker
getCellPosition2015pA.cxx, getCellPosition2015pA.h, getCellPosition2015pp.cxx, getCellPosition2015pp.h - added new files with new functions for un-uniform grid cell positions, switched based on DB fmsPositionModel;
StFmsDbMaker.cxx, StFmsDbMaker.h - modified to use for un-uniform grid cell positions;
macros/fmsPositionModel_db.C, fms_db_ChannelGeometry_akio.C, fms_db_recpar.C, fpsChannelGeometry_db.C, fpsConstant_db.C, fpsGain_db.C, fpsMap_db.C, fpsPosition_db.C, fpsSlatId_db.C, fpsStatus_db.C, loadlib.C, table_reupload.C - added new macros to write/read DB tables for FPS;
fms_db_ChannelGeometry.C, fms_db_detectorposition.C, fms_db_fmsgain.C, fms_db_fmsgaincorr.C, fms_db_map.C, fms_db_patchpanelmap.C, fms_db_qtmap.C - modified to read/write DB tables for FPS;
StFmsHitMaker
StFmsHitMaker.cxx, StFmsHitMaker.h - added SetReadMuDst() to give options for reading back from MuDst, reading hits only and rerun clustering, or reading hit+cluster+point;
StFmsPointMaker
StFmsPointMaker.cxx, StFmsPointMaker.h - first revision of StFmsPointMaker; added readMuDst() to give options when reading back from mudst;
StFmsUtil
StFmsClusterFinder.h, StFmsClusterFitter.h, StFmsConstant.h, StFmsDbConfig.h, StFmsEventClusterer.h, StFmsFittedPhoton.h, StFmsGeometry.h, StFmsTowerCluster.h, StFmsTower.h, StFmsClusterFinder.cxx, StFmsClusterFitter.cxx, StFmsDbConfig.cxx, StFmsEventClusterer.cxx, StFmsGeometry.cxx, StFmsTowerCluster.cxx, StFmsTower.cxx - first revision of StFmsUtil code;
StFmsClusterFinder.h, StFmsClusterFitter.cxx, StFmsClusterFitter.h, StFmsConstant.h, StFmsEventClusterer.cxx, StFmsEventClusterer.h, StFmsTowerCluster.cxx, StFmsTowerCluster.h - modified to uses StFmsDbMaker to get appropriate geometry parameters;
StFmsGeometry.cxx, StFmsGeometry.h - removed StFmsGeometry class, now it will use StFmsDbMaker to get appropriate parameters;
StFpsRawHitMaker
StFpsRawHitMaker.cxx, StFpsRawHitMaker.h - modified to work with StFmsDbMaker;
StGenericVertexMaker
StiPPVertex/StPPVertexFinder.cxx - corrected print statement bemc->eemc ;
Sti
Star/StiStarDetectorBuilder.cxx - updated to avoid call of deprecated function;
StiIst
StiIstDetectorBuilder.cxx - removed unused local variable; updated doxygen;
StiPxl
StiPxlHitLoader.cxx - removed unused code's lines;
StiPxlDetectorBuilder.cxx - updated doxygen;
StiSsd
StiSstDetectorBuilder.cxx - updated doxygen;
StiSstDetectorBuilder.cxx, StiSstDetectorBuilder.h - removed empty destructor;
StJetMaker
tree/StjTreeIndex.h - changed _major and _minor compile errors;
StjTreeReader.h - modified to match changes in StjTreeIndex.h;
StMcQaMaker
StMcQaMaker.h - updated to adjust to gcc 4.8.2;
StMuDSTMaker
COMMON/StMuArrays.cxx, StMuArrays.h, StMuDstMaker.cxx, StMuDstMaker.h, StMuFmsCollection.cxx, StMuFmsCollection.h, StMuFmsHit.h, StMuFmsUtil.cxx, StMuFmsUtil.h - modified to add FMS detector data;
StMuFmsCluster.cxx, StMuFmsCluster.h, StMuFmsPoint.cxx, StMuFmsPoint.h - added new files to handle FMS MuDst data;
StPass0CalibMaker
StVertexSeedMaker.cxx - added chi and beamwidth to BLpars ntuple;
StPeCMaker
StPeCTrigger.cxx - modified to account non trigger events;
St_pp2pp_Maker
St_pp2pp_Maker.cxx, St_pp2pp_Maker.h - modified to change the orientations, skeleton to read new DB and MakeTracks(...);
StSstDaqMaker
StSstDaqMaker.h - removed unused and unimplemented class members;
RTS
include/rtsSystems.h - added STRXXX;
src/DAQ_TPX/daq_tpx.cxx, daq_tpx.h - added TPX altrobank;
StarDb
Calibrations/tpc/TpcLengthCorrectionMDF.20150520.135123.C, TpcRowQ.20150520.135122.C, TpcSecRowB.20150520.135122.root - added run 2015 dEdx calibrations for FixedTarget2015 dataset;
TpcAdcCorrectionB.y2015.C, TpcDriftDistOxygen.y2015.C, TpcLengthCorrectionB.y2015.C, TpcPadCorrection.y2015.C, TpcPhiDirection.y2015.C, TpcResponseSimulator.y2015.C, TpcRowQ.y2015.C, TpcSecRowB.y2015.C, TpcZCorrectionB.y2015.C, TpcdCharge.y2015.C, TpcdEdxCor.y2015.C, tpcAltroParams.y2015.C, tpcAnodeHV.y2015.C, tpcAnodeHVavg.y2015.C, tpcDriftVelocity.y2015.C, tpcGainCorrection.y2015.C, tpcGas.y2015.C, tpcGasTemperature.y2015.C, tpcMethaneIn.y2015.C, tpcPressureB.20150520.135122.C, tpcPressureB.y2015.C, tpcSlewing.y2015.C, tpcWaterOut.y2015.C - added new files to reset TPC pressure dependence for FixedTarget2015 dataset;
TpcAvCurrent.C, tpcDriftVelocity.20150121.180611.C - removed files;
TpcResponseSimulator.y2014.C - modified;
StDb/idl/fmsPositionModel.idl - added new table (geometry switch) for FMS;
- August 15, 2015
new library SL15i tagged as SL15i has been created and built on SL6.4 (32 bits & 64bits) and SL5.3 platforms;
default compiler on SL6.4 is gcc 4.8.2 . Library was tested, found bugs fixed, library was released on August 18.
Main features:
- new compiler gcc 4.8.2 and codes modification ;
- added new version of Pythia 6.4.28 ;
- changed the way of initialization of MTD geometry;
- StPeCMaker modified to give more flexibility in writing output for upc events ;
- few bugs fixed ;
Next codes have been updated:
asps
Simulation/starsim/atmain/agxuser.age - modified to disable building geometry via makefile;
StRoot
StAnalysisMaker
StAnalysisMaker.cxx, StAnalysisMaker.h - added messages (print out) for for Sst, Gmt, pp2pp;
StarClassLibrary
StHelix.cc - modified to replace isnan -> 'std::isnan' to satisfy C++11 standards ;
phys_constants.h, math_constants.h - added files removed from StHbtMaker;
StParticleTable.cc - updated to propagate PDG id for antideuteron;
StarGenerator
Pythia6_4_28/Pythia6.cxx, Pythia6.h, Pythia6_4_28LinkDef.h, StarPythia6.cxx, StarPythia6.h, address.F, pythia-6.4.28.F - new version of PYTHIA;
FILT/StarFilterMaker.cxx - fixed compiler warning;
StarLight/nBodyPhaseSpaceGen.cpp - modified to use 'std::isnan' for gcc 4.8.2;
UTIL/StarParticleData.cxx - fixed compile warning;
UrQMD3_3_1/StarUrQMD.cxx - fixed compiler warning;
1fluid.F - modified to declare return type for CHEM to match function declaration;
macros/starsim.pythia6.C - macro to run Pythia 6.4.28;
StStarLogger
StWsLogger.cxx - added unistd.h header where 'geteuid()' and 'gethostname()' are defined to satisfy gcc 4.8.2 compiler;
StBFChain
StBFChain.cxx - removed numbers;
StBTofSimMaker
StBTofSimMaker.cxx, StBTofSimMaker.h - modify to initialize static constants outside of class definition to comply with gcc 4.8.2 compiler;
StBTofUtil
StBTofHitCollection.h, StBTofRawHitCollection.h - removed size_t ambiguity by adding cstddef; added cstddef C++ header defining size_t type;
StTofCellCollection.h, StTofDataCollection.h, StTofHitCollection.h, StTofRawDataCollection.h, StTofSlatCollection.h - added cstddef C++ header defining size_t type to satisfy gcc 4.8.2 compiler;
StChain
StMaker.cxx - removed numbers from lsMakers;
StDaqLib
L3/L3_Reader.hh - added space between literal and identifier to satisfy gcc 4.8.2 compiler;
TRG/code2008.cxx - fixed spacing for gcc 4.8.2;
StDbLib
MysqlDb.cc - fixed warning: MYSQL_RES pointer is not supposed to be deleted by client in destructor;
StDbUtilities
StMagUtilities.cxx - modified to allow call of 'UndoDistortion()' for a (dummy) initialization;
StTpcCoordinateTransform.cc - added recalculation of padrow during transformation;
StDetectorDbMaker
StiKalmanTrackFinderParameters.h - modified to expand to 4 regions, added protection for this;
StEventUtilities
StEventHitIter.cxx, StEventHitIter.h - updated to add StEventHitIter ==> ROOT dictionary;
StFmsFastSimulatorMaker
StFmsFastSimulatorMaker.h - fixed string literal spacing for C++11 compliance ;
StFtpcClusterMaker
StFtpcClusterFinder.cc - modified to replace isnan -> 'std::isnan' to satisfy C++11 standards ;
StFtpcTrackMaker
StFtpcVertex.hh - modified to replace isnan -> 'std::isnan' to satisfy C++11 standards ;
StGammaMaker
StGammaCandidateMaker.cxx - updated to reuse variable defined in if condition part to satisfy gcc 4.8.2 compiler;
StGammaCandidate.cxx - removed unused chunk of code;
StGammaTrack.cxx, StGammaTreeMaker.cxx - added parenthesis to resolve possible ambiguity in logical expressions for gcc 4.8.2 compiler;
StIstClusterMaker
StIstClusterMaker.h - added space before and after "__DATE__" and "__TIME__" to be compiled with gcc 4.8.2;
StIstDbMaker
StIstDb.cxx, StIstDb.h - corrected style with 'astyle -s3 -p -H -A3 -k3 -O -o -y -Y -f';
StIstHitMaker
StIstHitMaker.h - added space before and after "__DATE__" and "__TIME__" to be compiled with gcc 4.8.2;
StIstRawHitMaker
StIstRawHitMaker.h - added space before and after "__DATE__" and "__TIME__" to be compiled with gcc 4.8.2;
StIstRawHitMaker.cxx - corrected style with 'astyle -s3 -p -H -A3 -k3 -O -o -y -Y -f'; removed unused variable;
StIstSimMaker
StIstFastSimMaker.h - added space before and after "__DATE__" and "__TIME__" to be compiled with gcc 4.8.2;
StIstFastSimMaker.cxx - modified to use by default geometry tables from StIstDb instead of building ideal geometry; added useful debug level messages; minor changes in output messages;
StIstFastSimMaker.cxx, StIstFastSimMaker.h - corrected style with 'astyle -s3 -p -H -A3 -k3 -O -o -y -Y -f';
StIstUtil
StIstCluster.cxx - corrected style with 'astyle -s3 -p -H -A3 -k3 -O -o -y -Y -f';
Sti
StiDetectorContainer.h - empty method 'clear()' added ;
StiDetectorBuilder.cxx - methods 'SaveGeometry()' and 'Print()' implemented; in method 'Built()' added saving all the volumes in StiDetectorVolume format; method operator<<(ostream& os, const DetectorMapPair & detMapEntry) implemented ;
StiDetectorBuilder.h - added added methods Print() & SaveGeometry; the last one saves Sti geometry in the form of StiDetectorVolume for visualization;
StiKNNSeedFinder.h, StiKNNSeedFinder.cxx - added interface for KNN seed finder from Stv;
StiKNNSeedFinder.h - added non empty 'clear()';
StiKNNSeedFinder.cxx - added 'Clear()' & 'clear()' methods ;
StiKalmanTrackFinder.cxx - cleanup mess of 'reset()' and 'clear()' methods ;
StiMapUtilities.cxx - modified to put back assert for hit usage;
StiTrackNode.cxx - removed non used array;
StiTrackFinder.h - added 'FeedBack()' method for debugging only;
StiKalmanTrackFinder.cxx - added call to 'FeedBack()';
StiElossCalculator.cxx, StiKalmanTrackNode.cxx - replaced isnan -> 'std::isnan' to resolve ambiguity for isnan in gcc 4.8.2 compiler; also switched to standard c++ header;
StiMasterHitLoader.h - added 'this ->' to templated base class method to help gcc 4.8.2 to resolve the dependent name;
StiMaker
StiMaker.cxx - cleanup mess of 'reset()' and 'clear()' methods ;
StiDefaultToolkit.cxx - added StiKNNSeedFinder ;
StiUtilities
StiPullEvent.cxx - cleanup;
StMiniMcMaker
StMiniMcMaker.cxx - added 'std::isnan' to resolve ambiguity for isnan with gcc 4.8.2 compiler;
removed defined but not unused local typedefs;
StMcEvent
StMcMtdHit.cc - fixed BUG in the code which hid the path length; the line declaring kNCell was terminated with a comma (,) not a semi-colon (;), which means that mPathLength was declared as a local, const static variable, rather than setting the member variable in the class;
StMcEtrHit.cc - fixed bug in StMcEtrHit; was returning an uninitialized variable (iLayer) but the variable ilayer should be returned instead;
StMcHit.cc, StMcPxlSectorHitCollection.cc, StMcTrack.cc - fixed compiler warning;
StMtdEvtFilterMaker
StMtdEvtFilterMaker.h, StMtdTrackingMaskMaker.h - added space between user-defined and string literals required by gcc 4.8.2 compiler;
StMtdMatchMaker
StMtdMatchMaker.cxx, StMtdMatchMaker.h - added the distance along radius to the calculation of the distance between a MTD hit and a projected track position;
StMtdSimMaker
StMtdSimMaker.cxx, StMtdSimMaker.h - modified to initialize static constants outside of class definition to comply with gcc 4.8.2 compiler;
StMtdUtil
StMtdConstants.h - added the constant difference in radius between adjacent modules;
StMtdGeometry.cxx, StMtdGeometry.h - remove calling a macro in Init() to create geometry, It should be done within the maker that uses this utility class;
added the TGeoManager parameter to the default constructor to force the existance of the geometry when using this utility class ;
modified to simplify the code for getting the pointer to the magnetic field;
modified to initialize static constants outside of class definition to satisfy gcc 4.8.2 compiler;
StMtdGeometry.cxx - added class scope to static members;
StPass0CalibMaker
StEvtTrigDetSumsMaker.cxx - modified ;
StSpaceChargeEbyEMaker.cxx - modified to use an initialization call for StMagUtilities for each event;
StPeCMaker
StPeCGeant.cxx, StPeCGeant.h - added StMuMcVertex information and calculate invariant mass only for pion pairs;
StPeCMaker.cxx - added choice to skip writting the tree to output file and added summary histograms;
StPeCMaker.h - added flag to suppress tree to output and include summary histograms;
StPeCEvent.cxx, StPeCEvent.h - modified to remove RP container copy to output;
StPeCPair.cxx - modified to stop extrapolation to TOF, now copy information from StMuBTofPidTraits;
StPeCTrigger.cxx - added trigger for pA part of run 15;
doMuEvent_picoFromEmbedding.C - added macro to produce UPC pico dsts from embedding MuDst;
StSecondaryVertexMaker
StKinkMaker.cxx, StV0FinderMaker.cxx - modified to replace isnan -> 'std::isnan' to satisfy C++11 standards ;
StSsdDbMaker
StSstDbMaker.cxx, StSstDbMaker.h - modified 'getSstDimensions()' to return the table data, not the structure;
StSsdSimulationMaker
StSsdEmbeddingMaker.cxx, St_sls_Maker.cxx - removed unused local variables ;
StSsdPointMaker
StSsdPointMaker.cxx - removed unused local variables;
StSsdUtil
StSpaListNoise.cc, StSsdBarrel.cc, StSsdWafer.cc, StSstWafer.cc - removed unused local variables ;
StStrangeMuDstMaker
StStrangeMuDstPlayer.cxx, StStrangeMuDstPlayer.h - removed references to topoMapFixer;
StSvtSimulationMaker
StSvtSignal.cc - added 'std::isnan' to resolve ambiguity for gcc 4.8.2 compiler;
StTpcRSMaker
StTpcRSMaker.cxx, StTpcRSMaker.h, TpcRS.C - cleaned up __PAD_BLOCK__; recalculated no. of real hits in g2t_track n_tpc_hit (exc luding pseudo pad row); added current and accumulated charge in dE/dx correction ;
StTpcRSMaker.h - fixed cvs message;
StUtilities
StMultiH2F.cxx - fixed minor bug with 'SavePrimitive';
StMessTypeList.h - modified to include stdlib to get size_t;
RTS
EventTracker/FtfGeneral.h - removed local preprocessor macros for min and max; modified to use standard c++ te mplated functions std::min and std::max ;
eventTracker.cxx - removed unused variables ;
gl3Event.cxx - moved variable definition to the place where it is initialized;
include/RC_Config.h - updated;
src/DAQ_FGT/fgtPed.cxx, fgtPed.h - added some pedestal variables;
src/DAQ_READER/daqReader.cxx - removed unused variables;
pams
sim/gstar/gstar_part.g - updated to propagate a PDG id for antideuteron;StarVMC
Geometry/MutdGeo/MutdGeo5.xml - modified to improve timing and energy resolution of MTD;
GeoTestMaker/GeoTestMaker.h, StMCConstructGeometry.cxx - fixed __DATE__ ;
StarAgmlChecker/StarAgmlChecker.cxx, StarAgmlChecker.h - removed unused variable; made 'dtor' virtual;
StarAgmlViewer/StarAgmlViewer.cxx- fixed compiler warning; removed unused x ;
StarBASE/StarBASE.h - fixed __DATE__ ;
StarVMCApplication/StarMCHits.cxx - improved const-ness; removed unused structure;
StVMCMaker/TGeoDrawHelper.cxx - modified to switch to double so as not to hide method on base class;
StDb
idl/HitError.idl - added comments;
OnlTools
Jevp/StJevpBuilders/istBuilder.cxx, istBuilder.h - modify to initialize static constants outside of class definition to satisfy gcc 4.8.2 compiler ;
StOnlineDisplay/StDataReadModule.h, StEvpReader.h, StSteeringModule.h - added space between user-defined and string literals to satisfy gcc 4.8.2 compiler;
gl3Data.cxx - modified to resolve function by explicit call to std::min to satisfy gcc 4.8.2 compiler;
- August 10, 2015
SL15h library was updated with codes below to provide y2015a production geometry version for run 2015 calibration production. Updated codes have been retagged with the same tag SL15h .
Next codes have been updated:
StRoot
StBFChain
BigFullChain.h - added bfc options with y2015a production geometry;
StChain
GeometryDbAliases.h - updated to load y2015a geometry when it is required, not y2015;
StarVMC/Geometry/MutdGeo/
MutdGeo5.xml - modified to improve timing and energy resolution of MTD;
- July 22, 2015
new library SL15h tagged as SL15h has been created and built on SL6.4 (32bits ) and SL5.3 platforms;
default compiler on SL6.4 is gcc 4.4.7 . Library was tested, found bugs fixed, library was released on July 23.
Main features:
- new ROOT 5.34.30 version;
- few codes modifications to adjust to new ROOT version;
- added y2015a production geometry;
- added StiSstHitLoader and QA plots for SST detector;
- removed next makers: StHbtMaker, StFlowMaker, StPidAmpMaker, StFlowAnalysisMaker, StStrangeMuDstMaker because there are no person to support them but needed an updates due to necessary adjustment to new ROOT version ;
Next codes have been updated:
StRoot
StBFChain
BigFullChain.h - Hbt, Flow and derivative chain options made obsolete because StHbtMaker are not supported by anyone but need update to make it consistent with new ROOT version;
StChain
GeometryDbAliases.h - added y2015a production geometry, initial release;
StEEmcUtil
StEEmcSmd/EEmcSmdGeom.cxx - fixed wrong initialization of TVector3;
StMuDSTMaker
StMuDSTMakerLinkDef.h - commented out pragma;
StMuEvent.h - modified to adjust missing includes from the removed makers;
StiSsd
StiSstHitLoader.h, StiSstHitLoader.cxx - added SstHitLoader to load SST hits ; straight copy of StiSsdHitLoader;
StiSstDetectorGroup.cx - modified to change call to StiSstHitLoader;
StSstPointMaker
StSstPointMaker.h - inserted blank to to satisfy C++11 standards ;
StSstUtil
StSpaNoise.hh, StSstClusterControl.cxx, StSstClusterList.cc, StSstConfig.hh, StSstDynamicControl.cxx, StSstLadder.cc, StSstPackage.cc, StSstStripList.cc, StSstWafer.cc - updated to include headers with path to submodule;
StSstBarrel.cc, StSstBarrel.hh, StSstWafer.hh - removed obsolete libraries : ssdConfiguration, ssdDimensions, ssdWafersPosition ; fixed static StSstBarrel name;
StSstLadder.cc, StSstBarrel.cc - removed unused variable;
StSstWafer.cc, StSstWafer.hh - removed unused variable; Int_t doLorentzShiftSide moved to void();
St_QA_Maker
StEventQAMaker.cxx, StEventQAMaker.h, StQABookHist.cxx, StQABookHist.h, StQAMakerBase.cxx, StQAMakerBase.h - modified to copy SSD to SST; HFT histogams now use SST;
StEventQAMaker.cxx - modified to replace isnan => std::isnan to satisfy C++11 standards ;pams
geometry/geometry/geometry.g - added y2015a production geometry, initial release;
StarDb
AgMLGeometry/Geometry.y2015a.C - added y2015a production geometry, initial release;
StarVMC
geant3/TGeant3/TGeant3.h, TGeant3TGeo.h - added stubs to TGeant3 (etc...) to handle additional pure virtua l functions added to the base class in latest ROOT;
Geometry/Geometry.cxx - added y2015a production geometry, initial release;
Geometry/FpdmGeo/FpdmGeo4.xml - added y2015a production geometry, initial release;
Geometry/Compat/xgeometry.xml - added y2015a production geometry, initial release;
Geometry/macros/StarGeometryDb.C - added y2015a production geometry, initial release;
- June 24, 2015
new library SL15g tagged as SL15g has been created and built on SL6.4 (32bits ) and SL5.3 platforms;
default compiler on SL6.4 is gcc 4.4.7 .Library was tested with standard test suite, found bugs fixed, and library was released on July 14.
Main features:
- first revision of StSstDaqMaker, SST daq reader code;
- first revision of StSstUtil & StSstPointMaker created from SSD code and reshaped to support SST;
- added FTBF version of HCAL setup;
- few bugs fixed ;
Next codes have been updated:
StRoot
StarClassLibrary
StParticleTable.cc - modified to correct mapping between G3 id and pdg id; the G3 is the key and must be unique;
JPsi (id=168, dimuon channel) added to particle table;
StH0Strangelet.cc, StH0Strangelet.hh - added new files to support H0 dibaryon;
StarGenerator/BASE
BASE/StarPrimaryMaker.cxx, StarPrimaryMaker.h - minor bug fixed to enable cut on max rapidity of particles; added z-vertex cut, with wide default;
Hijing1_383/StarHijing.cxx - set default to store full particle record; fixed mother-daughter relationship tracking; assert statement added to verify that mother particle created before daughters;
modified hijing examples to show proper configuration syntax/work around CINT limitation with respect to returning references; added few configuration common blocks as TTables in generator makers;
Hijing1_383LinkDef.h - added new file to expose commons to CINT;
Hijing.cxx, Hijing.h, StarHijing.cxx, StarHijing.h - added access to lund compressed particle codes (KC); restored default particle decays mistakenly switched off ;
Pythia6_4_23/Pythia6.h, StarPythia6.cxx - modified hijing examples to show proper configuration syntax/work around CINT limitation with respect to returning references; added few configuration common blocks as TTables in generator makers;
macros/starsim.hijing.C, starsim.hijing.D0.C, starsim.hijing.hypertriton.C, starsim.hijing.pHe3.C - modified hijing examples to show proper configuration syntax/work around CINT limitation with respect to returning references; added few configuration common blocks as TTables in generator makers;
starsim.hijing.C - added access to lund compressed particle codes (KC); restored default particle decays mistakenly switched off;
StBFChain
BigFullChain.h, StBFChain.cxx - added multiple options to support SST;
StBFChain.cxx - corrected logic for for blacklisting;
StDbLib
StDbTable.cc - fixed char type: null-terminator assignment;
St_geant_Maker
St_geant_Maker.cxx - added hits for FTBF version of HCAL;
StMtdSimMaker
StMtdSimMaker.cxx, StMtdSimMaker.h - added data member mWriteHisto to control the output of histograms;
StBTofSimMaker
StBTofSimMaker.cxx - updated to enable MC hits in embedding;
StSstDaqMaker
StSstDaqMaker.cxx, StSstDaqMaker.h - first revision of SST daq reader code;
StSsdDbMaker
StSstDbMaker.cxx, StSstDbMaker.h - modified to move to SST tables;
StSstPointMaker
StSstPointMaker.cxx, StSstPointMaker.h - first revision of SstPointMaker code created from SSD code and reshaped;
StSstUtil
StSpaListNoise.hh, StSpaNoise.hh, StSstBarrel.hh, StSstClusterControl.h, StSstCluster.hh, StSstClusterList.hh, StSstConfig.hh, StSstConsts.h, StSstDynamicControl.h, StSstLadder.hh, StSstPackage.hh, StSstPackageList.hh, StSstPoint.hh, StSstPointList.hh, StSstStrip.hh, StSstStripList.hh, StSstWafer.hh, StSpaListNoise.cc, StSpaNoise.cc, StSstBarrel.cc, StSstCluster.cc, StSstClusterControl.cxx, StSstClusterList.cc, StSstConfig.cc, StSstDynamicControl.cxx, StSstLadder.cc, StSstPackage.cc, StSstPackageList.cc, StSstPoint.cc, StSstPointList.cc, StSstStrip.cc, StSstStripList.cc, StSstWafer.cc - first reversion of SST code created from the SSD code and reshaped;
pams
geometry/geometry/geometry.g - enabled secondary tracking (hit association) for PIXEL and FGT ;
sim/g2t/g2t_hca.F - added readout for FTBF version of the HCAL test module;
added HCAL test configuration;
sim/gstar/gstar_part.g - added H0 strangelet (m=2210 MeV) with 100% BR to Sigma- proton ;
StarVMC
Geometry/Geometry.cxx - added configuration of HcalGeoF module;
Geometry/Compat/xgeometry.xml - enabled secondary tracking (hit association) for PIXEL and FGT;
added HCAL test configuration;
Geometry/HcalGeo/HcalGeoF.xml - added FTBF version of HCAL setup; updated with active material for BBC and Ledg;
Geometry/macros/StarGeometryDb.C - added configuration of HcalGeoF module;
StDb
idl/spaceChargeCor.idl - fixed for comments;
- May 28, 2015
new library SL15f tagged as SL15f has been created and built on SL6.4 (32bits ) and SL5.3 platforms;
default compiler on SL6.4 is gcc 4.4.7 .Library was tested and released on May 29.
Main features:
- initial revision of SST hits collection and SST interfaces in StEvent;
- added new constructors for setting local hit positions, modified existing constructors in StEvent/StPxlHit ; StPxlHitMaker and StPxlUtil modified accordingly to changes in StEvent;
- added new DB domain for SST detector and final set of SST tables;
- implemented StarGenEventReader code as a root-file event reader which can be used to push previously generated events into the simulation;
- codes cleanup as preparation for c++11 compiling standards, few bugs fixed;
Next codes have been updated:
asps
rexe/TGeant3/TGiant3.cxx - fixed typo in obscure, unused method;
StarClassLibrary
PhysicalConstants.h - removed warning;
StarGenerator
BASE/StarPrimaryMaker.cxx, StarPrimaryMaker.h - added LOG_INFO when kinematic cuts are changed from default;
StarGenerator.cxx, StarGenerator.h - modified to add a root-file event reader, which can be used to push previously generated events into the simulation;
Pythia6_4_23/Pythia6.cxx, Pythia6.h, StarPythia6.h - added access to py1ent and pycomp subroutines, and set access to common blocks through static member functions;
StarGenEventReader/StarGenEventReader.cxx, StarGenEventReader.h - added a root-file event reader, which can be used to push previously generated events into the simulation;
macros/starsim.reader.C - modified to add a root-file event reader, which can be used to push previously generated events into the simulation;
StarRoot
TRArray.cxx - removed senseless 'if' statement ;
StMultiKeyMap.cxx, StMultyKeyMap.cxx, THelixTrack.cxx, TTreeIter.cxx - fixed syntax noted by CheckCpp;
TRVector.cxx - fixed bug and removed 'Assert' ;
StAssociationMaker
EMC/StEmcAssociationMaker.cxx - updated an error in if-statement syntax;
StBFChain
BigFullChain.h - added 'geant3vmc' option, which loads the VMC library early and suppresses xgeometry ;
St_base
StTree.cxx, StTree.h - slightly modified logic, added braces into logical expressions;
StChain
StRtsTable.cxx - fixed clumsy cast, adjusted to new gcc, bug #3108 ;
StDbLib
StDbDefs.hh, StDbManagerImpl.cc - added new db domain: SST;
StDbModifier.cxx - modified to deallocate memory in destructor of StDbModifier; cleanup;
MysqlDb.cc - redundant pointer check removed; fixed false positive uninitialized use of memory;
StDbSql.cc - modified to assign zero to the pointer after 'delete';
StDbXmlReader.cc - fixed small memory leak;
StDbXmlWriter.cc, StHyperLock.cpp, StHyperLock.h - fixed type issue;
MysqlDb.cc, StDbModifier.cxx - proper 'delete' added before overwrite;
StDbBuffer.h - fixed unused internal pseudotype access considered as array out of bounds access;
StHyperUtilFilesystem.cpp - fixed dangerous use of strncopy;
StHyperCacheManager.cpp - fixed for uninitialized memory warning;
StDbBroker
DbRead.cxx, StDbBroker.cxx - fixed small memory leak and type conversion warnings;
StDbBroker.cxx- modified to avoid memleak by moving check to the entrance of the function;
St_db_Maker
St_db_Maker.cxx - fixed bug #3101; removed old commented code;
StEvent
StEventTypes.h - added SST;
StSstHit.cxx, StSstHit.h, StSstHitCollection.cxx, StSstHitCollection.h, StSstLadderHitCollection.cxx, StSstLadderHitCollection.h, StSstWaferHitCollection.cxx, StSstWaferHitCollection.h - initial revision of SST hits collection;
StContainers.cxx, StContainers.h, StDetectorDefinitions.h, StDetectorName.cxx, StDetectorName.h, StEnumerations.h, StEvent.cxx, StEvent.h, StEventClusteringHints.cxx, StEventScavenger.h, StTrackFitTraits.cxx, StTrackFitTraits.h, StTrack.cxx, StTrack.h - added hooks and interfaces for SST detector;
StPxlHit.cxx, StPxlHit.h - added new constructors for setting local hit position; made proper initialization of all data member; modified existing constructor, new getter and setter for local hit coordinates;
StSstHit.cxx, StSstHit.h - ahanged 'mADC' from int to unsigned short;
StL3EventSummary.cxx - fixed nonsense if() statement in constructor;
StTrackDetectorInfo.h, StTrackDetectorInfo.cxx - added IST & PXL;
StEnumerations.cxx - modified to make method 'detectorIdByName' more flexible;
StTriggerData.cxx, StTriggerData2004.cxx - corrected logic in 'if' statement;
StEventUtilities
StEventHitIter.cxx - added IST & PXL;
StFgtUtil
geometry/StFgtGeom.cxx - fixed memory leak;
StFtpcTrackMaker
StFtpcDisplay.cc - fixed memory leak;
StIstClusterMaker
StIstSimpleClusterAlgo.cxx - bug #3102 fixed; change type: unsigned char maxTb = -1 to char maxTb = -1 ;
StIstClusterMaker.cxx, StIstClusterMaker.h, StIstIClusterAlgo.h, StIstSimpleClusterAlgo.cxx - modified to set default value of unsigned variables in a more explicit way ;
StIstScanClusterAlgo.cxx, StIstSimpleClusterAlgo.cxx - removed a priori true condition without changing the logic;
StIstSimMaker
StIstFastSimMaker.h - default of random seed changed to false;
StIstUtil
StIstCollection.cxx, StIstCollection.h, StIstConsts.h - modified to change type for the number of time bins for consistency and to avoid explicit type conversions ;
StMcEvent
StMcPxlHit.hh - changed return uchar ==> int ;
StMuDSTMaker
COMMONStMuEvent.h - fixed class version for added class 'mNHitsHFT';
StPass0CalibMaker
StEvtVtxSeedMaker.cxx, StMuDstVtxSeedMaker.cxx, StVertexSeedMaker.cxx, StVertexSeedMaker.h - added z position of VPD vertex; code cleanup in preparation for C++11;
updated to include prompt hits and post-crossing tracks, simplified detmap packing;
StSpaceChargeEbyEMaker.cxx - fixed incorrect memset usage, bug #3093);
StMuDstVtxSeedMaker.cxx, StVertexSeedMaker.h - updated to use HFT hits; modified to make more rapid chi2 convergence; modified make Ntuples attached to files not to be deleted;
StSpaceChargeEbyEMaker.cxx, StSpaceChargeEbyEMaker.h - added more vertex selection criteria: PCT daughters, and VPD Z agreement;
StPxlDbMaker
StPxlDb.cxx - modified to set name of resulting matrix after copying from a temporary matrix object;
StPxlHitMaker
StPxlHitMaker.cxx - updated hit's Y coordinate only when hit is identified as coming from real data otherwise do nothing; modified to streamline creation of PXL hits by making use of StPxlUtil/StPxlDigiHit;
StPxlHitMaker.cxx, StPxlHitMaker.h - removed unused members and local variables, these values are set now internaly in the new version of StEvent/StPxlHit ;
StPxlSimMaker
StPxlFastSim.cxx, StPxlISim.h - modified to switch to using constants from 'StPxlUtil';
StPxlFastSim.cxx - modified to streamline creation of PXL hits by making use of StPxlUtil/StPxlDigiHit;
StPxlUtil
StPxlConstants.h - modified to defined dimensional constants for PXL sensitive sensor area; modified to move the constants into the namespace and get rid of those defined in the global space;
StPxlDigiHit.cxx, StPxlDigiHit.h - new files created for helper to manipulate local hit position in StPxlHit;
StStarLogger
MySQLAppender.cxx - fixed bug in macro expansion;
StSsdDbMaker
StSstDbMaker.h - added space around literals to make g++ compiler (4.8.2) happy;
StSsdPointMaker
StSsdPointMaker.cxx -possible infinite loop fixed ; fixed memory leak, bug #3105; fixed arrayIndex out of bounds;
Sti
StiTrackNodeHelper.cxx - fixed bug #3096 , missing break;
StiRnD
Hft/StiPixelDetectorBuilder.h - fixed bug #3094;
StTreeMaker
StTreeMaker.cxx - added braces in logical expressions, fixed bug #3095;
StTpcDb
StTpcDb.cxx - removed duplicated line;
StTpcDbMaker.cxx - fixed array out of bound; comment out tpcGlobalPosition field dependence;
StUtilities
StMessageManager.cxx - fixed memory leak: unnecessary char array in FindMessageList() ;
StMultiH1F.cxx - modified to set min/maxima;
RTS
src/DAQ_FPS/daq_fps.h - removed unnecessary structures and defines;
src/DAQ_PP2PP/daq_pp2pp.cxx - fixed memory leak in pedrms;
src/DAQ_TPX/tpxGain.cxx - fixed small fopen leak;
tpxPed.cxx - modified to add more special pedestal test features;
src/SFS/fs_index.cxx - fixed possible memory leak;
sfs_index.cxx - fixed small memory leak;
pams
geometry/geometry/geometry.g - corrected configuration error in VPD in y2015/agml/agstar geometry; implemented an extra flag to handle call the right geometry module;
updated to associate hits on secondary tracks to the global track, not the primary track which initiates decay/shower, bug #3092;
StarDb
Calibrations/tpc/TpcLengthCorrectionB.20120515.120002.C, TpcLengthCorrectionMDF.20120515.120002.C, TpcRowQ.20120515.120001.C, TpcSecRowB.20120515.120001.root - added preliminary dE/dx calibrations for cuAu 200GeV run 2012;
Geometry/tpc/tpcGlobalPosition.y2015.C, TpcOuterSectorPosition.y2015.C, TpcSuperSectorPosition.y2015 .C, tpcPadPlanes.devTY.C - added new files for ideal year 2015 geometry;
StarVMC
StarVMCApplication/St_g2t_Chair.cxx - commented out BEMC/EEMC calorimeter hit codes, it was not used in production;
Geometry/Compat/xgeometry.xml - corrected configuration error in VPD in y2015/agml/agstar geometry; implemented an extra flag to handle call the right geometry module;
updated to associate hits on secondary tracks to the global track, not the primary track which initiates decay/shower, bug #3092;
StDb
idl/sstMaskChip.idl, sstStripCalib.idl, sstWafersPosition.idl - added final set of SST tables;
fpsStatus.idl - added new FPS status table;
OnlTools
Jevp/StJevpPresenter/EvpMain.cxx - modified;
zdc_smd.h - removed;
- May 4, 2015
all codes tagged with SL15c tag have been checked out in new area and updated with MTD event filtering codes and related changes necessary to proceed with MTD run 2014 production.
Also some fixes needed to embedding production have been added to the library, see below for list of updates;
New library has been retagged as SL15e and built on SL6.4 (32bits ) and SL5.3 platforms;
default compiler on SL6.4 is gcc 4.4.7 .Library was tested and released on May 5.
Main features:
- further development of MTD code for events filtering ;
- modification to StHelix to change the minimum step size and provide better precision for D0 reconstrution;
- corrected dEdx information in MiniMc needed for embedding;
Next codes have been updated:
StRoot
StarClassLibrary
StHelix.cc, StHelix.hh - added two default argument to dca of two helices for HFT which gives users the option to change the minStepSize and the search range of 'StHelix::pathLengths(StHelix&)';
StarRoot/
THelixTrack.cxx, THelixTrack.h - modified to change the minimum step size in two helices, number of iterations, now point nearest to two helices calculated iteratively by two strait lines;
StBFChain
BigFullChain.h - added basic chain for pAu run 2015 fastoffline; introduced 'mtdFilt' option for MTD events filtering;
StBFChain.cxx - updated for prepasses before implementations of StTagFilterMaker, changed tags.root => pretags.root;
StDbLib
StDbServiceBroker.cxx - modified to throttle LB connections activity if 3+ good hosts found;
St_db_Maker
St_db_Maker.cxx, St_db_Maker.h - modified to handle dynamic DB disconnects, keep connection if less than 30 sec passed since last data retrieval;
StEmbeddingUtilities
StEmbeddingQADraw.cxx - fixed wrong particle name in ::getParticleName();
StEvent
StMtdHeader.cxx, StMtdHeader.h - added data member 'mTpcSectorMask' and 'mShouldHaveRejectEvent';
StMiniMcMaker
StMiniMcMaker.cxx - the default dEdx method in StMuDSTmaker has been changed from 'kTruncatedMeanId' to 'kLikelihoodFitId'; with 'kTruncatedMeanId' we are using only 70% of available dE/dx measurements and this is reflected in nHitsDedx; with 'kLikelihoodFitId' all available dE/dx measurements will be used;
StMtdEvtFilterMaker
StMtdTrackingMaskMaker.cxx - added print-out in reconstruction;
StMtdEvtFilterMaker.cxx, StMtdEvtFilterMaker.h - modified to remove dz and pTlead cuts in the filtering by default;
changed the number scheme for 'shouldHaveRejectEvent()';
StMtdHitMaker
StMtdHitMaker.cxx - modified to fill the two new data members 'mShouldHaveRejectEvent' and 'mTpcSectorMask' in MTD header for MTD event filtering;
updated to use 'AddData()' to pass the information from event filtering stage;
StMtdMatchMaker
StMtdMatchMaker.cxx, StMtdMatchMaker.h - added a member function 'cleanUpMtdPidTraits()' to clean up the MTD pidTraits for all global and primary tracks before the matching process. This is needed when running MuDst in afterburner mode;
StMtdMatchMaker.cxx - fixed the geometry of shifted backleg 8 and 24;
StMtdUtil
StMtdGeometry.cxx, StMtdGeometry.h - fixed the geometry of shifted backleg 8 and 24;
StMuDSTMaker
COMMON/StMuMtdHeader.cxx, StMuMtdHeader.h - 'StMuMtdHeader.{h,cxx}' modified to add two new data members to 'StMtdHeader' and 'StMuMtdHeader' to save the information from the two-pass reconstruction that will be used for Run14;StDb
idl/mtdEventFilterCuts.idl, mtdQTSlewingCorr.idl - added new MTD tables;
StarVMC
Geometry/MutdGeo/MutdGeo4.xml - updated hit definition for MTD, to improve timing resolution;
- April 13, 2015
new library SL15d tagged as SL15d has been created and built on SL6.4 (32bits ) and SL5.3 platforms;
default compiler on SL6.4 is gcc 4.4.7 .Library was tested and released on April 15.
Main features:
- initial revision of StFpsRawHitMaker, FPS reader for raw data;
- initial revision of StMtdEvtFilterMaker for filtering of MTD data;
- implemented new PYTHIA 8.1.86 version of Decayer;
- OnlTools: FMS & IST event builder updated for run 2015;
- several bugs fixed;
Next codes have been updated: >br>
StRoot
StarGenerator
Pythia8_1_86/ StarPythia8Decayer.h, StarPythia8Decayer.cxx - added first working version of Pythia 8.1.86 Decayer;
StBFChain
BigFullChain.h - added 'fpsDat' option to process with FPS raw data;
added options 'mtdEvtFilt' & 'mtdTrkMask' to process MTD events filtering;
moved 'MtdTrackingMask' before TPC, and include MTD dependence on MuDst libs;
StEmcSimulatorMaker
StEmcSimulatorMaker.cxx - removed 'delete' which crashed running bfc.C;
StEvent
StEnumerations.cxx - added new implementation of detectorNameById(StDetectorId id) for automated update of new detector id;
added 'break' when file is found in detectorIdInit();
StFpsRawHitMaker
StFpsRawHitMaker.cxx, StFpsRawHitMaker.h - added new files to process with FPS raw data;
StMcEvent
StMcIstLadderHitCollection.cc, StMcIstLadderHitCollection.hh, StMcIstSensorHitCollection.cc, StMcIstSensorHitCollection.hh - added new IST hit collections;
StMtdEvtFilterMaker
MtdTrackFilterTag.idl, StMtdEvtFilterMaker.h, StMtdTrackingMaskMaker.h, StMtdEvtFilterMaker.cxx, StMtdTrackingMaskMaker.cxx - new maker for filtering MTD data;
StMtdMatchMaker
StMtdMatchMaker.cxx - modified to use the constants defined in 'StMtdConstants' ;
modified to use global coordinates, instead of local ones, to calculate the distances between projected track positions and MTD hits. Using local coordinates causes an unphysical shoulder at large DeltaZ ;
fixed the following bug: if a track can be projected to two adjacent modules, the position in the module with a smaller module number gets dropped before matching. This caused an asymmetry in the local z distribution of matched tracks ;
StMtdQAMaker
StMtdQAMaker.cxx - modified to use 'gMtdCellDriftV' from StMtdConstants.h ;
StMtdUtil
StMtdGeometry.cxx, StMtdGeometry.h - modified to use the constants defined in 'StMtdConstants' ;
StPass0CalibMaker
StSpaceChargeEbyEMaker.cxx - updated to make sure there no tracks with PXL or IST hits in calibration ;
StPeCMaker
StPeCTrigger.cxx - added run 2015 RP triggers;
StSsdFastSimMaker
StSsdFastSimMaker.cxx - modified to save SSD geant hits in local coordinates : removed the 1st GlobalToLocal transformation and added correction for smearing the proper local coordinates;
Sti
StiHitTest.cxx, StiHitTest.h - added debug class StiHftHits. It creates histogram of selected HFT hits;
StiKalmanTrackFinder.cxx - modified to call hftHits before & after refit();
removed non used method 'StiKalmanTrackFinder::extendTracks(double rMin)'; added calls of 'StiHftHits::hftHist';
StiKalmanTrack.cxx, StiKalmanTrack.h - introduced member 'mCombUsed' to memorize combination of seleceted hits;
added Enum 'keepHit' and 'kGoodHir' instead of using 1 & 2; added new parameter StiTrackNode *near;
StiKalmanTrackFitter.cxx - updated for debuging;
StiHitContainer.cxx, StiLocalTrackSeedFinder.cxx, StiLocalTrackSeedFinder.h - removed redundant printouts;
StiMasterHitLoader.h - added printouts of number hits for all detector hit loaders;
StiTrackNodeHelper.cxx - modified to take care of singular matrix;
StiKalmanTrackNode.h, StiKalmanTrackNode.cxx - implemented new method 'evaluateChi2Info' to recalculate Xi2 ;
StiMaker
StiStEventFiller.cxx, StiStEventFiller.h - added print out of number of PXL, IST & SSD hits used in tracking in every event;
added print out of GOOD HFT hits associated with tracks;
StiUtilities
StiDebug.cxx - modified for debuging;
StiIst
StiIstHitLoader.cxx - removed redundant printouts;
StiSsd
StiSsdHitLoader.cxx - removed redundant printouts;
StiTpc
StiTpcHitLoader.cxx - removed redundant printouts;
StiUtilities
StiDebug.cxx, StiDebug.h - modified to make method 'StiDebug::Debug()' not inline to provide right loading order for StiUtilities.so;
added to summary number of histograms per canvas;
StTpcHitMaker
StTpcHitMaker.cxx, StTpcRTSHitMaker.cxx - introduced sector masking (only MTD-based) ;
StTriggerDataMaker
StTriggerDataMaker.cxx - modified to move some messages from LOG_INFO to LOG_DEBUG;
St_QA_Maker
QAhlist_logy.h, StEventQAMaker.cxx, StEventQAMaker.h, StQAMakerBase.cxx, StQAMakerBase.h - introduced Roman Pots histograms;
QAhlist_EventQA_qa_shift.h, QAhlist_logx.h, StEventQAMaker.cxx, StQABookHist.cxx, StQABookHist.h - TPC dE/dx changes: Bethe-Bloch => Bichsel, and implemented tighter cuts against pile-up tracks;
RTS
src/SFS/sfs_index.cxx - fixed memory leak;
pams
sim/g2t/g2t_ssd.F - changed SSD hits to use local coordinates;
StarDb
Calibrations/tpc/TpcCurrentCorrection.20140315.000047.C, TpcLengthCorrectionMDF.20140315.000051.C, TpcRowQ.201403 15.000046.C, TpcSecRowB.20140315.000044.root, TpcZCorrectionB.20140315.000045.C, tpcAnodeHVavg.20130412.153000.C, tpcDriftVelocity.201 50121.180611.C, tpcPressureB.20140315.000047.C - added new dEdx calibrations files for Run 2014, AuAu 200GeV;
StarVMC
StarAgmlLib/G3Commons.h - added new file;
AgBlock.h AgModule.cxx, AgModule.h, StarAgmlLibLinkDef.h, StarAgmlStacker.h - modified to export G3 tracking parameters associated with GSTPAR as tables attached to each AgML block, in order to allow us to configure G3 physics in a VMC application;
AgModule.cxx - reduced logfile spam;
Geometry/CaveGeo/CaveGeo3.xml - removed the east/west reference system so that beam pipe is correctly constructed by Sti without modification, bug #3031;
Geometry/BbcmGeo/ BbcmGeo.xml - modified to export G3 tracking parameters associated with GSTPAR as tables attached to each AgML block, in order to allow us to configure G3 physics in a VMC application ;
Geometry/HcalGeo/ HcalGeo1.xml - modified to export G3 tracking parameters associated with GSTPAR as tables attached to each AgML block, in order to allow us to configure G3 physics in a VMC application ;
Geometry/EcalGeo/ EcalGeo.xml, EcalGeo6.xml - modified to export G3 tracking parameters associated with GSTPAR as tables attached to each AgML block, in order to allow us to configure G3 physics in a VMC application ;
Geometry/FpdmGeo/FpdmGeo1.xml, FpdmGeo2.xml, FpdmGeo.xml, FpdmGeo4.xml - modified to export G3 tracking parameters associated with GSTPAR as tables attached to each AgML block, in order to allow us to configure G3 physics in a VMC application ;
Geometry/FsceGeo/FsceGeo.xml - modified to export G3 tracking parameters associated with GSTPAR as tables attached to each AgML block, in order to allow us to configure G3 physics in a VMC application ;
Geometry/PhmdGeo/PhmdGeo.xml - modified to export G3 tracking parameters associated with GSTPAR as tables attached to each AgML block, in order to allow us to configure G3 physics in a VMC application ;
Geometry/TpceGeo/TpceGeo3a.xml, TpceGeo4.xml - modified to export G3 tracking parameters associated with GSTPAR as tables attached to each AgML block, in order to allow us to configure G3 physics in a VMC application;
Geometry/TpcxGeo/TpcxGeo1.xml, TpcxGeo2.xml - modified to export G3 tracking parameters associated with GSTPAR as tables attached to each AgML block, in order to allow us to configure G3 physics in a VMC application;
Geometry/ZcalGeo/ZcalGeo.xml - modified to export G3 tracking parameters associated with GSTPAR as tables attached to each AgML block, in order to allow us to configure G3 physics in a VMC application ;
StDb
idl/mtdEventFilterCuts.idl - added new table for MTD event filterring;
sstClusterControl.idl, sstConfiguration.idl, sstDimensions.idl, sstSlsCtrl.idl, sstChipCorrect.idl, sstGainCalibWafer.idl, sstNoise.idl, sstWaferConfiguration.idl- added new SST tables;
OnlTools
Jevp/StJevpBuilders/fmsBuilder.cxx - modified to change weight for FMS critical plots;
PREPOST changed, set basic threshold for matching;
fmsBuilder.cxx, fmsBuilder.h - added FMS critical plots and changed draw options;
istBuilder.cxx - added ist_bad_channels.txt to remove bad chips; added ist_noisy_chips.txt to identify noisy chips and apply higher cut (10*rms) on adc for those chips;
modified to zero out hits < 3 ; modified to mask out zerobias; separated non-zs and zs;
istBuilder.h - added noisy chip identifier;
trgBuilder.cxx - updated to adjust plots for pp 200GeV run 2015;
ppBuilder.cxx, ppBuilder.h - modified to add the average hits-per-bunch histogram;
daqBuilder.cxx, istBuilder.cxx - fixed memory leak;
Jevp/StJevpServer/JevpServer.cxx, JevpServer.h - updated; fixed memory leak;
Jevp/StJevpPlot/JevpPlot.h, JevpPlotSet.cxx, JevpPlotSet.h - fixed memory leak;
- March 16, 2015
library SL15c has been updated with codes below by request of HFT group for run 2014 production:
StMuDSTMaker
COMMON/StMuEvent.cxx, StMuEvent.h - modified to add 4 unsigned shorts to StMuEvent;
Updated code was retagged with tag SL15c;
- March 4, 2015
new library SL15c tagged as SL15c has been created and built on SL6.4 (32bits ) and SL5.3 platforms;
default compiler on SL6.4 is gcc 4.4.7 .Library was tested and released on March 6.
Main features:
- further tunning of Sti tracking with HFT;
- initial revision of StFmsCluster & StFmsPoint in StEvent structure;
- initial revision of new simulation maker for IST StIstSimMaker;
- installed new version of PYTHIA 6.2.22 for forward processes studies;
- added new TPC SC&GL DB table to handle sector-by-sector GridLeak distortions;
- QA maker updated with initial revision of HFT histograms;
- added FPS & pp2pp pedestal bank to RTS structure;
- added new tables for PP2PP pedestals and roman pot positions, code updated accordingly;
- added FPS plots to OnlTools;
- several bugs fixed;
Next codes have been updated:
StRoot
StAnalysisUtilities
StHistUtil.cxx - modified to provide histogram normalization;
StBFChain
BigFullChain.h - added placeholder for the FMS incoming review;
setup base chain for run 2015; added option to call on StIstFastSimMaker;
BigFullChain.h, StBFChain.cxx - added options 'NoPxlIT, NoIstIT, NoSstIT' to enable HFT calibration with hits not on track;
StDetectorDbMaker
StDetectorDbChairs.cxx - updated for year 2014 dEdx corrections;
StarGenerator
Pythia6_2_22/Pythia6.cxx, Pythia6.h, Pythia6_2_22LinkDef.h, StarPythia6.cxx, StarPythia6.h, address.F, pystar-6.4.22.F, pythia-6.2.22.F, pytune.F - new version of PYTHIA 6.2.22 for forward studies;
StEvent
StFmsCluster.cxx, StFmsCluster.h, StFmsPoint.cxx, StFmsPoint.h - initial revision of FMS clusters and points;
StContainers.cxx, StContainers.h, StEnumerations.h, StEventTypes.h, StFmsCollection.cxx, StFmsCollection - modified due adding StFmPoint and StFmsCluster;
StEmcUtil
database/StBemcTables.cxx, StBemcTables.h - updated to include new DB table "bemcTriggerPed4" for BEMC online trigger monitoring for year 2015;
database/StBemcTablesWriter.cxx - updated to store "bemcTriggerPed4" values in database;
StFmsDbMaker
StFmsDbMaker.cxx, StFmsDbMaker.h - added fps functionalities and interface to fms_rec table; updated for FPS tables to use;
StFmsFastSimulatorMaker
StFmsFastSimulatorMaker.cxx, StFmsFastSimulatorMaker.h - updated for run 2015;
Sti
StiDetector.cxx, StiDetector.h - inside() added ;
added method insideL() to account discrepancy between alligned hits and not alligned geometry;
StiKalmanTrack.cxx - modified to account more accurate zero magnetic field; removed redundant hit->subTimesUsed();
updated to restore inversion of hh because it is used in multiple places;
StiKalmanTrackFinder.cxx, StiKalmanTrackFinder.h, StiLocalTrackSeedFinder.h, StiTrackFinder.h - removed not used method 'extendTracksToVetrtex(...)' ;
StiKalmanTrackFinder.cxx - removed redundant call to StTrack::reserveHits;
StiKalmanTrackNode.h, StiKalmanTrackNode.cxx - new member '_wallx' added; added inside();
StiKalmanTrackNode.cxx - fixed small angle approximation; commented out an assert causing bfc.C crash reported in ticket #3007;
added lines to check that all crossings are outside of the volume;
method 'propagate(StiKalmanTrackNode *,StiDetector *,int dir)' was rewritten, for case cyl propagate(xk...) is not called anymore due to problem with accuracy;
modified to replace all Asserts for sign() with zign() for speedup;
fixed bug #3034 caused 'Assertion failed' and #3048 which caused missing primary tracks in pp collisions;
some outdated asserts and debug lines removed; modified to call recov() in propagateError(): when length is big recov(1) is called, otherwice recov(0);
StiKalmanTrackNode.cxx, StiKalmanTrackNode.h, StiTrackNodeHelper.cxx, StiTrackNodeHelper.h - rolled back all changes related to nudge problem ;
StiNodePars.h - 'rotate()' added;
updated to define constants related to mag field;mMethod 'nan()' added to check 'NaN' in StiNodePars;rRemoved logic with zero magnetic field in 'ready()' (wrong place); replaced Double_t ==> double ;
StiTrackNode.h - 'StiNodeErrs::rotate' added; methods 'nan()' added for debugging;
modified to call recov(1) in StiKalmanTrackNode::propagateError() when length is bigger than kBigLen;
StiTrackNode.cxx - minimal value for angle errors decreased to 1e-5; MaxPars increased;
redundant call to TCL::trasat(...) removed;
modified to calculate distance in cylCross along track now; this distance was made signed;
'StiNodeErrs::rotate' & 'StiNodePars::rotate' are implemented ;
methods 'nan()' added for debugging; added check sin < 1 ;
changed the cut 0.1 radial ==> 0.01 radian ;
StiTrackNode.h, StiTrackNode.cxx - added method to calculate sign of error matrix zign(), which is more correct than sign();
new implementation of the method : recov() ==> recov(int force=0); force=1 means strong checking, using method sign() which is rather slow; force=0 weak check, used zign() which is fast but not too reliable;
StiTrackNodeHelper.h, StiTrackNodeHelper.cxx - member 'mwallx' added; all simple named members renamed (like a ==> mA) ;
rotation in code replaced by call 'StiNodePars::rotate' ;
StiTrackNodeHelper.cxx - removed redundant 'rotPars.check()'; fixed small angle approximation; modified numbers ==> constants;
method 'StiTrackNodeHelper::pathIn(...)' rewritten to account that for cylinder shape crossing angle is not the same as for planar shape;
modified to call recov(0) or recov(1) in updateNode() and propagateErrs() if length < kBigLen ;
StiHit.cxx, StiHit.h - added reusing hits; method insideL() added to check hit in loading;
StiHitContainer.cxx, StiKalmanTrack.cxx, StiLocalTrackSeedFinder.cxx - renamed timesUsed() ==> isUsed();
StiMapUtilities.cxx - replaced setTimesUsed() ==> addTimesUsed();
StiMaker
StiMaker.cxx - removed redundant inputFile parameter; added comments about treeSearch On/Off; removed BTof ;
StIstClusterMaker
StIstScanClusterAlgo.cxx - added check for empty container of to-be-merged proto-clusters, fixed bug #3056; This is done to avoid a situation when we run out of column-wise clusters in the current (happens when all clusters are merged and removed from the temporary container) column but the next one still has some cluster left.
StIstDbMaker
StIstDbMaker.cxx - reverted "Move ToWhiteBoard() to Make". Will implement a different solution to avoid losing istDb from this maker's data container;
changed 'ToWhiteBoard()' to 'ToWhiteConst()' because we don't want to loose the StIstDb object at every call to StMaker::Clear();
StIstDbMaker.cxx, StIstDbMaker.h - created StIstDb object in constructor and pass it to the framework in Init();
StIstSimMaker
StIstFastSimMaker.cxx, StIstFastSimMaker.h - added new simulation maker for IST;
StiIst
StiIstDetectorBuilder.cxx, StiIstHitLoader.cxx - updated to make all info/warn/error messages consistent across StiDetectorBuilder's;
StiIstDetectorBuilder.cxx - added a check for valid global object of TGeoManager. The detector builder is required one and cannot proceed if one does not exist;
added check for valid gGeoManager in buildDetectors instead of constructor, fixup for previous commit;
created a copy of sensor transformation matrix using the ideal TGeo geometry in order to have an ability to modify it without disturbing the original TGeo geometry;
modified position of the original sensor by centering its copy around Z=0; this is achieved by removing the original translation of sensor along the Z axis ;
StiIstHitLoader.cxx - modified to let StiIstHit to be reused 5 times;
StIstRawHitMaker
StIstRawHitMaker.cxx - modified to allow tracks to share IST and PXL hits by up to 5 times;
StIstUtil
StIstRawHit.cxx - fixed a bug for the print() to list all time bin's charges and noises;
StiPxl
StiPxlDetectorBuilder.cxx, StiPxlHitLoader.cxx - updated to make all info/warn/error messages consistent across StiDetectorBuilder's;
StiPxlDetectorBuilder.cxx - added a check for valid global object of TGeoManager. The detector builder is required one and cannot proceed if one does not exist;
added check for valid gGeoManager in buildDetectors instead of constructor, fixup for previous commit;
modified to build geo path to PXL sensor by actually using the sensor number;
created a copy of sensor transformation matrix using the ideal TGeo geometry in order to have an ability to modify it without disturbing the original TGeo geometry;
modified position of the original sensor by centering its copy around Z=0; this is achieved by removing the original translation of sensor along the Z axis ;
StiPxlHitLoader.cxx - modified to allow tracks to share IST and PXL hits by up to 5 times;
StiSsd
StiSsdHitLoader.cxx - updated to get rid of local variable 'ladder' shadowing the loop's counter having the same name;
StiSstDetectorBuilder.cxx - updated to make all info/warn/error messages consistent across StiDetectorBuilder's;
switched to StiPlacement constructor when positioning active IST sensors;
StiSsdDetectorBuilder.cxx, StiSstDetectorBuilder.cxx - added a check for valid global object of TGeoManager. The detector builder is required one and cannot proceed if one does not exist;
added check for valid gGeoManager in buildDetectors instead of constructor, fixup for previous commit;
created a copy of sensor transformation matrix using the ideal TGeo geometry in order to have an ability to modify it without disturbing the original TGeo geometry;
modified position of the original sensor by centering its copy around Z=0; this is achieved by removing the original translation of sensor along the Z axis ;
StiUtilities
StiDebug.cxx - call to Sumary() removed in Finish() ;
StLaserAnalysisMaker
LanaTrees.C - added new laser drift velocity calculator; modified to check fit status;
modified to force East == West drift velocities for Run XIV, because of bad East part;
StLaserAnalysisMaker.cxx - added protection against zero dcaGeometry pointer;
LanaTrees.C, StLaserAnalysisMaker.cxx - adjusted split style for ROOT_VERSION_CODE ;
StMtdQAMaker
StMtdQAMaker.cxx, StMtdQAMaker.h - added new histogramms to store the run indices; changed the titles of some histograms for better readability;
StMtdUtil
StMtdGeometry.cxx - fixed an overlook in extracting geometry for 2015 during bfc chain running;
StPeCMaker
StPeCTrigger.cxx - added trigger information for Roman Pot triggers 2015 pp200GeV;
StPeCMaker.cxx, StPeCMaker.h - added a setter to select writing Roman Pot Collection to output tree;
StPeCEnumerations.h - fixed StPeCnMaxTracks =6;
StPeCEvent.cxx, StPeCEvent.h - added copy of the Roman Pot StMuRpsCollection to output tree;
StPxlSimMaker
StPxlFastSim.cxx, StPxlFastSim.h - modified for minor refactoring of 'StPxlFastSim::distortHit()' to include a new warning for unphysical hit position;
StPxlFastSim.cxx - modified to set idTruth of StPxlHit to -999 if parentTrack of mcHit does not exist;
StPxlDbMaker
StPxlDbMaker.cxx, StPxlDbMaker.h - updated to create StPxlDb object in constructor and pass it to the framework via ToWhiteConst() in Init();
StTpcHitMaker
StTpcHitMaker.cxx - fixed pad and timebucket sanity units ( were off by x64), bug #3057;
St_QA_Maker
QAhlist_logy.h, StEventQAMaker.cxx, StEventQAMaker.h, StQABookHist.cxx, StQABookHist.h, StQAMakerBase.cxx, StQAMakerBase.h - updated for initial version of HFT histogram;
StQAMakerBase.cxx - modified to protect from missing data/histograms;
StEventQAMaker.cxx, StQAMakerBase.cxx, StQAMakerBase.h - fixed missing run 2014 cases, remove unused 'firstEventClass', re-work normalizations with StHistUtil;
St_pp2pp_Maker
St_pp2pp_Maker.cxx, St_pp2pp_Maker.h - modified to read the new "Calibrations/pp2pp/pp2ppPedestal160" database ;
modified to keep code backward-compatible so that it works for both 2009 and >=2015 data; also introduced "mVersion" to deal with it; added a check, in case "trace==2" it quits thmodified to use e event;
modified to use the pedestal subtracted bank "adc_ped_sub" and so don't need to subtract pedestals for every ADC;
changed the mapping of VH/UDOI to VH2/UDOI as the relationship of W2U (~WVU) / W2D (~WVD) and the sequencer nos
have reversed: in 2009, WVD is sequencer 7 and W2U is sequencer 8 whereas in 2015, W2U is sequencer 7 and W2D is sequencer 8 ;
RTS
include/rtsSystems.h - removed RPII ;
src/rtsmakefile.def, rtsplusplus.def - updated;
src/DAQ_FPS/daq_fps.cxx, daq_fps.h - added FPS pedestal bank;
src/DAQ_PP2PP/daq_pp2pp.cxx, daq_pp2pp.h - added PP2PP PEDRMS; implemented the ped_sub bank;
src/DAQ_READER/daq_dta.cxx - fixed bug;
src/RTS_EXAMPLE/rts_example.C - added PP2PP PEDRMS; added FPS pedestal bank; implemented the ped_sub bank;
pams
sim/g2t/g2t_fgt.F - updated to export FgtdGeoV hits to ROOT;
StarDb
Calibrations/tracker/PixelHitError.y2013.C, ist1HitError.20050101.000001.C - updated for hit errors;
KalmanTrackFinderParameters.y2014.C - added new file for Y2014 selection of HFT hits;
StarVMC
Geometry/FgtdGeo/FgtdGeoV.xml - updated length of FGTM based on versioning, so that we may stretch it out for larger eta;
StDb
idl/tpcSCGL.idl - added new TPC Space Charge and Grid Leak table to modify the database as suggested to handle sector-by-sector GridLeak distortions;
pp2ppPedestal160.idl, pp2ppRPpositions.idl - added new tables for PP2PP pedestals and roman pot positions;
bemcTriggerPed4.idl - added new EMC table;
tpcCorrection.idl - updated for year 2014 dEdx carrections;OnlTools
Jevp/StJevpBuilders/fmsBuilder.cxx - added LED input plots for fmsBuilder;
fpsBuilder.h, fpsBuilder.cxx - first draft for FPS online plots;
tofBuilder.cxx - fixed mapping for run 2015, added new hist limits, adjusted trigger windows;
ppBuilder.cxx - corrected the mapping and also set SVX_ID 7 => 3 ;
istBuilder.cxx - modified to include a local pedestals file initialization method; moved initialization to startrun() ;
added misconfigured apv mask;
ppBuilder.cxx, ppBuilder.h - modified to use "adc_ped_sub" instead of "adc"; modified the title-offset and margin to avoid titles being obstructed by labels;
vpdBuilder.cxx - fixed earliest channel plots, improved hist binning;
- February 5 - 9, 2015
library SL15b has been updated with MTD codes fixes to process with MTD calibration during production and codes to fix problem with laser data processing.
Library was retagged with tag SL15b_1 and rebuilt;
Next codes have been updated:
StRoot
StMtdCalibMaker/StMtdCalibMaker.cxx, r.1.3 ;
StMtdHitMaker/StMtdHitMaker.cxx, r.1.22, StMtdHitMaker.h, r.1.13 ;
StLaserAnalysisMaker/StLaserAnalysisMaker.cxx, r.1.22;
Sti/StiNodePars.h, r. 2.12.2.1 ;
Sti/StiKalmanTrack.cxx, r. 2.134.2.1 :
StDb/idl/mtdPositionCorr.idl;
- January 16, 2015
new library SL15b tagged as SL15b has been created and built on SL6.4 (32bits ) and SL5.3 platforms;
default compiler on SL6.4 is gcc 4.4.7 .Library was tested, found bugs fixed and library was released on January 26.
Main features:
- new IST codes released: StIstRawHitMaker, StIstClusterMaker and StIstHitMaker;
- few modifications for PXL & IST codes related to ladder position preventing tracks from propagating back to Sti volumes at larger radii;
- several bugs fixed;Next codes have been updated:
StRoot
StChain
GeometryDbAliases.h - updated with dev2016 geometry setting;
St_geant_Maker
St_geant_Maker.cxx - updated to support FMS preshower detector in HCAL;
updated to read out sensitive layer from FgtdGeoV.xml;
Sti
StiPlacement.cxx, StiPlacement.h - added new constructor with TGeo;
StiHit.cxx - minor bug fixes;
StiShape.h - added shape type 'kSector' ;
StiKalmanTrack.cxx, StiKalmanTrack.h - added method test() for debug only;
StiKalmanTrackFinder.cxx - changed getNormal...() to getLayer...() in search of volumes; double active/nonactive loop added;
StiKalmanTrackNode.cxx - method locate() simplified;
StiTrackNode.cxx - update max correlation to .99999 ; fixed problem with zero magnetic field and embedding primary trackes, bug #2996 & #2981
StiTrackNodeHelper.cxx - fixed some 2nd order inaccuracy;
StiIst
StiIstDetectorBuilder.cxx - modified to switch to new 'StiPlacement' constructor when positioning sensor halves;
modified to split sensor layers in two halves;
StiIstDetectorBuilder.cxx, StiIstDetectorBuilder.h, StiIstHitLoader.cxx - updated 'getActiveDetector()' to include sensor half when selecting appropriate Sti layer; made corresponding switch in StIstHitLoader;
StiIstDetectorBuilder.cxx, StiIstDetectorBuilder.h - removed private 'createPlacement' because we now have an equivalent 'StiPlacement' constructor; updated doxygen documentation;
StiIstHitLoader.cxx - updated to get rid of unused variables;
StIstHitMaker
StIstHitMaker.cxx, StIstHitMaker.h - new maker added calculates hit global position, and writes IST hits to StIstHitCollection;
StIstRawHitMaker
StIstRawHitMaker.cxx, StIstRawHitMaker.h - new code added to reads and unpack a DAQ or SFS file; accesses calibration DBs;
marks out bad channels and chips; creates and fills the IST containers;
StIstClusterMaker
StIstClusterMaker.cxx, StIstClusterMaker.h - new maker added to build clusters from raw IST hits;
StIstIClusterAlgo.cxx, StIstIClusterAlgo.h - added interface for concrete implementations of IST clustering algorithms to creates a cluster collection from a raw hit collection for each IST ladder;
StIstScanClusterAlgo.cxx, StIstScanClusterAlgo.h, StIstSimpleClusterAlgo.cxx, StIstSimpleClusterAlgo.h - new maker added for concrete implementation of a simple algorithm for clustering of the raw hits registered by the 2D IST sensors. The maker does: - reads all raw hits per ladder (six sensors) and groups into vectors;
- does clustering in individual column;
- does clustering in neighboring columns;
- fill hit collections;
StiPxl
StiPxlDetectorBuilder.cxx - modified to switch to new 'StiPlacement' constructor when positioning sensor halves; modified to split sensor layers in two halves;
updated doxygen documentation;
StiSsd
StiSstDetectorBuilder.cxx, StiSstDetectorBuilder.h - updated doxygen documentation;
StPeCMaker
StPeCGeant.cxx, StPeCGeant.h,StPeCParticle.cxx, StPeCParticle.h - modified to include information from StMuMcTrack (this is not backward compatible);
StSsdDbMaker
StSstDbMaker.cxx - updated to validate input values to the accessor of individual sensor transformations;
StSstDbMaker.h - added overlooked header include with SST constants;
pams
sim/g2t/g2t_hca.F, g2t_volume_id.g - modified to support FMS preshower detector in HCAL;
StarDb
AgMLGeometry/Geometry.dev2016.C - added new files for dev2016 geometry;
Geometry/tpc/tpcPadPlanes.devTX.C - added final configuration for iTPC;
StarVMC
Geometry/FpdmGeo/FpdmGeo4.xml - modified to increase max elos from 50 GeV to 250 GeV in FMS;
Geometry/SisdGeo/SisdGeo7.xml - modified to put in reverse order of SST ladders and flip sensitive layers about z ;
- January 8, 2015
new library SL15a tagged as SL15a has been created and built on SL6.4 (32bits ) and SL5.3 platforms;
default compiler on SL6.4 is gcc 4.4.7 . Library was tested and released on January 9.
Main features:
- implemented another iteration on the SST geometry in Sti;
- made optimization of IST/PXL/SST geometry in Sti to provide reasonable consensus between speed of processing and tracking quality;
- implemented first cut for year 2015 geometry;
- implemented dev2016 geometry with HCAL & FGT ;
- few modifications in MTD code: added an option to load trigger time window cuts;
- several bugs fixed;
Next codes have been updated:
StRoot
StChain
GeometryDbAliases.h - updated to define y2015 geometry with 20141215.000000 timestamp;
Sti
StiPlacement.cxx, StiPlacement.h - new constructor added, it defines ALL variables of the class, directly, indirectly or by default. If radius is negative, it becames positive with modification of angle +=PI. In normal case user doesn't need to define all other parameters but he still can do it;
set default values for layer radius, layer angle & region voved from 'setNormalRep' to constructor to provide backward compatibility, fixes for bug #2943;
StiDetector.cxx, StiDetector.h - added new 'setter()' method;
StiMaker
StiMaker.h, StiMaker.cxx - implemented new method 'finishTracks'; In this method:
- arranged loop over nodes;
- moved node to the center volume along x or r local;
- if StiDebug::mgGlobal >1 created a set of technical histogramms;
StiMaker.cxx - updated for temporary supress of 'inside()';
StAnneling.cxx, StAnneling.h, StKFTrack.cxx, StKFTrack.h, StKFVertex.cxx, StKFVertex.h, StKFVertexMaker.cxx, StKFVertexMaker.h, StKFVerticesCollection.cxx, StKFVerticesCollection.h, StPhiEtaHitList.cxx, StTrack2FastDetectorMatcher.cxx, StiDefaultToolkit.cxx, StiMaker.cxx, StiStEventFiller.cxx - modified to add access to TMVA ranking;
StKFVertexMaker.flow - added new file;
StKFEvent.cxx, StKFEvent.h, StMuDstVtxT.cxx, StMuDstVtxT.h, StVertexP.h, StVertexT.h - removed files;
StiIst
StiIstDetectorBuilder.cxx - modified to use the global tranformation unrolled all the way to the top node instead of local tranformation to the first mother volume;
minor edits for consistency across StXXXDetectorBuilders:
- switched to the same names as in StiPxlDetectorBuilder;
- switched to the natural numbering scheme as in StiPxlDetectorBuilder;
modified to use the center sensor (or the one close to the center) to build the unified sensor layer in Sti;
removed ionization from StiMaterial constructor as it is not used anywhere including energy loss calculations;
refactored gas material definition (For the gas surrounding the detector we use air properties as defined in global geometry manager. If the AIR material is not available we use default hardcoded properties);
modified to switch to StiMaterial constructor that accepts the radiation length as is. The description of the constructor is very poor but there is no need to multiply it by the density;
removed debugging function used for testing of manually modified volumes;
modified to access transformation matrices directly via StIstDb object;
modified to remove useless assignments and redundant variables; removed deprecated calls to dummy methods;
set detector group Id at detector builder level. The detector Id-s for individual Sti detectors are set when the detector is added to the builder;
modified to resize the detector container (std::vector) when new detectors are added;
modified to use the middle sensor on the ladder to extract alignment corrections from DB;
modified to get sensitive IST volumes from the global TGeoManager in a manner similar to PXL and SST detector builders;
renamed a bunch of local variables just to be consistent with the other detector builders;
removed pointless check for valid gas surrounding detectors in this builder;
modified to append new Sti detectors to the end of detector container, and use ladder id to index sector slots;
removed warning for extremely unlikely exception when a new StiDetector is not constructed by Sti detector factory. Such situations need to be treated in a way other than simply issuing a warning;
removed never used variable, forward declarations, and header includes;
made minor stylistic changes for consistency across PXL, IST, and SST detector builders;
modified to define placement for sensitive IST layers in a way consistent with PXL and SSD detector builders;
fixed loop over ladders since we use human friendly numbering starting with 1;
implemented simplified Sti geometry for inactive material in IST;
modified to increase density of manually constructed IST brackets in Sti;
removed output debug messages as they can be easily replaced by a single call to 'StiDetectorBuilder::Print()';
StiIstDetectorBuilder.h - modified to make 'buildInactiveVolumes()' method inheritable;
StiIstDetectorBuilder.cxx, StiIstDetectorBuilder.h - removed definition and addition of "hybrid" material because it is not used anywhere ;
refactored silicon material definition for sensitive layers (Only silicon material is used in construction of sensitive layers. As with the gas we first try to use the material definition in the global geometry manager. If the SILICON material is not available we use default hardcoded properties );
added flag similar to PXL to build ideal geometry for IST and SST. By default (buildIdealGeom = false) the database transformations are used in all StiXxxDetectoGroup-s;
added parameter to choose IST detector builder. This is justified by the requirement of backward compatibility. The user can choose the appropriate option in case there is a need to reconstruct the data using an older detector builder;
removed methods which will not be used by the new builder;
added a couple of helper methods to ease manual construction and placement of inactive volumes;
instead of setting StiDetector parameters in a local private method switched to using new interface provided by StiDetector update (method 'setter()' ), the refactoring took place for both sensitive and inactive volumes;
added an accessor to access active StiDetectors, i.e. volumes which may have hits associated with them;
StiIstDetectorBuilder.cxx, StiIstDetectorBuilder.h, StiIstDetectorGroup.cxx, StiIstDetectorGroup.h - minor stylistic changes in comments;
StiIstDetectorBuilder1.cxx, StiIstDetectorBuilder1.h - added new files to save current version of StiIstDetectorBuilder in order to by maintain 100% backward compatibility. The user may choose to construct the IST detector with the older version by simply propagating an option to StiIstDetectorGroup. StiIstDetectorBuilder1 inherits from StiIstDetectoBuilder to avoid duplicate code. Removed implementation of inherited methods and other irrelevant declarations;
StiIstHitLoader.cxx, StiIstHitLoader.h - removed useless data members;
StiIstHitLoader.cxx - simplified debug output by reusing existing streamers of StHit class and its daughters; removed excessive print statements;
modified to use the accessor for sensitive Sti detector/volumes;
StiPxl
StiPxlDetectorBuilder.cxx - modified to use the global transformation enrolled all the way to the top node instead of local transformation to the first mother volume;
modified to use the center sensor (or the one close to the center) to build the unified sensor layer in Sti;
removed ionization from StiMaterial constructor as it is not used anywhere including energy loss calculations;
refactored gas material definition (For the gas surrounding the detector we use air properties as defined in global geometry manager. If the AIR material is not available we use default hardcoded properties);
modified to switch to StiMaterial constructor that accepts the radiation length as is. The description of the constructor is very poor but there is no need to multiply it by the density ;
removed deprecated calls to dummy methods;
modified to resize the detector container (std::vector) when new detectors are added;
set detector group ID at detector builder level. The detector ID-s for individual Sti detectors are set when the detector is added to the builder;
modified to use the middle sensor on the ladder to extract alignment corrections from DB;
removed unutilized code;
removed warning for extremely unlikely exception when a new StiDetector is not constructed by Sti detector factory. Such situations need to be treated in a way other than simply issuing a warning;
removed never used variable, forward declarations, and header includes;
made minor stylistic changes for consistency across PXL, IST, and SST detector builders;
attempted to make a clear translation between the natural (sector/ladder/sensor) and Sti numbering schemas;
instead of setting StiDetector parameters in a local private method switched to using new interface provided by StiDetector; the refactoring took place for both sensitive and inactive volumes;
removed output debug messages as they can be easily replaced by a single call to 'StiDetectorBuilder::Print()';
switched to method that converts geo sensor id to Sti layer indices;
StiPxlDetectorBuilder.cxx, StiPxlHitLoader.cxx - modified to split PXL sensitive layers in two halves. The change should help to avoid track backward steps in Sti due to ill ordered volumes in r and phi;
modified to avoid setting StiDetector members _key1 and _key2 as they are not really used anywhere;
re-implemented segmentation of PXL sensor to two halves: in the sensor's local coordinate system the first half is for x<0 and the second one is for x>0. The notion of inner and outer halves is not critical and in fact confusing because it depends on the original rotation around the z axis;
StiPxlDetectorBuilder.cxx, StiPxlDetectorBuilder.h - removed definition and addition of "hybrid" material because it is not used anywhere;
refactored silicon material definition for sensitive layers (Only silicon material is used in construction of sensitive layers. As with the gas we first try to use the material definition in the global geometry manager. If the SILICON material is not available we use default hardcoded properties );
added a private method to convert natural/geo sensor id to Sti layer indices;
added an accessor to access active StiDetectors, i.e. volumes which may have hits associated with them;
StiPxlDetectorBuilder.cxx, StiPxlDetectorBuilder.h, StiPxlDetectorGroup.cxx, StiPxlDetectorGroup.h - minor stylistic changes in comments;
StiPxlHitLoader.cxx - modified to use local x rahter than row number to distribute hits into different half ladders;
simplified debug output by reusing existing streamers of StHit class and its daughters; removed excessive print statements;
StiSsd
StiSstDetectorBuilder.cxx - removed ionization from StiMaterial constructor as it is not used anywhere including energy loss calculations;
refactored gas material definition (For the gas surrounding the detector we use air properties as defined in global geometry manager. If the AIR material is not available we use default hardcoded properties);
refactored 'useVMCGeometry()' to build sensitive Sti layers in the same way as in PXL and IST detectors;
created model of SST inactive material using the mother volume;
modified to switch to StiMaterial constructor that accepts the radiation length as is. The description of the constructor is very poor but there is no need to multiply it by the density ;
redefined StiMaterial for the segmented SST mother volume (SFMO) ;
modified to use transformation matrices for sensitive layers from database when non-ideal geometry is requested ;
modified to adjust material properties for the modified SFMO volume. Scaled the density to match the increase in the inner radius (to avoid overlap with sensitive layers);
modified to use different names for SFMO end tube volumes;
modified to avoid using the material averaging routine as the inactive material is entirely constructed by hand;
created 9 tubes (Sti detectors) to describe the material distribution in SST;
increased the inner radius of the central tube by 0.85 cm to avoid overlap with sensitive layers. Scaled the density of this volume accordingly by keeping mass constant;
modified to resize the detector container (std::vector) when new detectors are added;
set detector group Id at detector builder level. The detector Id-s for individual Sti detectors are set when the detector is added to the builder;
modified to append new Sti detectors to the end of detector container, and use ladder id to index sector slots;
modified to use the middle sensor on the ladder to extract alignment corrections from DB;
made minor stylistic changes for consistency across PXL, IST, and SST detector builders;
removed output debug messages as they can be easily replaced by a single call to 'StiDetectorBuilder::Print()';
modified to avoid setting of StiDetector members _key1 and _key2 as they are not really used anywhere;
StiSstDetectorBuilder.h - removed never used variable, forward declarations, and header includes;
changed helper function declaration to static;
StiSstDetectorBuilder.cxx, StiSstDetectorBuilder.h - removed definition and addition of "hybrid" material because it is not used anywhere;
refactored silicon material definition for sensitive layers (Only silicon material is used in construction of sensitive layers. As with the gas we first try to use the material definition in the global geometry manager. If the SILICON material is not available we use default hardcoded properties );
added a private method to split the SST mother volume into three tubes;
modified to use object with direct access to database (mSstDb) instead of StSsdBarrel similar to PXL and IST detector builders;
removed deprecated method and calls to dummy methods;
added parameter to choose SST detector builder;
removed method 'segmentSFMOVolume' because the inactive material is now built manually in 'buildInactiveVolumes';
added a private helper function hopefully as a temporary solution before StiDetector is modified;
instead of setting StiDetector parameters in a local private method switched to using new interface provided by StiDetector, the refactoring took place for both sensitive and inactive volumes;
StiSstDetectorBuilder.cxx, StiSstDetectorBuilder.h, StiSstDetectorGroup.cxx, StiSstDetectorGroup.h - aded flag similar to PXL to build ideal geometry for IST and SST. By default (buildIdealGeom = false) the database transformations are used in all StiXxxDetectoGroup-s;
minor stylistic changes in comments;
StiSstDetectorBuilder1.cxx, StiSstDetectorBuilder1.h - added new files to save current StiSstDetectorBuilder in order to maintain 100% backward compatibility; removed deprecated calls to dummy methods;
modified to make class inherit from StiSstDetectoBuilder and removed implementation of inherited methods and other irrelevant declarations;
StiSstDetectorBuilder.h - modified to make auxiliary methods available in derived classes;
StiUtilities
StiDebug.h, StiDebug.cxx - cleanup;
StIstDbMaker
StIstDb.cxx, StIstDb.h - updated for doxygen-style comments;
renamed 'printGeoHMatrices' to customary 'Print' as that what users of ROOT framework normally expected;
added method to access transformation matrix for a given IST ladder/sensor pair;
StIstDb.cxx - modified 'getter()' for sensors transformation matrix to accept ladder and sensor id-s using human friendly numbering starting with 1. The input values outside of possible ranges will return a null pointer;
corrected mapping of ladder/sensor to global aggregate sensor id (The global sensor index (id) used in the 'istSensorOnLadder' DB table spans the range from 1001 to 1144. This bug was reported by Michael Lomnitz and fixed now);
StIstUtil
StIstClusterCollection.cxx, StIstClusterCollection.h, StIstCollection.h - updated doxygen-style comments;
coding style clean-up; removed unconstructive comments;
StMtdHitMaker
StMtdHitMaker.cxx, StMtdHitMaker.h - added an option to load trigger time window cuts from local files for cosmic ray data.This is motivated by the fact that the cuts are different for cosmic ray and collision data;
the time of a MTD hit is calculated as(mLeadingEdgeTime.first+mLeadingEdgeTime.second)/2;
added the scheme to swap backlegs 25 & 26 for the second part of Run13 data when running MuDst in afterburner mode. Note that the scheme is different for the first part of Run13 data. Different schemes can be select using function 'setSwapBacklegInRun13(Int_t swap)';
StMtdQAMaker
StMtdQAMaker.cxx, StMtdQAMaker.h - modified to use (leadTimeW+leadTimeE)/2 instead of 'leadTimeW' for MTD hit time;
StMtdSimMaker
StMtdSimMaker.cxx, StMtdSimMaker.h - modified to use localz and time-of-flight information from GEANT to determine the leading times on east and west sides for MC MTD hits. With this change, the localz of the MC hits can be calculated exactly the same as the regular hits;
StMtdUtil
StMtdGeometry.cxx - modified to reflect change for year 2015 geometry file: MTD modules placed under directory MagRefSys_1;
StPeCMaker
StPeCPair.cxx, StPeCPair.h - modified to copy the fill functionality of method with both inputs to the one with MuDst input. This gives TOF extrapolation in the pPairs branch;
StPeCEvent.cxx - modified instantiation of 'StPeCPair' when using MuDst input to get TOF extrapolation in the pPairs branch;
StSsdDbMaker
StSstDbMaker.cxx, StSstDbMaker.h - added method to access transformation matrix for a given SST ladder/sensor pair;
modified to use different name to access transformation matrices;
fine tuned the accessor to transformation matrices for IST sensitive layers;
added flag to keep track of this maker status in the standard way. The status flag gets invalidated if there is a problem reading data from DB ;
removed pointless framework methods, consolidated debug log messages;
StSstDbMaker.cxx - initialized mode data member in constructor initialization list;
added basic check to trigger on invalid DB results and fail the maker if none is returned;
set the readiness flag in Init instead of 'CalculateWafersPosition' helper function;
StSsdDbMaker.cxx, StSsdDbMaker.h, StSstDbMaker.cxx, StSstDbMaker.h - fixed styler;
StSsdUtil
StSstConsts.h - added new header with SST constants similar to what we already have for PXL and IST;
StSsdBarrel.cc - removed commented code; deleted pointless print statement;
StTrsMaker
StTrsMaker.cxx - in Maker() added SetSeed() call for StTrsRand; Input seed now taken from 'g2t_event::ge_rndm2]';
St_geant_Maker
St_geant_Maker.cxx - added FMS preshower to data readout;
St_geom_Maker
GeomBrowser.h, GeomBrowser.cxx, StGeomBrowser.cxx - updated to work with AgML for years 2012+ ;
pams
geometry/geometry/geometry.g - dev2016 geometry implemented in starsim; added HCAL to dev2016;
added FGT to HCAL dev2016 geometry;
corrected version of VPD in 2015;
sim/g2t/geometry/g2t_volume_id.g - updated g2t volume ID for FMS preshower;
StarDb
AgMLGeometry/Geometry.y2015.C - added year 2015 geometry file to enable y2015 geometry tag in BFC;
StarVMC
Geometry/Geometry.cxx - updated due to new file VpddGeo3.xml added to modify West beam pipe supports for FMS preshower detector;
implemented y2015 1st cut geometry and dev2016 development geometry; added FGT to HCAL dev2016 geometry;
Geometry/BbcmGeo/BbcmGeo.xml - updated due to new file VpddGeo3.xml added to modify West beam pipe supports for FMS preshower detector for year 2015;
Geometry/CaveGeo/CaveGeo3.xml - added new Cave Geometry file to define alignment groups for subsystem s;
Geometry/CalbGeo/CalbGeo2.xml - modified to place into appropriate group;
Geometry/Compat/xgeometry.xml - updated due to new file VpddGeo3.xml added to modify West beam pipe supports for FMS preshower detector for year 2015;
dev2016 geometry implemented in starsim; added HCAL to dev2016 geometry; added FGT to HCAL dev2016 geometry;
Geometry/EcalGeo/EcalGeo6.xml - modified to place into appropriate group;
Geometry/FpdmGeo/FpdmGeo4.xml - modified to place into appropriate group; updated to year 2015 FMS/preshower geometry model;
Geometry/FgtdGeo/FgtdGeoV.xml - added 6-disk forward tracking variant of the FGT / y2016 fwd tracking studies;
Geometry/HcalGeo/HcalGeo.xml, HcalGeo1.xml - updated due to new file VpddGeo3.xml added to modify We st beam pipe supports for FMS preshower detector for year 2015; added FMS preshower to HCAL;
Geometry/IdsmGeo/IdsmGeo2.xml - set tighter Rmax to fit through inner radius of BBC ;
Geometry/MagpGeo/MagpGeo.xml - modified to place into appropriate group;
reduced outer radius of magnet mother volume to eliminate sub-mm overlap with mtd;
modified to place MAGP with 'ONLY' now, as it doesn't overlap with neighbors;
Geometry/MutdGeo/MutdGeo5.xml - modified to place into appropriate group;
Geometry/UpstGeo/UpstGeo.xml - modified to place into appropriate group;
Geometry/VpddGeo/VpddGeo2.xml - updated to place into appropriate group;
VpddGeo3.xml - added new file to modify West beam pipe supports for FMS preshower detector;
modified to limit mother volume to tube segment; placed as 'ONLY' as it no longer overlaps with support structures;
fixed overlap issue and place east VPD in east ref sys;
Geometry/ZcalGeo/ZcalGeo.xml - updated to place into appropriate group;
reduced radius of mother volume to avoid overlap with shielding;
Geometry/macros/StarGeometryDb.C - updated for West beam pipe supports for FMS preshower detector;
added FGT to HCAL dev2016 geometry;
StarAgmlLib/StarTGeoStacker.cxx - added warning for placing *MANY* volume in volume group (assembly);
added shape debug option; modified to inspect shape rather than print on debug;StDb
idl/fmsRec.idl - added new FMS constants table;OnlTools
Jevp/StJevpBuilders/ppBuilder.cxx, ppBuilder.h - added new histograms for run 2015;
Jevp/StJevpServer/JevpServer.cxx, Makefile - updated for year 2015;
JevpServer.cxx, JevpServer.h - implemented logging for builder crashes;
Jevp/StJevpPlot/JevpPlotSet.cxx, JevpPlotSet.h - implemented logging for builder crashes;
Lidia Didenko
2016
STAR SOFTWARE NEWS  December 18, 2016
---------------------
The present release assignment:
             SL09g_embed (SL09g_2Embed_v10) ROOT_LEVEL 5.22.00
             SL10c_embed (SL10c_embed_v5)  ROOT_LEVEL 5.22.00
             SL10h_embed (SL10h_embed_v6)  ROOT_LEVEL 5.22.00
             SL10k_embed (SL10k_embed_v11) ROOT_LEVEL 5.22.00
             SL11b    (SL11b_2)  ROOT_LEVEL 5.22.00 MC & st_W pp 500GeV, run 2009
             SL11d_embed (SL11d_embed_v6)  ROOT_LEVEL 5.22.00
             SL12a_embed  (SL12a_embed_v3) ROOT_LEVEL 5.22.00
             SL12d    (SL12d_2)  ROOT_LEVEL 5.22.00 UU 193GeV, pp 200GeV run 2012 production
             SL12d_embed (SL12d_embed_v6) ROOT_LEVEL 5.22.00
             SL13b    (SL13b_2)  ROOT_LEVEL 5.22.00 pp 500GeV run 2012 production
             SL13b_embed (SL13b_embed_v1)  ROOT_LEVEL 5.22.00
             SL14a    (SL14a_2)  ROOT_LEVEL 5.34.09 pp 500GeV run 2013 production, days 76-12
             SL14g    (SL14g_3)  ROOT_LEVEL 5.34.09 pp 500GeV run 2013 production, days 129-161
             SL14i    (SL14i_2)  ROOT_LEVEL 5.34.09 AuAu 14.6GeV run 2014 production
             SL15b    (SL15b_1)  ROOT_LEVEL 5.34.09 AuHe3 & AuAu 200GeV run 2014 preview production
             SL15c    (SL15c)    ROOT_LEVEL 5.34.09 AuAu 200GeV run 2014 data production with HFT
             SL15e    (SL15e)    ROOT_LEVEL 5.34.09 AuAu 200GeV run 2014 st_mtd data production
             SL15e_embed  (SL15e_embed_v1) ROOT_LEVEL 5.34.09
             SL15i    (SL15i)    ROOT_LEVEL 5.34.30
             SL15j    (SL15j)    ROOT_LEVEL 5.34.30
             SL15k    (SL15k_1)  ROOT_LEVEL 5.34.30 pp 200GeV run 2015 st_fms & st_rp stream data production
             SL15l    (SL15l)    ROOT_LEVEL 5.34.30 pAu 200GeV st_fms run 2015 data production
             SL16a    (SL16a)    ROOT_LEVEL 5.34.30
             SL16b    (SL16b_1)  ROOT_LEVEL 5.34.30
             SL16c    (SL16c)    ROOT_LEVEL 5.34.30
       old-> SL16d    (SL16d_1)  ROOT_LEVEL 5.34.30 pp,pAu,pAl run 2015 production without HFT tracking
             SL16e (SL16e)       ROOT_LEVEL 5.34.30
             SL16f (SL16f)       ROOT_LEVEL 5.34.30
             SL16g (SL16g)       ROOT_LEVEL 5.34.30
             SL16h (SL16h)       ROOT_LEVEL 5.34.30
             SL16i (SL16i)       ROOT_LEVEL 5.34.30
       pro-> SL16j (SL16j)       ROOT_LEVEL 5.34.30
             SL16k (SL16k)       ROOT_LEVEL 5.34.30
       new-> SL16l (SL16l)       ROOT_LEVEL 5.34.30
       dev-> DEV                 ROOT_LEVEL 5.34.30
      .dev-> .DEV                ROOT_LEVEL 5.34.30

-------------------------------------------------
Release History
SL16a library
SL16b library
SL16c library
SL16d library
SL16e library
SL16f library
SL16g library
SL16h library
SL16i library
SL16j library
SL16k library
SL16l library
-
December 16, 2016
new library SL16l tagged as SL16l has been created and built on SL6.4 (32bits & 64bits );
default compiler is gcc 4.8.2 . Library was tested with standard test suite, passed it successfully and released on December 19.
Main features:
- added detector setups for each version of the FTS detector;
- added new trigger data structure for run 2017 ;
- first release of StFmsFpsMaker code for FMS-FPS correation analysis ;
- initial revision of StExtGeometry in StEvent;
- several bugs fixed;
Next codes have been updated:
StRoot
StDaqLib
TRG/trgStructures2017.h - added new trigger data structure for run 2017;
StEvent
StExtGeometry.cxx, StExtGeometry.h - initial revision of StExtGeometry;
StTrack.cxx, StTrack.h - added StExtGeometry features;
StTriggerData2016.cxx - minor updates for trigger 2016;
StTriggerData2017.cxx, StTriggerData2017.h - added new files for trigger data run 2017;
StEventClusteringHints.cxx, StEventLinkDef.h - added hooks for StTriggerData2017;
StTriggerData.cxx, StTriggerData.h, StTriggerData2017.cxx, StTriggerData2017.h - added new trigger data structure for run 2017;
StFmsDbMaker
StFmsDbMaker.cxx - updated to avoid crash when FPS DB is not there;
StFmsDbMaker.cxx, StFmsDbMaker.h - added getLorentzVector to take into account beamline angles/offsets for pt calculation;
StFmsFpsMaker
StFmsFpsMaker.cxx, StFmsFpsMaker.h - first release for FMS-FPS correlation analysis;
StFmsPointMaker
StFmsPointMaker.cxx - modified to use StFmsDbMaker::getLorentzVector for correct momentum calcuration based on beamline angles/offsets ;
StGenericVertexMaker
StGenericVertexFinder.cxx, StGenericVertexFinder.h, StGenericVertexMaker.cxx - removed mIsMC flag in order to treat the simulated and real data in the same manner during vertex reconstruction;
StGenericVertexMaker.cxx - removed dead code; removed outdated ClassImp ROOT macro;
StGenericVertexFinder.cxx - removed unused dependences;
StiPPVertex/StPPVertexFinder.cxx - removed assert temporary; removed mIsMC flag in order to treat the simulated and real data in the same manner during vertex reconstruction;
removed unused '#include "TCanvas.h"';
StPPVertexFinder.cxx, StPPVertexFinder.h - removed unused dependences; removed pointless assert in StPPVertexFinder; corrected ROOT headers; removed unused local variable;
StvPPVertex/StPPVertexFinder.cxx - removed mIsMC flag in order to treat the simulated and real data in the same manner during vertex reconstruction;
removed unused '#include "TCanvas.h"'; removed unused local variable;
StSecondaryVertexMaker
StKinkLocalTrack.cc, StKinkMaker.cxx, StV0FinderMaker.cxx, StXiFinderMaker.cxx - removed outdated ClassImp ROOT macro;
StTriggerDataMaker
StTriggerDataMaker.cxx - added v44 for run17/StTriggerData2017;
StZdcVertexMaker
StZdcVertexMaker.cxx - removed outdated ClassImp ROOT macro;
RTS
EventTracker/Makefile - fixed event display;
include/prepareGbPayload.h, RC_Config.h - updated;
RC_Config.h, iccp.h - updated;
src/DAQ_READER/daqReader.cxx - updated for run 2017;
src/DAQ_RHICF/daq_rhicf.cxx - finalized;
src/DAQ_FPS/daq_fps.cxx - implemented tweeks for FPS;
src/SFS/sfs_index.cxx - updated;
trg/include/trgDataDefs.h - updated for tun 2017;
StarVMC
Geometry/StarGeo.xml - added geometry tags for 3 versions of the FTS based on y2017 rough cut geometry;
updated to keep new (IDSM) suport cone for FTS studies; added FTS Reference 1 and 2;
updated to Increase size of FTS disks representing TGC wheels;
Geometry/BbcmGeo/BbcmConfig.xml - added FTS Reference 1 and 2;
Geometry/EpdmGeo/EpdmConfig.xml, EpdmGeo0.xml - added FTS Reference 1 and 2;
Geometry/FtsdGeo/FtsdConfig.xml, FtsdGeo.xml - added detector setups for each version of the FTS; control flag added for pl acement in CAVE vs IDSM; added FTS reference 1 and 2; updated reference 1 to contain all 12 disks, to optimize on positions;
FtsdGeo.xml - updated to keep new (IDSM) suport cone for FTS studies; updated z-position; increased size of FTS disks representing TGC wheel s;
xgeometry/xgeometry.age - enabled FTS versions 1-3 in starsim; added FTS Reference 1 and 2;
OnlTools
Jevp/StJevpServer/JevpServer.cxx - removed old detectors;
- November 10, 2016
new library SL16k tagged as SL16k has been created and built on SL6.4 (32bits & 64bits );
default compiler is gcc 4.8.2 . Library was tested with standard test suite, passed it successfully and released on November 14.
Main features:
- defined year 2017 rough geometry cut;
- EPD detector integrated into framewrork ;
- EvtGen1_06_00 & Tauola1_1_5 event generators updated;
- Sti improved method to reuse hit in tracking with option 'hitReuseOn' ;
- StPicoDstMaker added new vertex selection mode "VpdOrDefault";
- several bugs fixed;Next codes have been updated:
StRoot
StarGenerator
DECAY/AgUDecay.cxx - udated;
EvtGen1_06_00/StarEvtGenDecayer.cxx - modified to handle default location of configuration files;
EvtGen1_06_00/src/EvtGenBase/ - added missing files
EvtGen1_06_00/src/EvtGenExternal/ - added missing files
EvtGen1_06_00/src/EvtGenModels/ - added missing files
Pythia8_1_86/StarPythia8Decayer.cxx, StarPythia8Decayer.h - updated;
Pythia6_4_28/StarPythia6.cxx, StarPythia6.h - updated;
Tauola1_1_5/tauola-fortran/- added missing files and changed .f --> .F ;
Tauola1_1_5/SANC/s2n_init.F - changed .f --> .F ;
Tauola1_1_5/src/tauolaFortranInterfaces/tauola_extras.F - changed .f --> .F ;
StBFChain
StBFChain.cxx, BigFullChain.h - replaced minicern ==> StarMiniCern; Pxl == Pixel ; modified that Sti doesn' load StiCA libraries;
StChain
GeometryDbAliases.h - defined y2017 rough cut geometry ;
StDetectorDbMaker
StDetectorDbChairs.cxx - modified to make TpcAvgPowerSupply table optional, to keep back compatibility;
updated to make trigL3Expanded, trigL3Expanded, and dsmPrescales optional;
StEmbeddingUtilities
StEmbeddingQA.h, StEmbeddingQA.cxx - added an option to set the maximum pT cut ;
StGenericVertexMaker
StGenericVertexFinder.h - modified to sort class members by their access type; refactoring and readability improvements made;
StGenericVertexMaker.cxx - moved log print statement out of consructors;
StGenericVertexFinder.h, StGenericVertexMaker.cxx - added and reworded some doxygen and other comments ;
StGenericVertexFinder.cxx StGenericVertexMaker.cxx StGenericVertexMaker.h - initialized data members in class initializer list;
Minuit/StMinuitVertexFinder.cxx - updated to use ternary operator to treat overflows; switched to C++11 range loops, removed nuisance counters;
StMinuitVertexFinder.cxx, StMinuitVertexFinder.h - modified to make refactoring and readability improvements;
StMinuitVertexFinder.cxx - moved log print statement out of consructors;
StMinuitVertexFinder.cxx - added and reworded some doxygen and other comments;
StiPPVertex/StPPVertexFinder.cxx, StPPVertexFinder.h - modified to convert flag to boolean; switched to C++11 range loops, removed nuisance counters; modified to make refactoring and readability improvements;
StPPVertexFinder.cxx - moved log print statements out of constructors;
StPPVertexFinder.cxx, StPPVertexFinder.h, TrackData.cxx, Vertex3D.cxx, VertexData.h - added and reworded some doxygen and other comments;
StPPVertexFinder.cxx - modified to consolidate into single logical expression;
VertexData.cxx, VertexData.h - added constructor to build vertex with coordinates;
StvPPVertex/StPPVertexFinder.cxx - moved log print statements out of constructors;
StPPVertexFinder.cxx, StPPVertexFinder.h, TrackData.cxx, Vertex3D.cxx, VertexData.h - added and reworded some doxygen and other comments;
Sti
StiKalmanTrack.cxx - workaround to fix the bugs #3231, #3232, #3232; simplified code in refitL();
StiKalmanTrackFinder.cxx - modified ;
StiKalmanTrackNode.cxx - updated for more accurate tracking when in refit track sometimes missed the vollume, related to bug #3243 ;
StiKalmanTrackNode.h - moved method pathLength ==> .cxx ;
StiTrackNode.cxx - method cylCross modified to change the order of solutions; before the first solution was the closest to the current point, now it is also the closest but in direction of tracking; modified so that if track is missing the cylinder, point of the closest approach provided and number of solutions is zero;
StiTrackNodeHelper.cxx, StiTrackNodeHelper.h - tracking direction is added and method 'setDir()' ;
StiHitContainer.h, StiHitContainer.cxx - removed method partitionUsedHits();
StiKalmanTrack.h - removed method 'extendToVertex';
StiPlacement.cxx - increased accuracy of digitalization of layer radius;
StiCA
StiCATpcSeedFinder.cxx - fixed bugs #3232, #3233 ;
StiMaker
StiMaker.cxx, StiMaker.h - CleanGlobalTracks() method added. This method provides cleanen reused hits in the style of CA. The call is triggered by nMaxTimes attribute, which allows reuse hits nMaxTimes times;
St_geant_Maker
Embed/StPrepEmbedMaker.cxx - modified to read "refmult" and "vx,vy,vz" from moretags.root file if it exists; the minimum number of embedded particles are now set to 5 instead of 1 when number of embeded particles is set to be proportional to refmult;
St_geant_Maker.cxx - EPD integrated into framework;
StPicoDstMaker
StPicoDstMaker.cxx - modified to get back to four QT broads configuration for Run17; added position correction to QT; set QT information to 0 for monitor channels and unused channels;
StPicoDstMaker.cxx - modified to use local pointer to validate selected vertex; updated to use year of next RHIC Run 2017 for data taken after October 1, 2016;
StPicoDstMaker.cxx, StPicoDstMaker.h - added new vertex selection mode "VpdOrDefault", in case there is no VPD vertex available or no TPC vertex is close to the VPD one within a window the default vertex (i.e. the first in the list) will be selected. This is particularly important for triggers that do not require VPD coincidence, e.g. BHT2;
StPicoEvent
StPicoTrack.h - changed StPicoTrack::dca to ::dcaPoint to avoid confusion ;
StPicoMtdTrigger.cxx - modified to get back to four QT broads configuration for Run17; added position correction to QT; set QT information to 0 for monitor channels and unused channels;
StPicoTrack.cxx - modified to interrupt initialization on invalid arguments, this saves one level of indentation for the quite lengthy "else" branch;
StPicoMtdTrigger.cxx - fixed the issue of obtaining the correct running year for runs before Jan 1st ; set year of next RHIC Run 2017 for data taken after October 1, 2016;RTS
include/RC_Config.h, l1Algorithm.h, rtsSystems.h, cmds.h, iccp.h - updated;
src/rtsmakefile.def - updated;pams
sim/g2t/g2t_fpd.F - updated for setup to use attenuated values for energy loss;
g2t_volume_id.g - EPD integrated into framework;
g2t_epd.F, g2t_epd.idl - added new files to integrate EPD into framework;
sim/idl/fpdm_fmcg.idl - added ROOT access to the //DETM/FPDM/FMCG data structure; allows slow simulator to access the attenuation flag, so that it knows whether attenuation was applied in simulation or not;
g2t_epd_hit.idl - added new file to integrate EPD into framework;StarVMC
g2Root/Conscript, torotm.cxx - removed; g2Root.F moved to St_geant_Maker;
Geometry/StarGeo.xml - defined year 2017 rough cut geometry; EPD integrated into framework;
Geometry/FpdmGeo/FpdmConfig.xml, FpdmGeo4.xml - updated geometry and configuration to support attenuation of light in FMS pbglass towers;
xgeometry/xgeometry.age - removed early 'return' from y2014-y2015; defined y2017 rough cut geometry; default geometry in loadAgML.kumac changed to y2017; modified to integrate EPD into framework;
pgf77/Conscript, idisp.c - removed;StarDb
Calibrations/tpc/TpcRowQ.20160618.000211.C, TpcSecRowB.20160618.000211.root - added extra dEdx calibration for run 2016 AuAu 200GeV part 2;
TpcCurrentCorrectionX.20160512.000203.C, TpcLengthCorrectionMDF.20160512.000207.C, TpcRowQ.20160512.000208.C, TpcSecRowB.20160512.000208.root, TpcTanL.20160512.000205.C - added dAu 200GeV dEdx calibrations for run 2016;
TpcAdcCorrectionB.20160101.000214.C, TpcLengthCorrectionMDF.20160207.000216.C, TpcLengthCorrectionMDF.20160512.000216.C, TpcLengthCorrectionMDF.20160618.000216.C, TpcRowQ.20160207.000215.C, TpcRowQ.20160512.000215.C, TpcRowQ.20160618.000215.C, TpcSecRowB.20160207.000215.root, TpcSecRowB.20160512.000215.root, TpcSecRowB.20160618.000215.root - added 2-nd iteration of dE/dx calibration for run 2016 AuAu 200GeV and dAu 200GeV; - September 23, 2016
new library SL16j tagged as SL16j has been created and built on SL6.4 (32bits & 64bits );
default compiler is gcc 4.8.2 . Library was tested with standard test suite, passed it successfully and released on September 27.
Main features:
- new geometry version AgML 2.0 released;
- picoDst code integrated ;
- added alternative TPC PID model used dN/dx - number of primary electrons of ionization;
- added first revision of iTPC DAQ;
- added new Event Generator models: EvtGev 1.06.00, Photos 3.61, Tauola 1.1.15, HepMC 2.06.0 ;
- several bugs fixed;Next codes have been updated:
StRoot
StarGenerator/EvtGen1_06_00 - new event generator code;
StarGenerator/Tauola1_1_5 - new event generator code;
StarGenerator/Photos3_61 - new event generator code;
StarGenerator/HepMC2_06_09 - new event generator code;
StBFChain
BigFullChain.h, StBFChain.cxx - added initial PicoDst chain options;
StDetectorDbMaker
StSstSurveyC.h, StiSstChairs.cxx, StiSstHitErrorCalculator.h, StiSstTrackingParameters.h - added new files for SST table;
StDetectorDbChairs.cxx - modified to add new SST table; added access to extended TpcCurrentCorrectionX table;
StDetectorDbChairs.cxx, St_TpcAvgPowerSupplyC.h, St_tpcAnodeHVC.h, St_tpcAnodeHVavgC.h - modified to add new TPC corrections;
St_TpcAdcCorrectionBC.h, St_TpcCurrentCorrectionC.h, St_TpcEdgeC.h, St_TpcEffectivedXC.h, St_TpcTanLC.h, St_TpcrChargeC.h - added files for new TPC corrections;
St_tpcSecRowBC.h, St_tpcSecRowCC.h, St_tpcSecRowXC.h - removed files;
StdEdxY2Maker
StTpcdEdxCorrection.cxx, StTpcdEdxCorrection.h, StdEdxY2Maker.cxx, StdEdxY2Maker.h, StdEdxY2MakerLinkDef.h - modified to add new TPC corrections;
dEdxTrackY2.cxx, dEdxTrackY2.h - removed files;
StEvent
StTriggerData2016.cxx - added missing check for validity of mBBC[buffer] ;
StTpcDedxPidAlgorithm.cxx - added new method for TPC PID: dNdx (primary electrons of ionization);
StMcEvent
StMcTpcHit.hh - added number of primary electrons;
StMuDSTMaker
COMMON/StMuProbPidTraits.h, StMuProbPidTraits.cxx, StMuTrack.cxx - added new TPC PID data using dNdx method (primary electrons of ionization);
StPicoEvent
StPicoBEmcPidTraits.cxx, StPicoBEmcPidTraits.h, StPicoBTofHit.cxx, StPicoBTofHit.h, StPicoBTofPidTraits.cxx, StPicoBTofPidTraits.h, StPicoBTowHit.cxx, StPicoBTowHit.h, StPicoEmcTrigger.cxx, StPicoEmcTrigger.h, StPicoEvent.cxx, StPicoEvent.h, StPicoMtdHit.cxx, StPicoMtdHit.h, StPicoMtdPidTraits.cxx, StPicoMtdPidTraits.h, StPicoMtdTrigger.cxx, StPicoMtdTrigger.h, StPicoTrack.cxx, StPicoTrack.h, StPicoUtilities.h - first revesion of new code to produce PicoDst;
StPicoDstMaker
StPicoArrays.cxx, StPicoArrays.h, StPicoDst.cxx, StPicoDst.h, StPicoDstMaker.cxx, StPicoDstMaker.h - first revesion of new code to produce PicoDst ;
StTpcRSMaker
StTpcRSMaker.cxx, StTpcRSMaker.h, TpcRS.C - modified to add Heed model and adjust for new StTpcdEdxCorrections;
ArCH4.g, PAI.cxx, PAI.h - removed files;
Sti
StiTrackNodeHelper.cxx - fixed bug #3243 and remove redundant checks to spare time;
StiSsd
StiSstDetectorBuilder.cxx - switched Ssd => Sst table for HitError Calculation ;RTS
include/RC_Config.h, rtsSystems.h - added year 2017 detectors systems;
src/DAQ_ITPC/Makefile, itpcCore.cxx, itpcCore.h, itpc_maps.h, itpc_padplane.h, itpc_rowlen.h- added first version for iTPC DAQ;
src/DAQ_FPS/daq_fps.cxx, daq_fps.h - added redout for FPOST;
src/DAQ_RHICF/Makefile, daq_rhicf.cxx, daq_rhicf.h - first revision of RHICF code;
daq_rhicf.cxx - added skipping of the bankHeader;
src/RTS_EXAMPLE/Makefile, rts_example.C - added RHICF;pams
sim/idl/g2t_tpc_hit.idl - added number of primary electrons in Hit;
g2t_track.idl - added number of primary electrons in Hit; added number of real TPC hits;StarVMC
StarAgmlLib/AgMLStructure.cxx, AgMLStructure.h - added new files for AgML 2.0 first release;
StarAgmlStacker.cxx - modified to apply consistent nicknaming convention between ROOT and AgSTAR geometries;
GeometryStarGeo.xml dummy.cc - added new files for AgML 2.0 first release;
Geometry.cxx, Geometry.h, geometryStats.cc, geometryStats.hh - removed files;
Geometry/ZcalGeo/ZcalConfig.xml - new file for AgML 2.0 first release;
Geometry/VpddGeo/VpddConfig.xml - new file for AgML 2.0 first release;
Geometry/TpceGeo/TpceConfig.xml - new file for AgML 2.0 first release;
Geometry/UpstGeo/UpstConfig.xml - new file for AgML 2.0 first release;
Geometry/SisdGeo/SisdConfig.xml - new file for AgML 2.0 first release;
Geometry/SvttGeo/SvttConfig.xml - new file for AgML 2.0 first release;
Geometry/SupoGeo/SupoConfig.xml - new file for AgML 2.0 first release;
Geometry/SconGeo/SconConfig.xml - new file for AgML 2.0 first release;
Geometry/ShldGeo/ShldConfig.xml - new file for AgML 2.0 first release;
Geometry/QuadGeo/QuadConfig.xml - new file for AgML 2.0 first release;
Geometry/PixlGeo/DtubConfig.xml, PixlConfig.xml, PsupConfig.xml, PxstConfig.xml - new file for AgML 2.0 first release;
Geometry/PipeGeo/PipeConfig.xml - new file for AgML 2.0 first release;
Geometry/PhmdGeo/PhmdConfig.xml - new file for AgML 2.0 first release;
Geometry/MagpGeo/MagpConfig.xml - new file for AgML 2.0 first release;
Geometry/MutdGeo/MutdConfig.xml - new file for AgML 2.0 first release;
Geometry/IdsmGeo/IdsmConfig.xml - new file for AgML 2.0 first release;
Geometry/HcalGeo/HcalConfig.xml - new file for AgML 2.0 first release;
Geometry/IstdGeo/IstdConfig.xml - new file for AgML 2.0 first release;
Geometry/FtpcGeo/FtpcConfig.xml - new file for AgML 2.0 first release;
Geometry/FtroGeo/FtroConfig.xml - new file for AgML 2.0 first release;
Geometry/FtsdGeo/FtsdConfig.xml - new file for AgML 2.0 first release;
Geometry/FgtdGeo/FgtdConfig.xml - new file for AgML 2.0 first release;
Geometry/FpdmGeo/FpdmConfig.xml - new file for AgML 2.0 first release;
Geometry/CaveGeo/CaveConfig.xml - new file for AgML 2.0 first release;
Geometry/EcalGeo/EcalConfig.xml - new file for AgML 2.0 first release;
Geometry/Compat/xgeometry.xml - new file for AgML 2.0 first release;
Geometry/BbcmGeo/BbcmConfig.xml - new file for AgML 2.0 first release;
Geometry/BtofGeo/BtofConfig.xml - new file for AgML 2.0 first release;
Geometry/CalbGeo/CalbConfig.xml - new file for AgML 2.0 first release;
xgeometry/xgeometry.age - new file for AgML 2.0 first release;StarDb
Calibrations/tpc/TpcZDC.20160207.000004.C, TpcZDC.20160618.000004.C - added new files to switch off ZDC correction for run 2016;
TpcCurrentCorrection.20160207.000033.C, TpcCurrentCorrection.20160618.000033.C, TpcDriftDistOxygen.20160207.000004.C, TpcDriftDistOxygen.20160618.000004.C, TpcEffectivedX.20160207.000102.C, TpcEffectivedX.20160618.000102.C, TpcLengthCorrectionMDF.20160207.000102.C, TpcLengthCorrectionMDF.20160618.000102.C, TpcRowQ.20160207.000104.C, TpcRowQ.20160618.000104.C, TpcSecRowB.20160207.000104.root , TpcSecRowB.20160618.000104.root, TpcTanL.20160207.000059.C, TpcTanL.20160618.000059.C, TpcZCorrectionB.20160207.000102.C, TpcdXCorrectionB.20160207.000040.C, TpcdXCorrectionB.20160618.000040.C, tpcPressureB.20160207.000102.C, tpcPressureB.20160618.000102.C - added preliminary dEdx calibrations for auau 200GeV run 201;
TpcAdcCorrectionB.y2016.C - modified ;
TpcCurrentCorrection.C - added default correction ;
TpcAdcCorrectionB.y2015.C, TpcDriftDistOxygen.y2015.C, TpcDriftDistOxygen.y2016.C, TpcEdge.C, TpcEffectivedX.C, TpcLengthCorrectionB.y2015.C, TpcLengthCorrectionB.y2016.C, TpcPadCorrection.y2015.C, TpcPadCorrection.y2016.C, TpcPhiDirection.y2015.C, TpcPhiDirection.y2016.C, TpcResponseSimulator.y2014.C, TpcResponseSimulator.y2015.C, TpcResponseSimulator.y2016.C, TpcRowQ.y2015.C, TpcRowQ.y2016.C, TpcSecRowB.y2015.C, TpcSecRowB.y2016.C, TpcSecRowC.C, TpcTanL.C, TpcZCorrectionB.y2015.C, TpcZCorrectionB.y2016.C, TpcdCharge.y2016.C, TpcdEdxCor.y2016.C, TpcrCharge.C, tpcAnodeHV.y2016.C, tpcAnodeHVavg.y2016.C, tpcDriftVelocity.y2016.C, tpcGas.y2016.C, tpcGasTemperature.y2016.C, tpcMethaneIn.y2015.C, tpcMethaneIn.y2016.C, tpcPressureB.y2015.C, tpcPressureB.y2016.C, tpcSlewing.y2015.C, tpcSlewing.y2016.C, tpcWaterOut.y2015.C, tpcWaterOut.y2016.C - added new files to set/reset default values ;
TpcAdcCorrectionB.y2016.C TpcdXCorrectionB.C - modified;
dEdxModel/dEdxModel_Bichsel.root, dEdxModel_Heed.root, dNdx_Heed.root - added new files for Heed model;StDb
idl/vpdSimParams.idl - added new TOF table;
TpcEffectivedX.idl - added table to account effective TPC pad row thickness;
tpcCorrectionX.idl - added extended tpcCorrection;OnlTools
Jevp/StJevpServer/JevpServer.cxx - updated;
Jevp/StJevpViewer/EthClient.h, JevpViewer.cxx, JevpViewer.h, TGTab2.cxx, example.cxx, example.h - - updated; - September 7, 2016
new library SL16i tagged as SL16i has been created and built on SL6.4 (32bits & 64bits );
default compiler is gcc 4.8.2 . Library was tested with standard test suite, passed it successfully and released on September 09.
Main features:
- code improvement to speed up reconstruction by ~10% ;
- refactoring vertex finding code to help PPV to find the optimal vertex position when a 3D fit to vertex is used;
- several bugs fixed;Next codes have been updated:
StRoot
StdEdxY2Maker
StdEdxY2Maker.cxx - disabled dN/dx fit;
StGenericVertexMaker
StFixedVertexFinder.cxx, StFixedVertexFinder.h, StGenericVertexFinder.cxx, StGenericVertexFinder.h, StGenericVertexMaker.cxx, StppLMVVertexFinder.cxx, StppLMVVertexFinder.h - removed unused arguments in UseVertexConstraint();
old UseVertexConstraint() made private virtual and call it from its public replacement in the base class and mark methods as private explicitly;
removed unused private data member mWeight; eliminated unused private beamline parameters;
modified to use for beamline position equivalent static methods from parent class;
switched to cleaner c++11 range loop syntax; minor c++ refactoring: removed unused counter; c-style array updated to std::array;
StGenericVertexFinder.cxx - modified to use conventional weight for seed position; use inverse of sigma^2 as a weight when calculating the weighted average seed position from provided track DCA's;
Minuit/StMinuitVertexFinder.cxx, StMinuitVertexFinder.h - updated;
StiPPVertex/StPPVertexFinder.cxx, StPPVertexFinder.h, TrackData.cxx - removed unused arguments in UseVertexConstraint();
StPPVertexFinder.cxx - modified to force the initial seed position to be on the beamline; when fit vertex with the beamline constraint force the initial seed position to be on the beamline;
modified to reduced initial step size in minuit for hopefully faster convergence;
updated to define minuit fit search window using PPV parameters: new definition allows to change the window width together with the track pre-selection;
Sti
StiLocalTrackSeedFinder.cxx - implemented assert when two hit are to close;
RTS
include/RC_Config.h, rtsSystems.h - updated; - August 5, 2016
new library SL16h tagged as SL16h has been created and built on SL6.4 (32bits & 64bits );
default compiler is gcc 4.8.2 . Library was tested with standard test suite, passed it successfully and released on August 8.
Main features:
- updated IST/SST geometry with latest changes;
- implemented y2016a production geometry for run 2016;
- few bugs and coverity findings fixed ;Next codes have been updated:
StRoot
StarClassLibrary
StMCTruth.cxx - commented out dead code, initialized members in ctor; coverity fixes;
StParticleDefinition.cc - initialized members in ctor; coverity fixes;
StParticleTable.cc - fixed error in G3ID to PDGid mapping;
StarGenerator
DECAY/AgUDecay.cxx - corrected indexing error when deselecting particles which are stacked for further processing;
FILT/StDijetFilter.cxx - fixed coverity findings;
TEST/StTruthTestMaker.cxx - fixed devision by zero;
TPCCATracker
AliHLTTPCCADef.h, AliHLTTPCCAHitArea.cxx, AliHLTTPCCANeighboursCleaner.cxx, AliHLTTPCCANeighboursFinder.h, AliHLTTPCCASliceDataVector.cxx, AliHLTTPCCASliceDataVector.h, AliHLTTPCCATrackParamVector.h, AliHLTTPCCATracker.cxx, AliHLTTPCCATracker.h, AliHLTTPCCATrackletConstructor.cxx, AliHLTTPCCATrackletSelector.cxx, AliHLTTPCCATrackletVector.h, CA.C - removed VALGRIND ;
StBFChain
BigFullChain.h - implemented chain with run 2016 production geometry y2016a;
StBichsel
bichselG10.C - modified to restore colors;
StBTofUtil
StBTofINLCorr.h - updated to increase the max number of TDIG for INL corrections for the recent upload of a new board to the TOF INL Corr DB Table;
StChainGeometryDbAliases.h - added support for y2014c / y2015d / y2016a geometries, taking into account l asted changes in IST and SST;
StMcEvent
StMcBTofHit.cc, StMcTpcHit.hh - initialized members in ctor, coverity fixes;
StMcEventMaker
StMcEventMaker.cxx - fixed mess in indexes started from 0 and 1;
StMCFilter
StDijetFilter.cxx - fixed memory leak;
StMtdCalibMaker
StMtdCalibMaker.cxx, StMtdCalibMaker.h - updated to check that calibration parameters are not apply to MC hits;
coverity fixes: check values of backleg, module, cell;
StMtdEvtFilterMaker
StMtdEvtFilterMaker.cxx, StMtdTrackingMaskMaker.cxx - initialized data members, coverity fixes;
StMtdHitMaker
StMtdHitMaker.cxx - fixed coverity findings: check the range of backlegid;
StMtdMatchMaker
StMtdMatchMaker.cxx, StMtdMatchMaker.h - fixed coverity findings: initialization of data members;
added MTD hit IdTruth to avoid applying dy shift for BL 8 and 24 for MC hits;
StMtdUtil
StMtdGeometry.cxx, StMtdGeometry.h - added MTD hit IdTruth to avoid applying dy shift for BL 8 and 24 for MC hits;
StMtdQAMaker
StMtdQAMaker.cxx - fixed coverity findings: initialization of data members;
StMtdQAMaker.cxx, StMtdQAMaker.h - added histograms for vertex QA, and dTof calibration;
StMuDSTMaker
COMMON/StMuMtdHeader.cxx, StMuMtdHeader.h, StMuMtdHit.cxx, StMuMtdHit.h, StMuMtdRawHit.cxx, StMuMtdRawHit.h - added variables initialization to ctors initlist realted to updates to StMuMtd* classes to fix coverity reported errors;
StPass0CalibMaker
StEvtVtxSeedMaker.cxx, StEvtVtxSeedMaker.h, StMuDstVtxSeedMaker.cxx, StMuDstVtxSeedMaker.h, StVertexSeedMaker.cxx, StVertexSeedMaker.h - added tDay, tFill to resNtuple, and improved C++11 compliance;pams
geometry/geometry/geometry.g - added support for y2014c / y2015d / y2016a geometries, taking into account last changes in IST and SST;StarVMC
Geometry/Geometry.cxx - added support for y2014c / y2015d / y2016a geometries, taking into account last changes in IST and SST;
Geometry/VpddGeo/VpddGeo2.xml - removed double placement of volume IBSG;
Geometry/IstdGeo/IstdGeo2.xml - added changes to IST geometry to fix issues with overlaps shadowing cooling materials;
Geometry/SisdGeo/SisdGeo2.xml, SisdGeo3.xml, SisdGeo4.xml, SisdGeo5.xml, SisdGeo6.xml, SisdGeo7.xml - fixed issue with overlap causing large number of steps through SSD/SST geometries; change does not have impact on phsyically meaningful quantitites, and is made for all geometry tags;
Geometry/Compat/xgeometry.xml - added support for y2014c / y201d / y2016a geometries, taking into account last changes in IST and SST;
Geometry/macros/StarGeometryDb.C - added support for y2014c / y2015d / y2016a geometries, taking into account lasted changes in IST and SST;StarDb
AgMLGeometry/Geometry.y2014c.C, Geometry.y2015d.C, Geometry.y201a.C - added support for y2014c / y2015d/ y2016a geometries, taking into account last changes in IST and SST;
Calibrations/tpc/TpcAvgPowerSupply.y2015.C, TpcAvgPowerSupply.y2016.C, TpcAvgPowerSupply.y2017.C - added default power supply parameters;OnlTools
Jevp/StJevpPlot/DisplayDefs.cxx, DisplayDefs.h, PdfFileBuilder.cxx, PdfFileBuilder.h - updated;
Jevp/StJevpPresenter/JevpGui.cxx - updated;
Jevp/StJevpBuilders/hltBuilder.cxx, hltphiBuilder.cxx, l4Builder.cxx, tofBuilder.cxx - updated;
Jevp/StJevpServer/JevpServer.cxx, JevpServer.h, JevpServerMain.cxx - updated;
Jevp/StJevpViewer/EthClient.cxx, JevpViewer.cxx - updated; - July 8, 2016
new library SL16g tagged as SL16g has been created and built on SL6.4 (32bits & 64bits );
default compiler is gcc 4.8.2 . Library was tested with standard test suite, passed it successfully and released on July 12.
Main features:
- further improvement of Sti/StiCA integration codes, pass-2;
- SST makers were updated to do strip masking;
- few bugs and multiple coverity findings fixed ;Next codes have been updated:
asps
Simulation/starsim/atgeant/agdblib.age, agdgetp.age, agdocum.age, agdocume.age - retired unused DB / Zebra interface;
Simulation/starsim/atmain/agxinit.F, agxinit.cdf, dblib.cxx, dbuser.age - retired unused DB / Zebra interface;
Simulation/starsim/deccc/avost.c - coverity fixes;StRoot
StarGenerator
Hijing1_383/StarHijing.cxx - fixed array overrun in temporary particle list (coverity fixes);
FILT/StDijetFilter.cxx - updated to prevent resource leak (coverity fixes); protected against deferencing the end of the list (coverity fixes);
StarLight/StarLight.cxx - intialized all memebers; resolved issue with duplicate code branch;
TEST/StTruthTestMaker.cxx, StTruthTestMaker.h - initialized members (coverity fixes);
UTIL/AgStarParticle.cxx - coverity fixes;
UrQMD3_3_1/StarUrQMD.cxx - removed dead code (coverity fixes);
StBFChain
StBFChain.cxx - modified to increase list of seed finders from CA to CA Default;
StBTofCalibMaker
StBTofCalibMaker.h, StBTofCalibMaker.cxx - coverity fixes;
StGenericVertexMaker
StiPPVertex/Vertex3D.cxx - adopted removal of public StiKalmanTrack::getPoint() in Sti;
Sti
StiDefaultToolkit.h, StiDefaultToolkit.cxx - added 2 seed finders CA & KNN;
StiDetector.h, StiDetector.cxx - removed unused 'getCenterX' method and added 'getDetPlane' method;
StiKalmanTrack.h, StiKalmanTrack.cxx - method 'initialize0' moved here from CA; modified to add additional parameters in method 'reserveHits' : 1=reserve hits and 0=free hits; removed refit with arguments; in method 'approx' has been added aditional parameter: max number of hits to use; non used methods removed;
StiKalmanTrackFinder.h, StiKalmanTrackFinder.cxx - class StiKalmanTrackFinder modified to inheret only from StiTrackFinder; method 'addSeedFinder' added; method 'findAllTracks' removed; member _trackSeedFinder replaced by vector of seed finders _seedFinders; updated for more clear logic of fails handling; modified usage of Zero hit times in seed;
StiKalmanTrack.cxx - removed changing of timesUsed in releaseHits; work around to fix bug #3230 in CA;
StiKalmanTrack.h - changed rMin 4 ==> 0;
StiKalmanTrackNode.cxx - removed debug codes;
StiLocalTrackSeedFinder.h - removed unused methods and members;
StiMapUtilities.h, StiMapUtilities.cxx - added struct SetHitUnused;
StiToolkit.h - added CA & KNN seed finders;
StiTrack.h - added initialize0 ;
StiTrackFinder.h - some pure virtual methods replaced by empty ones;
StiTrackNode.cxx, StiTrackNode.h - method 'sign' added to check matrix for negativity;
StiVMCToolKit.cxx - 'PrintShape' improved;
StiLocalTrackMerger.h, StiLocalTrackMerger.cxx - not used class removed;
StiDefaultToolkit.h, StiDefaultToolkit.cxx, - StiTrackMerger removed;
StiLinkDef.h, StiToolkit.h - track mergers removed;
StiTrack.h - not used methods removed;
StiHit.cxx - modified to return asset if too many tracks for one hit;
StiMapUtilities.cxx - changed setTimesUsed to suTimesUsed;
StiCA
StiCATpcSeedFinder.h, StiCATpcSeedFinder.cxx - modified to make StiCATpcSeedFinder inherited now from StiTrackFinder; for StiCATpcSeedFinder assigned name "CASeedFinder"; method 'startEvent' added; method 'findTrack' added which is used for all seed finders; method 'findTpcTracks' replaced by 'findTrack'; auxiliary class StiCALoader added to create CA seed finder via rootcint;
StiCATpcTrackerInterface.h - includes simplified;
StiCATpcTrackerInterface.cxx - removed automatic creation of seed finder;
StiCADefaultToolkit.cxx, StiCADefaultToolkit.h, StiCAKalmanTrack.cxx, StiCAKalmanTrack.h, StiCAKalmanTrackFinder.cxx, StiCAKalmanTrackFinder.h - removed;
StiCATpcSeedFinder.cxx - mSeeds->pop_back() moved into safe place;
StiMaker
StiStEventFiller.cxx - updated for simplification;
StiMaker.h, StiMaker.cxx - CleanGlobalTracks added; updateToolKit removed;
StiMaker.cxx - include StiCADefaultToolkit.h removed; local function CountHits() added for print only; added seed finders SeedFinderKNN & SeedFinderCA; updated to use flag StiCA with CA seed finder;
StMuDSTMaker
COMMON/StMuFmsHit.h - fixed the incrementing version number v1->v2 due to change from StObject->TObject;
St_geant_Maker
St_geant_Maker.cxx - updated to set global pointer gGeometry during NEW at line 1776; updated to eliminate result storing if it's not checked; fixed index which may go out of bounds;
Embed/StPrepEmbedMaker.cxx - intialized all memebers;
StMcAnalysisMaker
StMcAnalysisMaker.cxx - initialized members; implemented protection against devision by zero;
StMCFilter
StGENParticle.cxx, StGenParticle.h - initialized members;
StDijetFilter.cxx - fixed memory leak; implemented protection against end of list;
StSstDaqMaker
StSstDaqMaker.h, StSstDaqMaker.cxx - sstBadStrips table decoded and activated; coverity fixes: DIVIDE_BY_ZERO, NO_EFFECT, STACK_USE, UNINIT_CTOR ;StarVMC
StarAgmlChecker/StarAgmlChecker.h - coverity fixes;StDb
idl/sstBadStrips.idl - added new sst table;OnlTools
Jevp/StJevpBuilders/JevpBuilder.cxx - updated;
Jevp/StJevpPresenter/EvpMain.cxx - updated;
Jevp/StJevpPlot/JevpPlot.cxx - updated; - June 21, 2016
new library SL16f tagged as SL16f has been created and built on SL6.4 (32bits & 64bits );
default compiler is gcc 4.8.2 . Library was tested with standard test suite, found bugs fixed and library was released on June 22.
Main features:
- first release of library with Sti & StiCA codes integration;
- added TPCCATracker code for CA seed finding :
- added new interface to the AgSTAR PARTICLE definition machinery;
- few bugs and multiple coverity findings fixed ;Next codes have been updated:
StRoot
StAnalysisUtilities
StHistUtil.cxx, StHistUtil.h - fixes for coveriry finding: memory leaks, possible null pointer dereferences, over-write character buffers; resolved coverity BUFFER_SIZE_WARNING with careful copy function;
StarGenerator
DECAY/AgUDecay.cxx, AgUDecay.h - modified to make unknown particle states from external decayer be (1) decayed by the external decayer, or (2) automatically added to geant;
EVENT/StarGenAAEvent.cxx, StarGenEPEvent.cxx, StarGenPPEvent.cxx, StarGenParticle.cxx - updated for proper initialization of all data members in ctor;
FILT/StarParticleFilter.cxx, StarParticleFilter.h - added new files to generate particle filter;
StarFilterMaker.cxx, StarParticleFilter.h - updated for proper initialization of all data members in ctor;
STEP/AgUStep.cxx - updated for proper initialization of all data members in ctor;
TEST/StTruthTestMaker.cxx - eliminate devision by zero;
UTIL/AgStarParticle.h, AgStarParticle.cxx - added new interface to the AgSTAR PARTICLE definition machinery;
addressOfCommons.F - added new file;
StarParticleData.cxx, StarParticleData.h - modified to allow particles to be declared to both G3 and StarParticleData; modified to push user defined particles to lookup table;
StBFChain
StBFChain.cxx - modified to use strncpy() eveywhere and check length; coverity fixes;
BigFullChain.h, StBFChain.cxx - updated to make sure StiCA depends on Sti and TPCCATracker libraries; modified to pass seedfinder option to StiMaker;
St_base
StMessMgr.cxx - modified to ensure char arrays are sufficiently long ; proper initialization;
StBichsel
StdEdxModel.cxx - fixed memory leak;
dEdxParameterization.cxx - fiexd covarity warning;
bichselG10.C - added option for BzM;
StChain
StChain.cxx - missing init added ;
StDbBroker
DbUse.cxx, StDbBroker.cxx, StDbBroker.h, dbNodes.cc, DbRead.cxx - fixed coverity findings;
StDbLib
StHyperCacheFileLocal.cpp, StHyperUtilFilesystem.cpp, StHyperUtilGeneric.cpp, MysqlDb.h, StDbManagerImpl.hh, StDbNode.hh, StDbServer.hh, StDbServiceBroker.h, StDbSql.hh, StDbTableDescriptor.h, StDbXmlReader.h, StlXmlTree.h, dbStruct.hh, StDbConfigNodeImpl.cc, StDbNode.cc, StDbSql.cc, StDbTable.cc, StlXmlTree.cxx, StDbDefaults.cc - updated to fix coverity findings;
StDbManager.cc, StDbModifier.cxx - fixed resource leakage (coverity) ;
StDbXmlReader.cc - fixed buffer size (coverity);
StHyperUtilFilesystem.cpp - updated to make unused return code to be used;
StDbXmlWriter.cc - commented out unused variable in unused code;
StHyperCacheConfig.h - fixed initialization (coverity);
StDbConfigNodeImpl.cc, StDbLogger.hh, StDbManagerImpl.cc, StDbServerImpl.cc, StDbSql.cc - fixed the loop (coverity findings);
StDbXmlWriter.cc, StHyperUtilFilesystem.cpp, StHyperUtilGeneric.cpp, StHyperUtilPlatform.cpp - fixed coverity findings;
StEvent
StFmsCluster.cxx, StFmsPoint.cxx, StFmsPointPair.h, StTriggerData.cxx, StTriggerData.h, StTriggerData2016.cxx, StTriggerData2016.h - coverity findings fixed;
StFilterMaker
StGammaFilterMaker.cxx - updated to initialize array of pointers (coverity finding);
StEemcGammaFilterMaker.cxx - removed deadcode (coverity) and removed uneccessary printout;
StFmsDbMaker
StFmsDbMaker.cxx, StFmsDbMaker.h - coverity report fixing;
StFmsFastSimulatorMaker
StFmsFastSimulatorMaker.cxx - coverity findings fixed;
StFmsHitMaker
StFmsHitMaker.cxx - coverity findings fixed;
StFmsPointMaker
StFmsPointMaker.cxx - coverity report fixed;
StFmsUtil
StFmsClusterFinder.cxx, StFmsClusterFitter.h, StFmsEventClusterer.cxx, StFmsTower.cxx, StFmsTowerCluster.cxx - coverity report fixes;
Sti
StiHitContainer.h - updated with coverity fixes;
StiDefaultToolkit.cxx, StiDefaultToolkit.h, StiHit.cxx, StiHitContainer.h, StiKalmanTrack.cxx, StiKalmanTrack.h, StiKalmanTrackFinder.cxx, StiKalmanTrackFinder.h, StiLinkDef.h, StiVMCToolKit.cxx - modified for Sti/StiCA integration and refactoring;
StiTPCCATrackerInterface.cxx, StiTPCCATrackerInterface.h, StiTpcSeedFinder.cxx, StiTpcSeedFinder.h - removed due to Sti/StiCA integration and refactoring;
Base/StiFactory.h -modified for Sti/StiCA integration;
StiCA
StiCADefaultToolkit.cxx, StiCADefaultToolkit.h, StiCAKalmanTrack.cxx, StiCAKalmanTrackFinder.cxx, StiCAKalmanTrackFinder.h, StiCAKalmanTrack.h, StiCATpcSeedFinder.cxx, StiCATpcSeedFinder.h, StiCATpcTrackerInterface.cxx, StiCATpcTrackerInterface.h - added new tracking code with CA seed finding;
StiMaker
StKFVertexMaker.cxx, StiMaker.cxx, StiMaker.h, StiMakerLinkDef.h - modified for Sti/StiCA integration and refactoring;
StiDefaultToolkit.cxx, StiDefaultToolkit.h - removed;
StiSsd
StiSstDetectorBuilder.cxx, StiSsdIsActiveFunctor.cxx, StiSsdIsActiveFunctor.h, StiSstDetectorBuilder.cxx - updated for Sti/StiCA integration ;
StMuDSTMaker
COMMON/StMuFmsCluster.cxx, StMuFmsUtil.cxx - coverity findigs fixed: UNINIT_CTOR on member mEnergy; DEADCODE on check for null pointer;
StSstUtil
StSstWafer.hh - modified to change setMatcheds() to void;
StSstWafer.cc - multiple RESOURCE_LEAK fixes for caverity posting;
StSstBarrel.cc, StSstBarrel.hh, StSstWafer.hh, StSstWafer.cc - coverity: PASS_BY_VALUE fixes;
StSstBarrel.cc, StSstStripList.cc, StSstStripList.hh - coverity FORWARD_NULL fixes;
StSstWafer.cc - coverity REVERSE_INULL fixes;
StSstPoint.cc - coverity UNINIT_CTOR fixes;
StiSvt
StiSvtHitLoader.cxx - updated for Sti/StiCA integration ;
StiUtilities
StiDebug.cxx, StiPullEvent.h - updated for Sti/StiCA integration;
StUtilities
StMessage.cxx - coverity fixes;
StMessageManager.cxx - fixed memory leak (coverity findings);
StMessage.h, StMessageCounter.cxx, StMessageCounter.h - updated for better initializations (coverity fixes);
TPCCATracker
AliHLTArray.h, AliHLTArrayIO.h, AliHLTTPCCAClusterData.cxx, AliHLTTPCCAClusterData.h, AliHLTTPCCADataCompressor.h, AliHLTTPCCADef.h, AliHLTTPCCAGBHit.cxx, AliHLTTPCCAGBHit.h, AliHLTTPCCAGBTrack.cxx, AliHLTTPCCAGBTracker.cxx, AliHLTTPCCAGBTracker.h, AliHLTTPCCAGBTrack.h, AliHLTTPCCAGrid.cxx, AliHLTTPCCAGrid.h, AliHLTTPCCAHitArea.cxx, AliHLTTPCCAHitArea.h, AliHLTTPCCAHit.h, AliHLTTPCCAHitId.h, AliHLTTPCCAMath.h, AliHLTTPCCAMergedTrack.h, AliHLTTPCCAMerger.cxx, AliHLTTPCCAMerger.h, AliHLTTPCCAMergerOutput.h, AliHLTTPCCANeighboursCleaner.cxx, AliHLTTPCCANeighboursCleaner.h, AliHLTTPCCANeighboursFinder.cxx, AliHLTTPCCANeighboursFinder.h, AliHLTTPCCAOutTrack.cxx, AliHLTTPCCAOutTrack.h, AliHLTTPCCAParam.cxx, AliHLTTPCCAParameters.h, AliHLTTPCCAParam.h, AliHLTTPCCARow.cxx, AliHLTTPCCARow.h, AliHLTTPCCASliceDataVector.cxx, AliHLTTPCCASliceDataVector.h, AliHLTTPCCASliceOutput.cxx, AliHLTTPCCASliceOutput.h, AliHLTTPCCASliceTrack.h, AliHLTTPCCAStartHitId.h, AliHLTTPCCAStartHitsFinder.cxx, AliHLTTPCCAStartHitsFinder.h, AliHLTTPCCATrack.cxx, AliHLTTPCCATracker.cxx, AliHLTTPCCATracker.h, AliHLTTPCCATrack.h, AliHLTTPCCATrackletConstructor.cxx, AliHLTTPCCATrackletConstructor.h, AliHLTTPCCATracklet.h, AliHLTTPCCATrackletSelector.cxx, AliHLTTPCCATrackletSelector.h, AliHLTTPCCATrackletVector.cxx, AliHLTTPCCATrackletVector.h, AliHLTTPCCATrackLinearisation.h, AliHLTTPCCATrackLinearisationVector.h, AliHLTTPCCATrackParam.cxx, AliHLTTPCCATrackParam.h, AliHLTTPCCATrackParamVector.cxx, AliHLTTPCCATrackParamVector.h, BinaryStoreHelper.hCA.C, MemoryAssignmentHelpers.h, Reconstructor.cpp, Reconstructor.h, RootTypesDef.h, St opwatch.h, tsc.h - new code for TPC tracking with CA seed finding;
St_QA_Maker
StQABookHist.cxx - fixed initializations;
StSsdDbMaker
StSstDbMaker.cxx, StSstDbMaker.h - coverity fixes;
StSstDaqMaker
StSstDaqMaker.cxx - fixed memory leak, refactored how output file name is formed; got rid of unused local variable; fixed initialization of variables;
StSstPointMaker
StSstPointMaker.cxx - fixed coverity findings;
StSstUtil
StSstClusterList.cc - fixed memory leak in splitCluster() (cpp=check finding);
StSstBarrel.cc, StSstLadder.cc - coverity : CTOR_DTOR_LEAK fixed;
StSstWafer.cc, StSstWafer.hh - coverity : FORWARD_NULL fixed ; modified to simplify method;
StSstStripList.cc - coverity : REVERSE_INULL fixed;
StSstPackage.cc, StSstPointList.cc - coverity : RESOURCE_LEAK fixed in exchange method;
StSstConfig.cc, StSstClusterControl.cxx - coverity: UNINIT_CTOR fixed;
StUtilities
StMultiH1F.cxx, StMultiH1F.h, StMultiH2F.cxx, StMultiH2F.h - fixed coverity warnings, removed unnecessary ROOT types;pams
geometry/geometry/geometry.g - corrected logic error which creates mtd twice in y2015c+;StarVMC
StarAgmlLib/AgBlock.cxx - updated for proper initialization of all data members in ctor;
AgMaterial.cxx - updated to print components only for mixtures;
AgMedium.cxx - updated;
AgShape.cxx - initialized all member variables ;
Geometry/Geometry.cxx - correction in BTOF alignment for some geometry tags; corrected mistake in the y2007a SVT geometry tag instantiating wrong geometry module;
Geometry/Compat/xgeometry.xml - modified to force update;StDb
idl/beamOrbitInfo.idl - added new beam orbit table;OnlTools
Jevp/recoverEvpDb.pl - added new file;
Jevp/StJevpBuilders/l4Builder.h, l4Builder.cxx - added hBesGoodVrVsVz;
Jevp/StJevpServer/JevpServer.cxx - updated; - May 18, 2016
new library SL16e tagged as SL16e has been created and built on SL6.4 (32bits & 64bits );
default compiler is gcc 4.8.2 . Library was tested with standard test suite, passes it successfully and library was released on May 20.
Main features:
- added new function to StGenericVertexMaker code to use beamline constraint errors when fit primary vertex with PPV & VFMinuit ;
- finalized codes adjustment necessary to compile library with optimization level 02;
- few bugs and coverity warnings fixed ;Next codes have been updated:
asps
Simulation/starsim/rebank/aslgetba.age - replaced DO loop with vectorized FORALL loop (FORtran 95) to comply with optimization level 2 for library compilation, bug #3202; FORALL enables vectorized array assignment with masking conditions;StRoot
StarGenerator
BASE/StarPrimaryMaker.cxx - removed confusing beamline constraint message when no beamline constraint applied;
AgStarReader.cxx - fixed initialization;
StarPrimaryMaker.cxx - fixed coverity warning, initialization, compiler warning;
StarLight/beambeamsystem.cpp - fixed array out of bounds by expanding array by 1;
gammagammaleptonpair.cpp, gammagammaleptonpair.h - fixed an unititialized value; fixed array out of bounds by expanding array by 1 ;
gammagammaleptonpair.cpp - added include assert.h;
twophotonluminosity.cpp - updated to get rid of cppcheck warning that index may be < 0 ; assert added;
UTIL/StarParticleData.cxx, StarParticleData.h - added method to set tracking code of a particle definition;
StarParticleData.cxx - fixed coverity warning, hidden argument;
StarRandom.cxx - fixed initialization;
StBFChain
BigFullChain.h, StBFChain.cxx - added 'beamline3D' option to use with new vertex finders;
StBFChain.h - fixed initialization in ctor;
StBFChain.cxx - added missing length check;
StChain
GeometryDbAliases.h - corrected mistake;
StMaker.cxx - added dimension check protection;
StDbUtilities
StMagUtilities.cxx - fixed coverity warnings, one typo in Radius calculation, updated very minor optimizations;
StEvent
StTpcHit.h - fixed coverity warning; added initialization of mAdd;
StGammaMaker
StGammaRawMaker.cxx - initialized pointer to zero, since cppcheck doesn't see that it always gets set in next lines;
StJetMaker
StUEMaker2009.cxx - changed to include StJetMaker2012 instead of StJetMaker2009;
StJetSkimEventMaker.cxx - added StBTofHeader and StEnumerations and set vpd event information;
StGenericVertexMaker
StGenericVertexFinder.h - modified to switch to another but equivalent header file;
implemeted alias for a long type name;
StCtbMatcher.h, StppLMVVertexFinder.cxx - removed unused variables reported by compiler;
StGenericVertexMaker.cxx - modified to determine fit mode from BFC options and pass to vertex finders supporting this option;
implemented special treatment for vertices satisfying the beamline equation: the denominator is zero when the point is exactly on the beamline, so there will be returned a zero for the chi2 in this case;
StGenericVertexFinder.cxx, StGenericVertexFinder.h - moved beam equation to base class; moved static container of DCA states to the base class; renamed static variable according to STAR standards;
removed uninformative log messages; introduced option to choose a vertex fitting mode; set default value in the constructor;
renamed static method s/CalcBeamlineChi2/CalcChi2Beamline/ ;
modified to wrap static member in static method to avoid initialization order fiasco ;
introduced static member methods to calculate chi^2; updated to use CalcChi2DCAs() to calculate chi^2 for track helices represented by their DCA states with respect to a point, use 'CalcChi2DCAsBeamline()' to calculate chi^2 which in addition to 'CalcChi2DCAs()' includes a chi^2 of the point with the beamline;
implemented new static method to calculate vertex seed position from track DCAs;
StGenericVertexFinder.cxx, StGenericVertexFinder.h, StGenericVertexMaker.cxx, StGenericVertexMaker.h, StppLMVVertexFin der.cxx - cosmitic changes to improve readability and comments;
Minuit/StMinuitVertexFinder.cxx, StMinuitVertexFinder.h - modified to propagate vertex fitting mode to derived classes; removed uninformative log messages; modified to use another chi^2 function with beamline to minimize;
updated to prevent modifications of DCA's with pointers in this vector;
moved beam equation to base class; moved static container of DCA states to the base class;
cosmetic changes to improve readability and comments;
StMinuitVertexFinder.cxx - modified to revert condition to get fully equivalent 'if' statement; replaced bool flag (mVertexConstrain) with equivalent new n-fold option that can take more than two values in order to accommodate new vertex fitting modes; modified to select minimization function based on internal option;
renamed static variable according to STAR standards; renamed static method s/CalcBeamlineChi2/CalcChi2Beamline/ ;
wrapped static member in static method to avoid initialization order fiasco;
StiPPVertex/StPPVertexFinder.cxx, StPPVertexFinder.h -removed uninformative log messages; modified to propagate vertex fitting mode to derived classes;
implemented new method to create track DCA and fill static container;
improved PPV vertex position by fitting tracks pointing to it;
StPPVertexFinder.cxx - replaced the existing mVertexConstraint flag with equivalent option that can take more than two values in order to accomodate new vertex fitting modes;
modified to use base class seeds in initial vertex position;
replaced bool flag (mVertexConstrain) with equivalent new n-fold option;
StPPVertexFinder.cxx, VertexData.cxx - cosmetics changes to improve readability and comments;
Sti
StiHitTest.cxx, StiKalmanTrackNode.cxx, StiTrackNodeHelper.cxx, StiTrackNode.cxx - updated to get rid of warning messages;
StiTrackNode.cxx - modified to comply with level 2 library optimization;
StiMaker
StPhiEtaHitList.cxx - updated to get rid of warning messages;
StiUtilities
StiDebug.cxx - updated to get rid of warning messages;
StMcEvent
StMcEvent.cc, StMcHit.hh, StMcMtdHit.cc, StMcTofHit.hh, StMcTrack.cc, StMcVertex.cc - fixed coverity warnings;
StMuDSTMaker
COMMON/StMuDbReader.cxx, StMuDbReader.h - inlined method moved in the header;
StMuDstFilterMaker.cxx, StMuDstMaker.cxx - updated to get rid of compiler warning by removing set but never used variables;
StPass0CalibMaker
StSpaceChargeDistMaker.cxx - fixed initialize, cast to double for division;
StPxlSimMaker
StPxlFastSim.cxx, StPxlSimMaker.cxx - minor modifications to improve coding style;
St_geant_Maker
St_geant_Maker.cxx - fixed bug #3204: removed unused call to geant3->Gfhead, whose only purpose seems to be to cause a corruption of the stack;
St_QA_Maker
StEventQAMaker.cxx, StQABookHist.cxx, StQABookHist.h, StQAMakerBase.cxx - modified to address coverity findings: uninitialized vars, dead code, one PMD error, and one TOF error;RTS
include/trgQTMasks.h - fixed broken defines at the end;StarVMC
StarAgmlLib/StarNoStacker.h - updated position which was missing in the no-action stacker, as required by interface; - May 12, 2016
SL16d library has been updated with codes below to build optimized library version with optimization level 02. This optimization will help to speed up production ~2 times;
Library was retagged as SL16d_1 and rebuilt on SL6.4 platform.
Next codes have been updated:
- asps/Simulation/agetof/Conscript
- asps/Simulation/starsim/Conscript
- asps/Simulation/starsim/rebank/aslgetba.age
- pams/gen/hijing_382/Conscript
- Sti/StiTrackNode.cxx
- St_geant_Maker/St_geant_Maker.cxx
- mgr/Conscript-standard, ConsDefs.pm
- OnlTools/Jevp/Conscript-standard - April 14, 2016
new library SL16d tagged as SL16d has been created and built on SL6.4 (32bits & 64bits );
default compiler is gcc 4.8.2 . Library was tested with standard test suite and released on April 18.
Main features:
- updated trigger simulator for run 2012 data analysis;
- added cosmic ray option to kinematics event generator;
- Sti updated to comply with compilation for level 2 optimization;
- further development of OnlTools for online monitoring plots;
- few bugs fixed ;Next codes have been updated:
StRoot
StAnalysisUtilities
StHistUtil.cxx - updated to implement histogram list by subsystem, single TPC sector reference choice;
StBFChain
BigFullChain.h, StBFChain.cxx - added 'hitreuseon' option to reuse TPC hits for track fitting;
StarGenerator
Kinematics/StarKinematics.cxx, StarKinematics.h - adedd cosmic ray option to kinematics event generator;
Pythia6_4_23/Pythia6_4_23LinkDef.h - modified to expose more common blocks to CINT;
Pythia6_4_28/Pythia6_4_28LinkDef.h - modified to expose more common blocks to CINT;
STEP/AgUStep.cxx, AgUStep.h - improved printout and modified to allow to run if no root geometry;
macros/starsim.cosmics.C - added cosmic ray option to kinematics event generator;
StEvent
StTriggerData2016.cxx, StTriggerData2016.h - method 'bbcVP101()' added;
StGenericVertexMaker
StGenericVertexMaker.cxx - minor refactoring, reduced scope of local variables;
StGenericVertexFinder.cxx, StGenericVertexFinder.h - added static member to keep beamline parameters;
added static method to calculate chi2 for beamline and a point;
StGenericVertexFinder.cxx, StGenericVertexFinder.h, StGenericVertexMaker.cxx - modified to use all available beamline parameters from DB ;
StGenericVertexFinder.cxx - prefixed included headers with path to corresponding module;
Minuit/StMinuitVertexFinder.cxx - removed pointless remnants; modified to set static variable value at initialization;
StvPPVertex/StPPVertexFinder.cxx - removed pointless remnants;
StiPPVertex/StPPVertexFinder.cxx - modified to convey to C++11 syntax;
Sti
StiKalmanTrack.cxx, StiKalmanTrackNode.cxx, StiKalmanTrackNode.h, StiTrackNode.cxx, StiTrackNode.h, StiTrackNodeHelper.cxx - fixed compilation problem for library optimization with level 2; array [1] removed;
StiMaker
StiStEventFiller.cxx - fixed compilation problem for library optimization with level 2; array [1] removed;
StPxlSimMaker
StPxlSimMaker.cxx, StPxlSimMaker.h - modified to set choice of geometry mutually exclusive; set flag to control geometry source; fixed a logic bug;
StTriggerUtilities
StTriggerDefinition.h - removed onbits0/offbits0 to match with what was in the database table;
StTriggerSimuMaker.cxx, StTriggerSimuMaker.h, StTriggerSimuResult.cxx, StTriggerSimuResult.h, StVirtualTriggerSimu.h - updated trigger simulator for run12 analysis;
Bemc/StBemcTriggerSimu.cxx - updated trigger simulator for run12 analysis;
Emc/StEmcTriggerSimu.cxx StEmcTriggerSimu.h - updated trigger simulator for run12 analysis ;
StDSMUtilities/TriggerDefinition.hh - updated trigger simulator for run12 analysis;
macros/read_trigger_definitions.C, read_trigger_thresholds.C, write_trigger_definitions.C, write_trigger_thresholds.C - updated for trigger simulator for run12 analysis;
RunTriggerSimu.C - added new macro to run trigger simulator;
St_QA_Maker
QAhlist_subsystems.h - added new file with list of histograms by subsystem;RTS
src/DAQ_READER/daqReader.cxx, daqReader.h - fixed trigger IDs;StarDb
Calibrations/tpcTpcLengthCorrectionMDF.20150131.000051.C - added new files with fixed correction for for I70;
TpcRowQ.20150609.000102.C, TpcSecRowB.20150609.000102.root - added run 2015 dE/dx calibrations for pAl 200GeV;OnlTools
Jevp/StJevpBuilders/bemcBuilder.cxx, daqBuilder.cxx, eemcBuilder.cxx, fpdBuilder.cxx, fpsBuilder.cxx - modified;
l4Builder.cxx - updated the Y-axis range for Tof_TrayID_TrgTime and X-axis range for_dEdx;
tofBuilder.cxx - changed trigger windows;
vpdBuilder.h, vpdBuilder.cxx - added new plots for the testing of Plan B algo, added pulser monitoring plots;
modified to make config to read every run, fixed issue show wrong TACS;
daqBuilder.cxx, tpxBuilder.cxx, JevpBuilder.cxx - updated;
Jevp/StJevpPlot/JLatex.h, JevpPlot.cxx, JevpPlot.h, PdfFileBuilder.h - modified;
DisplayDefs.cxx, DisplayDefs.h, JevpPlotSet.cxx, JevpPlotSet.h - updated;
Jevp/StJevpPresenter/EvpMain.cxx, JevpGui.cxx, JevpGui.h, simpleQT.cxx, JevpGui.cxx, JevpScreenWidget.cxx, JevpScreenWidget.h, ReferenceWidget.cxx, ReferenceWidget.h, ZoomWidget.cxx, ZoomWidget.h - updated;
canvas.cxx, canvas.h, JevpScreenWidget.cxx, JevpScreenWidget.h, RootWidget.cxx, RootWidget.h - added new files;
Jevp/StJevpViewer/TGTab2.cxx, TGTab2.h, example.cxx, example.h, testNative.C, EthClient.cxx, EthClient.h, JevpViewer.cxx, JevpViewer.h, ZoomFrame.cxx, ZoomFrame.h, runViewer.C - added new files;
Jevp/StJevpServer/JevpServer.cxx, JevpServerMain.h, JevpServer.h, JTMonitor.cxx - updated; - March 3, 2016
new library SL16c tagged as SL16c has been created and built on SL6.4 (32bits & 64bits );
default compiler is gcc 4.8.2 . Library was tested with standard test suite, found bugs fixed and library was released on March 8.
Main features:
- StEvent, StEventUtilities modified to fix the function StTrackTopologyMap::hasHitInSstLayer() usage for SST;
- added new code StIstSimMaker for IST slow simulation;
- StIstRawHitMaker updated with latest development;
- fixed bug on row number in StPxlRawHitMaker;
- corrected MTD radii and added y2015c geometry tag;
- OnlTools/Jevp further updates for run 2016 online monitoring plots;
- few other bugs fixed ;Next codes have been updated:
StRoot
StBFChain
BigFullChain.h - changed options 'istRaw' to 'istRawHit'; added 'istSlowSim' option;
added production chain with y2015c geometry (with corrected MTD geometry);
StBFChain.cxx - introduced 'HftHitFilt' option to remove non-HFT hits;
StarRoot
TIdTruUtil.cxx, TIdTruUtil.h - added utility for IdTruth calculation;
St_base
StarChairDefs.h - updated to extend debug;
StChain
GeometryDbAliases.h - corrections to MTD radii and y2015c geometry tag added;
StDetectorDbMaker
StDetectorDbChairs.cxx - updated to extend debug;
StEvent
StTrackTopologyMap.cxx - modified to make kSsd and kSst equivalent in numberOfHits();
StTrackTopologyMap.h - added method 'hasHitInSstLayer()';
StTrackDetectorInfo.cxx - implemented set of modifications for SST;
StHit.cxx, StHit.h - removed implentation of 'detector()' making class pure abstract;
StBTofHit.h, StEmcCluster.h, StEmcPoint.h, StEnumerations.h, StFgtHit.h, StFtpcHit.h, StIstHit.h, StPxlHit.h, StRichHit.h, StRnDHit.cxx, StSsdHit.h, StSstHit.h, StTofHit.h, StTpcHit.h, StSvtHit.h - implemented method 'detector()' which is now a pure abstract method in StHit;
StEventUtilities
StuFixTopoMap.cxx - modified to use HFT format for SST;
StIstClusterMaker
StIstScanClusterAlgo.cxx - added idTruth for clusters;
StIstRawHitMaker
StIstRawHitMaker.cxx, StIstRawHitMaker.h - averlayed latest code development; added idTruth;
modified to use 'std::array' instead of C-array ;
StIstRawHitMaker.cxx - corrected usage of 'addRawHit()' due to change in StIstUtil; updated mDataType to be by default = 2;
modified to keep logic the same when filling uncorrected signal;
removed new condition requiring positive charge values which is unclear why it should be;
StIstSimMaker
StIstSlowSimMaker.cxx, StIstSlowSimMaker.h - added new files for IST slow simulation;
StiMaker
StiMaker.cxx - replaced kSsdId => kSstId;
StiSsd
StiSstDetectorBuilder.cxx - replaced kSsdId => kSstId;
StGenericVertexMaker
StGenericVertexFinder.cxx, StGenericVertexFinder.h - moved include of StEventTypes.h from header of generic class to implementation files of generic and concrete classes, which caused the problem, bug #3194;
StiPPVertex/StPPVertexFinder.cxx - moved include of StEventTypes.h from header of generic class to implementation files of generic and concrete classes, which caused the problem, bug #3194;
StMuDSTMaker
COMMON/StMuRpsCollection.h - modified to add positionRMSCluster method;
St_QA_Maker
StEventQAMaker.cxx, StQABookHist.cxx - expanded track detector ID histograms;
StEventQAMaker.cxx - modified to use kMaxDetectorId ;
StPeCMaker
StPeCTrigger.cxx - implemented initial level of year 2016 UPC triggers;
StPeCEvent.cxx - updated;
StTriggerDataMaker
StTriggerDataMaker.cxx - removed reference to StEventTypes.h which caused problem running chain, bug #3194;RTS
include/HLT/HLTFormats.h - changed MTD hit format;
src/RTS_EXAMPLE/daqFileHacker.C - added new file;pams/geometry/geometry/geometry.g - corrections to MTD radii and y2015c geometry tag added;
StarVMC
StarAgmlUtil/AgMLPosition.cxx - modified to include cmath header explicitly;
Geometry/Geometry.cxx - corrections to MTD radii and y2015c geometry tag added;
Geometry/Compat/xgeometry.xml - corrections to MTD radii and y2015c geometry tag added;
Geometry/MutdGeo/MutdGeo7.xml - corrections to MTD radii added;StarDb/AgMLGeometry/Geometry.y2015c.C - added y2015c geometry tag;
OnlTools
Jevp/StJevpBuilder/l4Builder.cxx, l4Builder.h - added diEletron2Twr plot and two more dimuon plots;
istBuilder.cxx, istBuilder.h - added hit occupancy selection to mask out hot chips;
updated to keep monitoring hot chips; moved hitmap of coloumn and row out of hit occupancy cut;
istBuilder.cxx - changed type TH1S to TH1I for maxTB histograms;
mtdBuilder.cxx - added new QT board to QA plots for run 2016 ;
Jevp/StJevpServer/jevpHistoMother, JevpServer.cxx, l4HistoMother - updated;
Jevp/StJevpPlot/DisplayDefs.cxx, JevpPlotSet.cxx - updated;
Jevp/StJevpPresenter/qtTestBaseScript.C - modified;
simpleQT.cxx, simpleQT.h - added new files; - March 28, 2016
SL16b library has been updated with codes below to proceed with test production for new tracking evaluation. Library was retagged as SL16b_1 and rebuilt on SL6.4;
New STI updates do not modify default behaviour but added the option to enable hit reuse for different tracks fitting;
Next codes have been updated:
StRoot
StBFChain
BigFullChain.h, StBFChain.cxx - added 'hitreuseon' option to enable hit reuse for multiple tracking;
Sti
StiHitContainer.cxx, StiHitContainer.h, StiHitLoader.h - added max number of tracks assigned to one hit;
StiLocalTrackSeedFinder.cxx - updated not to use 1st hit;
StiMaker
StiMaker.cxx, StiMaker.h - added max number of tracks assigned to one hit; - February 10, 2016
new library SL16b tagged as SL16b has been created and built on SL6.4 (32bits & 64bits );
default compiler is gcc 4.8.2 . Library was tested with standard test suite and released on February 12.
Main features:
- OnlTools/Jevp further updates for run 2016 online monitoring plots;
- StarVMC/StarAgmlLib - added code to support the new positioning of volumes;
- TriggerData updated for run 2016;
- few bugs fixed ;Next codes have been updated:
asps
Simulation/starsim/atlsim.logon.kumac - updated to load AgML util for misalignment support;StRoot
StBFChain
BigFullChain.h, StBFChain.cxx - updated to load StarAgmlUtil library; added print of key on library load;
StDaqLib
TRG/trgStructures2016.h - removed 'union' because ROOT doesn't understand it;
StEvent
StEventLinkDef.h - added several missing pragmas, mostly related to trigger;
StTriggerData.cxx, StTriggerData.h, StTriggerData2016.cxx, StTriggerData2016.h - added functions to access MTD DSM and QT info;
StIstRawHitMaker
StIstRawHitMaker.cxx, StIstRawHitMaker.h - some clean-up in included headers;
StarClassLibrary
DRand48Engine.cc, JamesRandom.cc, RandBreitWigner.cc, RandEngine.cc, RandExponential.cc, RandFlat.cc, RandGauss.cc, RandPoisson.cc, RanecuEngine.cc, RanluxEngine.cc, RanluxEngine.cc - removed deprecated storage class specifier 'register' since it serves no purpose;
StarRoot
TH1Helper.cxx - updated to use const modifier to access const object in this local context;
StFmsUtil
StFmsEventClusterer.cxx, StFmsTowerCluster.cxx, StFmsTowerCluster.h - modified for better chi2 handling;
StJetMaker
StUEMaker2009.cxx - updated to include a sum Paritcle pT function to StUeEvent and mcVertex are now stored for particle level branches;
StUEMaker2009.cxx, StUEMaker2009.h - updated to change ClassDef versions;
St_QA_Maker
StEventQAMaker.cxx, StEventQAMaker.h - added a mode for printing out TPC hits ;
StSstDaqMaker
StSstDaqMaker.cxx, StSstDaqMaker.h - added some protection to avoid chain crash when there is no available calibration table;RTS
include/HLT/HLTFormats.h - added HLT_MTDQuarkonium;
src/DAQ_TPX/tpxPed.cxx, tpxPed.h - fixed the slowness of pedestal initialization;
src/DAQ_READER/daqReader.cxx - moved JEFF log to NOTE;pams
geometry/geometry/geometry.g - fixed bug 3187: y2016 geometry was not completely setup in geometry.g;StarVMC
Geometry/TpceGeo/TpceGeo1.xml, TpceGeo3a.xml - reshaped FORtran-specfic array initialzation;
StarAgmlLib/AgPosition.cxx, AgPosition.h - added new code to assume responsability for positioning of volumes;
StarAgmlLibLinkDef.h - modified to adjust to new positioning code;
AgAttribute.cxx, AgAttribute.h, AgCreate.cxx, AgCreate.h, AgMaterial.cxx, AgMaterial.h, AgMedium.cxx, AgMedium.h, AgPlacement.cxx, AgPlacement.h, AgShape.cxx, AgShape.h, StarAgmlLibLinkDef.h, StarAgmlStacker.h, StarTGeoStacker.cxx, StarTGeoStacker.h - modified to accommodate new code for positioning of volumes;
AgTransform.cxx, AgTransform.h, AgParameterList.cxx, AgParameterList.h - removed codes;
StarAgmlUtil/AgMLPosition.h, AgMLPosition.cxx - added fortran interface to AgML positioning code;StarDb
Calibrations/tpc/TpcAdcCorrectionB.y2016.C, tpcAltroParams.y2016.C - added new files for ALTRO threshold = 4 correction for run 2016;
StDb/idl/mtdQTSlewingCorrPart2.idl - added extension of the MTD Slewing table for Run 2016;OnlTools
Jevp/StJevpBuilders/baseBuilder.cxx, baseBuilder.h, bbcBuilder.cxx, bbcBuilder.h, bemcBuilder.cxx, bemcBuilder.h, daqBuilder.cxx, daqBuilder.h, eemcBuilder.cxx, eemcBuilder.h, fgtBuilder.cxx, fgtBuilder.h, fmsBuilder.cxx, fmsBuilder.h, fpdBuilder.cxx, fpdBuilder.h, fpsBuilder.cxx, fpsBuilder.h, gmtBuilder.cxx, gmtBuilder.h, hltBuilder.cxx, hltBuilder.h, hltphiBuilder.cxx, hltphiBuilder.h, istBuilder.cxx, istBuilder.h, l3Builder.cxx, l3Builder.h, l4Builder.cxx, l4Builder.h, mtdBuilder.cxx, mtdBuilder.h, ppBuilder.cxx, ppBuilder.h, pxlBuilder.cxx, pxlBuilder.h, ssdBuilder.cxx, ssdBuilder.h, tofBuilder.cxx, tofBuilder.h, tpxBuilder.cxx, tpxBuilder.h, trgBuilder.cxx, trgBuilder.h, upcBuilder.cxx, upcBuilder.h,vpdBuilder.cxx, vpdBuilder.h - modified to accommodate the new JevpBuilder.cxx/h code;
JevpBuilder.cxx, JevpBuilder.h - added new files;
ssdBuilder.cxx, ssdBuilder.h - modified to reject first channel in each chip, corrected CM failed map, and fixed ped and rms hist display; added JevpBuilder; updated rms hist display settings;
l4Builder.cxx, l4Builder.h - added dimuon plots;
trgBuilder.cxx - update to raise limits for ZDC ADC monitoring in run 2016;
istBuilder.cxx - removed zerobias cut & vertex cut;
ssdBuilder.cxx - fixed rms y-axias scale to 30 ADC;
Jevp/StJevpPlot/JevpPlotSet.cxx, JevpPlotSet.h - modified accordingly to new JevpBuilder code;
DisplayDefs.cxx, DisplayDefs.h - added new files to move DisplayDefs to isolate shared items into StJevpPlot ;
Jevp/StJevpServer/DisplayDefs.cxx, DisplayDefs.h - removed files due to moving them to StJevpPlot;
Jevp/StJevpPresenter/JevpGui.h - modified dur to relocation of DisplayDefs code to StJevpPlot; - January 13, 2016
new library SL16a tagged as SL16a has been created and built on SL6.4 (32bits & 64bits );
default compiler is gcc 4.8.2 . Library was tested with standart test suite and released on January 15.
Main features:
- added new dEdx method;
- DAQ_TPX code updated with new FEE mapping;
- StJetMaker updated with new codes to allow for Region selection of the towers, tracks, and mcparticles;
implemented the off axis cone underlying event analysis;
- added new files to StarAgmlUtil for AgML support library;
- OnlTools/Jevp updated for run 2016 online monitoring plots;
- few bugs fixed ;Next codes have been updated:
asps
Simulation/starsim/atgeant/agsrotm.age - modified to regularize PHI angles in specifying the rotation matrix; modified to map theta into [0,180] and phi into [0,360]; added additional check so that we do not cre ate the unit matrix;
Simulation/starsim/atlsim.logon.kumac - changed default geometry to y2015a; load AgML support library;StRoot
StBFChain
BigFullChain.h - added year 2016 base reco chain;
StBichsel
Bichsel.cxx, Bichsel.h, StBichselLinkDef.h, dEdxParameterization.cxx, dEdxParameterization.h - added new TpcRS dEdx model;
Bichsel.C, Bichsel70.C, BichselA.C, BichselB.C, BichselD.C, BichselMostProbable.C, BichselP.C, StdEdxModel.cxx, StdEdxModel.h, bichdX.C, bichselBG.C, bichselG.C, bichselG10.C, bichseldNdbg.C, bichseldX.C, dEdxModel.C - added new files with TpcRS dEdx model;
StDetectorDbMaker
StDetectorDbChairs.cxx, StDetectorDbMaker.cxx, StDetectorDbMaker.h, St_TpcAvgCurrentC.h, St_tpcAnodeHVavgC.h, St_trgTimeOffsetC.h - modified to add more chairs;
StGmtSurveyC.h, StIstSurveyC.h, StPxlSurveyC.h, St_TpcAvgPowerSupplyC.h, St_istChipConfigC.h, St_istControlC.h, St_istGainC.h, St_istMappingC.h, St_istPedNoiseC.h, St_pvpdStrobeDefC.h, St_pxlBadRowColumnsC.h, St_pxlControlC.h, St_pxlHotPixelsC.h, St_pxlRowColumnStatusC.h, St_pxlSensorStatusC.h, St_pxlSensorTpsC.h, St_tofCamacDaqMapC.h, St_tofCorrC.h, St_tofDaqMapC.h, St_tofINLCorrC.h, St_tofINLSCorrC.h, St_tofModuleConfigC.h, St_tofPedestalC.h, St_tofTDIGOnTrayC.h, St_tofTOffsetC.h, St_tofTotbCorrC.h, St_tofTrgWindowC.h, St_tofTzeroC.h, St_tofZbCorrC.h, St_tofr5MaptableC.h, St_vpdDelayC.h, St_vpdTotCorrC.h - added new files with implemnetaion of new chairs;
St_trgTimeOffsetC.h - restored triggerTimeOffset and triggerTimeOffsetWest;
StdEdxY2Maker
StPidStatus.cxx, StPidStatus.h, StTpcdEdxCorrection.cxx, StTpcdEdxCorrection.h, StdEdxY2Maker.cxx, StdEdxY2Maker.h - reshaped histograms; added new dEdx method ;
StEvent
StDedxDefinitions.h, StDedxPidTraits.cxx, StDetectorDefinitions.h, StEnumerations.h - added GMT, SST ID and new dE/dx method;
StiMaker
StiStEventFiller.cxx - fixed first hit on primary tracks problem, bug #3166;
StIstRawHitMaker
StIstRawHitMaker.cxx, StIstRawHitMaker.h - modified to switch from std::vector to std::array;
modified to use double instead of float for all ADC values as there is no reason to use float in these modest local calculations;
added class method to set hit charges from an std::array and use this new method in StIstRawHitMaker;
added new constructor allowing set charges in time bins;
StIstUtil
StIstRawHit.cxx, StIstRawHit.h, StIstRawHitCollection.cxx, StIstRawHitCollection.h - added class method to set hit charges from std::array and use this new method in StIstRawHitMaker;
modified to get rid of unnecessary copy constructor and assignment operator;
modified to use 'std::fill_n' to initialize a C-style array member;
eliminated channel id param in 'StIstRawHitCollection::addRawHit';
added class method to set hit charges from an std::array and use this new method in StIstRawHitMaker;
added new constructor allowing set charges in time bins;
StIstRawHit.cxx, StIstRawHit.h - modified to move definition of templated member function to header;
StJetFinder
StFastJetPars.cxx, StFastJetPars.h, StProtoJet.cxx, StProtoJet.h, StjFastJet.cxx, StjFastJet.h - implemented the off axis cone underlying event analysis;
StFastJetAreaPars.cxx, StFastJetAreaPars.h - added new files to implement the StFastJetAreaPars class; this is needed to include the jet area calculation in the jet trees;
StJetMaker
StAnaPars.h, StJetMaker2009.cxx, StJetMaker2009.h - implemented the off axis cone underlying event analysis ;
StJetMaker2012.cxx, StJetMaker2012.h - added new files to implement new StJetMaker2012 class;
StUEMaker2009.cxx, StUEMaker2009.h - added new files to implement StUEMaker2009 class, which is used for the regional UE calculation class;
emulator/StjeTowerEnergyListToStMuTrackFourVecList.cxx - implemented the off axis cone underlying event analysis ;
mcparticles/StjAbstractMCParticleRegion.h, StjMCParticleRegion.cxx, StjMCParticleRegion.h - added new classes which allow for Region selection of the towers, tracks, and mcparticles;
mudst/StjEEMCMuDst.h - implemented the off axis cone underlying event analysis ;
tracks/StjAbstractTrack.h, StjTrackList.h - implemented the off axis cone underlying event analysis ;
StjAbstractTrackRegion.h, StjTrackRegion.cxx, StjTrackRegion.h - added new classes which allow for Region selection of the towers, tracks, and mcparticles;
towers/StjAbstractTowerRegion.h, StjTowerRegion.cxx, StjTowerRegion.h - added the classes which allow for Region selection of the towers, tracks, and mcparticles;
StPass0CalibMaker
StSpaceChargeDistMaker.cxx - updated copy of TpcRS code for dE/dx;
StSstDaqMaker
StSstDaqMaker.cxx, StSstDaqMaker.h - fixed CMN failed chip rejection error;
StFmsUtil
StFmsEventClusterer.cxx - moved some LOG_INFO to LOG_DEBUG;RTS
src/DAQ_TPX/tpxCore.cxx, tpxCore.h, tpx_fee_position.h - added new FEE maps;
tpxCore.cxx, tpxFCF.cxx, tpxFCF.h, tpxFCF_2D.cxx, tpxGain.cxx, tpxPed.cxx, tpxPed.h - modified to adjust to new FEE mapping;StarDb
Calibrations/tpc/TpcCurrentCorrection.20150131.000044.C, TpcdXCorrectionB.20150131.000041.C, TpcLengthCorrectionB.20150131.000008.C, TpcLengthCorrectionMDF.20150131.000030.C, TpcLengthCorrectionMDF.20150131.0000 50.C, tpcPressureB.20150131.000002.C, TpcRowQ.20150131.000048.C, TpcRowQ.20150504.200049.C, TpcZCorrectionB.20150131.000046.C, TpcSecRowB.20150131.000048.root, TpcSecRowB.20150504.200049.root - added dE/dx calibrations for run 2015 pp 200GeV and pAu 200GeV data;
dEdxModel/dEdxModel.root - added new TpcRS dEdx model;
P10T.root - modified;StarVMC
Geometry/BtofGeo/BtofGeo6.xml - modified;
Geometry/IdsmGeo/IdsmGeo1.xml, IdsmGeo2.xml - modified to change translation to an argument of Placement, rather than its own operator;
Geometry/SisdGeo/SisdGeo7.xml - fixed : kOnly ->konly;
StarAgmlUtil/AgParameterList.cxx, AgParameterList.h, AgTransform.cxx, AgTransform.h - added new files for AgML support library; implemented functionality needed to position volumes in both G3 and ROOT geometry models, i.e. handles updating the transformation matrix after each positioning command issued by AgML;StDb/idl/tofTotbCorr.idl, tofZbCorr.idl, vpdTotCorr.idl - removed field with no. of usefull elements;
OnlTools
Jevp/qtTest - added new file;
Jevp/StJevpBuilders/baseBuilder.cxx, bbcBuilder.cxx - updated for run 2016;
Jevp/StJevpServer/JevpServer.cxx, JevpServer.h - updated for run 2016;
Jevp/StJevpPlot/JevpPlotSet.cxx - updated for run 2016;
Jevp/StJevpPresenter/QtTest.cxx, QtTest.h, QtTestGui.cxx, QtTestGui.h, qtTestBaseScript.C - added new files for run 2016;
Lidia Didenko
2017
STAR SOFTWARE NEWS  January 4, 2018
---------------------
The present release assignment:
             SL09g_embed (SL09g_2Embed_v10) ROOT_LEVEL 5.22.00
             SL10c_embed (SL10c_embed_v5)  ROOT_LEVEL 5.22.00
             SL10h_embed (SL10h_embed_v6)  ROOT_LEVEL 5.22.00
             SL10k_embed (SL10k_embed_v11) ROOT_LEVEL 5.22.00
             SL11b    (SL11b_2)  ROOT_LEVEL 5.22.00 MC & st_W pp 500GeV, run 2009
             SL11d_embed (SL11d_embed_v6)  ROOT_LEVEL 5.22.00
             SL12a_embed  (SL12a_embed_v3) ROOT_LEVEL 5.22.00
             SL12d    (SL12d_2)  ROOT_LEVEL 5.22.00 UU 193GeV, pp 200GeV run 2012 production
             SL12d_embed (SL12d_embed_v6) ROOT_LEVEL 5.22.00
             SL13b_embed (SL13b_embed_v1)  ROOT_LEVEL 5.22.00
             SL14a    (SL14a_2)  ROOT_LEVEL 5.34.09 pp 500GeV run 2013 production, days 76-12
             SL14g    (SL14g_3)  ROOT_LEVEL 5.34.09 pp 500GeV run 2013 production, days 129-161
             SL14i    (SL14i_2)  ROOT_LEVEL 5.34.09 AuAu 14.6GeV run 2014 production
             SL15b    (SL15b_1)  ROOT_LEVEL 5.34.09 AuHe3 & AuAu 200GeV run 2014 preview production
             SL15c    (SL15c)    ROOT_LEVEL 5.34.09 AuAu 200GeV run 2014 data production with HFT
             SL15e_embed  (SL15e_embed_v1) ROOT_LEVEL 5.34.09
             SL15k    (SL15k_1)  ROOT_LEVEL 5.34.30 pp 200GeV run 2015 st_fms & st_rp stream data production
             SL15l    (SL15l)    ROOT_LEVEL 5.34.30 pAu 200GeV st_fms run 2015 data production
             SL16a    (SL16a)    ROOT_LEVEL 5.34.30
             SL16b    (SL16b_1)  ROOT_LEVEL 5.34.30
             SL16d    (SL16d_1)  ROOT_LEVEL 5.34.30 pp,pAu,pAl run 2015 production without HFT tracking
             SL16g (SL16g)       ROOT_LEVEL 5.34.30 pp 500GeV run 2013, auau 20GeV run 2014 st_W production
             SL16j (SL16j)       ROOT_LEVEL 5.34.30 auau 200GeV  run 2016 production
             SL16k (SL16k)       ROOT_LEVEL 5.34.30 auau 200GeV run 2016 st_hlt production without HFT tracking
             SL17a (SL17a)       ROOT_LEVEL 5.34.30
       old-> SL17b (SL17b)       ROOT_LEVEL 5.34.30 dAu 200GeV run 2016 preproduction
             SL17c (SL17c)       ROOT_LEVEL 5.34.30
       pro-> SL17d (SL17d)       ROOT_LEVEL 5.34.30 dAu 20-200GeV run 2016 production
             SL17e (SL17e)       ROOT_LEVEL 5.34.30
             SL17f (SL17f_1)     ROOT_LEVEL 5.34.30 auau 200GeV run 2016 st_upc production;
                                                    pp 200GeV run 2015 st_rp reproduction;
             SL17g (SL17g_1)     ROOT_LEVEL 5.34.30 pp 510GeV run 2017 st_W production
             SL17h (SL17h)       ROOT_LEVEL 5.34.30
       new-> SL17i (SL17i)       ROOT_LEVEL 5.34.30 SL7.3, AuAu 54GeV run 2017 production
       dev-> DEV                 ROOT_LEVEL 5.34.30
      .dev-> .DEV                ROOT_LEVEL 5.34.30

-------------------------------------------------
Release History
SL17a library
SL17b library
SL17c library
SL17d library
SL17e library
SL17f library
SL17g library
SL17h library
SL17i library
- November 29, 2017
new library SL17i tagged as SL17i has been created and built on SL6.4 and SL7.3 platform;
default compiler on SL7.3 is gcc 4.8.5 . Library was tested with standard test suite, passed it successfully and released on December 3 .
Main features:
- StiIst, StiPxl, StiSsd codes modified to build geometry path to sensitive elements in a new function ;
- added K*0(892) in StarClassLibrary and gstar ;
- in StarVMC/Geometry added TPC global alignment option to TPC placement and
misalignment option to TPC in y2014x,y2015x,y2016x geometries;
- several bugs fixed;Next codes have been updated:
asps
rexe/TGeant3/TGiant3.h - modified to expose Gcflag_t to ROOT;
StRoot
StDbLib
StDbServiceBroker.cxx - updated with auto-throttling mechanism for network error notifications;
StarClassLibrary
StKStarZero.cc, StKStarZero.hh - added K*0(892) aka pdg 313 to gstar with g3id = 10013 ;
StParticleTable.cc - modified accordingly to accomodate K*0(892) updates;
StarGenerator
STEP/AgUStep.cxx, AgUStep.h - added 'isvol' flag to stepping tree;
StBTofCalibMaker
StBTofCalibMaker.cxx, StBTofCalibMaker.h - modified to remove outdated ClassImp macro; removed unnecessary specification of default std::allocator;
StBTofHitMaker
StBTofHitMaker.cxx, StBTofHitMaker.h - modified to remove outdated ClassImp macro; removed unnecessary specification of default std::allocator ;
StBTofMatchMaker
StBTofMatchMaker.cxx, StBTofMatchMaker.h - modified to remove outdated ClassImp macro; removed unnecessary specification of default std::allocator ;
StBTofMixerMaker
StBTofMixerMaker.cxx, StBTofMixerMaker.h - modified to remove outdated ClassImp macro; removed unnecessary specification of default std::allocator ;
StBTofSimMaker
StBTofSimMaker.cxx, StBTofSimMaker.h - modified to remove outdated ClassImp macro; removed unnecessary specification of default std::allocator ;
StDbUtilities
StMagUtilities.cxx, StMagUtilities.h - modified to allow 'FullGridLeak' to work on specific sheets via sheet widths;
StEvent
StFgtPoint.cxx, StFmsPoint.cxx, StFmsPointPair.cxx - cleanup: removed StRoot/ from included header prefix;
StdEdxY2Maker
StdEdxY2Maker.cxx - updated to disable dN/dx fit ;
StFmsDbMaker
StFmsDbMaker.cxx, StFmsDbMaker.h - added 'getCorrectedAdc' and fix a memory leak ;
StiIst
StiIstDetectorBuilder.cxx, StiIstDetectorBuilder.h - modified to build geometry path to sensitive elements in a new function ;
StiIstDetectorBuilder.cxx - updated to extend search for sensitive volumes in alternative hierarchies;
StiPxl
StiPxlDetectorBuilder.cxx, StiPxlDetectorBuilder.h - modified to build geometry path to sensitive elements in a new function ;
StiPxlDetectorBuilder.cxx - updated to extend search for sensitive volumes in alternative hierarchies ;
StiSsd
StiSstDetectorBuilder.cxx, StiSstDetectorBuilder.h - modified to build geometry path to sensitive elements in a new function ;
StiSstDetectorBuilder.cxx - updated to extend search for sensitive volumes in alternative hierarchies;
StPxlSimMaker
StPxlSimMaker.h - modified do not generate ROOT streamer;
StPxlDigmapsSim.cxx - initialized member pointer in constructor; removed pointless pointer validation;
StSstDaqMaker
StSstDaqMaker.cxx - corrected path to included header file;
StTpcDb
StTpcDbMaker.cxx - enabled Mag.Field depending flavor ;
St_geant_Maker
St_geant_Maker.cxx - removed unecessary log output;RTS
include/daqFormats.h - updated trigger formats;
src/rtsplusplus.def - updated;
src/SFS/fs_index.cxx, fs_index.h, sfs_index.cxx;
trg/include/trgDataDefs_44.h, trgDataDefs_45.h - added new files to update trigger structure;pams
sim/gstar/gstar_part.g - added K*0(892) aka pdg 313 to gstar with g3id = 10013;
sim/g2t/g2t_volume_id.g - updated to have the option to shut the framework up;StarVMC
StarAgmlLib/AgPosition.cxx, AgPosition.h, StarAgmlLibLinkDef.h - added runtime debug switch to AgPosition;
AgPosition.cxx - updated to have the option to shut the framework up;
Geometry/StarGeo.xml - updated to step back to slightly less accurate IST model for y2016x geometry cooling tubes in ladders will not be seen;
added misalignment option to TPC in y2014x,y2015x,y2016x geometries; added back y2015d geometry;
Geometry/IdsmGeo/IdsmGeo2a.xml - modified to use new TPC alignment scheme;
Geometry/IstdGeo/IstdGeo2a.xml - updated to make sure these get initialized to zero;
Geometry/PixlGeo/PixlGeo6b.xml - updated to have the option to shut the framework up;
Geometry/SisdGeo/SisdGeo7a.xml - updated to have the option to shut the framework up;
Geometry/TpceGeo/TpceConfig.xml, TpceGeo3a.xml - added TPC global alignment option to TPC placement;
xgeometry/xgeometry.age - enabled y2014x geometry; - October 20, 2017
new library SL17h tagged as SL17h has been created and built on SL6.4 (32bits & 64bits );
default compiler is gcc 4.8.2 . Library was tested with standard test suite, passed it successfully and released on October 24.
Main features:
- StPicoEvent & StPicoDstMaker modified to include FMS hits in picoDst ;
- added first version of geometry for time-of-flight endcap ;
- added first version of y2018 geometry;
- release first implementation of misalignable geometries model;
- StEvent - added initial revision of Trigger Data structure for run 2018;
- first release of StPxlSimMaker/DIGMAPS : a standalone tool to study digitization of HFT software ;
- codes adjusted for forcoming SL7.3 platform with gcc 4.8.5 compiler ;
- several bugs fixed;Next codes have been updated:
StRoot
StarGenerator
DECAY/AgUDecay.cxx, AgUDecay.h - modified to rework decayer logic such that mother particles appear in event record ;
Pythia8_1_62/StarPythia8Decayer.cxx - modified to rework decayer logic such that mother particles appear in event record;
Pythia8_1_86/StarPythia8Decayer.cxx - modified to rework decayer logic such that mother particles appear in event record;
StBFChain
BigFullChain.h, StBFChain.cxx - implemented options for ideal and misalignable geometries;
StChain
GeometryDbAliases.h - added y2018 geometry tag for bfc.C ;
added support the y2014x, y2015x, y2016x geometries;
StDaqLib/TRG/trgStructures2018.h - added new files for trigger structure for year 2018;
StEvent
StTriggerData2018.cxx, StTriggerData2018.h - added initial revision for year 2018 data;
StEventClusteringHints.cxx, StEventLinkDef.h - modified to handle new StTriggerData2018;
StTriggerData.h, StTriggerData.cxx, StTriggerData2017.h, StTriggerData2017.cxx - added access fct epdADC() and epdTDC();
StFmsDbMaker
StFmsDbMaker.cxx, StFmsDbMaker.h - modified to add 'BitShiftGain' ;
macros/fmsBitShiftGain_db.C, push_fmsBitShiftGain - added new files for 'BitShiftGain' related updates;
fms_db_detectorposition.C, fpsPosition_db.C, fpsgeom.txt - modified for 'BitShiftGain' related updates;
StFmsHitMaker
StFmsHitMaker.cxx, StFmsHitMaker.h - modified to add 'fmsBitShiftGain';
StFmsFastSimulatorMaker
StFmsFastSimulatorMaker.cxx, StFmsFastSimulatorMaker.h - added 'BitShiftGain' ;
StiIst
StiIstDetectorBuilder.cxx - modified to make active sensors may appear at different paths in ideal and misaligable geometry models;
StiPxl
StiPxlDetectorBuilder.cxx - modified to make active sensors may appear at different paths in ideal and misaligable geometry models;
StiSsd
StiSstDetectorBuilder.cxx - modified to make active sensors may appear at different paths in ideal and misaligable geometry models;
St_geant_Maker
St_geant_Maker.cxx - updated to integrate ETOF into simulation;
StPicoEvent
StPicoFmsHit.cxx, StPicoFmsHit.h - added new files to include FMS hits in picoDst;
StPicoDstMaker
StPicoFmsFiller.cxx, StPicoFmsFiller.h - added new files to fill in FMS branch in picoDst;
StPicoArrays.cxx, StPicoArrays.h, StPicoDst.cxx, StPicoDst.h, StPicoDstMaker.cxx, StPicoDstMaker.h - modified to use StPicoFmsFiller to fill FMS branch in picoDst;
StPxlSimMaker
StPxlFastSim.h, StPxlSimMaker.cxx - updated to integrate new development of PXL simulation;
StPxlDigmapsSim.cxx, StPxlDigmapsSim.h - added new files for PXL fast/full simulation;
DIGMAPS/digaction.cxx, digaction.h, digadc.cxx, digadc.h, digbeam.cxx, digbeam.h, digcluster.cxx, digcluster.h, digevent.cxx, digevent.h, dighistograms.cxx, dighistograms.h, diginitialize.cxx, diginitialize.h, digmaps.cxx, digmaps.h, digparticle.cxx, digparticle.h, digplane.cxx, digplane.h, digproto.cxx, digproto.h, digreadoutmap.cxx, digreadoutmap.h, digresult.cxx, digresult.h, digtransport.cxx, digtransport.h - added new files to study digitization in HFT software;
StTriggerDataMaker
StTriggerDataMaker.cxx - updated for run 2018;RTS
include/fcfClass.hh, myrinet.h, platform.h, rtsSystems.h - updated;
src/DAQ_ITPC/daq_itpc.cxx, itpcCore.cxx, itpcCore.h, itpc_maps.h - updated ;
src/DAQ_FCS/daq_fcs.cxx, daq_fcs.h - added flags;
src/LOG/Makefile, rtsLog.C - added logging from stdin;pams
sim/g2t/g2t_eto.F - added new files to read ETOF to g2t table;
g2t_volume_id.g - updated to integrate ETOF into simulation;
modified to support alternate paths to pxl, ist, sst active sensors, while maintaining the same absolute volume ID;
g2t_eto.idl - new IDL file for ETOF g2t module;
sim/idl/g2t_track.idl - updated to integrate ETOF into simulation;StarVMC
StarAgmlLib/AgCreate.cxx, AgPosition.cxx, AgPosition.h, StarTGeoStacker.cxx - updated to support volume placement / misal ignment via DB tables;
StarAgmlUtil/AgMLPosition.cxx, AgMLPosition.h, AgParameterList.h, AgTransform.cxx, AgTransform.h - updated to support volume placement / misalignment via DB tables;
Geometry/StarGeo.xml - updated to use MUTD16 in y2017a production geometry;
implemented misaligned geometry tags for year 2014 to year 2016 ;
implemented the y2014x, y2015x, y2016x geometries in xgeometry; switched in the misalignable modules in the 'x' geometries;
Geometry/EtofGeo/EtofConfig.xml, EtofGeo0.xml - first version of time-of-flight endcap;
updated to integrate ETOF into simulation ;
Geometry/IdsmGeo/IdsmGeo2a.xml - added new file with misalignable IDS geometry;
IdsmConfig.xml, IdsmGeo2a.xml - implemented the y2014x, y2015x, y2016x geometries in xgeometry; switched in the misalignable modules in the 'x' geometries;
Geometry/IstdGeo/IstdGeo1a.xml, IstdGeo1b.xml, IstdGeo2a.xml - added new files for misalignable IST geometry;
IstdConfig.xml - modified ;
Geometry/PixlGeo/PixlGeo6a.xml, PixlGeo6b.xml - added new files for misalignable PXL geometry;
PixlConfig.xml - modified ;
Geometry/SisdGeo/SisdGeo7a.xml - added new file for misalignable SST geometry;
SisdConfig.xml - modified;
StarAgmlLib
AgPosition.cxx, AgPosition.h - added support for specifying rotation matrix directly;
StarAgmlUtil
AgMLDb.h, AgMLDb.cxx - added new files to establishes the interface between the AgML placement codes and the database;
xgeometryxgeometry.age - implemented the y2014x, y2015x, y2016x geometries in xgeometry; switched in the misalignable modules in the 'x' geometries;StarDb
AgMLGeometry/Geometry.y2018.C - added y2018 geometry;
StDb
idl/epdGain.idl - table updates for EPD;
fmsBitShiftGain.idl - added new FMS table;mgr/Dyson/Export/AgROOT.py, Mortran.py - updated to support volume placement / misalignment via DB tables;
mgr/Dyson/Syntax/SyntaxHandler.py - updated to support volume placement / misalignment via DB tables;OnlTools
Jevp/StJevpBuilders/JevpBuilder.h, fgtBuilder.h, fmsBuilder.h, fpsBuilder.h, hltBuilder.h, hltphiBuilder.h, istBuilder.h, l4Builder.h, ssdBuilder.h - updated to comply with sl73_gcc485 platform;
fcsBuilder.cxx, fcsBuilder.h - added new files;
Jevp/StJevpPlot/PdfFileBuilder.cxx - updated;
PDFUtil/PdfIndex.cxx - updated; - October 9, 2017
SL17g library has been updated with fixes related to tracks matching to BTOF detector. Library was retagged as SL17g_1 ;
Next codes have been updated:
StRoot
StBFChain
BigFullChain.h - added useBTOFmatchOnly dependence on useBTOF4Vtx, removed VFStoreX dependence on genvtx;
StGenericVertexMaker
StGenericVertexMaker.cxx - updated 'useBTOFmatchOnly' option to imply useBTOF;
StiPPVertex/StPPVertexFinder.cxx - updated for proper reporting/usage of 'useBTOFmatchOnly' option, plus LOGGER usage bugs fixed
StBTofUtil
StBTofTables.cxx - restored access to TOF status table (Calibrations/tof/tofStatus) ; - September 16, 2017
new library SL17g tagged as SL17g has been created and built on SL6.4 (32bits & 64bits );
default compiler is gcc 4.8.2 . Library was tested with standard test suite, passed it successfully and released on September 18.
Main features:
- StPicoEvent & StPicoDstMaker updated with new codes to integrate BBC/EPD detectors data into picoDst tree;
- StMuDSTMaker updated to recover FMS hits in MuDst using StTriggerData;
- StPxlRawHitMaker modified to append rawHits to StPxlRawHitCollection as needed for embedding;
- added new maker StEpdDbMaker for EPD detector;
- added new tables for EPD nd PXL detectors;
- several bugs fixed;Next codes have been updated:
StRoot
StBFChain
BigFullChain.h - added picoDst dependence for StPass0CalibMaker ;
BigFullChain.h, StBFChain.cxx - implemented 'VFStoreX' option to leave in MuDst more than 5 vertices ;
'pxlSlowSim' option implemented ; added 'epdDb' option;
StarRoot
THelixTrack.cxx - fixed to comply with coverity ;
TRandomVector.h, TRandomVector.cxx - added ctr with packed error matrix ;
TAttr.h, TAttr.cxx - changed IAttr() strtol("",0,0) ==> strtol("",0,10) to avoid non decimal representation ; int return values substituet to long to meet future 64bit libraries;
StDetectorDbMaker
StDetectorDbChairs.cxx, St_MDFCorrectionC.h, St_SurveyC.h, St_pxlSensorTpsC.h - added new chair : St_vpdSimParamsC, added cash for MDF calculations;
St_vpdSimParamsC.h - added new chair : St_vpdSimParamsC ;
StdEdxY2Maker
StPidStatus.cxx, StPidStatus.h, StTpcdEdxCorrection.cxx, StdEdxY2Maker.cxx, dEdxHist.cxx - modified to adjust to run 2017 pp 500GeV data;
StEpdDbMaker
StEpdDbMaker.h, StEpdDbMaker.cxx - added new code for EPD detector;
StFmsDbMaker
StFmsDbMaker.cxx, StFmsDbMaker.h - modified to decalare member functions cons; added function 'readGainCorrFromText()' ;
StFmsHitMaker
StFmsHitMaker.cxx - modified to remove StRoot/ from include path;
StIstSimMaker
StIstSlowSimMaker.cxx - fixed column and row at sensor edge in function findPad() ;
StGenericVertexMaker
StiPPVertex/VertexData.cxx - added missing initializations in constructor;
StPPVertexFinder.cxx - fixed memory leak of StEmcCollection ;
StMtdMatchMaker
StMtdMatchMaker.cxx - added protection for BL9, installed in 2017 for test, since the geometry file does not include this backleg ;
StMuDSTMaker
COMMON/StMuFmsCollection.cxx, StMuFmsCollection.h, StMuFmsUtil.cxx, StMuFmsUtil.h - modified to recover FMS hits in MuDst using StTriggerData;
StPass0CalibMaker
StVertexSeedMaker.cxx - introduced modes for aggregation, modified to implement vertex-seed-finding with picoDsts;
StPicoDstVtxSeedMaker.cxx, StPicoDstVtxSeedMaker.h - added new files for vertex-seed-finding with picoDsts;
StPicoDstMaker
StPicoBbcFiller.cxx, StPicoBbcFiller.h, StPicoEpdFiller.cxx, StPicoEpdFiller.h - added new files to integrate BBC/EPD detectors data into picoDst tree;
StPicoArrays.cxx, StPicoArrays.h, StPicoDstMaker.cxx, StPicoDstMaker.h - modified to integrate BBC/EPD detectors data into picoDst tree; updated to comply with STAR coding guidelines;
StPicoDstMaker.cxx, StPicoDstMaker.h - modified to add time to StPicoEvent; saved time when generating picodst from mudst and recover when reading picodst;
StPicoEvent
StPicoBbcTile.cxx, StPicoBbcTile.h, StPicoCommon.cxx, StPicoCommon.h, StPicoEpdTile.cxx, StPicoEpdTile.h - added new files to integrate BBC/EPD detectors data into picoDst tree; updated to comply with STAR coding guidelines;
StPicoEvent.h - modified to integrate BBC/EPD detectors data into picoDst tree; updated to comply with STAR coding guidelines;
StPicoUtilities.h - modified to define custom_refMult as std::array rather than std::map, it gives a 2-3 factor speed up if the array is used in place of the map; updated to comply with STAR coding guidelines;
StPicoEvent.cxx, StPicoEvent.h - added time to StPicoEvent; saved time when generating picodst from mudst and recover when reading picodst;
StPicoBEmcPidTraits.cxx, StPicoBTofHit.h, StPicoBTofPidTraits.cxx, StPicoCommon.h, StPicoEmcTrigger.cxx, StPicoMtdHit.h, StPicoMtdPidTraits.cxx, StPicoMtdTrigger.cxx, StPicoTrack.cxx - updated for facelifting changes;
StPxlClusterMaker
StPxlClusterCollection.cxx, StPxlClusterCollection.h, StPxlClusterMaker.cxx - updated to ensure idTruth is preserved for MC hits for overlapping scenarios between MC/data and two or more MC hits;
StPxlClusterMaker.cxx - changed std::random_shuffle to std::rand to be consistent with STAR coding ;
StPxlDbMaker
StPxlDb.cxx, StPxlDb.h, StPxlDbMaker.cxx - added access functions for pxlDigmapsSim table ;
StPxlRawHitMaker
StPxlRawHitCollection.cxx, StPxlRawHitCollection.h, StPxlRawHitMaker.cxx - modified to append rawHits to StPxlRawHitCollection only if exists - for simu/embedding ;
StSsdDbMaker
StSstDbMaker.cxx - corresponding to DB table changed sstOnTpc = oscOnTpc*sstOnOsc;
StTriggerUtilities
StTriggerSimuMaker.cxx - added pointer guard for trigger definition and trigger threshold tables, the pointers can not be null;RTS
trg/include/trgCrateDefs.h - added new file;
trgDataDefs.h, trgConfNum.h - modified;
RC_Config.h, rtsSystems.h - changed EPQ > EQ3; FQx > EQx ;
src/DAQ_READER/daqReader.cxx - updated;
src/RTS_EXAMPLE/rts_example.C - updated;
src/DAQ_ITPC/itpcCore.cxx, itpcCore.h - updated;
src/SFS/fs_index.cxx, sfs_index.cxx, sfs_index.h - updated;StarDb
Calibrations/tpc/TpcLengthCorrectionMDF.20170101.000016.C, TpcPadCorrectionMDF.20170101.000013.C, TpcResponseSimulator.20151 220.000002.C, TpcRowQ.20170101.000012.C, TpcRowQ.20170622.000012.C, TpcSecRowB.20170101.000012.root, TpcSecRowB.20170622.000012.root, TpcTanL.201 70101.000006.C, TpcZCorrectionB.20170101.000007.C, tpcPressureB.20170101.000004.C - added new files for first iteration of dE/dx calibration for Run 2017;
TpcLengthCorrectionMDF.C, TpcResponseSimulator.y2016.C - modified;
StDb
idl/pxlDigmapsSim.idl - added new table for PXL;
epdFEEMap.idl, epdQTMap.idl - added new tables for EPD ;OnlTools
Jevp/StJevpBuilders/tofBuilder.cxx, vpdBuilder.cxx, vpdBuilder.h - removed unused VPD plots and update trigger window for TOF tray 105;
trgBuilder.cxx - updated; - January 4, 2018
SL17f library has been updated with fixes related to TOF simulation issue, bug #3316, needed to process TOF embedding production. Updated codes have been retagged with the same tag SL17f_1 ;
Next codes have been updated:
StRoot
StBTofSimMaker
StBTofSimMaker.cxx - updated to correctly incorporates the VPD resolution for events without any VPD info;
updated guard against non-existant 'btofheader' in embedding mode;
StVpdSimMaker
StVpdSimConfig.h - updated to check for and use an existing St_db_Maker before creating a new one; also changed logic in getVpdResolution - which is used when VpdSimMaker is NOT run; - October 3, 2017
SL17f library has been updated with fixes related to tracks matching to BTOF detector. Library was retagged as SL17f_1 ;
Next codes have been updated:
StRoot
StBFChain
BigFullChain.h - added useBTOFmatchOnly dependence on useBTOF4Vtx, removed VFStoreX dependence on genvtx;
StGenericVertexMaker
StGenericVertexMaker.cxx - updated 'useBTOFmatchOnly' option to imply useBTOF;
StiPPVertex/StPPVertexFinder.cxx - updated for proper reporting/usage of 'useBTOFmatchOnly' option, plus LOGGER usage bugs fixed
StBTofUtil
StBTofTables.cxx - restored access to TOF status table (Calibrations/tof/tofStatus) ; - June 5, 2017
new library SL17f tagged as SL17f has been created and built on SL6.4 (32bits & 64bits );
default compiler is gcc 4.8.2 . Library was tested with standard test suite, passed it successfully and released on June 8.
Main features:
- StTriggerData added new methods for bbcBB101(), bbcBB102() and bbcTDC5bit() for run 2017;
- StGenericVertexMaker - further development options to handle primary vertices;
- StEmcADCtoEMaker updated for picoDst production;
- several bugs fixed;Next codes have been updated:
StRoot
StarRoot
TRandomVector.cxx, TRandomVector.h - cleaned up;
StBFChain
BigFullChain.h - implemented run 2017 chain for auau data;
StEmcADCtoEMaker
StBemcData.cxx, StEmcADCtoEMaker.cxx, StEmcADCtoEMaker.h - updated for picoDst production;
StEmcRawMaker
StBemcRaw.cxx - updated for picoDst production;
StEvent
StTriggerData2017.cxx, StTriggerData2017.h - added bbcBB101() and bbcBB102() methods;
StTriggerData.h, StTriggerData.cxx, StTriggerData2017.cxx, StTriggerData2017.h - added bbcTDC5bit() method ;
StTriggerData.h, StTriggerData.cxx - modified for decoding of QTb data;
StDcaGeometry.cxx, StDcaGeometry.h - cosmetic changes;
StdEdxY2Maker
StTpcdEdxCorrection.cxx - removed time validity check for trigDetSum table;
StPidStatus.cxx, StPidStatus.h, StdEdxY2Maker.cxx - modified;
dEdxHist.cxx, dEdxHist.h - added new files to extract histogram definition in separate file;
StGenericVertexMaker
StGenericVertexMaker.cxx - updated options for MuDst mode; modified to store number of unqualified vertices and use only BTOF-matched tracks;
corrected default beamline options for VFMinuit and PPV;
StGenericVertexFinder.h, StGenericVertexMaker.cxx, StGenericVertexMaker.h - minor refactoring changes: get rid of a temporary variable; get rid of extra return; zero vertices returned for unqualified event; removed deprecated CalibBeamLine();
variables renamed for readability; removed some not very helpful debug output; updated doxygen, whitespace, resolved ambiguity;
StCtbUtility.h, StFixedVertexFinder.cxx, StFixedVertexFinder.h, StGenericVertexFinder.cxx, StGenericVertexMaker.cxx, StGenericVertexMaker.h - cosmetic changes; removed log messages from source files; prefixed included headers with paths to respective modules;
Minuit/StMinuitVertexFinder.cxx, StMinuitVertexFinder.h - variables renamed for readability; removed some not very helpful debug output; updated doxygen, whitespace, resolved ambiguity;
StiPPVertex/StPPVertexFinder.cxx, StPPVertexFinder.h - updated options to store number of unqualified vertices anduse only BTOF-matched tracks; modified to get rid of a temporary variable; get rid of extra return; zero vertices returned for unqualified event; removed deprecated CalibBeamLine();
StPPVertexFinder.cxx - modified to move assert (mToolkit) to test only truly needed; setup fit with single parameter for 1D fit; removed overlooked reference to a debug histogram;
BemcHitList.cxx, BemcHitList.h, BtofHitList.cxx, BtofHitList.h, CtbHitList.cxx, CtbHitList.h, EemcHitList.cxx, EemcHitList.h, ScintHitList.cxx, StPPVertexFinder.cxx, StPPVertexFinder.h, TrackData.cxx, TrackData.h, Vertex3D.cxx, Vertex3D.h, VertexData.cxx, VertexData.h - cosmetic changes; removed log messages from source files; prefixed included headers with paths to respective modules;
BtofHitList.cxx, StPPVertexFinder.cxx, StPPVertexFinder.h, TrackData.h, VertexData.cxx - variables renamed for readability; removed some not very helpful debug output; updated doxygen, whitespace, resolved ambiguity;
StJetMaker
StJetMaker2012.cxx, StAnaPars.h - added FMS tower to jet maker;
mudst/StjBEMCMuDst.cxx - modified to assign detector by using enumeration StDetectorId defined in StEvent/StEnumerations.h;
StjFMSMuDst.cxx, StjFMSMuDst.h - added FMS rowser to jet maker;
towers/StjFMS.cxx, StjFMS.h, StjFMSNull.cxx, StjFMSNull.h, StjFMSTree.cxx, StjFMSTree.h - added FMS towser to jet m aker;
StMuDSTMaker
COMMON/StMuPrimaryVertex.cxx, StMuPrimaryVertex.h - modified to pass pointer properly;
StPicoDstMaker
StPicoDstMaker.h - modified to synchronize the declaration and defintion of function setVtxMode() such that the old c++ interpreter in ROOT5 does not complain about "Ambiguous overload";
StPreEclMaker
StPreEclMaker.cxx - commented out unsupported StEmcADCtoEMaker::clearStEventSta();macros/mudst/VtxRecoMuDst.C - added new macrob to re-find vertices in MuDst;
StarDb
Calibrations/tpc/TpcResponseSimulator.20141220.000000.C - added new file, calibration for run 2015;
TpcResponseSimulator.20151220.000001.C - added TpcRS calibration for Run 2016;
TpcResponseSimulator.y2016.C - added default MC version of the correction; - May 8, 2017
new library SL17e tagged as SL17e has been created and built on SL6.4 (32bits & 64bits );
default compiler is gcc 4.8.2 . Library was tested with standard test suite, passed it successfully and released on May 10.
Main features:
- OnlTools/Jevp FPS and MTD Builders updated for run 2017;
- added FTS detector in StEvent structure;
- StGenericVertexMakeradded new vertex fit option "BeamlineNoFit"
to distinguish between Beamline1D fit for MinuitVF and PPV ;
- StMuDSTMaker modified to change associated vertex when running
a vertex finder as an afterburner ;
- several bugs fixed;Next codes have been updated:
StRoot
StarClassLibrary
StHelixHelper.cxx - replaced Step() ==> Path() ;
StarGenerator
BASE/StarPrimaryMaker.cxx - modified to hide m_DataSet;
DECAY/AgUDecay.cxx - modified to make sure taus fall through to the decayer, and preserve history in event record;
StarRoot
TF1Fitter.cxx - modified to use public accessor to access protected member;
TF1Fitter.cxx, TF1Fitter.h - added explicit type cast to match TF1 constructor signature in ROOT5 and ROOT6 ;
StarMagField
StarMagField.cxx, StarMagField.h - added setConstBz; fixed wrong default values;
StChain
StMaker.h - added GetData() to hide m_DataSet ;
StEpcMaker
StEpcMaker.cxx - modified to hide m_DataSet;
StEvent
StDetectorDefinitions.h, StEnumerations.h, StTrack.h, StTrack.cxx - added FTS detector;
StExtGeometry.h, StExtGeometry.cxx - updated name to add 0;
StRnDHit.h, StRnDHit.cxx - added own error matrix;
StVertex.h - convenience setter for covariance matrix from array of doubles;
Stl3RawReaderMaker
Stl3RawReaderMaker.cxx - modified to hide m_Debug;
Stl3CounterMaker.cxx - modified to hide m_Debug;
StGenericVertexMaker
StGenericVertexFinder.cxx, StGenericVertexMaker.cxx, VertexFinderOptions.cxx, VertexFinderOptions.h - added new vertex fit option " BeamlineNoFit" to distinguish between Beamline1D fit for MinuitVF and PPV; added helper function to identify fit options requiring beamline; modified to match BFC option "beamline" to "BeamlineNoFit" for PPV; modified to take advantage of new helper function 'requiresBeamline' ;
StGenericVertexFinder.cxx, StGenericVertexFinder.h - TMinuit moved to base class;
Minuit/StMinuitVertexFinder.cxx, StMinuitVertexFinder.h - TMinuit moved to base class;
StiPPVertex/TrackData.h - added overlooked TrackDataTconstructor definition;
StPPVertexFinder.cxx, StPPVertexFinder.h - added new vertex fit option 'BeamlineNoFit' to distinguish between 'Beamline1D' fit for MinuitVF and PPV; added helper function to identify fit options requiring beamline; modified to match BFC option "beamline" to "BeamlineNoFit" for PPV; modified to take advantage of new helper function 'requiresBeamline' ;
StPPVertexFinder.cxx - TMinuit moved to base class;
StFmsDbMaker
StFmsDbMaker.cxx, StFmsDbMaker.h - added Sigma and Valley for Fps/Fpost;
StFmsFastSimulatorMaker
StFmsFastSimulatorMaker.cxx, StFmsFastSimulatorMaker.h - added gain scaling when attenuation was on during geant simulation;
StFtpcClusterMaker
StFtpcClusterMaker.cxx - modified to hide m_DataSet;
StFtpcMixerMaker
StFtpcMixerMaker.cxx - modified to hide m_DataSet;
StFtpcSlowSimMaker
StFtpcSlowSimMaker.cxx - modified to hide m_DataSet;
StIstClusterMaker
StIstScanClusterAlgo.h - added destructor ;
StIstClusterMaker.cxx - fixed crash;
Sti
StiElossCalculator.h, StiElossCalculator.cxx - standard ctr added and set method;
StMuDSTMaker
COMMON/StMuPrimaryVertex.cxx, StMuPrimaryVertex.h, StMuTrack.cxx, StMuTrack.h - cosmetics, whitespace adjustments;
StMuTrack.h - modified to change associated vertex when running a vertex finder as an afterburner;
StMuTrack.cxx - added additional info to print statement;
StMuEvent.cxx, StMuEvent.h - modified to declare getters const;
StMuRpsCollection.h - modified to increment ClassDef in StMuRpsCollection;
StPmdReadMaker
StPmdReadMaker.cxx - modified to hide m_DataSet;
StPmdSimulatorMaker
StPmdSimulatorMaker.cxx - modified to hide m_DataSet;
StSstDaqMaker
StSstDaqMaker.cxx, StSstDaqMaker.h - replaced Int_t ==> UInt_t to avoid wrong cast; removed GetData();
StSstDaqMaker.cxx - modified to hide m_DataSet;
StSsdPointMaker - modified to hide m_DataSet;
StSstPointMaker
StSstPointMaker.cxx - modified to hide m_DataSet;
StSsdSimulationMaker
StSsdEmbeddingMaker.cxx, St_sls_Maker.cxx, St_spa_Maker.cxx - modified to hide m_DataSet;
St_db_Maker
St_db_Maker.cxx - modified to hide m_DataSet;
St_ctf_Maker
St_ctf_Maker.cxx - modified to hide m_DataSet;
St_emc_Maker
St_emc_Maker.cxx - modified to hide m_DataSet;
St_geom_Maker
St_geom_Maker.cxx - cleanup;
St_geant_Maker
St_geant_Maker.cxx - modified to hide m_DataSet;
St_geant_Maker.h - removed 'delete';
St_trg_Maker
year2003.cxx - modified to hide m_Debug;
St_trg_Maker.cxx - modified to hide m_DataSet;StarVMC
Geometry/FpdmGeo/FpdmGeo3.xml - enabled attenuation option in y2011 (and other) FMS geometries;
FpdmGeo4.xml - fixed check on data structure to enable FMS attenuation;
StVMCMaker/StVMCMaker.cxx - modified to hide m_DataSet;
xgeometry/xgeometry.age - added y2011b case statement;StarDb
AgMLGeometry/Geometry.y2011b.C - added missing y2011b support;OnlTools
Jevp/StJevpBuilders/fpsBuilder.cxx, ppBuilder.cxx - updated;
mtdBuilder.cxx, mtdBuilder.h - updated to treat BL 9 as a 3-tray system; added a 2D hit map for good hits; added the distribution of hit time; - April 15, 2017
new library SL17d tagged as SL17d has been created and built on SL6.4 (32bits & 64bits );
default compiler is gcc 4.8.2 . Library was tested with standard test suite, passed it successfully and released on April 18.
Main features:
- OnlTools/Jevp added new plots for FPOST detector in run 2017;
- first release of daq code for FCS detector;
- added new DB tables for FPOST detector;
- StGenericVertexMaker updated for vertex reconstruction from MuDst data format ;
- several bugs fixed;Next codes have been updated:
StRoot
StarRoot
TRandomVector.h, TRandomVector.cxx - updated;
StDbUtilities
StMagUtilities.cxx, StMagUtilities.h - implemented generic SpaceCharge and GridLeak functions independent of specific modes;
StFmsDbMaker
StFmsDbMaker.cxx - fixed nslat function; updated for run 2017 FMS positions;
getCellPosition2017.cxx, getCellPosition2017.h - added run 2017 FMS positions ;
StGenericVertexMaker
StGenericVertexFinder.cxx - coverity fixes;
StiPPVertex/StPPVertexFinder.cxx - changed primary tracks association for StMuTracks; removed seemingly unnecessary condition; modified not to pass mother track separately, since TrackData knows about its mother track;
TrackData.cxx, TrackData.h - introduced deligating constructor; added specialization for template constructor;
StMtdQAMaker
StMtdQAMaker.cxx, StMtdQAMaker.h - removed the function to apply trigger time window cuts since they are applied already during reconstruction; updated to accommodate 8-QT system used in 2016; removed the implementation for StEvent QA since it is not maintained ; vertex selection for cosmic ray updated;
StMuDSTMaker
COMMON/StAddRunInfoMaker.cxx - fixed Checking event->info();
StPass0CalibMaker
StSpaceChargeEbyEMaker.cxx - modified to use generic GridLeak function;
Sti
StiNodePars.h - corrected for zero manetic field;RTS
src/DAQ_FCS/daq_fcs.cxx, daq_fcs.h - added new code for FCS detector;StDb
idl/fpostGain.idl, fpsGain.idl - added new DB tables for FPOST detector;OnlTools
Jevp/StJevpBuilders/fpsBuilder.cxx, fpsBuilder.h - added new plots for FPOST ;
ppBuilder.cxx, trgBuilder.cxx - updated ;
fpsBuilder.cxx - updated to move accessing RCC counter before the hit loop; modified not to fill hists for events with no FPS/FPOST data; - March 10, 2017
new library SL17c tagged as SL17c has been created and built on SL6.4 (32bits & 64bits );
default compiler is gcc 4.8.2 . Library was tested with standard test suite, passed it successfully and released on March 13.
Main features:
- OnlTools/Jevp updated plots for run 2017;
- first release of StBTofSimMaker, StBTofMixerMaker, StVpdSimMaker and StVpdCalibMaker makers ;
- added new DB tables for EPD detector;
- StGenericVertexMaker updated with option to reconstruct primary vertex using MuDst format;
- several bugs fixed;Next codes have been updated:
asps
Simulation/starsim/include/atlsim/agchit.inc - removed extra (and unused) definition of common blocks;StRoot
StBFChain
BigFullChain.h - implemented base chain for run 2017; reshaped of options for Vpd/BTof Sim + mixer for BTof;
StBTofCalibMaker
StBTofCalibMaker.cxx, StBTofCalibMaker.h - updated;
StBTofMixerMaker
StBTofMixerMaker.cxx, StBTofMixerMaker.h - added first version of BTofMixer maker;
StBTofSimMaker
StBTofSimMaker.cxx, StBTofSimMaker.h - updated after review;
StDbLib
StDbDefs.hh, StDbManagerImpl.cc - added new detector EPD;
StEvent
StTriggerData.cxx, StTriggerData.h - added bbcVP101;
StFmsPointPair.cxx, StFmsPointPair.h - changed F to D for StLorentzVector;
StTriggerData2017.cxx - changed mtdQtAtCh for run17 mapping;
StiCA
StiCATpcTrackerInterface.cxx - fixed bug in accounting laser in magnetic fileld calculation;
StGenericVertexMaker
StCtbUtility.cxx, StppLMVVertexFinder.cxx, StppLMVVertexFinder.h - codes cleanup and improved styling:
remove commented code for debugging; removed extra validation; removed from nclude header for apple OS; removed pointless assert; modified to use standard portable type name; removed unused header math_constants.h; removed abandoned member function;
StGenericVertexFinder.h - updated to enhance proxy data structures for track and vertex;
StGenericVertexFinder.cxx, StGenericVertexFinder.h, StGenericVertexMaker.cxx, StGenericVertexMaker.h - updated mainly for stylistic improvement; modified DB access code;
VertexFinderOptions.cxx, VertexFinderOptions.h - added new files to select vertec finder options;
Minuit/StMinuitVertexFinder.cxx, StMinuitVertexFinder.h - codes cleanup and improved styling:
remove commented code for debugging; removed extra validation; removed from nclude header for apple OS; removed pointless assert; modified to use standard portable type name; removed unused header math_constants.h; removed abandoned member function;
StMinuitVertexFinder.cxx, StMinuitVertexFinder.h - refactoring design flaws by getting rid of static members:
- StMinuitVertexFinder: moved static fit functions to base class; modified to use equivalent base class fit function for Beamline3D fits; get rid of static mWidthScale in favor of equivalent local variables;
- converted functions from static to member + adjustments; introduced self static pointer to vertex finder implementations, this is required by TMinuit relying on static fit functions;
- StMinuitVertexFinder: Use common fit function type; renamed Chi2AtVertex to virtual CalcChi2DCAs; converted static sDCAs to mDCAs; converted static sBeamline to mBeamline;
StMinuitVertexFinder.cxx - set appropriate number of free parameters for TMinuit; deleted TMinuit object;
StMinuitVertexFinder.cxx, StMinuitVertexFinder.h - removed depricated method; the fit type is now set in constructor a long with other appropriate settings; modified DB access code;
StMinuitVertexFinder.h - updated to enhance proxy data structures for track and vertex;
StiPPVertex/EemcHitList.cxx, EemcHitList.h, StPPVertexFinder.cxx, StPPVertexFinder.h, Vertex3D.cxx, Vertex3D.h - codes cleanup and improved styling:
remove commented code for debugging; removed extra validation; removed from nclude header for apple OS; removed pointless assert; modified to use standard portable type name; removed unused header math_constants.h; removed abandoned member function;
StPPVertexFinder.cxx, StPPVertexFinder.h - refactoring design flaws by getting rid of static members;
updated to enhance PPV with MuDst functionality; modified to create optional BTOF and CTB hit lists;
BemcHitList.h, StPPVertexFinder.cxx, StPPVertexFinder.h, TrackData.cxx, TrackData.h, Vertex3D.cxx, VertexData.cxx, VertexData.h - modifid to enhance proxy data structures for track and vertex :
- TrackDataT: implemented new helper for TrackData to manipulate original mother track; added method to calculate chi2 w.r.t. a vertex; added member pointer to DCA geometry; added print() method; added fields with simulation data;
- VertexData: added member to flag triggered vertex;
BemcHitList.cxx, BemcHitList.h, BtofHitList.cxx, BtofHitList.h, EemcHitList.cxx, EemcHitList.h, StPPVertexFinder.cxx,StPPVertexFinder.h - modified DB access code;
StMtdMatchMaker
StMtdMatchMaker.cxx, StMtdMatchMaker.h - added a new data member mYear to indicate run year; invoke appropriate functions in StMtdGeometry class to calculate local y to make the class backward compatible;
StMtdQAMaker
StMtdQAMaker.cxx, StMtdQAMaker.h - added option to select different vertex; added more QA plots for PID variable;
StMtdUtil
StMtdGeometry.cxx, StMtdGeometry.h - added back the old implementation of GetCellLocalYCenter() function to make the class backward compatible;
StVpdCalibMaker
StVpdCalibMaker.cxx, StVpdCalibMaker.h - updated after review;
StVpdSimMaker
StVpdSimMaker.cxx, StVpdSimMaker.h, StVpdSimConfig.h - first release of VPD simulation maker;
St_QA_Maker
StEventQAMaker.cxx, StQABookHist.cxx, StQAMakerBase.cxx, StQAMakerBase.h - removed HFT plots for run 2017;RTS
include/RC_Config.h - updated for run 2017;
src/DAQ_ITPC/Makefile, daq_itpc.cxx, daq_itpc.h, itpcCore.cxx, itpcCore.h - updated;
src/DAQ_READER/daqReader.cxx, daq_det.cxx, daq_dta.cxx - added iTPC as a pseudo detector for now;
src/DAQ_BSMD/daq_bsmd.cxx - updated;
src/RTS_EXAMPLE/Makefile, rts_example.C - added iTPC; fixed RCC counter; fixed FPS metadata;StDb
idl/epdFEEMap.idl, epdGain.idl, epdQTMap.idl, epdStatus.idl - added new EPD tables;OnlTools
Jevp/level.source - updated;
Jevp/StJevpBuilders/trgBuilder.cxx, tpxBuilder.cxx - updated;
mtdBuilder.cxx - changed back to the 4-QT board system;
l4Builder.h, l4Builder.cxx - added DCA plots for BEMC and TOF matched tracks;
Jevp/StJevpData/jmlXml.C - updated;
Jevp/StJevpPlot/DisplayDefs.cxx, JevpPlotSet.cxx, PdfFileBuilder.cxx - updated;
Jevp/StJevpServer/JevpServer.cxx - updated; - February 14, 2017
new library SL17b tagged as SL17b has been created and built on SL6.4 (32bits & 64bits );
default compiler is gcc 4.8.2 . Library was tested with standard test suite, passed it successfully and released on February 16.
Main features:
- OnlTools: added JevpBuilder for EPD;
- added ETOF detector to DAQ structure;
- added DAQ reader files for iTPC;
- StMtdGeometry modified for run 2017 and beyond;
- StGenericVertexMaker: added vertex seed finding algorithm based on TSpectrum;
- StdEdxY2Maker and related codes updated to adjust dEdx calibrations for dAu20-62GeV ;
- several bugs fixed;Next codes have been updated:
StRoot
StDetectorDbMaker
StDetectorDbChairs.cxx, StIstSurveyC.h, StPxlSurveyC.h, StSstSurveyC.h, St_SurveyC.h, StiIstChairs.cxx, St_TpcPadCorrectionMDF.h - added new table to correct dE/dx pad dependence for dAu20-62GeV run 2016, reshaped Survey;
StiIst2HitErrorCalculator.h, StiIst3HitErrorCalculator.h - removed files;
StdEdxY2Maker
StTpcdEdxCorrection.cxx, StTpcdEdxCorrection.h, StdEdxY2Maker.cxx - added new Table to correct dE/dx pad dependence, for dAu20-62 run 2016 calibration;
StGenericVertexMaker
StGenericVertexFinder.cxx, StGenericVertexFinder.h - added vertex seed finding based on TSpectrum;
added option (SeedFinder_t) to choose from seed finders algorithms;
stylistic change to achieve somewhat cleaner initialization of the base class by using constructor delegation. The default constructor is still created with unspecified seed finder and vertex fit types;
StiPPVertex/StPPVertexFinder.cxx, StPPVertexFinder.h - added vertex seed finding based on TSpectrum;
modified to build likelihood and find vertex candidates in a separate method;
updated to set return status when fitting tracks to vertex;
StPPVertexFinder.cxx - added option (SeedFinder_t) to choose from seed finders algorithms; modified to use SeedFinder_t option to select seed finder;
modified to fit tracks with vertex after all seeds have been found; The way how the coordinates of the seeds updated depends on the fiting mode option specified by the user;
updated to copy found vertices to final container regardless of the fitting mode;
eliminated acces the StEvent as it is passed as argument;
StPPVertexFinder.cxx - examinTrackDca() simplified, it did calculate and create dca node, accuracy is the same, but code is simplified and speeded up;
StPPVertexFinder.cxx, StPPVertexFinder.h - created member HList concurently with finder ;
modified Const parameters which should not be arguments; initialized members in list with reasonable default values;
StPPVertexFinder.h - changed access to private memebers for histograms;
StPPVertexFinder.cxx - cleanup global space by getting rid of preprocessor directives;
Minuit/StMinuitVertexFinder.cxx - added option (SeedFinder_t) to choose from seed finders algorithms;
StFmsDbMaker
StFmsDbMaker.cxx, StFmsDbMaker.h - added FPost detector;
StFpsRawHitMaker
StFpsRawHitMaker.cxx, StFpsRawHitMaker.h - added FPost detector; removed LOG_INFO;
StMtdUtil
StMtdGeometry.cxx, StMtdGeometry.h - modified for run 2017 and beyond do not move BL 8&24 along y direction by hand since this is already done in the geometry file;
StMtdMatchMaker
StMtdMatchMaker.cxx - adjusted due to modification in StMtdGeometry code;
StMuDSTMaker
COMMON/StMuTrack.h - modified to let users change track type e.g. global/primary/etc..;
StMuDst.cxx, StMuDst.h - updated to copy previously missing values in StMuTrack to StTrack conversion;
Sti
StiHit.cxx, StiHit.h - added methods idTruth() & qaTruth(); in the case of simulation these methods get IdTruth info from related StHit;
StiKalmanTrack.h, StiKalmanTrack.cxx - added method 'removeNode', it removes node from the track; becames important for the case with reuse hits when old DCA node is not more correct and must be removed and new one created;
added method 'getChi2Max()' to calculate maximal bad node, it could be used for filtering with reuse hits ON;
added method idTruth, it uses idTruth's of hits and calculates dominant contrubutor;
StiMapUtilities.cxx - replaced subTimesUsed() ==> setTimesUsed(0) ;
StiTrack.h - base getChi2Max() added;
StiTreeNode.h StiTreeNode.cxx - added 'remove node' ;
StiMaker
StiMaker.cxx - in method 'CleanGlobalTracold' old Dca node removed for track with reused hits, new Dca node created after refit;
in method 'FinishTracks' some histo created;
StiUtilities
StiDebug.h, StiDebug.cxx - new Count(char*,char*,double) added;
StPass0CalibMaker
StSpaceChargeDistMaker.cxx, StSpaceChargeEbyEMaker.cxx - adjusted to structure changes in StTpcdEdxCorrection;
StTpcRSMaker
StTpcRSMaker.cxx, TpcRS.C - added new Table to correct dE/dx pad dependence for dAu20-62 calibration;RTS
includertsLog.h - fixed some const chars and added standalone LOG;
rtsSystems.h, rtsMonitor.h - added GG structure;
src/LOG/logTest.C, rtsLogUnix.c - fixed some const char;
src/DAQ_ETOF/Makefile, daq_etof.cxx, daq_etof.h - added ETOF detector;
src/DAQ_ITPC/daq_itpc.cxx, daq_itpc.h - added daq reader files for iTPC;
src/RTS_EXAMPLE/Makefile, rts_example.C - added ETOF detector; added iTPC reader;
src/SFS/fs.C, fs_index.cxx, fs_index.h, sfs_index.cxx - fixed thread safety;StarDb
Calibrations/tpc/TpcResponseSimulator.dev2019.C, TpcResponseSimulator.y2017.C, TpcTanL.C, tpcElectronics.dev2019.C, tpcPressureB.C, TpcEffectivedX.C - added new files ;
tpcDriftVelocity.y2017.C - added default drift velocity for run 2017;
TpcCurrentCorrectionX.C - added default value;
TpcResponseSimulator.devTA.C, TpcResponseSimulator.devTB.C, TpcResponseSimulator.devTC.C, TpcResponseSimulator.devTD.C, TpcResponseSimulator.devTE.C, TpcResponseSimulator.devTF.C - remoevd files;
TpcCurrentCorrectionX.20160521.000305.C, TpcLengthCorrectionMDF.20160618.000314.C, TpcPadCorrectionMDF.20160521.000312.C, TpcPadCorrectionMDF.20160618.000102.C, TpcPadCorrectionMDF.C, TpcRowQ.20160521.000311.C, TpcSecRowB.20160521.000311.root, TpcTanL.20160521.000310.C, TpcZCorrectionB.20160521.000308.C - added tables for dE/dx calibration for dAu20-62GeV run 2016;
Geometry/tpc/
TpcHalfPosition.C, TpcInnerSectorPositionB.C, TpcOuterSectorPositionB.C, TpcPosition.C, TpcSuperSectorPositionB.C - added default TPC alignment files for MC ;
tpcPadPlanes.dev2019.C - added new file for development ;OnlTools
Jevp/HistoDefs.pl - updated;
Jevp/StJevpBuilders/epdBuilder.cxx, epdBuilder.h - added JevpBuilder for EPD;
Jevp/StJevpServer/JevpServer.cxx - updated; - January 19, 2017
new library SL17a tagged as SL17a has been created and built on SL6.4 (32bits & 64bits );
default compiler is gcc 4.8.2 . Library was tested with standard test suite, passed it successfully and released on January 23.
Main features:
- OnlTools updated to support run 2017;
- added new tables and code for FPOST (FPS) detector;
- StTriggerUtilities updated for year 2013 dijet analysis;
- introduced FullGridLeak distortion correction;
- several bugs fixed;Next codes have been updated:
StRoot
StarGenerator
Pythia6_4_28/Pythia6.cxx, Pythia6.h, StarPythia6.h, closeDecays.F - modified to close/open pythia6 decay channels;
StBFChain
StBFChain.cxx, BigFullChain.h - introduced FullGridLeak distortion correction;
StDbUtilities
StMagUtilities.h, StMagUtilities.cxx - introduced FullGridLeak distortion correction; speed tweek to Poisson3DRelaxation;
StEvent
StEnumerations.h - added FPost (FPS) detector ID and StFpostConstants enumerations;
StJetMaker
StJetSkimEventMaker.cxx, StJetSkimEventMaker.h - updated for 2013 dijet analysis ;
StGenericVertexMaker
StCtbUtility.cxx, StppLMVVertexFinder.cxx, StXiFinderMaker.cxx - updated to use pi constant from standard library ;
StFixedVertexFinder.cxx, StGenericVertexFinder.cxx, StGenericVertexFinder.h, StppLMVVertexFinder.cxx - stylistic code adjustment: changed public addVertex() to accept references ;
StiPPVertex/BemcHitList.cxx, BtofHitList.cxx, CtbHitList.cxx, EemcHitList.cxx, StPPVertexFinder.cxx - updated to use pi const ant from standard library ;
StPPVertexFinder.cxx, VertexData.cxx, VertexData.h - updated to initialize vertexID in constructor;
StPPVertexFinder.cxx, StPPVertexFinder.h - removed redundant setter; added keyword to virutal methods;
StPPVertexFinder.cxx, StPPVertexFinder.h, TrackData.cxx - stylistic c++ coding adjustments: changed public addVertex() to accept references ;
Minuit/StMinuitVertexFinder.cxx - stylistic c++ coding adjustments;
StTpcDb
StTpcDbMaker.cxx - introduced FullGridLeak distortion correction;
StTpcRSMaker
StTpcRSMaker.cxx, TpcRS.C - fix bug 3268: added missing correction for TpcAvgPowerSupply; added treatment for stopping electons and gammas;
StTpcRSMaker.cxx - modifed to make switch to account __STOPPED_ELECTRONS__ ;
StTriggerUtilities
StTriggerSimuMaker.cxx, StTriggerSimuMaker.h - updated for 2013 dijet analysis ;
Bemc/StBemcTriggerSimu.cxx, StBemcTriggerSimu.h - updated for 2013 dijet analysis ;
Eemc/StEemcTriggerSimu.cxx, StEemcTriggerSimu.h - updated for 2013 dijet analysis ;
StDSMUtilities/DSMAlgo_EM201_2009.cc, DSMLayer_B001_2009.cc, DSMLayer_B001_2009.hh, DSMLayer_B101_2009.cc, DSMLayer_B101_200 9.hh, DSMLayer_E001_2009.cc, DSMLayer_E001_2009.hh, DSMLayer_E101_2009.cc, DSMLayer_E101_2009.hh, DSMLayer_EM201_2009.cc, DSMLayer_EM201_2009.hh TCU.cc, TriggerDefinition.hh - added new files for 2013 dijet analysiss ;
StDSMUtilities/y2013/DSMAlgo_BC101_2013.cc, DSMAlgo_BC101_2013.hh, DSMAlgo_BE001_2013.cc, DSMAlgo_BE001_2013.hh, DSMAlgo_BE0 03_2013.cc, DSMAlgo_BE003_2013.hh, DSMAlgo_BW001_2013.cc, DSMAlgo_BW001_2013.hh, DSMAlgo_BW003_2013.cc, DSMAlgo_BW003_2013.hh, DSMAlgo_EE001_201 3.cc, DSMAlgo_EE001_2013.hh, DSMAlgo_EE002_2013.cc, DSMAlgo_EE002_2013.hh, DSMAlgo_EE101_2013.cc, DSMAlgo_EE101_2013.hh, DSMAlgo_EE102_2013.cc, DSMAlgo_EE102_2013.hh, DSMAlgo_EM201_2013.cc, DSMAlgo_EM201_2013.hh, DSMAlgo_EM201_2013_a.cc, DSMAlgo_EM201_2013_a.hh - added new files for 2013 dijet analysis ;RTS
src/rtsplusplus.def - updated for run 2017;
src/DAQ_READER/daqReader.cxx - updated for run 2017;
trg/include/trgConfNum.h - updated for run 2017;StarDb
AgMLGeometry/Geometry.y2017.C - added year 2017 geometry support;
StDbLib
rules.make - makefile updateed for standalone/online version;
MysqlDb.cc - updated for new compiler;
StDb
idl/fpostChannelGeometry.idl, fpostConstant.idl, fpostGain.idl, fpostMap.idl, fpostPosition.idl, fpostSlatId.idl, fpostStatus.idl - added new FPOST (FPS) tables;OnlTools
Jevp/StJevpBuilders/fmsBuilder.cxx fmsBuilder.h - added hit map to FMS Jevp plots;
l4Builder.h, l4Builder.cxx - updated for parallelize histograms filling with OpenMP;
JevpBuilder.cxx, trgBuilder.h, trgBuilder.cxx, zdc_smd.h - updated for run 2017;
Jevp/StJevpPlot/DisplayDefs.cxx, DisplayDefs.h - updated for run 2017;
Jevp/JevpEdit/JevpEdit.java - updated for run 2017;
Jevp/StJevpServer/JevpServer.cxx, JevpServer.h - updated for run 2017;
2018
STAR SOFTWARE NEWS  December 14, 2018
---------------------
The present release assignment:
             SL09g_embed (SL09g_2Embed_v10) ROOT_LEVEL 5.22.00
             SL10c_embed (SL10c_embed_v5)  ROOT_LEVEL 5.22.00
             SL10h_embed (SL10h_embed_v6)  ROOT_LEVEL 5.22.00
             SL10k_embed (SL10k_embed_v11) ROOT_LEVEL 5.22.00
             SL11d_embed (SL11d_embed_v6)  ROOT_LEVEL 5.22.00
             SL12a_embed  (SL12a_embed_v3) ROOT_LEVEL 5.22.00
             SL12d_embed (SL12d_embed_v6) ROOT_LEVEL 5.22.00
             SL13b_embed (SL13b_embed_v1)  ROOT_LEVEL 5.22.00
             SL14g    (SL14g_3)  ROOT_LEVEL 5.34.09 pp 500GeV run 2013 production, days 129-161
             SL14i    (SL14i_2)  ROOT_LEVEL 5.34.09 AuAu 14.6GeV run 2014 production
             SL15c    (SL15c)    ROOT_LEVEL 5.34.09 AuAu 200GeV run 2014 data production with HFT
             SL15e_embed  (SL15e_embed_v1) ROOT_LEVEL 5.34.09
             SL15k    (SL15k_1)  ROOT_LEVEL 5.34.30 pp 200GeV run 2015 st_fms & st_rp stream data production
             SL15l    (SL15l)    ROOT_LEVEL 5.34.30 pAu 200GeV st_fms run 2015 data production
             SL16d    (SL16d_1)  ROOT_LEVEL 5.34.30 pp,pAu,pAl run 2015 production without HFT tracking
             SL16d_embed  (SL16d_embed_v1) ROOT_LEVEL 5.34.30
             SL16g_embed  (SL16g_embed_v3) ROOT_LEVEL 5.34.30
             SL16j (SL16j)       ROOT_LEVEL 5.34.30 auau 200GeV  run 2016 production
             SL16j_embed  (SL16j_embed_v2) ROOT_LEVEL 5.34.30
             SL16k_embed  (SL16k_embed_v1) ROOT_LEVEL 5.34.30
             SL17d (SL17d)       ROOT_LEVEL 5.34.30 dAu 20-200GeV run 2016 production
             SL17d_embed  (SL17d_embed_v1) ROOT_LEVEL 5.34.30
             SL17f (SL17f_1)     ROOT_LEVEL 5.34.30 auau 200GeV run 2016 st_upc production;
                                                    pp 200GeV run 2015 st_rp reproduction;
             SL17g (SL17g_1)     ROOT_LEVEL 5.34.30 pp 510GeV run 2017 st_W production
             SL17i (SL17i)       ROOT_LEVEL 5.34.30 SL7.3 cucu 200-22 GeV run 2005 reproduction
             SL18a (SL18a)       ROOT_LEVEL 5.34.30
       old-> SL18b (SL18b)       ROOT_LEVEL 5.34.30 pp 510GeV run 2017 st_physics production
       pro-> SL18c (SL18c_1)     ROOT_LEVEL 5.34.30 pp 510GeV run 2017 st_fms, st_mtd production
                                                       AuAu 54GeV run 2017 production
             SL18d (SL18d)       ROOT_LEVEL 5.34.30
             SL18e (SL18e)       ROOT_LEVEL 5.34.30
             SL18f (SL18f_1)     ROOT_LEVEL 5.34.30 pp 510GeV run 2017 st_epd production
       new-> SL18h (SL18h)    ROOT_LEVEL 5.34.30
       dev-> DEV                 ROOT_LEVEL 5.34.30 SL7.3
      .dev-> .DEV                ROOT_LEVEL 5.34.30

-------------------------------------------------
Release History
SL18a library
SL18b library
SL18c library
SL18d library
SL18e library
SL18f library
- December 14, 2018
new library SL18h library tagged as SL18h has been created and built on SL6.4 and SL7.3 .
- August 10, 2018
SL18f library has been updated with new picoDst code and retagged with tag SL18f_1 . Library was rebuilt on SL6.4 and SL7.3 platforms;
Next codes have been updated
StRoot
StBFChain
BigFullChain.,h StBFChain.cxx - implemented new options for PicoDst covariance matrix write controls;
StEpdHitMaker
StEpdHitMaker.cxx - updated Make()to returns kStErr if any of the following are missing/null: StTriggerData, StEpdDbMaker, StEvent ;
StPass0CalibMaker
StPicoDstVtxSeedMaker.cxx - changed return type in StPicoEvent;
StPicoDstMaker
StPicoDstMaker.cxx, StPicoDstMaker.h - modified for new picoDst format;
StPicoUtilities.h - added new file;
StPicoEvent
StPicoArrays.cxx, StPicoArrays.h, StPicoBEmcPidTraits.cxx, StPicoBEmcPidTraits.h, StPicoBTofHit.cxx, StPicoBTofHit.h, StPicoBTofPidTraits.cxx, StPicoBTofPidTraits.h, StPicoBTowHit.cxx, StPicoBTowHit.h, StPicoBbcHit.cxx, StPicoBbcHit.h, StPicoCommon.cxx, StPicoDst.cxx, StPicoDst.h, StPicoEmcTrigger.cxx, StPicoEmcTrigger.h, StPicoEpdHit.cxx, StPicoEpdHit.h, StPicoEvent.cxx, StPicoEvent.h, StPicoFmsHit.cxx, StPicoFmsHit.h, StPicoMtdHit.cxx, StPicoMtdHit.h, StPicoMtdPidTraits.cxx, StPicoMtdPidTraits.h, StPicoMtdTrigger.cxx, StPicoMtdTrigger.h, StPicoTrack.cxx, StPicoTrack.h - modified to adjust with new picoDst format;
PhysicalConstants.h, StPicoDstLinkDef.h, StPicoDstReader.cxx, StPicoDstReader.h, StPicoHelix.cxx, StPicoHelix.h, StPicoMessMgr.h, StPicoPhysicalHelix.cxx, StPicoPhysicalHelix.h, StPicoTrackCovMatrix.cxx, StPicoTrackCovMatrix.h, SystemOfUnits.h - added new files to produce new picoDst format;
- July 29, 2018
new library SL18f tagged as SL18f has been created and built on SL6.4 and SL7.3 platform;
default compiler on SL7.3 is gcc 4.8.5 . Library was tested with standard test suite, passed it successfully and released on August 1 .
Main features:
- first release of eTOF software;
- further iTPC code integration and updates;
- updated EPD geometry and event-plane information holder;
- several bugs fixed;Next codes have been updated:
StRoot
StAnalysisUtilities
StHistUtil.cxx - cosmetic's changes: inverse test conditions to skip loop iterations;
StETofUtil
StETofGeometry.cxx, StETofGeometry.h, StETofHardwareMap.cxx, StETofHardwareMap.h, StETofMessageFormat.cxx, StETofMessageFormat.h - first revision of eTOF software;
StETofHardwareMap.h, StETofHardwareMap.cxx - updated to compiled in 64bit mode;
StETofDigiMaker
StETofDigiMaker.cxx, StETofDigiMaker.h - first revision of eTOF code; updated to compile in 64bit mode;
StETofQAMaker
StETofQAMaker.cxx, StETofQAMaker.h - first revision of eTOF code;
StEpdUtil
StEpdEpFinder.cxx, StEpdEpFinder.h, StEpdEpInfo.cxx, StEpdEpInfo.h - added event-plane finding chass StEpdEpFinder and event-plane information-holder class StEpdEpInfo;
StEvent
StETofCollection.h, StETofDigi.h, StETofHeader.h, StETofHit.h, StETofCollection.cxx, StETofDigi.cxx, StETofHeader.cxx, StETofHit.cxx - added new codes for eTOF detector;
StContainers.cxx, StContainers.h, StEventClusteringHints.cxx, StEventTypes.h - modified to add eTOF detector;
StEvent.cxx, StEvent.h - added eTOF hook;
StETofDigi.h, StETofHit.h - added getter function for the associated hit;
StETofHeader.cxx - updated to compile in 64bit mode;
Sti
StiKalmanTrack.cxx, StiKalmanTrackFitter.cxx - removed unused variables;
StiCA
StiCATpcTrackerInterface.cxx - removed unused variables;
StiMaker
StiMaker.cxx, StiMaker.h - cosmitic changes in white space;
StiTpc
StiTpcDetectorBuilder.cxx, StiTpcDetectorBuilder.h - cosmitic changes in white space;
removed unused variables and functions of questionable value; minor rework of inactive volumes;
modified to overload ostream operator<< for StiLayer;
added a flag to force split individual Sti TPC layers;
StiTpcDetectorBuilder.cxx - modified to make number of Sti TPC layers to be always 12 ;
introduced alias for long identifier: St_tpcPadConfigC& tpcPadCfg = *St_tpcPadConfigC::instance();
modified to change the way how Sti TPC padrow IDs assigned to ordered layers;StiTpcDetectorBuilder.h - modified to move StiLayer definition out of StiTpcDetectorBuilder;
added a flag to force split individual Sti TPC layers;
StTpcDb
StTpcDb.cxx, StTpcDbMaker.cxx - removed unused variables;
St_QA_Maker
StEventQAMaker.cxx - cosmetic's changes: inverse test conditions to skip loop iterations;
RTS
include/rts.h, iccp.h - updated;pams
sim/g2t/g2t_volume_id.g - updated EPD geometry and numbering;StarVMC
Geometry/EtofGeo/EtofConfig.xml - corrected ETOF partial installation configuration;
EtofGeo0.xml - updated version of the ETOF, correcting sector numbering;
Geometry/EpdmGeo/EpdmGeo0.xml - updated EPD geometry and numbering;
xgeometry/xgeometry.age - updated to make y2018a geometry available to starsim; - July 5, 2018
new library SL18e tagged as SL18e has been created and built on SL6.4 and SL7.3 platform; default compiler on SL7.3 is gcc 4.8.5 . Library was tested with standard test suite, passed it successfully and released on July 7.
Main features:
- further iTPC code integration and updates;
- implemented new STGC detector in RTS DAQ_READER software ;
- several bugs fixed;Next codes have been updated:
StRoot
StarRoot
TF1Fitter.cxx - modified to use public accessor to access protected member (restorted ); added explicit type cast to match TF1 constru ctor signature in ROOT5 and 6 ;
StBFChain
BigFullChain.h, StBFChain.cxx - added the "huge" option, allocating 80M words to the geant bank for simulation;
added TPC Padrow 40 distortion correction ;
updated chain options for year 2018, year 2019 geometry with iTPC ; added placeholder for ETof chains;
StBTofMixerMaker
StBTofMixerMaker.cxx, StBTofMixerMaker.h - fixed the MixerMakers technique for updating the BTofCollection-previously was not storing MC hits in some embedding cases;
StChain
GeometryDbAliases.h - updated with year 2019 geometry development;
StDaqLib
GENERIC/CRC.cxx, RecHeaderFormats.cxx - added missing namespace OLDEVP;
StDbUtilities
StMagUtilities.cxx - updated UndoPadRow13Distortion() in order to move #define's inside the function as const Int_t's;
modified for simpler way to address calculation of data arrays for wrong sign of the voltages;
StMagUtilities.cxx, StMagUtilities.h - introduced padrow 40 correction for iTPC GridLeak Wall, reduce includes dependencies;
StTpcCoordinateTransform.hh - added Explicit include for TMath ;
StTpcCoordinateTransform.cc - the number of T0 constants increased from 24 to 48 to accommodate inner iTPC sectors. The sector index is updated according to the requested sector/row;
updated to avoid modifying the input TPC sector ID [1, 24] inside of 'StTpcCoordinateTransform::zFromTB()'. The input sector ID should be passed to 'StTpcDb:riftVelocity(sector)' unmodified;
StDetectorDbMaker
St_tpcHighVoltagesC.h - added access to new GridLeak Wall fields;
StEvent
StTriggerData.cxx, StTriggerData.h, StTriggerData2018.cxx, StTriggerData2018.h - added functions: epdNHits, vpdADCSum, vpdMeanTimeDifference ;
StEventUtilities
EveDis.C, StEventHelper.cxx, StEventHelper.h, StRedoTracks.cxx, StuDraw3DEvent.cxx, StuDraw3DEvent.h, StuFixTopoMap.cxx, StuFtpcRefMul t.hh, StuPostScript.cc, StuRefMult.hh - updated for iTPC integration;
StFmsDbMaker
StFmsDbMaker.cxx - fixed not dumping last detector Id to dump file;
StMagF
StMagFMaker.cxx - updated for iTPC integration;
StMuDSTMaker
COMMON/StMuFmsUtil.h - modified to move fillFmsHits to public;
StPass0CalibMaker
StSpaceChargeEbyEMaker.cxx - updated to include TSystem.h and TROOT.h ;
StPicoDstMaker
StPicoDstMaker.cxx, StPicoDstMaker.h - updated to justify class member with magnetic field ;
StPmdUtil
StPmdMapUtil.h - fixed typo in header include guards;
StSvtClusterMaker
StSvtHitMaker.cxx - updated to include of TROOT.h ;
StTpcDb
StTpcDb.h - removed unnecessary dependence on StMagUtilities.h ;
StTpcDbMaker.cxx - introduced padrow 40 correction for iTPC GridLeak Wall, reduce includes dependencies;
StTpcHitMaker
StTpcHitMaker.cxx - updated to set TPC row number for legacy TPC DAQ records;
StTpcHitMoverMaker
StTpcHitMoverMaker.cxx - added Explicit include for spaceChargeCor;
StTrsMaker
StTrsMaker.cxx - fixed to make code compiled after iTPC integration;
src/StTpcDbGeometry.cc, StTrsParameterizedAnalogSignalGenerator.cc - fixed to make code compiled after iTPC integration;
StTrgDatFileReader
StTrgDatReader.cxx - modified to fix run number problem when running with StFile list ;
St_QA_Maker
StEventQAMaker.cxx - modified to use the number of hits associated with the track;
StEventQAMaker.cxx, StEventQAMaker.h, StQABookHist.cxx, StQABookHist.h, StQAMakerBase.cxx, StQAMakerBase.h - introduced EPD QA hosts;RTS
include/rtsLog.h - added iTPC;
rtsSystems.h - updated to handle of more than 32 dets; added STGC detector;
RC_Config.h, iccp.h, iccp2k.h, prepareGbPayload.h - updated for STGC detector;
iccp2k.h - updated to avoid unnecessary dependency;
include/HLT/HLTFormats.h - added bField in HLT_EVE ;
src/DAQ_FCS/daq_fcs.cxx, daq_fcs.h - modified;
src/DAQ_TPX/tpxCore.cxx, tpxGain.cxx, tpxGain.h - fixed altro override;
tpxCore.cxx, tpxCore.h, tpxGain.cxx, tpxPed.cxx - updated tweaks for STGC detector ;
src/DAQ_ITPC/daq_itpc.cxx, daq_itpc.h, itpcFCF.cxx, itpcFCF.h, itpcInterpreter.cxx - implemented first step of offline cluster finder; bug fixed;
itpcCore.h, itpcCore.cxx - bug fixed; updated;
itpcFCF.cxx - removed internal cuts;
src/SFS/fs_index.cxx - added some logging;
src/DAQ_READER/daq_det.cxx, daq_dta_structs.h - small addition;
daqReader.h, daqReader.cxx, daq_det.cxx, daq_det.h - changes for more than 32 dets to add STGC detector;
daqReader.h - updated to avoid unnecessary dependency;
src/DAQ_STGC/Makefile, daq_stgc.cxx, daq_stgc.h, stgcPed.cxx, stgcPed.h - added new STGC detector;StarVMC
Geometry/StarGeo.xml - added the ShldGeo to the y2018 series of geometries. The shielding in the tunnels is important in simulation to block numerous (100k) low E particles from splashing back into the CAVE when we generate hijing events (with wide open eta cuts), fixes for ticket #3346;StarDb
Caibrations/tpc/TtpcSectorT0offset.20080623.000000.C - size increased;
Geometry/tpc/TpcInnerSectorPosition.C - added and deactivated from MySql;
tpcSectorT0offset.20080623.000000.C - increased size 24-48 for iTPC;
StDb
idl/itpcPadGainT0.idl - added new iTPC pad gain t0 table;
tpcHighVoltages.idl - TPC table updated;
iTPCSurvey.idl, tpcRDOMap.idl, tpcRDOT0offset.idl - added new tables for iTPC ;OnlTools
Jevp/StJevpBuilders/l4Builder.cxx, l4Builder.h - added histograms for fixed target;
LaserReader.cxx, tpxBuilder.cxx, tpxBuilder.h - updated;
StOnlineDisplay/StSteeringModule.cxx - updated to include TSystem.h ; - May 8, 2018
new library SL18d tagged as SL18d (on May 7) has been created and built on SL6.4 and SL7.3 platforms;
default compiler on SL7.3 is gcc 4.8.5 . Library was tested with standard test suite, passed it successfully and released on May 10 .
Main features:
- first release of iTPC detector integration code;
- picoDst code updated to include EPD info in picoDst format;
- StarGenerator modules updated with changes necessary for HFT embedding production;
- OnlTools eTOF and iTPC codes/plots updated for run 2018 ;
- several bugs fixed;Next codes have been updated:
StRoot
StAnalysisUtilities
StHistUtil.cxx - initial accomodation for iTPC;
StarGenerator
DECAY/AgUDecay.cxx, AgUDecay.h - modified not to stack neutrinos for transport;
modified to permit decays only where all final state particles are known to TDatabasePDG; it resolved an issue with different sources of particle information;
EMBED/StarEmbedMaker.cxx, StarEmbedMaker.h - implemeted first working release of an embedding plugin for StarGenerator. This initial release provides capability to set the vertex and error for the fixed vertex finder based on input from the tags.root files;
Pythia8_1_62/StarPythia8.cxx, StarPythia8.h, StarPythia8Decayer.cxx, StarPythia8Decayer.h - modified to resolve the issue with differing definitions in the various particle data tables. If a particle has more mass in pythia8 than in hijing, then when it decays at rest, pythia8 will not be able to decay it. This results in the decayer code going into an infinite loop, trying to decay something that won't decay.
Solution is the following: when a particle is decayed by pythia8 take as given the momentum of the particle, but recalculate the energy of the particle using the mass tabulated by pythia 8;
Pythia8_1_86/StarPythia8Decayer.cxx, StarPythia8Decayer.h - modified to resolve the issue with differing definitions in the various particle data tables. If a particle has more mass in pythia8 than in hijing, then when it decays at rest, pythia8 will not be able to decay it. This results in the decayer code going into an infinite loop, trying to decay something that won't decay.
Solution is the following: when a particle is decayed by pythia8 take as given the momentum of the particle, but recalculate the energy of the particle using the mass tabulated by pythia 8;
UTIL/StarParticleData.cxx - asigned G3 id = 4 to all neutrinos;
Kinematics/StarKinematics.cxx - added support for randomly sampling from a comma- or space-delimited list of particles;
StarKinematics.h - updated documentation to reflect added option of particle list;
StarKinematics.cxx, StarKinematics.h - made optimization: move TVector3 to a member variable, rather than use (expensive) ctor/dtor on every particle ;
StarKinematics.cxx, StarKinematics.h - added option to throw flat in rapidity instead of pseudorapidity;
StBFChain
StBFChain.cxx - eliminated usage of BTof libraries Geant-related libraries; by default the BTOF geometry is constructed from the TGeo geometry so there is no need to load the libraries referencing Geant code;
introduced iTpcIT option;
BigFullChain.h - upadted to load Geant-dependent libraries used by older ToF libraries;
updated options for distortion smearing by calibration resolutions;
added new option to deactivate iTpc hits; introduced iTpcIT option;
added P2005c chain option and geometry ry2005g to process cucu 62GeV run 2005 data without SVT & SSD tracking;
StBTofSimMaker
StBTofSimMaker.cxx, StBTofSimMaker.h - updated to use cell-by-cell time resolution for FastSim;
StBTofSimResParams.h - new file added to implement usage of cell-by-cell time resolution for FastSim;
StDbUtilities
StMagUtilities.cxx, StMagUtilities.h - modified to make distortion smearing by calibration resolutions;
StTpcCoordinateTransform.cc, StTpcCoordinateTransform.hh - extended interface to accept TPC sector + use padConfig;
StDetectorDbMaker
StDetectorDbChairs.cxx - added access to new tpcCalibResolutions table; modified to use logger for print out;
St_tpcCalibResolutionsC.h - new file created for tpcCalibResolutions table;
StDetectorDbChairs.cxx - extended interface in St_TpcAvgCurrentC returning channel ID; modified to make ChannelFromRow() accepts TPC sector ID in addition to padrow ID; updated to use updated St_TpcAvgPowerSupplyC::ChannelFromRow(int, int) in StTpcdEdxCorrection;
updated to enable TPC/iTPC switch via St_tpcPadConfig;
St_TpcAvgCurrentC.h, St_TpcAvgPowerSupplyC.h - extended interface in St_TpcAvgCurrentC returning channel ID; modified to make ChannelFromRow() accepts TPC sector ID in addition to padrow ID; updated to use updated St_TpcAvgPowerSupplyC::ChannelFromRow(int, int) in StTpcdEdxCorrection;
St_tpcDimensionsC.h, St_tpcPadGainT0BC.h, St_tpcPadGainT0C.h - updated to enable TPC/iTPC switch via St_tpcPadConfig;
St_tpcPadConfigC.h - added convenience method to identify iTPC padrows;
StdEdxY2Maker
StTpcdEdxCorrection.cxx, StTpcdEdxCorrection.h - extended interface in St_TpcAvgCurrentC returning channel ID; modified to make ChannelFromRow() accepts TPC sector ID in addition to padrow ID; updated to use updated St_TpcAvgPowerSupplyC::ChannelFromRow(int, int) in StTpcdEdxCorrection;
StTpcdEdxCorrection.cxx, StTpcdEdxCorrection.h, StdEdxY2Maker.cxx - modified to provide access TPC params via St_tpcPadConfig instead of StTpcDb;
StEpdUtil
StBbcGeom.cxx, StBbcGeom.h, StEpdGeom.h - updated for finishing methods that return overlapping EPD and BBC tile IDs;
StEpdGeom.h - added simple class StEpdEvp which offers BASIC event plane determination using the EPD;
StEpdEvp.h, StEpdEvp.cxx - new files: added simple class StEpdEvp which offers BASIC event plane determination using the EPD;
StEvent
StMtdHit.h - fixed linker error by removing declared but undefined functions;
StMwcTriggerDetector.cxx - reverted removal of StMwcTriggerDetector constructor which was removed on 2009-11-23 leaving the declaration behind in the corresponding header file. However, this constructor is used in existing StTriggerDetectorCollection();
StEnumerations.h, StDetectorDefinitions.h, StTpcHit.h - introduced kiTpcId ; cosmetics changes;
StTrackTopologyMap.cxx, StTrackTopologyMap.h - iTPC modifications, plus proper use of booleans ;
StEventUtilities
StuFixTopoMap.cxx - introduced iTPC;
StFmsUtil
StFmsEventClusterer.cxx - updated to turn off excessive output from StFmsEventClusterer;
StFtpcTrackMaker
StFtpcConfMapper.hh - fixed linker error by removing declared but undefined functions ;
StGenericVertexMaker
StFixedVertexFinder.cxx, StFixedVertexFinder.h - added option for user to specify the uncertainties on the vertex; useful in embedding jobs in order to get the track association with primary vertex correct;
StIstDbMaker
StIstDb.cxx, StIstDb.h, StIstDbMaker.cxx - added access to new table istSimPar;
StIstDbMaker.cxx - added print-out information for loaded tables;
StIstSimMaker
StIstSlowSimMaker.cxx, StIstSlowSimMaker.h -added the single hit efficiency loaded from istSimPar;
StIstSlowSimMaker.cxx - updated to avoid (rare) edge effect, which caused infinite loop; fixed the issue with hits off of the pad;
Sti
StiKalmanTrack.cxx, StiKalmanTrack.h - added new method StikalmanTrack::getInnerMostDetHitNode(); should be used in StiCA to replace getInnerMostTPCHitNode(); added legal(...) method to check acception of hit;
modified to replace thrown exceptions with runtime asserts; cosmetic style changes;
StiDetectorContainer.cxx - modified to take into account that Sti detectors are not guaranteed to be arranged consecutively: with the addition of iTPC channels in TPC sector 20 the order in which Sti layers can be arranged by (padrow, sector) is not symmetric anymore ;
StiDetector.cxx - added member value to printed info ;
StiDetector.h - cosmetic changes;
StiDetectorTreeBuilder.cxx, StiHitLoader.h, StiMasterDetectorBuilder.cxx, StiVMCToolKit.cxx - modified to use logger for print out;
StiHitContainer.cxx - cosmetic changes;
StiKalmanTrackFitter.cxx - cosmtic changes;
StiTrackNodeHelper.cxx - modified to convert assert to warning: |mJoinPars.hz() - mTargetHz| <= 1e-10 ; The assert was checking the magnetic field in the updated Sti node during the refit. With the addition of iTPC layers some CA provided tracks do not look healthy with nodes coming from unrelated sectors; cosmetic style changes;
Star/StiStarDetectorBuilder.cxx - modified to use logger for print out;
StiCA
StiCATpcTrackerInterface.cxx - modified to enable TPC/iTPC switch via St_tpcPadConfig;
added new method StikalmanTrack::getInnerMostDetHitNode() to use it in StiCA to replace getInnerMostTPCHitNode();
modified to skip hits from inactive Sti layers;
StiMaker
StiMaker.cxx, StiMaker,h - added new option to deactivate iTpc hits; minor cosmetics corrections;
StiStEventFiller.cxx - cosmetic style changes;
StiTpc
StiTpcHitLoader.cxx, StiTpcHitLoader.h - modified to exclude iTPC hits until a switch is implemented ;
modified to reject hits coming from iTPC padrows when requested by user, by default iTPC hits will be used by Sti along with the regular TPC hits; with this modification we provided the functionality to exclude iTPC hits from track reconstruction;
partially reverted rejection of hits coming from iTPC padrows ;
StiTpcHitLoader.cxx - modified to load TPC hits by using new access to Sti detectors; removed iTpc hits guard; some cosmetics code improvements;
StiTpcDetectorGroup.cxx, StiTpcDetectorGroup.h - modified to reject hits coming from iTPC padrows when requested by user;
by default iTPC hits will be used by Sti along with the regular TPC hits; with this modification we provided the functionality to exclude iTPC hits from track reconstruction;
updated to allow activation of iTPC layers in TPC detector builder; by default the iTPC layers are inactive;
StiTpcDetectorBuilder.cxx, StiTpcDetectorBuilder.h - updated to allow activation of iTPC layers in TPC detector builder; by default the iTPC layers are inactive; added private support methods constructTpcPadrowShape() and constructTpcPadrowDetector(); localized variables to function where they are used; build individual Sti shape for every TPC layer; added support functionality to map TPC to Sti sectors and padrows;
StiTpcDetectorBuilder.h - mofified to convert signature to accept StiLayer; activated proper halves of TPC Sti layers;
StiTpcDetectorBuilder.cxx - modified to use sti-to-tpc layer map to replace nested loops; convert signature to accept StiLayer;
modified to use St_tpcPadConfigC in place of St_tpcPadPlanesC, this essential makes the code aware of iTPC sectors;
activated proper halves of TPC Sti layers; sdjusted layer length and position for Sti layers representing halves of TPC;
disabled manually reserving space for StiDetector containers; disabled Sti detectors for iTPC sector/padrows;
StLaserAnalysisMaker
LaserEvent.cxx - modified to enable TPC/iTPC switch via St_tpcPadConfig ;
StMcEvent
StMcEmcHitCollection.hh, StMcEvent.hh, StMcHitIter.h, StMcMtdHit.hh, StMcTrack.hh - fixed linker error by removing declared but undefined functions;
StMuDSTMaker
COMMON/StMuDstMaker.h - fixed linker error by removing declared but undefined functions;
StMtdUtil
StMtdGeometry.cxx - fixed the bug of converting projected localy to cellId;
StTpcDb
StTpcDbMaker.cxx - modified to make distortion smearing by calibration resolutions; cosmetic changes;
StTpcDb.cxx, StTpcDb.h - modified to enable TPC/iTPC switch via St_tpcPadConfig ;
StTpcHitMaker
StTpcHitMaker.cxx, StTpcRTSHitMaker.cxx - changed hardware Id for hits originated in iTpc padrow rather than iTpc sector;
updated to use different DAQ readers when reading TPC data: selecting one reader type is not enough in the iTPC era cause the outter and inner sectors may have different formats;
StTpcHitMoverMaker
StTpcHitMoverMaker.cxx - modified to enable TPC/iTPC switch via St_tpcPadConfig ;
StPass0CalibMaker
StPicoDstVtxSeedMaker.cxx - changed location of include;
StEvtVtxSeedMaker.cxx, StSpaceChargeDistMaker.cxx - modified to enable TPC/iTPC switch via St_tpcPadConfig;
StPicoDstMaker
StPicoDstMaker.cxx, StPicoDstMaker.h, StPicoFmsFiller.cxx, StPicoFmsFiller.h - modified that EPD and BBC realized as a functions and moved inside the StPicoDstMaker; StPicoArrays and StPicoDst classes are moved to ../StPicoEvent;
StPicoEvent
StPicoBEmcPidTraits.cxx, StPicoBEmcPidTraits.h, StPicoTrack.cxx, StPicoTrack.h - StPicoArrays and StPicoDst classes are moved to ../StPicoEvent ;
modified StPicoBbcTile and StPicoEpdTile that changed to StPicoBbcHit and StPicoEpdHitm, also logic of storing 2 closest towers in StBEmcPidTraits was changed; StPicoMtdTrigger.cxx - modified to change the function used to read QT information for 2017 and beyond;
StPxlDbMaker
StPxlDb.cxx, StPxlDb.h, StPxlDbMaker.cxx - added access to new table pxlSimPar;
StPxlDbMaker.cxx - added print-out information to check loaded tables;
StPxlSimMaker
StPxlDigmapsSim.cxx, StPxlDigmapsSim.h - added the single hit efficiency loaded from pxlSimPar table;
StVpdCalibMaker
StVpdCalibMaker.cxx - updated to reduce excessive output;
St_geant_Maker
St_geant_Maker.cxx - updated to setup support for 3 planes of Si tracking; modified to get the hit count right for FTS; re-enabled the FTSA (fts "active") volume;
St_QA_Maker
TpcHitUtilities.cxx - modified to enable TPC/iTPC switch via St_tpcPadConfig ;
QAhlist_EventQA_qa_shift.h - updated list for QA;
QAhlist_EventQA_qa_shift.h, StEventQAMaker.cxx, StQABookHist.cxx, StQAMakerBase.cxx - updated for iTPC accomodation;
StUtilities
StMultiH1F.cxx, StMultiH1F.h - updated to override Write() to save sub histograms in StMultiH1F;RTS
EventTracker/gl3Event.cxx - updated ;
src/DAQ_ITPC/daq_itpc.cxx, itpcFCF.cxx, itpcFCF.h - tweeks to iTPC; bugs fixed;
itpcInterpreter.cxx, itpcInterpreter.h - bugs fixed; added fee_count;
itpcInterpreter.cxx, itpcInterpreter.h, daq_itpc.cxx - made many changes for version 1;
itpcPed.cxx, itpcPed.h - tweak for pulser run; updated;
src/DAQ_FCS/daq_fcs.cxx, daq_fcs.h - updated;
src/DAQ_READER/daq_dta.cxx, daq_dta.h - updated to extend some structures;pams/ sim/gstar/gstar_part.g - added Lambda_c with G3 id of 208;
StarDb
Calibrations/tpc/TpcResponseSimulator.dev2019.C, tpcDriftVelocity.C, tpcElectronics.dev2019.C, tpcPadGainT0B.20180301.000000.C, tpcSectorT0offset.y2018.C - added new local DB files for iTPC;
Geometry/ist/istLadderOnIstMisalign.20131210.000001.C, istLadderOnIstMisalign.20140101.000001.C, ist LadderOnIstMisalign.20141210.000001.C, istLadderOnIstMisalign.20150101.000001.C, istLadderOnIstMisalign.20151210.000001.C, istLadderOnIstMisalign.20160101.000001.C - added misalignment tables for IST dead materials;
Geometry/pxl/pxlLadderOnSectorMisalign.20131210.000001.C, pxlLadderOnSectorMisalign.20140101.000000.C, pxlLadderOnSectorMisalign.20141210.000001.C, pxlLadderOnSectorMisalign.20150101.000001.C, pxlLadderOnSectorMisalign.20151210.000001.C, pxlLadderOnSectorMisalign.20160101.000001.C - added misalignment tables for PXL dead materials;
Geometry/sst/sstLadderOnSstMisalign.20131210.000001.C, sstLadderOnSstMisalign.20140101.000001.C, sstLadderOnSstMisalign.20141210.000001.C, sstLadderOnSstMisalign.20150101.000001.C, sstLadderOnSstMisalign.20151210.000001.C, sstLadderOnSstMisalign.20160101.000001.C - added misalignment tables for SST dead materials;
StDb
idl/tpcCalibResolutions.idl - added new TPC table;
tpcSectorT0offset.idl - extended T0 calibration to inner (iTPC) sectors. This is done to accomodate different numbers for inner (new iTPC) and outter TPC sectors;OnlTools
Jevp/StJevpBuilders/l4Builder.cxx - updated to move some histograms to corresponding trigger protected area;
itpcBuilder.cxx, itpcBuilder.h - modified to include clusters, and latest event; added cluster histograms;
etofBuilder.cxx - added reset on startrun; changed style of etof plots for better visibility, added etof to title; changed maximum range of eTof_nHits plot to 250;
fixed the number of messages to read in & added new hitMap ;
etofBuilder.h, etofBuilder.cxx - added more histograms for monitoring fine and coarse time, correlation eTof vs. bTof and hitmaps per MRPC;
l3Builder.cxx - updated ;
Jevp/StJevpServer/
JevpServer.cxx - updated;
Jevp/StJevpPlot/JevpPlot.cxx - updated;
DisplayDefs.cxx, DisplayDefs.h, JLatex.cxx, JLatex.h, JevpPlot.cxx, PdfFileBuilder.cxx - updated for run 2018;
Jevp/JevpEdit/JevpEdit.java - updated; - April 13, 2018
library SL18c has been updated with picoDst code, rebuilt and retagged with tag SL18c_1 .
Next codes have been updated:
StPicoEvent
StPicoBEmcPidTraits.h, StPicoBEmcPidTraits.cxx, StPicoTrack.h, StPicoTrack.cxx, StPicoMtdTrigger.cxx;
StPicoDstMaker
StPicoFmsFiller.h, StPicoFmsFiller.cxx, StPicoDstMaker.h, StPicoDstMaker.cxx;
StPicoArrays.cxx, StPicoArrays.h, StPicoBbcFiller.cxx, StPicoBbcFiller.h, StPicoDst.cxx, StPicoDst.h, StPicoEpdFiller.cxx, StPicoEpdFiller.h - removed - March 15, 2018
new library SL18c tagged as SL18c has been created and built on SL6.4 and SL7.3 platform;
default compiler on SL7.3 is gcc 4.8.5 . Library was tested with standard test suite, passed it successfully and released on March 17 .
Main features:
- first revision of y2018a production geometry for run 2018;
- StFmsPointMaker and StFmsClusterFitter implemented new shower shape with 6 z slices
- StEpdUtil added geometry class for BBC inner tiles;
- OnlTools implemented online plots for eTOF detector;
- several bugs fixed;Next codes have been updated:
StRoot
StBFChain
BigFullChain.h - added basic chain for run 2018;
StBTofMatchMaker
StBTofMatchMaker.cxx - modified to use TGeo initializer for BTof geometry;
StBTofUtil
StBTofGeometry.h - removed declared but undefined function;
StBichsel
StdEdxModel.h - removed declared but undefined function;
StChain
GeometryDbAliases.h - added support for y2018a geometry;
StEpdHitMaker
StEpdHitMaker.cxx - updated do not make StEpdHit objects if ADC is zero;
StEpdUtil
StBbcGeom.cxx, StBbcGeom.h - added geometry class for BBC inner tiles; added PMT-to-tile mapping; corrected reverse mapping of PMTs to tiles;
StEpdGeom.cxx, StEpdGeom.h - modified to speedup EPD geometry class;
StBbcGeom.cxx, StBbcGeom.h, StEpdGeom.cxx, StEpdGeom.h - added methods to return a list of BBC tiles that averlap with an EPD tile;
StEventUtilities
StEventHelper.h, StEventHitIter.cxx, StEventHitIter.h - removed declared but undefined function;
StFmsDbMaker
StFmsDbMaker.cxx - removed inline keyword from source file; bug fixed;
StFmsDbMaker.h - removed declared but undefined function;
StFmsPointMaker
StFmsPointMaker.cxx, StFmsPointMaker.h - introduced 2 options, mVertexZ(0) , mShowerShapeWithAngle(1); default for mShowerShapeWithAngle =1 to implement the 6 slice shower shape with wider shower shape; mShowerShapeWithAngle=0 for single slice model;
added initialization of mObjectCount and mMaxEnergySum;
StFmsUtil
StFmsClusterFinder.cxx - modified due to implementaion of new 6 slices shower shape;
StFmsClusterFitter.cxx, StFmsClusterFitter.h - different shower shape version is provided; modified to use fixed 1 & 2 photon energy in fitting;
StFmsEventClusterer.cxx, StFmsEventClusterer.h - updated with different shower shape; modified to enable 2nd fit for 2 photon in 1 cluster;
StGenericVertexMaker
StiPPVertex/BtofHitList.cxx - updated to use TGeo initializer for BTof geometry;
StPicoEvent
StPicoMtdTrigger.cxx - changed minimum QT tac cut for 2017 run;
StiMaker
StiMaker.h - removed declared but undefined function;
StTriggerUtilities
StJanEventMaker/JanEventReader.h - fixed operator!= not defined for ifstream;RTS
src/DAQ_ETOF/Makefile, daq_etof.cxx - added checkpoint;
src/DAQ_ITPC/daq_itpc.cxx, itpcInterpreter.cxx, itpcInterpreter.h, itpcPed.h, itpc_rowlen.h - bug fixes;
itpcFCF.cxx, itpcFCF.h - added new files for FCF ;
daq_itpc.cxx - modified to add FCF;
itpcPed.h, itpc_rowlen.h - bug fixed;
src/DAQ_PP2PP/daq_pp2pp.cxx - bug fixed;
src/RTS_EXAMPLE/rts_example.C - added FCF;StarVMC
Geometry/StarGeo.xml - added y2018a geometry tag;
Geometry/BbcmGeo/BbcmGeo.xml - fixed issue with hits declaration; OPTS=C sets a 'calorimeter' hit, which does not track the complete idtruth history of the hit;
Geometry/EpdmGeo/EpdmGeo0.xml - fixed issue with hits declaration; OPTS=C sets a 'calorimeter' hit, which does not track the complete idtruth history of the hit;StarDb
AgMLGeometry/Geometry.y2018a.C - added support for for y2018a geometry;
Calibrations/tpc/TpcAvgCurrent.y2018.C, TpcAvgPowerSupply.y2018.C, TpcAvgPowerSupply.y2019.C, TpcRowQ.y2018.C, TpcSecRowB.y2018.C, tpcAnodeHVavg.y2018.C, tpcElectronics.y2019.C, tpcPadGainT0B.y2018.C - added calibrations files for iTPC;
StDb
idl/istSimPar.idl, pxlSimPar.idl - added new tables;OnlTools
Jevp/StJevpBuilders/itpcBuilder.cxx - updated to change conditions for hot channels row 28;
itpcBuilder.h, itpcBuilder.cxx - added plots per event;
tofBuilder.cxx - updated VPD channel map for run18;
etofBuilder.cxx, etofBuilder.h, etofMessageFormat.cxx, etofMessageFormat.h - new files for eTOF online plots;
Jevp/StJevpServer/JevpServer.cxx - updated for run 2018; - February 27, 2018
new library SL18b has been tagged as SL18b and built on SL6.4 and SL7.3 platforms;
default compiler on SL7.3 is gcc 4.8.5, on SL6.4 gcc 4.8.2 . Library was tested with standard test suite, passed it successfully and released on March 2 .
Main features:
- StEvent updated with EPD hits collection;
- first revision of StEpdHitMaker and StEpdUtil makers;
- added EPD data for StMuDSTMaker format;
- StBTofGeometry implemented new method to construct StBTofGeometry from the TGeo detector description;
- StPicoDstMaker modified to store all BEMC towers: id, ADC and energy;
- added y2019 rough cut geometry ;
- added iTPC geometry and constants for y2018 and y2019 overall geometry;
- several bugs fixed;Next codes have been updated:
StRoot
StarGenerator
Hijing1_383/StarHijing.cxx - Zr96, Ru96 added to menu; modified to allow geant to decay particles by default;
Pythia8_1_62/StarPythia8.h - added option to read in cmnd file;
StBFChain
BigFullChain.h - added 'epdHit' option;
StBTofUtil
StBTofGeometry.cxx, StBTofGeometry.cxx - implemented new method to construct StBTofGeometry from the TGeo detector description; updated to form TGeo paths for trays and modules ;
StChain
GeometryDbAliases.h - updated to integrate y2019 geometry (full eTOF);
StDetectorDbMaker
St_itpcPadPlanesC.h, St_tpcPadConfigC.h - added new files for iTPC;
StEpdHitMaker
StEpdHitMaker.cxx, StEpdHitMaker.h - first revision of EPD hits maker;
StEpdUtil
StEpdGeom.cxx, StEpdGeom.h - first revision, utility area for EPD; StEpdGeom class provides geometry info for each tile;
implemented inline functions IsWest and IsEast;
StEvent
StEpdCollection.cxx, StEpdCollection.h, StEpdHit.cxx, StEpdHit.h - added new files for EPD hits collection;
StContainers.cxx, StContainers.h, StEvent.cxx, StEvent.h, StEventClusteringHints.cxx, StEventTypes.h - modified for new EPD classes;
StTpcRawData.cxx - updated to include iTPC;
StTriggerData.cxx, StTriggerData.h, StTriggerData2018.cxx, StTriggerData2018.h - updated for run 2018 ;
StiMaker
StTrack2FastDetectorMatcher.cxx - modified to build StBTofGeometry from TGeo geometry when available;
StIstRawHitMaker
StIstRawHitMaker.cxx, StIstRawHitMaker.h - updated;
StFmsDbMaker
StFmsDbMaker.cxx, StFmsDbMaker.h - updated for faster reading DB table;
StFmsHitMaker
StFmsHitMaker.cxx - modified to clean up DB aceess for run# and event# for daq/StEvent/Mudst file reading;
StMtdQAMaker
StMtdQAMaker.cxx, StMtdQAMaker.h - updates for run 2018, more histograms;
StMuDSTMaker
StMuDSTMakerLinkDef.h - added EPD type;
COMMON/StMuArrays.cxx, StMuArrays.h - added EPD type;
StMuDst.cxx, StMuDst.h - added EPD array;
StMuEpdHitCollection.h, StMuEpdHit.h, StMuEpdUtil.h, StMuEpdHitCollection.cxx StMuEpdHit.cxx StMuEpdUtil.cxx - added new files for EPD MuDst format;
StMuTypes.hh - added EPD type:
StMuDstMaker.cxx, StMuDstMaker.h - added EPD support and fixed long standing bug in SetStatus;
StPass0CalibMaker
StSpaceChargeEbyEMaker.cxx - restored pre-pass settings for old data;
StPeCMaker
StPeCMaker.cxx - initialized BTOF geometry using proper interface;
StPicoDstMaker
StPicoArrays.cxx, StPicoArrays.h, StPicoBbcFiller.cxx, StPicoBbcFiller.h, StPicoDst.cxx, StPicoDst.h, StPicoDstMaker.cxx, StPicoDstMaker.h, StPicoEpdFiller.cxx, StPicoEpdFiller.h, StPicoFmsFiller.cxx, StPicoFmsFiller.h - updated to store all BEMC towers (id, ADC, Energy); BUG fix: in case of the BEMC matched track we store the correct tower indices for the 2 highest and closest towers; the TpcVpdVzDiffCut default value is set to be 6cm; minore style updates;
StPicoEvent
StPicoBEmcPidTraits.cxx, StPicoBEmcPidTraits.h, StPicoBTofHit.cxx, StPicoBTofHit.h, StPicoBTofPidTraits.cxx, StPicoBTofPidTraits.h, StPicoBTowHit.cxx, StPicoBTowHit.h, StPicoBbcTile.cxx, StPicoBbcTile.h, StPicoCommon.cxx, StPicoCommon.h, StPicoEmcTrigger.cxx, StPicoEmcTrigger.h, StPicoEpdTile.cxx, StPicoEpdTile.h, StPicoEvent.cxx, StPicoEvent.h, StPicoFmsHit.cxx, StPicoFmsHit.h, StPicoMtdHit.cxx, StPicoMtdHit.h, StPicoMtdPidTraits.cxx, StPicoMtdPidTraits.h, StPicoMtdTrigger.cxx, StPicoMtdTrigger.h, StPicoTrack.cxx, StPicoTrack.h, StPicoUtilities.h - updated style; modified to update classes with copy constructors ;
St_pp2pp_Maker
St_pp2pp_Maker.cxx - modified for year 2017;
StTofCalibMaker
StTofCalibMaker.cxx - removed outdated ClassImp macro;
StTofHitMaker
StTofHitMaker.cxx - removed outdated ClassImp macro;
StTofMaker
StTofMaker.cxx - removed outdated ClassImp macro;
StTofSimMaker
StTofSimMaker.cxx - removed outdated ClassImp macro;
StTofUtil
StTofrGeometry.cxx, StTofrGeometry.h - removed outdated ClassImp macro;
StTofpMatchMaker
StTofpMatchMaker.cxx - removed outdated ClassImp macro;
StTofrMatchMaker
StTofrMatchMaker.cxx - removed outdated ClassImp macro;RTS
include/rtsSystems.h - updated;
src/DAQ_ITPC/daq_itpc.cxx - fixed bug with sector;
src/RTS_EXAMPLE/daqFileMerger.C - added new file;pams
geometry/tpcegeo/tpcegeo5.g - added iTPC geometry;
sim/g2t/g2t_volume_id.g - modified to reduce unneeded output; updated g2t volume ID for EPD;StarVMC
Geometry/StarGeo.xml - corrected MTD geometry description in 2018 first cut and experimental geometries; added y2019 rough cut geometry;
Geometry/EtofGeo/EtofConfig.xml, EtofGeo0.xml - added y2019 rough cut geometry; added full installation option as default connected to y2019; y2018 still uses only one single sector;
EtofGeo0.xml - extended hit scoring in eTOF ;
xgeometry/xgeometry.age - modified to integrate y2019 geometry (full eTOF);StarDb
AgMLGeometry/Geometry.y2019.C - added new file to integrate y2019 geometry (full eTOF);
AgiGeometry/Geometry.y2018.C, Geometry.y2019.C, HALL.y2018.root, HALL.y2019.root, y2018.h, y2019.h - added iTPC branch;
Calibrations/tpc/TpcResponseSimulator.y2019.C - added new file for iTPC ;
TpcLengthCorrectionMDF.C - modified;
tpcDriftVelocity.20180223.165758.C, tpcDriftVelocity.20180223.170356.C, tpcDriftVelocity.20180223.222119.C, tpcDriftVelocity.20180224.030742.C, tpcDriftVelocity.20180224.163131.C, tpcDriftVelocity.20180224.204912.C, tpcDriftVelocity.20180225.013145.C, tpcDriftVelocity.20180225.050346.C, tpcDriftVelocity.20180225.053037.C, tpcDriftVelocity.20180225.085554.C, tpcDriftVelocity.20180225.131406.C, tpcDriftVelocity.20180225.171556.C - added new calibrations files for run 2018;
Geometry/tpc/itpcPadPlanes.C, tpcPadConfig.C, tpcPadConfig.y2018.C, tpcPadConfig.y2019.C - added iTPC geometry constants;
StDb
idl/fmsBitShiftGainB.idl, fmsGainB.idl, fmsGainCorrectionB.idl - added new non-indexed versions of FMS tables for performance;
itpcPadPlanes.idl, tpcPadConfig.idl - added new files for iTPC;OnlTools
Jevp/StJevpBuilders/l4Builder.h, l4Builder.cxx - added vz and vz_Vpdvz plots;
itpcBuilder.h, itpcBuilder.cxx - updated plots for TPC to iTPC overall ;
trgBuilder.cxx, trgBuilder.h - added QT timing in trgBuilder;
Jevp/StJevpServer/ JevpServer.cxx - added QT timing in trgBuilder; - January 18, 2018
new library SL18a tagged as SL18a has been created and built on SL6.4 and SL7.3 platform;
default compiler on SL7.3 is gcc 4.8.5 . Library was tested with standard test suite, passed it successfully and released on January 23 .Main features:
- implemented y2018x geometry for run 2018 ;
- created final verison of EPD geometry for run 2018;
- FPD geometry updated to integrate FMS postshower; added FMS postshower hits interface to C++ ;
- StarVMC/Geometry all codes modified to move responsibility to set SIMU flag to detector's Config files;
- daq ITPC new codes committed, working revision;
- several bugs fixed;Next codes have been updated:
asps
Simulation/starsim/rebank/aslgetba.age, aslsetba.age - modified to make compiler smater after two last upgrades and avoid loops optimization problem inside of the AgSTAR/zebra interface;StRoot
StAssociationMaker
StAssociationMaker.cxx - updated for better counting of MC track common hits;
StarRoot
TF1Fitter.cxx, StMultyKeyMap.cxx - updated ;
StChain
GeometryDbAliases.h - y2018x geometry model defined ;
St_db_Maker
St_db_Maker.cxx - modified to skip wrong file name correction;
StTofUtil
StTofGeometry.cxx - updated to Get rid of unsupported xdf and outdated ctf tables;
StEpdDbMaker
StEpdDbMaker.cxx, StEpdDbMaker.h - updated wire 1 ID, postion index(PP) starts from 0 and included tile 0;
StFmsFastSimulatorMaker
StFmsFastSimulatorMaker.cxx - updated for FPost ;
StFmsHitMaker
StFmsHitMaker.cxx, StFmsHitMaker.h - modified to merge timedep gain;
StFmsPointMaker
StFmsPointMaker.cxx - cosmetic changes: removed StRoot/ from include path because it's already in the default path search;
StFmsUtil
StFmsClusterFinder.cxx, StFmsClusterFitter.cxx, StFmsConstant.h, StFmsEventClusterer.cxx - cosmetic changes: removed StRoot/ from include path because it's already in the default path search ;
Sti
StiDetectorBuilder.h, StiDetectorContainer.h, StiFilter.h, StiKalmanTrack.h, StiKalmanTrack.cxx, StiKalmanTrackFinder.h, StiKalmanTrackNode.h - removed declared but undefined functions;
StiKalmanTrackNode.cxx - removed inline attribute to match the declaration; modified to let compiler decide whether to inline or not;
StiDetectorBuilder.cxx, StiDetectorBuilder.h - modified to save Sti geometry (via TVolume) in StiMaker lib rather than Sti;
StiMaker
StiMaker.cxx - modified so that if no input file, provide default name; removed unused std::string;
StiMaker.h - remove unused std::string;
StKFVertexMaker.h - added missing include;
StTrack2FastDetectorMatcher.cxx - cosmetics updates: modified do not use common name from std:: as local variable;
StiMaker.cxx, StiMaker.h - removed unused std: string;
StiDetectorVolume.cxx, StiDetectorVolume.h - modified to save Sti geometry (via TVolume) in StiMaker lib rather than Sti;
StiUtilities
StiPullEvent.h - removed declared but undefined functions;
StIstClusterMaker
StIstClusterMaker.cxx, StIstIClusterAlgo.cxx, StIstIClusterAlgo.h, StIstScanClusterAlgo.cxx, StIstScanClusterAlgo.h, StIstSimpleClusterAlgo.cxx, StIstSimpleClusterAlgo.h - cosmetic changes: removed StRoot/ from include path because it's already in the default path search;
StIstHitMaker
StIstHitMaker.cxx - cosmetic changes: removed StRoot/ from include path because it's already in the default path search;
StIstRawHitMaker
StIstRawHitMaker.cxx, StIstRawHitMaker.h - cosmetic changes: removed StRoot/ from include path because it's already in the default path search;
StIstSimMaker
StIstSlowSimMaker.cxx - cosmetic changes: removed StRoot/ from include path because it's already in the default path search;
StIstUtil
StIstCluster.cxx, StIstClusterCollection.cxx, StIstRawHit.cxx, StIstRawHitCollection.cxx - cosmetic changes: removed StRoot/ from include path because it's already in the default path search;
St_geant_Maker
St_geant_Maker.cxx - added FMS postshower hits interface to C++ ; updated sensitive volume names for interface to C++ ;
StMiniMcEvent
StMiniMcPair.h, StTinyMcTrack.h, StTinyRcTrack.h - modified to move idTruths and keys from short to int;
StMiniMcMaker
StMiniMcMaker.cxx, dominatrackInfo.cc - modified to move idTruths and keys from short to int;
StMuDSTMaker
COMMON/StMuFgtCluster.cxx, StMuFgtStrip.cxx, StMuFgtStrip.h - cosmetic changes: removed StRoot/ from include path because it's already in the default path search;
StTriggerUtilities
StTriggerSimuMaker.cxx - updated to remove explicit reference to a database;
removed direct query to STAR database server in InitRun(int), users need to make sure that the trigger simulator retrieves correct run number ;RTS
include/rtsMonitor.h, rtsSystems.h - added ITPC_ID;
src/DAQ_ITPC/daq_itpc.cxx, daq_itpc.h, itpcCore.cxx - updated for ITPC ;
itpcInterpreter.cxx, itpcInterpreter.h, itpcPed.cxx, itpcPed.h - added new files for ITPC;
src/RTS_EXAMPLE/rts_example.C - updated for ITPC;
src/SFS/sfs_index.cxx - updated for run 2018;pams
sim/g2t/g2t_volume_id.g - updated EPD volume id ;
g2t_fpd.F, g2t_volume_id.g - added FMS postshower hits interface to C++ ;
g2t_epd.F - updated sensitive volume names for g2t_epd.F;mgr/Dyson/Export/AgROOT.py - new runtime feature added to AgML;
StarVMC
Geometry/StarGeo.xml - retired EPD test tags; implemented EPD in y2018 series geometry model; implemented experimental TPC geometry (radial segmentation of gas, hermetic, support for iTPC) in y2018x; responsability to set SIMU flag moved to Config files;
Geometry/BbcmGeo/BbcmConfig.xml, BbcmGeo.xml - updated for run 2018: large BBC tiles are removed and the BBC is moved to a new z-position; BBC mother volume thickness is reduced, to avoid overlap with EPD, but radius remains unchanged;
Geometry/BtofGeo/BtofConfig.xml - modified to control SIMU flag (history of track mode) via Config files which should now be consistent with code prior to AgML 2.0 ;
Geometry/CalbGeo/CalbConfig.xml - modified to control SIMU flag (history of track mode) via Config files which should now be consistent with code prior to AgML 2.0 ;
Geometry/CaveGeo/CaveConfig.xml - modified to control SIMU flag (history of track mode) via Config files which should now be consistent with code prior to AgML 2.0 ;
changed cave to the *default* SIMU=2 secondary following flag ;
Geometry/EcalGeo/EcalConfig.xml - modified to control SIMU flag (history of track mode) via Config files which should now be consistent with code prior to AgML 2.0 ;
Geometry/EpdmGeo/EpdmConfig.xml, EpdmGeo0.xml - updated version of the EPD geometry, more accurate description of the tile geometry, including thin and thick sections of each tile;
EpdmGeo0.xml - updated final version of EPD geometry; corrected dz=0 for tiles in last revision; updated Z position to +/-374cm ;
Geometry/EtofGeo/EtofConfig.xml - modified to control SIMU flag (history of track mode) via Config files which should now be consistent with code prior to AgML 2.0 ;
Geometry/FgtdGeo/FgtdConfig.xml - modified to control SIMU flag (history of track mode) via Config files which should now be consistent with code prior to AgML 2.0 ;
Geometry/FpdmGeo/FpdmConfig.xml, FpdmGeo4.xml - updated to integrate the FMS postshower;
Geometry/FtpcGeo/FtpcConfig.xml - modified to control SIMU flag (history of track mode) via Config files which should now be consistent with code prior to AgML 2.0 ;
Geometry/FtroGeo/FtroConfig.xml - modified to control SIMU flag (history of track mode) via Config files which should now be consistent with code prior to AgML 2.0 ;
Geometry/HcalGeo/HcalConfig.xml - modified to control SIMU flag (history of track mode) via Config files which should now be consistent with code prior to AgML 2.0 ;
Geometry/IdsmGeo/IdsmConfig.xml - modified to control SIMU flag (history of track mode) via Config files which should now be consistent with code prior to AgML 2.0 ;
changed idsm to the *default* SIMU=2 secondary following flag ;
Geometry/IstdGeo/IstdConfig.xml - modified to control SIMU flag (history of track mode) via Config files which should now be consistent with code prior to AgML 2.0 ;
Geometry/QuadGeo/QuadConfig.xml - modified to control SIMU flag (history of track mode) via Config files which should now be consistent with code prior to AgML 2.0 ;
Geometry/MagpGeo/MagpConfig.xml - modified to control SIMU flag (history of track mode) via Config files which should now be consistent with code prior to AgML 2.0 ;
Geometry/MutdGeo/MutdConfig.xml - modified to control SIMU flag (history of track mode) via Config files which should now be consistent with code prior to AgML 2.0 ;
Geometry/PipeGeo/PipeConfig.xml - modified to control SIMU flag (history of track mode) via Config files which should now be consistent with code prior to AgML 2.0 ;
changed pipe to the *default* SIMU=2 secondary following flag ;
Geometry/PixlGeo/DtubConfig.xml, PixlConfig.xml, PsupConfig.xml - modified to control SIMU flag (history of track mode) via Config files which should now be consistent with code prior to AgML 2.0 ;
Geometry/PhmdGeo/PhmdConfig.xml - modified to control SIMU flag (history of track mode) via Config files which should now be consistent with code prior to AgML 2.0 ;
Geometry/SconGeo/SconConfig.xml - modified to control SIMU flag (history of track mode) via Config files which should now be consistent with code prior to AgML 2.0 ;
Geometry/SisdGeo/SisdConfig.xml - modified to control SIMU flag (history of track mode) via Config files which should now be consistent with code prior to AgML 2.0 ;
Geometry/ShldGeo/ShldConfig.xml - modified to control SIMU flag (history of track mode) via Config files which should now be consistent with code prior to AgML 2.0 ;
Geometry/SvttGeo/SvttConfig.xml - modified to control SIMU flag (history of track mode) via Config files which should now be consistent with code prior to AgML 2.0 ;
Geometry/SupoGeo/SupoConfig.xml - modified to control SIMU flag (history of track mode) via Config files which should now be consistent with code prior to AgML 2.0 ;
Geometry/TpceGeo/TpceConfig.xml, TpceGeo5.xml - added experimental TPC geometry with hermetic segmentation of TPC gas volume;
explicitly set SIMU=2 in test configuration ;
Geometry/VpddGeo/VpddConfig.xml - modified to control SIMU flag (history of track mode) via Config files which should now be consistent with code prior to AgML 2.0 ;
Geometry/UpstGeo/UpstConfig.xml - modified to control SIMU flag (history of track mode) via Config files which should now be consistent with code prior to AgML 2.0 ;
Geometry/ZcalGeo/ZcalConfig.xml - modified to control SIMU flag (history of track mode) via Config files which should now be consistent with code prior to AgML 2.0 ;
xgeometry/xgeometry.age - EPD test tags deprecated; y2018x geometry defined ;
modified to defind the volume where secondares are saved prior to executing the modules ;StarDb
AgMLGeometry/Geometry.y2018x.C - added y2018x geometry;
StDb
idl/tofSimResParams.idl - added new TOF table;
epdFEEMap.idl, epdGain.idl, epdQTMap.idl, epdStatus.idl - added new EPD tables;OnlTools
Jevp/StJevpBuilders/fcsBuilder.cxx, fcsBuilder.h, JevpBuilder.cxx -updated for run 2018;
Lidia Didenko
2019
STAR SOFTWARE NEWS December 05, 2019
---------------------
The present release assignment:
             SL09g_embed (SL09g_2Embed_v10) ROOT_LEVEL 5.22.00
             SL10c_embed (SL10c_embed_v5)  ROOT_LEVEL 5.22.00
             SL10h_embed (SL10h_embed_v6)  ROOT_LEVEL 5.22.00
             SL10k_embed (SL10k_embed_v11) ROOT_LEVEL 5.22.00
             SL11d_embed (SL11d_embed_v6)  ROOT_LEVEL 5.22.00
             SL12a_embed  (SL12a_embed_v3) ROOT_LEVEL 5.22.00
             SL12d_embed (SL12d_embed_v6) ROOT_LEVEL 5.22.00
             SL13b_embed (SL13b_embed_v1)  ROOT_LEVEL 5.22.00
             SL14g    (SL14g_3)  ROOT_LEVEL 5.34.09 pp 500GeV run 2013 production, days 129-161
             SL14i    (SL14i_2)  ROOT_LEVEL 5.34.09 AuAu 14.6GeV run 2014 production
             SL15c    (SL15c)    ROOT_LEVEL 5.34.09 AuAu 200GeV run 2014 data production with HFT
             SL15e_embed  (SL15e_embed_v1) ROOT_LEVEL 5.34.09
             SL15l    (SL15l)    ROOT_LEVEL 5.34.30 pAu 200GeV st_fms run 2015 data production
             SL16d    (SL16d_1)  ROOT_LEVEL 5.34.30 pp,pAu,pAl run 2015 production without HFT tracking
             SL16d_embed  (SL16d_embed_v2) ROOT_LEVEL 5.34.30
             SL16g_embed  (SL16g_embed_v3) ROOT_LEVEL 5.34.30
             SL16j (SL16j)       ROOT_LEVEL 5.34.30 auau 200GeV  run 2016 production
             SL16j_embed  (SL16j_embed_v3) ROOT_LEVEL 5.34.30
             SL16k_embed  (SL16k_embed_v1) ROOT_LEVEL 5.34.30
             SL17d (SL17d)       ROOT_LEVEL 5.34.30 dAu 20-200GeV run 2016 production
             SL17d_embed  (SL17d_embed_v3) ROOT_LEVEL 5.34.30
             SL17f (SL17f_1)     ROOT_LEVEL 5.34.30 auau 200GeV run 2016 st_upc production;
                                                    pp 200GeV run 2015 st_rp reproduction;
             SL17g (SL17g_1)     ROOT_LEVEL 5.34.30 pp 510GeV run 2017 st_W production;
             SL17i (SL17i)       ROOT_LEVEL 5.34.30 SL7.3 cucu 200-22 GeV run 2005 reproduction;
             SL18b (SL18b)       ROOT_LEVEL 5.34.30 pp 510GeV run 2017 st_physics production;
             SL18c (SL18c_1)     ROOT_LEVEL 5.34.30 pp 510GeV run 2017 st_fms, st_mtd production;
                                                       AuAu 54GeV run 2017 production;
             SL18c_embed (SL18c_embed_v1) ROOT_LEVEL 5.34.30
             SL18f (SL18f_1)     ROOT_LEVEL 5.34.30 pp 510GeV run 2017 st_epd production;
                                                    AuHe3 200GeV run 2014 st_physics data production;
             SL18h (SL18h)       ROOT_LEVEL 5.34.30 pp 500GeV run 2017 st_rp stream data reproduction;
                                                    AuAu 200GeV run 2014 data reproduction with selected trigger ID;
                                                    pp 200GeV run 2015 st_rp stream data reproduction;
                                                    pAu/pAl 200GeV run 2015 st_ssdmb stream data reporuduction;
             SL19a (SL19a)       ROOT_LEVEL 5.34.30
       old-> SL19b (SL19b_1)     ROOT_LEVEL 5.34.30 AuAu 27GeV run 2018 production
       pro-> SL19c (SL19c)       ROOT_LEVEL 5.34.30 cuAu 200GeV run 2012 data reproduction
             SL19d (SL19d)       ROOT_LEVEL 5.34.30 SL7.3
       new-> SL19e (SL19e)       ROOT_LEVEL 5.34.30 SL7.3
       dev-> DEV                 ROOT_LEVEL 5.34.30 SL7.3
      .dev-> .DEV                ROOT_LEVEL 5.34.38

-------------------------------------------------
Release History ..
SL19a library
SL19b library
SL19c library
SL19d library
SL19e library
pass the argument runViewer.C(\"$args\")"
OnlTools/Jevp/StJevpBuilders/etofBuilder.cxx
fixing MAC address, change sector 19 -> 21
OnlTools/Jevp/StJevpBuilders/tpcBuilder.cxx
Added comment, //LOG("JEFF", "filling tpx qs")
OnlTools/Jevp/StJevpPlot/JevpPlot.cxx
Added comment //LOG("JEFF", "histo %s: entries %d", myname, curr->histo->GetEntries());
OnlTools/Jevp/StJevpServer/JevpServer.cxx
basedir varible has been change from (char *)"/RTScache/conf/jevp_test to (char *)"/RTScache/conf/jevp
OnlTools/Jevp/StJevpViewer/EthClient.cxx
OnlTools/Jevp/StJevpViewer/EthClient.h
Add some variables in the constructor, added new connected and updateServerTags() method,
From getTabDisplayNode method into getTabDisplayBranchOrLeaf, getTabDisplayBranch, getTabDisplayLeaf methods
OnlTools/Jevp/StJevpViewer/JevpViewer.cxx
OnlTools/Jevp/StJevpViewer/JevpViewer.h
Added EthClient *gshifteth, changed input parameters for buildTabs method, JevpViewer, ExitViewer, update, getPlotAtIdx methods have been updated
OnlTools/Jevp/StJevpViewer/runViewer.C
Passing argument to entryPoint(args) and runViewer(char *args)
StRoot/StBFChain/StBFChain.cxx
StRoot/StBFChain/StBFChain.h
Changes from Akio to support FMS db tag (passed to StFmsDbMake)
StRoot/StBichsel/StBichselLinkDef.h
StRoot/StBichsel/StdEdxModel.cxx
StRoot/StBichsel/StdEdxModel.h
StRoot/StBichsel/bichselG10.C
new dEdxModel for dN/dx, calibration for Run XVIII fixed Target (will not be considerred)
StRoot/StChain/GeometryDbAliases.h
One more adjstement to make it compatible with proposed ranges, y2020a fast offline geometry
StRoot/StDetectorDbMaker/StDetectorDbChairs.cxx
StRoot/StDetectorDbMaker/St_beamInfoC.h
new dEdxModel for dN/dx, calibration for Run XVIII fixed Target (will not be considerred)
StRoot/StDetectorDbMaker/St_tpcBXT0CorrEPDC.h
Changes from Irakli supporting timeBinWidth as argument
StRoot/StFmsDbMaker/StFmsDbMaker.cxx
adding Attr for FmsGainCorrB table flavors
StRoot/StTpcHitMoverMaker/StTpcHitMoverMaker.cxx
added timebucket and drift velocity into epd-based T0 correction calculation
StRoot/StarGenerator/macros/starsim.hijing.C
Cleanup and expose the geometry tag to the arguement list.
StRoot/StdEdxY2Maker/StTpcdEdxCorrection.cxx
StRoot/StdEdxY2Maker/StTpcdEdxCorrection.h
StRoot/StdEdxY2Maker/StdEdxY2Maker.cxx
StRoot/StdEdxY2Maker/StdEdxY2Maker.h
StRoot/StdEdxY2Maker/dEdxHist.cxx
Use dN/dx for Run >= 19, new dEdxModel for dN/dx, calibration for Run XVIII fixed Target (will not be considerred)
StRoot/macros/calib/Calib_SC_GL.C
Avoid Minuit complaint when asking about a fixed parameter
StRoot/macros/embedding/findfailedxml.sh
added parameters to select specific fset for checking; added a new daq truncation
StRoot/macros/embedding/get_embedding_xml_rcf.pl
updated for bnl_condor_embed policy
StRoot/macros/embedding/submitxml.csh
updated for bnl_condor_embed policy
StarDb/Calibrations/tpc/tpcBXT0CorrEPD.20190609.130000.C
StarDb/Calibrations/tpc/tpcBXT0CorrEPD.20190609.150000.C
StarDb/Calibrations/tpc/tpcBXT0CorrEPD.20190618.100000.C
StarDb/Calibrations/tpc/tpcBXT0CorrEPD.20190618.220000.C
StarDb/Calibrations/tpc/tpcBXT0CorrEPD.20190629.030000.C
StarDb/Calibrations/tpc/tpcBXT0CorrEPD.20190702.140000.C
StarDb/Calibrations/tpc/tpcBXT0CorrEPD.20190709.040000.C
StarDb/Calibrations/tpc/tpcBXT0CorrEPD.20190709.160000.C
StarDb/Calibrations/tpc/tpcBXT0CorrEPD.C
StarDb/Calibrations/tpc/tpcBXT0CorrEPD.y2018.C
StarDb/Calibrations/tpc/tpcBXT0CorrEPD.y2019.C
added timebucket and drift velocity into epd-based T0 correction calculation
StarDb/dEdxModel/dEdxModel.root
new dEdxModel for dN/dx, calibration for Run XVIII fixed Target (will not be considerred)
StarVMC/Geometry/StarGeo.xml
FMS attenutation in 2015 and 2017 geometries, y2020a fast offline geometry
StarVMC/Geometry/FcsmGeo/HcalGeo1.xml
Remove "C" calorimeter option from hits, so that ID truth is available
StarVMC/Geometry/FpdmGeo/FpdmGeo3.xml
Mismatch in structure definition between the geometry module and the hit scoring.
StarVMC/Geometry/FpdmGeo/FpdmGeo4.xml
changes in write instruction
StarVMC/Geometry/FstmGeo/FstmGeo.xml
Max stepsize is not needed (and caused side effect in Si), so removed.
Change all placements from MANY to ONLY... there should be very few real
overlapping volumes which we need to deal with.
Exception is the inner and outer wedge. These overlap each other, and need
to be flagged as such.
However, GenFit appears to have issues with MANY placement. So we set the
assembly flag on the volume, enabling AgML to create the volumes as an
assembly instead
StarVMC/Geometry/FtsdGeo/FtsdGeo.xmlTop level sTGC and Si tracker volumes switched to kOnly for genfit
StarVMC/Geometry/PipeGeo/PipeGeo.xml
Use MANY only in the presence of the fixed target
StarVMC/Geometry/StgmGeo/StgmGeo1.xml
Reduce z / increase R of mother volume to minimum size needed to contain daughte
StarVMC/StarAgmlLib/AgBlock.cxx
StarVMC/StarAgmlLib/AgBlock.h
StarVMC/StarAgmlLib/StarTGeoStacker.cxx
Implement count for volume branchings
StarVMC/xgeometry/xgeometry.age
y2020 rough cut release / missing forward prototypes
asps/Simulation/starsim/geant/gzebra.F
Remove redundant initialization of ZEBRA. Reduce logging level.
kumacs/sim/README
kumacs/sim/material.kumac
kumacs/sim/run_hijing.kumac
kumacs/sim/run_pythia_minbias.kumac
pams/sim/g2t/g2t_stg.F
remove unnecessary output
pams/sim/g2t/g2t_volume_id.g
Fix for zfatal bug. Missing volume id in fast simulator because the fpdmgeo4 module was not properly detected / configured in g2t_volume_id
- October 12, 2019
SL19d library has been updated with next codes:
StRoot
StBFChain
BigFullChain.h - modified to place epdHit before tpcHitMover for new TPC T0 correction;
StDetectorDbMaker
StDetectorDbChairs.cxx - added epd-based T0 correction to account for timing shift when collision is displaced from center;
St_tpcBXT0CorrC.h, St_tpcBXT0CorrEPDC.h - added files for epd-based T0 correction to account for timing shift when collision is displaced from center;
StTpcHitMoverMaker
StTpcHitMoverMaker.cxx - added epd-based T0 correction to account for timing shift when collision is displaced from center;
StarDb
Calibrations/tpc/ tpcBXT0CorrEPD.20190609.130000.C, tpcBXT0CorrEPD.20190609.150000.C, tpcBXT0CorrEPD.20190618.100000.C, tpcBXT0CorrEPD.20190618.220000.C, tpcBXT0CorrEPD.20190629.030000.C, tpcBXT0CorrEPD.20190702.140000.C, tpcBXT0CorrEPD.20190709.040000.C, tpcBXT0CorrEPD.20190709.160000.C, tpcBXT0CorrEPD.C, tpcBXT0CorrEPD.y2016.C, tpcBXT0CorrEPD.y2017.C, tpcBXT0CorrEPD.y2018.C, tpcBXT0CorrEPD.y2019.C - created entries (CINT files) for epd-based T0 correction;
TpcResponseSimulator.20171220.000001.C - added 10% gap correction to lower the outer sector dEdx for Run18 AuAu 27GeV;
TpcResponseSimulator.20151220.000003.C - added 20% gap correction between inner and outer sector dEdx;
StDb
idl/tpcBXT0Corr.idl - added new idl file to created entries for epd-based T0 correction;
Updated codes have been retarged with the same tag SL19d and rebuilt;
- October 5, 2019
new library SL19d tagged as SL19d has been created and built on SL7.3 platform;
Library was tested with standard test suite, passed it successfully and released on October 7 .
Main features:
- picoDst code updated to fill data for eTOF detector;
- FmsCollection/Cluster updated to make shower shape scaling for all shapes;
- EmbeddingQA added option for BTOF pid for primary tracks;
- StarVMC/Geometry added flag for year 2018 geometry to use the mixed iTPC/TPC configuration;
- StarVMC/Geometry added forward calorimeter system;
- implemented initial version of the STGC geometry model;
- implemented initial version of the forward silicon tracker FST;
- implemented dev2021 geometry tag with forward upgrade detectors;
- sim/g2t and St_geant_Maker updated to integrate hits for forward tracking and forward calorimeter;
- RTS/src/DAQ_FGT/ code added FST;
- several bugs have been fixed;Next codes have been updated:
asps
rexe/rexeLinkDef.h - removed reference to non-existent class TPaveTree ;
Simulation/starsim/atlroot/GtHash.cxx - added missing header for TMath::Hash function;StRoot
StBFChain
StBFChain.cxx - modified to print StMemStat results in a way consistent with doPs() in StMaker;
modified to move 'doPs' function from StMaker to StMemStat;
St_base
Stsstream.h - introduced a C++(11) alternative to global Form() function in ROOT;
StBTofUtil
StBTofGeometry.cxx - fixed node paths when using TpcRefSys (affects runs before 2013);
StChain
StMaker.cxx - removed seemingly outdated macro-based branching;
moved 'doPs' function from StMaker to StMemStat;
StDbUtilities
StMagUtilities.cxx - modified to be sure to restore SpaceCharge settings in PredictSpaceCharge();
StEpdUtil
StEpdEpFinder.cxx, StEpdEpFinder.h - updated to make shift corrections for for every EventType and the phi-weights at the same time;
StEvent
StFmsCollection.cxx, StFmsCollection.h - updated to make FMS shower shape scaling for all shapes;
StTriggerData2019.cxx - corrected blue filled bunch bit, and cleaning up unused spin bits;
StTriggerData.cxx, StTriggerData.h ,StTriggerData2019.cxx, StTriggerData2019.h - improved QT board error reports/handling; added EPD access functions;
StETofHeader.h - added non-c++ include defining uint64_t for rootcint;
StEmbeddingUtilities
StEmbeddingQA.cxx, StEmbeddingQADraw.cxx, StEmbeddingQATrack.cxx, StEmbeddingQATrack.h, StEmbeddingQAUtilities.cxx - added option for btof pid for primary real tracks;
StFmsPointMaker
StFmsPointMaker.cxx, StFmsPointMaker.h - modified to make shower shape scaling for all shapes;
StFmsUtil
StFmsClusterFitter.cxx, StFmsClusterFitter.h, StFmsEventClusterer.cxx, StFmsEventClusterer.h - modified to make shower shape scaling for all shapes;
St_geant_Maker
St_geant_Maker.cxx, St_geant_Maker.h - updated to integrate HITS for forward tracking and forward calorimeter;
StarRoot
StMemStat.cxx, StMemStat.h - added string representation to StMemStat; moved 'doPs' function from StMaker to StMemStat;
added parameter to add custom string to StMemStat output;
added StMemStat:PaveProcStatus() to save extracted values from /proc/status in a text file;
added StMemStat::ReadProcStatus() to parse /proc/status;
StMemStat.cxx - updated to use consistent scale for byte to MB conversion; minor refactoring of StMemStat::AsString();
TIdTruUtil.cxx - updated to handle 0 idTruth ;
StPicoDstMaker
genDst.C, producePicoDst.xml - added FMS information to genDst.C; activate the most important branches via SetStatus("BranchName*",1) method by default in genDst.C ;
StPicoDstMaker.cxx, StPicoDstMaker.h - updated for picoDst filling for eTOF detector;
StPicoBEmcPidTraits.h - added missing header defining std::numeric_limits;
StPicoEvent
StPicoArrays.cxx, StPicoArrays.h, StPicoBEmcPidTraits.cxx, StPicoBEmcPidTraits.h, StPicoBEmcSmdEHit.cxx, StPicoBEmcSmdEHit.h, StPicoBEmcSmdPHit.cxx, StPicoBEmcSmdPHit.h, StPicoBTofHit.cxx, StPicoBTofHit.h, StPicoBTofPidTraits.cxx, StPicoBTofPidTraits.h, StPicoBTowHit.cxx, StPicoBTowHit.h, StPicoBbcHit.cxx, StPicoBbcHit.h, StPicoDst.cxx, StPicoDst.h, StPicoDstLinkDef.h, StPicoDstReader.cxx, StPicoDstReader.h, StPicoEmcTrigger.cxx, StPicoEmcTrigger.h, StPicoEpdHit.cxx, StPicoEpdHit.h, StPicoEvent.cxx, StPicoEvent.h, StPicoFmsHit.cxx, StPicoFmsHit.h, StPicoHelix.cxx, StPicoMtdHit.cxx, StPicoMtdHit.h, StPicoMtdPidTraits.cxx, StPicoMtdPidTraits.h, StPicoMtdTrigger.cxx, StPicoMtdTrigger.h, StPicoTrack.cxx, StPicoTrack.h, StPicoTrackCovMatrix.cxx, StPicoTrackCovMatrix.h - modified to adjust for impementation of picoDst filling for eTOF detector;
modified to move inline function definitions to the class body; updated the Print() methods in order to avoid warnings;
StPicoETofHit.cxx StPicoETofHit.h StPicoETofPidTraits.cxx StPicoETofPidTraits.h picodst_env.sh - added new files to fill picoDst for eTOF detector;
StPicoBTofHit.cxx, StPicoBTofHit.h, StPicoMtdTrigger.h - added missing setId(Int_t, Int_t, Int_t) definition in StPicoBTofHit; added missing shouldHaveRejectEvent() definition in StPicoMtdTrigger ;
StPicoArrays.cxx - fixed bug of the branch short name: BEmcPidTraits -> EmcPidTraits;
StPicoBEmcPidTraits.h, StPicoBEmcSmdEHit.h, StPicoBEmcSmdPHit.h - included missing header from std C++ numeric limits;RTS
include/rc.h - added new state;
rtsSystems.h - added FST; added new STGC TCD;
include/SUNRT/ipcQLib.hh - added send/receive;
EventTracker/FtfBaseTrack.cxx - updated;
src/rtsplusplus.def - updated;
src/RTS_EXAMPLE/daqFileChopper.C, daqFileHacker.C, rts_example.C - updated;
rts_example.C - added FST;
src/DAQ_FGT/daq_fgt.cxx, fgtPed.cxx - added FST;
src/DAQ_READER/daqReader.cxx, daqReader.h - updated;
src/DAQ_ITPC/daq_itpc.cxx, itpcFCF.cxx, itpcFCF.h, itpcInterpreter.cxx - updated for run 2019;
src/DAQ_FCS/daq_fcs.cxx fcs_data_c.cxx fcs_data_c.h - updated for run 2019;pams
sim/idl/g2t_track.idl - modified to integrate HITS for forward tracking and forward calorimeter;
g2t_hca_hit.idl - added new file for forward calorimeter;
sim/g2t/g2t_volume_id.g - updated to rely on changes to the geometry which flag the mixed iTPC/TPC mode;
g2t_fts.F, g2t_fts.idl, g2t_hca.F, g2t_hca.idl, g2t_volume_id.g - modified to integrate HITS for forward tracking and forward calorimeter;
g2t_stg.F, g2t_stg.idl, g2t_wca.F, g2t_wca.idl - added new files for forward detectors;StarVMC
Geometry/StarGeo.xml - added flag for 2018 geometry to use the mixed iTPC/TPC configuration;
updated to define dev2021 geometry tag with forward upgrade detectors;
Geometry/TpceGeo/TpceConfig.xml, TpceGeo3a.xml - added configuration flag to denote the mixed iTPC/TPC configuration for 2018;
Geometry/HcalGeo/HcalGeo0a.xml, HcalGeo0b.xml, HcalGeo0.xml - added new files to depricate HCAL in preparation for FCS integration;
Geometry/HcalGeo/HcalConfig.xml - updated to point to new module files for HCAL detector;
Geometry/FcsmGeo/FcsmConfig.xml, HcalGeo1.xml, PlatGeo1.xml, PresGeo1.xml, WcalGeo1.xml - added new files for forward calorimeter system, comprising "West" EM calorimter, Hadronic Calorimeter, platform and preshower detectors;
Geometry/StgmGeo/StgmConfig.xml, StgmGeo1.xml - implemented initial version of the sTGC geometry model;
Geometry/FstmGeo/FstmConfig.xml, FstmGeo.xml - implemented initial version of the forward silicon tracker;
xgeometry/xgeometry.age - reduced physics set for 32 v 64 bit nightly tests;
modified to allow for detailed control over geant physics flags;
implemented new dev2012 geometry tag;OnlTools
Jevp/StJevpBuilders/tpcBuilder.cxx - fixed error in sector numbering for clusters;
tofBuilder.cxx - modified to change the TOF Trigger Window back to the begining of run19 for 31.2 and 100 GeV test run; - June 19, 2019
new library SL19c tagged as SL19c has been created and built on SL6.4 and SL7.3 platform;
Library was tested with standard test suite, passed it successfully and released on June 21 .
Main features:
- updated StETofMatchMaker & StETofCalibMaker codes;
- fixed bug (#3390) related to TPC dE/dx of Run 19 data;
- fixed bug in MuDst with FMS collection in run 2016 data;
- StEpdUtil added sum-of-weights information, for both wheels and rings;
- OnlTools updated for eTOF online histograns for run 2019;Next codes have been updated:
StAnalysisUtilities
StHistUtil.cxx - added sDCA vs. time-in-run;
StDetectorDbMaker
StDetectorDbChairs.cxx - modified to fix bug #3390 and adjusted to add St_TpcAdcCorrectionMDF.h;
StDetectorDbChairs.cxx, St_TpcResponseSimulatorC.h - modified to add extra correction for the 1st pad row; increased range for gain correcton;
St_TpcDriftVelRowCorC.h - added new file to add extra correction for the 1st pad row;
StdEdxY2Maker
StPidStatus.cxx, StTpcdEdxCorrection.cxx, StTpcdEdxCorrection.h, StdEdxY2Maker.cxx - modified to fix bug #3390 and adjusted to addition of St_TpcAdcCorrectionMDF;
StEpdUtil
StEpdEpFinder.cxx, StEpdEpInfo.cxx, StEpdEpInfo.h - added sum-of-weights information, for both wheels and rings, for both raw and phi-weighted;
StEpdEpFinder.cxx - fixed indexing bug which caused an error in the new SumOfWeights quantity;
StEpdEpInfo.cxx - fixed bug in bounds-checking for sum-of-weights return methods in StEpdEpInfo.cxx;
StETofCalibMaker
StETofCalibMaker.h - added function to set the reference pulser;
StETofCalibMaker.cxx - changed default value for reference pulser;
StETofMatchMaker
StETofMatchMaker.cxx - modified to match distances as member variables and updated handling for many-tracks-to-one-hit matches;
StETofMatchMaker.cxx, StETofMatchMaker.h - updated start time for simulation and more histograms added to doQA mode;
StETofMatchMaker.h - changed match distances to become member variables;
StETofUtil
StETofGeometry.h - added support for StPicoHelix;
StMuDSTMaker
COMMON/StMuFmsUtil.cxx - modified to solve the issue with FMS data writing in picoDst format;
StTpcRSMaker
StTpcRSMaker.cxx - modified to fix TrackDirection, added extra correction for the 1st pad row; fixed bug #3390; added St_TpcAdcCorrectionMDF;
StTriggerUtilities
Eemc/StEemcTriggerSimu.cxx - made changes for the trigger simulator to only use 2013 algorithms for that year, not for later years, later years still use 2009 algorithms;
Bemc/StBemcTriggerSimu.cxx - made changes for the trigger simulator to only use 2013 algorithms for that year, not for later years, later years still use 2009 algorithms;
St_QA_Maker
StEventQAMaker.cxx, StEventQAMaker.h, StQAMakerBase.cxx, StQAMakerBase.h - added sDCA vs. time-in-run ;RTS
include/HLT/HLTFormats.h - added earliest TACs for BBC/VPD/EPD to trigger data; added bunch id to event;
EventTracker/FtfSl3.cxx, gl3Event.cxx, FtfSl3.h, eventTrackerLib.cxx, gl3Event.cxx, gl3Event.h, gl3Hit.h - updated;
FtfSl3.cxx, FtfSl3.h, gl3Event.cxx, gl3Event.h, gl3Hit.cxx, gl3Hit.h, gl3Track.cxx, l3CoordinateTransformer.cxx, l3CoordinateTransformer.h - added iTPC;
src/DAQ_FCS/daq_fcs.cxx, fcs_data_c.cxx, fcs_data_c.h - added some features; updated to fix the bugs;
src/DAQ_STGC/stgcPed.cxx - updated;StarVMC
Geometry/SisdGeo/SisdGeo7a.xml - modified to enable the sstOnOsc misalignment for the SST geometry model;StarDb
Geometry/tpc/TpcHalfPosition.y2019.C, TpcSuperSectorPositionB.y2019.C,iTPCSurvey.y2019.C, itpcPadPlanes.C - added real a nd ideal position for year 2019 TPC/iTPC geometry;
TpcAdcCorrectionMDF.C - added default TpcAdcCorrectionMDF, year 2019 version of TpcResponseSimulator;
TpcResponseSimulator.y2019.C, tpcAltroParams.y2019.C - modified for year 2019 version of TpcResponseSimulator;StDb
idl/tpcCorrection.idl - modified to fix bug #3390;
TpcResponseSimulator.idl - added extra correction for the 1st pad row ;OnlTools
Jevp/StJevpBuilders/l4Builder.cxx, l4Builder.h - added bunch id to event; moveed bunch_id to BESGood; added earliest TACs for BBC/VPD/EPD to trigger data; changed binning;
tpcBuilder.cxx, tpcBuilder.h - added no cluster vs sector; changed cluster y scale;
LaserReader.cxx, LaserReader.h - updated;
etofBuilder.cxx - implemented better way to get slope in multiplicity correlation plot; updated to put resetTime label back to green color in the startrun() function;
etofBuilder.h, etofBuilder.cxx - fixed a few histogram axis labels; changed reference pulser; added empty channel count to digi density plot;
Jevp/StJevpServer/JevpServer.cxx - updated;
StOnlineDisplay - all codes removed because they are unsuported; - May 14, 2019
SL19b library has been updated with codes below to allow skipping of bad events in the AuAu27 data (first half):
StRoot
StDetectorDbMaker/St_tpcStatusC.h
StTpcHitMaker/StTpcRTSHitMaker.cxx, StTpcHitMaker.cxxLibrary has been retagged with tag SL19b_1 and updated codes rebuilt.
- April 24, 2019
new library SL19b tagged as SL19b has been created and built on SL6.4 and SL7.3 platform;
Library was tested with standard test suite, found bugs fixed and library was released on April 29 .
Main features:
- added TPC codes modification related to dEdx calibrations for run 2018 data production;
- introduced codes for AbortGapCleaning distortion corrections;
- implemented y2019a geometry first production release;
- added Fixed target geometry for year 2019 ;
- implemented full iTPC geometry ;
- added new version of PYTHIA 8 (Pythia8_2_35) event generator in StarGenerator;
- implemented KLUD geometry which allows for the creation of up to 10 effective cylindrical and/or disk volumes aligned along the z-axis;
- QtRoot removed;
- OnlTools: StJevpBuilders & StJevpPlot updated for run 2019;
- fixed #3388 related to StiCA problem across some sector boundaries;Next codes have been updated:
asps
Simulation/agetof/agetof.def - fixed required for 64 bits starsim: the *differences* between memory addresses;
Simulation/starsim/atgeant/agdgetp.age, agsbegm.age, agspopb.age, agspopb.age, agspush.age, agsreset.age, axposition.age - updated for 64 bits locf ==>longF agdgetp.age;
Simulation/starsim/comis/cbis.F, ccopysa.F, ccopysa.F, cscall.F, cscalx.F, cscath.F, cschar.F, csetc.F, csicha.F,csicns.F, csinc1.F, csinccl.F, csincl.F, csinfh.F, csinfn.F, csinit.F, csint1.F, csinta.F, csintx.F, csintz.F, cskcal.F, cspmd0.F, cspmd1.F, cspmd2.F, cspmd3.F, cspmd4.F, cspmd5.F, cspmd6.F, cspmd7.F, cspmd8.F, cspmd9.F, cspmfs.F, cssetc.F, cstran.F, mhdef.F, mhfree.F, mident.F - added 64 bits version of comis codes;
Simulation/starsim/comis/comis/comis.inc, csbuf.inc, cscbwl.inc, csdpvs.inc, csfmt.inc, csfres.inc, cshfill.inc, cshlnm.inc, csichv.inc, csinc.inc, cskeys.inc, cskucs.inc, cslun.inc, csopen.inc, cspanm.inc, cspar.inc, cspnts.inc, csrec.inc, cssysd.inc,cstab.inc, cstabps.inc, cstbls.inc, cstvrs.inc, csutil.inc, cswpar.inc, dlfcn.inc, mdloc.inc, mdpool.inc, miword.F, pilot.h - added 64 bits version of comis codes;
Simulation/starsim/deccc/cscald.c, cscali.c, cscalia.c, cscalr.c, cschar.c, csmytokn.cxx, jumptn.c, jumpxn.c, locf.c - added 64bits version of comis codes;
cs_hlshl.c - added 64 bits function pointer ==> token ;
idisp.c - fixed 64 bits adresses;
Simulation/starsim/dzdoc/mzpaw.F - 64bits modification: use array in common instead of malloc;
Simulation/starsim/geant/gzebra.F - modified to increase Zebra to 20M words;
rexe/TGeant3/gcomad.F - modified for 64bits: integer*8 for address;StRoot
StAnalysisUtilities
StHistUtil.cxx - modified QA hists for run 2019 data;
StBFChain
BigFullChain.h, StBFChain.cxx - added picoDst BSMD write mode, implemented chain for Chains for 2019 data + etof compended, implemented options for shadowing and AbortGapCleaning distortion correction;
StBTofSimMaker
StBTofSimMaker.cxx - modified to move usage of pointer to after instantiation of the pointer ;
StBichsel
StBichselLinkDef.h, StdEdxModel.cxx, StdEdxModel.h, bichdX.C, bichselG.C, bichselG10.C - modified for run 2018 dEdx calibration ;
StdEdxPull.cxx, StdEdxPull.h - new files added for run 2018 dEdx calibration;
StChain
GeometryDbAliases.h, StChain.cxx - added y2019a geometry first production release;
StDaqLib
EMC/EMC_BarrelReader.cxx, EMC_SmdReader.cxx - modifications for 64bits: use TTimeStamp for unix time ;
StDbLib
StDbDefs.hh, StDbManagerImpl.cc - updated for eTOF DB management;
StDbUtilities
StDbUtilitiesLinkDef.h, StSvtCoordinateTransform.cc, StTpcCoordinateTransform.cc, StTpcCoordinateTransform.hh - updated to complete dEdx calibrations for run 2018 data production; added new function 'PredictSpaceCharge()' using real hit radii;
StMagUtilities.cxx, StMagUtilities.h - updated for for AbortGapCleaning distortion corrections;
StDetectorDbMaker
StDetectorDbMaker.cxx, StDetectorDbMakerLinkDef.h, StSstSurveyC.h, StTpcSurveyC.h, St_SurveyC.h, St_itpcPadGainT0C.h, St_TpcAvgCurrentC.h, St_TpcAvgPowerSupplyC.h, St_TpcResponseSimulatorC.h, St_tpcSlewingC.h, St_tpcDimensionsC.h, St_tpcPadConfigC.h, St_tpcPadGainT0BC.h, St_tpcPadGainT0C.h, St_tpcRDOMasksC.h, St_tpcRDOMapC.h, St_tpcRDOT0offsetC.h, StiTPCHitErrorCalculator.h, St_tpcTimeDependenceC.h, StiTpcChairs.cxx - modified to complete dEdx calibrations for run 2018 data production;
St_iTPCSurveyC.h - removed defined but not implemented functions;
StDetectorDbChairs.cxx, St_tpcSCGLC.h - updated for for AbortGapCleaning distortion corrections;
St_tpcPadConfigC.cxx - removed;
StETofCalibMaker
StETofCalibMaker.cxx, StETofCalibMaker.h - added first version of pulser correction procedure;
StETofHitMaker
StETofHitMaker.h - added cyclic mean calculation function for average hit time;
StETofHitMaker.cxx - added more correlation & average hit time histograms for offline QA;
StETofMatchMaker
StETofMatchMaker.cxx - added more histograms for offline QA;
StEmcUtil
geometry/StEmcGeom.cxx - updated to remove creating and deleting StMaker;
StEvent
StTpcHit.h, StTpcHitCollection.cxx, StTpcHitCollection.h - updated to complete dEdx calibrations for run 2018 data production;
StEventCompendiumMaker
StEventCompendiumMaker.cxx, StEventCompendiumMaker.h - removed redundant definition of mag.field in Event summary;
StEventUtilities
StuFixTopoMap.cxx - added flexibility for iTpc hits;
StMiniMcEvent
StTinyMcTrack.cxx - OverComplicated print commented out;
StMiniMcMker
StMiniMcMaker.cxx - fixed some memory leaks;
StMtdMatchMaker
StMtdMatchMaker.cxx - bug fixed: check the existence of vertex when analyzing StEvent ;
StMtdMatchMaker.h - improved: extrapolate tracks to the proper primary vertex when available;
StMtdQAMaker
StMtdQAMaker.cxx, StMtdQAMaker.h - added option to apply vertex vr cut ;
StMtdTrigUtil.cxx - added MTD trigger utility class for analyzing MTD trigger information;
StMtdTrigUtil.h - added function to retrieve QT trigger channel ;
StPass0CalibMaker
StSpaceChargeDistMaker.cxx - enabled TPC/iTPC switch via St_tpcPadConfig;
StRefMultCorr
CentralityMaker.cxx, CentralityMaker.h, StRefMultCorr.cxx, StRefMultCorr.h - new modules for cantrality definition;
StTpcDb
StTpcDb.cxx, StTpcDbMaker.cxx - introduced codes for AbortGapCleaning distortion corrections;
StTpcHitMaker
StTpcAvClusterMaker.cxx, StTpcAvClusterMaker.h, StTpcHitMaker.cxx, StTpcHitMaker.h, StTpcHitMakerLinkDef.h, StTpcMixerMaker.cxx, StTpcRTSHitMaker.cxx, StTpcRTSHitMaker.h, St_daq_adc_tb.h, St_daq_cld.h, St_daq_sim_adc_tb.h, St_daq_sim_cld.h, St_tpc_cl.h - updated to complete dEdx calibration for run 2018 data production;
StTpcHitMoverMaker
StTpcHitMoverMaker.cxx - introduced codes for AbortGapCleaning distortion corrections;
StTpcRSMaker
StTpcRSMaker.cxx, StTpcRSMaker.h, TpcRS.C - reshaped;
StTpcRSMakerLinkDef.h, TF1F.cxx, TF1F.h - updated to complete dEdx calibrations for run 2018 data production;
StTreeMaker
StTreeMaker.cxx - removed assert;
StTriggerUtilities
StDSMUtilities/DSMLayer_B001_2009.hh, DSMLayer_B101_2009.hh, DSMLayer_E001_2009.hh, DSMLayer_E101_2009.hh, DSMLayer_EM201_2009.hh, DSMLayer_LD301_2009.hh, TCU_2009.hh, trgUtil_2009.hh - updated;
StTrsMaker
StTrsMaker.cxx - bug fixed;
St_QA_Maker
QAhlist_EventQA_qa_shift.h, QAhlist_subsystems.h, StEventQAMaker.cxx, StEventQAMaker.h, StQABookHist.cxx, StQABookHist.h, StQAMakerBase.cxx, StQAMakerBase.h - updated for run 2019 QA histograms;
St_db_Maker
St_db_Maker.cxx - added ATTENTION message;
St_geant_Maker
St_geant_Maker.cxx, St_geant_Maker.h, navigate.g - Implemented a templated method for creating and filling the g2t hit tables; bug fixed;
Embed/StPrepEmbedMaker.cxx - updated primary vertex sigma names; updated vertex errors;
StarGenerator/BASE/AgStarReader.cxx, StarPrimaryMaker.cxx - Fixes particle time-of-flight;
StarGenerator/Hijing1_383/StarHijing.cxx - fixed mistake in declaration of FORtran/C++ rng interface;
address.F - modified to use iso_c_binding to establish FORtran/C++ interface;
hijing1.383.F - modified for better implementation; checked that the candidate string number (N_ST) is not past the last generated particle.;
StarGenerator/Kinematics/StarKinematics.cxx - fixed bug #3364 related to distance Units in the Simulation Framework, made it mm consistent with the HEPEVT standard used in event generators ;
StarGenerator/Pythia6_2_22/address.F - modfied to use iso_c_binding for to establish interface to C++;
StarGenerator/Pythia6_4_23/address.F - modfied to use iso_c_binding for to establish interface to C++;
StarGenerator/Pythia6_4_28/address.F - modfied to use iso_c_binding for to establish interface to C++;
StarGenerator/Pythia8_2_35/ - multiple codes updated to install version of PYTHIA 8 event generator;
StarGenerator/UrQMD3_3_1/address.F - modfied to use iso_c_binding for to establish interface to C++;
StdEdxY2Maker
StPidStatus.cxx, StPidStatus.h, StTpcdEdxCorrection.cxx, StdEdxY2Maker.cxx, StdEdxY2Maker.h - modified to add PicoTrack for StPidStatus, added protection for range in Phi correction;
StdEdxY2Maker.cxx, StdEdxY2Maker.h, StTpcdEdxCorrection.cxx, StTpcdEdxCorrection.h, StdEdxY2MakerLinkDef.h, dEdxHist.cxx, dEdxHist.h - added dE/dx calibration for run 2018 isobar and AuAu 27GeV data production;
Sti
StiKalmanTrack.cxx, StiKalmanTrack.h, StiKalmanTrackFinder.cxx, StiVMCToolKit.cxx - fixed JetCorr tracking problem;
StiKalmanTrack.cxx - modified to restore NHitsPossible by swimming through other layers in getAllPointCount() after removing from initalize0();
StiDetectorContainer.cxx, StiDetectorContainer.h - introduced restricted swimming in moveIn() necessary for following reasonable trajectories;
StiMaker
StiMaker.cxx - fixed bug;RTS
EventTracker/gl3Event.cxx, l3CoordinateTransformer.h - updated;
include/RC_Config.h, cmds.h, daq100Decision.h, daqFormats.h, iccp.h, iccp2k.h, iccpHeader.h, prepareGbPayload.h, rtsMonitor.h, rtsSystems.h - updated for run 2019;
include/DB/RunLog/daqEventTag.h - updated for run 2019;
scr/rtsmakefile.def - updated;
scr/DAQ_FCS/daq_fcs.cxx, daq_fcs.h - updated DAQ for FCS detector;
fcs_data_c.cxx - new files for FCS detector;
scr/DAQ_ITPC/daq_itpc.cxx, daq_itpc.h, itpcFCF.cxx, itpcInterpreter.cxx, itpcInterpreter.h, itpcPed.cxx, itpcPed.h - updated DAQ for iTPC;
scr/DAQ_L4/daq_l4.h - updated;
src/DAQ_STGC/stgcPed.cxx - updated;
scr/DAQ_TPC/daq_tpx.cxx, tpxCore.cxx, tpxCore.h, tpxGain.cxx, tpxPed.cxx - updated;
src/RTS_EXAMPLE/rts_example.C, rts_example.trg.C - updated;
trg/include/RTS_EXAMPLE/trgDataDefs.h, trgDataDefs_46.h - new code for run 2019 trigger data;pams
sim/g2t/g2t_get_kine.F, g2t_volume_id.g - updated;StarDb
AgMLGeometry/Geometry.y2019a.C - added year 2019 geometry;
Calibrations/tpc/TpcAdcCorrectionB.r2015.C, TpcAdcCorrectionB.r2016.C, TpcAdcCorrectionB.r2018.C, TpcAdcCorrectionB.y2015.C, TpcAdcCorrectionB.y2016.C, TpcAdcCorrectionB.y2018.C, TpcAdcCorrectionB.y2018.C.Altro3, TpcAdcCorrectionB.y2018.C.Altro4, TpcAdcCorrectionB.y2019.C, TpcAvgCurrent.y2019.C - new files;
TpcAvgPowerSupply.y2018.C, TpcAvgPowerSupply.y2019.C, TpcLengthCorrectionMDF.C, TpcResponseSimulator.C, TpcResponseSimulator.dev2019.C, TpcResponseSimulator.y2010.C, TpcResponseSimulator.y2011.C, TpcResponseSimulator.y2017.C, TpcResponseSimulator.y2019.C - modified;
TpcCurrentCorrectionX.20170101.000000.root, TpcDriftDistOxygen.y2018.C, TpcDriftDistOxygen.y2019.C, TpcDriftVelRowCor.20190101.000007.C, TpcDriftVelRowCor.20190101.000400.C, TpcDriftVelRowCor.C, TpcLengthCorrectionB.y2018.C, TpcLengthCorrectionB.y2019.C, TpcPadCorrectionMDF.y2016.C, TpcPadCorrectionMDF.y2018.C, TpcResponseSimulator.y2005.C, TpcPadCorrectionMDF.y2016.C, TpcPadCorrectionMDF.y2018.C, TpcResponseSimulator.y2005.C, TpcResponseSimulator.y2018.C - added new files;
TpcRowQ.y2005.C, TpcRowQ.y2006.C, TpcRowQ.y2019.C, TpcSecRowB.C, TpcSecRowB.y2018.C, TpcSecRowC.C - modified;
tpcAltroParams.y2010.C, tpcAltroParams.y2016.C, tpcElectronics.dev2019.C, tpcSectorT0offset.20071101.000000.C, tpcSectorT0offset.20080128.000000.C, tpcSectorT0offset.y2018.C - updated;
TpcSecRowB.y2019.C, TpcSecRowC.y2018.C, TpcSecRowC.y2019.C, TpcTanL.y2018.C, TpcTanL.y2019.C, TpcZCorrectionB.y2018.C, TpcZCorrectionB.y2019.C, TpcdXCorrectionB.r2018.C, TpcdXCorrectionB.y2016.C, itpcPadGainT0.C, itpcPadGainT0.r2018.root, itpcPadGainT0.y2018.C, itpcPadGainT0 .y2019.C, tpcAltroParams.20180426.121919.C, tpcAltroParams.20180426.124701.C, tpcAltroParams.y2019.C, tpcAnodeHVavg.y2019.C, tpcGas.y2018.C, tpcPadGainT0.y2018.C, tpcPressureB.r2018.C, tpcPressureB.r2019.C, tpcPressureB.y2018.C, tpcRDOMap.C, tpcRDOMap.r2016.C, tpcRDOMap.y2016.C, tpcRDOT0offset.20180312.162439.C, tpcRDOT0offset.C, tpcRDOT0offset.y2019.C - new files;
tpcSectorT0offset.20190118.000001.C, tpcSectorT0offset.20190118.000003.C, tpcSectorT0offset.20190118.000005.C, tpcSectorT0offset.20190204.200005.C, tpcSectorT0offset.20190205.160005.C, tpcSectorT0offset.20190207.115309.C, tpcSectorT0offset.20190212.121959.C, tpcSectorT0offset.20190214.225622.C, tpcSectorT0offset.20190215.021615.C, tpcSectorT0offset.20190215.224935.C, tpcSectorT0offset.20190223.080000.C, tpcSectorT0offset.y2019.C, tpcTimeDependence.C - new files;
Geometry/tpc/TpcInnerSectorPositionB.y2016.C, iTPCSurvey.CtpcPadPlanes.C - new files;
itpcPadPlanes.C, tpcPadConfig.y2019.C, tpcPadPlanes.dev2019.C - updated;StDb
idl/TpcResponseSimulator.idl, tpcPadPlanes.idl - updated for dE/dx calibration;
idl/ rhicfBarMap.idl, rhicfGain.idl, rhicfPedestal.idl, rhicfPlateRange.idl - new tables for RHICf detector;
etofPulserTotPeak.idl - new eTOF table;
tpcChargeEvent.idl - new table for AbortGapCleaning distortion corrections;StarVMC
Geometry/StarGeo.xml - added y2019a geometry first production release;
Geometry/CaveGeo/CaveGeo3.xml - updated to make sure correct version of data structure is available;;
Geometry/KludGeo/KludGeo.xml - implemented KLUD geometry which allows for the creation of up to 10 effective cylindrical and/or disk volumes aligned along the z-axis;
KludConfig.xml - enabled run-time configuration for this geometry during starsim runs;
Geometry/PipeGeo/PipeConfig.xml, PipeGeo.xml - added Fixed target geometry;
TargConfig.xml - added file to control target geometry;
TargGeo.xml - added Fixed target geometry;
Geometry/TpceGeo/TpceConfig.xml, TpceGeo5.xml - updated experimental geometry. Make some of the "standard" paramters the default;
TpceGeo6.xml - implemented full iTPC geometry ;
StarAgmlLib/AgMLStructure.h - rguement was shadowing a member, resulting in (legion of) warnings;
AgModule.cxx, AgModule.h - removed unused reference to (deprecated) AgStructure class;
Mortran.h, StarTGeoStacker.cxx - fixed coverity defects;
StarAgmlUtil/AgParameterList.h - fixed coverity defects;OnlTools
Jevp/StJevpBuilders/JevpBuilder.cxx, daqBuilder.cxx, daqBuilder.h, etofBuilder.cxx, etofBuilder.h, etofMessageFormat.cxx, etofMessageFormat.h, l4Builder.cxx, l4Builder.h, trgBuilder.cxx, trgBuilder.h - updated for run 2019;
tpcBuilder.cxx, tpcBuilder.h - new TPC builder files for run 2019;
Jevp/StJevpPlot/JevpPlot.cxx, JevpPlot.h, JevpPlotSet.cxx, JevpPlotSet.h, JevpServer.cxx - updated for run 2019 online QA plots; - March 11, 2018
new library SL19a library tagged as SL19a has been created and built on SL6.4 and SL7.3 .
Library was tested with standard test suite, found bugs fixed and library was released on March 21.
New features of the library:
- eTOF and related codes updated;
- trigger data for run 2019;
Next codes have been updated
StRoot
StBFChain
StTriggerDataMaker
BigFullChain.h, StBFChain.cxx - implemented options for eTOF processing;
StDaqLib
TRG/trgStructures2019.h - trigger data for run 2019
StETofCalibMaker
StETofCalibMaker.cxx , StETofCalibMaker.h - new maker for eTOF detector;
StETofDigiMaker
StETofDigiMaker.cxx, StETofDigiMaker.h - new maker for eTOF detector;
StETofHitMaker
StETofHitMaker.cxx, StETofHitMaker.h - new maker for eTOF detector;
StETofMatchMaker
StETofMatchMaker.cxx, StETofMatchMaker.h - new maker for eTOF detector;
StEpdUtil
StBbcGeom.cxx, StBbcGeom.h, StEpdEpFinder.cxx, StEpdEpFinder.h, StEpdEpInfo.cxx, StEpdEpInfo.h,
StEpdEvp.cxx, StEpdEvp.h, StEpdGeom.cxx, StEpdGeom.h - updated for eTOF detector;
StEpdUtilLinkDef.h - new file for eTOF;
StEvent
StDetectorDefinitions.h, StDetectorName.cxx, StETofDigi.h, StETofHit.cxx, StETofHit.h - updated
StEnumerations.h, StEvent.cxx, StEvent.h, StEventClusteringHints.cxx, StEventLinkDef.h, StEventTypes.h - updated
StTpcRawData.h, StTrackTopologyMap.cxx, StTriggerData.cxx, StTriggerData.h - updated
StETofPidTraits.cxx , StETofPidTraits.h - new files for eTOF;
StRHICfCollection.cxx, StRHICfCollection.h - new files for eTOF;
StTriggerData2019.cxx, StTriggerData2019.h - new files for trigger data run 2019;
StMuDSTMaker
COMMON/StMuETofCollection.cxx, StMuETofCollection.h, StMuETofDigi.cxx, StMuETofDigi.h, StMuETofHeader.cxx, StMuETofHeader.h, StMuETofHit.cxx, StMuETofHit.h, StMuETofPidTraits.cxx, StMuETofPidTraits.h - new files for eTOF detector;
StMuEvent.cxx, StMuEvent.h, StMuTrack.cxx, StMuTypes.hh - updated;
StPicoDstMaker
StPicoDstMaker.cxx, StPicoDstMaker.h, StPicoFmsFiller.cxx, StPicoFmsFiller.h, StPicoUtilities.h - updated
StPicoEvent
StPicoBEmcSmdEHit.cxx, StPicoBEmcSmdEHit.h, StPicoBEmcSmdPHit.cxx, StPicoBEmcSmdPHit.h - new files for BEmc;
StPicoArrays.cxx, StPicoArrays.h, StPicoBEmcPidTraits.cxx, StPicoBEmcPidTraits.h - updated ;
StPicoBTofHit.cxx, StPicoBTofHit.h, StPicoBTofPidTraits.cxx, StPicoBTofPidTraits.h, StPicoBTowHit.cxx, StPicoBTowHit.h, StPicoBbcHit.cxx, StPicoBbcHit.h, StPicoCommon.h, StPicoDst.cxx, StPicoDst.h, StPicoDstLinkDef.h, StPicoDstReader.cxx, StPicoDstReader.h, StPicoEmcTrigger.cxx, StPicoEmcTrigger.h, StPicoEpdHit.cxx, StPicoEpdHit.h, StPicoEvent.cxx, StPicoEvent.h, StPicoFmsHit.cxx ,StPicoFmsHit.h, StPicoHelix.cxx, StPicoHelix.h, StPicoMtdHit.cxx, StPicoMtdHit.h, StPicoMtdPidTraits.cxx , StPicoMtdPidTraits.h, StPicoMtdTrigger.cxx, StPicoMtdTrigger.h, StPicoPhysicalHelix.cxx, StPicoPhysicalHelix.h, StPicoTrack.cxx, StPicoTrack.h, StPicoTrackCovMatrix.cxx, StPicoTrackCovMatrix.h - updated to improve style;
StTagsMaker
StTagsMaker.cxx - updated;
StTriggerDataMaker.cxx - updated for run 2019;
StDb
idl/etofCalibParam.idl, etofDetResolution.idl, etofDigiSlewCorr.idl, etofDigiTimeCorr.idl, etofDigiTotCorr.idl, etofElectronicsMap.idl, etofGeomAlign.idl, etofHitParam.idl , etofMatchParam.idl, etofResetTimeCorr.idl, etofSignalVelocity.idl, etofSimEfficiency.idl , etofStatusMap.idl, etofTimingWindow.idl - new tables for eTOF;
2020
STAR SOFTWARE NEWS April  20, 2020
---------------------
The present release assignment:
             SL09g_embed (SL09g_2Embed_v10) ROOT_LEVEL 5.22.00
             SL10c_embed (SL10c_embed_v5)  ROOT_LEVEL 5.22.00
             SL10h_embed (SL10h_embed_v6)  ROOT_LEVEL 5.22.00
             SL10k_embed (SL10k_embed_v11) ROOT_LEVEL 5.22.00
             SL11d_embed (SL11d_embed_v6)  ROOT_LEVEL 5.22.00
             SL12a_embed  (SL12a_embed_v3) ROOT_LEVEL 5.22.00
             SL12d_embed (SL12d_embed_v6) ROOT_LEVEL 5.22.00
             SL13b_embed (SL13b_embed_v1)  ROOT_LEVEL 5.22.00
             SL14g    (SL14g_3)  ROOT_LEVEL 5.34.09 pp 500GeV run 2013 production, days 129-161
             SL14i    (SL14i_2)  ROOT_LEVEL 5.34.09 AuAu 14.6GeV run 2014 production
             SL15c    (SL15c)    ROOT_LEVEL 5.34.09 AuAu 200GeV run 2014 data production with HFT
             SL15e_embed  (SL15e_embed_v1) ROOT_LEVEL 5.34.09
             SL16d    (SL16d_1)  ROOT_LEVEL 5.34.30 pp,pAu,pAl run 2015 production without HFT tracking
             SL16d_embed  (SL16d_embed_v2) ROOT_LEVEL 5.34.30
             SL16g_embed  (SL16g_embed_v3) ROOT_LEVEL 5.34.30
             SL16j (SL16j)       ROOT_LEVEL 5.34.30 auau 200GeV  run 2016 production
             SL16j_embed  (SL16j_embed_v3) ROOT_LEVEL 5.34.30
             SL16k_embed  (SL16k_embed_v1) ROOT_LEVEL 5.34.30
             SL17d (SL17d)       ROOT_LEVEL 5.34.30 dAu 20-200GeV run 2016 production
             SL17d_embed  (SL17d_embed_v3) ROOT_LEVEL 5.34.30
             SL17f (SL17f_1)     ROOT_LEVEL 5.34.30 auau 200GeV run 2016 st_upc production;
                                                    pp 200GeV run 2015 st_rp reproduction;
             SL17g (SL17g_1)     ROOT_LEVEL 5.34.30 pp 510GeV run 2017 st_W production;
             SL17i (SL17i)       ROOT_LEVEL 5.34.30 SL7.3 cucu 200-22 GeV run 2005 reproduction;
             SL18b (SL18b)       ROOT_LEVEL 5.34.30 pp 510GeV run 2017 st_physics production;
             SL18c (SL18c_1)     ROOT_LEVEL 5.34.30 pp 510GeV run 2017 st_fms, st_mtd production;
                                                       AuAu 54GeV run 2017 production;
             SL18c_embed (SL18c_embed_v1) ROOT_LEVEL 5.34.30
             SL18f (SL18f_1)     ROOT_LEVEL 5.34.30 pp 510GeV run 2017 st_epd production;
                                                    AuHe3 200GeV run 2014 st_physics data production;
             SL18h (SL18h)       ROOT_LEVEL 5.34.30 pp 500GeV run 2017 st_rp stream data reproduction;
                                                    AuAu 200GeV run 2014 data reproduction with selected trigger ID;
                                                    pp 200GeV run 2015 st_rp stream data reproduction;
                                                    pAu/pAl 200GeV run 2015 st_ssdmb stream data reporuduction;
             SL19a (SL19a)       ROOT_LEVEL 5.34.30
             SL19b (SL19b_1)     ROOT_LEVEL 5.34.30 AuAu 27GeV run 2018 production
             SL19c (SL19c)       ROOT_LEVEL 5.34.30 cuAu 200GeV run 2012 data reproduction
             SL19d (SL19d)       ROOT_LEVEL 5.34.30 SL7.3
             SL19e (SL19e)       ROOT_LEVEL 5.34.30 SL7.3
       old-> SL20a (SL20a)       ROOT_LEVEL 5.34.38 SL7.3
       pro-> SL20c (SL20c)       ROOT_LEVEL 5.34.38 SL7.3
       new-> SL20d (SL20d)       ROOT_LEVEL 5.34.38 SL7.3
       starnew -> SL20d
       starpro -> SL20c
       starold -> SL20a
       dev-> DEV                 ROOT_LEVEL 5.34.30 SL7.3
      .dev-> .DEV                ROOT_LEVEL 5.34.38

-------------------------------------------------
Release History ..
SL20a library
SL20c library
SL20d library
OnlTools/Jevp/launch
Removed some of the QT libraries
OnlTools/Jevp/StJevpBuilders/l4Builder.cxx
OnlTools/Jevp/StJevpBuilders/l4Builder.h
Updates to make sl73_gcc485 compile
OnlTools/Jevp/StJevpBuilders/tpcBuilder.cxx
Write logs
OnlTools/Jevp/StJevpPlot/CanvasImageBuilder.cxx
OnlTools/Jevp/StJevpPlot/CanvasImageBuilder.h
Time parameter has been added to writeRunStatus function
OnlTools/Jevp/StJevpPlot/ImageWriter.cxx
OnlTools/Jevp/StJevpPlot/ImageWriter.h
makedir function has been commented and loop function has been updated too for handling new makedir function update
OnlTools/Jevp/StJevpPlot/JevpPlotSet.cxx
OnlTools/Jevp/StJevpPlot/JevpPlotSet.h
Added minEvts variable
OnlTools/Jevp/StJevpPlot/RunStatus.cxx
OnlTools/Jevp/StJevpPlot/RunStatus.h
Added time parameter to addEvent function
OnlTools/Jevp/StJevpServer/JevpServer.cxx
OnlTools/Jevp/StJevpServer/JevpServer.h
Added new functions getServerTag and freeServerTags
StRoot/RTS/EventTracker/FtfFinder.cxx
StRoot/RTS/EventTracker/FtfSl3.cxx
StRoot/RTS/EventTracker/eventTrackerLib.cxx
StRoot/RTS/EventTracker/gl3Event.cxx
Fixed large event crashes
StRoot/RTS/src/DAQ_FCS/daq_fcs.cxx
Checkpoint from daqst3
StRoot/RTS/src/DAQ_FCS/fcs_data_c.cxx
StRoot/RTS/src/DAQ_FCS/fcs_data_c.h
Some modification for offline/CINT compatibility. Using 6bit/64 instead of 8bit
StRoot/RTS/src/RTS_EXAMPLE/daqFileHacker.C
Updated doHack function
StRoot/StBFChain/BigFullChain.h
StRoot/StBFChain/StBFChain.cxx
StRoot/StBFChain/doc/StBFChain.cxx_doc
StRoot/StBFChain/doc/index.html
Add PicoVtxFXT mode
StRoot/StBTofCalibMaker/StBTofCalibMaker.cxx
Xin add more pions and add protons for T0s in the FXT mode
StRoot/StChain/GeometryDbAliases.h
Add y2018c, y2019b and y2020b geometries with FXT @ 200.7 cm (offline reco measured position)
StRoot/StDetectorDbMaker/StDetectorDbChairs.cxx
StRoot/StDetectorDbMaker/St_beamInfoC.h
StRoot/StDetectorDbMaker/St_starMagOnlC.h
StRoot/StDetectorDbMaker/St_tpcBXT0CorrEPDC.h
StRoot/StDetectorDbMaker/St_tpcRDOMapC.h
StRoot/StDetectorDbMaker/St_tpcRDOMasksC.h
Add new chairs, add collision parameters calculation to St_beamInfoC
StRoot/StEvent/StTriggerData.cxx
StRoot/StEvent/StTriggerData2019.cxx
Added protection from corrupt Qt board data (Akio)
StRoot/StFmsUtil/StFmsClusterFitter.h
Avoid floating point exception (from Yuri)
StRoot/StGenericVertexMaker/StGenericVertexFinder.h
Make SetVertexError() part of a generic finder
StRoot/StPicoDstMaker/StPicoDstMaker.cxx
StRoot/StPicoDstMaker/StPicoDstMaker.h
Update of the StPicoDstMaker class. Vertex selection option FXT has been added.
With it enabled, the first vertex that was reconstructed in the range from 198 to 202 cm
along z axis can be selected. Needed for the FXT program.
StRoot/StPicoEvent/StPicoEpdHit.h
Update of the EPD hit methods
- Method to obtain truncated nMIP is added
- nMIP now handles bad tiles
StRoot/StPicoEvent/StPicoTrack.cxx
StRoot/StPicoEvent/StPicoTrack.h
Minor update of StPicoTrack. Method to calculate signed DCA of the track
to primary vertex has been added.
StRoot/StTpcRSMaker/StTpcRSMaker.cxx
Wrong alarm, revert it back
StRoot/StTriggerUtilities/Eemc/StEemcTriggerSimu.cxx
uncomment lines regarding load EEMC FEE mask
StRoot/StTriggerUtilities/StDSMUtilities/DSMAlgo_BC101_2015.cc
Update with additional registers to be compatible with 2015 pAu run
StRoot/StVpdCalibMaker/StVpdCalibMaker.cxx
Removed an old typo in the log messages regarding the corralgo version that the VPD will be using.
StRoot/St_geant_Maker/Embed/StPrepEmbedMaker.cxx
Fix two errors in FCS preshower hits.
StRoot/StarGenerator/Hijing1_383/Hijing.cxx
StRoot/StarGenerator/Hijing1_383/Hijing.h
StRoot/StarGenerator/Hijing1_383/StarHijing.cxx
StRoot/StarGenerator/Hijing1_383/StarHijing.h
Delay initialization of concrete hijing event generator until we generate
the first event.
StRoot/StarGenerator/macros/starsim.hijing.C
Call AgExit in batch mode.
StRoot/StarGenerator/macros/starsim.kinematics.C
Remove unnecessary geometry call
StRoot/StarGenerator/macros/starsim.pythia8standalone.C
Document better and provide a control flag
StRoot/StarRoot/TRandomVector.cxx
More clear randomization
StRoot/StdEdxY2Maker/StTpcdEdxCorrection.cxx
StRoot/StdEdxY2Maker/StTpcdEdxCorrection.h
StRoot/StdEdxY2Maker/StdEdxY2Maker.cxx
Add TpcAccumlatedQ with 192 rows
StRoot/macros/embedding/subrobot.sh
adapted to RCF
StRoot/macros/embedding/cori/farmerQAutil.sh
StRoot/macros/embedding/cori/prepEmbedTaskList.py
StRoot/macros/embedding/cori/r4sTask_embed.templ
StRoot/macros/embedding/cori/starFarmer.templ
StRoot/macros/embedding/cori/starLocalDb.sh
updated by Jeff for mysql57
StRoot/macros/mudst/genDst.C
Specify makers to set attributes
StarDb/Calibrations/tpc/TpcResponseSimulator.y2018.C
StarDb/Calibrations/tpc/tpcBXT0CorrEPD.C
StarDb/Calibrations/tpc/tpcBXT0CorrEPD.y2016.C
StarDb/Calibrations/tpc/tpcBXT0CorrEPD.y2017.C
StarDb/Calibrations/tpc/tpcBXT0CorrEPD.y2018.C
StarDb/Calibrations/tpc/tpcBXT0CorrEPD.y2019.C
StarDb/Calibrations/tpc/tpcBXT0CorrEPD.y2020.C
Move to MySQL, clean up
StarVMC/Geometry/StarGeo.xml
Add y2018c, y2019b and y2020b geometries with FXT @ 200.7 cm (offline reco measured position)
StarVMC/Geometry/PipeGeo/TargConfig.xml
Add y2018c, y2019b and y2020b geometries with FXT @ 200.7 cm (offline reco measured position)
StarVMC/Geometry/macros/loadAgML.C
Not sure why I need to resolve this dependency by hand...
StarVMC/StarAgmlChecker/StarAgmlChecker.cxx
Iterate over all nodes
StarVMC/StarAgmlLib/StarTGeoStacker.cxx
Do not assert on hydrogen
StarVMC/minicern/jumptn.c
StarVMC/minicern/jumpxn.c
StarVMC/minicern/locf.c
64b
StarVMC/xgeometry/xgeometry.age
Add y2018b geometry tag (add fixed target into geometry).
Enable y2020a geometry tag in xgeometry.
asps/Simulation/geant321/gphys/gbreme.F
Protect against divide-by-almost-zero
asps/Simulation/geant321/gphys/gmulof.F
Make safe against accessing ELOW(0)
asps/Simulation/geant321/gphys/grayl.F
Protect against cos(theta)>1 and/or <1
asps/Simulation/geant321/gphys/gvaviv.F
Apply changes found in VMC geant3 (reorder, protect against div-by-0's)
asps/Simulation/starsim/comis/csinfn.F
asps/Simulation/starsim/comis/csinit.F
asps/Simulation/starsim/comis/csintx.F
asps/Simulation/starsim/comis/csintz.F
asps/Simulation/starsim/comis/csjcax.F
asps/Simulation/starsim/comis/cskcal.F
asps/Simulation/starsim/comis/cstran.F
asps/Simulation/starsim/comis/mdext.F
Add csguard call
asps/Simulation/starsim/comis/comis/comis.inc
asps/Simulation/starsim/comis/comis/cspar.inc
asps/Simulation/starsim/comis/comis/mdpool.inc
add csguard call
asps/Simulation/starsim/deccc/locf.c
Move update temporary back
asps/Simulation/starsim/deccc/memget.c
assert added to check 64b consistency
asps/rexe/TGeant3/TGiant3.h
Put back old version
mgr/CmpSL
Added CreateLinks as additional action
mgr/ConsDefs.pm
compiler bug with sse instructions avoided with code updates under geant321/gphys
mgr/Dyson/Export/AgROOT.py
Enable user-defined whitelist for ROOT/TGeo geometry construction
pams/sim/gstar/gstar_part.g
Fix cut-n-paste error on K0short definitionsetNdivisions(505) for hHLTGood2VzT object
OnlTools/Jevp/StJevpBuilders/tofBuilder.cxx
double size the bTOF timing window for the 9.2 GeV and other lower energy collisions
OnlTools/Jevp/StJevpPlot/DisplayDefs.cxx
Implemented logging
OnlTools/Jevp/StJevpPlot/JevpPlotSet.cxx
Avoided using timelog in _startrun, _stoprun and _event function
OnlTools/Jevp/StJevpServer/JevpServer.cxx
Activate and deactivate the runCanvasImageBuilder flag
OnlTools/Jevp/StJevpServer/JevpServer.h
Created new char variable, named as imagewritedir
StRoot/RTS/include/RC_Config.h
Change the data type int to UINIT32 of RHIC_Trigger2
StRoot/StBTofCalibMaker/StBTofCalibMaker.cxx
StRoot/StBTofCalibMaker/StBTofCalibMaker.h
Xin add more pions and add protons for T0s in the FXT mode
StRoot/StChain/StChain.cxx
Even more timing/clock info
StRoot/StChain/StMaker.cxx
Replace TString::Contains() with faster strchr()
StRoot/StEpdUtil/StEpdEpFinder.cxx
fixed typo/bug in StEpdEpFinder.cxx where wrong eventType was used in phi weighting correction. This is expected to have minimal impact. Thanks to Xiaoyu Liu for finding the bug.
StRoot/StEpdUtil/StEpdFastSim/RunSimulator.C
Small addition to the fast simulator instructions
StRoot/StEpdUtil/StEpdFastSim/StEpdFastSim.cxx
Fixed small bug in StEpdFastSim where I was declaring the mGeom variable locally in the ctor
StRoot/StEpdUtil/StEpdFastSim/StEpdFastSim.h
fixed memory leak in event generator and fast simulator
StRoot/StEpdUtil/StEpdFastSim/StEpdTrivialEventGenerator.cxx
small bug fix that prevented DEV from compiling-- sorry!
StRoot/StEpdUtil/StEpdFastSim/StEpdTrivialEventGenerator.h
fixed memory leak in event generator and fast simulator
StRoot/StJetMaker/StJetSkimEventMaker.cxx
fill L2Result when only present in MuDst files
StRoot/StPicoEvent/StPicoDstReader.h
Minor modification of StPicoDstReader. Now it can run with both ReadPicoEvent(...)
and readPicoEvent(...) methods.
StRoot/StTpcHitMaker/StTpcHitMaker.cxx
Only look for StEvent when needed, e.g. not for raw modes such as in embedding
StRoot/StTpcHitMaker/StTpcHitMaker.h
Reduce time-expenseive calls to GetInputDS(), some coverity cleanup
StRoot/StTpcHitMaker/StTpcRTSHitMaker.cxx
Remove compiler ambiguity on double vs. float in TMath::Min,Max()
StRoot/StTpcHitMaker/StTpcRTSHitMaker.h
some coverity cleanup
StRoot/StTriggerUtilities/StTriggerSimuMaker.cxx
StRoot/StTriggerUtilities/StTriggerSimuMaker.h
Add EMC DSM algorithm for the 2017 pp run
StRoot/StTriggerUtilities/Bemc/StBemcTriggerSimu.cxx
Add EMC DSM algorithm for the 2017 pp run
StRoot/StTriggerUtilities/Eemc/StEemcTriggerSimu.cxx
Add EMC DSM algorithm for the 2017 pp run
StRoot/StTriggerUtilities/Emc/StEmcTriggerSimu.cxx
StRoot/StTriggerUtilities/Emc/StEmcTriggerSimu.h
Add EMC DSM algorithm for the 2017 pp run
StRoot/StTriggerUtilities/StDSMUtilities/DSMAlgo_EM201_2015.cc
StRoot/StTriggerUtilities/StDSMUtilities/DSMAlgo_EM201_2015.hh
StRoot/StTriggerUtilities/StDSMUtilities/DSMLayer_B001_2014_B.cc
StRoot/StTriggerUtilities/StDSMUtilities/DSMLayer_B001_2015.cc
StRoot/StTriggerUtilities/StDSMUtilities/DSMLayer_B101_2009.cc
StRoot/StTriggerUtilities/StDSMUtilities/DSMLayer_B101_2013.cc
StRoot/StTriggerUtilities/StDSMUtilities/DSMLayer_B101_2014_B.cc
StRoot/StTriggerUtilities/StDSMUtilities/DSMLayer_B101_2015.cc
StRoot/StTriggerUtilities/StDSMUtilities/DSMLayer_E001_2009.cc
StRoot/StTriggerUtilities/StDSMUtilities/DSMLayer_E101_2009.cc
StRoot/StTriggerUtilities/StDSMUtilities/DSMLayer_E101_2013.cc
StRoot/StTriggerUtilities/StDSMUtilities/DSMLayer_EM201_2009.cc
StRoot/StTriggerUtilities/StDSMUtilities/DSMLayer_EM201_2013.cc
StRoot/StTriggerUtilities/StDSMUtilities/DSMLayer_EM201_2013_A.cc
StRoot/StTriggerUtilities/StDSMUtilities/DSMLayer_EM201_2014_B.cc
StRoot/StTriggerUtilities/StDSMUtilities/DSMLayer_EM201_2015.cc
StRoot/StTriggerUtilities/StDSMUtilities/StDSM2009Utilities.hh
StRoot/StTriggerUtilities/StDSMUtilities/TCU_2009.cc
Add EMC DSM algorithm for the 2017 pp run
StRoot/St_geant_Maker/St_geant_Maker.cxx
Fix two errors in FCS preshower hits.
StRoot/St_geant_Maker/St_geant_Maker.h
Accumulate and report total energy deposited in all active elements of the detector modules for the job.
StRoot/St_geant_Maker/Embed/StPrepEmbedMaker.cxx
Enabled fixed random number generator seeds
StRoot/StarGenerator/Pythia6_2_22/StarPythia6.h
StRoot/StarGenerator/Pythia6_4_23/StarPythia6.h
StRoot/StarGenerator/Pythia6_4_28/StarPythia6.h
Fixed type in header guard
StRoot/StarRoot/StMultyKeyMap.cxx
Cleanup
StRoot/StarRoot/THelix3d.cxx
StRoot/StarRoot/THelix3d.h
_added (Generalization of THelixTrack_ for arbitrary direction of mag field)
StRoot/StarRoot/THelixTrack.cxx
Out old version back
StRoot/StarRoot/TPolinom.cxx
NoWarn
StRoot/StarRoot/TRungeKutta.cxx
Included updated TRungeKutta.h header file
StRoot/StarRoot/TRungeKutta.h
Newly added classes TRungeKutta, TRKuttaMag
StRoot/StarRoot/xTCL.cxx
Suppress eigen2
StRoot/macros/bfc.C
const++
StRoot/macros/embedding/cori/r4sTask_embed.templ
added global cons code for a single job
StarDb/Calibrations/tpc/README.TpcTableToUpdate
StarDb/Calibrations/tpc/TpcResponseSimulator.20171220.000001.C
StarDb/Calibrations/tpc/TpcResponseSimulator.y2019.C
StarDb/Calibrations/tpc/tpcAltroParams.y2019.C
rename tpcSectorT0offset.20190223.080000.C to tpcSectorT0offset.20190101.000000.C, remove intermidiate tpcSectorT0offset.20190*.C
StarVMC/Geometry/FcsmGeo/FcsmConfig.xml
StarVMC/Geometry/FcsmGeo/PresGeo1.xml
StarVMC/Geometry/FcsmGeo/WcalGeo1.xml
Add runtime option to remove forward EMcal (WCAL) and/or presehower (PRES)
from geometry. Feature was present on the forward tracking branch
at e.g. WcalGeo ver 1.1.4.5, but lost during integration onto main...
... probably intentional, as this is *not* a feature to be carried into
a production environment.
StarVMC/Geometry/FstmGeo/FstmGeo.xml
Fixed invalid component in mixture.
StarVMC/Geometry/IstdGeo/IstdGeo1.xml
StarVMC/Geometry/IstdGeo/IstdGeo1a.xml
StarVMC/Geometry/IstdGeo/IstdGeo1b.xml
StarVMC/Geometry/IstdGeo/IstdGeo2.xml
StarVMC/Geometry/IstdGeo/IstdGeo2a.xml
Fix issue with definition of Fluorine element ( Z swapped with A ) in two mixtures used in cooling tubes in the IST.
StarVMC/StarAgmlLib/AgModule.cxx
StarVMC/StarAgmlLib/AgModule.h
Extend AgModule with a tracking flag.
StarVMC/StarAgmlLib/StarTGeoStacker.cxx
Warn / assert on invalid components of mixtures. Fill AgML extension class.
asps/Simulation/starsim/Conscript
Disable optimization in starsim (may backstep)
mgr/Conscript-standard
Nodebug for geometry (not even -O1)
mgr/MakeGeometry
Info message added
mgr/Dyson/Export/AgROOT.py
Do not #include emacs backup files.
pams/gen/hijing_382/heptup.F
Added "-seed" option, permitting user to specified a fixed, reproducible
random number seed for reproducibility, or what have you.
pams/sim/g2t/g2t_volume_id.g
Add FCS preshower volume ID
pams/sim/g2t/g2t_wca.F
increment the right hit pointer on the track
pams/sim/idl/g2t_track.idl
Add W-cal and preshower hit pointers and preshower hit count to track
------------------Newly added files---------------
pams/sim/g2t/g2t_pre.F
FCS preshower integration
pams/sim/g2t/g2t_pre.idl
Small change to forward calo preshower…
StarVMC/StarAgmlLib/AgMLExtension.cxx
StarVMC/StarAgmlLib/AgMLExtension.h
Extend TGeoVolume instances with additional information and functionality from AgML.
StarDb/Calibrations/tpc/TpcDriftDistOxygen.y2018.C
StarDb/Calibrations/tpc/TpcDriftDistOxygen.y2019.C
StarDb/Calibrations/tpc/TpcResponseSimulator.20161220.000001.C
new Run17 params and Run18 params after separating sector20 from the rest
StarDb/Calibrations/tpc/tpcPressureB.r2018.C
StarDb/Calibrations/tpc/tpcPressureB.r2019.C
StarDb/Calibrations/tpc/tpcPressureB.y2018.C
StarDb/Calibrations/tpc/tpcSectorT0offset.20190101.000000.C
rename tpcSectorT0offset.20190223.080000.C to tpcSectorT0offset.20190101.000000.C, remove intermediate tpcSectorT0offset.20190*.C
StarDb/Calibrations/tpc/tpcSectorT0offset.20190118.000001.C
StarDb/Calibrations/tpc/tpcSectorT0offset.20190118.000003.C
StarDb/Calibrations/tpc/tpcSectorT0offset.20190118.000005.C
StarDb/Calibrations/tpc/tpcSectorT0offset.20190204.200005.C
StarDb/Calibrations/tpc/tpcSectorT0offset.20190205.160005.C
StarDb/Calibrations/tpc/tpcSectorT0offset.20190207.115309.C
StarDb/Calibrations/tpc/tpcSectorT0offset.20190212.121959.C
StarDb/Calibrations/tpc/tpcSectorT0offset.20190214.225622.C
StarDb/Calibrations/tpc/tpcSectorT0offset.20190215.021615.C
StarDb/Calibrations/tpc/tpcSectorT0offset.20190215.224935.C
StarDb/Calibrations/tpc/tpcSectorT0offset.20190223.080000.C
StRoot/StarGenerator/macros/starsim_nightly_test.C
Nightly test for starsim.
Generates hijing events (with a few extra muons thrown in). Creates
histograms for each g2t hit table, and the g2t track and vertex tables.
Fills each histogram with the number of entries in the table scaled by
the number of participating nucleons in the hijing interaction.
StRoot/StarRoot/THelixTrack_.cxx
StRoot/StarRoot/THelixTrack_.h
_added (Generalization of THelixTrack_ for arbitrary direction of mag field)
StRoot/StTriggerUtilities/StDSMUtilities/DSMAlgo_EE001_2017.cc
StRoot/StTriggerUtilities/StDSMUtilities/DSMAlgo_EE001_2017.hh
StRoot/StTriggerUtilities/StDSMUtilities/DSMAlgo_EE002_2017.cc
StRoot/StTriggerUtilities/StDSMUtilities/DSMAlgo_EE002_2017.hh
StRoot/StTriggerUtilities/StDSMUtilities/DSMAlgo_EE101_2017.cc
StRoot/StTriggerUtilities/StDSMUtilities/DSMAlgo_EE101_2017.hh
StRoot/StTriggerUtilities/StDSMUtilities/DSMAlgo_EE102_2017.cc
StRoot/StTriggerUtilities/StDSMUtilities/DSMAlgo_EE102_2017.hh
StRoot/StTriggerUtilities/StDSMUtilities/DSMAlgo_EM201_2017.cc
StRoot/StTriggerUtilities/StDSMUtilities/DSMAlgo_EM201_2017.hh
StRoot/StTriggerUtilities/StDSMUtilities/DSMLayer_E001_2017.cc
StRoot/StTriggerUtilities/StDSMUtilities/DSMLayer_E001_2017.hh
StRoot/StTriggerUtilities/StDSMUtilities/DSMLayer_E101_2017.cc
StRoot/StTriggerUtilities/StDSMUtilities/DSMLayer_E101_2017.hh
StRoot/StTriggerUtilities/StDSMUtilities/DSMLayer_EM201_2017.cc
StRoot/StTriggerUtilities/StDSMUtilities/DSMLayer_EM201_2017.hh
StRoot/StTriggerUtilities/StDSMUtilities/sum_eemc_http.hh
Add EMC DSM algorithm for the 2017 pp run
OnlTools/Jevp/StJevpPlot/CanvasImageBuilder.cxx
Commented makedir function call of writeImageFiles
OnlTools/Jevp/StJevpPlot/CanvasImageBuilder.h
This is the program called by the server which produces canvases and places them in a queue for the ImageWriter thread
OnlTools/Jevp/StJevpPlot/ImageWriter.cxx
Newly added makedir and getpath function. If the path doesn’t exist then create a directory by calling makedir function.
OnlTools/Jevp/StJevpPlot/ImageWriter.h
Added thrMsgQueue and pthread_mutex_t objects in ImageWritter class
mgr/ConsDefs.pm
Updated based on bug found in gcc 4.8.5. (SSE register problem)
OnlTools/Jevp/level.source
Update from SL19a to SL19d
OnlTools/Jevp/StJevpBuilders/JevpBuilder.cxx
OnlTools/Jevp/StJevpBuilders/eemcBuilder.cxx
Included rtsSystems.h, added conditional log into void eemcBuilder::event
OnlTools/Jevp/StJevpBuilders/epdBuilder.cxx
update epd plots to have right labels on tac east vs west
OnlTools/Jevp/StJevpBuilders/etofBuilder.cxx
OnlTools/Jevp/StJevpBuilders/etofBuilder.h
added status bit plot per Get4 and a better visualization of pulser time differences
OnlTools/Jevp/StJevpBuilders/etofMessageFormat.cxx
OnlTools/Jevp/StJevpBuilders/etofMessageFormat.h
update for reading in the status bit in pattern messages
OnlTools/Jevp/StJevpBuilders/l4Builder.cxx
OnlTools/Jevp/StJevpBuilders/l4Builder.h
Add ETOF QA plots, empty log message, set display range for HLTGood2VzT, Add beam width with fitting
OnlTools/Jevp/StJevpBuilders/tpcBuilder.cxx
update for 121 bx, Fixed phi calculation for charge distribution. Issue around phi=180 deg Masked out an itpc channel in sector 10 which in on/off hot.
OnlTools/Jevp/StJevpBuilders/trgBuilder.cxx
update for 121 bx
OnlTools/Jevp/StJevpPlot/JevpPlot.cxx
OnlTools/Jevp/StJevpPlot/JevpPlot.h
Added external_miny in JavpPllot constructor, also added function to set MinY
OnlTools/Jevp/StJevpServer/JevpServerMain.cxx
update for 121 bx
StDb/idl/etofCalibParam.idl
etof table update requested by Florian
StRoot/RTS/include/RC_Config.h
Change private to public variables class EvbChooser, newly added struct HLT_UDP_struct structure
StRoot/RTS/include/daqModes.h
As of June 25, we added the streaming feature. This forces all NORMAL triggers to have bit 0x8 set. the bit 0x8 unset means streaming trigger!
StRoot/RTS/include/iccp2k.h
Added #define CMD2_STREAMING_TRIGGER 0x11
StRoot/RTS/include/prepareGbPayload.h
If seed is 0 then call srand48 function and log it with JEFF, seed48 =
StRoot/RTS/include/HLT/HLTFormats.h
Added ETOF Pi
StRoot/RTS/include/SUNRT/clock.h
Updated currtime function of RtsTimer class
StRoot/RTS/src/DAQ_FCS/fcs_data_c.cxx
Checkpoint from daqst2
StRoot/RTS/src/DAQ_ITPC/itpcInterpreter.cxx
Change the itpc_fee_map array (// moved #6 to #11; and #3 to #6)
Added fpga_fee_v_all variable and updated when strncmp(ascii_dta,"V: all",6)==0 and sscanf(ascii_dta,"V: all 0x%X",&id1)==1
StRoot/RTS/src/DAQ_ITPC/itpcInterpreter.h
Added FPGA versions (u_int fpga_fee_v_all)
StRoot/RTS/src/DAQ_TPX/daq_tpx.cxx
get rid of log message, first two rdo's are ALLWAYS zero, as are all masked rdos
StRoot/RTS/src/RTS_EXAMPLE/daqFileHacker.C
Newly added function void doHack(daqReader *rdr) with initHack() function has been updated
StRoot/StAnalysisMaker/StAnalysisMaker.cxx
Add short tracks toward ETOF, end-of-line needed for nShortTrackForETOF
StRoot/StBFChain/BigFullChain.h
Chains for 2020, Using CorrY and pico defaults for 2020
StRoot/StBTofPool/dbase/macros/tof_reload.C
Initilizd BTOF 2020
StRoot/StBTofPool/dbase/macros/tofsim_reload.C
Initilizd BTOF 2020
StRoot/StBichsel/bichselG10.C
Add ions
StRoot/StChain/GeometryDbAliases.h
Y2011c added into static const DbAlias_t fDbAlias[]
StRoot/StETofCalibMaker/StETofCalibMaker.cxx
StRoot/StETofCalibMaker/StETofCalibMaker.h
added new database tables for pulsers, updated pulser handling and trigger time calculation, ignore duplicate digis from stuck firmware, use known pulser time differences inside one Gbtx to recover missing pulser signals, update handling of reset time for new cases in Run20
StRoot/StETofHitMaker/StETofHitMaker.cxx
StRoot/StETofHitMaker/StETofHitMaker.h
StRoot/StETofMatchMaker/StETofMatchMaker.cxx
StRoot/StETofMatchMaker/StETofMatchMaker.h
possibility to use step-wise track extrapolation in changing magnetic field via setting a flag, update to histograms for .hist.root files, added etof-only and hybrid btof-etof start time calculations for on-the-fly corrections, fixing StEvent part of eTOF-only T0 calculation
StRoot/StETofUtil/StETofGeometry.cxx
StRoot/StETofUtil/StETofGeometry.h
added handling of StPicoHelix in extrapolation & step-wise extrapolation in changing magnetic field
StRoot/StEvent/StEnumerations.h
Add short tracks toward ETOF
StRoot/StEvent/StTrack.h
Add short tracks toward ETOF
StRoot/StJetMaker/macros/RunJetFinder2012pro.C
disable bbc option for trigger simulator
StRoot/StMagF/StMagFMaker.cxx
Option to change mag factor added, Buf fix. SAttr(...) always returns non zero pointer
StRoot/StMuDSTMaker/COMMON/StMuFilter.cxx
Add short tracks toward ETOF
StRoot/StPicoDstMaker/StPicoDstMaker.cxx
StRoot/StPicoDstMaker/StPicoDstMaker.h
StRoot/StPicoEvent/StPicoBEmcPidTraits.cxx
StRoot/StPicoEvent/StPicoDst.h
StRoot/StPicoEvent/StPicoEvent.h
StRoot/StPicoEvent/StPicoTrack.cxx
StRoot/StPicoEvent/StPicoTrack.h
StRoot/StPicoEvent/StPicoTrackCovMatrix.cxx
StRoot/StPicoEvent/StPicoTrackCovMatrix.h
The update of the StPicoDstMaker and SPicoEvent classes that includes:
- Update of the StPicoTrack: BEMC-matched tower index, topology map for iTPC
- Update of the StPicoBEmcPidTraits: ntow algorithm that returns the tower index has been updated. A logical error has been fixed
- Update of StPicoDstMaker:
a) algorithm of storing StPicoBEmcE(P)Hit has been corrected for the shifts (periodicity in phi when calculating hit distances)
b) modifications related to StPicoTrack
c) correction of the eTOF information storage
- Support of TFG codes by adding preprocessor check of the __TFG__VERSION__ variable
StRoot/StRefMultCorr/BadRun.h
StRoot/StRefMultCorr/CentralityMaker.cxx
StRoot/StRefMultCorr/CentralityMaker.h
StRoot/StRefMultCorr/Param.h
StRoot/StRefMultCorr/StRefMultCorr.cxx
StRoot/StRefMultCorr/StRefMultCorr.h
gRefmult for Run14 and Run16 adde
StRoot/StTriggerUtilities/StTriggerSimuMaker.cxx
removing old run13 dsm algo files
StRoot/StTriggerUtilities/Bemc/StBemcTriggerSimu.cxx
StRoot/StTriggerUtilities/Bemc/StBemcTriggerSimu.h
removing old run13 dsm algo files
StRoot/StTriggerUtilities/Eemc/EEfeeTP.h
StRoot/StTriggerUtilities/Eemc/EEfeeTPTree.cxx
StRoot/StTriggerUtilities/Eemc/EEfeeTPTree.h
removing old run13 dsm algo files
StRoot/StTriggerUtilities/Eemc/StEemcTriggerSimu.cxx
StRoot/StTriggerUtilities/Eemc/StEemcTriggerSimu.h
removing old run13 dsm algo files
StRoot/StTriggerUtilities/Emc/StEmcTriggerSimu.cxx
StRoot/StTriggerUtilities/Emc/StEmcTriggerSimu.h
removing old run13 dsm algo files
StRoot/StTriggerUtilities/StDSMUtilities/DSMAlgo_BC101_2009.cc
StRoot/StTriggerUtilities/StDSMUtilities/DSMAlgo_EE001_2009.cc
StRoot/StTriggerUtilities/StDSMUtilities/DSMAlgo_EE002_2009.cc
StRoot/StTriggerUtilities/StDSMUtilities/DSMAlgo_EE101_2009.cc
StRoot/StTriggerUtilities/StDSMUtilities/DSMAlgo_EM201_2009.cc
StRoot/StTriggerUtilities/StDSMUtilities/DSMLayer_B001_2009.cc
StRoot/StTriggerUtilities/StDSMUtilities/DSMLayer_B001_2009.hh
StRoot/StTriggerUtilities/StDSMUtilities/DSMLayer_B101_2009.cc
StRoot/StTriggerUtilities/StDSMUtilities/DSMLayer_B101_2009.hh
StRoot/StTriggerUtilities/StDSMUtilities/DSMLayer_E001_2009.cc
StRoot/StTriggerUtilities/StDSMUtilities/DSMLayer_E001_2009.hh
StRoot/StTriggerUtilities/StDSMUtilities/DSMLayer_E101_2009.cc
StRoot/StTriggerUtilities/StDSMUtilities/DSMLayer_E101_2009.hh
StRoot/StTriggerUtilities/StDSMUtilities/DSMLayer_EM201_2009.cc
StRoot/StTriggerUtilities/StDSMUtilities/DSMLayer_EM201_2009.hh
StRoot/StTriggerUtilities/StDSMUtilities/DSMLayer_LD301_2009.cc
StRoot/StTriggerUtilities/StDSMUtilities/DSMLayer_LD301_2009.hh
removing old run13 dsm algo files, updating trigger simulator to accomodate run13 pp, run14 UPC and run15 pp dsm algorithms
StRoot/StTriggerUtilities/StDSMUtilities/StDSM2009Utilities.hh
removing old run13 dsm algo files
StRoot/StTriggerUtilities/StDSMUtilities/sumTriggerPatchChannels.hh
removing old run13 dsm algo files
StRoot/St_QA_Maker/QAhlist_EventQA_qa_shift.h
Add more ETOF histograms
StRoot/St_QA_Maker/StQAMakerBase.cxx
StRoot/St_QA_Maker/StQAMakerBase.h
Introduce iTPC plots
StRoot/St_db_Maker/St_db_Maker.cxx
Cleanup, replace return 1,2,3 by kXDFkind, kCkind, kROOTkind
StRoot/St_geant_Maker/St_geant_Maker.cxx
StRoot/St_geant_Maker/St_geant_Maker.h
Update to forward silicon geometry and associated changes to support.
StRoot/StarGenerator/Kinematics/StarKinematics.cxx
0 ==> 1e-1
StRoot/StarMagField/StarMagField.cxx
Print++, added print statement StarMagField(0,0,0) = …
StRoot/StarRoot/THelixTrack.cxx
BACKWORD to old version
StRoot/StarRoot/TTreeIter.cxx
StRoot/StarRoot/TTreeIter.h
TTreeIter with TChain
StRoot/StdEdxY2Maker/StdEdxY2Maker.cxx
new dEdxModel for dN/dx, calibration for Run XVIII fixed Target
StRoot/StiMaker/StiStEventFiller.cxx
Add short tracks toward ETOF when there, remove toward EEMC when not there
StRoot/macros/detectorId.C
Check non existing file
StRoot/macros/embedding/bfcMixer_Hft.C
added options for Run16 dAu200 and dAu62 HFT embedding
StRoot/macros/embedding/bfcMixer_Tpx.C
added options for Run16 dAu39 and dAu20
StRoot/macros/embedding/runEmbeddingSimulation2014.C
StRoot/macros/embedding/runEmbeddingSimulation2016.C
change the default to pythia8 decayer
StRoot/macros/mudst/genDst.C
Include DbV, more like BFC
StarDb/Calibrations/tpc/TpcResponseSimulator.20151220.000003.C
second order fix for cluster timing and dEdx - this eliminates the issue seen in hitmap for the TPC
StarVMC/Geometry/StarGeo.xml
Integrate preshower for FCS
StarVMC/Geometry/BbcmGeo/BbcmConfig.xml
StarVMC/Geometry/CaveGeo/CaveConfig.xml
Restore SL17i values for SIMU flag to these modules, such that conversions are made persistent in the event record in front of the FMS.
StarVMC/Geometry/FcsmGeo/FcsmConfig.xml
StarVMC/Geometry/FcsmGeo/PresGeo1.xml
Integrate preshower for FCS
StarVMC/Geometry/FpdmGeo/FpdmConfig.xml
Restore SL17i values for SIMU flag to these modules, such that conversions are made persistent in the event record in front of the FMS.
StarVMC/Geometry/FstmGeo/FstmGeo.xml
Update to forward silicon geometry and associated changes to support.
StarVMC/Geometry/SconGeo/SconConfig.xml
Restore SL17i values for SIMU flag to these modules, such that conversions are made persistent in the event record in front of the FMS.
StarVMC/StarAgmlLib/StarTGeoStacker.cxx
Sanity check will fail on assemblies, as they have no shape (thus no capacity aka volume). This commit properly handles assemblies.
StarVMC/xgeometry/xgeometry.age
Add options for fluka and fluka+mikap
asps/Simulation/starsim/atmain/agxuser.age
Added SIMU flag to options for gprint.
mgr/agmlParser.py
Add profiling option to AgML parser
mgr/Dyson/Export/AgROOT.py
The incoming version of the FTS geometry takes ~30min to convert from
AgML to the compilable "cxx" files, signifincatly longer than other
geometries. Conversion to "age" files does not take notiably longer
than other geometries.
Running the python profiler on AgML identifies the "replacements()"
function as the leading time consumer. This function performs a
number of text searches using python's regular expression module.
Several regex's are processed on each line of XML code which agml
parses. The result is a significant slow down as some fairly complicated
regexs must be compiled over and over again.
This commit adds two guard statements, which perform a fast check to
see if the line in question needs to be tested against the expensive
regular expressions.
To verify that these changes have no impact on the code, I performed
a unix diff on the ".cxx" and ".h" outputs, comparing before and after
this change. There were zero differences found
mgr/Dyson/Syntax/SyntaxHandler.py
Remove print statement added in last commit.
pams/sim/g2t/g2t_fts.F
Changes to forward silicon geometry, and associated volume ID changes.
pams/sim/g2t/g2t_volume_id.g
Fix g2t_volume_id for forward silicon
Newly added files:
StRoot/StarRoot/THelix3d.h
StRoot/StarRoot/THelixTrack.h
StRoot/StarRoot/TRungeKutta.cxx
StRoot/StarRoot/TRungeKutta.h
BACKWORD
StRoot/StEpdUtil/StEpdFastSim/RunSimulator.C
StRoot/StEpdUtil/StEpdFastSim/StEpdFastSim.cxx
StRoot/StEpdUtil/StEpdFastSim/StEpdFastSim.h
StRoot/StEpdUtil/StEpdFastSim/StEpdTrivialEventGenerator.cxx
StRoot/StEpdUtil/StEpdFastSim/StEpdTrivialEventGenerator.h
Adding StEpdFastSim area for EPD fast simulation
StDb/idl/etofPulserTimeDiffGbtx.idl
new ETOF table for Florian
StarDb/AgMLGeometry/Geometry.y2020a.C
y2020a fast offline geometry
StarDb/Calibrations/tpc/tpcBXT0CorrEPD.y2020.C
ideal/empty calib for 2020
2021
STAR SOFTWARE NEWS APR 9, 2021
---------------------
The present release assignment:
             SL09g_embed (SL09g_2Embed_v10)  ROOT_LEVEL 5.22.00
             SL10c_embed (SL10c_embed_v5)    ROOT_LEVEL 5.22.00
             SL10h_embed (SL10h_embed_v6)    ROOT_LEVEL 5.22.00
             SL10k_embed (SL10k_embed_v11)   ROOT_LEVEL 5.22.00
             SL11d_embed (SL11d_embed_v6)    ROOT_LEVEL 5.22.00
             SL12a_embed (SL12a_embed_v3)    ROOT_LEVEL 5.22.00
             SL12d_embed (SL12d_embed_v6)    ROOT_LEVEL 5.22.00
             SL13b_embed (SL13b_embed_v1)    ROOT_LEVEL 5.22.00
             SL14g       (SL14g_3)           ROOT_LEVEL 5.34.09 pp 500GeV run 2013 production, days 129-161
             SL14i       (SL14i_2)           ROOT_LEVEL 5.34.09 AuAu 14.6GeV run 2014 production
             SL15c       (SL15c)             ROOT_LEVEL 5.34.09 AuAu 200GeV run 2014 data production with HFT
             SL15e_embed (SL15e_embed_v1)    ROOT_LEVEL 5.34.09
             SL16d       (SL16d_1)           ROOT_LEVEL 5.34.30 pp,pAu,pAl run 2015 production without HFT tracking
             SL16d_embed (SL16d_embed_v2)    ROOT_LEVEL 5.34.30
             SL16g_embed (SL16g_embed_v3)    ROOT_LEVEL 5.34.30
             SL16j       (SL16j)             ROOT_LEVEL 5.34.30 auau 200GeV  run 2016 production
             SL16j_embed (SL16j_embed_v3)    ROOT_LEVEL 5.34.30
             SL16k_embed (SL16k_embed_v1)    ROOT_LEVEL 5.34.30
             SL17d       (SL17d)             ROOT_LEVEL 5.34.30 dAu 20-200GeV run 2016 production
             SL17d_embed (SL17d_embed_v3)    ROOT_LEVEL 5.34.30
             SL17f       (SL17f_1)           ROOT_LEVEL 5.34.30 auau 200GeV run 2016 st_upc production;
                                                    pp 200GeV run 2015 st_rp reproduction;
             SL17g       (SL17g_1)           ROOT_LEVEL 5.34.30 pp 510GeV run 2017 st_W production;
             SL17i       (SL17i)             ROOT_LEVEL 5.34.30 SL7.3 cucu 200-22 GeV run 2005 reproduction;
             SL18b       (SL18b)             ROOT_LEVEL 5.34.30 pp 510GeV run 2017 st_physics production;
             SL18c       (SL18c_1)           ROOT_LEVEL 5.34.30 pp 510GeV run 2017 st_fms, st_mtd production;
                                                       AuAu 54GeV run 2017 production;
             SL18c_embed (SL18c_embed_v1)    ROOT_LEVEL 5.34.30
             SL18f       (SL18f_1)           ROOT_LEVEL 5.34.30 pp 510GeV run 2017 st_epd production;
                                                    AuHe3 200GeV run 2014 st_physics data production;
             SL18h       (SL18h)             ROOT_LEVEL 5.34.30 pp 500GeV run 2017 st_rp stream data reproduction;
                                                    AuAu 200GeV run 2014 data reproduction with selected trigger ID;
                                                    pp 200GeV run 2015 st_rp stream data reproduction;
                                                    pAu/pAl 200GeV run 2015 st_ssdmb stream data reporuduction;
             SL19a       (SL19a)             ROOT_LEVEL 5.34.30
             SL19b       (SL19b_1)           ROOT_LEVEL 5.34.30 AuAu 27GeV run 2018 production
             SL19c       (SL19c)             ROOT_LEVEL 5.34.30 cuAu 200GeV run 2012 data reproduction
             SL19d       (SL19d)             ROOT_LEVEL 5.34.30 SL7.3
             SL19e       (SL19e_1)             ROOT_LEVEL 5.34.30 SL7.3
             SL20a       (SL20a)             ROOT_LEVEL 5.34.38 SL7.3
             SL20c       (SL20c)             ROOT_LEVEL 5.34.38 SL7.3
             SL20d       (SL20d)             ROOT_LEVEL 5.34.38 SL7.3
             SL21a       (SL21a)             ROOT_LEVEL 5.34.38 SL7.3
             SL21b       (SL21b_v2)          ROOT_LEVEL 5.34.38 SL7.3
             SL21c       (SL21c_5)           ROOT_LEVEL 5.34.38 SL7.3
             SL21d       (SL21d)             ROOT_LEVEL 5.34.38 SL7.3

             old       -> SL20d (SL20d)      ROOT_LEVEL 5.34.38 SL7.3
             pro       -> SL21a (SL21a)      ROOT_LEVEL 5.34.38 SL7.3
             new       -> SL21b (SL21b)      ROOT_LEVEL 5.34.38 SL7.3

             starnew   -> SL21b
             starpro   -> SL21a
             starold   -> SL20d

             dev-> DEV                       ROOT_LEVEL 5.34.30 SL7.3
             .dev-> .DEV                     ROOT_LEVEL 5.34.38 SL7.3

-------------------------------------------------
Release History
SL21a
DB Update
SL21b
SL21b_v2
SL21c
SL21c_1
SL21c_2
SL21c_3
SL21c_4
SL21c_5
SL21d
OnlTools/Jevp/StJevpBuilders/l4Builder.cxx
protected OpenMP function calls with macro to make the code without flag -fopenmp
OnlTools/Jevp/StJevpBuilders/trgBuilder.cxx
Commented some of the code
OnlTools/Jevp/StJevpPlot/JevpPlotSet.cxx
OnlTools/Jevp/StJevpPlot/JevpPlotSet.h
Added capability of reading multiple files
OnlTools/Jevp/StJevpServer/JevpServer.cxx
Commented fms,fps builder
StRoot/RTS/include/RC_Config.h
added float variable
StRoot/RTS/include/iccp2k.h
Added structure definition EvbSummary
StRoot/RTS/include/prepareGbPayload.h
Changed the LOG
StRoot/RTS/include/rc.h
Added GS_SYNCING for FCS use
StRoot/RTS/src/DAQ_FCS/daq_fcs.cxx
StRoot/RTS/src/DAQ_FCS/daq_fcs.h
StRoot/RTS/src/DAQ_FCS/fcs_data_c.cxx
StRoot/RTS/src/DAQ_FCS/fcs_data_c.h
added case for 0x9810
StRoot/RTS/src/DAQ_ITPC/daq_itpc.cxx
End of FY19 run
StRoot/RTS/src/DAQ_READER/daqReader.cxx
StRoot/RTS/src/DAQ_READER/daqReader.h
Added the code to change the trigger frequency
StRoot/RTS/src/RTS_EXAMPLE/Makefile
Added fcs2019 to tinfo
StRoot/RTS/src/RTS_EXAMPLE/rts_example.C
StRoot/StBTofCalibMaker/StBTofCalibMaker.cxx
StRoot/StBTofCalibMaker/StBTofCalibMaker.h
Introducing meaningful nTofSigma calculations in VPDstartless mode
StRoot/StBTofPool/dbase/macros/tof_reload.C
StRoot/StBTofPool/dbase/macros/tofsim_reload.C
modified for initialise Run21
StRoot/StBTofSimMaker/StBTofSimMaker.cxx
relocate StVpdSimConfig.h to StBTofUtil area for shared used between StBTofSimMaker, StVpdSimMaker, and StBTofCalibMaker
StRoot/StBTofSimMaker/StBTofSimMaker.h
change path to StVpdSimConfig.h from StVpdSimMaker to StBTofUtil
StRoot/StChain/GeometryDbAliases.h
Commit y2021a production geometry
StRoot/StEvent/StContainers.cxx
StRoot/StEvent/StContainers.h
StRoot/StEvent/StDetectorDefinitions.h
StRoot/StEvent/StEnumerations.h
StRoot/StEvent/StEvent.cxx
StRoot/StEvent/StEvent.h
StRoot/StEvent/StEventClusteringHints.cxx
StRoot/StEvent/StEventTypes.h
Updated to add FCS elements (Akio)
StRoot/StSpinPool/StJetEvent/StJetEvent.h
update unixTime in StJetEvent to return correct unixTime
StRoot/StSpinPool/StJetSkimEvent/StJetSkimEvent.h
update unixTime in StJetSkimEvent to return correct unixTime
StRoot/StVpdSimMaker/StVpdSimMaker.cxx
StRoot/StVpdSimMaker/StVpdSimMaker.h
move StVpdSimConfig.h to StBTofUtil area for shared used between StBTofCalibMaker and StVpdSimMaker
StRoot/StarClassLibrary/StParticleDefinition.hh
StRoot/StarClassLibrary/StParticleTable.cc
StRoot/StarClassLibrary/StParticleTypes.hh
StRoot/StarClassLibrary/StarPDGEncoding.hh
Update to gstar_part.g and StarClassLibrary to support simulation of H4 Lambda , He4 Lambda and He5 Lambda hypernuclei
StRoot/StarGenerator/FILT/StarParticleFilter.cxx
StRoot/StarGenerator/FILT/StarParticleFilter.h
Limit consideration to final state particles, and allow user to specify parent of trigger particle(s).
StarVMC/Geometry/StarGeo.xml
Commit y2021a production geometry
StarVMC/Geometry/FstmGeo/FstmGeo.xml
Revised disk positions from FV.
StarVMC/Geometry/TpceGeo/TpceConfig.xml
Update TPC deadzone based on observed difference in fixed target data
StarVMC/Geometry/TpceGeo/TpceGeo3a.xml
StarVMC/Geometry/TpceGeo/TpceGeo6.xml
Fix inner vs outer deadzone
StarVMC/StarAgmlLib/StarTGeoStacker.cxx
Improve volume/shape sanity check... no need to check shapeless assembly volumes.
StarVMC/xgeometry/xgeometry.age
Commit y2021a production geometry
mgr/Conscript-standard
Add optstar includes for forward tracking.
pams/sim/g2t/g2t_pre.F
pams/sim/g2t/g2t_volume_id.g
Reduce verbosity
pams/sim/gstar/gstar_part.g
Remove the STOP, as we may be passed stable nuclei here
---Newly added files---
StRoot/StEvent/StFcsCluster.cxx
StRoot/StEvent/StFcsCluster.h
StRoot/StEvent/StFcsCluster.cxx
StRoot/StEvent/StFcsCluster.h
StRoot/StEvent/StFcsCollection.cxx
StRoot/StEvent/StFcsCollection.h
StRoot/StEvent/StFcsHit.cxx
StRoot/StEvent/StFcsHit.h
StRoot/StEvent/StFcsPoint.cxx
StRoot/StEvent/StFcsPoint.h
Initial Revision
StRoot/StBTofUtil/StBTofSimResParams.h
StRoot/StBTofUtil/StVpdSimConfig.h
move StBTofSimResParams.h and StVpdSimConfig.h to StBTofUtil area for shared used between StBTofCalibMaker and the SimMakers for BTOF and VPD
StRoot/StBTofPool/dbase/macros/readtofSimResParams.C
Include radout/writeout of VPD resolutions.
OnlTools/Jevp/StJevpBuilders/fcsBuilder.cxx
Just change center TB for LED since Tonko shifted by 1RC
OnlTools/Jevp/StJevpBuilders/fcsBuilder.h
added few things for led/physics
OnlTools/Jevp/StJevpBuilders/fcsMap.h
StDbLib/StDbManagerImpl.cc revision 1.38.2.1 for all libraries which are released after year 2013
StRoot/RTS/EventTracker/FtfSl3.cxx
Fixed crash on too many clusters in sector
StRoot/RTS/include/platform.h
Define Unix
StRoot/RTS/include/prepareGbPayload.h
Define vxworks
StRoot/RTS/include/UNIX/ThreadsMsgQueue.hh
Define Unix & Linux
StRoot/RTS/src/DAQ_FCS/daq_fcs.cxx
Fixed bug in ZS
StRoot/RTS/src/DAQ_FCS/fcs_data_c.cxx
StRoot/RTS/src/DAQ_FCS/fcs_data_c.h
New function load_fc_map and bad_error, error_count variable
StRoot/RTS/src/DAQ_ITPC/daq_itpc.cxx
StRoot/RTS/src/DAQ_ITPC/itpcFCF.cxx
StRoot/RTS/src/DAQ_ITPC/itpcFCF.h
Implemented killed FEEs
StRoot/RTS/src/DAQ_ITPC/itpcInterpreter.cxx
FY21: bad port #13 on RDO ID 0x))52ED7C moved to #11
StRoot/RTS/src/DAQ_STGC/Makefile
StRoot/RTS/src/DAQ_STGC/daq_stgc.cxx
StRoot/RTS/src/DAQ_STGC/daq_stgc.h
Added VMM handling
StRoot/RTS/src/RTS_EXAMPLE/Makefile
StRoot/RTS/src/RTS_EXAMPLE/rts_example.C
Added STGC VMM decoding
StRoot/RTS/src/RTS_EXAMPLE/tpc_rerun.C
Tweaked so that I can use any gain file
StRoot/StAnalysisUtilities/StHistUtil.cxx
Small adjustment to label size
StRoot/StBFChain/BigFullChain.h
Add StEventUtilities dependence for StTpcHitMover
StRoot/StBFChain/StBFChain.cxx
Add PicoVtxVpdOrDefault
StRoot/StBFChain/doc/StBFChain.cxx_doc
StRoot/StBFChain/doc/index.html
Add StEventUtilities dependence for StTpcHitMover
StRoot/StChain/GeometryDbAliases.h
Add dev2022 as default in the 2022 timeline
StRoot/StDbLib/StDbDefs.hh
adding new db domain: FCS
StRoot/StDbLib/StDbManagerImpl.cc
StRoot/StDbUtilities/StMagUtilities.cxx
Pass a padrow to alignment codes to determine inner vs outer sector alignment matrix
StRoot/StDetectorDbMaker/StDetectorDbChairs.cxx
Introduce Event-by-Event T0 corrections
StRoot/StETofHitMaker/StETofHitMaker.cxx
Fixed deleting of created hits with StEvent data
StRoot/StETofHitMaker/StETofHitMaker.h
Fixed memory leak in StEtofHitMaker.cxx by adding a delete to merged hits
StRoot/StEpdUtil/StEpdUtilLinkDef.h
Added StEpdTrivialEventGenerator and StEpdFastSim to the LinkDef file
StRoot/StEpdUtil/StEpdFastSim/StEpdFastSim.cxx
Fixed bugs: 1.sin(theta)->fabs(tan(theta)) when calculating x/yHit. 2.setQTdata(pow(2,30)) when initiating a StPicoEpdHit
StRoot/StEvent/StETofHeader.cxx
StRoot/StEvent/StETofHeader.h
Include the front-end mismatch pattern (Philipp
StRoot/StEvent/StEvent.cxx
Added setFcsCollection method (Akio)
StRoot/StPicoDstMaker/StPicoDstMaker.cxx
StRoot/StPicoDstMaker/StPicoDstMaker.h
Fix of the missing FXT vertex selection mode due to the version missmatch
StRoot/StPicoEvent/StPicoArrays.cxx
StRoot/StPicoEvent/StPicoArrays.h
StRoot/StPicoEvent/StPicoBTofPidTraits.cxx
StRoot/StPicoEvent/StPicoBTofPidTraits.h
StRoot/StPicoEvent/StPicoDst.cxx
StRoot/StPicoEvent/StPicoDst.h
StRoot/StPicoEvent/StPicoDstLinkDef.h
StRoot/StPicoEvent/StPicoDstReader.cxx
Update of the StPicoEvent:
- Information of zdcUnAttenuated values, number of primary tracks (FXT mult) added to Event
- Add MC information (vertices and tracks) as the McVertex and McTrack classes
- Add nSigma(e/pi/K/p) for BTofPidTraits
- IdTruth, QATruth and vertex index added to Track
StRoot/StPicoEvent/StPicoEvent.cxx
StRoot/StPicoEvent/StPicoEvent.h
StRoot/StPicoEvent/StPicoTrack.cxx
StRoot/StPicoEvent/StPicoTrack.h
Add missing classes
StRoot/StTpcHitMoverMaker/StTpcHitMoverMaker.cxx
Introduce Event-by-Event T0 corrections
StRoot/St_QA_Maker/QAhlist_EventQA_qa_shift.h
StRoot/St_QA_Maker/QAhlist_subsystems.h
Get histogram lists up-to-date
StRoot/St_QA_Maker/StEventQAMaker.cxx
Trigger ID names only available from year 2001 on
StRoot/St_QA_Maker/StQAMakerBase.cxx
Re-work the trigger bits plot to have actual trigger names
StRoot/StdEdxY2Maker/StdEdxY2Maker.cxx
Add TpcAccumlatedQ with 192 rows
StRoot/StiCA/StiCATpcSeedFinder.cxx
Add comments to explain recent commits resolving a seg fault with identical hits
StRoot/macros/makePicoDst.C
Add StTpcDb dependency for StEvenntUtilities
StRoot/macros/analysis/doEvents.C
StRoot/macros/analysis/find_vertex.C
Remove StTpcDb dependence for StEventUtilities
StRoot/macros/embedding/runEmbeddingSimulation2014.C
Sort out mismatch in names and decay modes for the lambda/lambdabar
StRoot/macros/graphics/GeomBrowse.C
Remove StTpcDb dependence for StEventUtilities
StarVMC/Geometry/StarGeo.xml
dev2022 implements forward calorimter system as planned (no dedicated preshower)
StarVMC/Geometry/StgmGeo/StgmGeo1.xml
New name is required in order for AgML/G4star to pickup isvol=1 flag... probably true for agstar as well
StarVMC/xgeometry/xgeometry.age
And add in the xgeometry interface for dev2022 geometry
pams/sim/gstar/gstar_part.g
Remove the STOP, as we may be passed stable nuclei here
====== Newly added files ======
StarDb/Geometry/tpc/TpcSuperSectorPositionB.20190101.000515.C
Add real and ideal position for y2019
StarDb/AgMLGeometry/Geometry.dev2022.C
DB loader for dev2022
StarDb/AgMLGeometry/Geometry.y2021a.C
Commit y2021a production geometry
StRoot/macros/embedding/simJetRequest.kumac
macro to simulate the jet production with pythia (for 2015 transverse data)
StRoot/macros/embedding/bfcMixer_Jet.C
bfcMixer for Jet embedding
StRoot/StPicoEvent/StPicoMcTrack.cxx
StRoot/StPicoEvent/StPicoMcTrack.h
StRoot/StPicoEvent/StPicoMcVertex.cxx
StRoot/StPicoEvent/StPicoMcVertex.h
Add missing classes.
StRoot/StEventUtilities/StEbyET0.cxx
Remove StTpcDb dependence for StEventUtilities
StRoot/StEventUtilities/StEbyET0.h
Introduce Event-by-Event T0 corrections
StRoot/StDetectorDbMaker/St_EbyET0C.h
Introduce Event-by-Event T0 corrections
StRoot/RTS/src/TRG_FCS/Makefile
StRoot/RTS/src/TRG_FCS/fcs_ecal_epd_mask.h
StRoot/RTS/src/TRG_FCS/fcs_trg_base.cxx
StRoot/RTS/src/TRG_FCS/fcs_trg_base.h
StRoot/RTS/src/TRG_FCS/fcs_trg_run.C
StRoot/RTS/src/TRG_FCS/stage_0_201900.cxx
StRoot/RTS/src/TRG_FCS/stage_0_202101.cxx
StRoot/RTS/src/TRG_FCS/stage_1_201900.cxx
StRoot/RTS/src/TRG_FCS/stage_1_202201.cxx
StRoot/RTS/src/TRG_FCS/stage_2_201900.cxx
StRoot/RTS/src/TRG_FCS/stage_2_202201.cxx
StRoot/RTS/src/TRG_FCS/stage_2_TAMU_202202.cxx
StRoot/RTS/src/TRG_FCS/stage_2_tonko_202101.cxx
StRoot/RTS/src/TRG_FCS/stage_3_201900.cxx
StRoot/RTS/src/TRG_FCS/stage_3_202201.cxx
StRoot/RTS/src/TRG_FCS/stage_3_tonko_202101.cxx
StRoot/RTS/src/TRG_FCS/VHDL/stage_0.vhd
StRoot/RTS/src/TRG_FCS/VHDL/stage_1.vhd
StRoot/RTS/src/TRG_FCS/VHDL/stage_2.vhd
StRoot/RTS/src/TRG_FCS/VHDL/stage_3.vhd
Adding VHDL from online/RTS/TRG_FCS/VHDL
StRoot/RTS/src/DAQ_STGC/stgc_data_c.cxx
StRoot/RTS/src/DAQ_STGC/stgc_data_c.h
Added VMM handling
StDb/idl/EbyET0.idl
new TRG table for Gene
StDb/idl/fcsDetectorPosition.idl
StDb/idl/fcsEcalGain.idl
StDb/idl/fcsEcalGainCorr.idl
StDb/idl/fcsHcalGain.idl
StDb/idl/fcsHcalGainCorr.idl
StDb/idl/fcsPresGain.idl
StDb/idl/fcsPresValley.idl
new FCS tables for Akio
StRoot/StTpcDb/StTpcDb.cxx
StRoot/StTpcDb/StTpcDb.h
StRoot/StTpcDb/StTpcDbLinkDef.h
StRoot/StTpcDb/StTpcDbMaker.cxx
StRoot/StBFChain/BigFullChain.h version 1.312
Archive
Current Release Assignments
STAR SOFTWARE NEWS December 3, 2007
---------------------
The present release assignment:
           SL02d    (SL02d)    ROOT_LEVEL 3.02.07 AuAu 200GeV real data production
           SL02e    (SL02e)    ROOT_LEVEL 3.02.07 pp and AuAu 200GeV real data production
           SL03f    (SL03f)    ROOT_LEVEL 3.05.04 ppMinBias 2001/2002 rerun, pp200 Pythia
           SL03h    (SL03h)    ROOT_LEVEL 3.10.01 dAu and pp data reproduction
           SL04d    (SL04d)    ROOT_LEVEL 3.10.01 62 GeV production (continue with SL04e)
           SL04e    (SL04e)    ROOT_LEVEL 3.10.01 AuAu 200 & 62 GeV Hijing production
           SL04f    (SL04f_a)  ROOT_LEVEL 3.10.01 dAu 200GeV reproduction
           SL05a    (SL05a)    ROOT_LEVEL 4.00.04 AuAu200, productionMinBias
           SL05c    (SL05c)    ROOT_LEVEL 4.00.04 AuAu200 production
           SL05d    (SL05d_1)  ROOT_LEVEL 4.00.04 CuCu 200&62 Gev production
           SL05e    (SL05e)    ROOT_LEVEL 4.00.04 pp200 MC production
           SL05f    (SL05f_3)  ROOT_LEVEL 4.04.02 pp run 2005 production
           SL05h    (SL05h)    ROOT_LEVEL 4.04.02 SL 3.0.5
           SL06b    (SL06b_1)  ROOT_LEVEL 4.04.02 cucu 200GeV production
           SL06d    (SL06d_2)  ROOT_LEVEL 4.04.02 MC prod for SVT&SSD review
     old-> SL06e    (SL06e)    ROOT_LEVEL 4.04.02 pp 2006 production
           SL06f    (SL06f_2)  ROOT_LEVEL 4.04.02 MC production for TUP
           SL06g    (SL06g_2)  ROOT_LEVEL 5.12.00 MC production for TUP, SL4.4
           SL07a    (SL07a_3)  ROOT_LEVEL 5.12.00 MC production, SL4.4
     pro-> SL07b    (SL07b_2)  ROOT_LEVEL 5.12.00 CuCu reproduction, SL4.4
           SL07c    (SL07c_3)  ROOT_LEVEL 5.12.00 CuCu reproduction, pp200 pythia,SL4.4
     new-> SL07d    (SL07d_3)  ROOT_LEVEL 5.12.00 auau 200GeV, run 2007,SL4.4
     dev-> DEV                 ROOT_LEVEL 5.12.00 SL4.4
    .dev-> .DEV                ROOT_LEVEL 5.12.00
 -------------------------------------------------
General documents
Library release structure and policy
Release History
SL06g library
SL06f library
SL06e library
SL06d library
SL06c library
SL06b library
SL06a library
SL05h library
SL05g library
SL05f library
SL05e library
SL05d library
SL05c library
SL05b library
SL05a library
SL04k library
SL04j library
SL04i library
SL04h library
SL04g library
SL04f library
SL04e library
SL04d library
SL04c library
SL04b library
SL04a library
SL03h library
SL03f library
SL03e library
SL03d library
SL03c library
SL03b library
SL02i library
SL02h library
SL02g library
SL02f library
SL02e library
SL02d library
SL02c library
SL02b library
SL02a library
SL01l library
SL01k library
SL01i library
SL01j library
Library releases before 10/01/2001
-
August 10, 2007
SL06g library has been updated with codes below to make patches for SL4.4 platform:- StDbBroker
StDbWrappedMessenger.cc ;
- StDetectorDbMaker
StDetectorDbClock.cxx ;
StDetectorDbMaker.cxx;
- StTpcDb
StRTpcDimensions.cxx/h, StRTpcElectronics.cxx/h, StRTpcFieldCage.cxx/h, StRTpcGlobalPosition.cxx/h,
StRTpcHitErrors.cxxh, StRTpcPadPlane.cxx/h, StRTpcSectorPosition.cxx/h, StRTpcSlowControlSim.cxx/h,
StRTpcWirePlane.cxx/h, StTpcDbMaker.cxx/h, StTpcdEdxCorrection.cxx, St_tpcCorrectionC.cxx;
- StStarLogger
StLoggerManager.cxx/h;
- StJetMaker
StJetHist/StJetHistMaker.cxx;
StFourPMakers/StEmcTpcFourPMaker.h;SL06g library was rebuild and retagged with tag SL06g_2.
-
July 12, 2007
library SL06g has been updated with codes below to corrected gcc4 compilation needed for transition to SL4.4 platform.- asps/staf
sdd/Conscript;
- StEmcUtil
voltageCalib/PowerLawFit.h;
- StEmcUtil
voltageCalib/LinearFit.h;
- StGenericVertexMaker
Minuit/StMinuitVertexFinder.cxx, r1.10;
- StMuDSTMaker
COMMON/StMuTrack.cxx, r1.27;
- Sti
Base/StiFactory.h, r2.8;
StiMasterHitLoader.h, r2.9;
StiHitLoader.h, r2.7;
- Stl3Util
base/St_l3_Coordinate_Transformer.cxx, r1.5;
- StarClassLibrary
StMultiArray.cxx/h;
- mgr
CERN_LEVEL.sl44_gcc346;Updated codes have been retagged with tag SL06g_1
-
December 22, 2006
new library SL06g (tagged as SL06g) has been created, tested and released on December 26Main features:
- new ROOT version 5.12.00;
- new geometries added for tracking upgrade study & development; StRnD codes adjusted
- StiPullEvent has been modified for tracking upgrade study, for detailes look at the email ;
- first release of QtRoot in STAR library;Next codes have been updated:
StDbUtilities
StMagUtilities.cxx/h - added ShortedManualRing() and protection against B=0 filed;
StChain
StMaker.cxx - added geometry tags upgr10 & upgr11; included Upgr12 tag (corrected IGT);
StMaker.h - replace the class StMessMgr forward declaration with the real declaration and adjust St_TLA_Maker to show how to use logger;
StDbLib
MysqlDb.cc, StDbManagerImpl.cc/hh - modified;
ChapiDbHost.cxx/h, ChapiStringUtilities.cxx/h, StDbServiceBroker.cxx/h, StlXmlTree.cxx/h - added new files for db load balancing ;
StEEmcDbMaker
StEEmcDbMaker.cxx - modified EndCap embedding;
StEEmcSimulatorMaker
StEEmcFastmaker.h, StEEmcSlowMaker.cxx/h - modified for Endcap embedding ;
StEEmcMixerMaker.cxx/h - new files added for Endcap embedding;
StEEmcRawMaker
StEEmcRawMaker.cxx - modified for Endcap embedding ;
StEEmcPrint.cxx/h - new files added for Endcap embedding;
StEmcTriggerMaker
StBemcTrigger.cxx/h, StEmcTriggermaker.cxx/h - first update for 2006 BEMC L0;
StEventDisplayMaker
StEventDisplayMaker.cxx - adjusted for QtRoot ;
StiRnD
Hpd/StiHpdDetectorBuilder.cxx - fixed air and silicon variables; fixed the bug related to the starting angle of the first detector; fixed the width;
Ist/StiIstHitLoader.cxx - fixed UPGR09 geometry layer number mismatch bug; fixed problem with UPGR09 comparibility to make it possible to run other configurations;
StPixelFastSimMaker
StPixelFastSimMaker.cxx - added fix for UPGR09 geometry problem with layer numbers mismatch, fixed UPGR09 comparibility to work with all geometry versions;
StPass0CalMaker
StSpaceChargeEbyEMaker.cxx - modified to better handling zero magnetic field;
StSsdUtil
StSpaListNoise.cc - get back to previous daqCutValue;
StTofSimMaker
StTofSimMaker.cxx - fixed to avoid zero adc values in the denominator;
St_geom_Maker
GeomBrowser.ui,GeomBrowser.ui.h, QExGeoDrawHelper.cxx/h, QExObjectListItem.h, QtGBrowserGeoDrawHelper.h, QtGBrowserInspect.h, QtGBrowserObjectListItem.h, StGeomBrowser.cxx/h, St_geom_MakerLinkDef.h, arrow_left.xpm, arrow_right.xpm, reload.xpm, snapshot.xpm, view3d.xpm, wirebox.xpm - added the the interactive Qt-based version of the st_geom_Maker;
GeomBrowser.ui, GeomBrowser.ui.h - added new method to read inventor file with the GeomBrowse; updated list of standard Geant geometries;
St_TLA_Maker
St_TLA_Maker.cxx - replace the class StMessMgr forward declaration with the real declaration and adjust St_TLA_Maker to show how to use logger;Sti
StiKalmanTrack.cxx/h - operator = added; method getPoint added;
StiKalmanTrackNode.cxx/h - info block added and filled for pulls; method getRxy() added; reduce() added for testNode; inf=0 added in default constructor ;
StiTrackFinder.h - defind default = ON for treeSearch ;
StiKalmanTrackFinder.cxx - set if hit candidates number added ; direct dependency from SVT removed;
StiTreeNode.cxx/h - detauch of tail added ;
StiToolkit.h - StiNodeInf factory added ;
StiTrack.cxx/h - operator = added;
StiHitErrorCalculator.cxx - modified;
StiDetectorGroup.h, StiGenericDetectorGroup.cxx/h - implemented the generic detector group for OO polymorphism ;
StiToolkit.h - modified for polymorphic StiDetectorGroup container implemention ;
StiMaker
StiMaker.cxx/h - noTreeSearch flag added ;
StiDeafultToolkit.cxx/h - StiNodeInf factory added;
StiStEventFiller.cxx/h - fillPulls reorganized; filling pull with trackes added;
StiGeomMake.cxx/h - added new code to convert StiDetector to TVolume for EventDisplayMaker ; added StiDetector decorator to make4 correct ROOT ContextMenu and Browse;
StiDefaultToolkit.cxx/h - modified ;
StiDetectorVolume.cxx/h - added;
StiGeomMaker/cxx/h - removed;
StiUtilities
StiPullEvent.cxx/h - added branches mHitsR, nHitCand, iHitCand;
StiPullEvent.cxx/h - trackes added;
StarRoot
StCheckQtEnv.cxx - adjusted ROOT version;pams/geometry
istbgeo/istbgeo5.g - added two layers, mid layer at 9.5 cm;
istbgeo/istbgeo4.g - geometry with mid layer only at 9.5 cm;
istbgeo/istbgeo3.g - added code field to the main structure to handle version volume id;
geometry/geometry.g - introduced geometry tags Upgr10 & Upgr11 which utilize source files istbgeo4 and istbgeo5; corrected geometry with tag UPGR12 (for IGT)
geometry/geometry.g - added geometry tag DUMM01 which will be used for material balance effect study;
dumngeo/dumngeo.g - a dummy object added to aid in material balance study;
pams/sim
g2t/g2t_volume_id.g - modified to introduce versioning for the multiple IST configurations;
g2t/g2t_fgt.F, g2t_fst.F, g3t_igt.F, g2t_ist.F - commented out print statement;StarDb
VmcGeometry/Detectors.upgr10.root, Geometry.upgr10.C, geom.upgr10.root,upgr10.h,upgr10.rz ;
VmcGeometry/Detectors.upgr11.root, Geometry.upgr11.C, geom.upgr11.root,upgr11.h,upgr11.rz ;QtRoot
first module release in new STAR library; -
December 15, 2006
library SL06f has been updated with codes needed for Uprg06 & Upgr09 geometries.
Library was rebuilt, retagged with tag SL06f_2 and released.Next codes have been updated:
StChain
StMaker.cxx - upgr06 & upgr09 added;
StPixelFastSimMaker
StPixelFastSimMaker.cxx/h - added hit error db loader; modified to gets hit smearing parameters for IST from the database;
StiRnD
Ist/StiIstDetectorBuilder.cxx/h - modified to get hit errors from the database and make them different for each layer;
Hpd/StiHpdDetectorBuilder.cxx/h - modified to get hit errors from the database ;pams/geometry
geometry/geometry.g - added UPGR09 geometry tag, re-instate UPGR06 geometry tag; enable a cleaner barrel EMC code in Y2007
geometry/istbgeo3.g - added new IST configuration with only one, outer layer;
fpdmgeo/fpdmgeo3.g - first version of FMS(FPD);StarDb
Calibrations/tracker/hpdHitError.20050101.000000.C - added hpd hit errors files;
Calibrations/tracker/ist1HitError.20050101.000000.C, ist2HitError.20050101.000000.C h - added two files with IST hit errors;
VmcGeometry/Detectors.upgr09.root, Geometry.upgr09.C, geom.upgr09.root,upgr09.h;
Detectors.upgr06.root, Geometry.upgr06.C, geom.upgr06.root,upgr06.h; -
Nov 30, 2006
library SL06f has been updated with codes for Hft, Ist & Hpd hits smearing and bug fixes, rebuilt, retagged with tag SL06f_1 and release on December 1.Next codes have been updated:
StChain
StMaker.cxx - upgr08 added;
StPixelFastSimMaker
StPixelFastSimMaker.cxx/h - added smearing for Hpd and Ist and a switch to turn it on and off;updated with Pixel resolution smearing.
StiRnD
Hft/StiPixelDetectorBuilder.cxx/h - modified to use of pre-existing STAR DB inteface; added call to get tracking parameters from DB;
Hft/StiPixelDetectorBuilder.h - modified to overload of loadDS to extract tracking parameters;
Hft/StiPixelHitLoader.cxx - added smearing to hit loader;
Ist/StiIstDetectorBuilder.cxx - changed hit errors to 60 microns for x and 1.9 mm for y;
Hft/StiPixelHitLoader.cxx - added smearing to hit loader for Hft;
Hpd/StiHpdDetectorBuilder.cxx - modified to optimized hit errors;pams/geometry
geometry/geometry.g - updated upgr01 & upgr08 geometry; added Y2007 tag and set it up to include the new FMS(FPD)StarDb
Calibrations/tracker/hftHitError.upgr01.C, - MC smearing values for the HFT added;
Calibrations/tracker/hftTrackingParameters.upgr01.C - added Sti tracking parameters for Hft;
Calibrations/ssd/ssdStripCalib.upgr01.root - Added perfect SSD strip calib file: pedestals=150, rms=4;
VmcGeometry/upgr01.h - added new version of upgr01;
VmcGeometry/Detectors.upgr07.root, geom.upgr07.root, upgr07.h - files added for upgr07 geometry;
Detectors.upgr08.root, Geometry.upgr08.C, geom.upgr08.root, upgr08.h - files added for upgr08 geometry; -
Nov 16, 2006
new library SL06f has been created, tagged with tag SL06f, build, tested and released on November 21 .Main features:
- reshaped SSD simulation and reconstruction code;
- Sti uselees classes droped, codes ajusted; StiRnD implemented for tracking upgrades;
- geometry for tracking upgrade detectors developed ;
- new codes for tracking upgrade finalized at some stage (in ITTF framework) and committed;Next codes have been updated:
- StBFChain
BigFullChain.h - St_spa_Maker and StSsdDaqMaker makers renamed to be consistent with recent changes in SSD code; taken out StiEmc and StiFtpc;
StBFChain.cxx, BigFullChain.h - FtpcIT option removed, HpdIT option added ;
StBFChain.cxx, BigFullChain.h - option 'skip1row' added to skip 1-st pad row in TPC; added new SSD chain
BigFullChain.h - renamed StiPixel to StiRnD, remove svtdEdx and old dEdx;
StBFChain.cxx - added hasSim definition for FCFMaker;
- StChain
StMaker.cxx/h - added new geometry tags: upgr04 and upgr04; added geometry y2005e ; added y2007 geometry tag - timestamp for new run will start at 20061101;
- StDbUtilities
St_svtRDOstrippedC.cxx/h - added new files;
- StdEdxMaker
II3padC.cxx, StSvtdEdxMaker.cxx/h, StdEdxMaker.cxx/h, StdEdxMakerLinkDef.h, dEdxPoint.h, dEdxTrack.cxx/h - removed StSvtdEdxMaker and old StdEdxMaker;
- StEvent
StRnDHit.h - fixed setDouble() interface;
- StEmcTriggerMaker
StBemcTrigger.cxx/h, StEmcTriggerMaker.cxx/h - added 2005 J/Psi trigger;
- StEmcUtil
projection/StEmcPosition.cxx/h - added support for StMuTrack projections;
- StEventDisplayMaker
StEventDisplayMaker.cxx/h, StGlobalFilterTest.cxx, St_PolyLine3D.h, TEmcTower.cxx - fixed to make it work under ROOT 4.04 and ROOT 5.12;
- StFtpcClusterMaker
StFtpcDbReader.cc/hh - added definition of mPadPitch ;
- StFtpcTrackMaker
StFtpcTrackingParams.cc - modified to move the reconstruction parameters maxDcaVertex,minNumTracks from code to CodeParams;
StFtpcTrackMaker.cxx/h - comment out ftpc vs. tpc vertex histogram definitions, they are defined and filled in St_QA_Maker ;
- StGenericVertexMaker
StCtbUtility.cxx - removed dependencies from droped classes;
StiPPVertex/CtbHitList.cxx/h, StPPVertexFinder.cxx - removed dependencies from droped classes;
- StMcEvent
StMcEvent.cc, StMcTrack.cc/hh - added generic access functions for tracking and calorimeter hits ;
StMcContainers.hh, StMcEvent.cc/hh, StMcEventLinkDef.h, StMcEventTypes.hh, StMcTrack.cc/hh - modified to add HPD hits;
StMcHpdHit.cc/hh, StMcHpdHitCollection.cc/hh, StMcHpdLayerHitCollection.cc/hh - added new files for HPD hits collection;
StMcIstHit.cc - modified to update layer(), wafer() and side() methods;
- StMcEventMaker
StMcEventMaker.cxx - modified to fill the flag for the particles coming from primary vertex ; added HPD hits;
- StMiniMcMaker
StMiniEmbed.C - modified to use event branch instead of dst branch;
- StRTSClient
FCFMaker/FCFMaker.cxx - set hasSim definition to SetMode method;
- StSsdClusterMaker
package has been removed, now it's part of StSsdPointMaker;
- StSsdEvalMaker
package has been removed;
- StSsdDaqMaker
StSsdDaqMaker.cxx - modified to replace St_DataSet => TDataSet;
- StSsdDbMaker
StSsdDbMaker.cxx, StSsdDbWriter.cxx, St_SsdDb_Reader.cc/hh - added sim flag for ssdWafersPosition ;
StSsdDbMaker.cxx/h - addjusted for the new Ssd reshaped code;
StSsdDbWriter.cxx/h, St_SsdDb_Reader.cc/hh - codes removed due to reshaping;
- StSsdPointMaker
StSsdPointMaker.cxx/h - modified to use id_mctrack for setIdTruth and propagated to the hit;
StSsdBarrel.cc/hh, StSsdCluster.cc/hh, StSsdClusterControl.cxx/h, StSsdClusterList.cc/hh StSsdDynamicControl.cxx/h, StSsdLadder.cc/hh, StSsdPackage.cc/hh, StSsdPackageList.cc/hh, StSsdPoint.cc/hh, StSsdPointList.cc/hh, StSsdStrip.cc/hh, StSsdStripList.cc/hh, StSsdWafer.cc/hh - removed because methods for all classes (StSsdStrip, StSsdCluster, StSsdPoint) has been moved to StSsdUtil;
- StSsdSimulationMaker
St_sls_Maker.cxx/h, St_spa_Maker.cxx/h - modified to read the noise and pedestal from ssdStripCalib ;
StSlsBarrel.cc/hh, StSlsListPoint.cc/hh, StSlsListStrip.cc/hh, StSlsPoint.cc/hh, StSlsStrip.cc/hh, StSlsWafer.cc/hh, StSpaBarrel.cc/hh, StSpaListNoise.cc/hh, StSpaListStrip.cc/hh, StSpaNoise.cc/hh, StSpaStrip.cc/hh, StSpaWafer.cc/hh - removed because methods for all classes (StSsdStrip, StSsdPoint) has been moved to StSsdUtil;
- StSsdUtil
StSpaListNoise.cc/hh, StSpaNoise.cc/hh, StSsdBarrel.cc/hh, StSsdCluster.cc/hh, StSsdClusterControl.cxx/h, StSsdClusterList.cc/hh, StSsdDynamicControl.cxx/h, StSsdLadder.cc/hh, StSsdPackage.cc/hh, StSsdPackageList.cc/hh, StSsdPoint.cc/hh, StSsdPointList.cc/hh, StSsdStrip.cc/hh, StSsdStripList.cc/hh, StSsdWafer.cc/hh - added to regroup methods for the classes StSsdStrip, StSsdCluster and StSsdPoint;
StSsdEnumerations.hh, StSsdGeometry.cc/hh, StSsdHybridCollection.cc/hh, StSsdHybridObject.cc/hh, StSsdWaferCollection.cc/hh, StSsdWaferGeometry.cc/hh - codes removed, droped useless classes;- StTagsMaker
StTagsMaker.cxx - added Check that this chain is BFC one;
- Sti
StiDetectorBuilder.cxx, StiDetectorGroup.h, StiHit.cxx, StiKalmanTrack.cxx/h, StiKalmanTrackFinder.cxx, StiKalmanTrackNode.cxx, StiLinkDef.h, StiPlacement.cxx/h - removed StiDedxCalculator ; taken out Central represantation;
StiDedxCalculator.cxx/h - removed;
StiVMCToolKit.h - Ssd added in chain;
StiKalmanTrackFinder.cxx - added Hpd hit counts;
StiDetectorGroup.h, StiDetectorTreeBuilder.cxx, StiHit.h, StiHitContainer.cxx/h, StiHitLoader.h, StiKalmanTrack.cxx/h, StiKalmanTrackNode.cxx/h, StiLinkDef.h, StiMapUtilities.cxx, StiVMCToolKit.cxx - modified to cleanup useless classes;
AssociationQuality.cxx/h, CombinationIterator.h, StFastLineFitter.cxx/h, StiCircleCalculator.cxx/h, StiCompositeFinder.cxx/h, StiCompositeMaterial.cxx/h StiConicalShape.cxx/h, StiDefaultHitAssociationFilter.cxx/h, StiDefaultHitFilter.cxx/h, StiDefaultMutableTreeNode.cxx/h, StiDiskShape.h StiDrawableTrack.cxx/h, StiHelixCalculator.cxx/h, StiHelixFitter.cxx/h, StiHistograms.cxx/h, StiHitAssociator.h, StiHitError.cxx/h, StiHitToHitMap.cxx/h, StiHitToTrackMap.cxx/h, StiMath.cxx/h, StiStTrackFilter.h, StiTrackAssociation.cxx/h, StiTrackAssociator.h, StiTrackToIntMap.cxx/h, StiTrackToObjMap.cxx/h, StiTrackToTrackMap.cxx/h, StiTrackingPlots.cxx/h - removed codes, droped useless classes;
- Sti/Base
AssociationFilter.h, EditableAssociationFilter.h HistogramGroup.cxx/h, MessageType.cxx/h, Messenger.cxx/h, MessengerBuf.cxx/h, Vectorized.h, VectorizedFactory.h - removed uselees classes;
- StiEmc
StiEmcDetectorBuilder.cxx/h, StiEmcDetectorGroup.cxx/h, StiEmcHitLoader.cxx/h, StiEmcIsActiveFunctor.cxx/h - removed files;
- StiEvaluator
EfficiencyAnalysis.cxx/h, EfficiencyPlots.cxx/h, Evaluator.cxx/h, ResolutionPlots.cxx/h, StiEvalUtil.h StiEvaluator.cxx/h, StiEvaluatorHistograms.cxx/h - removed;
- StiFtpc
StiFtpcDetectorBuilder.cxx/h, StiFtpcDetectorGroup.cxx/h, StiFtpcHitLoader.cxx/h - removed ;
- StiMaker
StiMaker.cxx - removed Ftpc;
StiMaker.cxx - added HPD;
StiDefaultToolkit.cxx, StiMaker.cxx - cleanup dependencies from Sti useless classes;
- StiPixel
StiIstDetectorGroup.cxx, StiPixelDetectorGroup.cxx - modified to remove StiDedxCalculator;
StiIstDetectorBuilder.cxx/h, StiIstHitLoader.cxx - modified to to make perfect hits in IST work for UPGR02 geometry using VMC geometry in HitLoader and DetectorBuilder;
StiHpdDetectorBuilder.cxx/h, StiHpdDetectorGroup.cxx/h, StiHpdHitLoader.cxx/h, StiHpdIsActiveFunctor.cxx/h - added new files for HPD;
IstGeomParams.txt - removed;
StiIstDetectorBuilder.cxx - cleanup dependencies from Sti droped classes;
- StPixelFastSimMaker
StPixelFastSimMaker.cxx - added Hpd fast simulation code ;
- StiRnD
new code for tracking upgrades ;
Ist/StiIstDetectorBuilder.cxx/h, StiIstHitLoader.cxx - modified to improve hits;
StiIstDetectorBuilder.cxx - removed reference to droped Sti/Base/Messenger.h class;
- StiSsd
StiSsdDetectorBuilder.cxx/h, StiSsdDetectorGroup.cxx - modified to use Normal represantation, remove StiDedxCalculator;
StiSsdDetectorBuilder.cxx - cleanup dependencies from Sti droped classes ; added handling in case that SVTT mother volume is missing:
- StiSvt
StiSvtDetectorBuilder.cxx/h, StiSvtDetectorGroup.cxx, StiSvtHitLoader.cxx/h - modified to use Normal represantation, removed StiDedxCalculator;
StiIsSvtActiveFunctor.cxx/h, StiSvtLayerLadder.h - added new files;
StiSvtIsActiveFunctor.cxx/h - removed;
StiSvtDetectorBuilder.cxx - cleanup dependencies from Sti droped classes ;
- Sti/Star
StiStarDetectorGroup.cxx - removed StiDedxCalculator ; taken out Central represantation;
StiStarDetectorBuilder.cxx/h - cleanup useless classes ;
- StiTpc
StiTpcDetectorBuilder.cxx, StiTpcDetectorGroup.cxx - modified to use Normal represantation, removed StiDedxCalculator;
StiTpcDetectorView.h - removed ;
StiTpcHitLoader.cxx/h - cleanup dependencies from Sti useless classes ;- St_geant_Maker
St_geant_Maker.cxx - added readout of hits for two R&D detectors: GEM and HPD; mode initialization after open input fz-file;
- St_tcl_Maker
St_tcl_Maker.cxx - modified to fill StEvent directly if it exists; removed direct filling of StEvent;- pams/geometry
hpdtgeo/hpdtgeo.g - geometry for new pixel detector added; corrected the angular offset;
added a small safety margin on Rin, used 'ONLY' option to keep hits;
geometry/geometry.g - new geometry tag UPGR04 added for ongoing detectors development;
geometry/geometry.g - added steering geometry with tag UPGR05, which includes the HFT (former pixel), HPD, IST and SSD, but no SVT, GEM detectors are also excluded ; geometry tag Y2005E has been created which is an improvement over Y2005D (more precise SSD) bigger SVT shield (to accomodate the SSD) and a full barrel calorimeter;
added UPGR07 geometry tag;
switched to a correct version of ISTB in the tag UPGR05;
added steering for the TUP support structure;
optionally changed the radius of the FSTD (to better fit with the rest of TUP;
modified to use a more precise version of SSD code in UPGR05;
itspgeo/itspgeo.g - added a new crucial subsystem, which is the support structure for the tracking upgrade configurations;
pixlgeo/pixlgeo3.g - added an updated version of the HFT geometry;
modified to increase opening angle of the sector;
modified to decrease the radius of the "active" part of the detector;
employed the 'ONLY' version to insure we don't lose hits in case there is intersection with other volumes
istbgeo/istbgeo1.g - added an updated version of the IST geometry;
istbgeo/istbgeo2.g - replaced the redundant IBMZ volume with a copy of IBMY created with appropriately adjusted parameters;
added a structure to propagate versioning info to g2t_volume;
pipegeo/pipegeo.g - removed the pipe and svt shields that are unnecessary in the R&D "upgr0X" geometries;
igtdgeo/igtdgeo.g - fixed density;
added 'MANY' option to ensure correct material taken into account when working with the new support structure;
sisdgeo/sisdgeo4.g - support structure was protruding out of the mother volume;
Add "ONLY" option, to not lose hits in possible clash with the periphery of the FST;
fstdgeo/fstdgeo.g - added the 'MANY' option to the positioning (necessary due to overlaps in the upgrade geometries) and made the mother volume visible;
- pams/sim
idl/g2t_track.idl, g2t_hpd_hit.idl - added idl for HPD detector;
g2t/g2t_hpd.idl, g2t_hpd.F - modified interface for the HPD;
g2t/g2t_volume_id.g - added a clause for HPD; implemented a temporary solution for the IST volume numbering, to be used in conjunction with istbgeo2.g;- StarDb
ftpc/ftpcTrackingPars.C - modified to move the reconstruction parameters maxDcaVertex,minNumTracks from code to CodeParams; reduced maxDcaVertex from 100 to 2 to eliminate pileup;
VmcGeometry/Detectors.upgr03.root, Detectors.upgr04.root, Detectors.upgr05.root, Geometry.upgr03.C, Geometry.upgr04.C, Geometry.upgr05.C, geom.upgr03.root, geom.upgr04.root, geom.upgr05.root, upgr03.h, upgr04.h upgr05.h -added new files for upgrade detector geometres: upgr03, upgr04 and upgr05; number of old files modified ;
VmcGeometry/Detectors.y2005e.root, Geometry.y2005e.C, geom.y2005e.root, y2005e.h, y2005e.rz - added new files for y2005e geometry;
Calibrations/svt/svtRDOstripped.C, svtRDOstripped.y2005d.C, svtRDOstripped.y2006.C - added default svtRDOstripped;
tpc/daq/mezz_vs_fee.root, offset_vs_fee.root, pad_vs_fee.root, rdo_vs_fee.root, row_vs_fee.root - removed files;
RunLog/MagFactor.XXXXXXXX.XXXXXX.C - removed all MagFactors, they were moved to MySQL;
- StDb/idl
ftpcTrackingPars.idl - modified to move the reconstruction parameters maxDcaVertex,minNumTracks from code to CodeParams;
svtRDOs.idl, svtRDOstripped.idl - added new files to handle SVT Slow Control parameters;
mezz_vs_fee.idl, offset_vs_fee.idl, pad_vs_fee.idl, rdo_vs_fee.idl, row_vs_fee.idl, tpcPressure.idl - removed files; -
Sep 22, 2006
new library SL06e has been created, tagged with tag SL06e (Sep 6) build, tested, found bugs fixed and librray was released on September 22.Main features:
- EMC addition info (BPRS hits) saved in MuDST
- vertex finder PPV tuned for pile-up of 2006 run
- implemented new maker StBeamBackMaker for the beam background tracking
- short forward tracks pointing to EEMC (with >= 5 fitted points) saved in StiStEventFiller and MuDst
- modifications in StTriggerData and StTriggerDataCollection introduced an additional data member the run number. For detailes looks at the email
- L2Result included in MuDst
- several codes have been retiredNext codes have been updated:
- StAnalysisMaker
summarizeEvent.cc - added Event Id, correct Ftpc bad hit ; added print out Beam background trackes and short track pointing to EEMC;
- StBbcSimulationMaker
StBbcSimulationMaker.cxx - replaced Assert => R__ASSERT for ROOT 5.12;
- StBFChain
StBFChain.cxx/h - modified to allow instantiation multiple StBFChain's with different modes (used in Embedding chain);
BigFullChain.h - added 'useInTracker' switch from EGR to Sti global tracks in StAssociationMaker;
added new option for beam background tracking;
added option useInTracker to switch from EGR to STI track in StAssociationMaker;
- StBeamBackMaker
Track.cc/hh, StBeamBackMaker.cxx/h, Line.cc/hh, TopologyMap.cc/hh - imlpemented new code for beam background tracking;
- St_base
StObject.cxx - replaced Assert==>assert for ROOT 5.12;
- StChain
StMaker.cxx - replaced Assert => R__ASSERT for ROOT 5.12;
- StDaqClfMaker
StDaqClfMaker.cxx/h, fcfClass.cxx/hh, padfinder.h, rtsSystems.h - removed;
- StDbBroker
StDbWrappedMessenger.cc - fixed delete to delete allocated array;
- StDbLib
MysqlDb.cc - corrected const char / char inconsistancy with the vectors for standalone version ;
MysqlDb.cc/h, StDbManagerImpl.cc/hh, StDbServerImpl.hh - updated load balancer - removing hard-coded nodes from API to xml;
- StDetectorDbMaker
StDetectorDbMaker.cxx - modified ;
StDetectorDbFTPCVoltageStatus.cxx/h - created new files for FTPC voltage status from database;
- StEvent
StL0Trigger.cxx - removed runnumbers cut ;
StDcaGeometry.h - cleaned up ;
StEnumerations.h - added kHpdId;
StDetectorDefinitions.h - added kHpdIdentifier;
StTriggerData2003.cxx/h,tTriggerData2004.cxx/h, StTriggerData2005.cxx/h, StTriggerData.cxx/h - added new data member mRun ; added access method to L2 results;
StTriggerDetectorCollection.cxx/h, StZdcTriggerDetector.cxx/h - removed argument runnumber in constructor;
- StEventMaker
StTriggerDetectorCollection constructor changed and L2 interface in StTriggerData ;
- StDbUtilities
StMagUtilities.cxx/h - fixed TMatrix to make it typedef as TMatrixT to be consistent with ROOT 5.12;
- StEEmcDbMaker
cstruc/eemcConstDB.hh - new stat bit added;
- StEventDisplayMaker
StEventDisplayMaker.cxx - replaced Assert==>assert for ROOT 5.12;
- StEventDstMaker
StEventDstMaker.cxx - replaced Assert==>assert for ROOT 5.12;
- StEventUtilities
StuProbabilityPidAlgorithm.h - ROOT5 corrections;
- StEEmcSimulatorMaker
StMuEEmcSimuMaker.cxx/h - cleanup;
- StEEmcUtil
EEmcMC/EEmcMCData.cxx - replaced Assert==>assert for ROOT 5.12;
- StEmcTriggerMaker
StBemcTrigger.cxx, StEmcTriggerMaker.cxx - replaced cout statements with logger macros ;
- StEmcRawMaker
StEmcRawMaker.cxx - modified to clear EmcRawData for event ID%555!=0 to reduce footprint of StEvent, for B+E-EMC; Only events w/ ID%555==0 will be saved in StEvent for monitoring purpose;
StBemcRaw.cxx - modified to save all preshower hits for 2006 productions; modified don't throw away CAP==127||128 PRS and SMD hits this year
modified to save hits from other CAPs using control table;
- StFlowMaker
StFlowConstants.cxx/h, StFlowEvent.cxx, StFlowEvent.cxx/h - modififed to calculate v1 for selection=2 with mixed harmonics;
StFlowCutEvent.cxx, StFlowMaker.cxx - changed the dynamic_cast of GetInputDS("MuDst") to a const cast;
- StFlowAnalysisMaker
StFlowLeeYangZerosMaker.cxx/h, doFlowSumAll.C, doFlowSumFirstPass.C, minBias.C, plotCen.C, plotLYZ.C - modififed to calculate v1 for selection=2 with mixed harmonics;
- StFtpcClusterMaker
StFtpcClusterMaker.cxx - modified to set StDetectorState for Ftpc West/East depending on ftpcVoltageStatus; modified to return with kStWarn if error occurs accessing Calibrations_ftpc/ftpcVoltageStatus; StDetectorState is set only for events with FTPC data;
- StFtpcDriftMapMaker
StFtpcDriftMapMaker.cxx/h - modified to add deltaAr argument to allow user to change gas compostion;
macros/FtpcDriftMapMaker.C - modified to add deltaAr argument to allow user to change gas compostion;
- StGenericVertexMaker
StiPPVertex - BemcHitList.cxx, EemcHitList.cxx, ScintHitList.cxx, StPPVertexFinder.cxx, TrackData.cxx - cleanup for production;
macros/rdMuDst2print.C, rdSt2print.C - acces to multiple vertices in muDst corrected ;
- StMiniMcEvent
StTinyMcTrack.h - added parent key data member to StTinyMcTrack;
StTinyRcTrack.h - added reco key data member to StTinyRcTrack ;
StMiniMcMaker.cxx - added code to fill in parent key and reco key data members to StMiniMcMaker. Parent key for MC tracks is only filled when track has a valid parent();
StMiniEmbed.C StMiniHijing.C - loaded EEmcUtil, needed by StMcEvent;
- StMuDSTMaker
COMMON/StMuFilter.cxx - modified to accept short tracks pointing to EEMC ;
COMMON/StMuEvent.cxx/h - modified to include L2Result in MuDst ;
EZTREE/StTriggerDataMother.cxx - modified to pass run number when unpacking triger data;
- StPass0CalibMaker
StEvtVtxSeedMaker.cxx/h, StMuDstVtxSeedMaker.cxx/h, StVertexSeedMaker.cxx/h - added more detailed info in ntuple;
StSpaceChargeEbyEMaker.cxx/h - fixed averaging procedure ;
StVertexSeedMaker.cxx - added 2006 pp62 triggers;
- StarClassLibrary
StHelix.hh - added direction vector at given pathlength;
- StarRoot
THelixTrack.cxx, TMemStat.cxx, TTreeIter.cxx - replaced Assert => R__ASSERT;
TMemStat.cxx - replaced Assert==>assert for ROOT 5.12;
THelixTrack.h - StiEmx() added ;
TTreeIter.cxx - replaced Assert==>assert for ROOT 5.12;
TAttr.cxx/h - added new class to keep attributes. Moved from StMaker;
TNumDeriv.cxx/h - added numeric derivatives;
- StTreeMaker
StTreeMaker.cxx - replaced Assert==>assert for ROOT 5.12;
- StUtilities
StMultiH1F.h - additional Rebin() interface implemented for TH1.h vers. 1.79, ROOT 5.13;
- StTriggerDataMaker
StTriggerDataMaker.cxx - added run number to CTB trigger mapping.- Sti
Base/StiFactory.h - throw for too many instances;
StiHit.cxx - added more strict tests for hit quality;
StiHitErrorCalculator.h/cxx - removed the mess in xy and z errs;
StiPlacement.cxx - bug fixed;
StiKalmanTrackFinder.cxx - modified to allow single Ssd hit for tracking;
StiTrackFinderFilter.cxx - reduced minimum no. of fitted point to 5;
StTrack.h/cxx - added track flag definitions from EGR ; removed checking of StPhysicalHelixD quality for Beam Background tracks
- StiMaker
StiDefaultToolkit.cxx - set max NHits=2000000;
StiMaker.cxx/h - modified to return from Make() for too many hits;
StiStEventFiller.cxx/h - move filling of StTrackDetectorInfo into fillTrack; make cut for EEMC pointing track based on StTrackDetectorInfo instead of StTrackFitTraits;
StiStEventFiller.cxx/h - modified to accept short tracks pointing to EEMC;
- StiSsd
StiSsdDetectorBuilder.cxx/h - added loading of tracking and hit error parameters from DB;
- StiPixel
StiIstDetectorBuilder.cxx - modified to grab Ist parameters from $STAR/StRoot/IstGeomParams.txt; hard code in number for IST location in StiIstDetectorBuilder.cxx to allow for running production on grid;
StiIstHitLoader.cxx - tweaked StiIstHitLoader to use only 3 hits from IST for tracking;- pams/geometry
svttgeo/svttgeo7.g - modified to capture the last version of the "Distorted" SVT geometry used in our alignment studies;
igtdgeo/igtdgeo.g - modified ;
- pams/sim
idl/g2t_igt_hit.idl - added CVS tags;
idl/g2t_gem_hit.idl - added standard stub for the GEM barrel detector;
idl/g2t_track.idl - included the gem barrel detector;
g2t/g2t_ist.F, g2t_igt.F - added CVS tags;
g2t/g2t_igt.idl - added CVS tags;
g2t/g2t_gem.idl - requisite stub for the GEM detector interface;
g2t/g2t_gem.F - added the hits handler for the gem barrel;- StDb/idl
ftpcVoltageStatus.idl - added for FTPC Voltage Status;- StarVMC
StarVMCApplication/StarMCHits.cxx StarVMCApplication.cxx/h - added include for TFile.h and Debug flag ;
geant3/gdraw - removed number of files;
geant3/TGeant3/TGeant3.cxx/h, TGeant3TGeo.cxx/h, geant3LinkDef.h - modified;
geant3/TGeant3/G3Material.cxx/h, G3Medium.cxx/h, G3Node.cxx/h, G3Volume.cxx/h, G3toRoot.cxx/h, THIGZ.cxx/h, TPaveTree.cxx/h, rdummies.F - removed files;
geant3/gbase/gbhsta.F gfhsta.F gtrig.F - modified;- Retired codes:
xdf2root;
St_xdfin_Maker.cxx/h ;
pams/sim/gstar/gstar_readxdf.c, gstar_readxdf.idl; -
July 28 , 2006
library SL06d has been updated with codes below, retagged with tag SL06d_2 rebuild, tested and released to run ppProductionJPsi dataset;Next codes have been updated:
- StMuDSTMaker
COMMON/StMuDstMaker.cxx - reset the current vertex index to 0 for every event;
COMMON/StMuTrack.cxx/h - removed previous patches to MuDst ;
- StDbUtilities
StMagUtilities.h/cxx - added code to update the ShortedRing tables every time the DB changes;
- StTpcDb
StTpcdEdxCorrection.cxx - activated cut on drift distance; -
July 1 , 2006
library SL06d has been updated with codes below to fix the problem found during production, retagged with tag SL06d_1 rebuild, tested and released.Next codes have been updated:
- StGenericVertexMaker
Minuit/StMinuitVertexFinder.cxx - fixed sign of gDCA->impact() ;
- StDbUtilities
StMagUtilities.cxx/h - added new PredictSpaceCharge() function so that it includes fit errors in the prediction. It is now capable of including the SSD and SVT hits in the predictor/corrector loop;
- StMuDSTMaker
COMMON/StMuChainMaker.cxx - minor changes to prevent reading all files during initialisation;
COMMON/StMuTrack.cxx/h - modified 2D dca (DcaD), Z dca (DcaZ) and their cov. matrix as corresponing sigma and correlaton coef. from dcaGeometry to StMuTrack ( this is a quick patches, should be modified later in permanent solution)
- Sti
StiKalmanTrackFinder.cxx - modified to allow single SSD hit on track;
StiTrackNode.cxx - set minimal errors to accept 1mu errors of simulation vertex;
- StiSsd
StiSsdDetectorBuilder.cxx/h - modified to load tracking and hit error parameters from DB;
- StarRoot
THelixTrack.cxx/h - added DcaXY & DcaZ with the errors; cos(dip)**4 added to Dca(...) to account z err in the nearest point ; -
June 20, 2006
new library SL06d has been created, tagged with tag SL06d build, tested and released on June 20.Main features:
- improved primary vertex finding procedure using real track parameters errors (caused by multiple scattering, energy loss etc.) and dca track parameters for primary vertex fit;Next codes have been updated:
- StAssociationMaker
StAssociationMaker.cxx - checking for null StEvent pointer has been lost and moved back;
- StDaqLib
TRG/L2gammaResult2006.h, L2jetResults2006.h, L2pedResults2006.h - inline functions implemented in L2*.h ;
- StDbLib
MysqlDb.cc/h - added basic load balancing; added an extra machine (db01) for analysis between 11pm and 7am;
- St_db_Maker
St_db_Maker.cxx - modified to set default fMaxEntryTime='now';
- StChain
StChain.cxx - Db fields modification for logger usage ;
- StEvent
StDcaGeometry.cxx/h - initial revision;
StGlobalTrack.cxx/h - added track-at-DCA geometry;
- StEventUtilities
StEventHelper.cxx - changed counting of indexes for StMatrix from 1;
- StGenericVertexMaker
StFixedVertexFinder.cxx/h - added SetVertexPosition function;
StiPPVertex/StPPVertexFinder.cxx - accounting of DCA node added;
Minuit/StMinuitVertexFinder.cxx/h - modified to use dca track parameters for primary vertex fit;
- StMiniMcMaker
StMiniMcMaker.cxx - modified;
StMiniMcHelper.cxx/h - added to replace Helper.cxx/h to comply with STAR coding standards;
Helper.cxx/h - removed;
- StPass0CalibMaker
StSpaceChargeEbyEMaker.cxx/h - bug fixed: gapd and gapf backwards;
- StSecondaryVertexMaker
StV0FinderMaker.cxx - fixed chisq flagging so chisq set for SVT even when sti and v02 flags are used;
- St_QA_Maker
TpcHitUtilities.cxx/h, TpcMapUtilities.cxx - changed MapKey to MapQAKey to make it unique for QA;
- StarRoot
TPolinom.cxx/h - new classes TPolinom & TPoliFitter added;
THelixTrack.cxx/h - THelixFitter and error handling added; double Dca(double x,double y,double *dcaErr=0) added;- Sti
StiHit.cxx/h, StiKalmanTrack.cxx, StiKalmanTrackFinder.cxx, StiKalmanTrackFitter.cxx, StiKalmanTrackNode.cxx/h, StiLinkDef.h, StiToolkit.h StiTrackNode.cxx/h, StiTrackNodeHelper.cxx/h - modified to use dca track parameters for primary vertex fit;
StiDummyVertexFinder.cxx/h, StiResidualCalculator.cxx/h, StiResiduals.h - removed;
StiHit.cxx/h - method setError(float*) added;
StiKalmanTrackFinder.cxx - supress 1st svt hit solution;
- StiMaker
StiDefaultToolkit.cxx/h, StiMaker.cxx/h, StiStEventFiller.cxx/h - added dca track parameters;
StiMaker.cxx - set minimal errors of vertex 1 micron;
StiStEventFiller.cxx - FillStHitErr method added and called;
- StiSvt
StiSvtDetectorBuilder.cxx/h - removed SVT ladder mother volume;
- StiSsd
StiSsdDetectorBuilder.cxx - removed SSD ladder mother volume;- StStarLogger
MySQLAppender.cxx - removed DEALYED clause to handle 'Too many Sql connection problem'; increased the default buffer size;
mysql/StarJobs.csh - added shell scipt to access STAR job tracking from the batch;
mysql/NetLogger.xml - removed DEALYED clause to handle 'Too many Sql connection problem'; increased the default buffer size;- pams/geometry
geometry/geometry.g - removed the PIX1 tag; added the SISD_OFF flag that facilitates creation of test geometries in which both the SVT and the SSD are taken out;- StarDb/Calibrations
tracker/ssdHitError.20050101.000021.C, svtHitError.20050101.000006.C - added to set hit resolution: Svt 80 mkm (both drift and anode), Ssd 30 mkm (X) and 700 mkm (Z) for calibrated data; -
May 19, 2006
new library SL06c has been created, tagged with tag SL06c on May 18, build, tested and released on May 19.Main features:
- library containes last code fixes and updates as well as final tunning of tracking parameters and corrections to process with TPC+SVT+SSD reconstruction;
- modification for L2 and expansion for L3 triggers;Next codes have been updated:
- StAnalysisMaker
summarizeEvent.cc - reshaped the logger job tracking Db tables and add a few LOQ_QA message to record it with the Job tracking Db;
fixed the MySQLAppender problem (logger related) and re-shape the trakDb messages;
- St_base
StTree.cxx - modified that AccessPathName calls a rootd auth with xrootd syntax; fixed the side effect for non-root non-rootd local files
- StBFChain
BigFullChain.h, StBFChain.cxx - added VFFV and regrouped options; added VFMCE for extractng vertex from McEvent;
added options SpcChgCalG, VtxSeedCalG for data 2006 calibrations;
added proper dependence to EEFS for consistency;
added options KeepTpcHit and KeepSvtHit for StHitFilterMaker to keep TPC(SVT) hits in event.root ;
- StChain
StMaker.cxx - modified for UPGR03 geometry;
StChain.cxx - reshaped the logger job tracking Db tables and add a few LOQ_QA message to record it with the Job tracking Db;
fixed the MySQLAppender problem (logger related) and re-shape the trakDb messages;
- StDbLib
MysqlDb.cc - added assert for no db connection;
- StDbUtilities
StSvtCoordinateTransform.cc - modified to handle SVT drift velocity hack corrections; added missing implementation for setParamPointers;
St_svtCorrectionC.cxx/h - added to handle SVT drift velocity hack corrections; added condition that Npar < 0 means dead hybrid;
- StDetectorDbMaker
StDetectorDbTriggerID.cxx/h - added in access to L3Expanded and dsmPrescales; added in a new interface to get the total prescale applied to trigger ids;
- StEvent
StEnumerations.h - added StL2TriggerResultType; added enum;
StTriggerData2005.cxx/h - modified to handle L2 results data;
StTriggerId.h - extended mMaxTriggerIds to 42;
StTriggerData.h - added isL2Triggered();
StTriggerIdCollection.cxx/h - added L3 trigger expansion;
- StEventMaker
StEventMaker.cxx - added L3 expansion ;
- StEstMaker
StEstTracking.cxx - added protection if mProjOut.hit[k] is not set;
- StFlowMaker
StFlowMaker.cxx - fixed memory leak;
- StGenericVertexMaker
StppLMVVertexFinder.cxx - replace gufld() with mBfield = event->runInfo()->magneticField(); blocked the fake second primary vertex;
StGenericVertexMaker.cxx/h - modified to adjust for the new code of fixed position vertex finder ; modified for McEvent vertex implementation;
StFixedVertexFinder.cxx/h - new files added as initial version of fixed position vertex finder and option in maker to switch it on; modified for McEvent vertex implementation; changed VertexId to new enum;
StCtbUtility.cxx, StGenericVertexFinder.cxx, StGenericVertexMaker.cxx, StppLMVVertexFinder.cxx - added switches to logger;
Minuit/StMinuitVertexFinder.cxx/h - added protection against event->emcCollection()==0; added switches to logger;
StiPPVertex/BemcHitList.cxx, CtbHitList.cxx, EemcHitList.cxx, StPPVertexFinder.cxx - added switches to logger;
- StHitFilterMaker
StHitFilterMaker.cxx - modified to use options KeepTpcHit and KeepSvtHit to keep TPC(SVT) hits in event.root ;
- StMuDSTMaker/COMMON
StMuTriggerIdCollection.cxx/h - modified to add extra L3 information ;
- StPass0CalibMaker
StVertexSeedMaker.cxx - added 2006 triggers; added ppProductionTrans trigger for year 2006 data;
- StSsdPointMaker
StSsdBarrel.cc - added local coordinate to StEvent;
- StSsdClusterMaker
StScmBarrel.cc, StSsdPackage.hh, StSsdWafer.hh - modified to add local coordinates;
StSsdPoint.cc/hh, StSsdPointList.cc/hh - removed ;
- StSvtClusterMaker
StSvtAnalysedHybridClusters.hh, StSvtHitMaker.cxx - modified to fillin StSvtHits directly into StEvent, added local coordinates, modified to handle drift velocity hack corrections;
- StStarLogger
MySQLAppender.cxx/h - fixed the MySQLAppender problem and re-shape the trakDb messages; reshaped job tracking; added extra proptection against of the broken connections;
mysql/CreateJobTable.sql - reshaped job tracking;
mysql/ShowSomething.sql- pams/geometry
igtdgeo/igtdgeo.g - first revision of of the forward GEM disks;
geometry/geometry.g - new R&D tag, UPGR03, implemeted to properly manage the configuration of an alternative tracking upgrade project;- StStarLogger/mysql
CreateJobTable.sql, NetLogger.xml, RecreatedJobTable.sql - reshaped the logger job tracking Db tables and add a few LOQ_QA message to record it with the Job tracking Db;- StarDb/Geometry
svt/LadderOnShell.C, ShellOnGlobal.C, WaferOnLadder.C, LadderOnSurvey.C - modified ;
svt/LadderOnShell.20050101.000043.C - added z-shifts from data ;
svt/ShellOnGlobal.20050101.000042.C - added for final alignment with using last 4 mm of drift distance (2.5-2.9 cm) ;
svt/LadderOnShell.20050101.000063.C,LadderOnShell.20050101.000065.C, svtWafersPosition.20050101.000100.C - added final geometry for SVT review;
ssd/SsdLaddersOnSectors.C, SsdWafersOnLadders.C - modified;
ssd/SsdLaddersOnSectors.20050101.000047.C, SsdSectorsOnGlobal.20050101.000041.C - added final (as 04/30/06) position ;
ssd/SsdLaddersOnSectors.20050101.000055.C, ssdWafersPosition.20050101.000055.C - added fibal geometry for SSD for review ;
- StarDb/Calibrations
svt/svtDriftCorrection.C - added hack for drift velocity correction ;
svt/Hybrids.h, svtDriftCorrection.20050101.000049.C - added;
svt/svtDriftCorrection.20050101.000101.C - final SVT drift corrections;
tracker/ssdHitError.20050101.000021.C, svtHitError.20050101.000006.C - set hit resolution: Svt 80 mkm (both drift and anode), Ssd 30 mkm (X) and 700 mkm (Z) for calibrated data;
- StDb
idl/dsmPrescales.idl, trigL3Expanded.idl - implemented new tables for l3expanded trigger mapping ;
idl/svtCorrection.idl - added structure of svt corrections; -
April 27, 2007
SL06b has been updated with MC fixed vertex finder code and related codes to process with embedding production.
Library was retagged with SL06b_1 tag.Next codes have been updated:
- StBFChain
StBFChain.cxx/h, BigFullChain.h;
- StEvent
StEnumerations.h ;
- StGenericVertexMaker
StGenericVertexMaker.cxx;
StFixedVertexFinder.cxx/h ;
- StiMaker
StiMaker.cxx ; -
May 5, 2006
new library SL06b has been created, tagged with tag SL06b on May 1, build, tested and released on May 5.Main features:
- first release of tracking code (in ITTF framework) which refits primary tracks with vertex and uses Smoother method
mathematical model of Kalman was redeveloped, to take into account information (values/errors) from the previous iteration which was critical for refit method.
Standard Kalman algorithm does not allow to do it and as result refit in standard Kalman isn't possible
More detailes regarding new Kalman algorithm and code development could be found in the the email
- first release of muliple vertices finding code for heavy ion collisions with pile-up affect based on Minuit fitting
The algorithm details and evaluation plots can be found on the Web page
- new code for R&D IST detector introduced and released (StiPixel & StPixelFastSimulator);Next codes have been updated:
- St_base
StTree.cxx - modified to allow rootd:://file
- StBFChain
StBFChain.cxx, BigFullChain.h - new StiMaker interface added; scaler based calibration option added;
added flags PixelIT (and IstIT) to activate IST detector; added pixFastSim key for StPixelFastSimMaker;
removed dependence in StiUtilities, added 2006 chains;
switched to VFPPVnoCTB (was VFPPLMV5 as a start);
added new options 'fdbg' and 'flaser' for FTPC calibration maker;
added options for StiPulls, ForceGeometry, to run for ToF in TPC simulation; remove sfs option as redundant (srs), more options for McAna ;
- StChain
StChain.cxx - added tracking information from the STAR chain related to Logger work;
- StDaqLib
EMC/Makefile - added for compiling StEmcDecoder as a standalone .so library;
EMC/StEmcDecoder.cxx/h - added JetPatch decoding;
TRG/L2gammaResult2006.h, L2jetResults2006.h, L2pedResults2006.h - added L2 Result Structs;
- StDAQMaker
StDAQMaker.cxx - redundant delete removed
- StDbLib
MysqlDb.cc/hh - memory leak fixed
- StChain
StMaker.h/cxx - PrintAttr() method added
- St_db_Maker
St_db_Maker.cxx - test for memory curruption added
decrease level of aliases 2==>1 to avoid name clashes ;
- StEvent
StZdcTriggerDetector.cxx - fixed important bug in constructor. mAdc[3] and mAdc[7] were wrong;
StEnumerations.h - changed kMaxId -> kMaxDetectorId; added StPrimaryVertexOrder;
StEvent.cxx/h - added new RnD detectors collection; modified addPrimaryVertex(); new 2nd arg: StPrimaryVertexOrder;
StHit.h - modified mId short ==> int; made detector() virtual method ;
StHits.cxx - changed order of initializer in constructor;
StSvtHit.cxx/h - added data member and methods to deal with local positions ;
StSsdHit.cxx/h - added data member and methods to deal with local positions ;
StRnDHitCollection.cxx/h, StRnDHit.cxx - hit collection for R&D of new detectors added;
StContainers.cxx/h, StDetectorDefinitions.h, StEnumerations.h, StEventClusteringHints.cxx - added new R&D detector containers;
StEventLinkDef.h - added operator for StRnDHit for new R&D detectors;
StEventTypes.h - added R&D hits and collection;
StEnumerations.h - added ppvNoCtbVertexFinder to clarify analysis; added StL2AlgorithmId enumeration;
StTriggerData.h, StTriggerData2005.cxx, StTriggerData2005.h - added interface to L2 results;
StTriggerData2003.cxx, StTriggerData2004.cxx, StTriggerData2005.cxx - fixed bug in zdcUnAttenuated;
- StEventMaker
StEventMaker.cxx - simplified logic if StEvent already exists
- StEventUtilities
StEventHelper.cxx/h - iterators StHitIter & StSvtHitIter added; new methodes added to StEvent helper classes;
- StEmcUtil
database/StEmcDbHandler.cxx/h - added setMaxEntryTime and setFlavor methods;
- StEpcMaker
StEpcConstants.h, StPointCollection.cxx - bug fixed which crashed chain;
- StGenericVertexMaker
StGenericVertexMaker.cxx/h - CTB matching ON/OFF switch activated by m_Mode 0x8 or 0x10; vertex enum extension depending on CTB usage - hack in the moment; BTOW calibration changed for 2006+ from maxt eT of ~27 --> 60 GeV;
StGenericVertexFinder.cxx/h - added member for debuglevel; mVertexOrderMethod added;
Minuit/StMinuitVertexFinder.cxx - updated for multiple vertex finding and rank calculation for identifying the triggered vertex;mVertexOrderMethod added;
added protection for bemcDet==0; initialized variable mRequireCTB;
StiPPVertex/StPPVertexFinder.cxx/h - modified to use ppvNoCtbVertexFinder; mVertexOrderMethod added;
- StFlowAnalysisMaker
StFlowLeeYangZerosMaker.cxx/h - first version of the LeeYangZerosMaker implemented;
plotLYZ.C - added macro for plotting LeeYangZeros graphs;
StFlowLeeYangZerosMaker.cxx/h - modified to write out the Generating Functions after the first pass;
doFlowSumFirstPass.C - macro added to sum the Generating Functions between the two passes;
doFlowSumAll.C, doFlowSumAll.csh - macro and shell script added to sum the outputs of the second pass;
- StFlowMaker
StFlowMaker.cxx/h - modified new TFile ==> TFile::Open; modified for MuDst; stopped using eventSummary();
StFlowConstants.cxx/h - made additions needed for the StFlowLeeYangZerosMaker;
StFlowCutEvent.cxx/h - made additions needed for MuDst;
- StFtpcCalibMaker
StFtpcCalibMaker.cxx/h, StFtpcLaser.cc/hh, StFtpcLaserCalib.cc/hh, StFtpcLaserTrafo.cc/hh - added new calibration maker for FTPC;
macros - new macros added for FTPC calibration maker;
- StFtpcClusterMaker
StFtpcClusterMaker.cxx - all database initialization moved to InitRun; modified to save microsecondsPerTimebin and temperature/pressure corrections in DEBUGFILE run tree;
StFtpcDbReader.cc/hh, StFtpcParamReader.cc/hh - added constructor for StFtpcCalibMaker ;
StFtpcClusterDebug.hh - modified to save microsecondsPerTimebin, deltatapW/E in Run tree ;
StFtpcClusterFinder.cc/hh, StFtpcClusterMaker.cxx, StFtpcClustersStructures.hh - cluster struct definitions moved to StFtpcClustersStructures.hh; DEBUGFILE created with bfc option 'fdbg';
- StFtpcSlowSimMaker
StFtpcSlowSimMaker.cxx - all database initialization moved to InitRun;
- StFtpcTrackMaker
StFtpcTrackMaker.cxx - made changes necessary for DoT0Calib;
- StMuDSTMaker/COMMON
StMuDst.cxx, StMuDstFilterMaker.cxx, StMuTrack.h - modified to no longer rely on track keys for matching global and primary tracks
StMuDstFilterMaker.cxx - introduced check before copying primary vertex for backwards compatibility
macros/exampleMuDstFilter.C - added filter->Finish() to ensure writing of output file;
StMuPrimaryVertex.h/cxx - added members and getters for mean-dip and chisquared value;
StMuDstMaker.cxx/h - added overloaded version for StIOInterface::GetFile() to return name of current input or output file;
- StRTSClient/FCFMaker
FCFMaker.cxx - fixed case when no hit coming from g2t_tpc_hit table in simu mode;
- StStarLogger
MySQLAppender.cxx - add the DELAYED MySql queery option;
mysql/NetLogger.xml - add the DELAYED MySql queery option;
- StPass0CalibMaker
StSpaceChargeEbyEMaker.cxx/h - modified, EndCrashFix; added calibration mode;
- StPixelFastSimMaker
StPixelFastSimMaker.cxx/h - new code for Ist fast simulation added; removed streaming of each Pixel hit; set proper Detector Id;
- StPmdReadMaker
StPmdReadMaker.cxx/h - modified EndCrashFix;
- StPmdClusterMaker
StPmdClusterMaker.cxx - fill StEvent; mod-1 fixed for CPV;
- StPmdReadMaker
StPmdReadMaker.cxx - remove deletion of pmdCollection, it is deleted in Clear();
- StarClassLibrary
StLorentzVector.hh, StMatrix.hh, StThreeVector.hh, StarClassLibraryLinkDef.hh - addes missing methods to Cint dictionary;
- StarRoot
StarRootLinkDef.h - classes related to TAssign commented out;
THelixTrack.cxx/h - class TCircle to handle circles added; TCircle linear case improved; modified to do TCircle::Fit with errors; accuracy fixed;
- StTagsMaker
StTagsMaker.cxx - modified to remove new TClass(name.Data(),1,StEvtHddr.h,StEvtHddr.h), needed to cleans up all ROOT internal pointer;
- St_QA_Maker
QAhlist_EventQA_qa_shift.h - modified for FTPC: PtrkGood and PtrkPsi hists out, GtrkPadTime in;
- StTpcDb
StTpcDbMaker.cxx - set simu flag for tpcISTimeOffsets and tpcOSTimeOffsets tables ;
- StSvtSelfMaker
StSelfEvent.cxx/h, StSvtSelfMaker.cxx/h, StVertexKFit.cxx/h - Svt self alignment maker added;
- StTrsMaker
StTrsMaker.cxx - modified to merge 3 random generator to 1;
src/StTrsChargeSegment.cc, StTrsParameterizedAnalogSignalGenerator.cc, StTrsWireHistogram.cc - modified to merge 3 random generator to 1;
include/StTrsParameterizedAnalogSignalGenerator.hh - modified to merge 3 random generator to 1;
include/StTrsRandom.hh - added;- Sti
StiCompositeFinder.cxx - findTrack(double rMin=0) argument added
StiDebug.cxx/.h - moved to StiUtilities
StiKTNIterator.h/cxx - global mgEnd moved from .h into .cxx
StiKalmanTrack.cxx/h - new refit implemented; modified to require track id must < 2*16; modified to account errors; Interface to getGlobalDca changed; StiOldRefit env added; modifications allow primary tracks to loose few nodes; StiConfidence flag added;
corrected zero field min curvature - 1/1km;
StiKalmanTrackFinder.cxx/h - findTrack,extendSeeds,extendTracks arguments to rMin added; made default rMin=0; Redundant refit() call removed; DMAX3d increased 3=>4;
StiKalmanTrackFitter.cxx/h - modified to requer more than 3 nodes at the end of fit();
StiKalmanTrackFitterParameters.h/cxx - _maxChi2Vtx member added
StiKalmanTrackNode.cxx/h - assert replaced by print; dependency from StiKalmanTrackNode removed; getGlobalHitErrors added;
StiTrackFinderFilter.cxx - Z limit 205 removed;
StiHit.cxx - assert replaced by print; modification related to rotation;
StiMapUtilities.cxx - - assert replaced by print
StiLocalTrackSeedFinder.cxx/h - rMin added; min radius 60cm removed;
StiMapUtilities.cxx - modified to mark only fitted hits as used
StiToolkit.cxx/h - constructor added and modified to fill _instance automatically
StiTrack.h - changed private ==> protected; interface to getGlobalDca changed;
StiTrack.cxx - mId increment moved to StiKalamanTrack::reset()
StiTrackContainer.cxx - sort by number of fit points added
StiTrackFinder.h - rMin and combinatoric flag off/on added
StiTrackNode.cxx/h - classes StiNodePars,StiNode2Pars,StiNodeErrs,StiNodeMtx added; Z limit 205 removed; class StiHitErrs moved in; curv ==> pt changed; corrected zero field min curvature - 1/1km;
StiTrackNodeHelper.cxx/h - modified for refit; Chi2 evaluation improved; assert removed; curv ==> pt changed; StiOldJoinPrim env added;
Two error factors added; primary tracks fitting logic refined;
StiHitErrorCalculator.cxx/h - StiDebug.h moved into; dependency from StiKalmanTrackNode removed;
StiLocalTrackSeedFinder.cxx/h - make default rMin=0; seed fit replaced by StiKalmanTrack::approx;
StiResidualCalculator.cxx - dependency from StiKalmanTrackNode removed;
StiTrackingPlots.cxx - getGlobalDca ==> getDca changed;
- StiMaker
StiDefaultToolkit.cxx - last traces of StiMaker and associated maker removed
StiMaker.cxx/h - control is changed using StMaker::SetAttr; sub makerFunctionality added; IST code added; added kHftId and kIstId for StiDetector groups;
option useFakeVertex added;
StiMakerLinkDef.h - removed traces of StiMakerParameters;
StiStEventFiller.h - StiAux* mAux added;
StiStEventFiller.cxx - bug fixed, use vertex instead of first hit in refit; changed setGlobalDca==>setDca; changed kMaxId -> kMaxDetecto rId;
- StiPixel
StiIstDetectorBuilder.cxx/h, StiIstDetectorGroup.cxx/h, StiIstHitLoader.cxx/h, StiIstIsActiveFunctor.cxx/h - added new codes for IST detector ;
StiIstDetectorBuilder.cxx, StiIstHitLoader.cxx, StiPixelHitLoader.cxx - Tweaked to handle hit propagation via StRnDHitCollection;
StiIstDetectorBuilder.cxx - added fixes for the E-loss calculator and for the setKey methods;
StiPixelHitLoader.cxx - removed streaming of all read pixel hits;
StiPixelDetectorBuilder.cxx - added calls to StiDetector::setKey(key,val);
IstGeomParams.txt - added geometry parameters for IST;
StiPixelDetectorBuilder.cxx - set Detector Id to kHftId, corrected Ist*pars -> Pixel*pars;
- StiUtilities
StiDebug.h/cxx - StiDebug moved into from Sti;- pams/geometry
tpcegeo/tpcegeo2.g - fixed an error in the in the array initialization part;
geometry/geometry.g - introduced the baseline year 2006 geometry;
created UPGR01 and UPGR02 geometries which are basically year 2006 + SSD+HFT and year 2006+IST+HFT.
Note that NONE of engineering detail is available in either case, and less so for the integration structural elements.
added steering for the muon trigger system, "mutd";
specified a complete barrel calorimeter for Y2006;
added steering for the corrected SSD (sisdgeo3);
added steering for a small modifications in the SVT shield in Y2006 ;
cavegeo/cavegeo.g - modified to expand the radius of the "CAVE" to accomodate teh mupn trigger system;
quadgeo/quadgeo.g - updates for the quad model;
svttgeo/svttgeo5.g - improved the "no svt" version of the SVT geometry;
svttgeo/svttgeo6.g - added new version of the shielding geometry which only differs by the outer radius of 31.8 ;
shldgeo/shldgeo.g - small changes in the beam shield geometry;
sisdgeo/sisdgeo3.g - improved version for year 2005 geometry;
mutdgeo/mutdgeo.g - first version for an existing prototype of the Muon trigger system; added necessary elements to get same sensitive volumes as in TOFp trays;- StarDb/Calibrations
tracker/KalmanTrackFinderParameters.20010311.000000.C - modified to change maxChi2Vertex 30 ==> 900
tracker/KalmanTrackFitterParameters.20010312.000002.C - maxChi2(10==>30),maxChi2Vtx=100 added
tracker/svtHitError.20010312.000010.C - set 200 microns
- StarDb/Geometry/ssd
ssdWafersPosition.20050101.000000.C, ssdWafersPosition.20050101.000001.C, ssdWafersPosition.20050101.000002.C - added new files;
ssdWafersPosition.20041202.000000.C, ssdWafersPosition.20041202.000001.C, ssdWafersPosition.20041202.000002.C - removed files;
timestamp moved from 20041202 to 20050101 for ssdWafersPosition tables in order to comply with Svt and simulation ;
- StDb/idl
KalmanTrackFitterParameters.idl - maxChi2Vtx member added -
February 27, 2006
new library SL06a has been created, tagged with tag SL06a, build, tested and released on March 1.Main features:
library was build on the base of SL05h library which was checked out in the new area, updated with important bug fixes for EMC, SSD & FTPC codes and adjusted StJetMaker to provide stable environment for analysis work.Next codes have been updated:
- StDbBroker
StDbBroker.cxx - modified to grab rowsize from St_db_maker and passing it on to StDbTableDescriptor
StDbWrappedMessenger.cc - made message length dynamic
DbUse.cxx - cleaned up
- StDaqLib
EMC/EMC_BarrelReader.cxx, EMC_Reader.cxx, EMC_SmdReader.cxx, - modified;
EMC/StEmcDecoder.cxx/h - modified to fixed tower map bug;
EMC/TowerBug2004.txt, TowerBug2005.txt, TowerBug2006.txt - new files added ;
- StEmcADCtoEMaker
StBemcData.cxx/h, StEmcADCtoEMaker.cxx/h - modified to fix tower map bug and astyle run;
- StEmcCalibrationMaker
StEmcCalibMaker.cxx,StEmcEqualMaker.cxx,StEmcMipMaker.cxx
- StEmcSimulatorMaker
StEmcSimulatorMaker.cxx - small modification in the way the calibration spread/offset is created;
- StEmcRawMaker
StBemcRaw.cxx/h, StEemcRaw.cxx/h StEmcRawMaker.cxx/h - modified to fix tower map bug and astyle run;
- StEvent
StSsdHit.cxx - modified to fix decoding of hardware info
- StFtpcDriftMapMaker
macros/FtpcDriftMapMaker.C - macro to run StFtpcDriftMapMakerZ
StFtpcDriftMapMaker.cxx - modified to exit if error occurs while constructing StFtpcDbReader
- StFtpcClusterMaker
StFtpcDbReader.hh/cc - simplified StFtpcDbReader; modified the way if no RHIC clock frequency value available, set mMicrosecondsPerTimebin to dimensionsTable->sizeOfTimebin for DbV options earlier than 20051021 otherwise use electronicsTable->uSecondsPerTimebin as the default value for mMicrosecondsPerTimebin
StFtpcClusterMaker.cxx - modified to check if StFtpcDbRead not constructed exit with kStWarn; modified to calculate mMicrosecondsPerTimebin from RHIC clock frequency for each event;
- StFtpcSlowSimMaker
StFtpcSlowSimMaker.cxx - modified to check if StFtpcDbRead not constructed exit with kStWarn; modified to calculate mMicrosecondsPerTimebin from RHIC clock frequency for each event;
- StSsdClusterMaker
StScmBarrel.cc/hh, StScmPoint.cc/hh, StScmWafer.cc - modified to properly encode Cluster Size and Mean strip into the hardware information for the SSDHit;
StScmWafer.cc, St_scf_Maker.cxx, St_scm_Maker.cxx - modified to DeclareNtuple only if m_Mode != 0;
- StSsdDaqMaker
StSsdDaqMaker.cxx - small modification
- StSsdEvalMaker
St_sce_Maker.cxx - protections versus division by 0 added;
- StSsdPointMaker
StSsdPointMaker.cxx - modified to read ssdStripCalib table from the mysql db; ReadStrip method updated;
StSsdBarrel.cc - ReadNoiseFromTable method modified to ignore rows with id=0; improved hw position encoding in writePointToContainer matching the new decoding in StEvent
- StSsdUtil
StSsdEnumerations.hh - Mack/Upack helper class added- StJetMaker
StFourPMakers/StBET4pMaker.cxx/h - modified to handle tower swap in StBemcTables
macros/RunJetFinder2.C - modified to handle tower swap in StBemcTables
StJetSimuUtil/macros/RunJetSimuFinder.C - modified to handle tower swap in StBemcTables- StarDb/Geometry
ssd/SsdBarrelOnGlobal.C, ssdWafersPosition.20041202.000000.C, SsdLaddersOnSectors.C, SsdSectorsOnBarrel.C, SsdWafersOnGlobal.C, SsdWafersOnLadders.C - added for alignment work and Ssd wafer position -
January 25, 2006
library SL05h has been updated with the next codes to proceed with pp200 pythia MC production with ITTF + PPV codes:
- StBFChain
BigFullChain.h - changed order of loading of EMC code;
- StGenericVertexMaker
StiPPVertex/StPPVertexFinder.cxx - small fixes for MC events;
StMinuitVertexFinder.cxx - fixed noninitialized variable;
Updated codes have been retagged with SL05h tag. -
December 9, 2005
new library SL05h has been tagged on Dec 6 with tag SL05h, build, tested and released on December 9.Main features:
Linux was upgraded with SL 3.0.5 version and codes were adjusted;
first release of production version of SSD reconstuction code (for simultion and raw data) integrated to ITTF software.Next codes have been updated:
- asps/Simulation/starsim
atgeant/agdocba.age - modified to increase the size of the ASCII budder "NN" from 20 to 40 to void overflow- StAssociationMaker
StAssociationMaker.cxx/h, StMcParameterDB.cxx/h, StTrackPairInfo.cc/hh - Ssd added to Associator, added IdTruth options for Svt and Ssd
- StBFChain
BigFullChain.h - modified to move ssd makers before Sti
- StChain
StMaker.cxx/h - add more Simu time stamps reflecting new SVT;
- StDaqClfMaker
StDaqClfMaker.cxx - standard StEvent handling
- StDbLib
StDbSql.cc - bug fixed
- StEvent
StL0Trigger.cxx/h - run number range updated for run5
- StFtpcClusterMaker
StFtpcClusterMaker.h/cxx, StFtpcDbReader.hh - modified to calculate microsecondsPerTimebin from RHIC ClockFrequency; if RHIC ClockFrequency = 0, use default value from database
StFtpcClusterFinder.cc - deleted pradius,pdeflection before error exits to avoid memory leaks
- StFtpcTrackMaker
StFtpcTrackToStEvent.cc/hh - bug fixed for incorrect setting of track keys
- StFtpcSlowSimMaker
StFtpcSlowSimReadout.cc - removed +twopi in call to WhichPad when calculating pad_min; bug fixed
- StFpdMaker
StFpdMaker.cxx - created StEvent added to data
- StMcAnalysisMaker
StMcAnalysisMaker.cxx/h - added NTuple for svt and ssd hits
- StMuDSTMaker/COMMON
StMuDstMaker.cxx - fixed initialisation problem of mCurrentFile, leading to potential segvio when creating MuDst
- StPmdDiscriminatorMaker
StPmdDiscriminatorMaker.cxx - fixed bug caused crash due to mismatch in length of pmdclust and phmdclust
- StSsdClusterMaker
St_scm_Maker.cxx/h - fixed bug
StScfBarrel.cc/hh, StScfCluster.cc/hh, StScmBarrel.cc/hh, St_scf_Maker.cxx/h, St_scm_Maker.cxx/h - modified to use id_mctrack for setIdTruth
- StSsdSimulationMaker
StSpaBarrel.cc/hh, StSpaStrip.cc/hh, St_spa_Maker.cxx - modified to use id_mctrack for setIdTruth
- StSvtClusterMaker
StSvtAnalysedHybridClusters.cc - modified to use IdTruth instead of id_mchit
- StSvtSimulationMaker
StSvtSimulationMaker.cxx - changes for improving PASA shift added; make PASA shift 200 microns
- StarRoot
TMemStat.cxx - invoking PS removed, /proc/... is used instead
- St_geant_Maker
St_geant_Maker.cxx/h - modified to set DateTime from fz-file if it was not set before; added default kinematics if there is no input files;- Sti
StiVMCToolKit.h - SsdInChain set as Default- pams/geometry
phmdgeo/phmdgeo.g - reorganized the code in order to make it VMC compatible
svttgeo/svttgeo6.g - added updated version with the more precise "butterfly" shape of the actual sensitive area; change orientation of the non-sensitive trapezoids by 90 to account for the way the wafer is positioned in the assembly
geometry/geometry.g - added logic for calling the latest svttgeo6; added Y2003C, Y2004D and Y2005D to take advantage of this new SVT geometry file; added same to DEV2005 for development purposes; added a few parameters to the "low_em" setting to better simulate soft EM processes;
- pams/gen
herwig/hwigpr.f, plot.kumac - modified to read random seeds form the input file; renamed the common block variables; rewritten teh encoding
herwig/herwig.tcsh - added script that generates an input file for herwig, with random seeds
herwig/herwig.in - added random seeds;
herwig/herwig6507.f - changed names of kinematic variables to a more readable form
- pams/global
dst/dst_point_filler.F - transport IdTruth info from scs_spt to dst_point
- pams/sim
gstar/gstar_input.g - modified following the changed packaging of data on the Herwig site; modified handling of the event header data harvesting more info from the herwig ntuple;
g2t/g2t_ssd.F - modified
- pams/svt
idl/scf_cluster.idl, spa_strip.idl - modified to use id_mctrack
sce/ - removed all SSD codes
sls/ - removed all SSD codes
scm/ - removed all SSD codes
spa/ - removed all SSD codes
scf/ - removed all SSD codes- StDb/idl
ftpcElectronics.idl - added uSecondsPerTimebin
pmdSMCalib.idl, pmdCalibSummary.idl - added new pmd calibrations tables
- StarDb/svt
ssd/geom.C - added wafer global positions for simulations
ssd/ssdWafersPosition.C - realistic wafer global positions added
- StarDb/VmcGeometry
modified number of files; removed fz files; new files added: Detectors.y2003c.root, Detectors.y2004d.root, Detectors.y2005d.root, geom.y2003c.root, geom.y2004d.root, geom.y2005d.root, y2003c.h, y2004d.h, y2005d.h
Geometry.y2003c.C, Geometry.y2004d.C, Geometry.y2005d.C - added new geometry files -
October 14, 2005
new library SL05g has been build, tested and released on October 18.Main features:
first release of the library with Virtual Monte Carlo simulation codeNext codes have been updated:
- asps
Simulation/agetof/Conscript - modified;
Simulation/starsim/Conscript - modified to add FPP flag for non pgi version;
Simulation/starsim/comis/csallo.c - changed CERNLIB_QX_SC ==> CERNLIB_QXNO_SC;
Simulation/geant321/erdecks/gdedxcalc.F, mytrack.g - moved to erdecks, ertrak.F - modified to force loading of mytrack, gdedxcalc;
staf/sdd/Conscript - modified for SL4;
rexe/MAIN_rmain.cxx - remove extra
- StAnalysisMaker
summarizeEvent.cc - added information about ftpc tracks, adjust hit.flag cut to >3
- StAssociationMaker
StAssociationMaker.cxx - modified for persistent StMcEvent
EMC/StEmcAssociationMaker.cxx - modified for persistent StMcEvent
- StBFChain
BFC.h, BFC2.h, StBFChain.cxx/h - modified; BFC.C, BFC2.C, BigFullChain.h - added new files to implement chain with VMC; merged BFC.h and BFC2.h into BigFullChain.h
StBFChain.cxx - activated Ssd for IT
StBFChain.cxx/h - modified to use simulation time stamps and geometries from list defined in StMaker.cxx
BigFullChain.h - added StMcEvent in/out option (minimc.root file)
- StBichsel
Bichsel.cxx, dEdxParameterization.cxx - cleanup
- StChain
StChain.cxx/h, StMaker.cxx/h - switched from fBits to fStatus for StMaker control bits
StMaker.cxx/h - added all used simulation time stamps and geometries
- StDbUtilities
StSvtCoordinateTransform.cc - cleanup
- StEEmcSimulatorMaker
StEEmcSlowMaker.cxx/h - tower peds now added if option is set
- StEvent
StEmcPoint.h - class version increased by 1;
- StEmcTriggerMaker
StBemcTrigger.cxx/h, StEmcTriggerMaker.cxx/h - new version to include a realistic reconstruction of the BEMC trigger from the raw or simulated data;
- StEEmcDbMaker
cstructs/eemcConstDB.hh - added copyCat fail bit
- StFlowAnalysisMaker
StFlowAnalysisMaker.cxx, plot.C, plotCen.C - changed plot style
- StDbBroker
StDbBroker.h - replace UInt_t to Int_t for m_runNumber to avoid problem with undefined run number
- StDbLib
StDbTable.cc,StDbModifier.cxx, StDbTable.h, StDbTableDescriptor.cc/h,StTableDescriptorI.h - updated to correct padding issue for pacted tables
- StdEdxMaker
StSvtdEdxMaker.cxx - protection of 1/0 added
- StDetectorDbMaker
StDetectorDbMakerLinkDef.h, PACKAGE - added new files, dictionaries
- St_db_Maker
St_db_Maker.cxx - switched from fBits to fStatus for StMaker control bits; account replacing of UInt_t by Int_t for m_runNumber; added protection for validity date < 19950101
- St_dst_Maker
St_dst_Maker.cxx - protection against division by 0 added
- St_geant_Maker
St_geant_Maker.cxx/h - modified for VMC; added set date/time from fz-file;
- StGenericVertexMaker
StGenericVertexMaker.cxx - modified to check if theFinder exists
StMinuitVertexFinder.cxx - more strict cut for failed vertex added
StiPPVertex/StPPVertexFinder.cxx/h, VertexData.cxx - modified declaration
- StMagF
StMagFMaker.cxx/h - modified to switch to StarMagField
PACKAGE - added
- StMcEvent
modified a number of files to make StMcEvent persistent
- StMcAnalysisMaker
StMcAnalysisMaker.cxx - changed access to StMcEvent to use GetDataSet to be consistent with persistent StMcEvent
- StMcEventMaker
StMcEventMaker.cxx/h - modified to be consistent with persistent StMcEvent
- StMiniMcMaker
StMiniMcMaker.cxx - modified to be consistent with persistent StMcEvent
- StMixerMaker
StMixerMaker.cxx/h - IdTruth added
removed files: StMixerEmbedding.cc/hh, StMixerFastDigitalSignalGenerator.cc/hh
- StMuDSTMaker/COMMON
StMuDstMaker.cxx, StMuChainMaker.cxx - TChain modified to automatically skip of corrupted files
- StSsdPointMaker
StSsdPointMaker.cxx/h - added a method to the point maker to check which ssdStripCalib is picked up
- StTpcEvalMaker
StTpcEvalMaker.cxx - modified to be consistent with persistent StMcEvent
- StTrsMaker
StTrsMaker.cxx/h - bug fixed, IdTruth added
include/StTrsAnalogSignal.hh StTrsAnalogSignalGenerator.hh StTrsDigitalSector.hh StTrsDigitalSignalGenerator.hh StTrsFastDigitalSignalGenerator.hh StTrsOldDigitalSignalGenerator.hh StTrsRawDataEvent.hh StTrsSector.hh StTrsZeroSuppressedReader.hh - bug fixed, IdTruth added
src/StTrsAnalogSignal.cc, StTrsDetectorReader.cc, StTrsDigitalSector.cc, StTrsFastDigitalSignalGenerator.cc, StTrsOldDigitalSignalGenerator.cc, StTrsParameterizedAnalogSignalGenerator.cc, StTrsSector.cc, StTrsZeroSuppressedReader.cc - bug fixed, IdTruth added
StTrsSector.cc - adjust to ICC
- StRichPIDMaker
StRichPIDMaker.cxx - modified to be consistent with persistent StMcEvent
- StStrangeMuDstMaker
StStrangeMuDstMaker.cxx - new method for StMcEvent access added
- St_QA_Maker
StEventQAMaker.cxx - new method for StMcEvent access added
- St_tpcdaq_Maker
St_tpcdaq_Maker.cxx/h - IdTruth added
- StarClassLibrary
StMCTruth.h - method size() added
StLorentzVector.cc/hh,StMatrix.cc/hh,StParticleDefinition.hh, StParticleTable.hh, StThreeVector.cc/hh,StarClassLibraryLinkDef.hh - modified to make StLorentzVector persistent
StHelix.cc - pathLength to plane now finds nearest approach to intersection regardless of # of loops
- StarMagField
StarMagField.cxx - modified to adjust agufld function to comis, fixed B[0] = B[1] = 0 at r = 0
- StarRoot
TRArray.cxx/h, TRMatrix.h, TRSymMatrix.h, TRVector.h - changed operator () to be == []- Sti
StiLinkDef.h, PACKAGE - added dictionary
StiKalmanTrackNode.h - added protection for Zero field
StiDetectorBuilder.cxx - checking of centerOrientation added
StiHit.cxx/h, StiLocalTrackSeedFinder.cxx/h - removed StiHit error scale
StiMasterDetectorBuilder.cxx - added clone of VMC geometry before averaging
StiVMCToolKit.cxx - adjusted for extended volume name
StiCompositeLeafIterator.h, StiDedxCalculator.h - cleanup
- StiMaker
PACKAGE, StiMakerLinkDef.h - added dictionary
StiMaker.cxx/h - modified to be consistent with persistent StMcEvent
MiniChain.cxx/h - removed
StiDefaultToolkit.cxx - cleanup- pams/geometry
shldgeo/shldgeo.g - shielding geometry, Separated magnets into a separate branch, quadgeo;
cavegeo/cavegeo.g - modified for shielding study;
geometry/geometry.g - modified for shielding studies, added separate config variables for the Quad section, added options 'SVTT_OFF' & SVTT_ON' to switch SVT detector off/on simulation;
create a key that enables the user to lower the electromagnetic processes GEANT cut to 10 keV, from the KUMAC script without the need to recompile;
quadgeo/quadgeo.g - new code for the description of the upstream beam magnets;
svttgeo/svttgeo5.g - a new, stripped down version of the SVT that only includes the support cones but no central barrel, needed for the detector development and material balance studies
phmdgeo/phmdgeo.g - modified to reorganize the code in order to make it VMC compatible
- pams/sim
gstar/gstar_input.g - adjusted foe event characterization info from Herwig
- pams/global
egr/gdedxcalc.F mytrack.g - removed;
helix.F - modified to use subroutine resetNlevel instead direct access to common block;
- pams/gen
herwig/heptup.f, herwig.in, herwig6507.f, herwig6507.inc, herwig6507_tupl.mk, hwigpr.f - added new event generator;- StarVMC
new VMC code, containes next modules: StarVMCApplication,StVMCMaker, StVmcTools, g2Root, geant3,minicern,pgf77;- StarDb/svt/ssd
ssdStripCalib.root - default table with the latest format
- StarDb/VmcGeometry
modified number of files, added new files to add new geometries and expand volume name with generic one -
April 23, 2007
library SL05f has been updated with next codes, retagged with tag SL05f_3 and used to run embedding production with MC fixed vertex.- StAssociationMaker
StAssociationMaker.cxx
- StBFChain
StBFChain.cxx, Bfc.idl, BFC2.h;
- StiMaker
StiMaker.cxx/h, StiDefaultToolkit.cxx;
- StJetMaker
StJetHist/StJetHistMaker.cxx/h;
StPythia/StPythiaFourPMaker.cxx;
StJetSimuUtil/StJetSimuWeightMaker.cxx ;
- StMcAnalysisMaker
StMcAnalysisMaker.cxx;
- StMcEvent
- StMcEventMaker
StMcEventMaker.cxx/h ;
- StMiniMcMaker
StMiniMcMaker.cxx;
- St_QA_Maker
StEventQAMaker.cxx ;
- StRichPIDMaker
StRichPIDMaker.cxx;
- StStrangeMuDstMaker
StStrangeMuDstMaker.cxx;
- StTpcEvalMaker
StTpcEvalMaker.cxx; -
April 9, 2007
library SL05f has been updated with codes below and retagged with tag SL05f_2. Update are needed to process with embedding production with MC fixed vertex.- StGenericVertexMaker
StFixedVertexFinder.cxx/h;
- StEvent
StEnumerations.h;
- StBFChain
StBFChain.cxx, Bfc.idl, BFC2.h; -
August 25, 2005
library SL05f has been updated with next codes:- StMuDSTMaker
COMMON/StMuTrack.cxx,StMuPrimaryVertex.h/cxx,StMuIOMaker.cxx,StMuEvent.cxx/h,StMuDstMaker.cxx,StMuDst.cxx/h,StMuTypes.hh,StMuTrack.h - further updates for multiple vertices
- StEvent
StEnumerations.h - kMaxId == max number of detectors+1 modified
- StEmcUtil/projection
StEmcPosition.cxx/h - added projection based on StPhysicalHelixD
- StEEmcDbMaker
StEEmcDbMaker.cxx/h - modified to allow to mask fibers based on event content
- StEmcRawMaker
StEemcRaw.cxx - modified to drop only crates which are off instead of the whole event
- StPeCMaker
StPeCEvent.cxx - TClone to TObj fixes
- StJetMaker
StJets.cxx - TClonesArray to TObjArray safe change
StFourPMakers/StBET4pMaker.cxx - TClonesArray to TObjArray
- StFlowMaker
StFlowMaker.h - changes to be in compliance with recent changes in the MuDsts
- StHbtMaker
Infrastructure/StHbtEvent.cc
- StEventUtilities
StuRefMult.hh, StuFtpcRefMult.hh - changes related to multiple vertices MuDst modifications
- StSsdPointMaker
StSsdBarrel.cc,StSsdPointMaker.h/cxx
- StSecondaryVertexMaker
StKinkMaker.h/cxx - Crop() function introduce to flag the kinks with parents that share same daughter- Sti
StiKalmanTrack.cxx/h - getAllPointCount(...) added
StiTrackNode.cxx/h - static mgFlag and isFitted() added
StiKalmanTrackFinder.cxx - modified to remove track improving during fit to vertex
StiMapUtilities.cxx - removed reusing bad hits
- StiMaker
StiStEventFiller.cxx/h - PoinCount cleanup- StDb/idl
spaceChargeCor.idl, ssdStripCalib.idl
- StarDb/Calibrations
tracker/kinkTrackingParameters.20011201.000100.C,kinkTrackingParameters.20050324.150000.C - kink tracking parametersUpdated code codes have been retagged as SL05f_1
-
August 18, 2005
new library SL05f has been build, tested and released on August 18. Library has tag SL05f_1 .Main features:
- new ROOT version 4.04.02, supposed to provide proper schema evolution and allow to use templated versions of StThreeVector, StMatrix, StHelix and StPhysicalHelix;
- code modifications to adjust to the new ROOT version;
- new multiple primary vertices finder code implemented to process events with pile up effect;
- further improvement of ITTF code, multiple primary vertices support added;
- MuDst structure reshaped to provide support for multiple primary vertices;Next codes have been updated:
- asps/Simulation/starsim
Conscript, deccc/idisp.c - added flag WithoutPGI to get free_ and malloc_ without PGI;
atmain/gdebug.age - removed;
- StAnalysisMaker
summarizeEvent.cc - added summary of quality & protection for absence of svtHitCollection, agjusted for multiple primary vertices;
- StAssociationMaker
StAssociationMaker.cxx - modified to associate geant tracks id with hits ;
- StBFChain
BFC2.h, StBFChain.cxx - modified to add VFPPV option - multiple primary vertices finder code switching;
- StDbUtilities
StDbUtilitiesLinkDef.h, StGlobalCoordinate.hh, StSectorAligner.h, StSvtCoordinateTransform.cc, StTpcCoordinateTransform.cc/hh - modified to add TpcCoordinate transformation classes to dictionary and to use templated StThreeVector;
PACKAGE - added ;
- StEvent
StEnumerations.h - added StVertexFinderId enum;
StEmcPoint.cxx/h - removed clash with IdTruth;
StHit.cxx/h - modified;
StSvtHit.cxx/h - cleanup;
StTrack.cxx, StTrackDetectorInfo.cxx, StTrackGeometry.h - StThreeVectorD.hh includes added ;
- StEventUtilities
StEventHelper.cxx/h - modified use templated version of StPhysicalHelixD; modified to associate geant tracks id with hits ;
- StdEdxMaker
StdEdxMaker.h - modified use templated version of StThreeVectorD;
PACKAGE - added ;
- StdEdxY2Maker
StdEdxY2Maker.cxx/h, StdEdxY2MakerLinkDef.h - modified;
PACKAGE, dEdxTrackY2.cxx - added;
dEdxTrack.cxx/h - removed ;
- StEmcADCtoEMaker
StEmcADCtoEMaker.cxx/h - added corruption check flag ;
- StEEmcDbMaker
StEEmcDbMaker.cxx/h - updated for embedding;
- StEEmcSimulatorMaker
StEEmcFastMaker.cxx/h - updated for embedding;
- StEEmcUtil
EEmcGeom/EEmcGeomSimple.h - more get methods;
- StFlowMaker
StFlowMaker.h, StFlowPicoEvent.cxx - modified to use templated version of StThreeVectorF and StPhysicalHelixD;
PACKAGE - added;
- StFtpcTrackMaker
StFtpcTrackToStEvent.hh, StFtpcTrackingParams.hh - modified to use templated version of StThreeVectorF and StPhysicalHelixD;
PACKAGE - added;
- StGenericVertexMaker
StiPPVertex - new multiple primary vertex finder code;
BemcHitList.cxx/h, CtbHitList.cxx/h, EemcHitList.cxx/h, ScintHitList.cxx/h, StPPVertexFinder.cxx/h, TrackData.cxx/h, VertexData.cxx/h - new files added for multiple primary vertex finding;
StGenericVertexFinder.cxx/h, StMinuitVertexFinder.cxx/h, StppLMVVertexFinder.cxx/h - modified for multiple primary vertices support;
- StMiniMcMaker
StMiniMcMaker.h - modified to use templated StThreeVectorF;
- StMcAnalysisMaker
StMcAnalysisMaker.cxx - multiple primary vertices support;
- StMcEvent
StMcContainers.hh, StMcEvent.cc/hh, StMcEventTypes.hh, StMcTrack.cc/hh - modified to provide support for IGT detector;
StMcIgtHit.cc/hh, StMcIgtHitCollection.cc/hh, StMcIgtLayerHitCollection.cc/hh - added to provide support for IGT detector;
StMcPixelHitCollection.cc - removed old ifdef, now all classes are persistent;
StMcHitComparisons.hh - modified to replace StThreeVector.hh -> StThreeVectorF.hh;
StMcCtbHit.hh, StMcFgtHit.hh, StMcFstHit.hh, StMcFtpcHit.hh, StMcHitComparisons.hh, StMcIstHit.hh, StMcPixelHit.hh, StMcRichHit.hh, StMcSsdHit.hh, StMcTofHit.hh, StMcTpcHit.hh - removed forward declaration of StThreeVectorF, use #include, and only in StMcHit base class;
StMcFgtHit.cc/hh,StMcFstHit.cc/hh,StMcIgtHit.hh, StMcIstHit.cc/hh - default constructor modified, including base class StMcHit constructor;
- StMcEventMaker
StMcEventMaker.cxx/h - added code for filling of IGT classes ;
- StMuDSTMaker/COMMON
StMuDst.h, StMuTrack.h - modified to use template version of StPhysicalHelixD ;
StMuPrimaryVertex.cxx/h - new files added to support multiple primary vertices;
StMuTrack.cxx/h, StMuArrays.cxx/h, StMuDst.h, StMuDstMaker.cxx/h - modified to calculate tracks DCA with respect to the first vertex in the list (highest rank), but another vertex number can be specified;
StMuTrack.cxx - changed dca calculation: no longer scan period of helix to get DCA;
- StMiniMcMaker
dominatrackInfo.cc - multiple primary vertices support;
- StSecondaryVertexMaker
StXiFinderMaker.cxx - modified;
- StRTSClient
FCF/fcfAfterburner.cxx - modified to associate geant tracks id with hits ;
FCFMaker/FCFMaker.cxx - modified to associate geant tracks id with hits ;
- StSsdDaqMaker
StSsdDaqMaker.cxx/h - modified to fill pedestal histos ;
- StSsdClusterMaker
StScfBarrel.cc/hh, StScfCluster.cc/hh, StScfListCluster.cc/hh, StScfWafer.cc/hh, StSsdBarrel.cc/hh, StSsdWafer.cc St_scf_Maker.cxx/h, St_scm_Maker.cxx/h,St_ssd_Maker.cxx - modified ;
- StSsdPointMaker
StSsdBarrel.cc, StSsdPointMaker.cxx - makeSsdPedestalHistograms() method eliminated, modified to prevent crashes if ssdStripCalib is missing;
- StSsdDbMaker
St_SsdDb_Reader.cc - information from the ssdDimensions table added;
- StarMagField
StarMagField.h, StarMagFieldLinkDef.h, StarMagField.cxx - the version of STAR magnetic field extracted from StDbUtilities/StMagUtilities to be used in Simulation and Reconstruction instead of agufld;
- StStrangeMuDstMaker
StXiMuDst.hh - modified to use templated StPhysicalHelixD; changed class version to avoid ROOT bug;
- StarClassLibrary
StHelix.cc/hh, StHelixD.hh, StLorentzVector.hh, StLorentzVectorD.hh, StLorentzVectorF.hh, StMatrix.hh, StMatrixD.hh, StMatrixF.hh, StPhysicalHelix.cc/hh, StPhysicalHelixD.hh, StThreeVector.hh, StThreeVectorD.hh, StThreeVectorF.hh, StarClassLibraryLinkDef.hh - modified to agjust to new ROOT version;
StLorentzVector.cc, StMatrix.cc, StThreeVector.cc - new files added;
StHelixD.cc, StLorentzVectorD.cc, StLorentzVectorF.cc, StMatrixD.cc, StMatrixF.cc, StPhysicalHelixD.cc, StThreeVectorD.cc, StThreeVectorF.cc - removed files;
StMCTruth.cxx/h - added to associate geant tracks id with hits;
- StSecondaryVertexMaker
StKinkMaker.h - modified to use templated StPhysicalHelixD;
- StSvtClassLibrary
StSvtGeometry.cc, StSvtHybridData.cc/hh, StSvtHybridPixelsD.cc/hh - modified to associate geant tracks id with hits ;
- StSvtClusterMaker
StSvtAnalysedHybridClusters.cc/hh, StSvtAnalysis.cc/hh, StSvtClusterAnalysisMaker.cxx, StSvtClusterFinder.cc/hh, StSvtHitMaker.cxx - modified to associate geant tracks id with hits ;
StSvtClusterAnalysisMaker.cxx, StSvtClusterMaker.cxx/h - clear of collection added ;
- StSvtDaqMaker
StSvtHybridDaqData.cc - modified;
- StSvtSimulationMaker
StSvtElectronCloud.cc/hh, StSvtGeantHits.cc/hh, StSvtOnlineSeqAdjSimMaker.cxx StSvtSignal.cc/hh, StSvtSimulation.cc/hh, StSvtSimulationMaker.cxx/hh - modified to associate geant tracks id with hits ;
- StSvtSeqAdjMaker
StSvtSeqAdjMaker.cxx/h - modified;
- StTableUtilities
StTrackChair.h, St_dst_trackC.h - modified to use templated StHelixD;
- StTofUtil
tofPathLength.cc/hh modified to use templated StThreeVector;
StTofrGeometry.h - modified to use templated StThreeVector; hide typedefs IntVec, DoubleVec, PointVec and methods HelixCrossCellIds,HelixCross, projTrayVector from CINT;
StTofGeometry.h - modified to use templated StThreeVector and StPhysicalHelix;
- StTofpMatchMaker
StTofpMatchMaker.h - modified to use templated StThreeVectorD;
- StTofrMatchMaker
StTofrMatchMaker.h - modified to use template StThreeVectorD;
- StTpcDb
StTpcDb.cxx, StTpcDbLinkDef.h, StTpcdEdxCorrection.cxx/h, - replace dEdx_t=>dEdxY2_t;
- StTrsMaker
StTrsMaker.cxx/h, StTrsDigitalSector.hh, StTrsZeroSuppressedReader.cc/hh, StTrsDigitalSector.cc, StTrsFastDigitalSignalGenerator.cc,StTrsParameterizedAnalogSignalGenerator.cc - bug fixed;
- StPass0CalibMaker
StVertexSeedMaker.cxx/h, StMuDstVtxSeedMaker.cxx - modifications for pp, run2005, trigger ID & inheritance ;
StEvtVtxSeedMaker.cxx/h, StMuDstVtxSeedMaker.cxx/h - added new files to use StEvent for beamline constraint;
StSpaceChargeEbyEMaker.h - modified to use templated StPhysicalHelixD;- Sti
StiDummyVertexFinder.cxx/h, StiKalmanTrack.cxx/h, StiKalmanTrackFinder.cxx/h, StiStarVertexFinder.cxx/h, StiTrackFinder.cxx/h, StiTreeNode.cxx/h, StiVertexFinder.cxx/h - multiple primary vertices support;
StiKalmanTrackNode.cxx - modified;
StiKalmanTrackFinder.cxx - new logic for for muliple vertices implemented;
StiKalmanTrack.cxx/h - removeLastNode() added;
StiMcTrack.cxx/h, StiTrack.h - const added, refit added;
StiStarVertexFinder.cxx - set small but non zero errors for primary hits;
StiTrack.cxx - set track id < 32K ;
StiTrackContainer.cxx/h - sort() added;
StiTrackNode.h - getDet() renamed to getDeterm();
StiToolkit.h - IdTruth changes;
Base/Factory.cxx/h - added global memory counter;
- StiMaker
StiMaker.cxx - multiple primary vertices support, make 'clearmem' as default;
StiStEventFiller.cxx/h - multiple primary vertices support;
StiDefaultToolkit.cxx/h - changes related to association of geant tracks id with hits;
- StiSsd
StiSsdDetectorBuilder.cxx/h - DetectorBuilder updated with the correct methods from StSsdUtil;
- StiSvt
StiSvtDetectorBuilder.cxx, StiSvtHitLoader.cxx - cleanup;- St_db_Maker
St_db_Maker.cxx - SetFlavor/fDbBroker bug fixed;
StKinkMaker.h - modified to use templated StPhysicalHelixD;
StValiSet.cxx/h - added new files;
- St_dst_Maker.cxx
StMatchMaker.cxx, St_dst_Maker.cxx - setup stuff for flagging hits used in fit of tracks;
St_dst_Maker.cxx - array replaced by TArray ;
- St_geant_Maker
St_geant_Maker.cxx - included the newly developed Inner GEM tracker;
- St_QA_Maker
TpcHitUtilities.h -modified to use templated StThreeVectorD;- pams/geometry
gembgeo/gembgeo.g - added GEM barrel tracker code;
tpcegeo/tpcegeo.g, tpcegeo1.g - a diagnostics about the TPC gas density added;
pipegeo/pipegeo.g - added a thinner version of the already customized pipe for the pixel detector;
geometry/geometry.g - updates for pixel detector geometry; added config variables and steering for the GEM barrel tracker;
pixlgeo/pixlgeo2.g - added new version of the pixel detector geometry;
- pams/sim
idl/g2t_track.idl - new IGT hits included for the inner GEM based tracker;
idl/g2t_igt_hit.idl - added to declare IGT (inner GEM based tracker) hits;
g2t/g2t_igt.idl - added IGT hits for the GEM barrel;
g2t/g2t_volume_id.g - GEM barrel tracker added;
g2t/g2t_igt.F - IGT hits for the GEM barrel added;- StarDb
VmcGeometry - updated for recent geometry changes according to St_geant_Maker;
VmcGeometry/Detectors.ist1.root, Detectors.y2003a.root, Detectors.y2003b.root, Detectors.y2003x.root, Detectors.y2004.root, Detectors.y2004a.root, Detectors.y2004b.root, Detectors.y2004c.root, Detectors.y2004x.root, Detectors.y2004y.root, Detectors.y2005b.root, Detectors.y2005x.root, Detectors.year2000.root, Detectors.year2001.root, Detectors.year2002.root, Detectors.year2003.root, geom.ist1.root, geom.y2003a.root, geom.y2003b.root, geom.y2003x.root, geom.y2004.root, geom.y2004a.root, geom.y2004b.root, geom.y2004c.root, geom.y2004x.root, geom.y2004y.root, geom.y2005b.root, geom.y2005x.root, geom.year2000.root, geom.year2001.root, geom.year2002.root, geom.year2003.root, ist1.h, ist1.rz, y2003a.rz, y2003b.rz, y2003x.rz, y2004.rz, y2004a.rz, y2004b.rz, y2004c.rz, y2004x.rz, y2004y.h, y2004y.rz, y2005b.rz, y2005x.rz, year2000.rz, year2001.rz, year2002.rz, year2003.rz - added new files which includes modification from Maxim, added ist1 and y2004y geometries, added original rz-files, modified to change Tpc gas density;
VmcGeometry - updated number of files for recent geometry changes according to St_geant_Maker;
Geometry.ist1.C, Geometry.y2004y.C, Geometry.y2005.C, Geometry.y2005c.C, y2005.h, y2005.rz, y2005c.h, y2005c.rz, Detectors.y2005.root, geom.y2005.root - added new files; -
June 10, 2005,
new library SL05e has been build, tested and released on June 20. Library has tag SL05e .Main features:
- further development of ITTF code: new hit errors were fitted and implemented; hit pools modified to RMS=1 and made not depended on Z,DIP and Psi; Chi2 average made = 1, Prob(Chi2) made flat ;
- SSD code complete, ready for test production;
- new BEMC cluster finder and point maker code;
- geometry for year 2005 complete, year 2004 improved;Next codes have been updated:
- StBFChain
StBFChain.cxx - added Y2004y and RY2004y options
- StDbUtilities
StMagUtilities.cxx/h - added 3DGridLeak Distortion Correction and Utilities to support it
StMagUtilities.cxx - updated for the new version of TMatrix
- StEEmcUtil
EEmcMC/StEEmcMCEnum.h - first revision of code for MC data
EEmcMC/EEmcMCData.cxx/h - modified for for embedding, GEANT unpacker was split on 2 parts
- StEEmcSimulatorMaker
StEEmcFastMaker.cxx/h - modified
StEEmcSimulatorMaker.h/cxx - removed
- StEmcADCtoEMaker
StBemcData.cxx, StEmcADCtoEMaker.cxx - added calibrationType Reset for old productions
- StEmcMixerMaker
StEmcMixerMaker.cxx - small bug fixed when mixing SMD hits
- StEmcRawMaker
StBemcRaw.cxx - bug fixed
- StEventUtilities
TwistPatch.cxx/h - added new files for Twist correction
- StMcEvent
StMcEvent.cc/hh, StMcTrack.cc/hh - updated for EEMC, added eprs, esmdu, esdmv hits
- StMcEventMaker
StMcEventMaker.cxx/h - updated of EEMC filling for eprs, esmdu and esmdv hits
- StMuDSTMaker/COMMON
StMuDstFilterMaker.cxx/h - added some new features suggested by Alex Suiade: Emc data now supported (for SL04k and later MuDst),
flags added to switch Eemc and Bemc copying seperately (setDoBemc and setDoEemc)
global tracks are checked seperately; they were only copied if the corresponding primary fullfills the filter() criteria, now they are also copied if only the global track fullfills the criteria
StMuDstFilterMaker.cxx - modified to discard the whole event if StMuEvent does not pass the cut
StMuDst.cxx - bug fixed in StMuDst::fixTrackIndices(), now using the TClonesArray that are passed to the function, instead of the ones in StMuDst
StMuEmcTowerData.cxx/h - added copy constructor and clear fucntions for use in StMuDstFilterMaker
StMuEmcHit.cxx/h - changed argument type of copy cosntructor used in StMuDstFilterMaker
- StEpcMaker
StEpcConstants.h, StEpcCut.cxx/h, StEpcMaker.cxx/h, StPi0Candidate.cxx/h, StPointCollection.cxx/h - new Point maker code implemented
- StPreEclMaker
StClusterDisplay.cxx/h, StEmcPreCluster.cxx/h, StEmcPreClusterCollection.cxx/h, StPreEclMaker.cxx/h - modified for new cluster finder framework
EmcClusterAlgorithm.h, StEmcOldFinder.cxx/h, StEmcVirtualFinder.cxx/h - new files added for new cluster finder framework
- StSsdClusterMaker
StScfBarrel.cc/hh, StScfWafer.cc/hh, St_scf_Maker.cxx/h, St_scm_Maker.cxx/h, - modified to save SSD hits into StEvent
- StSsdDaqMaker
StSsdDaqMaker.cxx - condition if (pedestal>0) replaced by if (pedestal>=0)
- StSsdDbMaker
StSsdDbMaker.cxx - moved configuration Init()==>InitRun()
- StSsdPointMaker
StSsdPointMaker.cxx/h - modified to initrun and improve DB connection; added methods to fill the Tuple, added a histo for the pedestal and new name of the class : SsdPoint
- StPass0CalibMaker
StVertexSeedMaker.cxx/h, StEvtVtxSeedMaker.cxx/h,StMuDstVtxSeedMaker.cxx/h - introduction of new code to use MuDst for beamline constraint- Sti
StiDetectorGroup.h, StiDebug.cxx, StiMapUtilities.cxx, StiMaterial.cxx - cleaned up
StiHitErrorCalculator.cxx - Max & min errors changed to 1e-4,1
StiKalmanTrack.cxx/h - method refitL added
StiKalmanTrackFinder.cxx/h - chi2 selection sub branch of nodes modified
StiKalmanTrackNode.cxx/h - technical reorganization done
StiTrackNode.cxx/h - static method mult5 added
StiTrackNodeHelper.cxx/h - new code added
Base/Factory.h, StiFactory.h - fast delete added
Base/StiDefaultToolkit.cxx - modified to use fast delete
Base/Named.cxx/h, Parameter.cxx/h - modified
- pams/geometry
geometry/geometry.g - included the updated TPC backplane into the tag Y2004C along with FTRO ; improved geometry for year 2004 simulation run, tag Y2004Y implemented, Y2003X updated
btofgeo/btofgeo2.g, btofgeo3.g, btofgeo4.g - modified: removed unneeded Dens=0.282 statements from honeycomb Material definitions
btofgeo/btofgeo4.g - updated geometry for run 2005- StarDb/Calibrations/tracker
svtHitError.20010312.000010.C - added 200microns SVT errors
svtTrackingParameters.20010312.000010.C, tpcTrackingParameters.20010312.000010.C - modified to change maxChi2=20
tpcOuterHitError.20010312.000010.C, tpcInnerHitError.20010312.000010.C - added new fitted errors -
May 16, 2005,
new library SL05d has been build, tested and released on May 17. Library was tagged with SL05d_1 tag ( but has intermediate release tag SL05d too )Main features:
- first release of TOF reco codes;
- calibration adjustments codes updated for CuCu production;
- SSD simulation code developed, ready to run reconstruction;
- GEANT simultaion code for FGT detector added ;
- further development of ITTF code: geometry updates, modified TPC hit error parametrization, some modification of SVT code;Next codes have been updated:
- StAssociationMaker
EMC/StEmcAssociationMaker.cxx/h - method to print McTracks information was added
- StAnalysisUtilities
StHistUtil.cxx - reodering of some FTPC code on user ranges in radial hists
- StBFChain
StBFChain.cxx - re-enabled SSD & ssdIT options
StBFChain.cxx - enabled useCDV and useLDV options to use T0 or laser calibrations
- StDaqLib
TOF/TOF_Reader.cxx/hh - updated for year 2005 new data format, previous interfaces are separated out for convenience
- StdEdxY2Maker
StdEdxY2Maker.cxx - more checking
- StBichsel
Bichsel.cxx/h, dEdxParameterization.cxx/h - added modified GetMostProbableZM,GetAverageZM and GetI70M to account saturation for low b*g for nSigma calculations
- StEEmcDbMaker
StEEmcDbMaker.cxx - fixed overwriting of masks
- StEmcSimulatorMaker
StEmcSimulatorMaker.cxx - set correct StEmcRawHit::calibrationType() for simulated hits
- StEEmcUtil
EEmcGeom/EEmcGeomSimple.cxx - modified
- StEvent
StContainers.cxx/h, StEventTypes.h, StTofCollection.cxx/h, StTofData.cxx/h, StTofRawData.cxx/h - TOF classes for run 2005 implemented,
modification to take care of new TOF daq and electronics
- StMcEvent
StMcIstHit.hh, StMcFstHit.cc/hh - added loading of hits for IST & FST detectors
StMcIstHit.cc/hh, StMcIstHitCollection.cc/hh, StMcIstLayerHitCollection.cc/hh, StMcPixelHitCollection.hh - added persistency: ClassImp, ClassDef and inheritance from StObject
StMcFgtHit.cc/hh, StMcFgtHitCollection.cc/hh,StMcFgtLayerHitCollection.cc/hh, StMcFstHit.cc/hh, StMcFstHitCollection.cc/hh, StMcFstLayerHitCollection.cc/hh - new files for Fgt and Fst detectors
StMcContainers.hh, StMcEvent.cc/hh, StMcEventTypes.hh, StMcTrack.cc/hh - modification to accomodate changes related to Fgt and Fst detectors
- StMcEventMaker
StMcEventMaker.cxx/h - modifications to build the Fgt and Fst classes from the g2t tables; added loading of SSD hits from g2t_ssd_hit table
- StMuDSTMaker
COMMON/StMuArrays.cxx/h, StMuDstMaker.cxx/h, StMuTofUtil.cxx StMuDst.cxx/h - updated for run year 2005 TOF data format
COMMON/StMuMomentumShiftMaker.cxx - changed scheme for mOutDir
- StSsdDaqMaker
StSsdDaqMaker.cxx/h - new files, removed dependancy between StSsdDaqMaker and StSsdDbMaker
ssdLadderMap.h - new file
StSsdDaqMaker.cxx - hardware offset corrected for specific ladders
- StSsdDbMaker
StSsdDbMaker.cxx/h, StSsdDbWriter.cxx, St_SsdDb_Reader.cc/hh - new StSsdDbMaker rewritten without DirectDataBase Access
- StSsdClusterMaker
St_scf_Maker.cxx/h, St_scm_Maker.cxx/h, St_ssd_Maker.cxx/h - modified to read ssd/geom and no more writeScfCtrlHistograms and writeScmCtrlHistograms methods
- StSsdSimulationMaker
StSlsBarrel.cc/h, StSlsListPoint.cc/hh, StSlsListStrip.cc/hh, StSlsPoint.cc/hh, StSlsStrip.cc/hh, StSlsWafer.cc/hh, StSpaBarrel.cc/hh,
StSpaListNoise.cc/hh, StSpaListStrip.cc/hh, StSpaNoise.cc/hh, StSpaStrip.cc/hh, StSpaWafer.cc/hh, St_sls_Maker.cxx/hh, St_spa_Maker.cxx/hh - new revision
- StSsdEvalMaker
StSceBarrel.cc/hh, StSceWafer.cc/hh - new readPointFromTable method added to load g2t_ssd_hit table, modified to use tg2t_ssd_hit table, doEvalCluster and doEvalSpt modified
St_sce_Maker.cxx/h - new readPointFromTable method added to load g2t_ssd_hit table, modified to use g2t_ssd_hit table, read ssd/geom and no more writeScmHistograms methods; showScfStats and showScmStats added in the Finish
- StSsdPointMaker
StSsdBarrel.cc/hh, StSsdPointMaker.cxx - physics and pedestal data processing separated
StSsdBarrel.cc, StSsdCluster.cc/hh, StSsdPointMaker.cxx/h, StSsdWafer.cc - added new methodes makeScfCtrlHistograms, makeScmCtrlHistograms and Clusternoise
- StTofUtil
StTofrDaqMap.cxx/h - updated for year 2005 run new data format
StTofRawDataCollection.cxx/h - first release for new data format in StEvent for year 2005 run
StSortTofRawData.cxx/h - first release of interface to sort out TofRawData array for year 2005 run
- StTofMaker
StTofMaker.cxx/h - updated for year 2005 run
- StTofrMatchMaker
StTofrMatchMaker.cxx/h - modified for year 2005 run
- StTofpMatchMaker
StTofpMatchMaker.cxx/h - modified for year 2005 run
- StTofCalibMaker
StTofCalibMaker.cxx/h - updated for year 2005 run
- StTofSimMaker
StTofSimMaker.cxx - modification corresponding changes in StTofData structure for year 2005 run
- StarRoot
S THack.cxx - method LineToD added
StarRootLinkDef.h - dictionary for THack added
THelixTrack.cxx/h - GetDCA added
- StTpcDb
StTpcdEdxCorrection.cxx/h, St_tpcCorrectionC.cxx - modified, added cut opttion (npar >= 100), activated Edge correction
- StPass0CalibMaker
StTpcT0Maker.cxx - switches between TCL and FCF using m_Mode added
StSpaceChargeEbyEMaker.cxx/h - modifications for SpaceCharge study- Sti
StiCompositeTreeNode.h, StiDetector.cxx/h, - dummy reset() added
StiHitErrorCalculator.cxx - TPC size increased 200==>210
StiKalmanTrack.cxx/h - refit tuned
StiKalmanTrackFinder.cxx/h - special treat of SVT added
StiKalmanTrackNode.cxx - dL/dCurv more accurate
StiKalmanTrackNode.h - error factor added
StiLocalTrackSeedFinder.h, StiTrackFinder.h - signature changed
StiTrackNode.cxx/h - static function sinX added
StiTreeNode.cxx - bug fixed
Base/Factory.h - reorganisation: method free added
Base/StiFactory.h - new Factory implementation
StiDetectorBuilder.cxx/h, StiElossCalculator.cxx/h, StiShape.cxx/h, StiVMCToolKit.cxx - fixed problem with unassigned variable
StiVMCToolKit.cxx - added protection (and asserts) for mixed materials
- StiFtpc
StiFtpcHitLoader.cxx/h - removed LoadMcHits
- StiMaker
StiDefaultToolkit.cxx - new Factory implementation
StiStEventFiller.cxx - temprary hack, saved residuals
- StiSsd
StiSsdDetectorBuilder.cxx - removed Ssd from IT chain before new interface with SsdDbMaker will be fixed
- StiTpc
StiTpcDetectorBuilder.cxx/h - fixed problem with unassigned variable in StiTpcDetectorBuilder- St_geant_Maker
St_geant_Maker.cxx - two new variables implemented to place SVT and SSD hits separately in different tables,
added Hit description extractor (AgstHits)
St_geant_Maker.cxx - added an interface for reading the FGT (GEM) hits
- St_QA_Maker
StEventQAMaker.cxx - fixed problem of not using estPrimary tracks
- StHbtMaker/CorrFctn
QoslCMSCorrFctnRPkT.cxx/h - added correlation function class for RP-dependent analysis with multiple (hardwired!) kT bins- pams/geometry
istbgeo/istbgeo.g - solved problems with the modules/ladders not ending up on the proper radius after they were tilted and shifted
fgtdgeo/fgtdgeo.g - added hit description to the FGT detector, chnaged FGAR hit definition and FGSC fitsteh convention
geometry/geometry.g - added development tag DEV2005
- pams/sim
g2t/g2t_fgt.F, g2t_fgt.idl - new file added to process the FGT (GEM) hits for R&D
g2t/g2t_volume_id.g - volume enumeration added for FGT (GEM) detector
idl/g2t_fgt_hit.idl - added interface for the FGT detector
idl/g2t_track.idl - modifications needed for the FGT (GEM) detector- StarDb/Calibrations
tracker/svtTrackingParameters.20010312.000010.C, tpcTrackingParameters.20010312.000010.C - increased Chi2 and search window
- StDb/idl
tpcCorrection.idl - added cut option (npar >= 100)
- StarDb/VmcGeometry
Geometry.year2000.C, Geometry.year2001.C, Geometry.year2002.C, Geometry.year2003.C,
Geometry.y2003a.C, Geometry.y2003b.C, Geometry.y2003x.C,
Geometry.y2004.C, Geometry.y2004a.C, Geometry.y2004b.C, Geometry.y2004c.C, Geometry.y2004x.C,
Geometry.y2005b.C, Geometry.y2005x.C, Geometry.year2000.C, Geometry.year2001.C, Geometry.year2002.C, Geometry.year2003.C
- modified geometry files to set 'not IsOwner' for gGeoManager for ITTF code -
April 21, 2005,
library SL05b has been updated with
StFtpcClusterMaker/StFtpcDbReader.cc
code to handle FTPC East gain table properly
Library was retagged as SL05c and renamed to SL05c -
April 11, 2005,
library SL05b has been updated with next codes to set proper geometry tag needed for embedding:
StBFChain
- StBFChain.cxx
StChain
- StMaker.cxxpams/geometry
geometry/geometry.g
ftpcgeo/ftpcgeo1.g
fgtdgeo/fgtdgeo.gUpdated codes have been retagged as SL05b_2
-
April 1, 2005,
new library SL05b has been build, tested and released. Library was tagged with SL05b_1Main features:
futher improvement of Sti tracking and vertexing:
- track errors correctly filled in StEvent;
- combinatorial search is implemented, as a result more SVT hits accepted, number of primaries increased about 2%
important bug in StTpcDbMaker has been fixed which caused that wrong 'Twist' correction values for TPC were picked from the db
and global sector position for simulation was wrong (only SL05a library was effected);
few corrections have been done for year 2005 geometryNext codes have been updated:
- StEmcSimulatorMaker
StEmcPmtSimulator.cxx/h, StEmcSimpleSimulator.cxx/h, StEmcSimulatorMaker.cxx/h, StEmcVirtualSimulator.cxx/h, StPmtSignal.cxx/h - fixed problem with chain
- StFtpcClusterMaker
StFtpcGasUtilities.cc/h - calculate the average temperature correctly for year 2005+ runs when only one set of temperature readings is available
StFtpcClusterMaker.cxx/h - made changes for using body + extra temperatures starting with y2005
- StFtpcSlowSimMaker
StFtpcSlowSimMaker.cxx/h - made changes to use body + extra temperature readings starting with y2005, necessary for embedding
- StEmcUtil
database/StEmcDbHandler.cxx/h - added new class to to handle Emc database tables
- StIOMaker
StIOMaker.cxx - FileSet deleted in Finish by request GridCollector
- StSsdPointMaker
StSsdPointMaker.cxx, StSsdBarrel.hh/cc, StSsdLadder.hh/cc - positionSize argument added to the initLadders method,
StSsdPointMaker.cxx/h - PrintClusterSummary and PrintPointSummary methods added
StSsdStrip.hh, StSsdStrip.cc, StSsdStripList.cc, StSsdBarrel.cc - mPedestal member added to the StSsdStrip object. Constructor modified accordingly
StSsdCluster.hh/cc, StSsdPointList.hh/cc, StSsdPoint.hh/cc, StSsdPackageList.hh/cc, StSsdPackage.cc/hh, StSsdDynamicControl.h/cxx - missing CVS header added
StSsdBarrel.cc/hh - readNoiseFromTable methods modified to transmit the pedestal, hardware position information fully implemented,new member mActiveLadders added
StSsdWafer.cc/hh, StSsdStripList.hh/cc - setPedestalSigmaStrip method added, setSigmaStrip removed
StSsdPoint.hh/cc - new members mIdClusterP and mIdClusterN and associated methods added, modified to take HighCut value taken from the db
StSsdWafer.cc - setMatcheds method modified to transmit the cluster Ids to the point
- Sti
StiKTNIterator.h - reorganization of node container
StiHit.cxx - tolerance increased to 2 cm
StiHitTest.h/cxx - hit test algorithm added,
StiDetector.h - init to zero added,
StiHitErrorCalculator.cxx/h - modified
StiKalmanTrack.cxx/h - refit() method added, reorganization of node container made, getMaxPointCount() fixed;
StiKalmanTrackFinder.cxx/h - find method reorganised for future combinatoric, combinatorics added,
StiKalmanTrackFitter.cxx - modified not to use 1st node for refit
StiKalmanTrackNode.cxx/h -assert in rotate fixed, derivatives and their test fixed to eta==Psi model, reorganization of node container made, asserts replaced to prints
StiResidualCalculator.cxx
StiDefaultMutableTreeNode.cxx/h
StiTrack.h - obsolete non used methods;
StiTrackNode.cxx/h - StiContino removed from node, reorganization of node container;
StiSvtHitLoader.cxx - one more test for hits added;
- StiMaker
StiStEventFiller.cxx -
- StiTpc
StiTpcHitLoader.cxx - one more test for hits added
- StarClassLibrary
StLorentzVector.hh, StLorentzVectorD.hh, StLorentzVectorF.hh, StThreeVector.hh, StThreeVectorD.hh, StThreeVectorF.hh - defence FPE added
- StTpcDb
StTpcDb.cxx, StTpcDbMaker.cxx - bug fixed with flavor handling
- St_geant_Maker
St_geant_Maker.cxx - added code for reading hits from IST and FST tables- StJetMaker
StJetReader.cxx/h, StJets.cxx - updated to add PythiaAssociator, corrected EMC simulation path
StFourPMakers/StBET4pMaker.cxx/h - updated to add PythiaAssociator, corrected EMC simulation path
StJetSimuUtil/IoManager.cxx/h, StPythiaAssociator.cxx/h - updated to add PythiaAssociator, corrected EMC simulation path
StEmcHitMakers - removed
StTrackMatchers - removed
StJetHist/StJetHistMaker.cxx/h - first revision of StJetHistMaker
- StHbtMaker/CorrFctn
FracMergRowvsQinv.h/cxx - added 2D correlation function Qinv vs. Fraction of merged hits- pams/sim
g2t/g2t_volume_id.g - added the numbering for the IST and FST detectors
g2t/g2t_fst.F, g2t_fst.idl - added FST detector
idl/g2t_track.idl, g2t_fst_hit.idl - added FST detector
- pams/geometry
ftpcgeo/ftpcgeo1.g - corrected gas in FTPC, Ar+C02 mix in the chamber
svttgeo/svttgeo4.g - corrected bug in the definition of the electronics and IC
sisdgeo/sisdgeo2.g - created a new version of the structure SFPA to reflect the correct ladder positions
geometry/geometry.g - CorrNum variable turned out to be unwieldy, for y2005b geometry SVT elelctronics mother volume length bug fixed, Ar+C02 gas mix added in the FTPC, SSD ladder radius corected -
March 2, 2005,
library SL05a has been updated with next code:
- StFtpcTrackMaker
StFtpcTrackMaker.cxx - tracking was fixed, changed to standard TWO CYCLE TRACKING insteard of laser
Code has been retagged with SL05a tag -
February 17, 2005,
library SL05a has been updated with next codes to process AuAu200 production with Grid Leak corrections:- StBFChain
StBFChain.cxx - Remove SSD from chain dur to it crash reco jobs, L0/EMC precedence change, added QUtils for QA dependencies resolution;
- StDetectorDbMaker
StDetectorDbTpcOmegaTau.cxx, StDetectorDbTpcOmegaTau.h - access TPC OmegaTau from database added
StDetectorDbMaker.cxx - added GridLeak and OmegaTau calls
- StEEmcDbMaker
EEmcDbItem.cxx, EEmcDbItem.h, StEEmcDbMaker.cxx - few more access methods added, made sigPed visible in EEmcDbItem
- StEmcRawMaker
StBemcRaw.cxx, defines.h - crate Id check put back
StEemcRaw.cxx StEemcRaw.h - accomodate MAPMT firmware change in 2005
- StDbUtilities
StMagUtilities.cxx, StMagUtilities.h - changed for SpaceCharge / Leak corrections;
- StUtilities
StMessageManager.cxx - fixed bug (used pointer before assignment)
- StPass0CalibMaker
StSpaceChargeEbyEMaker.cxx - modified to fill StEvent info on SpaceCharge
- StDb/idl
tpcOmegaTau.idl - added table for tpcOmegaTau DB located before in StarDb/Calibrations/tpc
emcTriggerLUT.idl added table for bemc triggers
Updated codes were retagged with tag SL05a -
January 28, 2005,
new library SL05a has been created, tagged as SL05a
Library containes essential ITTF code development and updates related to Grid Leak correction problem for year 2004 AuAu200 data.Next codes have been updated:
- StBFChain
StBFChain.cxx - added OGridLeak option, reshaped B/E-EMC options, added chain for year 2005 run
- StDaqLib
EMC/StEmcDecoder.cxx/h - PSD map fixed. 2004 data is still being produced with wrong map
EMC/EMC_Reader.hh, EMC_SmdReader.cxx/h - modified to allow 12 fibers in the SMD for the y2005 psd data
- StDbLib
StDbManagerImpl.cc - reseted precedence for connecting to db. From Low to High: star,home,envVar
- StDbUtilities
StMagUtilities.cxx - changed InnerOuterRatio (pad size ratio) from 1.3 to 0.5
- StDetectorDbMaker
StDetectorDbGridLeak.cxx/h - GridLeak interface to DB implemented
- StEmcCalibrationMaker
StEmcCalibMaker.cxx/h, StEmcEqualMaker.cxx, StEmcMipMaker.cxx, StEmcPedestalMaker.cxx - small modifications
- StEEmcDbMaker
StEEmcDbMaker.cxx/h - more get-method development
- StEEmcSimulatorMaker
StMuEEmcSimuReMaker.cxx/h - EEMC slow simulator added
SlowSimUtil.cxx/h, StEEmcSlowMaker.cxx/h - added new files
macros/runEEmcSlowMaker.C - new macro added
- StEEmcUtil
EEdsm/EEmapTP.h
- StEmcSimulatorMaker
StEmcSimulatorMaker.cxx - more modifications
- StEmcRawMaker
StBemcRaw.cxx/h, defines.h - moved StBemcTables to StEmcUtil, corrected for y2005 PSD data banks
StBemcTables.cxx/h - removed files
StBemcRaw.cxx/h - created a new method to correct for the PSD map problem
StEemcRaw.cxx - small modification of logic
- StEmcUtil
database/StBemcTables.cxx/h - moved StBemcTables to StEmcUtil/database, added interface to trigger tables in offline DB
- StFlowAnalysisMaker
StFlowCumulantMaker.cxx/h, calculateCumulant.C - modified v1{3} code
StFlowAnalysisMaker.h/cxx - added full Psi weight for ZDC, SMD and fixed few bugs
submitSchedulerJobs.pl, runSchedulerJobsExample.config, combineMiddleSchedulerResults.pl, combineFinalSchedulerResults.pl, finishSchedulerJobs.pl - template to scheduler jobs on cumulant analysis added
myProjectProfile.C - a tool to project TProfile added, useful when derive vPt or vEta from v2D
- StFlowMaker
StFlowEvent.cxx/h, StFlowConstants.h - modified v1{3} code
StFlowConstants.cxx/h, StFlowEvent.cxx/h, StFlowMaker.cxx/h - added full Psi weight for ZDC, SMD and fixed few bugs
StFlowMaker.cxx - added checking for corrupted MuDst and picoDst files
StFlowMaker.cxx/h - modified to read run-by-run beam shifts and SMD pedestal
- StFtpcClusterMaker
StFtpcGasUtilities.cc - updated to use all 6 ftpc west body temperature readings for 2005 run
- StMcEventMaker
StMcEventMaker.cxx - protection against deleting twice added
- StMuDSTMaker
EZTREE/EztEmcRawData.cxx/h - updated for for corruption checking
- Sti
StiKalmanTrack.cxx - modified to use alpha instead of getRefAngle while extending to vertex
StiTrackingPlots.cxx/h - added point of closest approach to vertex (pca) histos
StiKalmanTrackNode.cxx/h - added cut for -ve cosCA
RadLengthPlots.cxx, StiHitErrorCalculator.cxx, StiKalmanTrack.cxx, StiKalmanTrackFinder.cxx, StiKalmanTrackFitter.cxx StiKalmanTrackNode.cxx/h, StiResidualCalculator.cxx, StiTrackingPlots.cxx - implemented new parameter model
RadLengthPlots.cxx, StiHitToTrackMap.cxx, StiLocalTrackMerger.cxx, StiTrackAssociation.h, StiTrackContainer.cxx/h, StiTrackToObjMap.cxx, StiTrackToTrackMap.cxx, StiTrackingPlots.cxx/h, StiResidualCalculator.cxx, StiKalmanTrackFinder.cxx - changed track container to vector
examples/CombinationIterator_ex.cxx, StiCompositeLeafIterator_ex.cxx, StiEvaluableTrack_ex.cxx - files removed
StiKalmanTrackNode.cxx/h - initial errors tuned
- StiMaker
StiMaker.cxx, StiStEventFiller.cxx - several bugs fixed, parameters protection added
StiMaker.cxx, StiStEventFiller.cxx - changed track container to vector
- StiGui
EventDisplay.cxx,PrintMenuGroup.cxx - track container iterators changed to vector::iterator
- StPmdReadMaker
StPmdReadMaker.cxx - updated to read 2005 data
- StPmdUtil
StPmdGeom.cxx/h, StPmdMapUtil.cxx/h - status problem fixed for chain, new map for 2005 data
- St_QA_Maker
StEventQAMaker.cxx StQABookHist.cxx/h - updated histos for PMD
- St_trg_Maker
St_trg_Maker.cxx - added decoding 2005=2004- pams/geometry
fstdgeo/fstdgeo.g - first revision and substantial reorganization than, better AlN description; added the water manifold (duct). Corrected a small error in the size of AlN plate;
removed active and passive layers, corrected nesting of the water duct volume;
istbgeo/istbgeo.g - first revision, large addition than, segmented silicon, AlN, chtips, new volume names;
geometry/geometry.g - updated the experimental IST1 tag to better refelct the needs of the new tracking group; took out the FTPC, put in the Pixel and SSD, and made provisions for the latter to work w/o the SVT volumes; corrected SSD geometry in y2005x.
mfldgeo/mfldgeo.g - agufld was made as function
fpdmgeo/fpdmgeo1.g - removed an annoying print statement
pixlgeo/pixlgeo1.g - small corrections
sisdgeo/sisdgeo.g, sisdgeo1.g, sisdgeo2.g - updates for case when SVT is missing form the configuration
- pams/sim
gstar/gstar_part.g - sigma(1385) family has been added to the particle listDatabase-wise updates:
- StDb/idl
ftpcTemps.idl - FTPC extra temperatures added
emcTriggerPed.idl - trigger pedestal for BEMC added
emcTriggerStatus.idl - broke towerStatus into multidimentional array [30][160] to better represent hardware
tpcFieldCageShort.idl - added missing resistance
tpcGridLeak.idl - added table for GridLeak calibration
- StarDb/VmcGeometry
Geometry.y2003a.root, Geometry.y2003b.root, Geometry.y2003x.root, Geometry.y2004.root, Geometry.y2004a.root, Geometry.y2004b.root,Geometry.y2004x.root, Geometry.y2005x.root, Geometry.year2000.root, Geometry.year2001.root,Geometry.year2002.root, Geometry.year2003.root - added new files, VMC geometries converted from fz-files. -
January 05, 2005,
library SL04k has been updated with next codes:
- Sti
Star/StiStarDetectorBuilder.cxx - restored previous revision
- St_QA_Maker
St_QA_Maker.cxx, StEventQAMaker.cxx/h, QAH.cxx/h, StQAMakerBase.cxx/h, StQABookHist.cxx/h, QAhlist_EventQA_qa_shift.h - updated QA histos for run 5 for PMD, primary tracks, FPD, QAShift lists
- StAnalysisUtilities
StHistUtil.cxx - updated QA hist utilities for run 5, PMD, primary tracks, FPD, QAShift lists
All library has been retagged with tag SL04k_3. -
December 14 - 16, 2004,
library SL04k has been updated with next codes:
- StBFChain
StBFChain.cxx - for TPT based reco added svt_daq,svtD to base chain B2004 (so will be shorter)
extended with VFppLMV5 to make symetric in feature comapring to Sti
for ALL 2004 chains (Sti or TPT) --> eemcD is an obsolete option, eemcDY2 will do both EMC
- StGenericVertexMaker
StppLMVVertexFinder.cxx - fixed 2 cuts in ppLMV4 for the TPT version
StGenericVertexFinder.cxx/h, StMinuitVertexFinder.cxx - added initaition of StGenericVertexFinder variables, replace mDumMaker by StMaker::GetChain() method
- StMuDSTMaker
COMMON/StMuTrack.cxx - added initialisation of eta, phi and pt affects events without main vertex
- StEmcADCtoEMaker
StBemcData.cxx - added event corrupt flag based on header check
StEmcADCtoEMaker.cxx, controlADCtoE.idl - added new flags to controlAdcToE table
- StEmcRawMaker
StBemcRaw.cxx/h - added histograms for status tables creation
- St_dst_Maker
StVertexMaker.cxx, ppLMV4.cxx - modifications to implement the ppLMV-5 cuts to ppLMV4
- StarRoot
TMemStat.cxx - specified path to ps
- Sti
Star/StiStarDetectorBuilder.cxx - new energy loss calculation implemented
StiDetector.h, StiElossCalculator.cxx/h - new energy loss calculation implemented
StiHitErrorCalculator.cxx/h - bug fixed
StiKalmanTrack.cxx, StiKalmanTrackFinder.cxx, StiKalmanTrackFitter.cxx, StiKalmanTrackNode.cxx/h - number of bugs fixed,
StiTrackingPlots.cxx/h - new histo implemented
- StiTpc
StiTpcDetectorBuilder.cxx - new energy loss calculation implemented
- StiSvt
StiSvtDetectorBuilder.cxx - new energy loss calculation implemented
- StiSsd
StiSsdDetectorBuilder.cxx - new energy loss calculation implemented
- StiPixel
StiPixelDetectorBuilder.cxx - new energy loss calculation implementedSL04k library was retagged as SL04k_2
-
December 1-2, 2004,
library SL04k has been updated with next codes:
- StDaqLib
EMC/StEmcDecoder.cxx - uninitilaized arrays set to default values
- StMuDSTMaker
COMMON/StMuCut.cxx/h - initialized arrays
COMMON/StMuEvent.cxx/h - added errors on primary vertex
- St_geant_Maker
St_geant_Maker.cxx - loss of one GtHash object per call fixed
- StTagsMaker
StTagsMaker.cxx - small memory leak fixed
- Sti
StiKalmanTrack.cxx/h - test for -ve and too big track length added
StiKalmanTrackFitter.cxx, StiTrack.h - minor changes>
StiKalmanTrackNode.cxx - set ionization potential for Ar in eloss calculateion instead 5, z propagation fixed
StiKalmanTrackFinder.cxx - pipe propagation fixed
StiDetector.cxx/h - added useful indexing tools
StiTrackingPlots.cxx/h - revamped the plotting package, svt modified
StiHit.cxx - rotation of cov. matrix fixed
- StiSsd
StiSsdDetectorBuilder.cxx - working version
- StiSvt
StiSvtDetectorBuilder.cxx - hybrid back
- StiMaker
StiStEventFiller.cxx - removed throw and replaced with continue; chi2[1] set to incremental chi2 at inner most hit or vertex;
modified to fill the fitTraits.chi2[1] data member for primaries only, it holds node->getChi2() from the innerMostHitNode, which will be the vertex for primaries
- StarDb/Calibrations/tracker
KalmanTrackFitterParameters.20010312.000002.C
svtHitError.20010312.000002.C
svtTrackingParameters.20010312.000002.C
tpcInnerHitError.20010312.000002.C
tpcOuterHitError.20010312.000002.C
tpcTrackingParameters.20010312.000002.C - Claude's tune parameters for TPC & SVT addedUpdated codes were retagged as SL04k_1
-
November 24, 2004,
library SL04k has been updated with next code:
asps/Simulation/starsim/atmain/dblib.cxx - bug fixed
asps/Simulation/starsim/Conscript - added compilation of old redhat 7.2 platforms
Updated codes has been retagged as SL04k_a -
November 18, 2004,
library SL04k has been updated with next codes and retagged as SL04k:- StAssociationMaker/EMC
StEmcAssociationMaker.cxx/h - modified to fill multimaps directly
- StBFChain
StBFChain.cxx - introduced SsdIT options and turn StiSsd ON from Sti option, SSD geometry activated, year 2005 geometry updated
- StDAQMaker
StDAQReader.cxx - added thereIsTriggerData() check and logic for return kStErr
StEEMCReader.cxx/h - added isEemcBankIn
StTRGReader.h - updated for year 2005 run
- StDaqLib
EEMC/EEMC_Reader.cxx/hh - implemented isEemcBankIn
EVP/emcReader.cxx/h - removed etow ch
TRG/trgStructures2005.h, code2005.cxx - updated for year 2005 run
TRG/TRG_Reader.cxx/hh - added logic for bad trigger data header + change print-out format
GENERIC/DetectorReader.cxx - changed message format
- StEmcADCtoEMaker
StEmcADCtoEMaker.cxx - bug fixed
- StEmcRawMaker
StBemcRaw.cxx - non initialization of some variables were fixed
StEemcRaw.cxx - unit var initialized
- StEstMaker
Infrastructure/StEstBranch.cc/hh - initialization fixed
- StEvent
StTriggerData2003.cxx, StTriggerData2004.cxx, StTriggerData2005.cxx/h - checkes for valid pre/post samples added
- StEventDisplayMaker
StEventControlPanel.cxx, StEventDisplayMaker.cxx/h, StGlobalFilterTest.cxx - bug fixed
- StEventUtilities
StEventHelper.cxx - test for the same StEvent pointer removed
- StMuDSTMaker
COMMON/StMuArrays.cxx/h, StMuDst.cxx/h, StMuDstMaker.cxx/h - added stuff to support ezTree mode of MuDstMaker
StMuDst.cxx/h - arg name must not be repeated
COMMON/StMuDstMaker.cxx/h - added call to StMuDst::set() for V0-event-pointers in read()
COMMON/StMuEmcUtil.cxx - fixed crate counters for Emc status flag copying ( [1-30] instead of [0-29] )
EZTREE/EztEmcRawData.cxx/h, EztEventHeader.cxx/h, EztTrigBlob.cxx/h, StMuEzTree.cxx/h - initial revision of ezTree classes for EEmc raw data to process Fastoffline of fast-detector data during run 2005
- StarClassLibrary
StThreeVectorD.hh, StThreeVectorF.hh - check for x,y =0 added
- StarRoot
THelixTrack.cxx/h - set default arg for THelixTrack::Print()
- Sti
StiKalmanTrackFitter.cxx - added call to nudge in fit function
- StTriggerDataMaker
StTriggerDataMaker.cxx - updated for year 2005 run -
November 11, 2004,
library SL04k has been updated with bug fixes and further development of ITTF code. Library has been retagged.Next codes have been updated:
- Sti
StiDetectorContainer.cxx/h, StiDetectorTreeBuilder.cxx, StiHit.cxx, StiHitContainer.cxx, StiKalmanTrack.cxx, StiKalmanTrackFinder.cxx/h, StiKalmanTrackNode.cxx/h, StiLocalTrackSeedFinder.cxx, StiMasterDetectorBuilder.cxx, StiPlacement.h, StiTrackingPlots.cxx;
Star/StiStarDetectorBuilder.cxx;
next modifications have been made:-
changed the StiPlacement class to hold keys to both the radial and angle placement.
Propagated the use of those keys in StiSvt StiTpc StiSsd and all relevant Sti classes. -
changed the StiKalmanTrackFinder::find(StiTrack*) function's algorithm for the navigation of
the detector volumes. The new code uses an iterator to visit all relevant volumes.
The code is now more robust and compact as well as much easier to read and maintain. -
changed the chi2 calculation in StiKalmanTrack::getChi2 and propagated the effects of this change
in both StiTrackingPlots and StiStEventFiller classes.
StiKalmanTrack.cxx/h, StiKalmanTrackNode.cxx - added functions for extrapolation, updates of track parameters
StiTrackingPlots.cxx/h - added diagnostic plots
- StiMaker
StiStEventFiller.cxx - fixed of the chi2 calculation
- StiSvt
StiSvtDetectorBuilder.cxx - added/fixed placement keys - disabled hybrids
- StiTpc
StiTpcDetectorBuilder.cxx - added/fixed placement keys, added fine tune of pad row placements based on db
- StiSsd
StiSsdDetectorBuilder.cxx - added/fixed placement keys, provisionally put a return in the 1st line of the builder -
-
October 28, 2004,
library SL04k has been created on .sl302_gcc323 and .rh80_gcc32 platforms, tested and released November 3.Main features of the library:
- StEmcADCtoEMaker code has been completely reshaped, the new improvements are:-
Code is much smaller and easier to read
-
It now reads DAQ files, StEvent and MuDstFiles
-
No need for StMuDst2StEventMaker (but this still works)
-
StEmcCollection that is created is plugged into muDST so the user can read the emcCollection directly from muDST (use the method StMuDst::emcCollection())
-
Crate status are properly filled in StEvent and StMuDst
-
Maker does not decide if event is corrupted or not, it just zeroes the corrupted crates. It is up to the user to check the crateStatus in StEvent (StMuDst) and make a decision
-
StEmcADCtoEMaker now depends on StEmcRawMaker
- new maker StEmcRawMaker has been created to replace former StEmcADCtoEMaker in production. It reads only DAQ structures and write output in StEvent
- StMuDSTMaker has been reshaped. The main functional changes concern the Emc and Pmd data structures.-
for EMC flags were added to signal corruption of crate headers
-
points and clusters are no longer copied from StEvent, because they are recalculated during analysis anyway
-
for Pmd the possibility to store hits (single-channel information) was added
-
some changes to the internal logic has been made which will allow to read some Emc (and Pmd) branches more selectively
-
fixed the problem with StMuIOMaker (there was no emc collection)
- Significant improvement for ITTF code has been made related to ratio of good/bad global tracks
-
Sti: StiKalmanTrack.cxx/h, StiKalmanTrackFinder.cxx/h, StiKalmanTrackFitter.cxx, StiKalmanTrackNode.cxx/h, StiTrackFinderFilter.cxx/h, StiLocalTrackMerger.cxx, StiPlacement.cxx - various changes to improve track quality
-
Star/StiStarDetectorBuilder.cxx - modified to make pipe longer
-
StiMaker: StiStEventFiller.cxx/h - changes related to track quality improvement
Other changes in the codes not related to the above modifications:
- StBFChain
StBFChain.cxx - changed emcDY2 to a new meaning (runs StEmcRawMaker instead of StEmcADCtoEMaker), added emcAtoE option to run StEmcADCtoEMaker
- StDbUtilities
StMagUtilities.cxx/h - added GetSpaceChargeMode() function
- StEvent
StDetectorId.h - enum StarMaxSize added
StTrackDetectorInfo.cxx, StTrackGeometry.cxx - error check improved
- StEventUtilities
StEventHelper.cxx/h - new model of track graphic implementation
- StEmcCalibrationMaker
StEmcCalibrationMaker.cxx - adjusted to new StEmcADCtoEMaker
- StEmcMixerMaker
macros/doEmcEmbedEvent.C - updated dependencies for new StEmcADCtoEMaker
- StEEmcSimulatorMaker
StEEmcFastMaker.cxx - added emcCollection if not exist
StMuEEmcSimuMaker.h, StMuEEmcSimuReMaker.cxx - muEmcColl fixed
- StarClassLibrary
StHelixD.cc/hh, StThreeVectorD.cc/hh, StThreeVectorF.cc/hh - improved, check for x,y=0 added
- StarRoot
THelixTrack.cxx/h - bug fixed- pams/geometry
geometry/geometry.g - moved filling of GDAT to the end of code, in this case main Zebra bank is properly populated
Y2004B geometry changed to activate the sisdgeo1
Y2005X geometry is created which is same as Y2004B but with the full barrel calorimeter
sisdgeo/sisdgeo1.g - improved structure of the code by replacing hardcoded numbers with variables which encapsulate formulas
radius of the mother volume has been changed to conform with the shield of the SVT -
-
October 15, 2004,
library SL04j has been updated with bug fixes and retagged as SL04j_b.Next codes have been updated:
- asps/Simulation/starsim
Conscript, comis - fixed for Scientific Linux
- StAnalysisUtilities
StHistUtil.cxx - FTPC radial histos updated
- StDaqLib
EMC/StEmcDecoder.cxx - bug fixed
EMC/EMC_BarrelReader.cxx - modified do not zero corrupted crates
- StFtpcClusterMaker
StFtpcClusterMaker.cxx/h - pad vs. time histograms moved to St_QA_Maker
- StFtpcTrackMaker
StFtpcTrackMaker.cxx/h - pad vs. time histograms moved to St_QA_Maker
StFtpcTrackToStEvent.cc/hh - new functionality introduced to comply with the new (=correct) definition of trackReferenceCount
- StarRoot
THelixTrack.cxx/h - inversion of direction added
THack.h - default argument for PadRefresh added
- StEmcADCtoEMaker
StEmcADCtoEMaker.cxx/h - bug fixes
- StEventDisplayMaker
StGlobalFilterABC.cxx/h, StGlobalFilterTest.cxx/h - added global filters
- StdEdxY2Maker
StdEdxY2Maker.cxx - turned off SpaceChargeQdZ and CompareWithToF
- StEEmcUtil
EEfeeRaw/EEfeeRawEvent.cxx - one more header change for miniDaq added
- StHbtMaker
Reader/StHbtMuDstMakerReader.cxx, StHbtMuDstReader.cxx - bug fixed to properly hadle mReaderStatus to make frontLoadedEventCut work
- StStrangeMuDstMaker
StStrangeMuDstMaker.cxx - kStEOF returns added to terminate chain
- StarClassLibrary
StHbook.cc, StHbook.hh removed files to break dependence of StarClassLibrary on packlib
- StiMaker
StiStEventFiller.cxx - bug fixed: flag%100 -> flag/100; updated to comply with StTrackDetectorInfo changes
StiDefaultToolkit.cxx - changed hit factory allocation -
October 14, 2004,
all farm nodes were upgraded with Scientific Linux 3.0.2.
SL04h, SL04i, SL04j libraries have been rebuild with native SL3 compiler, libraries are supported on .sl302_gcc323 and .rh80_gcc32 platforms
SL03h, SL04b, SL04c, SL04d, SL04e, SL04f are set in backward compatbility mode with RH8.0 -
September 20, 2004,
new library SL04j has been created and tagged as SL04j_a.More memory leak cleanup in the codes:
StDbUtilities/StSvtCoordinateTransform.cc/hh
StSecondaryVertexMaker/StKinkLocalTrack.cc/hh, StKinkMaker.cxx/hh, StV0FinderMaker.cxx
StEventUtilities/StuProbabilityPidAlgorithm.cxx
StPmdUtil/StPmdGeom.cxx
StTofMaker/StTofMaker.cxx
StdEdxMaker/StdEdxMaker.cxx
StEEmcDbMaker/StEEmcDbMaker.cxxNext codes have been updated:
- StEvent
StDedxPidTraits.h - small optimization of alignement
- StMcEvent
added new files: StMcIstHit.cc/hh, StMcIstHitCollection.cc/hh, StMcIstLayerHitCollection.cc/hh, tMcSsdHit.cc/hh, StMcSsdHitCollection.cc/hh, StMcSsdLayerHitCollection.cc/hh
modified codes StMcContainers.hh, StMcEvent.cc/hh, StMcPixelHit.cc/hh, StMcTrack.cc/hh to support Ist, SSD and changes to Pixel
- StFtpcClusterMaker
StFtpcGasUtilities.cc - corrected error in averageTemperatureEast
- StiMaker
MiniChain.cxx - changes related to SSD DB
- StiSsd
StiSsdDetectorBuilder.cxx, StiSsdHitLoader.cxx - changes related to SSD DB
- StTofCalibMaker
StTofCalibMaker.cxx - correct the nsigma in StTofPidTraits- pams/geometry
geometry/geometry.g - added geometry tag Y2004B which includes the most recent enhancements such as the FTPC readout cage
PIX1 - added geometry tag based on the request from the pixel group; the inner layer of SVT has been removed such that it can coexist with the innder pixel based tracker
svttgeo/svttgeo3.g - added a parameter to specify the innermost layer index thus providing the possibility to selectively remove inner layers
- pams/sim
idl/g2t_track.idl - addition for the SSD detector
g2t/g2t_volume_id.g - modified; g2t_ssd.F, g2t_ssd.idl - new material added to support SSD -
September 11, 2004,
SL04i has been updated with memory leak and bug fixes, memory usage reduction and minor modifications of codes. Library has been retagged as SL04i_a.Next codes have been updated with memory leak fixes and optimisation:
Sti/StiKalmanTrack.cxx
StiMaker/StiStEventFiller.cxx
StEmcCalibrationMaker/ StEmcMipMaker.cxx
StFtpcTrackMaker/StFtpcTrackToStEvent.cc, StFtpcTrackMaker.cxx, StFtpcConfMapper.cc, StFtpcTracker.cc/hh
StFtpcClusterMaker/StFtpcClusterMaker.cxx/h
StGenericVertexMaker/StMinuitVertexFinder.cxxNew updates:
- asps/Simulation/starsim/atmain
pyrpyth.F - added new file
rndm.age - proper interface with Pythia random number generation.
- StAssociationMaker
EMC/StEmcAssociationMaker.cxx/h - modified to create and delete matrixes on the fly
- StChain
StMaker.cxx/h - new methods SetAttr, IAttr,DAttr and SAttr added
- StBFChain
StBFChain.cxx - take StZdcVertexMaker from TpcChain and move it after StEventMaker
option 'clearmem' implemented to cleanup the memory alocation
modified constructor for embedding macro support
ppLMV5, .histos attribute and NoHistos options added
- StDaqLib/GENERIC
EventReader.cxx - more protection against corrupted DAQ data added
- StDAQMaker
StDAQReader.cxx - more protection against corrupted DAQ data added
- StDbUtilities
StSvtCoordinateTransform.cc - changed abs to fabs
StMagUtilities.cxx - put Manual space charge back to 0.0 in order to enable DB
- StEvent
StTrack.cxx - added +1 to the number of possible points when primary track
StTrackFitTraits.cxx/h - added +1 to the number of fit points when bool flag is set
StHit.h - added access function hardwarePosition()
- StEventMaker
StEventMaker.cxx - set vertex-used-in-fit flag for primary tracks
StEventMaker.cxx, StRootEventManager.cc - replaced StEvent Hit containers if there are entries in the corrensponding tables
- StEEmcDataMaker
StEEmcDataMaker.cxx - modified to create histos only if attribute is ON, added TH1F pointer protection everywhere
- StEmcADCtoEMaker
StEmcADCtoEMaker.cxx - modified to wrapp histograms in mFillHisto / histos attribute check
- StEmcUtil
geometry/StEmcGeom.cxx/h - modified>
- StEmcMixerMaker
StEmcMixerMaker.cxx , doEmcEmbedEvent.C - modified
- StEmcTriggerMaker
StEmcTriggerMaker.cxx - modified to check histos attribute first, otherwise, skip it
- StEEmcUtil
EEfeeRaw/EEfeeRawEvent.cxx/h, EEstarTrig.cxx - more methods implemented, remove questionable spin bits interpetation
- StEpcMaker
StEpcMaker.cxx - modified to create histo arrays only if histos attribute is set, changed histograms
- StPreEclMaker
StPreEclMaker.cxx/h - changed histograms
- StFtpcTrackMaker
StFtpcTrackToStEvent.cc - modified to comply with the change of definition of nFitPoints in the fitTraits of StTrack
StFtpcTrackMaker.cxx - modified to use the IAttr(".histos") to control histogramming
StFtpcPoint.cc - corrected bit allocation error for FTPC HardwarePosition
- StFtpcClusterMaker
StFtpcClusterFinder.cc, StFtpcClusterMaker.cxx - modified to use the IAttr(".histos") to control histogramming
- StMuDSTMaker
COMMON/StMuDst.cxx - bug fixed in createStTrack & mods for vertex flag in fitTraits
COMMON/StMuTrack.cxx/h - added 1 to possible points for primary tracks, like in StEvent
- StFlowAnalysisMaker
StFlowAnalysisMaker.cxx - several changes to comply with latest changes of MuDsts and StEvent: nHits, nFitPoints, nMaxPoints
- StFlowMaker
StFlowCutTrack.cxx, StFlowMaker.cxx, StFlowSelection.cxx, StFlowTrack.h - several changes to comply with latest changes of MuDsts and StEvent: nHits, nFitPoints, nMaxPoints
- StHitFilterMaker
StHitFilterMaker.cxx - modified to keep Tpc hits for tracks with Tof Pid Traits
- StGenericVertexMaker
StppLMVVertexFinder.cxx - outerGeometry()->helix() used by ppLMV for extrapolation to CTB
StCtbUtility.cxx, StppLMVVertexFinder.cxx - Z-vertex range increased to +/- 150 cm
StppLMVVertexFinder.cxx/h - ppLMV5/4 switch added
StGenericVertexFinder.cxx/h, StppLMVVertexFinder.cxx/h - modified code to Implement Init() and SetMode() and allow passing a switch to chose the vertex finder from within the same code implementation
- StPmdClusterMaker
StPmdClusterMaker.cxx/h - option 'OptHist' added to switch histos
- StSecondaryVertexMaker
StV0FinderMaker.cxx/h - modified to use resize() for vectors, improved vector size management
StV0FinderMaker.cxx - slightly modified parameters of vector memory control
- StStrangeMuDstMaker
StStrangeControllerBase.cxx, StStrangeMuDstMaker.cxx - replaced Delete to THack:ClearClone
- StSsdDbMaker
New functions for SSD database reading added
- StSsdPointMaker
Number of codes updated to read SSD databases
- Sti/Base
HistogramGroup.cxx/h - added method to retrieve histogram by name
- StiMaker
StiStEventFiller.cxx - when filling fit traits for primary tracks, set the new flag mPrimaryVertexUsedInFit
- StiTpc
StiTpcHitLoader.cxx - added a test for null tpcHitCollection
- StTagsMaker
StTagsMaker.cxx/h - replaced St_DataSet ==> TDataSet
- StTpcHitMoverMaker
StTpcHitMoverMaker.cxx - modified to move hits if tpc hit containers exists in StEvent, othewise update tpchit table
- StTofMaker
StTofMaker.cxx - more protection against corrupted DAQ data added
- StTpcDb
StRTpcPadPlane.cxx/h, StRTpcSectorPosition.h - improved speed by keeping own copy of table row
StRTpcT0.cxx - reduced redundant function calls to improve speed
- StZdcVertexMaker
StZdcVertexMaker.cxx - added protection for missing StTriggerData
- St_db_Maker
St_db_Maker.cxx/h - timers added for MySQL and maker itself
- macros/examples
bfcMixer.C - extended with doITTF to allow embedding with ITTF
LeakFinder.C, ojtable.C - example of macros for memory Leak search added
- StRTSClient
FCFMaker/FCFMaker.cxx/h - reduced memory footprintDatabase-wise updates:
- StDb/idl
emcTriggerStatus.idl - trigger Status for bemc added -
August 13, 2004,
new library SL04i has been tagged (Aug 12), built, tested and released
New updates:
- asps/agi/gst
removed Gstar code, abjusted for root4star using starsim
- StBFChain
StBFChain.cxx - added TOFr, TOFp mathing code and TOFCalib as default for P2004 chain; added SvtEmbed to chain;
added option MakeEvent to create StEvent at the very beginning;
added StSvtDbMaker set for simulation;
- StBichsel
Bichsel.cxx/h, dEdxParameterization.cxx - modified
StBichselLinkDef.h - added
- StDaqLib/EMC
StEmcDecoder.cxx/h - added trigger coordinates conversion
- StDbLib
StDbDefs.hh StDbManagerImpl.cc - added ZDC domain
- StdEdxY2Maker
StdEdxY2Maker.cxx/h - modified to adjust to the new numberOfFitPoints definiton
- StEvent
StTrackDetectorInfo.cxx/h, StTrackFitTraits.cxx/h, StTrack.cxx/h - changed to handle of numberOfFitPoints(), numberOfPossiblePoints(), numberOfPoints() correctely to allow ITTF more flexibility
- StEmcTriggerMaker
StBemcTrigger.cxx/h, StEmcTriggerMaker.cxx/h - update to properly calculate the trigger data from raw data
- StEmcSimulatorMaker
StEmcSimulatorMaker.cxx/h - moved global variables to private members and made small modifications to run in embedding mode
- StFtpcClusterMaker
StFtpcClusterFinder.cc - moved initialization or westHits and eastHits outside of loop over ftpc
- StFtpcTrackMaker
StFtpcTrackToStEvent.cc, StFtpcTrack.hh - the number of points and number of possible points is set by giving the appropriate detectorId; new (inline) function was added to StFtpcTrack, which returns the detectorId; modified to fill the FitTraits correctly
StFtpcTrackMaker.cxx/h - removed unused histograms
- StGenericVertexMaker
StGenericVertexMaker.cxx/h, StppLMVVertexFinder.cxx/h - developed vertex finding code for pp data with pile-up effect
- Stl3RawReaderMaker
Stl3RawReaderMaker.cxx - added tpc detector id when setting the number of points since StEvent can now store the number of points for different detectors
- StMuDSTMaker
COMMON/StMuTrack.cxx/h, StMuDst.cxx - added support for fitted and possible points in different detectors, for ITTF
COMMON/StMuTrack.cxx - extended support for fitspoints in Svt and Tpc to work for old files, added topologyMap check for nHitsFit(StDetectorId) and nHitsPoss(StDetectorId) to better handle existing MuDst
EMC - all codes moved to the absolete because current EMC data are writing to COMMON MuDst
COMMON/StMuTofUtil.cxx - fixed for track-point matching
- St_geant_Maker.cxx
St_geant_Maker.cxx - propagation of additional info related to simulation conditions in Pythia events
- StSpectraTagMaker
dEdx_formula.cc - replace old BetheBloch by Bichsel
- Star2Root
Star2Root library eliminated, St_PolyLine3D moved to StEventDisplayMaker
- StSecondaryVertexMaker
StV0FinderMaker.cxx/h - modified
- StEventDisplayMaker
St_PolyLine3D moved to StEventDisplayMaker
- StTofrMatchMaker
StTofrMatchMaker.cxx - quality cut applied
- StTofCalibMaker
StTofCalibMaker.cxx - missing nSigmaXX in tofHit implemented
- StTpcDb
StTpcdEdxCorrection.cxx/h - added Reset for dEdx_t and SpaceCharge correction
- StRTSClient
FCFMaker/FCFMaker.cxx.h - added for recent changes in StEvent- Sti
Base/VectorizedFactory.h - added a clear function to the class to enable a flush of the allocated memory at the end of an event
StiKalmanTrack.h - added getMaxPoints(int detectorId), where detectorId corresponds to the StDetectorId value
- StiMaker
StiMaker.cxx, MiniChain.cxx - minor modifications
StiStEventFiller.cxx - fixed the assignment of the first point for primaries. Now the logic for both globals and primaries is that the first element of the stHits() vector can actually be casted to an StHit; modified to call getMaxPointCount
StiDefaultToolkit.cxx - doubled StiKalmanTrackNode factory allocation to avoid crashed in production- pams/sim
g2t - new format for the common block due to Pythia work, requested additional info related to simulation conditions to be placed in header
idl/g2t_pythia.idl - propagation of Pythia event characterization data
- pams/global
idl/dst_point.idl - added cluster id
dst/dst_point_filler.F - added cluster id
gen/apythia - Pythia library moved to proper area- StEEmcPool
EEmcAnalysisMaker, StEEmcPi0Maker - users developmentDatabase-wise updates:
- StarDb/Calibrations/tpc
TpcSecRowB.20040404.000000.root - modified for pp run 2004, put to MySql later and removed from this directory
- StarDb/dEdxModel
added PaiT.root file -
August 4, 2004,
new library SL04h has been tagged, built, tested and released. This is an intermediate release to process AuAu200, run 2004 test production with ITTF chain;
New updates:
- StBFChain
StBFChain.cxx - added missing CtbMatchVtx; options added for E-E Space charge corrections;
added VFppLMV and VFMinuit options;
- StdEdxY2Maker
StdEdxY2Maker.cxx/h, StdEdxY2MakerLinkDef.h, dEdxTrack.h - patches for dAu production; add clean up for all TPC Pid traits (coming from ITTF) ;
- StBichsel
Bichsel.h, dEdxParameterization.cxx/h - modified to add more access function, switch from Ar to P10 tables as default
- StDbUtilities
StMagUtilities.cxx - added Event by Event SpaceCharge correction capabilities;
- StdEdxY2Maker
StdEdxY2Maker.cxx/h - add switches to P10 tables;
- StEvent
StTriggerData2003.cxx/h - added missing access function for ZDC
StFpdTriggerDetector.cxx/h - initial revision
StTriggerDetectorCollection.cxx/h - Fpd as trigger detector added
StBbcTriggerDetector.cxx/h, StEmcTriggerDetector.cxx/h, StL0Trigger.cxx/h, StTriggerData.cxx/h, StTriggerData2003.cxx/h, StTriggerData2004.cxx/h -
modified triggers data
StRunInfo.cxx/h - added SVT drift velocity scaler
StTofPidTraits.cxx/h - new class member introduced for TOF data
Number of codes modified to removed all clone() declerations and definitions. Use StObject::clone() only
StCtbTriggerDetector.cxx - updated to fix CTB response
StProbPidTraits.cxx/h - added GetChi2Prob method
- StEventMaker
StEventMaker.cxx - fill SVT drift velocity scaler into StRunInfo; update of trigger part
- StEEmcUtil
EEmcSmdGeom.h - added placeholder method getIntersection(Int_t,Float_t,Float_t)
EEfeeRaw/EEfeeRawEvent.cxx/h, EEmcEventHeader.cxx - BTOW data are not masked out any more but headres are checked as for EEMC
- StFtpcClusterMaker
StFtpcDbReader.cxx/hh - modified to get adjustAverageWest/East from Calibrations_ftpc/ftpcGas
StFtpcGasUtilities.cc/hh - modified to use use adjustAverageWest/East from database always output temperature calculation information
since this is a critical value for the FTPC
StFtpcClusterMaker.cxx - include runNumber in call to StFtpcGasUtilities
- StFtpcSlowSimMaker
StFtpcSlowSimMaker.cxx - add run number to averageTemperatureWest/East calling sequence
- StGenericVertexMaker
StppLMVVertexFinder.cxx/h - first revision of ppLMV ported to ITTF code
- StMuDSTMaker
COMMON/StMuEvent.cxx/h - added FPD and EMC trigger information
COMMON/StMuIOMaker.cxx/h - new developments of Wei-Ming Zhang
COMMON/StMuArrays.h, StMuDst.h - added access methods for Strangeness Monte-Carlo arrays
COMMON/StMuDstFilterMaker.h - added includes for some Strange Mudst classes to rpovide base class for Strange Mudst filter
- StPass0CalibMaker
StSpaceChargeEbyEMaker.cxx/h - introduction of SpaceCharge correction Event-by-Event
StVertexSeedMaker.cxx - modified to add pp trigger info for run 2004 to process beam line constraint calibrations
- StPmdReadMaker
StPmdReadMaker.cxx - fixed numbering convention to start from 0 when filling StEvent
- StPmdClusterMaker
StPmdClusterMaker.cxx - fixed numbering convention to start from 0 when filling StEvent; number of modifications
- StSecondaryVertexMaker
StKinkMaker.cxx - removed kinks with more than one daughter
- StStrangeMuDstMaker
StStrangeMuDstMaker.cxx/h - modified to handle missing Event branch info condition
- StStrangeTagsMaker
StStrangeTagsMaker.cxx - filling of Xibar, Omega(bar), NKink and MaxPtKink tags added
- StSvtClusterMaker
StSvtHitMaker.cxx/h - modified to save SVT drift velocity scaler to StEvent
- StSsdDbMaker
StSsdDbMaker.cxx/h, St_SsdDb_Reader.cc/hh, StSsdConfig.cc/hh, StSsdGeometry.cc/hh, StSsdHybridCollection.cc/hh, StSsdWaferCollection.cc/hh, StSsdBarrel.cc/hh, StSsdClusterControl.cxx/h , StSsdDynamicControl.cxx/h, StSsdLadder.cc/hh, StSsdWafer.cc/hh, StSsdPointMaker.cxx/h - modified to use of new database structures related to SSD Configuration
StSsdDbWriter.cxx/h - first version of a writer for SSD databases
StSsdStrip.cc/hh, StSsdStripList.cc - minor changes
- StSvtSimulationMaker
StSvtEmbeddingMaker.cxx/h, StSvtOnlineSeqAdjSimMaker.cxx/h, StSvtSimulationMaker.cxx/h - modified
- StTofCalibMaker
StTofCalibMaker.cxx/h - first revision
introduced two new tables in dbase: tofAdcRange & tofResolution
update on writing StTofPidTraits
Tofp Slewing function changed in AuAu200 GeV Run IV, include those runs with eastern PVPD dead
- StTofrMatchMaker
StTofrMatchMaker.cxx - continuing update for the DAQ array in Run IV
- StRTSClient
FCFMaker/FCFMaker.cxx - moved pixel anotation to FCFMaker from saveRes(); added support for StEvent
FCF/fcfClass.cxx - moved pixel anotation to FCFMaker from saveRes()
FCFMaker/fcfPixel.idl - moved from FCF
include/fcfClass.hh - switch off FCF_ANNOTATE_CLUSTERS as default- StiSsd
StiSsdDetectorBuilder.cxx/h - modified to use of new database table definitions related to SSD configuration- pams/geometry
btofgeo/btofgeo2.g - modified to replaced zero-dimension volumes with explicit dimensions
vpddgeo/vpddgeo.g - modified
vpddgeo/vpddgeo1.g - added new version
btofgeo/btofgeo3.g - modified
mittgeo/mittgeo.g - new tracker geometry
istbgeo/istbgeo.g - a properly configured version of the outer pixel barrel detector with 3 layers
pixlgeo/pixlgeo1.g - changes the outer radius of the mother volume to a more reasonable value
geometry/geometry.g - modified for ISTB detectors
- pams/sim/idl
g2t_ist_hit.idl - added hit structure for the IST detector
g2t_track.idl - added for IST detectorDatabase-wise updates:
- StarDb/Calibrations/tpc
number of files modified to replace 'index' by 'idx' following Mike's correction to tpcCorrection.idl
finally all files moved to MySql tables
tpcMethaneIn.20031120.000000.C - added to remove dependence from Methane, added to MySql
TpcdXCorrection.20031120.000000.C - added for dx corrections, moved to MySql
TpcAdcCorrection.20031120.000000.C - added full ADC correction, moved to MySql
TpcZCorrection.20031120.000000.C - added z correction for each row, moved to MySql
- StarDb/dEdxModel
BichselT.root, P10T.root, dNdE_Bichsel.root - modified
- StDb/idl
tofAdcRange.idl tofResolution.idl - added TOF calibration tables
ftpcGas.idl - added adjustment to average body temperatures calculated from 3 instead of 6 thermistor readings for FTPC West and FTPC East
zdcsmdPed.idl - added pedestals for ZDCSMDs
zdcsmdBeamCntr.idl - added BeamCenter for ZDCSMDs -
July 1, 2004,
new library SL04g has been tagged (June 28), built and tested. SL04g has been released on July 1
New updates:
- ROOT version 4.00.04
- asps/Simulation/starsim
deccc/ctype.c - added option to work with RH 9.0 with CERNLIB built with RH 8;
Conscript - added option to work with RH 9.0 with CERNLIB built with RH 8;
deccc/memget.c, cs_hlshl.c, avost.c, readlink.c, setenv.c - cleanup, removed unused veriables;
- StAssociationMaker
StAssociationMaker.cxx - checkes added for chiSquared values for the V0's when using/not using Est tracks ;
- StAnalysisUtilities
St_TableNtuple.cxx/h - removed - StBichsel
Bichsel.h, GetdEdxResolution.cxx - modified for new tpcCorrection format;
- StDbUtilities
StTpcCoordinateTransform.cc/hh, StTpcLocalCoordinate.hh, StTpcLocalDirection.hh, StTpcLocalSectorAlignedCoordinate.hh, StTpcLocalSectorAlignedDirection.hh, StTpcLocalSectorCoordinate.hh, StTpcLocalSectorDirection.hh - modified;
StTpcCoordinate.cxx/h - added;
StTpcLocalCoordinate.cc, StTpcLocalSectorAlignedCoordinate.cc, StTpcLocalSectorAlignedDirection.cc, StTpcLocalDirection.cc, StTpcLocalSectorCoordinate.cc, StTpcLocalSectorDirection.cc - removed ;
modifications have been done to add (sector,row) for Tpc Coordinate/Direction transformations; change sign of t0zoffset correction (to be synch. with fcf);
StSvtCoordinateTransform.cc/hh - added fuctions to allow event-by-event scaling of the drfit velocity;
- StdEdxMaker
StSvtdEdxMaker.cxx - improved dedx calculation by only looking at those hits that go over more than 1 anode;
- StdEdxY2Maker
StdEdxY2Maker.cxx/h, StdEdxY2MakerLinkDef.h, dEdxTrack.h - modified to add account for alignment;
dEdxPoint.h - removed;
StdEdxY2Maker.cxx - added protection for old mode setting;
- StEEmcUtil
EEmcGeom/EEmcGeomSimple.cxx/h - added a small exception class, phi angles adjusted to [0,2pi] interval in accordace to TVecror3 convention, replaced Jan's implementation of direction2tower method with a resurrected getTower (formerly getHit) method ;
EEmcSmdMap/EEmcSmdMap.cxx/h - modified;
EEmcSmdMap/EEmcSmd2SmdMapItem.cxx/h - added strip2strip mapping;
EEfeeRaw/EEfeeDataBlock.cxx, EEfeeRawEvent.cxx/h - updates of data block headers check, more detailed monitoring of data corruption ;
EEfeeRaw/EEstarTrig.cxx - modified for more detailed monitoring of data corruption;
EEfeeRaw/BsmdRawData.cxx, BsmdRawData.h - new codes to add BSMD to ezTree;
StEEmcSmd/EEmcSmdGeom.cxx - fixed memory leak;
- StFtpcClusterMaker
StFtpcClusterMaker.cxx - initialized StFtpcSoftwareMonitor*ftpcMon;
StFtpcClusterFinder.cc/h - replaced obsolete DEBUGFILE code with code to write out a root file for cluster/laser analysis;
- StFtpcTrackMaker
StFtpcTrackMaker.h/cxx modified to add code to write out a root file for calibration;
- StEEmcSimulatorMaker
StEEmcFastMaker.cxx/h, StMuEEmcSimuMaker.cxx/h - modified to provide methods to get sampling fraction, gains;
StMuEEmcSimuReMaker.cxx/h - added, takes a muDst as input, and uses the database maker to "massage" the ADC response, to better simulate the calorimeter as installed;
- StEEmcDbMaker
StEEmcDbMaker.cxx/h - modified to add setPreferredFlavor method backwards compatibility;
- St_QA_Maker
StEventQAMaker.cxx - adjusted to removed tpc & ftpc software monitors;
- StEvent
StTofCell.h - added implementation of zHit() ;
StTriggerData2003.cxx, StTriggerData2004.cxx - added ZDC info to dump();
- StEmcCalibrationMaker
StEmcCalibrationMaker.cxx, StEmcPedestalMaker.cxx - obsolete stream replaced;
- StFlowAnalysisMaker
StFlowAnalysisMaker.cxx, StFlowPhiWgtMaker.cxx/h - picoDst format changed to hold ZDC SMD information, trigger cut modified to comply with TriggerCollections, centrality definition for 62 GeV data introduced;
- StFlowMaker
StFlowCutEvent.cxx, StFlowEvent.cxx, StFlowMaker.cxx/h, StFlowPicoEvent.cxx/h - picoDst format changed to hold ZDC SMD information, trigger cut modified to comply with TriggerCollections, centrality definition for 62 GeV data introduced;
- StFtpcSlowSimMaker
StFtpcSlowSimMaker.cxx - replaced StarDb/ftpc/fdepars/fdepar with StarDb/ftpc/ftpcdEdxPars;
- StFtpcTrackMaker
StFtpcTrackMaker.cxx/h, StFtpcTrackingParams.cc/hh - replaced StarDb/ftpc/fdepars/fdepar with StarDb/ftpc/ftpcdEdxPars;
- StMagF
.includes_for_export.flg - added
- StSvtClusterMaker
StSvtHitMaker.cxx/h - fine tuning of drift velocity using laser spots, added number of anodes count to res[0] variable for use in dedx calculation;
- StTpcHitMoverMaker
StTpcHitMoverMaker.cxx - added (sector,row) for Tpc Coordinate/Direction transformations;
StTpcHitMoverMaker.h - access functions for StMagUtilities pointer added;
- StTofUtil
StTofGeometry.cxx/h - added function projTrayVector(..) to increase the matching speed, head file "StHelixD.hh" included;
- StTofpMatchMaker
StTofpMatchMaker.cxx/h - improved matching: checking before projecting track, improved the speed by an order of magnitude, rename the defition of int vector;
- StTpcDb
StTpcDbLinkDef.h, StTpcDbMaker.cxx, StTpcdEdxCorrection.cxx/h, St_tpcGainC.cxx/h, St_tpcPadResponseC.cxx/h, St_tpcPedestalC.cxx/h - modified;
St_tpcCorrectionC.cxx/h - added more chairs for TPC Db parameters;
StTpcdEdxCorrection.cxx/h, St_tpcCorrectionC.cxx - modified to add MethaneIn, GasTemperature, tpcWaterOut corrections;
- StPmdClusterMaker
StPmdClustering.h/cxx, StPmdClusterMaker.cxx/h, StPmdAbsClustering.cxx/h - improved clustering algorithm;
StConstants.hh - declaration of global constants used in StPmdClustering;
- StPmdSimulatorMaker
StPmdSimulatorMaker.cxx - numbering of det0 and det1 interchanged;
- StPmdUtil
StPmdDetector.cxx - zeroing in ctr added ;
StPmdCluster.h - sigmaL, sigmaS introduced;
StPmdMapUtil.cxx/h - new files added ;
- StRTSClient
FCF/fcfClass.cxx, fcfPixel.idl - new ANNOTATION scheme added;
FCFMaker/FCFMaker.cxx - new ANNOTATION scheme added;
include/fcfClass.hh - new ANNOTATION scheme added;
- St_tcl_Maker
St_tcl_Maker.cxx - modified to add (sector,row) for TpcCoordinate transformations;
- St_tpt_Maker
St_tpt_Maker.cxx - modified to add (sector,row) for TpcCoordinate transformations;- StEEmcPool
TTM/EEmcTTMMaker.cxx/h - new code;
StBlankStEventMaker - new maker;
StEzSmdCal - new code added ;
- StEStructPool
EventGenerators/StEStructPythia.cxx - moved some variable declarations inside comment, added simple trigger selection;
EventMaker - updated to expand centrality class;
AnalysisMaker - added new output;
Correlations - new cut-binning implementation and modified pair-cuts;- pams
ftpc/idl/fde_fdepar.idl - removed due to replacement by StDb/idl/ftpcdEdxPars.idl;
sim/gstar/gstar_part.g - make LASERINO charged;
sim/gstar/gstar.idl - removed;
global/dst/dst_point_unpack.F/idl - removed reference to fcl_fppoint;
geometry/pixlgeo/pixlgeo1.g - added new configuration of pixel-based inner tracker required by R&D work ;
geometry/mittgeo/mittgeo.g - first (dummy) version of the MIT tracker, dubbed MITT, based on pixel ladders;
geometry/geometry/geometry.g - added description of two new detectors: inner Pixel and dubbed MITT;Database-wise updates:
- StDb/idl:
ftpcdEdxPars.idl - added to replace pams/ftpc/fde_fdepar.idl;
tpcCorrection.idl - add index, nrows and offset as data memmebrs;
svtDriftCurve.idl - corrected vector to accept 10 elements;
- StarDb:
ftpc/ftpcdEdxPars.C - added to replace StarDb/ftpc/fdepars/fdepar.C;
ftpc/fdepars/fdepar.C - removed due to replacement by ftpc/ftpcdEdxPars.C;
Calibrations/tpc - number of files modified for dEdx calibrations for AuAu200, run2004: TpcAdcCorrection.20031120.000000.C, TpcDriftDistOxygen.20031120.000000.C, TpcLengthCorrection.20031120.000000.C, TpcSecRowB.20031120.000000.root, TpcZCorrection.20031120.000000.C, tpcPressureB.20031120.000000.C;
new files added for AuAu200, run2004: TpcdEdxCor.20031120.000000.C, TpcdXCorrection.20031120.000000.C, tpcGasTemperature.C, tpcMethaneIn.20031120.000000.C, tpcMethaneIn.C, tpcWaterOut.C; -
July 21, 27, 2004,
SL04f library was patched with the next codes:
- StEvent
StTriggerData2003.cxx, StTriggerData2003.h, StTriggerData2004.cxx, StCtbTriggerDetector.cxx, StTriggerData.h, StTriggerData2004.h - to fix bug in CTB vertex matching code;
- StBFChain
StBFChain.cxx/h
- StGenericVertexMaker
StppLMVVertexFinder.h,StppLMVVertexFinder.cxx - new vertex finder code for pp data;
Codes have been retagged as SL04f_b -
July 7, 2004,
SL04f library was patched with the next codes:
- StiMaker
StiStEventFiller.cxx/h
- StdEdxY2Maker
StdEdxY2Maker.cxx/h, StdEdxY2MakerLinkDef.h
- StSecondaryVertexMaker
StKinkMaker.cxx/h
Codes have been retagged as SL04f_b
- StEvent
StTriggerData2003.cxx/h, StTriggerData2004.cxx (tagged as SL04g) -
June 14, 2004,
SL04f library was updated with next codes:
- StBFChain.cxx - implemented ITTF options for dAu and pp data
- StPass0CalibMaker
- St_dst_Maker:
StKinkLocalTrack.cc, StKinkLocalTrack.hh, StKinkMaker.cxx, StKinkMaker.h
- StFtpcClusterMaker
- StFtpcTrackMaker
- StEventCompendiumMaker
- St_QA_Maker/StEventQAMaker.cxx
- macros/bfc.C
Library was retagged as SL04f_a -
May 20, 2004,
new library SL04f has been tagged (on May 18), built and tested. SL04f has been released on May 20
New updates:
- StBFChain:
StBFChain.cxx - FTPC option modified to adapt recent changes in FTPC code;
- StdEdxMaker:
StSvtdEdxMaker.cxx - added protection for Zero field data;
- StdEdxY2Maker:
StdEdxY2Maker.cxx/h - splited bad hit into categories, set fcf as default;
- StDAQMaker:
StPMDReader.cxx - bug fixed;
- StEEmcDbMaker:
eemcConstDB.hh - added more stat flags;
StEEmcDbMaker.cxx - modified for 62GeV AuAU production ;
StEEmcDbIndexItem1.cxx/h - removed;
StEEmcDbMaker.cxx - byStrip[] is now initialized when reading database from a file;
StEEmcDbMaker.cxx/h - fixed to process many runs;
- StEEmcSimulatorMaker:
StMuEEmcSimuMaker.cxx/h - new maker to override the ADC values stored in Monte Carlo MuDsts with values calculated from gains in an instance of the StEEmcDbMaker ;
- StEEmcUtil:
EEmcSmdMap/EEmcSmdMap.h - more methods added;
- StEEmcPool:
more development for number of codes, including StMuEEmcClusterMaker;
- StEvent:
StEventLinkDef.h - added enum StDetectorId, StRichHitFlag and StPwg to dictionary;
StFtpcHit.cxx/h - added constructor based on StFtpcPoint;
- StFlowAnalysisMaker:
StFlowAnalysisMaker.cxx/h - added modifications for ZDC-SMD;
- StFlowMaker:
StFlowConstants.cxx/h, StFlowMaker.cxx/h, StFlowEvent.cxx/h,StFlowCutEvent.cxx - added modifications for ZDC-SMD;
- StFtpcTrackMaker:
StFtpcPoint.cc/hh - const added to GedtDetectorId() and GetHardwarePosition(), creation of StEvent/StFtpcHit removed. This is done in a new constructor of StFtpcit itself;
StFtpcTrackToStEvent.cc/hh - dE/dx calculation taken out, fill of TopologyMap added;
StFtpcTracker.cc - deletion of track array added again, since it doesn't go into a DataSet anymore;
StFtpcTrackMaker.cxx/h - modified to write tracks to StEvent directly, primary vertex is red from StEvent, fillin MonSoftDst table here;
- StTofUtil:
StTofrGeometry.cxx/h - introduced data members to save the Tray and Sensor geometries in the initialization;
optimized the HelixCrossCellIds() function to save CPU time;
introduced a new function projTrayVector();
updated the ClassDef number 1->2 ;
- StTofrMatchMaker:
StTofrMatchMaker.cxx/h - changed according to the update of StTofrGeometry, save CPU time by 100 times;
- St_dst_Maker:
removed ftpc code from St_dst_maker, FTPC hits and tracks are written now in StEvent;
StMatchMaker.cxx, StPrimaryMaker.cxx - fixed bug to process Zero field data, added protection for Zero field data ;
- StRTSClient:
FCFMaker/FCFMaker.cxx - fixed small bug with cl_id and data dump in saveClusters;
moved initialializations from init() to constructor;
modified to turn on zero-truncation, but leave 5cm overlap;
- StStarLogger:
first release of StarLogger( new messenger);
- pams:
sim/g2t/g2r_get.F, genhit.h - account changed for CPP Path for geant321;
ftpc/idl/fcl_fppoint.idl, fpt_fptrack.idl - removed;Database-wise updates:
- StarDb:
Calibrations/tpc/TpcLengthCorrection.20030106.000000.C - adjusted scale for fcf and tcl for dAu, fcf is default; -
May 5, 2004,
new library SL04e has been tagged (on Apr 30), built and tested. SL04e has been released on May 5
New features: track finding and fitting method enumerations changed.
New updates:
- St_base:
added files StMessMgr.cxx/h - moved StMessMgr class from StUtilities for logger;
- StBFChain:
StBFChain.cxx - option y2004x added;
- StDaqLib:
EVP/emcReader.cxx, evpSupport.cxx - new code added which accomodates different flavors of emcp;
- StDetectorDbMaker:
number of files modified to replace the STAR messanger reference with the abstract interface pointer, modification for logger;
- StChain:
StEvtHddr.cxx/h - production time changed in GMT noe;
StMaker.cxx/h - added extra data-member and method for the coming STAR logger;
- StDAQMaker:
StDAQMaker.cxx - modified to use GetEvtHddr();
- StEvent:
StFtpcHit.cxx/h - added additional data member and access methods to hold the position in pad and time units including their std deviation. Constructors updated;
StZdcTriggerDetector.cxx - SMD problem fixed;
StTpcPixel.cxx/h - modified;
new files added StDedxDefinitions.h, StDedxMethod.h, StDetectorDefinitions.h, StDetectorId.h/inc, StTrackDefinitions.h, StTrackMethod.h/inc, StVertexDefinitions.h, StVertexId.h/inc - move enumerations from pams/global/inc => StEvent;
modified files StEnumerations.h, StTrackDefinitions.h, StTrackMethod.inc to add track finding method Id definition;
- StEventMaker:
StEventMaker.cxx - fixed bug in creating StTriggerDetectorCollection;
- StEventUtilities:
StuProbabilityPidAlgorithm.cxx/h - added isPIDTableRead();
StuFtpcRefMult.hh - removed dAu minbias trigger cut;
- StMuDSTMaker:
COMMON/StMuEmcUtil.cxx, StMuEmcCollection.cxx/h - endcap indexing modified;
COMMON/StMuTrack.cxx - initialization modified, changed initialization of mNSigma;
COMMON/StMuIOMaker.cxx/h, StMuDstMaker.cxx/h, StMuDst.cxx/h, StMuArrays.cxx/h- after tof create event fixed;
COMMON/StMuDst.cxx, StMuDstMaker.cxx, StMuIOMaker.cxx/h, StMuPmdUtil.cxx - modified to include TOF data with new schema;
COMMON/StMuDst2StEventMaker.cxx - modified to use GetEvtHddr();
COMMON/StMuDstMaker.cxx - fillHddr() added to fill time stamp;
COMMON/StMuIOMaker.cxx/h - big reorganization of code, now StMuIOMkaer inherits from StMuDstMaker;
COMMON/StMuPmdCollection.cxx/h - declaration of StMuPmdCluster added ;
COMMON/StMuArrays.cxx/h, StMuDstMaker.cxx/h - simplification made ;
- StEmcADCtoEMaker:
StEmcADCtoEMaker.cxx/h - svaeHistograms method added;
small modification for embedding added;
- StEmcMixerMaker:
StEmcMixerMaker.cxx/h - modification for new scheme of saving raw data into StEvent;
- StEEmcDataMaker:
StEEmcDataMaker.cxx - new EEMC hit indexing, new DB access;
StEEmcFastMaker.cxx, StEEmcDbMaker.cxx - modified;
- StEEmcDbMaker:
StEEmcDbMaker.cxx/h - more access methods added, DB cleanup ;
StEEmcDbIndexItem1.cxx/h - DB cleanup and some updates;
- StEEmcUtil:
St2eemcFeeRawMaker.cxx, EEname2Index.cxx - DB cleanup & update ;
EEfeeDataBlock.cxx, EEfeeRawEvent.cxx - header checking added;
- StdEdxY2Maker:
StdEdxY2Maker.cxx/h - added QA hitograms to keep track on bad hits and nSigma cuts ;
- StFtpcTrackMaker:
comment out delete StFtpcTrackingParams::Instance() in FinishRun as a temorary bug fix which crashed MC reco if run number has been changed ;
- StHitFilterMaker:
StHitFilterMaker.cxx/h - make Hitfilter take out those SVT hits not on tracks defined in the constructor;
- StFlowMaker:
StFlowMaker.cxx - make changes to support getting PID on fly for picodst and MuDst;
- StFtpcTrackMaker:
added new files StFtpcTrackToStEvent.cc/hh - initial revision to write StFtpcTracks directly to StEvent;
- StFtpcClusterMaker:
StFtpcGasUtilities.cc - removed double code in averageTemperatureEast;
- StPmdReadMaker:
StPmdReadMaker.cxx - chain 45,46 interchanged (in hardware) issue fixed;
- StRTSClient:
FCF/fcfAfterburner.cxx, fcfClass.cxx - added back-annotation and misc. cleanup;
include/fcfClass.hh - added back-annotation and misc. cleanup;
FCFMaker/FCFMaker.cxx/h - added back-annotation and misc. cleanup;
- StSecondaryVertexMaker:
StV0FinderMaker.cxx - removed cut on v0 being before hit;
- StarRoot:
TTreeIter.cxx/h - modified to allow non splitted objects;
- StStrangeMuDstMaker:
StStrangeMuDstPlayer.cxx - corrected StMessMgr header file to reflect the new interface for logger;
- StSvtClusterMaker:
StSvtAnalysis.cc - added flag as bad hits with 1 anode and peak less than 11;
StSvtClusterMaker - fixed bug that causes default drift vel. to be used instead of value from database;
- StTofpNtupleMaker:
StTofpNtupleMaker.cxx - added some missing updates for year4, added AdcLoRes in ntuple;
- StTofrNtupleMaker:
StTofrCellData.h StTofrNtupleMaker.cxx/h - added AdcLoRes in the ntuple;
- StTofUtil:
modified StTofGeometry.cxx to fix a bug on the mis-matching by the opposite direction tracks;
- StTreeMaker:
StTreeMaker.cxx - GetEvtHddr() implemented;
- StUtilities:
removed files StMessMgr.cxx/h, modified StMessageManager.cxx/h to change the interface for logger;
- St_QA_Maker:
QAhlist_EventQA_qa_shift.h StEventQAMaker.cxx StQABookHist.cxx/h modified to add signedDCA (Impact) plots for globals;- pams/geometry:
geometry/geometry.g - geometry Y2004x introduced which is same as Y2004 but with full Barrel Calorimeter, updated for PMD code;
sisdgeo/sisdgeo1.g - new version by the SSD geometry;
phmdgeo/phmdgeo.g - introduced a proper version flag used to reinstate the standard GEANT cuts in the GSTPAR calls, when version set to 2;
- pams/global:
inc - number of files moved to StEvent to modify enumerations;
egr/egr_impactcl.F, egr_primfit.F - modified,;
egr_fitter.F, egr_impactcl.F, egr_load_globtrk.F modified to make consitent track Fitting/Finding method with description;
ev0 - removed ev0_am3.F v0_reconstruct3.F;
idl - removed dst_pixel.idl;
evr/evr_am.F - modified to make consitent track Fitting/Finding method with description;
- pams/svt:
srs/srs_am.F - get errors correct in direct_gs function;Database-wise updates:
- StDb/idl - clusterControl.idl, ssdBarrelPosition.idl, ssdConfiguration.idl, ssdDimensions.idl, ssdLaddersPosition.idl, ssdSectorsPosition.idl, ssdStripCalib.idl, ssdWafersPosition.idl - added new files with ssd tables;
pmdPed.idl - added pmd pedestal table;
- StarDb/svt/srspars - srs_direct.C modified to change SVT smearing to 80 microns; -
April 8, 2004,
new library SL04d has been tagged, built and tested.
New updates:
- StAssociationMaker:
StAssociationMaker.cxx/h - added switch to control Association based on IdTruth or on Distance; added debug2 output to print out all hits in a padrow, both reco and MC, along with the IdTruth, quality (StHit) and the parentTrack()->key() (StMcHit) as well as the hit coordiantes;
StMcParameterDB.cxx - changed default value of the z cut to 5 mm;
- StBFChain:
StBFChain.cxx - adjusted PMD options, Kink2 will switch -kink;
GenericVertex changed to StGenericVertexMaker when looking for the beamLine option;
added option for CTB matching for StGenericVertexMaker;
added option "MiniMcMk" for creating minimc file in ITTF chain;
added option "MiniMcEven" for loading the StMiniMcEvent library;
added code to set the flag to use the Sti tracks in the AssociationMaker when the "ITTF" option is turned on;
changed the order of the "McAss" and "McAna" options so that they appear later in the ITTF chain, these options should run after StEvent has been created, StMcEvent has been loaded, and after StEvent has been filled with hits, tracks, V0s, Xis and Kinks;
added TOF/PMD data to MuDst;
added "NoRepeat" chain option;
implemented new "LaserCal" option based on FCF(daq100 clustring), previous one left as "LaseCal0";
P2004 switched to a new correction bundle Corr3 using OBmap2D;
added OSpaceZ2 in P2004;
- StDaqLib:
EMC/EMC_BarrelReader.cxx/h, EMC_SmdReader.cxx - added raw data to decoded data banks;
- StEmcADCtoEMaker:
StEmcADCtoEMaker.cxx/h, StBemcData.cxx - PSD is added to the maker;
- StDbUtilities:
StMagUtilities.cxx/h - updated Omega Tau parameters to Run IV values;
increased speed of space charge calculation with new Relaxation Algorithm;
modified to build 3D space charge capabilities;
updated Space charge R2 to use new DB call built by Gene;
- StDetectorDbMaker:
StDetectorDbSpaceCharge.cxx/h - modified to use separate tables for uniform and R2, update SpaceChargeR2;
number of files modified to use STAR message manager;
- StdEdxY2Maker:
StdEdxY2Maker.cxx modified to expand time till 6/1/2004, relax cut of drift distance;
- StEmcADCtoEMaker:
StEmcADCtoEMaker.cxx/h, StBemcData.cxx - modified to fill raw data structure in StEvent, added feature to print maps;
ghost pedestal removal procedure implemented;
- StEmcCalibrationMaker:
StEmcPedestalMaker.cxx/h - added load pedestal method;
- StEEmcDataMaker:
StEEmcDataMaker.cxx - store raw EEMC data, store EEMC hits in StEvent & MuDst;
EEmcDbCrate.cxx/h, EEmcDbItem.cxx/h, tEEmcDbMaker.cxx/h modified towards full access to DB;
- StEEmcDbMaker:
cstructs/eemcConstDB.hh - added EEMCSTAT_HOTSTR for marking hot strips;
EEmcDbCrate.cxx/h, StEEmcDbMaker.cxx - storage of EEMC raw data modified;
- StEEmcUtil:
EEfeeRaw/EEfeeDataBlock.cxx/h, EEfeeRawEvent.h, RootWrapper.cxx - modified ;
EEmcSmdMap/EEmcSmdMap.cxx/h - added methods and data structures to map towers onto SMD strips;
- StEvent:
StL3EventSummary.cxx - check pointer to L3_SUMD in constructor;
StEmcRawData.cxx/h - first revision to write EMC raw data in StEvent class ;
StEmcCollection.cxx/h - added StEmcRawData to collection;
StHit.cxx/h - added method to set mFitFlag;
StZdcTriggerDetector.cxx/h - added ZDC SMD support;
StTriggerData2004.cxx - proper mapping added;
- StFtpcClusterMaker:
StFtpcClusterFinder.cc/h - new data members for pad and time position, pad and time sigma filled;
- StFtpcTrackMaker:
StFtpcTrackMaker.cxx/h - moved destruction of the instance of StFtpcTrackingParams from Finish() to FinishRun();
StFtpcConfMapPoint.cc/h, StFtpcPoint.cc/h - new data members for pad and time position, pad and time sigma added, reference to StFtpcHit added;
StFtpcVertex.cc/hh - new constructor which takes input data from StVertex added;
- Stl3RawReaderMaker:
Stl3RawReaderMaker.cxx - added quality check of raw data quality to prevent inconsistent information in StL3EventSummary, bug fixed;
- StRTSClient:
FCFMaker - added output to FCFMaker if FCF_DEBUG_OUTPUT is defined;
FCF/fcfClass.cxx - added output to FCFMaker if FCF_DEBUG_OUTPUT is defined;
- StMiniMcMaker:
modifications for running ITTF chain in bfc.C:
changed to use StiIOInterface,
cleaned up Init(), InitRun() to handle the changing file names,
initialized a lot of variables and pointers in constructor,
deleted some pointers in Finish, removed the mDebug data member;
StMiniMcPair.h, StTinyMcTrack.h modified to add info to evaluate idTruth information ;
added key to StTinyMcTrack.h, added dominatrack, common hits to dominatrack and average hit quality to StMiniMcPair.h;
dominatrackInfo.cc - added new function to find the dominatrack, the number of hits belonging to the dominatrack and the average hit quality of those hits;
- StMixerMaker:
StMixerMaker.cxx/h - SetSequenceMerging added (matches TPCReader and tpcdaq_Maker methods) to allow run embedding for daq100 clustering;
- StMcAnalysisMaker:
StMcAnalysisMaker.cxx - added information about the matching into the track Ntuple: dominatrack, nHitsIdTruth, n MC hits for the dominatrack, n Fit points for the reconstructed track, n Points (from StDetectorInfo), "quality" = average hit quality of the reco hits belonging to the dominatrack;
- StMuDSTMaker:
COMMON/StMuArrays.cxx/h, StMuDst.cxx/h, StMuDstMaker.cxx/h, StMuIOMaker.cxx/h - modified to implement MuDst for PMD and TOF data;
COMMON/StMuTofHitCollection.cxx/h, StMuTofHit.cxx/h, StMuTofUtil.cxx/h - new files added to handle TOF data;
COMMON/StMuPmdCluster.cxx/h, StMuPmdCollection.cxx/h, StMuPmdUtil.cxx/h - new files added to handle PMD data;
- StGenericVertexMaker:
StGenericVertexMaker.cxx - code modified to look for StGenericVertexMaker instead of GenericVertex;
StGenericVertexFinder.cxx/h, tMinuitVertexFinder.cxx/h, StGenericVertexMaker.cxx - modified to fix identification of bad seeds, use better flagging and message manager;
- StPmdClusterMaker:
StPmdClustering.cxx/h, StPmdClusterMaker.cxx/h - refclust changed to have correct sigma/ncell;
- StPmdReadMaker:
StPmdReadMaker.cxx/h modified for first production;
- StSecondaryVertexMaker:
StKinkMaker.cxx/h - changed logic in acceptTrack();
StV0FinderMaker.cxx/h, StXiFinderMaker.cxx/h - flag to TPT tracks changed;
StV0FinderMaker.cxx - changed default options to : do not use SVT ;
- StSvtDbMaker:
StSvtDbMaker.cxx - fixes made to allow to call INitRun twice as happens in MC data sometimes;
StSvtDbReader.hh, St_SvtDb_Reader.cc, StSvtDbMaker.cxx/h - modified to get daq parameters;
- StSvtClassLibrary:
StSvtDaq.hh - added functions to Daq code;
- StSvtSimulationMaker:
StSvtEmbeddingMaker.cxx/h, StSvtGeantHits.cc/h, StSvtOnlineSeqAdjSimMaker.cxx/h, StSvtSimulationMaker.cxx/h - removed asserts from code so it doesn't crash if doesnt get parameters, just quits with kStErr;
- StSvtSeqAdjMaker:
StSvtSeqAdjMaker.cxx - fixed to stop valgrind complaing;
- StTofSimMaker:
StTofSimMaker.cxx - modified to use m_Mode as a switch for the output histograms;
- StTofrMatchMaker:
StTofrMatchMaker.cxx - bug fixed related to the hit position stored in TofCell;
- StUtilities:
StMessage.cxx/h, StMessageManager.h, StMessMgr.h - modified to add protected Ignore/AllowRepeats() for friend StBFChain class;
- St_QA_Maker:
StEventQAMaker.cxx - fixed filling of eventClass=1 null vertex hist ;
- macros:
examples/StAssociator.C - added switch to control the id or distance association;
bfcMixer.C - added doFCF for FCF embedding mode;- pams/geometry:
geometry/geometry.g - added proper VPD versioning, added version control for the FPD, via the variable FpdmConfig ;
fpdmgeo/ffpdstep.g - added new file to adjust to a new source for the FPD geometry, some code reorganization;
fpdmgeo.g - modified to reflect code reorganization;
fpdmgeo1.g - new code added to reflect the most current configuration;
phmdgeo/phmdgeo.g - updated to complete year 2004 geometry vpddgeo/vpddgeo.g - completed for year 2004 geometry;Database-wise updates:
- StarDb/Calibrations/tracker - added new files to replace default values in the ITTF code;
- StarDb/Calibrations/tpc - modified file pcZCorrection.20030106.000000.C to relax cut of drift distance;
the first version of dE/dx calibration for AuAu 62 GeV added;
- StarDb/global/vertices - added new files (with cuts): ev0par2.20040325.023200.C, exipar.20040325.023200.C for AuAu 62GeV production;
cut set modified for 62GeV production; -
March 22, 2004,
new library SL04c has been tagged on March 19, built and tested.
New updates:
- asps/Simulation, asps/rexe
created new interface to simulation based on starsim and root4star framework;
staf framework was eliminated;
- StDaqLib
EVP/emcReader.cxx - fixed bug and zero-suppression logic; modified due to relocation of rts.h;
EVP/ssdReader.cxxx - added pedestal and noise capability to the SSD reader ;
EEMC/EEMC_Reader.cxx/h - new EEMC daq reader implemented;
GENERIC/EventReader.cxx - modified due to relocation of rts.h ;
SVT/SVTV1P0.Banks.cxx/hh - modified due to relocation of rts.h ;
EMC/StEmcDecoder.cxx/h - preShower decoder included ;
SSD/SSD_Reader.cxx - added pedestal and noise capability to the SSD reader;
TPC/TPCV2P0.cxx/h, TPCV2P0_ZS_SR.cxx - replaced MERGE_SEQUENCES with a StDAQMaker chain parameter;
- StDAQMaker
StEEMCReader.cxx/h - new Eemc daq reader implemented ;
StDAQMaker.cxx/h - removed MergeSequences/DoNotMergeSequences implementation ;
replaced MERGE_SEQUENCES with a StDAQMaker chain parameter;
StTPCReader.cxx/h - implemented SetSequenceMerging();
- StBFChain
StBFChain.cxx/h - switches to starsim framework added;
sequence mrging handling added through tpcdaq_Maker / fcf option;
updated geometry definitions;
tofr/tofp match options added, Kink naming clash resolved, added modifications for ITTF ;
commented out EbyeScaTags;
added option OBmap2D, mask;
- StDbUtilities
StMagUtilities.cxx/h - changed Shorted Ring Algorithm over to Wieman's Bessel Function solution;
added new (faster) BField shape distortion routine, improved space charge calculation ;
added TPC transformations for direction, aligned sectors, protection ;
- StDetectorDbMaker
StDetectorDbFTPCGas.cxx/h - body 5/6 temperature for FTPC West added;
- StEEmcDbMaker
EEmcDbItem.cxx - modified to synchronize;
StEEmcDbMaker.cxx/h, EEmcDbCrate.cxx/h - implemented new EEMC data decoder;
- StEEmcDataMaker
new EEMC daq reader implemented;
- StEEmcUtil
EEfeeRaw/EEdims.h - maxPhi bins added;
- StEstMaker
StEstMaker.cxx - fixed memory leak;
- StFlowMaker
StFlowEvent.cxx/h - added random subs analysis method;
- StFlowAnalysisMaker
StFlowAnalysisMaker.cxx - added random subs analysis method;
- StFtpcClusterMaker
StFtpcGasUtilities.cc - activated reading and usage of additional body temperatures;
- StPmdUtil
StPmdGeom.cxx/h, StPmdDBUtil.h - board status based mapping added;
board status based files added XXX_BoardDetail.txt;
- StPmdReadMaker
StPmdReadMaker.cxx - corrected fillStEvent argument orders;
modified for for PMD run configuration ;
- StLaserEventMaker
the minimum number of valid tracks for a good drift velocity calculation was lowered to 450 if both east and west lasers are up and 225 if one of them is down;
- StPass0CalibMaker
StTpcT0Maker.cxx - modified to call StPreVertexMaker and StVertexMaker, to avoid seg. violation as primary vertex was not in table;
- StRTSClient
FCFMaker/FCFMaker.cxx - added TrackIDs in FCF and cleaned the includes,support for simulations in FCFMaker added ;
FCF/fcfAfterburner.cxx, fcfClass.cxx - added TrackIDs in FCF and cleaned the includes, support for simulations FCFMaker added;
include/fcfClass.hh, fcfAfterburner.hh - added TrackIDs in FCF and cleaned the includes, support for simulations in FCFMaker added;
- StSsdDbMaker
first revision of SsdDbMaker and St_SsdDb_Reader;
- StSsdPointMaker
first revision of Ssd code;
macro-definition of MAXIDMCHIT = 5 for propagating MC info done in StSsdStrip.hh and available for cluster and wafer classes;
MAXIDMCHIT switched to SSD_MAXIDMCHIT;
- StSsdUtil
first revision of SSD Util;
- StSvtDaqMaker
StSvtDaqMaker.cxx - bug fixed in GetDaqReader;
- StSvtClusterMaker
StSvtClusterAnalysisMaker.cxx/h, StSvtHitMaker.cxx/h - modified to remove from global scope variables used in debug mode which caused erratic behaviour;
- StSvtSeqAdjMaker
StSvtSeqAdjMaker.cxx/h - modified to remove from global scope variables used in debug mode which caused erratic behaviour, initialise some variables that valgrind was complaining about;
- St_trg_Maker
St_trg_Maker.cxx - added pedestal and noise capability to the SSD reader;
- StTpcDb
StTpcDb.cxx - updated triggerTimeOffset() due to a change in L0 TriggerActionWd ;
StTpcdEdxCorrection.cxx/h, added utitlity for dE/dx calibration;
- StSecondaryVertexMaker
StKinkMaker.cxx/h - set parent track, reduced redundancy;
- StTpcHitMoverMaker
increased mask for new kFast2DMap in StMagUtilities;
- St_dst_Maker
StKinkMaker.cxx/h - naming clash resolved by changing name;
StFtpcGlobalMaker.cxx - added description of ftpc cluster finding flags;
- St_geant_Maker
switched to starsim framework;
- St_tpcdaq_Maker
implemented SetSequenceMerging() ;
- St_QA_Maker
QAhlist_EventQA_qa_shift.h - added primary vertex finding efficiency plot for event classes;
StEventQAMaker.cxx - updated triggerIDs for Jeff Landgraf's scheme;
- StTofpMatchMaker
StTofpMatchMaker.cxx/h - modified to remove assert(), added member mYear4, use m_Mode to control the output root file;
- StTofrMatchMaker
StTofrMatchMaker.cxx/h - first release, Tofr matching between fired cells and TPC tracks;
- StTofUtil
tofPathLength.cc/hh - added tofPathLength(StThreeVectorD*, StThreeVectorF*, double);
StTofrGeometry.cxx/h - removed InitDaqMap() since a StTofrDaqMap is introduced;
StTofrDaqMap.cxx/h - first release, implemented mapping between daq channel numbers, adc(tdc) channel numbers and cell numbers;
- StTofPool
StTofpMcAnalysisMaker - first revision;
StTofrNtupleMaker - first revision;
- StEStructPool
Correlations/StEStructPairCuts.h;
Fluctuations/StEStructFluctuations.h,StEStructSigmas.cxx/h ;
AnalysisMaker/StEStructMCReader.cxx;- pams/geometry:
btofgeo/btofgeo2.g - finalized y2004 geometry for tof;
vpddgeo/vpddgeo.g - some version of y2004 geometry;
idl/btof_btog.idl - agjusted for y2004 tof geometry;
- pams/global:
dst/fill_dst_event_summary.cc - patches made;
- pams/sim:
g2t codes - modified for starsim;
g2t/g2t_volume_id.g - TOFp/TOFr modifications for y2004;
gstar/gstar_readxdf.c - modified for starsim;Database-wise updates:
- StarDb
dEdxModel - added files dNdE_Bichsel.root, dNdx_Bichsel.root with hitograms for dN/dE and dN/dx from H.Bichsel;
- StDb/idl
LocalTrackSeedFinder.idl - modified;
number of Tpc related .idl duplicate files deleted; -
February 18, 2004,
new library SL04b has been tagged, built and tested. Library was released on February 25.
New updates:- asps/Simulation/geant321:
erdecks - moved STAR version of erdecks codes from rexe to geant321 ;- StAnalysisUtilities:
extended histos for AuAu run 2004, new SVT histos added ;
StHistUtil.cxx modified to separate MinBias histos;
- StAssociationMaker:
StAssociationMaker.cxx/h - added method useEstTracks() for association of estGlobals;
- StBFChain:
StBFChain.cxx/h modified to imply -tcl to fcf;
added loading of libGeom.so required by St_geant_Maker;
modified options layout to accomodate for Xi2,V02 and their new dependence in symbols MuDstMaker library;
- StDAQMaker:
StDAQReader.cxx modified to pass ZeroToken events, added counter for ZeroToken events, modified for EEMC and event pool, modified to provide access SSD data in makers;
added new codes StSSDReader.cxx/h to provide access SSD data in makers;
- StDaqLib:
TPC/TPCV2P0_ZS_SR.cxx - added MERGE_SEQUENCES define;
EVP/daqFormats.h, emcReader.cxx, emcReader.h, evpSupport.h, rtsLog.h,rtsSystems.h - modified for EEMC and event pool;
added rts.h;
new files added evpSupport.cxx, rtsLogUnix.cxx, ssdReader.cxx, ssdReader.h to provide access SSD data in makers;
daqFormats.h, emcReader.cxx/h,,rtsLog.h, rtsSystems.h modified to provide access SSD data in makers;
EMC/StEmcDecoder.cxx - SMD map changed, initial methods for Pre Shower decoding added;
EEMC/EEMC_Reader.cxx/h - modified for EEMC and event pool;
GENERIC/DetectorReader.cxx, EventReader.cxx/h - provide access SSD data in makers;
SSD/SSD_Reader.cxx/h - provide access SSD data in makers;
- StDbLib:
StDbDefs.hh, StDbManagerImpl.cc - added bbc and tracker domains ;
- StdEdxY2Maker:
added assert for GetNRows() of Calibration tables, separate name space with StdEdxMaker for fcn and Landau ;
- StEvent:
StTofHit.cxx/h, StTofSlat.h, StTofCell.cxx/h - changed $LINK to StLink mechanism and added new member ;
StTriggerData.cxx/h, StTriggerData2003.cxx/h, StTriggerData2004.cxx/h modified to use enumeration StBeamDirector for east/west, added member for ZDC vertex;
StBbcTriggerDetector.cxx/h, StCtbTriggerDetector.cxx/h, StEmcTriggerDetector.cxx/h, StTriggerDetectorCollection.cxx/h, StZdcTriggerDetector.cxx/h - added new constructor to load data from StTriggerData;
StEmcPoint.cxx - added code to the constructor;
- StEventMaker:
StEventMaker.cxx modified to load StTriggerDetectorCollection using StTriggerData for runs 2003 and later. For 2001 and 2002 stick to TrgDet table;
- StEventUtilities:
StuFtpcRefMult.hh - updated and fixed multiplicity cuts ;
- StEmcCalibrationMaker:
removed number of old and replaced codes;
added new files: StEmcCalibMaker.cxx/h, StEmcCalibrationMaker.cxx/h, StEmcEqualMaker.cxx/h, tEmcMipMaker.cxx/h, StEmcPedestalMaker.cxx/h;
- StEEmcUtil/StEEmcSmd:
The StEEmcSmdGeom class was split into two classes. All StRoot-independent codes have been moved to new code EEmcSmdGeom.
TVector3 replaces StThreeVectorD in all function calls in EEmcSmdGeom. StThreeVectorD wrappers are provided in StEEmcSmdGeom, for integration into Star framework, added StEEmcSmdGeom::instance();
- StEstMaker
StEstInit.cxx StEstMaker.cxx StEstTracker.cxx modified to avoid crash for missing SVT events by quiting earlier, fixed size array removed;
- StEmcUtil/voltageCalib:
VoltCalibrator.cxx, hvGainCoeff.dat - small modifications ;
- StFtpcClusterMaker:
StFtpcGasUtilities.cc modified for run 2004;
StFtpcClusterMaker.cxx/h, StFtpcFastSimu.cc/hh removed intermediate tables;
- StFtpcTrackMaker:
number of codes modified to remove intermediate tables;
StFtpcTrackMaker.cxx - protection against missing FTPC DAQ data added;
- StHbtMaker:
CorrFctn/NonId3DCorrFctn.cxx - properly initialized variables in NonId3DCorrFctn;
ThCorrFctn/FsiWeightLednicky2.F - fixed characters disallowed by g77;
- StPeCMaker:
StPeCEnumerations.h, StPeCEvent.cxx/h, StPeCLumiEntry.cxx, StPeCLumiMaker.h StPeCMaker.cxx/h, StPeCPair.cxx/h, StPeCTrack.cxx/h, StPeCTrigger.cxx/h - modified to correct eta cut for tracks, charge sorting, added counting of FTPC and TPC primary tracks and bbc information, fixed bug in check of un-analylized MC events;
- StRTSClient:
fcfClass.cxx, FCFMaker.cxx modified to do log conversion inside cluster finder, to make deconvolution consistent with online Merge sequences, in case not merged by DaqLib;
FCFMaker.cxx, fcfAfterburner.cxx increased size of broken arrays;
- StMcAnalysisMaker:
extended rc and mc hits histograms looping over tpc and svt hits;
- StStrangeMuDstMaker:
StKinkMuDst - added keys (IDs) for Kink parent and daughter, updated ClassDef version for added data members;
- StSvtCalibMaker:
added StSvtBadAnodesMaker.cxx/h, map.h - first version of bad anode maker;
- StSvtDaqMaker:
StSvtDaqMaker.cxx/h - few corrections to pedestal reading made and added getDaqReader method ;
- StSvtDbMaker:
StSvtDbMaker, StSvtDbReader, StSvtDbWriter, St_SvtDb_Reader - added rms and daq parameters reading;
- StSvtClassLibrary:
added StSvtDaq.cc/hh - daq parameters object ;
- StSvtQAMaker:
new code for inserting SVT online monitor;
- StSecondaryVertexMaker:
StXiFinderMaker.cxx modified to to run on muDsts as well, added sign of dcaXiDaughters, slightly moved cuts;
StV0FinderMaker.cxx modified to use default options for SVT and ITTF+TPT;
- St_dst_Maker:
StFtpcGlobalMaker.cxx/h, StFtpcPrimaryMaker.cxx intermediate tables to store FTPC hits and tracks removed. Now the TObjArray's of hits and tracks are passed directly to StFtpcGlobalMaker.cxx and StFtpcPrimaryMaker.cxx where they are (still) copied into the dst tables; protection against missing FTPC DAQ data added;
- St_geant_Maker:
St_geant_Maker.cxx/h modified - first revision of Ag2Geom;
- St_QA_Maker:
modified histos for AuAu run 2004, new SVT histos added;
QAhlist_EventQA_qa_shift.h, StQAMakerBase.cxx modified to separate MinBias histos by triggerIDs: general histograms, minbias event histos, central event histos, high tower event histos;
- St_trg_Maker:
St_trg_Maker.cxx, year2003.cxx - provide access SSD data in makers ;pams/geometry:
- geometry/geometry.g - disabled the long since obsoleted version of TOF, should be rewritten;
latest corrections in the SVT geometry have been applied RETROACTIVELY to year2001 geometry tag, This breaks compatibility of the simulated SVT data between earlier simulation runs and the ones to follow;
- calbgeo/calbgeo1.g - small correction to new barrel, logic improvements;
- sisdgeo/sisdgeo.g - positioned the laddre mother volume with the 'many' option to guard ourselves against the quite possible overlap;
- btofgeo/btofgeo1.g - disabled the old configuration;
- btofgeo/btofgeo2.g - modified for run4 MRPC positioning inside TOFr-prime ;
- svttgeo/svttgeo2.g - assigned the 150um to the radial offset in the wafer position;
pams/global/evr:
evr_am.F modified for g77 compiler;
pams/tpc/tpt:
- tpt_merge_line.F, tpt_fit_track.F modified for g77 compiler;
pams/svt,sgr,stk,srs
replaced huge static arrays to dynamical ones to reduce memory usage ;Database-wise updates:
- StDb/idl:
HitError.idl, KalmanTrackFinderParameters.idl,TrackingParameters.idl - added idls for new Calibrations_tracker db;
tofCamacDaqMap.idl, tofConfig.idl, tofModuleConfig.idl,tofPedestal.idl, tofSimPars.idl, tofTrayConfig.idl, tofTzero.idl - updated idls for for Calibrations_tof;
added new TpcCorrection.idl - universal correction struct;
spaceChargeCor.idl - added new column detector ; -
January 25, 2004,
new library SL04a has been created
New updates:- asps/Simulation (starsim, gcalor, geant321) :
a new project developed, code name "starsim", which will replace gstar/staf executable. Better code organization, 'cons' based built of simulation library.- StAssociationMaker:
changed the code to make it backward compatible ;
- StBFChain:
added fixes to combine Trs and fcf (asic threshould + bad pad elimination) ;
added PMD and P2004 start up chain;
OShortR option/correction added;
modified option for SSD, removed from SVTChain;
all options shaped to take advantage of StEvent direct fill;
fixed FCF recent dependency in DAQMaker/DAQLib, introduced DAQ100 Cluster reading, added TpcHitMover support, modified logic for oncl and onlraw;
- St_db_Maker:
St_db_Maker.cxx - new timestamps implemented;
Safe destructor of TDataSet like object used;
- StDaqLib/TRG:
trgStructures2004.h - new trigger structure for 2004 run;
modified TRG_Reader.cxx/hh, added code2004.cxx for the 2004 trigger data format, disabled all trigger sanity check;
- StDaqLib/EVP:
emcReader.cxx/h - updated for EEMC 2004 support;
- StDaqLib/EMC:
StEmcDecoder.cxx - map changed for 2004 run (towers and SMD);
- StDaqLib/EEMC:
EEMC_Reader.cxx/h - updated for EEMC 2004 support;
- StDaqLib/TOF:
TOF_Reader.cxx/hh - changed for run 2004 (pVPD+TOFp+TOFr'); addtional TOFr' ADCs and TDCs put in, added TOTs of TOFr' in, combined in TDCs;
- StDAQMaker:
StPMDReader.cxx modified ;
StTRGReader.cxx/h - updated for run 2004;
StEEMCReader.cxx/h - updated for EEMC 2004 support;
added friend class for FCF(daq100 code) in StTPCReader.h;
- StDbUtilities:
StMagUtilities.cxx - added new routine to handle a shorted ring on the East end of the TPC, also new routine to help redo the space charge calculations;
added code for extra resistor outside TPC to help remedy short;
- StEvent:
first revision of StTriggerData2004.cxx/h - trigger data for run ;
StEventClusteringHints.cxx, StEventLinkDef.h, StTriggerData.h modified to handle StTriggerData2004;
StTpcHit.cxx, StHit.cxx/h modified to add Truth and Quality information from simulation, related to new starsim project;
StRunInfo.cxx/h - added RHIC scaler methods (BBC);
StTriggerData2004.cxx/h - methods to retrieve ZDC data added;
- StEventMaker:
fill new member of StRunInfo (RHIC scaler);
- St_dst_Maker:
StFtpcGlobalMaker.cxx, StFtpcPrimaryMaker.cxx modified to activate Markus' code to fill values at outermost point on ftpc tracks;
- StMcEvent:
added inheritance from StObject;
- StEmcADCtoEMaker:
upgraded for year 2004 configuration;
StBemcData.cxx - updated for Y2004 data in the east side;
- StEEmcDbMaker:
StEEmcDbMaker.cxx/h, EEmcDbItem.cxx/h - developed towards run 2004, saved ped in DB format;
eemcDbPMTcal.hh, eemcDbPMTconf.hh, eemcDbPMTname.hh, eemcDbPIXcal.hh, eemcDbPIXname.hh - extending DB arrays;
EEmcDbItem.cxx - added MAPMT pixel names;
StEEmcDbMaker.cxx/h - added methods for accessing preshower, postshower and SMD info;
- StEEmcUtil
EEfeeRaw - developed for run 2004, new implementaion for miniDaq ;
EEmcSmdMap - first implementaion of mapping between SMD strips and towers;
StEEmcSmd - member function added to return a vector pointing to the intersection of two strips;
- Stl3RawReaderMaker
fixed the bug which crashed the chain if there were no l3 data;
- StMixerMaker
StMixerMaker.cxx/h - added (GEANT) track Id information in Trs; propagated it via St_tpcdaq_Maker; account interface changed in StTrsZeroSuppressedReaded ;
- StMuDSTMaker:
THack::DeleteClonesArray added for deleting, to avoid ROOT bad features ;
- StStrangeMuDstMaker :
StStrangeMuDstMaker.cxx - delete controllers added in dtr, included events with no primary vertex;
- StSvtSimulationMaker:
further improvements of codes StSvtElectronCloud.cc/hh, StSvtHybridSimData.cc, StSvtSignal.cc/hh, StSvtSimulation.cc/hh, StSvtSimulationMaker.cxx to get simulator looking like reality ;
new code added StSvtOnlineSeqAdjSimMaker.cc/hh to simulate teh online daq response;
StSvtEmbeddingMaker.cxx/h - new version of embedding maker ;
removed StSvtHybridSimData.cc/hh;
final new version of SVT simulator accomplished;
- StSvtCalibMaker:
StSvtPedMaker.cxx/h modified to go with embedding;
- StSvtSeqAdjMaker :
StSvtSeqAdjMaker.cxx modified to remove gain calibration files and common mode moise subtraction;
- StSecondaryVertexMaker:
StV0FinderMaker.cxx, StXiFinderMaker.cxx - Bfield + consistency int/short;
- StFtpcClusterMaker:
added files StFtpcGasUtilities.cc/h to move pressure and gas corrections from StFtpcClusterMaker.cxx to StFtpcGasUtilities;
replaced all instances of StFtpcReducedPoint and StFtpcPoint with StFtpcConfMapPoint;
- StFtpcSlowSimMaker:
StFtpcSlowSimMaker.cxx modified to use StFtpcGasUtilities to obtain current pressure and FTPC gas temperature;
- StFlowMaker:
modified to read from PicoDST;
- StFlowAnalysisMaker:
implementation of v1{EP1,EP2}. This method is set to be the default for v1 now;
- StMcEvent:
included Endcap EMC hit collection in StMcEvent and Endcap hit vector in StMcTrack;
made changes to check the volume id of FTPC hits, new volume id's run from 1000 to 2906 (they include the sectors);
- StMcEventMaker:
Endcap EMC collections introduced into StMcEvent, read the corresponding g2t table for the hits, decode the volume Id and add it to the proper containers in StMcEvent and StMcTrack;
- StPmdReadMaker:
first revision of Pmd data reader;
- StPmdClusterMaker:
StPmdClusterMaker.cxx - PmdReader access included ;
- StPmdUtil:
StPmdGeom.cxx - ADC2EDEP added; StPmdDBUtil - first revision;
- StPmdCalibrationMaker:
first version of StPmdCalibConstMaker;
- StPmdSimulatorMaker:
StPmdSimulatorMaker - calibration constant values updated ;
- StRTSClient(daq100 code)
FCFMaker - daq100 clustering code developed, first production release;
FCF - daq100 clustering code developed, first production release;
- StTpcDb :
added St_tpcGainC.cxx/h, St_tpcPedestalC.cxx/h for pedestal and tpcGain;
- StTpcHitMoverMaker:
first version of the TpcHitMoverMaker which purpose is to take care of the corrections (StMagUtilities) previously made in TPT. This is needed for ITTF integration;
- StTofMaker:
changed for run 2004 - 'pVPD+TOFp+TOFr', additional TOFr' ADC and TDC channels put in, added TOTs of TOFr' in;
- StTofpMatchMaker:
StTofpMatchMaker.cxx modified to change default TDC and ADC ranges;
- StTriggerDataMaker:
StTriggerDataMaker - updated data for run 2004;
- StTrsMaker:
StTrsWireHistogram.cc modified to fix the problem that mIoSectorSpacing has never been defined and this causes that Inner Sector has randomly been ejected;
added (GEANT) track Id information in Trs code;
- St_tpcdaq_Maker:
added (GEANT) track Id information in Trs code, propagated it via St_tpcdaq_Maker;
added receiver board and mezzanine to daq100cl output table, changed encoding of rb_mz;
- St_trg_Maker :
year2003.cxx - disabled all trigger sanity checks;
- St_QA_Maker:
preparations for run 2004, added some svt plots;- St_base:
moved StString from St_base to StDbLib;
- StChain:
StMaker.cxx/h - safe destructor of TDataSet like object added;
- StarClassLibrary:
added new utility class StMath;
- StarRoot:
THack.cxx/h - THack class added to hack ROOT;- pams/geometry - developed towards 2004 geometry:
year2001 SVT correction was done retroactively, radial displacement 150 um instead of 250um, now year2001 tag isn't backward compatible;
pixel detector geometry updated;
geometry/geometry.g - created facility to modify the TPC gas density programmatically;
changed the SSD config number in y2004 to "2": 10 ladders, the "1" being one ladder installed previosuly and "3" being the complete 20 ladder configuration;
changed the correction number scheme for new code, svttgeo3;
barrel EMC and SSD updated for the year 2004 run with current geometry;
the configuration variable for the beam pipe introduced;
tpcegeo/tpcegeo.g - programmatically switch to a new version of the P10 gas density. This way, we maintain backward compatibility;
svttgeo/svttgeo2.g modified to accomodate the pixel detector hence the beampipe support AND the inner radius of the SVT mother both need to be shrunk;
svttgeo/svttgeo3.g - Silicon Strip Detector has been completely removed from here and is now residing in sisdgeo.g;
sisdgeo/sisdgeo.g - first functional version of Silicon Strip Geometry separated from the previous code in the SVT;
pipegeo/pipegeo.g - added the aluminum pipe config as a separate entry, as opposed to setting parameters directly from geometry.g, added a version with a slim central pipe section, so futher the studies related to the pixel detector;
- pams/sim/g2t:
g2t_volume_id.g - added the pixel detector volume encoding;
- pams/gen:
removed old mevsim, venus, pythia versions ;
- pams/tpc/idl:
daq100cl.idl - added receiver board and mezzanine to daq100cl output table, changed encoding of rb_mz;
- pams/tpc:
added IdTruth information to the number of codes related to new 'starsim' project ;
- pams/svt/srs:
srs_am.F - changed default resolution to 150 microns in all directions;Database-wise updates:
- StDb/idl:
modified files: eemcDbADCconf.idl eemcDbPMTcal.idl eemcDbPMTconf.idl - extension of EEMC calibration;
added: eemcDbPIXcal.idl, eemcDbPIXname.idl - extension of EEMC calibration;
tofCamacDaqMap.idl - CAMAC daq map for TOF detectors;
tofConfig.idl, tofModuleConfig.idl, tofTrayConfig.idl - MRPC-TOF (TOFr et al.) configuration files;
tofSimPars.idl - MRPC TOF calibration parameters file ;
tofrCaliPars.idl - TOFr calibration parameters (year3,4)file ;
tofPedestal.idl, tofTzero.idl, tofCorrection.idl - MROC TOF calibration parameters;
ftpcGasOut.idl - added bodyheat 5 and 6;
bemcHwpedestal.idl, bemcKill.idl, bemcPosition.idl, slsCtrl.idl, svtDaq.idl, svtRms.idl, tpcFieldCageShort.idl - added new idls for new tables for Calibrations_l2, Calibrations_svt, Geomerty_ssd;
HitError.idl, KalmanTrackFinderParameters.idl, KalmanTrackFitterParameters.idl, LocalTrackSeedFinder.idl, TpcAdcCorrection.idl, TpcDriftDistOxygen.idl, TpcLengthCorrection.idl, TpcMultiplicity.idl, TpcdEdxCor.idl, TpcdXCorrection.idl, TrackingParameters.idl, tpcPressureB.idl, LocalTrackSeedFinder.idl, bemcKill.idl - ITTF parameter tables descriptions;
- StarDb/global/vertices:
ev0par2.20031201.000000.C, exipar.20031201.000000.C - added preliminary AuAu cuts for run 2004;
- StarDb/ITTF:
KalmanTrackFinderParameters.C, KalmanTrackFitterParameters.C,SvtTrackingParameters.C, TpcHitError.C, TpcTrackingParameters.C, LocalTrackSeedFinder.C - first revision of ITTF parameter tables; -
December 8, 2003,
library SL03h has been updated with the next codes
- StEvent: StHelixModel.cxx, StTrack.cxx,StTrackNode.cxx;
- StEventMaker: StEventMaker.cxx
- StEventUtilities: StuFtpcRefMult.hh
- StMuDSTMaker/COMMON: StMuDstFilterMaker.cxx, StMuDstFilterMaker.h, StMuDstMaker.cxx, StMuEmcCollection.cxx, leak fixed
- StarRoot: TDirIter.cxx, THack.cxx, THack.h
- StarClassLibrary: StMath.cc, StMath.hh
- St_QA_Maker: StEventQAMaker.cxx, St_QA_Maker.cxx
Library has been retagged. -
November 14, 2003,
new library SL03h has been released. Library was built on redhat72 and redhat80
New updates:
- ROOT version 3.10.01
- all codes have been adjusted to redhat8.0 platform with gcc3.2 compiler, memory leasks in the number of codes were fixed;
more specific updates:
- StDbBroker:
removed all strstream objects in favor of stringstream+string directly in StDbBroker.cxx and StDbWrappedMessenger.cc
- StDbLib:
got rid of all ostrstream objects; replaced with ostringstream+string; modified rules.make and added file stdb_streams.h for standalone compilation,initialized mhasBinaryQuery flag in MysqlDb.cc ;
fixed leak of timeValues array in StDbSql.cc;
- StDaqLib/TRG:
code2003.cxx - new sanity check for 2003;
- StDaqLib/TPC:
protection against empty TPCSEQD banks added;
- StAssociationMaker/EMC
StEmcAssociationMaker.cxx/h modified;
- StBFChain:
added FCF option, y2003x option, l3onl in 2003 chains, added SetCorrection and GetCorrection for DAQ100 chains. This is autimatically set to 0 with "fcf" option and to 0x7 (111) otherwise;
- StEvent:
StTpcDedxPidAlgorithm.cxx - switch from primary to global track momentum for Nsigma calculations, replaced BetheBloch::Sirrf by m_Bichsel->GetI70 for nSigma calculations (StContainers.h) ;
StTrack.cxx, StTrack.h added setKey() method;
- StEventUtilities:
BetheBlochCalibrator.C - updated default parameters;
- StBichsel:
added parameterization for P10; removed ToF correction, account dE/dx parameterization instead of dE for I70;
added GetdEdxResolution.cxx for calculation of relative error in dE/dx for runs II and III;
- St_dst_Maker
modified StPrimaryMaker.cxx, StVertexMaker.cxx to write out the TPC only vertex as a calibration vertex if est vertex found, some modification for meaning of the EST mode;
StKinkMaker.cxx - TObjArray::SetOwner() added;
- EEmc code developed:
StEEmcUtil/StEEmcSmd - replaced hardwired SMD geometry file, StEEmcSmdGeom improved and reorganized;
StEEmcUtil/EEmcGeom, removed Stiostream/iostream from the source code, updated for updated for the new StEEmcSmdGeom
StEEmcUtil/EEfeeRaw, remove Stiostream/iostream from the source code
StEEmcPool created, added Conscript;
StEEmcPool/muDst - added example of access to EEMC data+DB+geom from muDst, updated for the new StEEmcSmdGeom;
StEEmcPool/LCP - added files: StMuLcp2TreeMaker.cxx StMuLcp2TreeMaker.h for extraction of LCP from muDst;
StEEmcDbMaker - access to DB table implemented, flavor option added,cstructs/eemcConstDB.hh - redefinition of stat bits, added eemcDbXMLdata.hh- XML data;
StEEmcDataMaker - new adc--> energy formula, still no absolute gain;
- StdEdxY2Maker:
moved stuff from FinishRun to InitRun, added Y2003 calibrations, added fix for run II fiducial volume cut;
- StMcEvent:
number of codes modified and added- addition of Tof classes and Pixel classes. Modified track, event, and container code to reflect this, fix bug in StMcVertex and in clearing of some hit collections;
- StMcEventMaker:
StMcEventMaker.cxx/h - filling of Tof and Pixel classes;
- StMuDSTMaker:
StEmcCollection and StMuEmcCollection developed, memory leak fixed;
StStrangeMuDstMaker: modified files StXiI.hh StXiMc.hh StXiMuDst.cc StXiMuDst.hh to calculate Xi momenta at/near primary vertex;
COMMON, modified StMuDst2StEventMaker.cxx to pass proper maker name;
first revision of StMuIOMaker.cxx and StMuIOMaker.h;
macros: first revision of exampleStMuIOMaker.C;
StMuDst.cxx StMuDst2StEventMaker.cxx StMuEmcUtil.cxx - updated for EMC data;
StMuDst.cxx - added filling of the topology map in the createStTrack function, added filling of track id to createStTrack() function;
StMuDstMaker.cxx - TClones::Clear added into StMuDstMaker::clear to avoid empty ebjects writing;
StMuProbPidTraits.cxx/h, StMuTrack.cxx - added error on dEdx measurements;
StMuProbPidTraits.h - incrmented ClassDef version numbber;
- StEmcADCtoEMaker:
StEmcADCtoEMaker.cxx : small modification in the histogram binning, patched to fix the problem with SMD-phi pedestals saved on database ;
modification in the way StEmcADCtoEMaker handles the database requests, added the option of reading muDst events directly (need to use StEmcPreDbMaker in order to set the correct timestamp for database);
removed SMD capacitors 124 and 125 from data for dAu and pp Y2003 runs only, timestamp flagged so it will work only for this data;
removed muDST option from StEmcADCtoEMaker;
new methods added in order to select either energy of pedestal cut for the SMD hits;
- StEmcMixerMaker:
small modifications;
- StEmcSimulatorMaker:
changed searching order for Geant hits;
- StPreEclMaker:
StEmcPreClusterCollection.cxx, StPreEclMaker.cxx have been changed to allow for clustering using hits with calibrationType < 128;
- StFtpcTrackMaker:
initialized mNumMainVertexTracks in StFtpcConfMapper.cc;
StFtpcTrackingParams.cc modified to use gufld to determine magnetic field factor;
- StFtpcClusterMaker:
StFtpcClusterMaker.cxx/h - removed temporary fix to prevent segmentation violation which occurred when more than one run per job;
StFtpcFastSimu.cc - calculate azimuthal angle phi in FTPC local coordinate system;
StFtpcGeantReader.cc/h modified to create member functions to extract ftpc plane and sector number from the GEANT volume id;
- StFtpcSlowSimMaker:
StFtpcSlowSimulator.cc modified to use StFtpcGeantReader member function to extract FTPC plane number from GEANT volumeID;
- StFtpcDriftMapMaker:
remove obsolete version of StFtpcMagboltz2, changes related to StMagUtilities constructer ;
- StStrangeMuDstMaker:
modified files StXiI.hh StXiMc.hh StXiMuDst.cc/hh to calculate Xi momenta at/near primary vertex;
StKinkBase.hh, StV0Mc.hh, StV0MuDst.hh, StXiMc.hh,StXiMuDst.hh - changed the order of inheritance and increased version numbers;
- SSD detector related code:
developed significantly, number of new codes added in StSsdPointMaker;
StSsdClusterMaker;
StSsdEvalMaker;
StSsdSimulationMaker;
- StTofUtil:
StTofCellCollection.cxx, StTofCellCollection.h - first release, used by TOF MatchMakers;
StTofrGeometry.cxx StTofrGeometry.h - first release, refer to tofPathLength.hh for function definitions;
tofPathLength.hh - first release, function definitions in seperate header file;
codes: StTofDataCollection.cxx/h, StTofSlatCollection.cxx/h, StTofHitCollection.cxx/h moved from StTofMaker to StTofUtil;
- StTofpMatchMaker:
first release of StTofpMatchMaker.cxx/h;
dBase updates: removed initLocalDb option, introduced dBase parameters for strobe event definitions, event counters and one pointer;
- StTofpNtupleMaker:
StTofpMatchData.h, StTofpNtupleMaker.cxx, StTofpNtupleMaker.h, StTofpSlatData.h - first release;
- StTofSimMaker:
zeroed pointers in constructor, StTofSimMaker.cxx -changed location of header files for the local collections;
- StTofMaker:
zeroed geometry pointer;
- StTrsMaker/src/StTrsZeroSuppressedReader.cc:
fixed bug in StTrsZeroSuppressedReader.cc intruced during gcc 3.2 updates;
- StRTSClient:
FCFMaker modified, changed name of the class from DaqClf to RTSClientFCF, added the t extents cuts to fcfClass.cxx, skiped row 13;
- Pmd code :
StPmdClustering.cxx- Dipak's changes on centroid;
StPmdUtil - CluX, CluY added;
StPmdSimulatorMaker - Dipak's changes;
- St_tpcdaq_Maker:
chain control of NOISE_ELIM GAIN_CORRECTION ASIC_THRESHOLDS added;
- St_base:
StTree.cxx - recognition of .MuDst.root added, in StFileI.h, StTree.cxx/h StFile::AddFile(file,remove) option added;
- StChain:
StMkDeb.cxx/h - simple debugging class added ;
- StIOMaker:
zero fileset is added to clear the logic;
- StarClassLibrary :
StHelix.cc, StHelixD.cc,helixTest.C - protection agains overfloat added into pathLength(StThreeVector,StThreeVector) ;
- StarRoot:
TH1Helper class added ;
- StUtilities:
changed option storage in StMessage.cxx/h, added some new cout-like functions and friend functions in Messager ;
initialize and test ostrstream buffer sizes;
- St_geant_Maker:
St_geant_Maker.h - added a declaration a a pointer to the structure geom_gdat, needed for the propagation the GEANT run data geometry tag and field scale, added the handling of the gdat structure, for now being written into runco file;
- St_trg_Maker:
bug in duplicated.code has been fixed and file was replaced with St_trg_duplicated.code;
- pams/geometry:
pixlgeo.g -a more functional version with one sixth of all ladders properly populated, added more tunning parameters for more precise geometry definition, introduced the mother volume for each ladder which contains both passive and active silicon layers, introduced mother volume for sectors ,(groups of 4 wafers)adjusted the sector opening angle, finished the changes needed to organize the detector into 6 symmetrical sectors, added the sensitivity and hits definition to the wafers' active layers;
phmdgeo.g - Dipak's new version implemeneted, CUTGAM and CUTELE values are introduced in the sensitive medium, proper mixture of Ar+CO2(70:30) has been introduced;
svttgeo1.g, r.1.1 - number of corrections to the silicon geometry: geometrical position of the silicon wafer,subsequent chick-ins includes the missing G10 PCB's and revised warter manifolds;
svttgeo2.g, r.1.1 - seriously updated version of the SVT geometry;
r.1.2 - modified the copper cable bundle geometry to allow for the inclusion, of the water feeds. Changed the strut material from Be to Carbon;
geometry.g - keep the newer version of the FTPC support pieces and add a call the new SVTT module, which will include a number of corrections, implemented y2003a and y2003b geometry, swap the tags y2003(b,c) to arrange them chronologically for better mneumonics, introduced variable for steering of the Silicon Strip detector code, renamed Y2003C tag into Y2004;
changed the semantics of the variable Geom, store the complete geometry tag in the variable Geom,Change the subroutine "geometry" into a "module" which process instruments it to access and manipulate ZEBRA banks as structures, introduced the bank GDAT, as a sub-bank of GEOM, which for now contains the field scale and the tag;
added file geom_gdat.idl - the automatically generated IDL describing the GDAT sub-bank of the GEOM bank, for the purpose of the Root interface, moved to different location later to reduce cross dependencies;
- pams/sim/g2t:
g2t_volume_id.g - the numbering scheme of the FTPC volumes has been changed and the component variables renamed for better readibility, the cryptic variable ibublic was renamed to iWheel;
- asps/agi/gst/agsim:
memget.c modified to make the function memgetf much less cryptic in terms of variable names and comments, introduced proper error checking whereby both ERRNO and the pointer form malloc are checked for validity;
agsim.g - better handling of the pointer returned by the function MEMGETF;
- asps/rexe:
Conscript - force usage of g77 instead of PGI for RH systems to avoid crash in grndmq ;Database-wise updates:
- StDb/idl - pVPD configuration settings and strobe event definitions;
- StDb/idl/eemcDbPMTstat.idl - EEMC upgrade 1;
- StDb/idl/tpcPedestal.idl - added TPC pedestal table description;
- StarDb/Calibrations/tpc - add one row for I60 in file TpcLengthCorrection.20010701.120000.C;
added tables for Y2003 dE/dx calibrations ;
TpcLengthCorrection.20030106.000000.C add new correction after accounting dE/dx nonlinearity ;
- StarDb/Calibrations/emc/y3bsmde - pedestals added;
- StarDb/Calibrations/emc/y3bsmdp - pedestals added;
- StarDb/dEdxModel - added parameterization for P10, replaced dE parameterization by dE/dx one for I70;
- ftpc calibrations have been worked out and put on DB, added tables:
under Conditions_ftpc table ftpcHDLCTemps;
under Calibrations_ftpc table ftpcGasOut;
- EMC calibrations corrected;
- new tower calibrations added; -
August 25, 2003,
new library SL03f has been updated with next codes to fix bugs:
- St_dst_Maker - ;
- StSecondaryVertexMaker - get sign AND magnitude of mag field correctly for Xi and V0 finder ; -
August 6, 2003,
new library SL03f has been created and released August 7
New updates:
- StBFChain: added V02 and Xi2 finding options, added svt V0s option, SVT Hit filtering implemented, svtMatchVtx option added so EST could be used for vertexing;
- StEvent: added StSPtrVecCalibrationVertex to I/O list, StTofSlat - revised version: new but not inheriting from StHit as before, StL0Trigger - fix for spin bits added;
- StHitFilterMaker: set options to delete TPC and SVT hit if Zert >30. If ZVert<30cm save all good svt hits and TPC hits on tracks;
- StFlowMaker: added etha cuts for event plane selection separated for FTPC east and west, PtWgtSaturation parameter introduced, get rid of beam gas events events with one empty FTPC or one empty half of the TPC are removed;
- StFlowAnalysisMaker: PtWgtSaturation parameter introduced, fixed for EtaSym plots implemented;
- StMuDSTMaker/COMMON: multiplicities for FTPC added, updated to include EEMC data in MuDst, updates for EMC data;
- StJetFinder: StTpcFourPMaker.cxx -changed mass calculation to calculate probability weighted mass average, StEmcTpcFourPMaker.cxx modified to use probability weighted mass calculation, subtracts track emc deposited energy from nearest first EMC energies until track emc deposited energy is used up or too away;
- StSecondaryVertexMaker: StXiFinderMaker.cxx modified to take Bfield calculated in V0Finder;
- StSvtClassLibrary: StSvtHybridPixelsD - added duble class for hybrid pixels for slow simulator;
- StSvtClusterMaker: changed errors to 300 microns;
- StSvtSeqAdjMaker: fixed pedestal offset to be 20 not 10 change variables to int from floats to avoid casting problems,changes to run slow simulator added;
- StSvtSimulationMaker: new revision to improve simulation code;
- StTofSimMaker: added upper adc and tdc limits, geometry initialization moved to InitRun();
- StPidAmpMaker: changed fit range;
- St_dst_Maker: StVertexMaker.cxx, MatchedTrk.cxx - set up codes to find vertex using SVT matched tracks if that mode is selected;- pams/sim/idl: g2t_event.idl - added the number of rejected events, needed to properly handle normalization in the rare signal Monte Carlo studies; g2t_pix_hit.idl - added structure for the pixel detector;
- pams/sim/g2t: g2t_get_event.F - updated format of the event header, including rejected events scaler, mheadrd.g - updated the event header Zebra bank; g2t_pix.F - added structure for the pixel detector;
- pams/sim/gstar: gstar_input.g - added the rejected events scaler;Database-wise updates:
- StarDb/global/vertices: added parameter files with legitimate values for SVT+TPC during pp running;
- StarDb/emc/simulator: modified for no database request to make possible to run full barrel EMC in MC data; -
July 18 2003,
new library SL03e has been created
New updates:
- new ROOT version 3.05.04
- StEvent: major revision of ToF classes, initial revision of StTofCell, restored plural for data members in StTofCollection, removed dependcies on DAQ lib in header file in StL3AlgorithmInfo;
- StAssociationMaker: modified no longer use find_if for FTPC to solve a bug for y<0, initialize tpcHitDistance and svtHitDistance to avoid a warning, modified to make z cut depends on z_mc, parameterization made in the parameter DB with a linearly increasing rms, symmetric in +/- z;
- StBFChain: RY2003X, C2003X, Y2003X option added;
- StChain/StMaker.cxx: modified to call InitRun even if no run at all,
- StDaqLib/FPD: added method to remove unprintef chars;
- StDaqLib/GENERIC: added method to remove unprintef chars;
- St_db_Maker: implemented y2003x = 20021115 geometry as for year2003 to run J/Psi HIJING simulation ;
- StDbUtilities/StMagUtilities.cxx: added new function called FixSpaceChargeDistortion( ), it can be used to convert the old (Uniform) space charge corrections to the new (1/R**2) space charge corrections. This correction can be applied to individual track momenta on the microDSTs and it does not require a re-production of the data to get the 1/R**2 spacecharge corrections;
- StEEmcUtil/EEfeeRaw: new additions, added a toplevel makefile, add trigger data to ezTree, rewritten implementation of EEmcL3Tracks using TClonesArray, implemented a common Makefile and mklinkdef.pl, added dE/dx info, added spin bits in EEstarTrig, added getNumberOfTracks method in EEmcL3Tracks.h,add file destriptor to print() method in EEstarTrig, added L3 track flag to EEmcHelix, added track length and number of points in EEmcL3Tracks, added check if trigID in EEstarTrig, added run number to the header EEmcEventHeader.h, updated root version number in EEmcEventHeader.h EEstarTrig.h;
- StEmcUtil/filters: removed redundant persitency ClassDef(,0) in StEmcFilter.h;
- StEEmcUtil: implemented a common Makefile and mklinkdef.pl, added install target to the Makefile;
- StEEmcUtil/StEEmcSmd: added geometry methods for StiEEmc;
- StEpcMaker: added setPrint() method;
- StEventUtilities: StuProbabilityPidAlgorithm updated for dAu PIDtable;
- StFlowAnalysisMaker: modified to get v4 and v6 with respect to the 2nd harmonic event plane;
- StFlowMaker: made event plane cuts now only odd and even, instead of different for each harmonic;
- StFtpcClusterMaker: modified to get min,max gas temperature and pressure limits from database instead of from parameters, removed inner cathode and cluster geometry parameters from ftpcClusterPars, modified to get inner cathode and cluster geometry parameters from database, made changes due to renaming table ftpcClusterGeometry to ftpcClusterGeom, added cathode offset information to constructor for SlowSimulator, modified not to re-flavor FTPC drift maps if already flavored to avoid creating memory leak which could occur if flavor changes within one *.fz file (only for MC data) ;
- StFtpcMixerMaker: modified to use the same StFtpcDbReader constructor as used by Sti/StFtpcDetectorBuilder;
- StFtpcTrackMaker: changed for dAu calibrations, added check for simulated hits before rotation commented out when rotation of hits has been implemented in StFtpcSlowSimMaker, pointer to geant taken out;
- StFtpcSlowSimMaker: added rotation of hits from global GEANT coordinates into local FTPC coordinates, this uses an instance of StFtpcTrackingParams, added database access for cathode offset information and functionality for cathode offset simulation;
- StMuDSTMaker/COMMON/StMuEmcUtil.cxx: bug fixed in angle calculation;
- StarClassLibrary: removed redundant dependency in BetheBloch.h, StarClassLibraryLinkDef.hh, removed ClassImp in BeteBloch, changed local variable name in pathLenght in StHelix.cc & StHelixD.cc ;
- StPreEclMaker: added setPrint() method;
- StJetFinder: modified StJetOutputMaker, eliminated JetEvent, added initProbabilities to StProjectedTrack class, fixed indexes;
- St_tpcdaq_Maker fixed not to skip event if there are no TPC hits and process with other detectors;
- StPmdClusterMaker: increased lev1, lev2 dimension from 20 to 50;
- StPmdDiscriminatorMaker: several changes to include NN;
- StPass0CalibMaker: added ppFPDw-slow;
- StStrangeMuDstMaker: encoded of FTPC mults, changed virtual functions, Updated ClassDef version for altered inheritance in StKinkMc.hh StKinkMuDst.hh StXiMc.hh, missing DcaService added;
- StSecondaryVertexMaker: StV0FinderMaker.cxx and StXiFinderMaker.cxx modified to use SVT tracks, fixed bool calculations, added exits when bad params, reshaped;
- StTofUtil/StTofGeometry.h : changed all InitXXX() methods from private to public;
- StMuDSTMaker/COMMON/macros: added StEventReadTest.C - a small macro that doesn't do anything but reading StEvent;
- StEbyeDSTMaker: added macros for pt fluctuation analysis (AsciiOut.C DeltaSigma.C EbENtuple.C GammaPlots.C Gammas.C);
- StSpinMaker: added trigger id mask;
- StRrsMaker: changed gain for charged particle: 2. -> 5;
- StHbtMaker/ThCorrFctn: added new FSI weight calculator from R. Lednickuy for calculation of proton-antiproton and lambda-lambda correlations;
- fixed bug related to triggerData2003, next makers have been updated: St_base, StDaqLib/GENERIC, StDAQMaker, St_db_Maker, StTriggerDataMaker, StDaqLib/TRG, StEvent, Stl3Util/gl3, Stl3Util/foreign/TRG, StEventMaker,StStrangeMuDstMaker, t_trg_Maker, StSpinMaker;
- test for nonexistance of XXXReader added to the next makers: StFpdMaker, StMixerMaker, StEEmcSimulatorMaker, St_tpcdaq_Maker, StRawTpcQaMaker, StEEmcDataMaker, StEEmcDbMaker, StFtpcSlowSimMaker, StTpcCalibrationMaker, StFtpcMixerMaker, StSvtCalibMaker, StTofMaker, StFtpcClusterMaker;
- macros/analysis/doFlowEvents.C: event plane cuts made now only odd and even, instead of different for each harmonic;
- macros/StMuDstMaker.C: added Lee's changes for the new V0Finder;Database-wise updates:
- StDb/idl: ftpcClusterPars.idl - parameters moved to offline database, moved min,max pressure and gas temperature to Calibrations_ftpc/ftpcGas in database, remove inner cathode and cluster geometry parameters from ftpcClusterPars,
- StDb/idl: ftpcGas.idl - added max,min pressure and temperature limits for ftpc gas to database, changed the order of the new fields to match database
- StDb/idl: ftpcClusterGeometry.idl - added run dependent values used by StFtpcClusterMaker to database, replaced with ftpcClusterGeom.idl to make the name shorter,
- StDb/idl: ftpcInnerCathode.idl - added inner cathode offsets to offline database,
- StarDb/ftpc: removed inner cathode and cluster geometry parameters from ftpcClusterPars, corrected row size, -
June 17, 2003,
library SL03d has been updated with codes
- StEvent: StTriggerData.h, StTriggerData2003.cxx, StTriggerData2003.h
to provide proper reading trigger data
Library has been rebuilt, updated codes retagged and released as NEW -
May 23, 2003,
new library SL03d has been created
New features: several bugs and memory leak have been fixed,
next codes were updated:
- StBFChain, added modification for clear DAQCTB embedding, re-propagated l3 changes from repaired file
- StEventUtilities, StuProbabilityPidAlgorithm.cxx modified to destroy myBandBGFcn in destructor;
- StDetectorDbMaker, added level_0 prescal, FTPC voltages, IntegratedTriggerID, all trigger info integrated to one database table;
StDetectorDbTpcRDOMasks, added error message to standard out if no table is found in the database;
- StMcEvent, added data members from modified g2t_event table: event generator final state tracks, N binary collisions, N wounded nucleons East and West, N jets;
- StMiniMcEvent: added data members for svt and ftpc fit points and hits for StTinyRcTrack ; added methods to calculate px, py, and p from the available pt, phi and pz, for global and primary momenta and also for monte carlo momentum;
added members so that curvature and tan(lambda) pull plots can be made,curvature and tan(lambda) are now stored, the 5 diagonal elements of the error matrix are also stored; the last two, for ittf tracks, are the error on curvature and error on tan(lambda), this is done from both the global and the primary tracks;
- StMiniMcMaker, modified to use primary tracks for the fit points in all cases, not the global tracks; implemented selection of West or East Ftpc based on eta>1.8 or eta<1.8;
modified to replace now whatever it finds between the first and last '.', not just geant.root, in the creation of the output file name;
curvature, tan(lambda) and Covariance matrix diagonal elements are now stored in rcTrack, for both primary and global tracks;
- StTrsMaker, modified to allow user to adjust normalFactor;
- StFtpcClusterMaker: StFtpcDbReader added a new only with FTPC dimensions and geometry for ITTF,improved for cathode offset corretions;
- StFtpcTrackMaker: introduced cuts for vertex estimation (globDca < 1 cm, multiplicity >= 200), Include rotation around y-axis for FTPC east and west;
- StEmcADCtoEMaker, bug fixed;
- StStrangeMuDstMaker, added Copy() function to player, fixed ControllerBase to handle common MuDst names;
- StSecondaryVertexMaker, StXiFinderMaker.cxx use brand new StHelixModel::setMomentum to solve memory leaks, setting new enum's;
- StarClassLibrary: StThreeVectorF.hh, StarClassLibraryLinkDef.hh, functions for CINT added;
- StPmdSimulatorMaker, StEvent added;
- StPmdClusterMaker, StEvent added, CPV clustering added;
- StPmdUtil, mapping added;
- St_dst_Maker: CtbResponse.cxx modified for embedding with CTB;
- St_geant_Maker, fixed the incompatibilities gradually accumulated in the part that reads and propagates the event header info, fill the header based on the parsed event record;
- StFlowMaker, default PID is changed from none to NA, SetDedxPtsPart() added;
- StFlowAnalysisMaker, added StFlowPhiWgtMaker.cxx StFlowPhiWgtMaker.h;
- StLaserEventMaker, tpc oriented has been turned off;
- StPass0CalibMaker, added ppFPD slow triggers;
- StJetFinder, number of modifications;
- StSpinMaker, number of modifications, fixed problem with jet value accessor functions;
- macros/examples/bfcMixer.C;
- pams/gen/hijing_382, hijing, fixed resonance istat code from 11 to 2,improved HEPTUP;
- pams/geometry/phmdgeo, slight comsmetic changes to the original PHMD code;
- pams/geometry/geometry updated to make Photon Multiplicity Detector part of the GEANT geometry version "y2003a" with proper versioning of its position;
- pams/sim/g2t:
g2t_get_event.F, introduced new data elements in teh event record - number of wounded nucleaons etc, changed interface to the mheadrd sub
mheadrd.g, modified to reading extra event-specific data elements from the Zebra MPAR structure;
g2t_event.idl, extra data added in the event record, such as binary collisions etc;
g2t_volume_id, fixed the error diagnostics, about the inconsistent geometry in endcap ECAL;
- pams/sim/gstar: gstar_input.g, has been upgraded to propagate event record data such as the number of binary collisions etc.Database-wise updates:
- StarDb/ftpc/ftpcClusterPars.C, improvements for cathode offset corretions;
- StarDb/ftpc/ftpcSlowSimPars.C, changed value shaper time to match dAu data;
- StDb/idl: added triggerInfo.idl, L0TriggerInfo.idl, ftpcVoltage.idl;
- StDb/idl: pmdUMDimensions.idl modified to change BoardStatus char array length from 9 to 16 for simpler padding;
- StDb/idl: ftpcClusterPars.idl, temporarily store inner cathode correction factors in pars;
- StDb/idl: ftpcDimensions.idl, added x-coord of installation point;
- StDb/idl: ftpcCoordTrans.idl, added observedVertexOffsetX;
- final calibration settings for FTPC AuAu 200GeV/c;For ITTF code releases and tagging look at ITTF code releases Web page
-
May 6, 2003,
new library SL03c has been created for pp 200GeV production
New features:
- StarClassLibrary: StLorentzVector - corrected problem in boost
- EEMC code developed: improvements for track/tower matching, added tower->tube mapping, StEEmcSmd code,
modification for EEMC daq reader, 'continous' eta & phi bins added, a lot of minor modifications and bug fixing, first release for production
- StDaqLib full support for EEMC reader,
- StDAQMaker full upport for EEMC daq reader, modify so the chain can run when there is no TPC data
- St_trg_Maker full upport for EEMC, modify so the chain can run when there is no TPC data
- StTriggerDataMaker implemented to propagated trigger info in StEvent,
- StEvent modified to add TriggerData,
- StEventMaker - added protection for cases where StDetectorDbTriggerID and StTrigSummary couldn't be obtained,
- SVT code modified to implement t0 object and to read t0 from DB, changes for changes for gain calibration file
- StdEdxMaker: StSvtdEdxMaker modified to get SVtGeom in initRun.
- StBFChain - production option for pp 200GeV implemented,
- StMuDSTMaker/COMMON - StAddRunInfoMaker created to add StRunInfo for the only year1 Au+Au 130GeV data,
StTriggerIdCollection added to createStEvent function in StMuDst.cxx,
added StMuDstFilterMaker to be able to filter MuDst.root files,
added StMuDst into TDataSet to make it possible to pick up for StEventDisplayMaker,
modified for the new scheduler implementation, fixed bug, now dEdx data propagated in MuDst
- StFtpcClusterMaker - included corrections for inner cathode offset and move some parameter to database,
- TOF code - updated and extended StructSlatHit, introduced tofSlatHitVector and Iterator,
generalize (2+1)-D slat model from 3 layers to n layers, introduced TOF path length calculation,
- StMcEvent - added member mSubProcessId which is used for Pythia events,
- StPass0CalibMaker modified to use data with TOF triggers,
- StPeCMaker - correcting problem with bField,
- St_QA_Maker - added pp 2003 trigger info, BBC/ZDC trigger histos
- StEmcCalibrationMaker - new QA tools added,
- StMixerMaker - fixed the 8->10 bit bug, now the mixer mixes in 10 bit and then converts 10->8 bit,
- StJetFinder - modified to data from both TPC and EMC,
- StSecondaryVertexMaker - first revision of V0 and Xi vertex finder,
- Sti related codes (ITTF codes) - developed, ready for test production,
- pams/sim/g2t - added zebra bank reader to allow for optional subprocess id information to be propagated,
g2t_get_event.F modified to allow to read optional Zebra banks into root table,
Warnning messages removed from big number of codes
Database-wise updates:
- StDbLib - added a fast multi-row write model specifically needed by the daqEventTag writer,
- StarDb/ftpc/ftpcClusterPars.C - included corrections for inner cathode offset,
- StDb/idl/ftpcClusterPars.idl - included offset of inner cathode and some new clusterfinding paramter,
- StDb/idl/eemcDbPMTname.idl - added for tower->tube mapping -
April 11, 2003,
library SL03b has been updated with
- StDaqLib/TRG/code2003.cxx
to fix the bug caused crash in processing UPCCombined events
- StTpcDb/StTpcDbMaker.cxx
- StTrsMaker/StTrsMaker.cxx
to fix the bug and process mulitple run numbers in the same file for MC production -
March 7, 2003,
new library SL03b has been created
New features:
- FTPC code and database have been updated to handle correctly with year 2001 offline database
- EEMC code further development
- StBFChain updated with new dAu MC chain
Library will be used for FTPC year 2001 data production and dAu MC data production -
April 8, 2003,
library SL03a has been updated with
- StDaqLib/TRG/code2003.cxx
to fix the bug caused crash in processing UPCCombined events -
February 28, 2003,
library SL03a has been updated with St_QA_Maker and StAnalysisUtilities to add new trigger schema -
February 20, 2003,
new library SL03a has been created and released. Library will be used for dAu 200 GeV/c production
New features:
- EMC MuDst integrated in common MuDst files
- StStrangeMuDstMaker modified
- StEvent new triggerID added
- TOF reader updated to read TOF year 2003 data
- DAQ reader updated to adjust daq format
- SVT clustering, vertex finder and DB handling updated
- FTPC code updated, clustering, tracking, slow simulator, developed offline database
- StEMCCalibrationMaker modified for online calibrations and monitoring
- EEMC developed, simulation part added to nightly test
- StFTPCMixerMaker and StEMCMixerMaker implemented for embedding
- StdEdxMaker reshaped
- StBFChain implemented new chain options
- St_QA_Maker added new histos for FTPC, changes for new trigger schema
- StHitFilterMaker allowes to keep hits associated with tracks -
December 2, 2002,
SL02i library has been updated with the next codes to update geometry and fix bugs:
- StFtpcTrackMaker,
- St_dst_Maker/StFtpcGlobalMaker.cxx,StFtpcPrimaryMaker.cxx,
- StBFChain;
- St_geant_Maker;
- St_db_Maker;
- StDaqClfMaker;
- pams/geometry: bbcmgeo, btofgeo, ecalgeo, fpdmgeo, geometry, vpddgeo;
- pams/sim/g2t : g2t_esm.F, g2t_volume_id.g;
- pams/sim/gphysdata ;
- StarDb/emc/simulator/Simulator.C;
SL02i library has been retagged and rebuilt -
November 18, 2002,
SL02i library has been updated with the next codes due to request of FTPC group:
- StFtpcTrackMaker,
- St_dst_Maker/StFtpcGlobalMaker.cxx,StFtpcPrimaryMaker.cxx,
- StDb/idl/ftpcDimensions.idl,
SL02i library has been retagged and rebuilt -
November 15, 2002,
SL02i library has been updated with bug fix code:
- StFtpcClusterMaker -
October 17, 2002 new SL02i library has been created.
SL02h library has been updated with the next codes:
- Sti, StiMaker, StiGui, StiEvaluator, further development;
- StAssociationMaker, changed encoded method for IT tracks to 263 ( was 32770 before);
- StBFChain, 'OSpaceZ2' option added and made hardwired values use enum() list from StMagUtilities,
'onlcl' and 'onlraw' options added to read TPC online clusters (DAQ100) and/or TPC raw information;
- added 'bbcSim' option for BBC simulation;
- StBbcSimulationMaker, new package created for BBC simulation;
- StEvent, bug fixed in StBbcTriggerDetector and StFpdCollection, modifications for RUN 2003 added in StBbcTriggerDetector;
- StFpdMaker, modified along with StEvent modifications for 2003 RUN;
- StDAQMaker, small modifications from Alex, added support for decoding DAQ100 data and writing it into table;
- StDaqLib/EMC, small modifications of reader and decoder;
- StDaqLib/GENERIC/EventReader, added support for decoding DAQ100 data and writing it into a table;
- StDaqLib/TPC, added support for decoding DAQ100 data and writing it into table;
- StDaqClfMaker, filled the deconvolution flag to help dedx;
- StDbUtilities/StSvtCoordinateTransform, t0 changed from 12 tp 9 as calculated from pp real data;
- StDbUtilities/StMagUtiltities, added new option for 1/R**2 space charge density distribution,
set default space charge density to zero, time dependent values come from DB;
- StEmcSimulatorMaker, modified not to have DB for EMC before 24-09-2001;
- StEmcADCtoEMaker, modified to use new internal data format;
- StEstMaker, fixed min radius cut to large value;
- StFptcClusterMaker, replaced large statically dimensioned arrays with dynamically dimensioned arrays;
- StFtpcTrackMaker, modified to get FTPC geometry and dimensions from database,bug fixed, QA histograms corrected;
- StFtpcSlowSimMaker, include ftpcAmpSlope,ftpcAmpOffset and ftpcTimeOffset in Database access,
permits usage of gain factors and time offset in the simulator,Charge scaling taken out ;
- StSvtSeqAdjMaker, added code to do Juns gain calibration, changed building of file name,
modification to make sure initRunworks when no svt data present, correct code to allow for the ordering init and initRun;
- St_dst_Maker, better handling of full or corrupted tables;
- St_geant_Maker, added code to read out BBC GSTAR tables needed for StBbcSimulationMaker,
- St_tpcdaq_Maker, changed to accomodate for DAQ100 cluster reading or raw hits reading, added support for decoding DAQ100 data and writing it into table;
- St_QA_Maker, rmoved limit on maximum number of histograms that can be copied;
- StAnalysisUtilities, removed limit on maximum number of histograms that can be copied;
- StHbtMakerReader, new reader, new 3D correlation function QinvQualAvSep;
- StMuDSTMaker/COMMON, updated to make the muDst from simultaion, maxFiles updated,
added cut on track encoded method for ITTF, fixed bug in createStEevent() function, now you can delete the StEvent, setting all unused subFilters explicitly to NULL;
- StMuDSTMaker/EMC, a pointer check added;
- pams/geometry/bbcmgeo, changes BPOOL hits to 'calorimeter',
important chenges: BBC East is now rotated around the vertical axis, rather than mirror-reflected as in the previous version,
TOF information is added to hits;
- pams/tpc, Daq100 cluster table added - first version;
- pams/geometry/tpcegeo, corrected argon density;
- pams/geometry/mfldgeo, bug fixed in node number, better granularity;
- pams/geometry/phmdgeo, geometry after row-col wise blocks;
- pams/g2t, added volume ID for BBC elements, new code to support BBC response simulation;
Database-wise:
- StarDb/ftpc/ftpcClusterPars.C, ftpcTrackingPars.C;
- StDb/ftpc/ftpcCoordTrans.idl, ftpcDimensions.idl, ftpcTrackingPars.idl;Library was retagged as SL02i and rebuilt;
-
September 19, 2002,
SL02h library has been updated with Sti, StiGui, StiMaker, StiEvaluator makers
and pams/global/inc/StTrackMethod.h, StTrackDefinitions.h to run test production with ITTF
Library has been retagged and rebuilt -
September 14, 2002,
SL02h library has been updated with StEmcSimulatorMaker to fix time stamp problem in MC production.
Library has been retagged and rebuilt -
August 26, 2002,
DEV library has been tagged as SL02h,checked out in new area and rebuilt.
SL02h has been tested and released on Aug 28. Library will be used for test production with DAQ100 clustering
Next codes have been updated:
- StBFChain, removed Flow from tags, PMD chain implementation, option to run DAQ100 clustering;
- StDaqClfMaker, installed new version of fcfClass ;
- StEmcCalibrationMaker, gain calculated from ped-subtracted mean above 30 ADC counts;
- StEmcUtill, fixed memory leak,
- StEventUtilities: StuPostScript, added drawing of hits;
- StEmcTriggerMaker, correction made to follow format for chain insertion without arguments;
- StMiniMcMaker, changed to deal with seq. faults in the file name handling;
- StarClassLibrary: StHelix related codes - minor speed improvements, StThreeVector related codes - added pseudoProduct
- StSpinMaker, test fortran pi0 reconstruction program,bug fixes, minor updates;
- StMuDSTMaker, additional member functions added by Helen'e request;
- StStrangeMuDstMaker, small corrections for kinks to be kept,handling events without primary vertex,
better cTau calculations, introduction of DcaService, fixes to StV0Controller;
- St_QA_Maker, some FTPC histogram changes;
- Sti, StiMaker, StiMaker/macros;
- pams/gen/starlight, corrections to gamma-gamma cross section.
- pams/geometry/bbcmgeo, geometry for STAR Beam-Beam Counter, changed to use symmetrical BBCM instead of seperate BBCW and BBCE; -
August 05, 2002, SL02g has been updated with FTPC code fixes
- StFtpcClusterMaker
- StFtpcTrackMaker
- St_dst_Maker : StFtpcGlobalMaker.cxx, StFtpcPrimaryMaker.cxx
Database-wise:
update of t0 for FTPC -
June 17, 2002,
DEV library has been tagged as SL02g,checked out in new area and rebuilt.
SL02g has been tested and released on June 28.
Next codes have been updated:
- StBFChain, changed making the database overwritting (sdt tag implemented);
- St_db_Maker, added warning if start=end for date and time for a table;
- StEventUtilities, changed tray and slat to UInt_t;
- StEmcSimulatorMaker, changed the way of searching of GEANT data, added option with DB(pedestal ans calibration coefficients;
- StEmcUtil, fixed getTrackId method and added flag in constructor to initialize towers with a given status;
modifications on projTrack() method added;
options to project tracks forwards and backwards has been included in projTrack() method;
- StFtpcClusterMaker, added new 2-dimenisional hitfinding algorithm;
- StFtpcTrackMaker, transformation of local FTPC coordinates in global coordinates introduced, after tracking local coordinates are transformed to global;
added flag to keep track in which coordinate system the point position is measured;
new value for rotation angle of FTPC east after temperature offset was corrected ;
- St_geant_Maker, fix wrong geant time;
- StMuDSTMaker/COMMON, changed the number of hits cut, so that also FTPC tracks are written out;
- StMuDSTMaker/COMMON/macros/dbMaker.C, a simple macro to create a database (a file) holding filenames and the corresponding number of event per file;
- StStrangeMuDstMaker, better handling of improperly closed files, some decay modes added,
better organization of enumeration, additional security against zombies in StEvent vectors added,
- StSvtClusterMaker, added SvtHits and a hit collection if StEvent already exists - prepartation for ittf;
- St_QA_Maker, some changes to FTPC chisq histos added;
- StMiniMcEvent,StMiniMcMaker, created to run MiniDst;
- StFlowMaker checked out with tag SL02f to avoid crashes for MC events;
Database-wise:
- StarDb/emc/simulator, added option with DB(pedestal ans calibration coefficients;
- StarDb/ftpc/ftpcClusterPars.C updated; -
May 24, 2002,
New library SL02f has been created. DEV library has been tagged as SL02f,checked out in new area and rebuilt.
SL02f has been tested and moved to 'new ' on May 27.
Next codes have been updated:
- StAssociationMaker, changed to incorporate association of tracks from Sti
- StAnalysisMaker, doxygen basic doc added
- StDbLib/MysqlDb.cc, rules.make, changed non-dbname in arguement of mysql_real_connect from 0 to NULL, Updated rules.make for local mysql installation on Linux
- St_base/StTree.cxx , bug fixed in UpdateFile
- StChargeStepMaker, fixes for ROOT/3.02.07
- StDetectorDbMaker, fixes for ROOT/3.02.07
- StRichSpectraMaker, revision of index of refraction and ray tracing have been done
- StEmcUtil, method to get em Et on EMC from GEANT has been included,
default values of minimum total energy on EMC barrel and minimum energy on tower has been modified
- StDbUtilities, correct t0 for pp running in svt, correct radius of 2nd barrel so all hits pass now SVT shifted
- StEvent, implementation of the SVT 2 tables scheme
- StEventMaker, implementation of the SVT 2 tables scheme
- StEmcADCtoEMaker, bugs fixed to recalibrate EMC after production
- StEmcCalibrationMaker, fixes for ROOT/3.02.07
- StFtpcSlowSimMaker, fixes for ROOT/3.02.07
- StFlowAnalysisMaker, modified to speed up cumulant, added correction to minBias.C for bins with one count,changed label on MultHist histogram
- StFlowMaker, moved centrality cuts into StFlowConstants
- Stl3RawReaderMaker, fixes for ROOT/3.02.07, switch reco/embedding mode (m_Mode=0/1).Embedding mode skips L3 biased events,reco mode fills StEvent as before
- St_dst_Maker, some changes for SVT, modified not to save SVT hit info on events when SVT not there, modified to send in different group of tables for the TPC and EST refit so flagging of hits is correct
- StSvtDaqMaker, corrected hybrid swapping, modified not to swap ladders 15 and 16 for pp sort this out properly later
- StSvtSeqAdjMaker, added reading bad anodes from DB
- StSvtClassLibrary, corrected hybrid swapping
- StSvtClusterMaker, added pass bad anode information into cluster fitter, fixed memory leak, added T0 jitter stuff, added reading bad anodes from DB
- StSvtDbMaker, added bad anode list reading
- StEstMaker, made EST works with shifted SVT geom, change search radii to 1cm
- StdEdxMaker, SVT dedx improvements, fills dedx table directly, suppressed output
- StRrsMaker, changed gain to 2
- StPass0CalibMaker, fixes for ROOT/3.02.07
- StSpinMaker, bug fixed
- StTreeMaker, modified message displayed on exit
- St_db_Maker, small modification adding more debugging of what it's doing
- St_mwc_Maker
- St_trg_Maker, bug fixed
- StppSpin, fixes for ROOT/3.02.07
- StHbtMaker
- St_TLA_Maker, Reshaped comments for doxygen
- pams/global/egr/egr_fitter.F, changes for SVT
- pams/global/svm/svm_efficiency.c, minor correction
- pmas/gen/mevsim, fixed bug in eta primary decay
- macros/analysis: StMuDstMaker.C -
May 22, 2002,
SL02e library has been updated with codes:
- StBFChain, new dynamic stamp sdtXXXXXXXX implemented to run MC production
- StMuDSTMaker/COMMON, StStrangeCuts added
- StMuDSTMaker/EMC, fixed bug and small modifications to recreate micro DST
- StStrangeMuDstMaker, fixed problem with file names for branches
- macros/analysis/listStrangeCuts.C, fixed bug with branch status and changed cuts split level
Codes have been retagged
SL02e library has been moved to PRO -
May 14, 2002,
SL02e library has been updated with code:
- StStrangeMuDstMaker to fix a bug and write V0 to MuDst
Code has been retagged -
May 6, 2002,
SL02e library has been updated with codes:
- StMuDSTMaker/COMMON
Codes have been retagged -
April 29, 2002,
SL02e, SL02d, SL02c libraries have been updated with next codes:
- StTrsMaker/StTrsParameterizedAnalogSignalGenerator.cc, StTrsChargeSegment.cc, added he3,he4,deuterons
Codes have been retagged -
April 23, 2002,
SL02e library has been updated with the next codes:
- StFtpcTrackMaker: bug fixed in ftpc tracking
- StFtpcClusterMaker: cleanup related to StFtpcTrackMaker changes
- StUtilities: new offset abilities implemented
- StAnalysisUtilities: addition of BBC/FPD histos
- St_QA_Maker: addition of BBC/FPD histos
- StUtilities: new offset abilities implemented
Codes have been retagged -
April 19, 2002,
SL02e library has been updated with the code:
- StEventUtilities to fix the bug in StuProbabilityPidAlgorithm which caused crashes in production
Code has been retagged -
April 7, 2002,
April 7 DEV library has been tagged as SL02e. New library SL02e was built,tested updated with bug fixes and released on April 9
New features essential for production:
Code-wise implementation:
- StBFChain: Changes made for Common MuDST (with Strangeness), adjusted to run in production
- StEvent/StTpcDedxPidAlgorithm.cxx fixed bug in theBetheBloch and for multiple instantiation
- StEmcUtil: modification on getTrackId()
- StFtpcTrackMaker: modified to exit with warning if primary vertex calculation return nan
- St_dst_Maker: ppLMV4.cxx,MatchedTrk.cxx, correct ppLMV for 0 filed, fixed bug causing crashes (pointer <-> array range)
- StSsdSimulationMaker: doxygen documentation, cleaning
- StSsdClusterMaker:small memory leak fixed;
- StSsdEvalMaker:memory leak fixed, doxygen documentation
- StSvtClusterMaker: finally got phase correction correct
- StTrgMaker: bugs fixed
- StMuDSTMaker/COMMON: improved filter options,updates for running in the production
- StPidAmpMaker: modified function to fit e+/- amp.
- StRrsMaker: pedestal noise, convolution and difference in MIP/gamma
- St_QA_Maker: last point residuals now use outerGeometry() for helix parameters
- macros:StAssociator.C, added gSystem->Load("StDetectorDbMaker")
- pams/geometry/tpcegeo/tpcegeo.g: material in the central membrane changed to copper
Database-wise:
- StDb/servers/ dbServers_bnl.xml: added xml file for new bnl mirrors
- Vertex seed calibrations data for pp put in DB -
March 22-23, 2002,
SL02d library has been updated with next codes:
- StBFChain: added agregate correction option Corr1/Corr2 . Introduced ppOpt (no makers)and reshaped VtxSeedCal accordingly.
- StDetectorDbMaker: plugged memory leaks
- StPass0CalibMaker/StVertexSeedMaker: bug fix
- StFtpcClusterMaker: fixed memory leak, invert cluster pad number in FTPC East,
convert cluster cartestian coordinates for FTPC west into STAR global coordinate system
- StDbLib: MysqlDbcc, MysqlDb.h #-of-retries on server connect increased to 7 with timeout period doubled per re try starting at 1 sec.
Needed for maintainable multiple mirror servers using dns for round-robin load balancing
- StMuDSTMaker/EMC: fixed memory leak
- macros/bfc.C
Library was rebuilt and retagged -
March 20, 2002,
SL02d library has been updated with next codes:
- StPass0CalibMaker/StVertexSeedMaker to handle vertex constrain for pp
- StFtpcClusterMaker: fixed bug caused memory leak
- StSvtClusterMaker: temporary fixed bug caused memory leak and new vertex finder params for pp
- StdEdxMaker: expanded time interval in calibration histograms
- StEmcUtil: fixed StEmcFilter::accept(Int_t), modified method StEmcPosition::getNextTowerId(...),
included method StEmcFilter::getNextId(...)
- StMuDSTMaker/EMC;
- StMuDSTMaker/RICHTOF;
- StMuDSTMaker/COMMON;
- StDb/idl/vertexSeed.idl modified for vertex constrain in pp
Library was rebuilt and retagged
Database-wise:
- dE/dx calibrations for pp put in DB -
March 19, 2002,
March 15 DEV library has been tagged as SL02d. New library SL02d was built,tested updated with bug fixes and released on March 19
New features essential for production:
Code-wise implementation:
- StChain,St_geant_Maker,StBFChain, StdEdxMaker, StMixerMaker, bfcMixer.C have been updated to fix embedding problem
- StEvent: fixed bug in StTrackTopologyMap.cxx
- StDaqLib/FTPC: FTPV1P0_ZS_SR.cxx modify to return false if no FTPADCD bank or no FTPADCX bank found for requested sector
- StTrgMaker: filter out tracks which begin beyond the MWC. Removed dead weight from trigCtb.C
- StEmcUtil: fixed bug on accept() method for towers and new method added
- StFtpcTrackMaker: adjusted eta segments for x,y positions of vertex, modified to avoid tracking if vertex position is outside of the inner radius of the Ftpc
- StSvtCalibMaker: laser spot positions recorded
- StFlowMaker: added new centralities
- St_QA_Maker: fixed bug with placement of trigger hists
- StMuDSTMaker/COMMON updated
- StMuDSTMaker/RICHTOF: modified logic when bad RICH event,removed of RICH collection and pid traits when not wanted
- StDbLib/StDbModifier.cxx : added variable length table defautls for simplifying writes of l3 counters to db
- pams/gen/mevsim : fixed pi0 decay bug
Database-wise:
- l3counters files have been put in DB
- EMC calibrations for pp data -
March 8, 2002,
SL02c library has been patched with
- StEvent/StV0Vertex to fix V0Vertex problem
- Stl3RawReaderMaker to fix L3Counter pass
- StBFChain related problems fixed,ZDCvtx option added, MuDSTChain, EMCmDST options added to process MuDST
- ROOT: TStreamerInfo.cxx fixed bug related to V0Vertex problem
- StFtpcClusterFinder
Library still is having a problem with bfcMixer, StIOMaker::GetFile(), trigger word in QA plots -
March 3, 2002,
March 1 DEV library has been tagged as SL02c. New library SL02c was built,tested and released on March 3
New features essential for production:
Code-wise implementation:
- new ROOT version 3.02.07 has been installed
- StBFChain: timestamp 'y2001n' has been added to pickup right svt geant geometry for year2001 which has been changed in Spectember 5th 2001
- St_db_Maker: added new timestamp 'y2001n' for svt geometry of year2001
- StChain, StIOMaker: new method for maker communication is developed and installed "NotifyMe"
- StEvent: added enum for l3 track finder, updated fittingMethod(): L3 added
- StMuDSTMaker: new code to create MuDst has been implemented
- StFtpcClusterMaker modified to get cluster unfolding paramteres from ftpcClusterPars; added histograms to monitor cluster finding
- StFtpcTrackMaker: added additional histograms to monitor cluster finding
- Stl3RawReaderMaker: added globalTrack->setEncodedMethod() to mark tracks as l3 tracks in StEvent
- StSvtDaqMaker: move GetDataSet(StDAQReader) from Init() to Make()
- pams/global/inc: added kL3TpcId to StDetectorDefinitions.h, StDetectorId.h
Database-wise:
- StDb/idl: move cluster unfolding parameters ftpcClusterPars.idl from code to StarDb/ftpc/ftpcClusterPars.C -
February 21, 2002,
DEV library has been tagged as SL02b. New library SL02b was built,tested,updated with bug fixes and released on February 25
New features essential for production:
Code-wise implementation:
- StEvent: added (in StRunInfo) member to hold BBC coincidence rate, StL0Trigger modified to change signature of bunchCrossingId7bit(),added beam info
added information to StRichSpectra for uDST purposes, added EMC trigger
- StEventMaker: fill parts of StRunInfo from StDetectorDbBeamInfo
- StDetectorDbMaker: added codes for Space charge calculations,for TPC Voltages for use in ExB Corrections, added beam info
- St_tpt_Maker: modified mask (extended options),instantiation of MagUtilities() uses db
- StMagUtilities: modified for field cage and space charge corrections, modified to get CathodeV and GG from DB, changed defaults and instantiation argument order
- StBFChain: added options for FieldCage and SpaceCharge corrections and svtDb, adjusted P2001, P2001a, pp2001a options
- StEmcTriggerMaker: trigger data histograms added, gets info from StEvent
- StdEdxMaker: removed access to St_tpcBadPad
- FTPC: StFtpcClusterMaker modified to get temperature difference from data base, separate radial chargestep histograms were created for Ftpc west and east
StFtpcTrackMaker modified to use primary vertex for tracking if it's available, otherwise use preVertex
- St_dst_Maker: modified StFtpcGlobalMaker to redo unconstrained fit for FTPC global tracks with primary vertex
& write out all FTPC hits, not just those on tracks
modified StV0Maker.cxx and StXiMaker.cxx to use database for cut parameters
separation of primary vertex and track finding has been done, now StVertexMaker does the primary-vertex-finding and should be called before StPrimaryMaker which does the primary-track-finding
set vertex id to vertex table entry row in lmv.cc and ppLMV4.cxx
set #global tracks = 30 for switch over from EVR to LMV
- StRchMaker: Remove picket fence pixels cluster finding once and for all
- StSvtCoordinateTransform updated to use proper database
- StSvtClusterMaker: modified StSvtHitMaker to get data from SVT database with StSvtDbMaker, Add SetFileNames function
- StSvtDbMaker: improved interface to SVT DB
- StDbLib: changed limit on flavor tag and made default retrieving more readable
- StTofUtil: changed default tdc calibration factor
- StTpcDb: move all database access to the InitRun part of the tpc Makers to provide flexibility in changing flavor of database
separated geometrical tpc rotation from field twist
- StTrsMaker: move Init code to InitRun
- St_tpcdaq_Maker: turned off noise_elim, moved calibration access from Init() to InitRun()
RDO mask implemented - St_trg_Maker: EMC unpacker rewritten, added code to switch between pre and post-Dec 1 2001 setups
- Stl3RawReaderMaker: added first version of Stl3CounterMaker
- StPidAmpMaker: new version reinstalled
- StRichSpectraMaker added information for uDST purposes
- StarClassLibrary: added methods to calculate signed DCA
- St_QA_Maker: added FTPC histograms
- StDb/idl: added table & saturation rate for space charge corrections
new structure for field cage parameters,
tpc high voltages needed for ExB,
added difference in FTPC gas temperature between FTPC West and East
implemented new calibration tables for the svt
added table to hold beam info
- pams/global/dst: modified fill_ftpc_dst to incorporate in StFtpcGlobalMaker
- pams/tpc/tpt: account for missing RDO in tracking. Allow tracks to swim across dead RDO during first stage tracking
Database-wise:
- StarDb/global/vertices: added cut parameters for V0 and Xi finding in pp data
- StarDb/tpc/daq: corrected map tables
- StarDb/Calibrations/tpc: all files have been put to MySql DB
- new tag for reconstruction DB implemented 'DbV20020226'
- space charge distortion and inner field cage correction implemented
- twist parameters on a per-field-setting basis -
January 22, 2002,
DEV library has been tagged as SL02a. New library SL02a was built,tested and released January 24
New features essential for production:
Code-wise implementation:
- first release of pp chain for real data production, includes beamLine option;
- FPD chain has been implemented and released;
- ftpc: added gas temperature difference between west and east FTPC to DB;
made ftpcGas database table used in FTPC cluster maker;
- svt: added t0 correction in hit, added cut of summed charge >15 for allowed hits,fixed memory leak;
added drift velocity calculation;
- StDetectorDbMaker implemented to hold DB detector information,currently:
classes for RichScalers and RichVoltageStatus;
tpc RDO masks;
FTPC's gas properties;
magnet information;
RICH Clock information;
- StTrsMaker: transverse diffusion coefficient is set correctly (bug fixed)
- StTpcT0Maker replaced by StPass0CalibMaker which includes StTpcT0Maker and StVertexSeedMaker to process calibrations for pp data
- StDb/idl: added vertexSeed table needed to process drift-velocity calibrations for pp data,
table to hold ftpcGasOut values and FTPC temperature/pressure calculations
Database-wise:
ASIC parameter set to 1420 for year 2001 data;
tpd drift velocity calibrations based on laser data put in DB to process pp data
tpcGain correction for pp data -
December 13, 2001,
SL01l library was created November 16 and after some iterations released December 13 to process AuAu 200GeV real data, (production P01gl)
New features essential for production:
Code-wise implementation:
- L3 summary added in StEvent
- St_trg_Maker updated for unpacking EMC data
- first release of EMC code for production
- working version of SVT code, StSvtDbMaker implemented to handle SVT database
Database-wise:
- first dE/dx calibrations for year 2001 data placed in DB
- tpcTimeGain calibrations files moved from AFS area to DB
- Complete pass at TPC drift velocities for year 2001 real data, put in DB and should be used in reconstruction with tag DbV1211
- ASIC parameter has been set to 1420 for year 2001 data January 18
Production-wise:
- first production run with EMC in chain
- first production run with tpcTimeGain calibrations for year 2001
- production run with ExB shape correction, padrow 13 field correction, clock correction, twist correction
- padrow 13 has been taken off for tracking -
November 15, 2001,
DEV library was tagged as SL01k and released to process AuAu 200GeV real data, (production P01gk)
New features essential for production:
Code-wise implementation:
- Developed L3 code to be ready for year 2001 data production
- Developed TOF code to be ready for year 2001 data production
- Developed StEvent part related to L3 and TOF codes
- StDbUtilities/StMagUtilities modified to get most of its values from the database, rather than hard-coded.
- has all codes related to SIM tag implementation and can be used for MC production and embedding
Database-wise:
- First pass at 2001 Gain corrections, located in the AFS area in StarDb/Calibrations/tpc
- Local t0 for year 2001 data adjusted, no adjustment for t0 correction for runs taken on days before 232
- First pass at TPC drift velocities for year 2001 real data put in DB and should be used in reconstruction with tag DbV1107 for run numbers taken on days 232-308
- Twist value (affects angle of TPC in magnet, twist ExB correction) adjusted to match best value for 1/2 field 2000
Production-wise:
- Production run with ExB shape correction, padrow 13 field correction, clock correction, twist correction
- padrow 13 has been taken off for tracking -
November 9, 2001, new SL01j library has been created.
SL01i library has been updated with next codes:
- StTpcDb/StTpcDbMaker.cxx: SIM tag implementation codes allow to handle database correction
which needed for real data and should not be used for simulation data,
Invert order of distortion correction and local->global transformation
- StDbUtilities/StMagUtilties: use DB
- St_tpt_Maker/St_tpt_Maker.cxx: invert order of distortion correction and local->global transformation
- pams/tpc/tcl/tph.F: invert order of distortion correction and local->global transformation
Library has been retagged as SL01j
and should be used to process MC AuAu 130GeV HIJING production for year 2000 geometry
(HIJING production P01hi) and embedding data
SL01j has been updated on November 16 with bug fixes for StTrsMaker and StRrsMaker
-
October 26, 2001,
DEV library was tagged as SL01i and released on October 29 to reprocess year 2000 AuAu 130Gev data (production P01hi)
New features essential for production:
new ROOT version 3.02.00
Code-wise implementation:
- Sector alignment based on zero field data 100 < vertZ < 200, straight-up tracks
- Transformation into global coordinates
- RICH position moved to handle global coordinates
Database-wise:
- Inner/outer z offset adjusted to remove residual step between inner and outer sectors in z
- Gain and local t0 corrections revisited
- tpc drift velocities calibrations recreated and put in DB, should be used in reconstruction with tag DbV1007
- Gain for padrow 13 set to 0 to remove this padrow
Production-wise:
- Production run with ExB shape correction, Padrow 13 field correction, Clock correction.
- Padrow 13 was taking off for tracking, No twist correction on in this production.
- Vertex offset has been taken out.
EVAL branches
Documentation for EVAL library branches
- October 29, 2014
branch StiHFT_1b of DEV library has been created under EVAL library name.
Next codes have been updated:
StRoot
StarRoot
THelixTrack.cxx, THelixTrack.h - rewritten version of THelixTrack. Main algorithm was not changed, changed only selection of coordinate system. Old approach, based on few points was not stable enough. New approach is based on construction of 2d matrix of and calculation of eigen vectors. New coordinate system is based on these vectors. It is more stable because not a few points are used but all of them. Performance should not be changed;
Sti
StiCompositeTreeNode.h - removed not used definition;
StiDetector.h - added 'insideL()' mode and 'inside()' for the global space point;
StiDetector.cxx - in method 'insideL()' suppressed all checks, apart from X or Rxy; in method insideL() also added check for environment variable "insideAssert", if it is not defined 'insideL()' always returns 1 to avoid asserts in production;
added mode 'StiDetector::insideL(const double xl[3],int mode=0)';
added new method 'StiDetector::inside(..)' to check global points;
changed the mode in inside(s) means now 1 + 2 + 4 == chackX(or R) + checkY(or Phi) + checkZ ;
StiDetector.cxx, StiDetector.h - method 'setProperty()' added;
method 'getCenterX()' added. It returns some X value of shape in local coordinate. When, after refit, track is missing detector, we still keep this node. Now point of node is dca point to (centerx,0) and parameters with errors are calculated in this point;
modified to rename inside(...) to insideG( ) to show that arguments are global;
StiDetectorBuilder.h - added new method AverageVolume. It uses TGeo volumes for averaging. The old method uses TGeoPhysical volumes;
method AveMate added to calculate average material; method MakeAverageVolume replaced the old one, to keep the same user interface;
updated to account 'MANY' & 'SENSitive';
made methods 'void AverageVolume(TGeoPhysicalNode *nodeP)' and 'int AverageVolume(const char *fullPath)' not virtual anymore;
added method 'int Diff(const char *path, const StiDetector *sVolu)', t compares the TGeoVolume with StiDetector and returns 0 if everything is correct;
method AveMateR added which does the same as AveMate but using random points; correct all "MULTY" accounted properly; for method 'diff()' added mode '0=AveMate' ;
changed inside (..,mode) mode=1+2+3 check X+Y+Z;
set cpp flag to keep ofl average temporary;
StiDetectorBuilder.cxx - added seed comments; replaced printf to Error() and Warning(); fixed bug in evaluation of si zes of averaged volumes; added Error messages in case 'MANY' and 'sensetive' ;
modified to move down check for determinant==1; assert for 'Geant Weight == StiWeight' temporary removed;
method 'Diff' was added, it checks for random space points which belongs to TGeoVolume;
added test for reflection, reflection is legal in Geant but was not accounted in Sti volume averaging, fixed;
eigen values normalized per number of points (8);
method AveMateR added which does the same as AveMate but using random points; correct all "MULTY" accounted properly; for method 'diff()' added mode '0=AveMate' ;
modified to check inside all boundaries;
modified to rename inside() ==> inside();
StiDetectorBuilder.h, StiDetectorBuilder.cxx - added new method to save graphic structure of Sti geometry into file to draw it afterwards ;
StiDetectorContainer.cxx - removed TPC oriented check, which does not allow usage of non Tpc hits in Seed finders, now all hits could be used in Seed finders; replaced assert with warning;
StiKalmanTrackFinder.cxx - made in layer loop getNormalRadius() ==> getLayerRadius(); modified to use only normalRadius for ordering; two loops now used to search volumes;
- 1st one searching only active volumes;
- 2nd one searching non active volumes, when 1st loop was useless;
This is activated ONLY when environment variable "activeNonActiveLoop"=1;
Assert added to check that Rxy>=Rnormal (related to bug #2915);
'nudge(hit)' added after hit setting to move node to hit;
modified to change getNormalRefAngle ==> getLayerAngle in find();
modified to change OpenAngle ==> OpenAngle/2 in find();
modified to change kEnded ==> kFailed;
StiKalmanTrackNode.cxx - assert added for tubes Rxy == Rnormal (bug #2915); added check for Hz, Hz==>fabs(Hz) to account negative Hz; added check for cos>1 ;
modify to distinguish planar and cylindrical shapes in 'Propagate to volume' (fixed bug #2915); method 'nudge()' was rewritten, for complicated cases THelixTrack used. Check for kFarFromBeam put back (was removed by mistake);
modified to use linear approximation in 'nudge()' if shift < 0.01 curvature;
method propagate(double xk, ...) rewritten to account cases which was omitted in previous version as non important;
removed over complicated and not used logics of "edges" :
- kEdgePhiPlus, kEdgeZminus, kEdgePhiMinus, kEdgeZplus,
- kMissPhiPlus, kMissZminus, kMissPhiMinus, kMissZplus,
and use instead only:
kFailed = -3, kTooFar = -2, kEnded = -1, kHit = 0
best solution saved into mygP and myFP, and only at the end the best is into mgP and mFPcopied;
modified to decrease strongness of assert. 1e-4 ==> 1e-3;
bug fixed sind ==> sind/cosd ;
modified to replace assert(fabs(mFP._sinCA)<1e-3) -> assert(fabs(mFP._sinCA)<1e-2); it is related to changes in mag field for curvature about 10cm;
modified to split cylindrical shape into two: full cylinder & sector of cylinder. Full cylinder could be rotated many times, sector can not. Very detailed setting of _state removed, kept only valid or not. 'mMtx' is used only for error propagation, not error rotation. For error rotation used StiNodeErrs::rotate; In StiKalmanTrackNode::isDca() check for detector == 0 added. All inline rotations moved into methods rotate(...) ;
replaced kFarFromBeam 10 ==> 2 ;
modified to implement the same rotation for kCylindric & kSector. Angles StiKalmanTrackNode:alpha and StiPlacement::alpha are not the same now;
replaced 'locate()' ==> 'inside()';
method insifeG(...) added;
StiKalmanTrackNode.h - new insides's added; inside(mode) used xyz of node; inside(x,y,mode) used x,y only; inside(x[3],mode) used external x,y,z but locale to this node;
renamed 'inside()' methods to use 'inside()' & 'inside()';
StiKalmanTrackNode.h, StiKalmanTrackNode.cxx - new method ['isPrimary()' added; new member '_wallx' added;
StiLocalTrackSeedFinder.cxx - assert removed, it was related to tpc hits that can not be closer in x than 1e-3, added instead 'if (dr<1e-4) return false';
StiHits.cxx - modified to make larger tolerance (>= 1mm) for hits out of volume boundary;
StiMaterial.cxx - added ionization=1946;
StiPlacement.cxx - cleanup;
removed defaults in setNormRep, moved to constructor;
StiTrackNode.cxx - introduced more accurate selection of correct solution in 'cylCross';
asserts with 'sign()' of error matrix commented out;
method 'cylCross()' rewritten again to account more cases;
'recov()' method modified;
added loop while(err matrix non positive), decrease correlations;
modified to decrease maximum correlation from 0.99 ==> 0.999 ;
StiTrackNode.h, StiTrackNode.cxx - StiNodeErrs::rotate() added;
StiVMCToolKit.h, StiVMCToolKit.cxx - added new method 'LoopOverVolumes' which is based on TGeo (not TGeoPhysical ); old one is kept, but due to different signature, is not called'
updated to account 'MANY' & 'SENSITIVE';
StiCylindricalShape.h - cleanup;
introduced two cylindrical shapes: kCylindrical for full cylinder and kSector for cylindrical sector;
StiKalmanTrack.cxx - in method 'refitL()' added additional loop to test nodes for inside/outside; for debugging call of 'nudge()' added to move node position onto detector plane, if failed node defined as invalid;
in method 'refitL()' check for inside() lead to stop tracking which was wrong, now it was fixed and if track after refit missed the volume tracking was not stop;
removed any influence of 'nudge()' to refit;
removed 'getNearBeam()' method and use 'dcaNode()' instead;
'Assert' for accuracy decreased from 1e-6 to 1e-4; if inner node not found, return with error; 'Assert' added when found Xi2 > maxXi2 after refit;
test for vertex replaced by test for detector;
StiKalmanTrack.h - removed 'getNearBeam()' method;
StiKalmanTrackFinder.cxx - assert inside() added instead of previous tube check;
StiTrackNodeHelper.cxx - fixed bug caused by that energy loss was not defined in the case of Vacuum;
added account of tube shape in propagation;
modified propagatePars to use zero path if track missed volume after refit;
bug fixed sind ==> sind/cosd ;
method 'StiTrackNodeHelper::propagatePars' splitted into old one 'propagateParsA()' and new one 'propagateParsB()' temporary. New method rotates only cylindrical shape, not sector one, as it was before;
added test for 'isPrimary()' ;
StiTrackNodeHelper.h - renamed all the class variables adding 'm' at the beginning to avoid misinterpreting;
StiTrackNodeHelper.cxx, StiTrackNodeHelper.h - introduced '_wallx';
modified to use averaged curvature for THelixTrack;
made both kCylindric & kSector rotated now;
mX1 recalculated because detector was slightly rotated;
StiNodePars.h - method 'double &phi() == eta()' added ;
StiNodePars::rotate() added;
StiShape.h, StiShape.cxx - replaced StiCylindrical ==> StiCylindrical & StiSector;
StiUtilities
StiDebug.h, StiDebug.cxx - save histograms method added;
StiMaker
StiMaker.cxx - modified to remove redundant inputFile;
modified to make only TPC as default;
StiMaker.cxx, StiMaker.h - added new method 'finishTracks(int gloPri)' :
- loop over nodes;
- moved node to the center volume along x or r local;
- if StiDebug::mgGlobal >1 create a set of technical histograms;
save histograms method added for debug ;
StiIst
StiIstDetectorBuilder.cxx - modified to use the global transformation unrolled all the way to the top node instead of local transformation to the first mother volume;
modified to switch to the same names as in StiPxlDetectorBuilder;
switched to natural numbering scheme as in StiPxlDetectorBuilder;
modified to use the center sensor (or the one close to the center) to build the unified sensor layer in Sti;
removed ionization from StiMaterial constructor as it is not used anywhere including energy loss calculations;
refactored gas material definition (For the gas surrounding the detector we use air properties as defined in global geometry manager. If the AIR material is not available we use default hardcoded properties);
modified to switch to StiMaterial constructor that accepts the radiation length as is. The desctription of the constructor is very poor but there is no need to multiply it by the density;
removed debugging function used for testing of manually modified volumes;
modified to access transformation matrices directly via StIstDb object;
removed deprecated calls to dummy methods;
set detector group ID at detector builder level. The detector ID-s for individual Sti detectors are set when the detector is added to the builder;
modified to resize the detector container (std::vector) when new detectors are added;
modified to use the middle sensor on the ladder to extract alignment corrections from DB ;
modified to get sensitive IST volumes from the global TGeoManager in a manner similar to PXL and SST detector builders;
removed pointless check for valid gas surrounding detectors in this builder. The gas is set right in this class anyway;
renamed a bunch of local variables just to be consistent with the other detector builders;
StiIstDetectorBuilder.cxx, StiIstDetectorBuilder.h - removed definition and addition of "hybrid" material because it is not used anywhere ;
refactored silicon material definition for sensitive layers.Only silicon material is used in construction of sensitive layers. As with the gas we first try to use the material definition in the global geometry manager. If the SILICON material is not available default hardcoded properties are used;
added flag similar to PXL to build ideal geometry for IST and SST. By default (buildIdealGeom = false) the database transformations are used in all StiXxxDetectoGroup-s;
StiIstDetectorBuilder.cxx, StiIstDetectorBuilder.h, StiIstDetectorGroup.cxx, StiIstDetectorGroup.h - minor stylistic changes in comments; removed unused and irrelevant included headers; got rid of std namespace;
implemented simplified Sti geometry for inactive material in IST;
added a couple of helper methods to ease manual construction and placement of inactive volumes;
made buildInactiveVolumes() method inheritable; changed helper function declaration to static;
fixed loop over ladders;
defined placement for sensitive IST layers in a way consistent with PXL and SSD detector builders;
removed never used variable, forward declarations, and header includes;
removed warning for extremely unlikely exception when a new StiDetector is not constructed by Sti detector factory. Such situations need to be treated in a way other than simply issuing a warning;
removed methods which will not be used by the new builder;
appended new Sti detectors to the end of detector container, and use ladder id to index sector slots;
added parameter to choose IST detector builder. This is justified by the requirement of backward compatibility. The user can choose the appropriate option in case there is a need to reconstruct the data using an older detector builder;
StiIstDetectorBuilder1.cxx, StiIstDetectorBuilder1.h - added new files to save current version of StiIstDetectorBuilder in order to maintain 100% backward compatibility. The user may choose to construct the IST detector with the older version by simply propagating an option to StiIstDetectorGroup. StiIstDetectorBuilder1 inherits from StiIstDetectoBuilder to avoid duplicate code. Removed implementation of inherited methods and other irrelevant declarations;
StiIstDetectorBuilder.cxx, StiIstDetectorBuilder.h, StiIstHitLoader.cxx, StiIstHitLoader.h - updated with commits made to main CVS on Jan 06 :
- added an accessor to access active StiDetectors, i.e. volumes which may have hits associated with them; modified to make use of the accessor for sensitive Sti detector/volumes;
- simplified debug output by reusing existing streamers of StHit class and its daughters;
- cleaned up forward declarations to include only the used classes; removed useless data members;
- removed output debug messages as they can be easily replaced by a single call to StiDetectorBuilder::Print();
- instead of setting StiDetector parameters in a local private method switched to using new interface provided by StiDetector; the refactoring took place for both sensitive and inactive volumes;
- increased density of manually constructed IST brackets in Sti; the effective bracket density have to be muliplied by the number of ladders;
StIstDbMaker
StIstDbMaker.cxx - replace endl -> endm in STAR Logger messages;
StIstDb.cxx, StIstDb.h, StIstDbMaker.cxx, StIstDbMaker.h - modified getter for sensors transormation matrix to accept ladder and sensor id-s using human friendly numbering starting with 1. The input values outside of possible ranges will return a null pointer;
added flags to indicate DbMaker readiness; return fatal if database tables are not found;
added method to access transformation matrix for a given IST ladder/sensor pair; set class version to 0 in order to avoid IO dictionary generation by ROOT's CINT. STAR makers are not persistent;
clean-up coding style;
StIstDb.cxx - corrected mapping of ladder/sensor to global aggregate sensor id. The global sensor index (id) used in the istSensorOnLadder DB table spans the range from 1001 to 1144 ;
StIstUtil
StIstClusterCollection.cxx, StIstClusterCollection.h, StIstCollection.h - modified to reflect changes in StIstDbMaker;
StiPxl
StiPxlDetectorBuilder.cxx - modified to use the global transformation unrolled all the way to the top node instead of local transformation to the first mother volume;
modified to use the center sensor (or the one close to the center) to build the unified sensor layer in Sti;
removed ionization from StiMaterial constructor as it is not used anywhere including energy loss calculations;
refactored gas material definition (For the gas surrounding the detector we use air properties as defined in global geometry manager. If the AIR material is not available we use default hardcoded properties);
modified to switch to StiMaterial constructor that accepts the radiation length as is. The desctription of the constructor is very poor but there is no need to multiply it by the density ;
removed deprecated calls to dummy methods;
set detector group ID at detector builder level. The detector ID-s for individual Sti detectors are set when the detector is added to the builder;
modified to resize the detector container (std::vector) when new detectors are added;
modified to use the middle sensor on the ladder to extract alignment corrections from DB ;
removed unutilized code;
StiPxlDetectorBuilder.cxx, StiPxlHitLoader.cxx - modified to split PXL sensitive layers in two halves. The change should help to avoid track backward steps in Sti due to ill ordered volumes in r and phi;
StiPxlHitLoader.cxx - modified to use local x rahter than row number to distribute hits into different half ladders;
StiPxlDetectorBuilder.cxx, StiPxlDetectorBuilder.h - removed definition and addition of "hybrid" material because it is not used anywhere;
refactored silicon material definition for sensitive layers (Only silicon material is used in construction of sensitive layers. As with the gas we first try to use the material definition in the global geometry manager. If the SILICON material is not available default hardcoded properties are used);
StiPxlDetectorBuilder.cxx, StiPxlDetectorBuilder.h, StiPxlDetectorGroup.cxx, StiPxlDetectorGroup.h - minor stylistic changes in comments; removed unused and irrelevant included headers; got rid of std namespace;
StiPxlDetectorBuilder.cxx, StiPxlDetectorBuilder.h, StiPxlHitLoader.cxx StiPxlHitLoader.h - updated with commits made to main CVS on Jan 06 :
- attempted to make a clear translation between the natural (sector/ladder/sensor) and Sti numbering schemas;
- added an accessor to access active StiDetectors, i.e. volumes which may have hits associated with them; modified to make use of the accessor for sensitive Sti detector/volumes
- simplified debug output by reusing existing streamers of StHit class and its daughters;
- switched to method that converts geo sensor id to Sti layer indices;
- added a private method to convert natural/geo sensor id to Sti layer indices;
- cleaned up forward declarations to include only the used classes; removed useless data members;
- removed output debug messages as they can be easily replaced by a single call to StiDetectorBuilder::Print();
- instead of setting StiDetector parameters in a local private method switched to using new interface provided by StiDetector; the refactoring took place for both sensitive and inactive volumes;
- re-implemented segmentation of PXL sensor to two halves. In the sensor's local coordinate system the first half is for x<0 and the second one is for x> . The notion of inner and outter halves is not critical and in fact confusing because it depends on the original rotation around the z axis. - modified to avoid setting StiDetector members _key1 and _key2 as they are not really used anywhere;
StiSsd
StiSstDetectorBuilder.cxx - removed ionization from StiMaterial constructor as it is not used anywhere including energy loss calculations;
refactored gas material definition (For the gas surrounding the detector we use air properties as defined in global geometry manager. If the AIR material is not available we use default hardcoded properties);
refactored useVMCGeometry() to build sensitive Sti layers in the same way as in PXL and IST detectors;
created model of SST inactive material using the mother volume;
modified to switch to StiMaterial constructor that accepts the radiation length as is. The desctription of the constructor is very poor but there is no need to multiply it by the density ;
redefined StiMaterial for the segmented SST mother volume (SFMO) ;
modified to use transformation matrices for sensitive layers from database when non-ideal geometry is requested ;
modified to adjust material properties for the modified SFMO volume. Scaled the density to match the increase in the inner radius (to avoid overlap with sensitive layers);
modified to use different names for SFMO end tube volumes;
modified to avoid using of material averaging routine as the inactive material is entirely constructed by hand;
created 9 tubes (Sti detectors) to describe the material distribution in SST;
modified to increase the inner radius of the central tube by 0.85 cm to avoid overlap with sensitive layers; scaled the density of this volume accordingly by keeping mass constant;
set detector group ID at detector builder level; the detector ID-s for individual Sti detectors are set when the detector is added to the builder;
modified to resize the detector container (std::vector) when new detectors are added;
modified to append new Sti detectors to the end of detector container, and use ladder id to index sector slots ;
modified to use the middle sensor on the ladder to extract alignment corrections from DB;
StiSstDetectorBuilder.h - modified to make auxilary methods available in derived classes ;
StiSstDetectorBuilder.cxx, StiSstDetectorBuilder.h - removed definition and addition of "hybrid" material because it is not used anywhere;
refactored silicon material definition for sensitive layers (Only silicon material is used in construction of sensitive layers. As with the gas we first try to use the material definition in the global geometry manager. If the SILICON material is not available we use default hardcoded properties );
added a private method to split the SST mother volume into three tubes;
modified to use object with direct access to database (mSstDb) instead of StSsdBarrel similar to PXL and IST detector builders;
removed deprecated method;
removed method 'segmentSFMOVolume()' because the inactive material is now built manually in 'buildInactiveVolumes()';
added a private helper function hopefully as a temporary solution before StiDetector is modified;
StiSstDetectorBuilder1.cxx, StiSstDetectorBuilder1.h - saved current StiSstDetectorBuilder in order to by maintain 100% backward compatibility;
modified to make class inherit from StiSstDetectoBuilder and removed implementation of inherited methods and other irrelevant declarations;
StiSsdDetectorBuilder.cxx, StiSstDetectorBuilder.cxx, StiSstDetectorBuilder1.cxx - removed deprecated calls to dummy methods;
StiSstDetectorBuilder.cxx, StiSstDetectorBuilder.h, StiSstDetectorGroup.cxx, StiSstDetectorGroup.h - aded flag similar to PXL to build ideal geometry for IST and SST. By default (buildIdealGeom = false) the database transformations are used in all StiXxxDetectoGroup-s;
minor stylistic changes in comments; removed unused and irrelevant included headers; got rid of std namespace;
StiSstDetectorGroup.cxx, StiSstDetectorGroup.h - added parameter to choose SST detector builder;
StiSsdHitLoader.h, StiSstDetectorBuilder.cxx, StiSstDetectorBuilder.h - updated with commits made to main CVS on Jan 06 :
- removed output debug messages as they can be easily replaced by a single call to StiDetectorBuilder::Print();
- instead of setting StiDetector parameters in a local private method switched to using new interface provided by StiDetector; the refactoring took place for both sensitive and inactive volumes;
- modified to avoid setting StiDetector members _key1 and _key2 as they are not really used anywhere;
StiUtilities
StiDebug.h, StiDebug.cxx - for method 'tally' TObjArray replaced by 'std::map';
StSsdDbMaker
StSstDbMaker.cxx - modified to use different name to access transformation matrices. Perhaps R is the right name to use instead of WL;
StSstDbMaker.cxx, StSstDbMaker.h - added method to access transformation matrix for a given SST ladder/sensor pair;
StSsdUtil
StSstConsts.h - added new header with SST constants similar to what we already have for PXL and IST;
StarVMC
Geometry/IstdGeo/IstdGeo1.xml - made changes to IST geometry to simplify placement of daughter volumes, remove MANY, eliminate overlaps between IBMO and other volumes under IDSM;
Geometry/PixlGeo/PixlGeo6.xml, PxstGeo1.xml - made changes to pixel and supports to eliminate minor overlaps;
Geometry/SisdGeo/SisdGeo7.xml - made fixes to the SSD geometry; changed SFLM to tube seg, removed one unneeded level, fixed overlaps;
Embedding libraries
        Embedding libraries documentation
                       August 6, 2019
             SL08e_embed (SL08e_5)        ROOT_LEVEL 5.12.00
             SL08f_embed (SL08f_4)        ROOT_LEVEL 5.12.00
             SL09g_embed (SL09g_2Embed_v10)ROOT_LEVEL 5.22.00
             SL10c_embed (SL10c_embed_v5) ROOT_LEVEL 5.22.00
             SL10h_embed (SL10h_embed_v6) ROOT_LEVEL 5.22.00
             SL10k_embed (SL10k_embed_v11)ROOT_LEVEL 5.22.00
             SL11d_embed (SL11d_embed_v7) ROOT_LEVEL 5.22.00
             SL12a_embed (SL12a_embed_v3) ROOT_LEVEL 5.22.00
             SL12d_embed (SL12d_embed_v6) ROOT_LEVEL 5.22.00
             SL13b_embed (SL13b_embed_v1) ROOT_LEVEL 5.22.00
             SL15e_embed (SL15e_embed_v1) ROOT_LEVEL 5.34.09
             SL16d_embed (SL16d_embed_v2) ROOT_LEVEL 5.34.30
             SL16g_embed (SL16g_embed_v3) ROOT_LEVEL 5.34.30
             SL16j_embed (SL16j_embed_v4) ROOT_LEVEL 5.34.30
             SL16k_embed (SL16k_embed_v1) ROOT_LEVEL 5.34.30
             SL17d_embed (SL17d_embed_v4) ROOT_LEVEL 5.34.30
             SL18c_embed (SL18c_embed_v2) ROOT_LEVEL 5.34.30

-------------------------------------------------
SL09g_embed library
SL10k_embed library
SL10h_embed library
SL10c_embed library
SL11d_embed library
SL12a_embed library
SL12d_embed library
SL13b_embed library
SL15e_embed library
SL16d_embed library
SL16g_embed library
SL16j_embed library
SL16k_embed library
SL17d_embed library
SL18c_embed library
- November 12, 2018
embedding library SL18c_embed has been created by checking out all codes with tag SL18c_1 and updated with necessary codes needed to proceed with embedding production. Accomplished library was re-tagged as SL18c_embed_v1 and rebuilt on SL7.3
Next codes have been updated:
StRoot
StBFChain/BigFullChain.h, r. 1.287; StBFChain.cxx, r.1.649.4.1;
StDbUtilities/StMagUtilities.h, r.1.62; StMagUtilities.cxx, r.1.111.2.1 ;
StDetectorDbMaker/St_tpcCalibResolutionsC.h, r.1.1; StDetectorDbChairs.cxx, r. 1.51.4.1;
StGenericVertexMaker/StFixedVertexFinder.cxx, r.1.8; StFixedVertexFinder.h, r.1.7;
StPass0CalibMaker/StPicoDstVtxSeedMaker.cxx r.1.2 ;
StBTofMixerMaker/StBTofMixerMaker.cxx, r.1.3; StBTofMixerMaker.h, r.1.3;
StBTofSimMaker/StBTofSimMaker.h, r.1.9; StBTofSimMaker.cxx, r.1.15; StBTofSimResParams.h, r.1.1;
StTpcDb/StTpcDbMaker.cxx, r. 1.68;
StTpcRSMaker/StTpcRSMaker.h, r.1.2.2.1; StTpcRSMaker.cxx, r.1.77.2.1;
St_geant_Maker/St_geant_Maker.cxx, r.1.16.2.1 ;StDb
idl/tpcCalibResolutions.idl, r. 1.1; - July 29, 2019
embedding library SL16d_embed has been patched with code
StRoot/StarGenerator/BASE/StarPrimaryMaker.cxx, r.1.19
mgr/cons, r. 1.113
Library was retaged with tag SL16d_embed_v2 and rebuilt on SL7.3 platform.
- April 16, 2018
embedding library SL16d_embed has been created by checking out all codes with tag SL16d_1 and updated with necessary codes needed to proceed with embedding production. Accomplished library was retaged as SL16d_embed_v1 and rebuilt on SL7.3 and SL6.4 platforms with compilers gcc 4.8.5 and 4.8.2.
Next codes have been updated:
StRoot
StAssociationMaker
StAssociationMaker.cxx;
StBFChain
BigFullChain.h, StBFChain.cxx ;
StBTofCalibMaker
StBTofCalibMaker.cxx, StBTofCalibMaker.h;
StBTofMixerMaker
StBTofMixerMaker.cxx, StBTofMixerMaker.h ;
StBTofSimMaker
StBTofSimMaker.cxx, StBTofSimMaker.h, StBTofSimResParams.h ;
StBichsel
StdEdxModel.cxx, dEdxParameterization.cxx;
StChain
GeometryDbAliases.h ;
StDbUtilities
StMagUtilities.cxx, StMagUtilities.h;
StDetectorDbMaker
StDetectorDbChairs.cxx;
StIstSurveyC.h, StPxlSurveyC.h, StSstSurveyC.h, St_SurveyC.h;
St_TpcAdcCorrectionBC.h, St_TpcAvgPowerSupplyC.h;
St_TpcCurrentCorrectionC.h, St_TpcEdgeC.h, St_TpcEffectivedXC.h;
St_TpcTanLC.h, St_TpcrChargeC.h;
St_tpcAnodeHVC.h, St_tpcAnodeHVavgC.h;
St_tpcCalibResolutionsC.h, St_vpdSimParamsC.h;
StdEdxY2Maker
StPidStatus.cxx, StTpcdEdxCorrection.cxx, StTpcdEdxCorrection.h, StdEdxY2Maker.cxx, StdEdxY2Maker.h, StdEdxY2MakerLinkDef.h, dEdxTrackY2.cxx, dEdxTrackY2.h;
StGenericVertexMaker
StFixedVertexFinder.cxx, StFixedVertexFinder.h;
StIstDbMaker
StIstDb.cxx, StIstDb.h, StIstDbMaker.cxx;
StIstRawHitMaker
StIstRawHitMaker.cxx, StIstRawHitMaker.h;
StIstSimMaker
StIstSlowSimMaker.cxx , StIstSlowSimMaker.h ;
StMiniMcEvent
StMiniMcPair.h, StTinyMcTrack.h, StTinyRcTrack.h;
StMiniMcMaker
StMiniMcMaker.cxx, dominatrackInfo.cc;
StPxlClusterMaker
StPxlClusterCollection.cxx, StPxlClusterCollection.h, StPxlClusterMaker.cxx;
StPxlDbMaker
StPxlDb.cxx, StPxlDb.h, StPxlDbMaker.cxx;
StPxlRawHitMaker
StPxlRawHitCollection.cxx, StPxlRawHitCollection.h;
StPxlSimMaker
StPxlDigmapsSim.cxx, StPxlDigmapsSim.h, StPxlFastSim.h, StPxlSimMaker.cxx, StPxlSimMaker.h;
DIGMAPS/digaction.cxx, digaction.h, digadc.cxx, digadc.h, digbeam.cxx, digbeam.h, digcluster.cxx, digcluster.h, digevent.cxx, digevent.h, dighistograms.cxx, dighistograms.h, diginitialize.cxx, diginitialize.h, digmaps.cxx, digmaps.h, digparticle.cxx, digparticle.h, digplane.cxx, digplane.h, digproto.cxx, digproto.h, digreadoutmap.cxx, digreadoutmap.h, digresult.cxx, digresult.h, digtransport.cxx, digtransport.h;
StTpcDb
StTpcDbMaker.cxx;
StTpcRSMaker
StTpcRSMaker.cxx, StTpcRSMaker.h;
StVpdCalibMaker
StVpdCalibMaker.cxx, StVpdCalibMaker.h;
StVpdSimMaker
StVpdSimConfig.h, StVpdSimMaker.cxx, StVpdSimMaker.h;
StarGenerator
BASE/AgStarReader.cxx, StarPrimaryMaker.cxx;
DECAY/AgUDecay.cxx, AgUDecay.h;
EMBED/StarEmbedMaker.cxx, StarEmbedMaker.h,
EVENT/StarGenAAEvent.cxx, StarGenEPEvent.cxx, StarGenPPEvent.cxx, StarGenParticle.cxx;
EvtGen1_06_00/all files ;
FILT/StDijetFilter.cxx, StarFilterMaker.cxx;
HepMC2_06_09/all files ;
Hijing1_383/StarHijing.cxx;
Kinematics/StarKinematics.cxx, StarKinematics.h;
Photos3_61/all files ;
Pythia6_4_28/Pythia6.cxx, Pythia6.h, StarPythia6.cxx, StarPythia.h, closeDecays.F;
Pythia8_1_62/StarPythia8.cxx, StarPythia8.h, StarPythiaDecayer.cxx, StarPythia8Decayer.h;
Pythia8_1_86/StarPythia8Decayer.cxx, StarPythia8Decayer.h;
STEP/AgUStep.cxx, AgUStep.h;
StarLight/StarLight.cxx, beambeamsystem.cpp, gammagammaleptonpair.cpp, gammagammaleptonpair.h, twophotonluminosity.cpp;
TEST/StTruthTestMaker.cxx, StTruthTestMaker.h;
Tauola1_1_5/all files;
UTIL/AgStarParticle.cxx, AgStarParticle.h, StarParticleData.cxx, StarParticleData.h, StarRandom.cxx, addressOfCommons.F;
UrQMD3_3_1/StarUrQMD.cxx;pams
sim/g2t/g2t_volume_id.g;StarVMC
Geometry/Geometry.cxx, Geometry.h, geometryStats.cc, geometryStats.hh, StarGeo.xml,dummy.cc;
multiple codes and files have been updated including:
Geometry/IstdGeo/IstdConfig.xml, IstdGeo1a.xml, IstdGeo1b.xml, IstdGeo2.xml, IstdGeo2a.xml;
Geometry/PixlGeo/DtubConfig.xml, PixlConfig.xml,PixlGeoa.xml, PixlGeo6b.xml,PsupConfig.xml,PxstConfig.xml;
Geometry/SisdGeo/SisdConfig.xml, SisdGeo2.xml, SisdGeo3.xml, SisdGeo4.xml, SisdGeo5.xml, SisdGeo6.xml,SisdGeo7.xml, SisdGeo7a.xml;
StarAgmlLib/AgBlock.cxx, AgCreate.cxx, AgMLStructure.cxx, AgMLStructure.h, AgMaterial.cxx, AgMedium.cxx, AgPosition.cxx, AgPosition.h, AgShape.cxx, StarAgmlLibLinkDef.h, StarAgmlStacker.cxx, StarNoStacker.h, StarTGeoStacker.cxx;
StarAgmlUtil/AgMLDb.cxx, AgMLDb.h, AgMLPosition.cxx, AgMLPosition.h, AgParameterList.h, AgTransform.cxx, AgTransform.h;StarDb
Geometry/ist/istLadderOnIstMisalign.20131210.000001.C, istLadderOnIstMisalign.20140101.000001.C, istLadderOnIstMisalign.20141210.000001.C, istLadderOnIstMisalign.20150101.000001.C, istLadderOnIstMisalign.20151210.000001.C, istLadderOnIstMisalign.20160101.000001.C ;
Geometry/pxl/pxlLadderOnSectorMisalign.20131210.000001.C, pxlLadderOnSectorMisalign.20140101.000000.C, pxlLadderOnSectorMisalign.20141210.000001.C, pxlLadderOnSectorMisalign.20150101.000001.C, pxlLadderOnSectorMisalign.20151210.000001.C, pxlLadderOnSectorMisalign.20160101.000001.C;
Geometry/sst/sstLadderOnSstMisalign.20131210.000001.C, sstLadderOnSstMisalign.20140101.000001.C, sstLadderOnSstMisalign.20141210.000001.C, sstLadderOnSstMisalign.20150101.000001.C, sstLadderOnSstMisalign.20151210.000001.C, sstLadderOnSstMisalign.20160101.000001.C;
AgMLGeometry/Geometry.devT.C, Geometry.y2011b.C, Geometry.y2014c.C, Geometry.y2015d.C, Geometry.y2016a.C, Geometry.y2017.C, Geometry.y2017a.C, Geometry.y2018.C, Geometry.y2018a.C, Geometry.y2018x.C, Geometry.y2019.C ;
Calibrations/tpc/TpcResponseSimulator.20141220.00000.C, TpcResponseSimulator.20151220.000002.C, TpcResponseSimulator.y2014.C, TpcResponseSimulator.y2015.C;StDb/idl/StvKonst.idl, TpcEffectivedX.idl, beamOrbitInfo.idl, epdFEEMap.idl, epdGain.idl, epdQTMap.idl, epdStatus.idl, fmsBitShiftGain.idl, fmsBitShiftGain.idl, fmsGainB.idl, fmsGainCorrectionB.idl, fpostChannelGeometry.idl, fpostConstant.idl, fpostGain.idl, fpostMap.idl, fpostPed.idl, fpostPosition.idl, fpostSlatId.idl, fpostStatus.idl, fpsGain.idl, fpsPed.idl, istSimPar.idl, itpcPadPlanes.idl, pxlDigmapsSim.idl, pxlSimPar.idl, sstBadStrips.idl, tofSimResParams.idl, tpcCalibResolutions.idl, tpcCorrection.idl, tpcPadConfig.idl, vpdSimParams.idl;
mgr/Conscript-standard;
- July 29, 2019
embedding library SL17d_embed has been patched with StRoot/StarGenerator/BASE/StarPrimaryMaker.cxx, r.1.19
Existing tag SL17d_embed_v3 has been moved to new revision.
- June 9, 2019
embedding library SL17d_embed has been updated with codes below to process with HFT simulations and embedding.
Library was retagged with tag SL17d_embed_v3 and rebuilt;
StRoot
StIstRawHitMaker
StIstRawHitMaker.cxx, r.1.50, StIstRawHitMaker.h, r.1.26 ;
StPxlRawHitMaker
StPxlRawHitCollection.cxx, r.1.4, StPxlRawHitCollection.h, r.1.5, StPxlRawHitMaker.cxx, r.1.12;
StPxlSimMaker
StPxlFastSim.h, r.1.8, StPxlSimMaker.cxx, r.1.13, StPxlSimMaker.h, r.1.11;
DIGMAPS/digcluster.h, r.1.2, digcluster.cxx, r.1.2, digmaps.h, r.1.2, digmaps.cxx, r.1.2, digreadoutmap.h, r.1.2, digreadoutmap.cxx r.1.2, digaction.cxx, r.1.2, digevent.cxx, 1.2, digparticle.cxx, r.1.3, digresult.cxx, r.1.2, digaction.h, r.1.2, digevent.h, r.1.2, digparticle.h, r.1.2, digresult.h, r.1.2, digadc.cxx, r.1.2, digadc.h, r.1.2, dighistograms.cxx, r.1.2, dighistograms.h, r.1.2, digplane.cxx, r.1.2, digtransport.cxx, r.1.2, digtransport.h, r.1.2, digplane.h, r.1.2, digbeam.cxx, r.1.2, digbeam.h, r.1.2, diginitialize.cxx, r.1.2, diginitialize.h, r.1.2, digproto.cxx, r.1.2, digproto.h, r.1.2;StIstSimMaker
StIstSlowSimMaker.cxx, r.1.6, StIstSlowSimMaker.h, r.1,2,
StPxlDbMaker
StPxlDb.cxx, r.1.11, StPxlDb.h, r.1.11, StPxlDbMaker.cxx, r.1.21;
StIstDbMaker
StIstDb.cxx, r.1.15, StIstDb.h, r.1.13, StIstDbMaker.cxx, r.1.21;StarDb
Geometry/pxl/
pxlLadderOnSectorMisalign.20131210.000001.C, pxlLadderOnSectorMisalign.20140101.000000.C, pxlLadderOnSectorMisalign.20141210.000001.C, pxlLadderOnSectorMisalign.20150101.000001.C, pxlLadderOnSectorMisalign.20151210.000001.C, pxlLadderOnSectorMisalign.20160101.000001.C;
Geometry/ist/
istLadderOnIstMisalign.20131210.000001.C, istLadderOnIstMisalign.20140101.000001.C, istLadderOnIstMisalign.20141210.000001.C, istLadderOnIstMisalign.20150101.000001.C, istLadderOnIstMisalign.20151210.000001.C, istLadderOnIstMisalign.20160101.000001.C;
Geometry/sst/
sstLadderOnSstMisalign.20131210.000001.C, sstLadderOnSstMisalign.20140101.000001.C, sstLadderOnSstMisalign.20141210.000001.C, sstLadderOnSstMisalign.20150101.000001.C, sstLadderOnSstMisalign.20151210.000001.C, sstLadderOnSstMisalign.20160101.000001.C;mgrConscript-standard, r.1.267; cons, r.1.113;
- May 15, 2019
embedding library SL17d_embed has been updated with codes below to update the BTOF simulator; to provide TPC distortion smearing in the simulations; to fix bug #RT3369 in TpcRS; to set errors on vertex positions; updated for HFT simulations.
Library was retagged with tag SL17d_embed_v2 and rebuilt;
StRoot
StBFChain/BigFullChain.h r.1.287; StBFChain.cxx vers. 1.649.4.1;
StBTofMixerMaker/StBTofMixerMaker.cxx, r.1.3; StBTofMixerMaker.h, r.1.3;
StDetectorDbMaker/St_tpcCalibResolutionsC.h, r.1.1; St_vpdSimParamsC.h, r.1.1; StDetectorDbChairs.cxx, r.1.51.4.1; St_MDFCorrectionC.h, r.1.2; St_SurveyC.h, r.1.5 ;
StDbUtilities/StMagUtilities.h, r.1.62 ; StMagUtilities.cxx, r.1.111.2.1;
StGenericVertexMaker/StFixedVertexFinder.cxx, r.1.8; StFixedVertexFinder.h, r.1.7;
StTpcRSMaker/StTpcRSMaker.h, r.1.28.6.1; StTpcRSMaker.cxx, r.1.75.4.1
macros/embedding/bfcMixer_Tpx.C, r.1.52;StDb/idl/istSimPar.idl, r.1.1 ; pxlDigmapsSim.idl, r.1.2; pxlSimPar.idl, r.1.1; tpcCalibResolutions.idl, r.1.1;
StarDb/AgMLGeometry/Geometry.y2018a.C, r.1.1; Geometry.y2019a.C, r.1.1;
- March 2, 2018
embedding library SL17d_embed has been checked out with tag SL17d and updated with necessary codes needed to proceed with embedding production. Accomplished library was retagged as SL17d_embed_v1 and rebuilt on SL6.4 with gcc 4.8.2.
Next codes have been updated:
StRoot
StAssociationMaker
StAssociationMaker.cxx, r.1.62 ;
StdEdxY2Maker
StdEdxY2Maker.cxx, r.1.87.2.1 ;
StMiniMcMaker;
StMiniMcMaker.cxx, r.1.49 ; dominatrackInfo.cc, r.1.4;
StMiniMcEvent
StTinyRcTrack.h, r.1.11; StTinyMcTrack.h, r.1.14; StMiniMcPair.h, r.1.6;
macros/embedding/;
bfcMixer_Tpx.C, r.1.47;
StBTofSimMaker
StBTofSimMaker.cxx, r.1.14 ; StBTofSimMaker.h, r.1.8 ;
StVpdSimMaker
StVpdSimConfig.h, r.1.3 ;
StBTofMixerMaker
StBTofMixerMaker.cxx, r.1.2; StBTofMixerMaker.h, r.1.2;
StBTofCalibMaker
StBTofCalibMaker.cxx, r.1.17; StBTofCalibMaker.h, r.1.11 ;
StDb/idl/tofSimResParams.idl
StChain
GeometryDbAliases.h, r.1.21;StarDb
AgMLGeometry/ - several new Geometry.y201*.C files added;
Calibrations/tpc/TpcResponseSimulator.20151220.000002.C r.1.1 ;StarVMC;
Geometry/ - multiple files;
StarAgmlUtil/ - multiple files;
StarAgmlLib/ - multiple files;
xgeometry/xgeometry.age;
StarGeometry/multiple files;
mgr/Dyson/ - January 30, 2017
embedding library SL16k_embed has been checked out with tag SL16k and updated with necessary codes needed to proceed with embedding production. Accomplished library was retagged as SL16k_embed_v1 and rebuilt on SL6.4 and SL7.3 platforms.
Next codes have been updated:
StRoot
StTpcRSMaker
StTpcRSMaker.cxx, r. 1.73.2.1;
StdEdxY2Maker
StPidStatus.cxx, r. 1.2.6.1; StdEdxY2Maker.cxx, r. 1.86.4.1;
StAssociationMaker/StAssociationMaker.cxx, r.1.62
StChain/GeometryDbAliases.h, r. 1.21
StMiniMcMaker/StMiniMcMaker.cxx r. 1.49
StMiniMcEvent/StTinyRcTrack.h, r. 1.11 ; StTinyMcTrack.h, r. 1.14; StMiniMcPair.h, r. 1.6 ;
StMiniMcEvent/StTinyMcTrack.h, r. 1.14;
StMiniMcEvent/StMiniMcPair.h, r. 1.6;
StBTofSimMaker/
StVpdSimMaker/
StBTofMixerMaker/
StBTofCalibMaker/
StVpdCalibMaker/macros/embedding/bfcMixer_Tpx.C, r. 1.47;
StarVMC/Geometry/
StarVMC/StarAgmlUtil/
StarVMC/StarAgmlLib/
StarVMC/StarGeometry/
StarVMC/xgeometryStarDb/AgMLGeometry
StarDb/Calibrations/tpc/TpcResponseSimulator.20151220.000002.C r.1.1StDb/idl/tofSimResParams.idl
mgr/Dyson/
- July 29, 2019
embedding library SL16j_embed has been patched with code
StRoot/StarGenerator/BASE/StarPrimaryMaker.cxx, r.1.19
mgr/cons, r. 1.113
Library was retaged with tag SL16j_embed_v3 and rebuilt on SL7.3 platform.
- May 2, 2018
embedding library SL16j_embed has been updated with codes needed for run 2016 HFT embedding production, retagged with tag SL16j_embed_v2 and rebuilt on SL6.4 and SL7.3 platforms;
Next codes have been updated:
StRoot
StBFChain
BigFullChain.h, StBFChain.cxx ;
StBTofSimMaker
StBTofSimMaker.cxx, StBTofSimMaker.h, StBTofSimResParams.h ;
StDbUtilities
StMagUtilities.cxx, StMagUtilities.h;
StDetectorDbMaker
StDetectorDbChairs.cxx;
StIstSurveyC.h, StPxlSurveyC.h, StSstSurveyC.h, St_SurveyC.h;
St_tpcSecRowBC.h, St_tpcSecRowCC.h, St_tpcSecRowXC.h, St_vpdSimParamsC.h;
St_tpcCalibResolutionsC.h ;
StGenericVertexMaker
StFixedVertexFinder.cxx, StFixedVertexFinder.h;
StIstDbMaker
StIstDb.cxx, StIstDb.h, StIstDbMaker.cxx;
StIstRawHitMaker
StIstRawHitMaker.cxx, StIstRawHitMaker.h;
StIstSimMaker
StIstSlowSimMaker.cxx , StIstSlowSimMaker.h ;
StPxlClusterMaker
StPxlClusterCollection.cxx, StPxlClusterCollection.h, StPxlClusterMaker.cxx;
StPxlDbMaker
StPxlDb.cxx, StPxlDb.h, StPxlDbMaker.cxx;
StPxlRawHitMaker
StPxlRawHitCollection.cxx, StPxlRawHitCollection.h;
StPxlSimMaker
StPxlDigmapsSim.cxx, StPxlDigmapsSim.h, StPxlFastSim.h, StPxlSimMaker.cxx, StPxlSimMaker.h;
DIGMAPS/digaction.cxx, digaction.h, digadc.cxx, digadc.h, digbeam.cxx, digbeam.h, digcluster.cxx, digcluster.h, digevent.cxx, digevent.h, dighistograms.cxx, dighistograms.h, diginitialize.cxx, diginitialize.h, digmaps.cxx, digmaps.h, digparticle.cxx, digparticle.h, digplane.cxx, digplane.h, digproto.cxx, digproto.h, digreadoutmap.cxx, digreadoutmap.h, digresult.cxx, digresult.h, digtransport.cxx, digtransport.h;
StTpcDb
StTpcDbMaker.cxx;
StarGenerator
BASE/StarPrimaryMaker.cxx;
DECAY/AgUDecay.cxx, AgUDecay.h;
EMBED/StarEmbedMaker.cxx, StarEmbedMaker.h,
EvtGen1_06_00/all files ;
Hijing1_383/StarHijing.cxx;
Kinematics/StarKinematics.cxx, StarKinematics.h;
Pythia6_4_28/Pythia6.cxx, Pythia6.h, StarPythia6.cxx, StarPythia6.h, closeDecays.F;
Pythia8_1_62/StarPythia8.cxx, StarPythia8.h, StarPythia8Decayer.cxx, StarPythia8Decayer.h;
Pythia8_1_86/StarPythia8Decayer.cxx, StarPythia8Decayer.h;
STEP/AgUStep.cxx, AgUStep.h;
Tauola1_1_5/ - multiple files;
UTIL/StarParticleData.cxx;pams
sim/g2t/g2t_volume_id.g;StarDb
Geometry/ist/istLadderOnIstMisalign.20131210.000001.C, istLadderOnIstMisalign.20140101.000001.C, istLadderOnIstMisalign.20141210.000001.C, istLadderOnIstMisalign.20150101.000001.C, istLadderOnIstMisalign.20151210.000001.C, istLadderOnIstMisalign.20160101.000001.C ;
Geometry/pxl/pxlLadderOnSectorMisalign.20131210.000001.C, pxlLadderOnSectorMisalign.20140101.000000.C, pxlLadderOnSectorMisalign.20141210.000001.C, pxlLadderOnSectorMisalign.20150101.000001.C, pxlLadderOnSectorMisalign.20151210.000001.C, pxlLadderOnSectorMisalign.20160101.000001.C;
Geometry/sst/sstLadderOnSstMisalign.20131210.000001.C, sstLadderOnSstMisalign.20140101.000001.C, sstLadderOnSstMisalign.20141210.000001.C, sstLadderOnSstMisalign.20150101.000001.C, sstLadderOnSstMisalign.20151210.000001.C, sstLadderOnSstMisalign.20160101.000001.C;StDb/idl/istSimPar.idl, pxlDigmapsSim.idl, pxlSimPar.idl, tpcCalibResolutions.idl ;
- February 2, 2018
embedding library SL16j_embed has been checked out with tag SL16j and updated with necessary codes needed to proceed with embedding production. Accomplished library was retagged as SL16j_embed_v1 and rebuilt on SL6.4 and SL7.3 platforms.
Next codes have been updated:
StRoot
StTpcRSMaker
StTpcRSMaker.cxx, r. 1.73.2.1;
StdEdxY2Maker
StPidStatus.cxx, r. 1.2.6.1; StdEdxY2Maker.cxx, r. 1.86.4.1;
StAssociationMaker/StAssociationMaker.cxx, r.1.62
StChain/GeometryDbAliases.h, r. 1.21
StMiniMcMaker/StMiniMcMaker.cxx r. 1.49
StMiniMcEvent/StTinyRcTrack.h, r. 1.11 ; StTinyMcTrack.h, r. 1.14; StMiniMcPair.h, r. 1.6 ;
StMiniMcEvent/StTinyMcTrack.h, r. 1.14;
StMiniMcEvent/StMiniMcPair.h, r. 1.6;
StBTofSimMaker/
StVpdSimMaker/
StBTofMixerMaker/
StBTofCalibMaker/
StVpdCalibMaker/macros/embedding/bfcMixer_Tpx.C, r. 1.47;
StarVMC/Geometry/
StarVMC/StarAgmlUtil/
StarVMC/StarAgmlLib/
StarVMC/StarGeometry/
StarVMC/xgeometryStarDb/AgMLGeometry
StarDb/Calibrations/tpc/TpcResponseSimulator.20151220.000002.C r.1.1StDb/idl/tofSimResParams.idl
mgr/Dyson/
- July 27, 2018
embedding library SL16g_embed has been updated with Trigger codes needed for SPIN embedding. Accomplished library was re-tagged as SL16g_embed_v3 and rebuilt.
Next codes have been updated:
StRoot
StBFChain
BigFullChain.h, r. 1.253.2.1;
StTriggerUtilities
StTriggerSimuMaker.cxx, StTriggerSimuMaker.h - revisions with tag SL18e;
Emc/StEmcTriggerSimu.cxx, StEmcTriggerSimu.h - revisions with tag SL18e;
Bemc/StBemcTriggerSimu.cxx, StBemcTriggerSimu.h - revisions with tag SL18e;
Eemc/StEemcTriggerSimu.cxx, StEemcTriggerSimu.h - revisions with tag SL18e;
StTriggerUtilities/StDSMUtilities/ - all codes with tag SL18e;
StTriggerUtilities/StDSMUtilities/y2013/ - all codes with tag SL18e;
StMCFilter
StMCFilter.cxx, StMCFilter.h - revisions with tag SL18e;
StSpinPool
StTriggerFilterMaker/StTriggerFilterMaker.cxx, StTriggerFilterMaker.h - revisions with tag SL18e;
StJetSkimEvent/StJetSkimEvent.cxx, StJetSkimEvent.h - revisions with tag SL18e;
StPythiaEvent.h, StPythiaEvent.cxx - revisions with tag SL13b_embed_v1;
StNNPDFAsymMaker/ - all codes with tag SL13b_embed_v1;
StBfcTriggerFilterMaker/StBfcTriggerFilterMaker.cxx, r.1.5.14.1; StBfcTriggerFilterMaker.h, r.1.5.12.1 ;
StJetMaker
StJetSkimEventMaker.cxx, r. 1.27.4.1; StJetSkimEventMaker.h, r. 1.8.10.1; - June 05, 2018
embedding library SL16g_embed has been updated with codes needed to proceed with embedding production for st_W stream data in auau 200GeV run 2014. Accomplished library was retagged as SL16g_embed_v2 and rebuilt.
Next codes have been updated:
StRoot
StAssociationMaker/StAssociationMaker.cxx
StDetectorDbMaker/StDetectorDbChairs.cxx, r.1.49.6.1; St_TpcEdgeC.h, r.1.1; St_TpcEdgeC.h, r.1.1; St_TpcAdcCorrectionBC.h, r.1.1; St_TpcrChargeC.h, r.1.1; St_TpcCurrentCorrectionC.h, r.1.1; St_TpcTanLC.h, r.1.1; St_TpcEffectivedXC.h, r.1.1; St_tpcAnodeHVC.h, r.1.5; St_tpcAnodeHVavgC.h, r.1.6;
StBTofCalibMaker/StBTofCalibMaker.cxx, r.1.17; StBTofCalibMaker.h, r.1.11;
StBTofMixerMaker/StBTofMixerMaker.cxx, r.1.2; StBTofMixerMaker.cxx, r.1.2;
StBTofSimMaker/ StBTofSimResParams.h, r.1.1 ;StBTofSimMaker.cxx, r.1.15; StBTofSimMaker.h, r.1.9 ;
StMiniMcMaker/StMiniMcMaker.cxx, r.1.49;
StMiniMcMaker/dominatrackInfo.cc, r.1.4;
StMiniMcEvent/StTinyRcTrack.h, r.1.11; StTinyMcTrack.h, r.1.14; StMiniMcPair.h, r.1.6;
StdEdxY2Maker/StPidStatus.cxx, r.1.2.6.1; StdEdxY2Maker.cxx, r.1.86.4.1; StdEdxY2Maker.h, r.1.31; StTpcdEdxCorrection.h, r.1.8; StTpcdEdxCorrection.cxx, r.1.14; StdEdxY2MakerLinkDef.h, r.1.8 ;
dEdxTrackY2.h, dEdxTrackY2.cxx - removed;
StTpcRSMaker/StTpcRSMaker.cxx, r.1.73.2.1, StTpcRSMaker.h, r.1.28;
StVpdCalibMaker/StVpdCalibMaker.cxx, r. 1.14; StVpdCalibMaker.h, r.1.8;
StVpdSimMaker/StVpdSimMaker.cxx, r.1.2; StVpdSimMaker.cxx, r.1.1; StVpdSimConfig.h, r.1.3;
macros/embedding/bfcMixer_Tpx.C, r.1.52;StarDb/Calibrations/tpc/TpcResponseSimulator.y2014.C ;
StDb/idl/tofSimResParamd.idl;
StDb/idl/vpdSimParams.idl ;
StDb/idl/TpcEffectivedX.idl, r.1.1; - June 21, 2017
embedding library SL16g_embed has been checked out with tag SL16g and updated with necessary codes needed to proceed with embedding production for st_W stream data in auau 200GeV run 2014 and pp 500GeV run 2013 collisions. Accomplished library was retagged as SL16g_embed_v1 and rebuilt.
Next codes have been updated:
StRoot
StarGenerator
All codes in the next directories updated by June 20 :
BASE/
DECAY/
EVENT/
FILT/
macros/
Pythia8_1_62/
Pythia8_1_86/
STEP/mgr/Conscript-standard, r.1.263 ;
- July 24, 2015
embedding library SL15e_embed has been checked out with tag SL15e and updated with necessary codes needed to proceed with embedding for P15ic & P15ie real data production (fixed bugs #3121 & #3123). Accomplished library was retagged as SL15e_embed_v1 and built on SL6.4 & SL5.3 platforms. Library was tested and released on July 26.
Next codes have been updated:
StRoot
StDbUtilities
StTpcCoordinateTransform.cc - added recalculation of pad row during transformation;
StTpcRSMaker
StTpcRSMaker.cxx, StTpcRSMaker.h, TpcRS.C - recalculated no. of real hits in g2t_track n_tpc_hit; added current and accumulated charge in dE/dx correction;
StMtdUtil
StMtdGeometry.cxx, StMtdGeometry.h - removed calling a macro in Init() to create geometry; it should be done within the maker that uses this utility class;
added the TGeoManager parameter to the default constructor to force the existance of the geometry when using this utility class;
modified to simplify the code for getting the pointer to the magnetic field;
StMtdMatchMaker
StMtdMatchMaker.cxx - created geometry in InitRun(), which is needed to use StMtdGeometry class;
StarVMC/Geometry/MutdGeo/MutdGeo5.xml - improved timing and energy resolution for MTD; - April 27 , 2016
embedding library SL13b_embed tagged as SL13b_embed_v1 has been created to resolved the problem (posted in ticket #3186) of using subsystem-specific DbV timestamp caused by using of old Mysql version compiled with old libraries. Current SL64 upgrade has latest MySql version and old DB libraries can not process subsystem related DbV timestamp.
Also added new trigger filtering and simulation codes and updated JetMaker, JetFinder & SpinPool necessary to proceed with run 2012 pp 500GeV embedding production. Library was compiled with gcc version 4.4 and codes have been adjusted accordingly;
Next codes have been updated:
asps/Simulation/starsim/Conscript - adjustd to gcc 4.4;
asps/Simulation/agetof/Conscript - adjustd to gcc 4.4;StRoot
StarGenerator/BASE/AgStarReader.cxx - patched for gcc 4.4 compiler;
StDaqLib/GENERIC/RecHeaderFormats.hh - patched for gcc 4.4 compiler;
StDetectorDbMaker/StDetectorDbChairs.cxx - patched for 4.4 compiler;
StJetFinder
StFastJetPars.cxx, StFastJetPars.h, StProtoJet.cxx, StProtoJet.h, StjFastJet.cxx StjFastJet.h - updated for run 2012 pp 500GeV embedding production with off-cone axis underlying-event;
StFastJetAreaPars.h, StFastJetAreaPars.cxx - added new codes for fastjet calculation;
StJetMaker
StAnaPars.h, StBET4pMaker.h, StJetMaker.h, StJetMaker2009.cxx, StJetMaker2009.h, StJetScratch.h, StJetSkimEventMaker.cxx, StJetSkimEventMaker.h, StjBEMCTowerMaker.h, StjMCParticleMaker.h, StjTPCTrackMaker.h - updated for run 2012 pp 500GeV embedding production with off-cone axis underlying-event calculation;
StJetMaker2012.cxx, StJetMaker2012.h - added new files for run 2012 pp 500GeV embedding production with off-axis cone underlying event calculation;
StUEMaker2009.cxx, StUEMaker2009.h - added new files;
StBET4pMaker.h, StJetMaker.h, StJetScratch.h, StJetSkimEventMaker.h, StjBEMCTowerMaker.h, StjMCParticleMaker.h, StjTPCTrackMaker.h - updated for run 2012 pp 500GeV embedding production with off-cone axis underlying-event calculation;
emulator/StjeTowerEnergyListToStMuTrackFourVecList.cxx - updated for run 2012 pp 500GeV embedding production with off-cone axis underlying-event calculation;
macros/StjBEMCTowerEnergyListMaker.C, StjMCAsymMaker.C, StjMCKinMaker.C, StjMCParticleListMaker.C, StjMuDstFileNameMaker.C, StjSimuBBCMaker.C, StjSpinMaker.C, StjTPCTrackListMaker.C, StjTrigger2005DataMaker.C, StjTrigger2005DataMaker2.C, StjTrigger2005MCMaker.C, StjTrigger2005MCMaker2.C, StjTrigger2006DataMaker.C, StjTrigger2006MCMaker.C, StjVertexMaker.C, StjWestBEMCTowerEnergyListMaker.C - updated;
mcparticles/
StjAbstractMCParticleRegion.h, StjMCParticleRegion.cxx - updated for underlying event calculation;
StjMCParticleRegion.h - new files added;
mudst/StjEEMCMuDst.h - updated for run 2012 pp 500GeV embedding production with off-cone axis underlying-event calculation;
towers/StjTowerEnergyFraction.cxx, StjTowerEnergyFraction.h, StjTowerRegion.cxx, StjTowerRegion.h - added new code for underlying event calculation;
StjAbstractTower.h, StjAbstractTowerRegion.h - added new code for underlying event calculation;
tracks/StjTrackList.h - updated for run 2012 pp 500GeV embedding production with off-cone axis underlying-event calculation;
StjAbstractTrack.h, StjAbstractTrackRegion.h,StjTrackPtFraction.cxx, StjTrackPtFraction.h, StjTrackRegion.cxx, StjTrackRegion.h - added new codes for underlying event calculation;
tree/StjTreeIndex.h, StjTreeReader.cxx, StjTreeReader.h - updated for run 2012 pp 500GeV embedding production with off-cone axis underlying-event calculation;
StFtpcTrackMaker
StFtpcTrack.cc - patched for gcc 4.4 compiler;
StGenericVertexMaker
StppLMVVertexFinder.cxx - patched for gcc 4.4 compiler;
StMiniMcMaker
StMiniMcMaker.cxx - patched for gcc 4.4 compiler;
StarMagField
StarMagField.cxx- patched for gcc 4.4 compiler;
StiMaker
StiStEventFiller.cxx - patched for gcc 4.4 compiler;
StTpcHitMoverMaker
StTpcHitMoverMaker.cxx - patched for gcc 4.4 compiler;
StTpcRSMaker
StTpcRSMaker.cxx - patched for gcc 4.4 compiler;
St_tcl_Maker
StTpcFastSimMaker.cxx - patched for gcc 4.4 compiler;
StTriggerUtilities
StTriggerDefinition.h, StTriggerSimuMaker.cxx, StTriggerSimuMaker.h, StTriggerSimuResult.cxx, StTriggerSimuResult.h, StVirtualTriggerSimu.h - updated for run 2012 pp 500GeV embedding production;
Bemc/
StBemcTriggerSimu.cxx, StBemcTriggerSimu.h - updated for run 2012 pp 500GeV embedding production;
StDSMUtilities/
DSMAlgo_EM201_2009.cc, TCU.cc, TCU.hh, TriggerDefinition.hh - updated for run 2012 pp 500GeV embedding production;
Emc/
StEmcTriggerSimu.cxx, StEmcTriggerSimu.h - updated for run 2012 pp 500GeV embedding production;
L2Emulator/L2gammaAlgo/L2gammaAlgo.cxx - updated for run 2012 pp 500GeV embedding production;
macros/read_trigger_definitions.C, read_trigger_thresholds.C, write_trigger_definitions.C, write_trigger _thresholds.C - updated for run 2012 pp 500GeV embedding production;pams/gen/hijing_382/Conscript - adjustd to gcc 4.4;
StSpinPool - many codes modified and new added for analysis;
QtRoot
all codes have been imported from HEAD (qt 4.8) to update QtRoot for SL13b branch; - May 24 , 2016
embedding library SL12d_embed has been updated with codes below to resolved the problem (posted in tick et #3186) of using subsystem-specific DbV timestamp caused by using of old Mysql version compiled with old libraries. Current SL64 upgrade has latest MySql version and old DB libraries can not process subsystem related DbV timestamp.
Also updated JetMaker, JetFinder & SpinPool necessary to proceed with run 2012 embedding production. Library was compiled with gcc version 4.4 and codes have been adjusted accordingly;
Library was retaged with tag SL12d_embed_v6Next codes have been updated:
asps/Simulation/starsim/Conscript - adjustd to gcc 4.4;
asps/Simulation/agetof/Conscript - adjustd to gcc 4.4;StDaqLib/GENERIC/RecHeaderFormats.hh - patched for gcc 4.4 compiler;
StDbLib
Makefile, MysqlDb.cc, StDbBuffer.h, StDbDefs.hh, StDbManagerImpl.cc, StDbModifier.cxx, StDbServiceBroker.cxx, StDbServiceBroker.h, StDbSql.cc, StDbTable.cc, StDbXmlReader.cc, StDbXmlWriter.cc, StHyperCacheFileLocal.cpp, StHyperCacheFileLocal.h, StHyperCacheManager.cpp, StHyperUtilFilesystem.cpp, StHyperUtilFilesystem.h, StHyperLock.h - updated for gcc 4.4 compiler;
StDetectorDbMaker
StDetectorDbChairs.cxx - patched for 4.4 compiler;
StiMaker
StiStEventFiller.cxx - - patched for 4.4 compiler;
StJetFinder
StFastJetPars.cxx, StFastJetPars.h, StProtoJet.cxx, StProtoJet.h, StjFastJet.cxx StjFastJet.h, StFastJetAreaPars.h - updated for run 2012 embedding production with off-cone axis underlying-event;
StJetMaker
StAnaPars.h, StBET4pMaker.h, StJetMaker.h, StJetMaker2009.cxx, StJetMaker2009.h, StJetScratch.h, StJetSkimEventMaker.cxx, StJetSkimEventMaker.h, StjBEMCTowerMaker.h, StjMCParticleMaker.h, StjTPCTrackMaker.h - updated to comply with gcc 4.4 compiler;
emulator/StMcTrackEmu.h, StjeTowerEnergyListToStMuTrackFourVecList.cxx - updated for run 2012 embedding production;
macros/RunJetFinder2009emb.C, StjBEMCTowerEnergyListMaker.C, StjMCAsymMaker.C, StjMCKinMaker.C, StjMCParticleListMaker.C, StjMuDstFileNameMaker.C, StjSimuBBCMaker.C, StjSpinMaker.C, StjTPCTrackListMaker.C, StjTrigger2005DataMaker.C, StjTrigger2005DataMaker2.C, StjTrigger2005MCMaker.C, StjTrigger2005MCMaker2.C, StjTrigger2006DataMaker.C, StjTrigger2006MCMaker.C, StjVertexMaker.C, StjWestBEMCTowerEnergyListMaker.C - updated;
mcparticles/
StjMCParticleToStMuTrackFourVec.h - updated;
StjMCParticleRegion.cxx, StjMCParticleRegion.h, StjAbstractMCParticleRegion.h - added new files to proceed with run 2012 embedding production;
mudst/StjEEMCMuDst.h, StjTPCMuDst.cxx - updated for run 2012 embedding production;
towers/StjTowerRegion.cxx, StjTowerRegion.h, StjAbstractTower.h, StjAbstractTowerRegion.h, StjTowerEnergyFraction.cxx, StjTowerEnergyFraction.h - added new files to proceed with run 2012 embedding production;
tracks/StjTrackList.h - updated for run 2012 embedding production ;
StjAbstractTrackRegion.h, StjAbstractTrack.h, StjTrackCutRandomAccept.h, StjTrackRegion.cxx, StjTrackRegion.h, StjTrackPtFraction.h, StjTrackPtFraction.cxx - added new files to proceed with run 2012 embedding production;
tree/StjTreeIndex.h, StjTreeReader.cxx, StjTreeReader.h - updated for run 2012 embedding production;
StGenericVertexMaker
StppLMVVertexFinder.cxx - patched for 4.4 compiler;
StFtpcTrackMaker
StFtpcTrack.cc - patched for 4.4 compiler;
StarMagField
StarMagField.cxx - - updated to comply with gcc 4.4 compiler;
StMiniMcMaker
StMiniMcMaker.cxx - patched for 4.4 compiler;
StMuDSTMaker/COMMON/StMuMomentumShiftMaker.cxx - updated to comply with gcc 4.4 compiler;
StTpcHitMoverMaker
StTpcHitMoverMaker.cxx - updated to comply with gcc 4.4 compiler;
StTpcRSMaker
StTpcRSMaker.cxx - updated to comply with gcc 4.4 compiler;
StTriggerUtilities
StTriggerDefinition.h, StTriggerSimuMaker.cxx, StTriggerSimuMaker.h, StTriggerSimuResult.cxx, StTriggerSimuResult.h, StVirtualTriggerSimu.h - updated for run 2012 embedding production ;
Bemc/StBemcTriggerSimu.cxx, StBemcTriggerSimu.h - updated for run 2012 embedding production ;
StDSMUtilities/DSMAlgo_EM201_2009.cc, TCU.cc, TCU.hh, TriggerDefinition.hh - updated for run 2012 embedding production ;
Emc/StEmcTriggerSimu.cxx, StEmcTriggerSimu.h - updated for run 2012 embedding production ;
Eemc/EEdsm1.h - updated for run 2012 embedding production ;
L2Emulator/L2algoUtil/L2DbConfig.cxx, L2VirtualAlgo2012.cxx - updated for run 2012 embedding production;
L2Emulator/L2gammaAlgo/L2gammaAlgo.cxx - updated for run 2012 embedding production;
macros/read_trigger_definitions.C, read_trigger_thresholds.C, write_trigger_definitions.C, write_trigger _thresholds.C - updated for run 2012 embedding production ;
St_tcl_Makerr
StTpcFastSimMaker.cxx - updated to comply with gcc 4.4 compiler;pams/gen/hijing_382/Conscript - adjustd to gcc 4.4;
StarVMC/g2Root/Conscript - adjustd to gcc 4.4;
StSpinPool - many codes modified and new added for analysis;
QtRoot
all codes have been imported from HEAD (qt 4.8) to update QtRoot for SL12d_embed branch; - January 29 , 2014
embedding library SL12d_embed has been updated with next codes:
StRoot/StarClassLibrary/StParticleTable.cc, r.1.21 to add D*(+)(-) --> D0 (bar) pi+ (-) 100% BR;
pams/sim/gstar/gstar_part.g, r. 1.45 to add D*(+)(-) --> D0 (bar) pi+ (-) 100% BR;
StRoot/macros/embedding/bfcMixer_Tpx.C ;
Library was retagged with tag SL12d_embed_v5 ;
- April 8 , 2013
embedding library SL12d_embed has been updated with codes listed below to fix bugs #2437, #2497 & #2549.
Library was rebuilt and retagged with tag SL12d_embed_v2
Next codes have been updated:
StRoot
StBFChain/BigFullChain.h, r.1.191;
StTpcHitMaker/StTpcHitMaker.cxx r.1.45, StTpcHitMaker.h, r.1.15, StTpcRTSHitMaker.cxx, r.1.36, StTpcRTSHitMaker.h, r.1.11;
StarClassLibrary/StParticleTable.cc r.1.19;
pams/sim/gstar/gstar_part.g, r.1.38;
StarDb/AgMLGeometry/loadStarGeometry.Cxx, r.1.4; - December 20 , 2012
new embedding library SL12d_embed has been created to fix bugs #2378 & #2437 for embedding production.
Next codes have been updated:
StRoot/StDetectorDbMaker/
StDetectorDbChairs.cxx, r.1.33; StDetectorDbMakerLinkDef.h, r.1.2; StDetectorDbRichScalers.h, r.1.14; St_tpcAnodeHVC.h r.1.4; St_tpcAnodeHVavgC.h, r.1.3; StTpcSurveyC.h, r.1.2; St_tpcCorrectionC.h, r.1.2; St_tpcPadGainT0C.h r.1.4; St_tpcPadGainT0BC.h, r.1.1; St_tpcRDOMasksC.h r.1.6; St_tpcStatusC.h, r.1.2; St_trigDetSumsC.h, r.1.9.
St_tpcHitErrorsC.h - removed;
StRoot/StTpcRSMaker/StTpcRSMaker.cxx, r.1.66;
StRoot/StDbUtilities/StTpcCoordinateTransform.cc, r.1.39; StTpcCoordinateTransform.hh, r.1.21;
StarDb/Calibrations/tpc/tpcPadGainT0B.*.root; tpcPadGainT0B.*.C;
StDb/idl/tpcPadGainT0B.idl, r.1.1 ;
Library has been retagged with tag SL12d_embed_v1 - June 07 , 2012
embedding library SL12a_embed has been checked out with tag SL12a and updated with necessary code s needed to proceed with embedding for P12ia real data production. Accomplished library was retagged as SL12a_embed_v1 and built on SL5.3. Library was tested and released on June 11.
gcc version 4.3.2 20081007 (Red Hat 4.3.2-7)
Next codes have been updated:
StRoot
StDetectorDbMaker/
St_tpcPadPlanesC.h, r.1.6;
StDetectorDbChairs.cxx, r.1.29;
St_tofTrayConfigC.h, St_tofStatusC.h, St_tofGeomAlignC.h, St_smdStatusC.h, St_smdPedC.h, St_smdGainC.h, St_smdCalibC.h, StiBTofHitErrorCalculator.h, StiBTofChairs.cxx, St_emcTriggerStatusC.h, St_emcTriggerPedC.h, St_emcTriggerLUTC.h, St_emcStatusC.h, St_emcPedC.h, St_emcGainC.h, St_emcCalibC.h, St_bsmdpMapC.h, St_bsmdeMapC.h, St_bprsMapC.h, St_bemcMapC.h; all r.1.1 ;
StMiniMcMaker/
StMiniMcMaker.cxx, r.1.41; StMiniMcMaker.h, r.1.19;
StMiniMcEvent/
StMiniMcEvent.h, r.1.9; StMiniMcEvent.cxx, r.1.9
St_geant_Maker
Embed/StPrepEmbedMaker.cxx, r.1.8; StPrepEmbedMaker.h, r.1.8;
StTpcRSMaker/
StTpcRSMaker.cxx, r.1.60 to fix bug #2347;
StTpcRSMaker.h, r.1.25;
TF1F.cxx, r.1.5 to fix bug #2342;
TpcRS.C, r.1.31;
macros/embedding/bfcMixer_tpcOnly.C, r.1.4;
bfcMixer_Tpx.C, r.1.34;
StarDb
Calibrations/tpc/TpcResponseSimulator.C, r.1.12; TpcResponseSimulator.y2009.C, r.1.11; TpcResponseSimulator.y2010. C, r.1.12; TpcResponseSimulator.y2011.C, r.1.8; TpcResponseSimulator.y2012.C, r.1.1;
dEdxModel/dNdE_Bichsel.root;
Library was retagged as SL12a_embed_v1 and rebuilt. - June 26, 2014
SL11d_embed library has been updated with next codes to add Psi(2s) -> e+e- decay channel and make updates consistent with codes in SL11d_embed library;
StRoot
StarClassLibrary/StPsi2s.cc, r.1.1; StPsi2s.hh, r.1.1;
StParticleTable.cc, r.1.22, StParticleTypes.hh, r.1.3;
StHDibaryon.cc, r.1.2, StHDibaryon.hh, r.1.1 ;
StXiZero1530.cc, r.1.1, StXiZero1530.hh, r.1.1 ;
pams
sim/gstar/gstar_part.g, r.1.46;Library was retagged with tag SL11d_embed_v7 and rebuilt.
- June 18, 2014
SL11d_embed library has been updated with next codes to add Hypertriton 3-body channel decay and to fix bug reported in ticket #2869;
StRoot
St_geant_Maker/Embed/StPrepEmbedMaker.cxx, r.1.10;
StarClassLibrary/StarPDGEncoding.hh, r.1.3;
StParticleTable.cc, r.1.15; StAntiHyperTriton.hh, r.1.1; StAntiHyperTriton.cc, r.1.1;
pams sim/gstar/gstar_part.g, r.1.33;Library was retagged with tag SL11d_embed_v7 and rebuilt.
- January 23, 2012
SL11d_embed library has been updated with next codes to fix bugs #2378 & #2437
StRoot/StDetectorDbMaker/
StDetectorDbChairs.cxx, r.1.33; StDetectorDbMakerLinkDef.h, r.1.2; StDetectorDbRichScalers.h, r.1.14; St_spaceChargeCorC.cxx, r.1.3; St_tpcAnodeHVC.h r.1.4; St_tpcAnodeHVavgC.h, r.1.3; StTpcSurveyC.h, r.1.2; St_tpcCorrectionC.h, r.1.2; St_tpcPadGainT0C.h r.1.4; St_tpcPadGainT0BC.h, r.1.1; St_tpcRDOMasksC.h r.1.6; St_tpcStatusC.h, r.1.2; St_trigDetSumsC.h, r.1.9 ;
St_tpcHitErrorsC.h - removed;
St_tofTrayConfigC.h,r.1.1; St_tofStatusC.h,r.1.1; St_tofGeomAlignC.h,r.1.1; St_smdStatusC.h,r.1.1; St_smdPedC.h,r.1.1; St_smdGainC.h,r.1.1;St_smdCalibC.h,r.1.1; StiBTofHitErrorCalculator.h,r.1.1; StiBTofChairs.cxx,r.1.1; St_emcTriggerStatusC.h,r.1.1; St_emcTriggerPedC.h, r.1.1;St_emcTriggerLUTC.h,r.1.1; St_emcStatusC.h,r.1.1; St_emcPedC.h,r.1.1; St_emcGainC.h,r.1.1; St_emcCalibC.h,r.1.1; St_bsmdpMapC.h,r.1.1; St_bsmdeMapC.h,r.1.1; St_bprsMapC.h,r.1.1; St_bemcMapC.h, r.1.1;
StRoot/StTpcHitMaker/StTpcRTSHitMaker.cxx, r.1.36; StTpcRTSHitMaker.h, r.1.11; StTpcHitMaker.cxx,r.1.45; StTpcHitMaker.h, r.1.15;
StRoot/StTpcRSMaker/StTpcRSMaker.cxx, r.1.66; StTpcRSMaker.h, r.1.25, TpcRS.C, r.1.31;
StRoot/StDbUtilities/StTpcCoordinateTransform.cc, r.1.39; StTpcCoordinateTransform.hh, r.1.21;
StRoot/St_geant_Maker/Embed/
StPrepEmbedMaker.cxx, r.1.8; StPrepEmbedMaker.h, r.1.8;
StRoot/macros/embedding/bfcMixer_Tpx.C
StarDb/Calibrations/tpc/tpcPadGainT0B.*.root; tpcPadGainT0B.*.C;
TpcAdcCorrectionB.y2011.C, r.1.6; TpcAvgCurrent.C, r.1.1; TpcCurrentCorrection.C, r.1.1; TpcResponseSimulator.C, r.1.12; TpcResponseSimulator.y2009.C, r.1.11; TpcResponseSimulator.y2010.C, r.1.13; TpcResponseSimulator.y2011.C, r.1.8;
StarDb/dEdxModel/dNdE_Bichsel.root, r.1.3; dNdx_Bichsel.root, r.1.2;
StDb/idl/TpcAvgCurrent.idl, r.1.2;
Libray was retagged as SL11d_embed_v4 and rebuilt. - July 3, 2012
SL11d_embed library has been updated with next codes to proceed with run 2009 embedding production for reproduced pp 200GeV run 2009 data.
StRoot/StBFChain/BigFullChain.h, r.1.168;
pams/gen/Pythia6_4_26 ,
pams/geometry/pixlgeo/PixlGeo4.g, r.1.1, PxstGeo1.g, r.1.1;
Libray was retagged as SL11d_embed_v3 and rebuilt.
- May 25, 2012
SL11d_embed library has been updated with patches for codes
StRoot/StMiniMcMaker/StMiniMcMaker.cxx, r.1.41; StMiniMcMaker.h, r.1.19;
StRoot/StMiniMcEvent/StMiniMcEvent.h, r.1.9; StMiniMcEvent.cxx, r.1.9
StRoot/St_geant_Maker/EmbedStPrepEmbedMaker.cxx, r.1.7; StPrepEmbedMaker.h, r.1.7;
StRoot/StTpcHitMaker/StTpcMixerMaker.cxx, r.1.3 to fix bug #2351.
StRoot/StTpcRSMaker/TF1F.cxx, r.1.5 to fix bug #2342.
StRoot/macors/embedding/bfcMixer_tpx.C, r. 1.34;
Libray was retagged as SL11d_embed_v2 and rebuilt.
- March 20 , 2012
embedding library SL11d_embed has been checked out with tag SL11d and updated with necessary codes needed to proceed with embedding for P11id real data production. Accomplished library was retagged as SL11d_embed_v1 and built on SL5.3. Library was tested and released on March 23.
gcc version 4.3.2 20081007 (Red Hat 4.3.2-7)
Next codes have been updated:
StRoot
StBFChain
Bfc.h, r.1.2;
BFC.C, r.1.4;
BigFullChain.h, r.1.165;
StBFChain.cxx, r.1.592;
StBFChain.h, 1.50;
StDetectorDbMaker
St_TpcResponseSimulatorC.h, r.1.4 ;
StDbBroker
StDbBroker.cxx, r.1.58;
StDbBroker.h, r.1.32;
StDbLib
StDbConfigNode.cc, r.1.29;
StDbConfigNode.hh, r.1.17;
StDbConfigNodeImpl.cc, r.1.9;
StDbConfigNodeImpl.hh, r.1.2;
St_db_Maker
St_db_Maker.cxx, r.1.129;
St_db_Maker.h, r.1.42 ;
StChain
StMaker.cxx; r. 1.245;
StTpcRSMaker
Altro.cxx, r.1.4;
StTpcRSMaker.cxx, r.1.57;
StTpcRSMaker.h, r.1.23;
TF1F.cxx, r.1.4;
TF1F.h, r.1.5;
TpcRS.C, 1.28 ;
StEmbeddingUtilities
StEmbeddingQA.cxx, r.1.22;
StEmbeddingQA.h, r.1.11;
StEmbeddingQAUtilities.cxx, r.1.16;
StEmbeddingQAUtilities.h, 1.12;
St_geant_Maker
Embed/StPrepEmbedMaker.h, r.1.5;
StPrepEmbedMaker.cxx, r.1.5 ;
macros/embedding
bfcMixer_DaqFzd.C, r. 1.2;
bfcMixer_Ftpc.C, r. 1.2;
bfcMixer_Tpx.C, r.1.31;
bfcMixer_TpxAuAu11.C, r.1.4;
bfcMixer_TpxAuAu200.C, r.1.2;
bfcMixer_TpxAuAu39.C, r.1.3;
bfcMixer_TpxAuAu7.C, r.1.3 ;
doEmbeddingQAMaker.C, r.1.8;
get_embedding_xml.pl, r.1.18;
get_embedding_xml_PtHard.sh, r.1.2;
get_random_seed, r.1.1;
pythiaTuneA_template.kumac, r.1.3;
starlight.kumac, r.1.2;
submit_PtHard.sh, r.1.2;pams
geometry/geometry/geometry.g; r.1.239 ;StarDb/VmcGeometry
Geometry.y2011a.C;
y2011a.h ;
StDb/idl/ TpcResponseSimulator.idl, r.1.4;
StarDb/Calibrations/tpc
TpcResponseSimulator.C, r.1.11
TpcResponseSimulator.y2009.C, r.1.10
TpcResponseSimulator.y2010.C, r.1.11
TpcResponseSimulator.y2011.C, r.1.6
mgr Conscript-standard, r.1.225 - April 4, 2013
embedding library SL10k_embed has been updated with next codes:
StRoot/StarClassLibrary/StParticleTable.cc, r.1.19; StHDibaryon.hh, r.1.1; StHDibaryon.cc, r.1.2;
pams/sim/gstar/gstar_part.g, r.1.38 to fix bug #2549;
Library was retagged with tag SL10k_embed_v9.
- January 2, 2013
embedding library SL10k_embed has been updated with next codes:
StRoot/StTpcHitMaker/StTpcRTSHitMaker.cxx, r.1.22.2.1 to fix bug #2437;
StarDb/Calibrations/tpc/TpcResponseSimulator.y2010.C, r.1.13 to fix bug #2378;
Library was retagged with tag SL10k_embed_v8.
- November 21 , 2012
embedding library SL10k_embed has been updated with next codes:
StRoot/StDetectorDbMaker/
StDetectorDbChairs.cxx, r.1.33; StDetectorDbMakerLinkDef.h, r.1.2; StDetectorDbRichScalers.h, r.1.14; St_spaceChargeCorC.cxx, r.1.3; St_tpcAnodeHVC.h r.1.4; St_tpcAnodeHVavgC.h, r.1.3; StTpcSurveyC.h, r.1.2; St_tpcCorrectionC.h, r.1.2; St_tpcPadGainT0C.h r.1.4; St_tpcPadGainT0BC.h, r.1.1; St_tpcRDOMasksC.h r.1.6; St_tpcStatusC.h, r.1.2; St_trigDetSumsC.h, r.1.9.
St_tpcHitErrorsC.h - removed;
StRoot/St_geant_Maker/Embed/
StPrepEmbedMaker.cxx, r.1.8; StPrepEmbedMaker.h, r.1.8;
StRoot/macros/embedding/bfcMixer_Tpx.C
StDb/idl/
tpcPadGainT0B.idl, r.1.1;
to fix bug #2378. Updated codes were retagged with tag SL10k_embed_v8. Library was rebuilt on SL5.3.
gcc version 4.3.2 20081007 (Red Hat 4.3.2-7)
- November 13 , 2012
embedding library SL10k_embed has been updated with code:
StRoot/StStTpcRSMaker/StTpcRSMaker.cxx, r. 1.60.2.1 (branch revision to 1.60)
to fix bug #2378. Updated library was retagged as SL10k_embed_v8 and rebuilt on SL5.3.
gcc version 4.3.2 20081007 (Red Hat 4.3.2-7)
- June 14 , 2012
embedding library SL10k_embed has been updated with code below to fix bug #2347. Updated library was retagged as SL10k_embed_v7 and rebuilt on SL5.3.
gcc version 4.3.2 20081007 (Red Hat 4.3.2-7)
Next codes have been updated:
StRoot
StDetectorDbMaker
StDetectorDbChairs.cxx, StDetectorDbMaker.cxx, StDetectorDbRichScalers.h, StTpcHitErrors.h, StTpcHitErrors.h, StTpcSurveyC.h,St_SurveyC.h, St_TpcAvgCurrentC.h, St_bemcMapC.h, St_bprsMapC.h, St_bsmdeMapC.h, St_bsmdpMapC.h, St_emcCalibC.h, St_emcGainC.h, St_emcPedC.h, St_emcStatusC.h, St_emcTriggerLUTC.h, St_emcTriggerPedC.h, St_emcTriggerStatusC.h, St_smdCalibC.h, St_smdGainC.h, St_smdPedC.h, St_smdStatusC.h, St_starClockOnlC.h,St_tpcDimensionsC.h, St_tpcElectronicsC.h, St_tpcFieldCageC.h, St_tpcMaxHitsC.h, St_tpcPadPlanesC.h, St_tpcStatusC.h, St_tpcWirePlanesC.h, St_trgTimeOffsetC.h, St_trigDetSumsC.h, St_vertexSeedC.h, StiBTofChairs.cxx, StiBTofHitErrorCalculator.h, StiChairs.cxx ;
StTpcRSMaker
StTpcRSMaker.cxx, StTpcRSMaker.h, TpcRS.C;
StarRoot
KFParticle.h, KFParticleBase.cxx, KFParticleBase.h, KFParticleLinkDef.h, StBiTree.cxx, StCloseFileOnTerminate.cxx, StCloseFileOnTerminate.h, StDraw3D.cxx, StDraw3D.h, StMultiKeyMap.cxx, StMultiKeyMap.h, StarRootLinkDef.h, TAttr.cxx, THelixTrack.cxx, THelixTrack.h, TMDFParameters.cxx, TMDFParameters.h, TRArray.cxx, TRArray.h, TRSymMatrix.cxx, TRSymMatrix.h, TRandomVector.cxx, TRandomVector.h, TTreeIter.cxx, thmu.C;
StarDb/Calibrations/tpc
TpcAdcCorrectionB.y2009.C, TpcAdcCorrectionB.y2010.C, TpcAdcCorrectionB.y201.C, TpcAvgCurrent.C, TpcCurrentCorrection.C, TpcMultiplicity.C, TpcMultiplicity.y2009.C, TpcMultiplicity.y2010.C, TpcMultiplicity.y2011.C, TpcResponseSimulator.C, TpcResponseSimulator.y2009.C, TpcResponseSimulator.y2010.C, TpcResponseSimulator.y2011.C, TpcResponseSimulator.y2012.C, TpcRowQ.C, TpcdXCorrection.y2009.C, TpcdXCorrection.y2010.C, TpcdXCorrection.y2011.C, tpcAnodeHV.y2011.C, tpcAnodeHVavg.y2011.C, tpcEffectiveGeom.C, tpcEffectiveGeom.y2001.C, tpcEffectiveGeom.y2003.C, tpcEffectiveGeom.y2004.C, tpcEffectiveGeom.y2005.C, tpcStatus.C;
StarDb/dEdxModel/dNdE_Bichsel.root - May 30, 2012
SL10k_embed library has been updated with next codes to fix bug #2347
StRoot/StTpcRSMaker/
StTpcRSMaker.cxx, r.1.57;
StTpcRSMaker.h, r.1.23;
TF1F.cxx, r.1.5;
TF1F.h, r.1.5;
TpcRS.C, r.1.28;
StRoot/StDetectorDbMaker/
St_TpcResponseSimulatorC.h, r.1.4;
StarDb/Calibrations/tpc TpcResponseSimulator.C, r.1.11;
TpcResponseSimulator.y2009.C, r.1.10;
TpcResponseSimulator.y2010.C, r.1.11;
TpcResponseSimulator.y2011.C, r.1.6;
StDb/idl/TpcResponseSimulator.idl, r.1.4;
Library was retagged with tag SL10k_embed_v6 and rebuilt.
- May 23, 2012
SL10k_embed library has been updated with patches for code
StRoot/StTpcHitMaker/StTpcMixerMaker.cxx, r.1.3 to fix bug #2351.
Libray was retagged as SL10k_embed_v5 and rebuilt. - March 26, 2012
SL10k_embed library has been updated with patches for codes related to DbV timestamp override features to use different timestamp for detector's subsystems.
Libray was retagged as SL10k_embed_v4 and rebuilt.
Next codes have been updated:
StRoot
StBFChain
StBFChain.cxx, r.1.570.2.2 (branch revision)
St_db_Maker
St_db_Maker.h, r.1.42;
St_db_Maker.cxx, r.1.129;
StDbLib
StDbConfigNode.cc, r.1.29; - December 27 , 2011
embedding library SL10k_embed has been checked out with tag SL10k and updated with neccessary codes needed to proceed with embedding for P10ik real data production. Accomplished library was retagged as SL10k_embed_v3 and built on SL5.3 platform. Library was tested and released on December 29.
gcc version 4.3.2 20081007 (Red Hat 4.3.2-7)
Next codes have been updated:
asps/Simulation/starsim
geant/gthion.F, gltrac.F;
include/commons/agckine.inc;
include/atlsim/agckine.inc;
atmain/agxinit.F,agxinit.cdf,agxuser.age;
agzio/agsvert.age;StRoot
StarClassLibrary
StAntiAlpha.cc,StAntiAlpha.hh;
StAntiDeuteron.hh,StAntiDeuteron.cc;
StAntiHelium3.hh,StAntiHelium3.cc;
StAntiHyperTriton.hh,StAntiHyperTriton.cc;
StAntiTriton.hh,StAntiTriton.cc;
StCerenkov.hh,StCerenkov.cc;
StGeantino.hh,StGeantino.cc;
StHelium3.hh,StHelium3.cc;
StHelix.hh;
StParticleTable.cc;
StThreeVector.hh;
StarClassLibraryLinkDef.hh;
StarPDGEncoding.hh;
StBFChain
StBFChain.cxx, r.1.570.2.1;
StBFChain.h; r.1.46.2.1 ;
StDbBroker
StDbBroker.cxx,StDbBroker.h;
StDbLib
StDbConfigNode.hh,StDbConfigNode.cc;
StDbConfigNodeImpl.hh,StDbConfigNodeImpl.cc;
StDbManager.hh;
StDbManagerImpl.hh,StDbManagerImpl.cc;
StDbDefs.hh;
St_db_Maker
St_db_Maker.cxx/hh;
StEmbeddingUtilities
StEmbeddingQA.h,StEmbeddingQA.cxx;
StEmbeddingQADraw.h,StEmbeddingQADraw.cxx;
StEmbeddingQATrack.h,StEmbeddingQATrack.cxx;
StEmbeddingQAUtilities.h, StEmbeddingQAUtilities.cxx;
StEmcRawMaker
StEemcRaw.cxx,StEemcRaw.h;
StMcEvent
StMcEvent.cc;
StMcTrack.cc;
St_geant_Maker/Embed
StPrepEmbedMaker.cxx, StPrepEmbedMaker.h;
StMiniMcEvent
StContamPair.h;
StMiniMcEvent.h, StMiniMcEvent.h.cxx;
StMiniMcPair.h;
StTinyMcTrack.h, StTinyMcTrack.cxx;
StTinyRcTrack.h;
StMiniMcMaker
StMiniMcMaker.cxx;
StTpcRSMaker
Altro.cxx;
StTpcRSMaker.h, StTpcRSMaker.cxx;
TpcRS.C;
pams/gen/StarLight
pams/geometry
bbcmgeo/bbcmgeo.g;
btofgeo/btofgeo2.g, btofgeo3.g, btofgeo4.g, btofgeo5.g, btofgeo6.g, btofgeo7.g;
calbgeo/calbgeo.g, calbgeo1.g;
ecalgeo/ecalgeo.g;
fgtdgeo/fgtdgeo3.g;
fpdmgeo/fpdmgeo.g, fpdmgeo1.g, fpdmgeo2.g, fpdmgeo3.g;
ftpcgeo/ftpcgeo1.g;
ftro/ftrogeo.g;
geometry/geometry.g;
mutdgeo/gmutdgeo4.g;
pixlgeo/PixlGeo4.g;
quadgeo/quadgeo.g;
scongeo/scongeo.g;
shldgeo/shldgeo.g;
sisdgeo/sisdgeo.g;
sisdgeo/sisdgeo1.g, sisdgeo2.g, sisdgeo3.g, sisdgeo4.g, sisdgeo5.g, sisdgeo6.g;
tpcegeo/tpcegeo.g, tpcegeo1.g, tpcegeo3.g,tpcegeo3a.g ;
wallgeo/wallgeo.g;
zcalgeo/zcalgeo.g;
fscegeo/fscegeo.g;
pams/sim/gstar gstar_part.g,gstar_input.g ;
StarDb/VmcGeometry/
Geometry.y2005i.C, Geometry.y2008d.C, Geometry.y2008e.C, Geometry.y2010c.C, Geometry.y2009d.C, Geometry.y2011.C;
y2005i.h, y2008d.h, y2008e.h, y2009d.h, y2010c.h, y2011.h;
StarDb/dEdxModel/ dNdx_Bichsel.root;All updated codes have been tagged with tag SL10kembed.
- April 2 , 2013
embedding library SL10h_embed has been updated with codes listed below to fix bugs #2378 & #2437 and resolve embedding requests. Library was retagged with tag SL10h_embed_v4 and built on SL5.3 platform. Library was tested and released on April 8.
gcc version 4.3.2 20081007 (Red Hat 4.3.2-7)
Next codes have been updated:
StRoot
StTpcHitMaker/StTpcRTSHitMaker.cxx, r. 1.25.2.1; StTpcMixerMaker.cxx, r. 1.3;
StChain/StMaker.cxx, r.1.244;
StEmbeddingUtilities/StEmbeddingQA.cxx, r.1.22; StEmbeddingQADraw.cxx, r.1.34; StEmbeddingQADraw.h, r.1.16; StEmbeddingQA.h, r.1.11; StEmbeddingQATrack.cxx, r.1.18; StEmbeddingQATrack.h , r.1.12; StEmbeddingQAUtilities.cxx, r.1.17; StEmbeddingQAUtilities.h, r.1.12;
macros/embedding/ - latest revision from CVS.Next codes have been updated: with tag SL10k_embed_v8:
StTpcRSMaker/StTpcRSMaker.cxx, StTpcRSMaker.h, TF1F.cxx, Altro.cxx, TpcRS.C, TF1F.h;
St_geant_Maker/Embed/StPrepEmbedMaker.cxx, StPrepEmbedMaker.h - latest by Apr 2. 2013;
StMiniMcEvent/StTinyRcTrack.cxx, StTinyMcTrack.h, StTinyMcTrack.cxx, StMiniMcPair.h, StMiniMcEvent.h, StMiniMcEvent.cxx, StContamPair.h;
StMiniMcMaker/StMiniMcMaker.h, StMiniMcMaker.cxx;
StMcEvent/StMcEvent.cc, StMcEvent.hh, StMcTrack.cc;
StDetectorDbMaker/StDetectorDbChairs.cxx, StDetectorDbMaker.cxx, StDetectorDbMakerLinkDef.h, StDetectorDbRichScalers.h, StTpcHitErrors.h, StTpcSurveyC.h, St_SurveyC.h, St_TpcAvgCurrentC.h, St_TpcResponseSimulatorC.h, St_bemcMapC.h, St_bprsMapC.h, St_bsmdeMapC.h, St_bsmdpMapC.h, St_emcCalibC.h, St_emcGainC.h, St_emcPedC.h, St_emcStatusC.h, St_emcTriggerLUTC.h, St_emcTriggerPedC.h, St_emcTriggerStatusC.h, St_smdCalibC.h, St_smdGainC.h, St_smdPedC.h, St_smdStatusC.h, St_spaceChargeCorC.cxx, St_starClockOnlC.h, St_tofGeomAlignC.h, St_tofStatusC.h, St_tofTrayConfigC.h, St_tpcAnodeHVC.h, St_tpcAnodeHVavgC.h, St_tpcCorrectionC.h, St_tpcDimensionsC.h, St_tpcElectronicsC.h, St_tpcFieldCageC.h, St_tpcMaxHitsC.h, St_tpcPadGainT0BC.h, St_tpcPadGainT0C.h, St_tpcPadPlanesC.h, St_tpcRDOMasksC.h, St_tpcStatusC.h, St_tpcWirePlanesC.h, St_trgTimeOffsetC.h, St_trigDetSumsC.h, St_vertexSeedC.h;
StEvent/StDcaGeometry.cxx, StDedxPidTraits.cxx, StDedxPidTraits.h, StEvent.cxx, StEvent.h, StEventClusteringHints.cxx, StEventScavenger.cxx, StEventScavenger.h, StEventTypes.h, StTpcDedxPidAlgorithm.cxx, StTpcDedxPidAlgorithm.h, StTpcHit.h, StTrack.cxx ,StTrack.h, StTriggerData.cxx, StTriggerData.h, StTriggerData2009.cxx, StTriggerData2009.h;
asps/Simulation/starsim/
atgeant/agrot.F;
atmain/agdummy.age; dblib.cxx;
geant/gltrac.F, gpdcay.F, gthion.F;
asps/Simulation/geant321/gcons;
pams/geometry/ - all CVS updates by date April 02, 2013;
pams/sim/gstar/gstar_input.g, r.1.44; gstar_part.g, r.1.38; gstar_part.kumac, r.1.2
StarDb/dEdxModel/dNdE_Bichsel.root, dNdx_Bichsel.root;
StarDb/Calibrations/tpc/TpcAdcCorrectionB.y2010.C, TpcAdcCorrectionB.y2009.C, TpcAdcCorrectionB.y2011.C, TpcCurrentCorrection.C, TpcMultiplicity.C, TpcResponseSimulator.C, TpcResponseSimulator.y2009.C, TpcResponseSimulator.y2010.C, TpcResponseSimulator.y2011.C, TpcResponseSimulator.y2012.C, TpcRowQ.C, tpcAnodeHV.y2011.C, tpcAnodeHVavg.y2011.C, tpcStatus.C;
StDb/idl/StvHitErrs.idl, TpcAvgCurrent.idl, TpcResponseSimulator.idl, tpcMaxHits.idl, tpcPadGainT0B.idl, tpcStatus.idl, triggerDefinition.idl, triggerThreshold.idl;
StarDb/VmcGeometry/Geometry.y2005i.C, Geometry.y2008d.C, Geometry.y2008e.C, Geometry.y2010c.C, Geometry.y2009d.C, Geometry.y2011.C, y2005i.h, y2008d.h, y2008e.h, y2009d.h, y2010c.h, y2011.h;StRoot/StChain/StMaker.cxx, r.1.244;
StRoot/macros/embedding/ - latest revisions from CVS. - May 23, 2012
SL10c_embed library has been updated with patches for code StRoot/StTpcHitMaker/StTpcMixerMaker.cxx, r.1.3 to fix bug #2351.
Libray was retagged as SL10c_embed_v3 and rebuilt.
- March 22, 2012
SL10c_embed library has been updated with patches for codes related to DbV timestamp override features to use different timestamp for detector's subsystems.
Libray was retagged as SL10c_embed_v2 and rebuilt.
Next codes have been updated:
StRoot
StBFChain
StBFChain.cxx, r.1.570.2.2 (branch revision)
St_db_Maker
St_db_Maker.h, r.1.42;
St_db_Maker.cxx, r.1.129;
StDbLib
StDbConfigNode.cc, r.1.29; - December 27 , 2011
embedding library SL10c has been checked out with tag SL10c_2Embedding and updated with necessary codes needed to proceed with embedding for P10ic real data production. Accomplished library was retagged as SL10c_embed_v1 and built on SL5.3 platform. Library was tested and released on December 30.
gcc version 4.3.2 20081007 (Red Hat 4.3.2-7)
Library was updated with all codes listed above and tagged with SL10kembed tag.
More codes have been propagated:
StRoot
StarClassLibrary
StHyperTriton.cc, StHyperTriton.hh;
StBFChain
StBFChain.cxx, r.1.570.2.1;
StBFChain.h; r.1.46.2.1 ;
StChain
StChain.cxx;
StMaker.h;
StRTSBaseMaker.cxx;
StRTSBaseMaker.h;
StarMagField
StarMagField.cxx;
StEvent
StTrack.cxx, StTrack.h;
StMiniMcMaker
StMiniMcMaker.h;
StRTSClient/FCFMaker
FCFMaker.cxx ;
StTpcDb
StTpcDb.cxx, StTpcDb.h ;
St_geant_Maker
Embed/StPrepEmbedMaker.cxx, StPrepEmbedMaker.h;
mgr
Conscript-standard, tagged with BSL10c_embed;All updated codes have been tagged with SL10cEmbed tag;
- December 5, 2013
SL09g_embed library has been updated with next codes:
StRoot
StarClassLibrary/StParticleTable.cc, StHyperTriton.hh, StHyperTriton.cc, StAntiDeuteron.hh, StAntiDeuteron.cc, StAntiTriton.hh, StAntiTriton.cc, StAntiAlpha.hh, StAntiAlpha.cc, StAntiHelium3.hh, StAntiHelium3.cc, StAntiHyperTriton.hh, StAntiHyperTriton.cc, StHDibaryon.hh, StHDibaryon.cc, StarPDGEncoding.hh;
pams/sim/gstar/gstar_part.g;
to define eta dalitz decay requested for embedding production.
Library was retagged with tag SL09g_2Embed_v10
- September 29, 2012
SL09g_embed library has been updated with patches for code
StRoot/StChain/StMaker.cxx, r.1.244 to fix bug #2419.
StRoot/macros/embedding/bfcMixer_Tpx.C, r.1.35 to fix bug #2419.
Libray was retagged as SL09g_2Embed_v7 and rebuilt.
- May 23, 2012
SL09g_embed library has been updated with patches for code
StRoot/StTpcHitMaker/StTpcMixerMaker.cxx, r.1.3 to fix bug #2351.
Libray was retagged as SL09g_2Embed_v6 and rebuilt.
- April 09 , 2012
SL09g_embed embedding library has been updated with codes below, retagged with tag SL09g_2Embed_v5 and rebuilt on SL5.3 platform. Library was tested and released on April 10.
gcc version 4.3.2 20081007 (Red Hat 4.3.2-7)
Next codes have been updated:
StRoot
StBFChain
StBFChain.h, r.1.46.2.1;
StBFChain.cxx, r.1.554.2.1;
StBTofMatchMaker
StBTofMatchMaker.cxx, r.1.5;
StEmbeddingUtilities
StEmbeddingQA.cxx, r.1.22;
StEmbeddingQADraw.cxx, r.1.33;
StEmbeddingQADraw.h, r.1.16;
StEmbeddingQA.h,r.1.11;
StEmbeddingQATrack.cxx, r.1.18;
StEmbeddingQATrack.h,r.1.12;
StEmbeddingQAUtilities.cxx, r.1.16;
StEmbeddingQAUtilities.h,r.12;
StDbBroker
StDbBroker.cxx, r.1.58;
StDbBroker.h, r.1.32;
StDbLib
StDbManagerImpl.hh, r.1.8;
StDbManagerImpl.cc,r.1.38;
StDbManager.hh,1.24;
StDbConfigNodeImpl.hh,r.1.2;
StDbConfigNodeImpl.cc,r.1.9;
StDbConfigNode.hh,r.1.17;
StDbConfigNode.cc, r.1.29
St_db_Maker
St_db_Maker.cxx, r.1.129;
St_db_Maker.h, r.1.42;
StDetectorDbMaker
St_TpcResponseSimulatorC.h, r.1.4;
St_geant_Maker
St_geant_Maker.cxx,r.1.135;
St_geant_Maker.h, r.1.50;
Embed/StPrepEmbedMaker.cxx, r.1.5; StPrepEmbedMaker.h, r.1.5;
StarMagField
StarMagField.cxx, r.1.17;
StTpcHitMaker
StTpcMixerMaker.cxx,r.1.2;
macros/embedding
drawEmbeddingQA.C,r.1.11; doEmbeddingQAMaker.C,r.1.8; bfcMixer_v4_svt.C,r.1.2; bfcMixer_v4_noFTPC.C,r.1.5; bfcMixer_v4.C,r.1.10; bfcMixer_Unified.C,r.1.5; bfcMixer_Tpx.C,r.1.32; bfcMixer_TpcSvtSsd.C,r.1.14; bfcMixer_TpcSvtSsd2005.C,r.1.3; bfcMixer_TpcSvt.C,r.1.5; bfcMixer_TpcOnly.C,r.1.3; bfcMixer_P07ic.C,r.1.3; bfcMixer_P07ib.C,r.1.7 bfcMixer_DaqFzd.C, r.1.2;StDb/idl
TpcResponseSimulator.idl, r.1.4;
StarDb/Calibrations/tpc
TpcResponseSimulator.y2009.C, r.1.8;mgr/
Conscript-standard, r.1.203.2.1;
Lidia Didenko
Library release structure and policy
Introduction
The below policy is a revised document from the initial policy instated in STAR at the beginning of its software development phase in February 2000.
Four canonical versions of the STAR software are provided at any given time. Those are dev, new, pro, and old. These canonical versions evolve in time i.e. it is understood that the content of (for example) new today is not fixed and likely to be different within some time frame (and following the above release policy and procedure). Two additional areas are described for completeness but are NOT canonical in the sens that their usage and meaning may evolve without prior warning nor discussion. Purpose and policy for each version is described below.
The official STAR software releases are otherwise named SLXXY where XX is a year number and Y is a letter from a to z. Those releases are fixed (and should not be changed or patched unless exceptional circumstances not described in this policy - patch should be in those cases rare and under a strict control and validation procedure).
There are no other official areas than the one mentioned herein. Please, consult the table below for additional information.
Notes, primary and secondary environment
The supported STAR software platforms, October 2017:
- Primary Environment: Scientific Linux 7.3 using gcc 4.8.5 version supporting 32 bits (mandatory for code developers ; compilation in optimized and non-optimized). Goal is to enable 64 bits under this OS.
- Secondary Environment: Scientific Linux 6.4 using gcc version 4.8.2/32 bits; we assume no necessary support for 64 bits and only the non-optimized version will be assembled.
- As before, switching to the 64 bits environment is achieved by using the command '% setup 64bits' and similarly, '% setup 32bits' - however, the 64bits environment is still not expected to work properly (Geant3 based simulation will not work, ROOT based analysis will).
Previous support from summer 2015:
- Primary Environment: Scientific Linux 6.4 using gcc version 4.8.2/32 bits (mandatory for code developers ; compilation in optimized and non-optimized
- Secondary Environment: Linux RedHat 5.3 using gcc 4.8.2 - unification of compiler should make integration easier.
Past support before 2015:
- Primary Environment: Scientific Linux 6.4 using gcc version 4.4.7/32 bits (mandatory for code developers ; compilation in optimized and non-optimized)
- Secondary Environment: Linux RedHat 5.3 using gcc 4.3.2 (recommended for code developers ; compilation requirement reduced to non-optimized mode)
The supported STAR software platform as per 2009/2011 were:
- Primary Environment: Scientific Linux 5.3 using gcc version 4.3.2/32 bits (mandatory for code developers ; compilation in optimized and non-optimized)
- Secondary Environment: Linux RedHat 4.4 using gcc 3.4.6 (recommended for code developers ; compilation requirement reduced to non-optimized mode)
- Other OS/Compiler used
- Scientific Linux 5.3, gcc 4.3.2/64 bits mode - please, use the command '% setup 64bits' to switch to this environment and try compiling. As per April 20th 2011, the count-down for making this alternate compilation one of the primary environment had begun. Policy effective due date: July 20th.
- Scientific Linux 5.3, gcc 4.5.1/32 bits may be used at a later time to leverage advanced C++ features (SIMD, Threads)
While multi-platform and/or multi-compiler impose a constraint on the developer, the procedure ensures portability and easier evolution to later version of the compiler. Time given in the library definitions section are in EST time, i.e. they correspond to the Tier0 (BNL) site local times.
Library definitions
Note: Infrastructure developers are mandated to work from private areas and not directly from a deployed canonical version (unless otherwise mentioned). However, full testing of a given engineered solution, ready to be deployed, may require a full library re-compilation. Whenever needed, this shall not occur without approval, advanced notice and Email announcement by the software librarian.
|
Version |
|
|
Usage and scope |
Leading edge development versions, for core software developers only |
|
Guarantees |
While we appreciate feedback, there are absolutely no functional guarantees (compilation or runtime) for those areas. If you chose to work with this area, it is at your own risk. |
|
Description |
Changes to code by the core software group do not go directly into dev, but into one of .dev or adev within the following restrictions/scope: |
|
Patching Policy |
N/A in .dev |
|
Release Policy |
For adev, code must compile on the primary and secondary platforms. At the end of the first and third week of each month (on Thursdays and whenever applicable), major changes to .dev may be checked in CVS and consequently propagate into dev by the next day. These commits should be made only after successful testing of .dev . The new dev environment is tested against code developers activities for the following week allowing for subtle adjustments not initially envisioned. |
|
Version |
|
|
Usage and scope |
Version containing the latest developments of code modules in the repository. |
|
Guarantees |
This environment was released upon successful compilation of approved code on the main supported production platform and compiler in both optimized and non-optimized. There are no compilation guarantees for other compiler/platforms. |
|
Description |
Although code is this area are likely to be buggy (or at least, not fully tested), they contain the latest algorithms and structures being worked on by the user and sub-system developers. Submission of code to the repository is frequent (daily). An effort to exclude major technical problems must be made by developers, but it is understood that behavior of code can not be all guaranteed. However, all code checked in by developers should be tested for basic operation prior to check-in in CVS that is, Note: The following schedule is used for updates to dev: it is updated automatically by the AutoBuild script starting from the adev area and the procedure will start daily at 11 PM. This procedure do not send any Email notice automatically. It will however execute the following steps: Functionality tests of dev are made every night by running a small number of events (~ 50) through the most common full production chains and detector geometries on the primary environment. Several data output format will be provided (supported data-summary-tape format, histograms, Micro-DST and/or other supported formats, ...) for both real and simulated data and span over a range of data source (centrality, species, etc ...). Such provision may be based on the result of the nightly tests, test suite made at Tier0 and Tier1 sites as achievable. Those tests are targeted toward eliminating gross errors, possible remaining crashes, obvious memory leaks etc ... |
|
Patching Policy |
Bugs will be reported by the QA or Software Librarian to the software code/ component/ sub-system responsible person. The given component should be fixed within a week as well as within development guidelines specified above. |
|
Release Policy |
On the second and forth week of each month (on Thursdays and whenever applicable), dev is tested with a larger (and more complete) test suite over the week-end. The test suite would remain the same apart from the statistics (at least 200/500 events). Basic test should be successfully run on the secondary platform. Shall all tests perform according to expectations, the content of dev is a candidate for propagation and re-build of new. Thus, under normal circumstances, dev is moved to new on a bi-weekly basis. Note that there are no mention of tagging at this stage although it may be more practical to use this mechanism for code propagation. The migration of dev to new should be discussed at the Software and Computing meeting on Wednesday and requires positive approval from the Software Librarian and the QA/QC team (validation tests must pass). Shall it be approved, the migration may proceed the following day. |
|
Version |
|
|
Usage and scope |
A relatively stable (weeks old) version for full integration testing, detailed QA, and public use by people needing a near leading edge version of the code. |
|
Guarantees |
Code compiles on at least two platforms and/or compiler versions and has passed basic nightly tests QA criteria. |
|
Description |
A new version is released to allow further tests in a relatively stable and QA-ed environment. More developed QA procedures may include a desired set of on-going user analysis and sample productions. |
|
Patching Policy |
Identified bugs and engineering of a solution addressing a given problem may be using the new environment for stability purposes. In such case: |
|
Release Policy |
Within the next two weeks period (as driven by the migration dev to new), this area may (or may not) be migrated to pro as follow: Shall the tests not be successful or satisfactory (unexpected results from QA), either a patch will be engineered or the new version will be replaced at the next scheduled migration of dev to new. Therefore, new changes on a more rapid cycle than the pro version, so any given new version may or may not make it to pro. A version that is not migrated to pro will be kept for a short period of time (of the order of a week) to allow people to migrate away from it on their own schedule. During this period it can be used via % If the bug fixes are successful an official tag is generated for the release. If not, a tag does not have to be generated until the next dev to new release, as long as this will happen within the next two weeks. If production have been run from the release, it must be tagged for reproducibility. |
|
Version |
|
|
Usage and scope |
The current production version |
|
Guarantees |
All components of the software are tagged and frozen for a production release, so that the release uniquely defines a stable, reproducible configuration. |
|
Description |
This level is a tagged and QA-ed version of the software library. It is used by production. The pro version is created from the latest new version at the time of the release. |
|
Patching Policy |
Whenever production has started, the only changes to a pro release will be to fix important bugs that impair functionality supposed to work in the release. Such fixes will be announced, discussed, documented immediately and scheduled with advance notice. Such fixes must be exceptional (and typically related to a critical component such as IO) as Physics content must identified prior to this stage. Should a grave Physics issue be identified, a new pro version should be released from new (see next paragraph). A new migration from new to pro is preferable to a retag of pro. However, shall the CVS retag be necessary (such case may arise if new contains code functionally incompatible with pro), the corrected versions will be identified by adding "_n" to the version number (e.g. SL04a_1 for the first corrected version). “n” will be an incremental number depending on the previous patch level. The tags and sub-sequent related tags will be clearly documented. All code (functional and patched) will be re-tagged with the XXX_n level tag, thus, leading to a consistent bulk CVS tagged library version. A patch made in pro must be applied to the dev and new versions (same compatible patch or modified for the more recent environment to correct the targeted problem). All corrections to pro version should also be applied to the current dev,new versions in an appropriate way. Modifications will never be made to a production release to add new functionality, change base code (ROOT or base classes) or fix functionality not yet operational when the release was made. If users want to have access to new functionality that has arrived since the release, they either need to use a newer version (new, dev) or wait for a new pro release containing the functionality. Shall the procedure for QA procedure mention for the release of new be used for the migration new to pro, production cycle should not be restarted but a new later release of pro scheduled. Production would then resume from the new release, created following the same new to pro release policy. |
|
Release Policy |
When a pro version is retired, becomes the old version. |
|
Proposed change |
“any change to the production code should be reflected in the library tag” |
|
Version |
|
|
Usage and scope |
The previous successful production release. |
|
Guarantees |
All quality checks mandated by pro. |
|
Description |
Previous old versions can be retrieved by the CVS tag. Old versions are not supported any longer (there are no bug fixes applied) but are preserved and retrievable by the software librarian. Production level sub-system code or core software infrastructure developments should NOT be done with any old version of the library |
|
Patching Policy |
Patches are NOT allowed at this level |
|
Release Policy |
There are no existing canonical releases beyond that level |
OS Upgrade
This page will provide information on caveats after specific OS upgrades. Please, refer to this information of you encounter problem as described.
Scientific Linux 4.4 from 3.0.5
Natively compiled libraries
Under Scientific Linux 44, the following library versions (and greater) are natively compiled: SL06g, SL07a, SL07b, SL07c, ... etc ... You can safely compile your code and work with those libraries.Information for site administrators: In order to provide native support, the following tag had to be released
 SL06g -> SL06g_2
 SL07a -> SL07a_3
 SL07b -> SL07b_2
 SL07c -> SL07c_2
Please, update your libraries rec-compile your libraries before and after the upgrade for consistency.
Non natively compiled libraries
There are however no guarantees that a mix of non-natively compiled libraries and natively compiled private code would work. Hence, the instructions below may work for some users but in no case represents a confirmation of full functionality. Especially, if you encounter a symbol mangling issue (symbols not being found in STAR libraries), it would likely be an indication of an incompatibility.Library SL05e < version <= SL06f
Are supported via backward compatibility links to Scientific Linux 3.0.5 natively compiled libraries.Information for users/all: the following issues are known:
- The compiler may spit the following warning while compiling
error: extra `;'
This problem appears due to the use of the -pedantic option in our compilation options. Unfortunately, not all the pedantic issues were caught and SL44 compiler is stricter in that regard.
To circumvent this problem, either fix your user code or use the following recipe - the example is given for STAR Library SL05c (please adapt for other libraries) ; this needs to be done only once
cvs co -rSL05c mgr/
compile as usual ...
sed "s/-pedantic //" mgr/ConsDefs.pm >mgr/ConsDefs.pm.new
mv -f mgr/ConsDefs.pm.new mgr/ConsDefs.pm
Library SL05f < versions <= SL05e
Are supported via backward compatibility link through Scientific Linux 3.0.2 .Library versions <= SL04f
Are supported via backward compatibility links through RedHat 8.0 .Instructions for administrators
SL4.4 out of the box may not work for the STAR typical environment and usage. The following issues were identified and need attention:Kernel parameters adjustments
The following lines need to be added to /etc/sysctl.conf
vm.dirty_ratio = 10Default for the last parameter is 500 but left in for consistency as we may need to adjust later. You can always test the changes under a running kernel conditions by instead modifying the equivalent /proc/sys/vm files but the settings would likely be lost at the next reboot unless you set them in sysctl.conf.
vm.lower_zone_protection = 150
vm.dirty_writeback_centisecs = 500
echo 150 >/proc/sys/vm/lower_zone_protectionROOT 5.12.00 and ROOT4STAR adjustments
echo 10 >/proc/sys/vm/dirty_ratio
echo 500 >/proc/sys/vm/dirty_writeback_centisecs
- For creating backward compatibility links in the STAR libraries
- get a recent copy of the mgr/CreateLinks script (tag SL07d or newer)
- go to the STAR library versions between L <= SL06f
- execute the CreateLinks scripts with argument "init"
- Issue with log4cxx and incompatible libstdc++
An incompatibility between libstdc++ versions was found when running root4star linked under older Scientific Linux (gcc) versions under SL4.4: root4star (backward compatible compiled) loads libstdc++.so.5 and log4cxx (native) loading libstdc++.so.6 . To avoid the issue, the work around is to ensure a copy of an older version of liblog4cxx exists in all backward compatible STAR libraries supporting the logger: this include SL05f < L <= SL06f. The recipe follows
- Keep a copy of log4cxx from Scientific Linux 3.0.5 on your system before the upgrade. This is located in $OPTSTAR.
- For each STAR Library L mentioned above, copy your saved liblog4cxx.so in $STAR/.$STAR_HOST_SYS/lib/ and $STAR/.$STAR_HOST_SYS/LIB/
- Keep a copy of log4cxx from Scientific Linux 3.0.5 on your system before the upgrade. This is located in $OPTSTAR.
- ...
Scientific Linux 5.3 from 4.4
Configuration and RPM list
General configuration
Distribution
% cat /etc/redhat-release
Scientific Linux SL release 5.3 (Boron)
Default compiler version
ATTENTION: The STAR software stack will NOT compile and/or link properly with the default SL5.3 gcc version (it has problems interpreting FORtran codes hence linking will fail in a few places and running may crash unexpectedly). You MUST upgrade and make 4.3.2 or greater the minimal version number.
% gcc --version
gcc (GCC) 4.3.2 20081007 (Red Hat 4.3.2-7)
To make gcc 4.3.2 the default, you could use the following quick helper script (you do not want to execute this twice)
#!/bin/sh
##### comp_switch.sh #################################
#
# Make GCC 4.3 the default system compiler
# Written by Chris Hollowell @ RACF
#
# gcc
mv /usr/bin/gcc /usr/bin/gcc41
mv /usr/bin/gcov /usr/bin/gcov41
mv /usr/bin/x86_64-redhat-linux-gcc /usr/bin/x86_64-redhat-linux-gcc41
ln -sfn /usr/bin/gcc43 /usr/bin/gcc
ln -sfn /usr/bin/gcov43 /usr/bin/gcov
ln -sfn /usr/bin/x86_64-redhat-linux6E-gcc43 /usr/bin/x86_64-redhat-linux-gcc
# g++
mv /usr/bin/c++ /usr/bin/c++41
mv /usr/bin/g++ /usr/bin/g++41
mv /usr/bin/x86_64-redhat-linux-c++ /usr/bin/x86_64-redhat-linux-c++41
mv /usr/bin/x86_64-redhat-linux-g++ /usr/bin/x86_64-redhat-linux-g++41
ln -sfn /usr/bin/g++43 /usr/bin/c++
ln -sfn /usr/bin/g++43 /usr/bin/g++
ln -sfn /usr/bin/x86_64-redhat-linux6E-g++43 /usr/bin/x86_64-redhat-linux-c++
ln -sfn /usr/bin/x86_64-redhat-linux6E-g++43 /usr/bin/x86_64-redhat-linux-g++
# gfortran
mv /usr/bin/gfortran /usr/bin/gfortran41
ln -sfn /usr/bin/gfortran43 /usr/bin/gfortran
AFS sysname
See Setting up your computing environment for more information related to the sysname.
RPM list
A reminder that some of those RPMs may have been created at BNL. See Additional software components "System Wide RPMs" for more information.
kernel-headers-2.6.18-164.6.1.el5
compat-libf2c-34-3.4.6-4
sl-release-notes-5.3-1
chkconfig-1.3.30.1-2
atk-1.12.2-1.fc6
libtermcap-2.0.8-46.1
readline-5.1-1.1
gawk-3.1.5-14.el5
elfutils-libelf-0.137-3.el5
binutils-2.17.50.0.6-9.el5
libart_lgpl-2.3.17-4
slang-2.0.6-4.el5
libgpg-error-1.4-2
lcms-1.18-0.1.beta1.el5_3.2
libgfortran-4.1.2-44.el5
gzip-1.3.5-10.el5
libusb-0.1.12-5.1
dmidecode-2.7-1.28.2.el5
perl-Digest-SHA1-2.11-1.2.1
iputils-20020927-45.el5
libFS-1.0.0-3.1
numactl-0.9.8-7.el5
acl-2.2.39-3.el5
mgetty-1.1.33-9.fc6
rcs-5.7-30.1
compat-glibc-2.3.4-2.26
dos2unix-3.1-27.2.el5
libattr-2.4.32-1.1
sqlite-3.3.6-2
keyutils-libs-1.2-1.el5
libmng-1.0.9-5.1
gmp-4.1.4-10.el5
libgfortran43-4.3.2-7.el5
beecrypt-4.1.2-10.1.1
compat-readline43-4.3-3
libXrender-0.9.1-3.1
libjpeg-devel-6b-37
redhat-menus-6.7.8-3.el5
libXres-1.0.1-3.1
libIDL-devel-0.8.7-1.fc6
sqlite-devel-3.3.6-2
compat-gcc-34-3.4.6-4
perl-libwww-perl-5.805-1.1.1
anacron-2.3-45.el5
readline-devel-5.1-1.1
freetype-devel-2.2.1-21.el5_3
gmp-devel-4.1.4-10.el5
audiofile-devel-0.2.6-5
gamin-devel-0.1.7-8.el5
perl-DateManip-5.44-1.2.1
keyutils-libs-devel-1.2-1.el5
db4-devel-4.3.29-9.fc6
libX11-1.0.3-9.el5
libXfixes-4.0.1-2.1
libXTrap-1.0.0-3.1
libXfontcache-1.0.2-3.1
compat-gcc-34-c++-3.4.6-4
fontconfig-2.4.1-7.el5
openldap-2.3.43-3.el5
alsa-lib-1.0.17-1.el5
libselinux-devel-1.33.4-5.1.el5
mesa-libGLU-6.5.1-7.7.el5
libgssapi-0.10-2
mx-2.0.6-2.2.2
python-sqlite-1.1.7-1.2.1
libselinux-utils-1.33.4-5.1.el5
python-iniparse-0.2.3-4.el5
mtools-3.9.10-2.fc6
glibc-utils-2.5-34
wget-1.10.2-7.el5
xorg-x11-apps-7.1-4.0.1.el5
libtool-1.5.22-6.1
ntp-4.2.2p1-9.el5_3.2
libXft-2.1.10-1.1
gail-1.9.2-1.fc6
pam-0.99.6.2-4.el5
redhat-artwork-5.0.9-1.SL.2
screen-4.0.3-1.el5
xorg-x11-proto-devel-7.1-9.fc6
e2fsprogs-libs-1.39-20.el5
openssl-devel-0.9.8e-7.el5
portmap-4.0-65.2.2.1
libXcursor-devel-1.1.7-1.1
pycairo-devel-1.2.0-1.1
emacs-common-21.4-20.el5
openssh-server-4.3p2-29.el5
quota-3.13-1.2.5.el5
pygtk2-devel-2.10.1-12.el5
tk-devel-8.4.13-5.el5_1.1
mesa-libGLU-devel-6.5.1-7.7.el5
libXi-devel-1.0.1-3.1
libXcursor-devel-1.1.7-1.1
libXfont-devel-1.2.2-1.0.3.el5_1
dbus-glib-0.73-8.el5
mesa-libGLU-6.5.1-7.7.el5
sendmail-8.13.8-2.el5
bind-utils-9.3.4-10.P1.el5
pam_krb5-2.2.14-10
systemtap-runtime-0.7.2-3.el5_3
Xaw3d-devel-1.5E-10.1
openldap-devel-2.3.43-3.el5
dbus-libs-1.1.2-12.el5
dbus-python-0.70-7.el5
avahi-qt3-0.6.16-1.el5_2.1
rpm-build-4.4.2.3-9.el5
redhat-lsb-3.1-12.3.EL
pm-utils-0.99.3-10.el5
gimp-print-4.2.7-22.2.el5
xorg-x11-fonts-truetype-7.1-2.1.el5
hal-0.5.8.1-38.el5
ImageMagick-6.2.8.0-4.el5_1.1
openafs-kernel-1.4.10-2.6.18_164.6.1.el5_1.1
xemacs-21.4.22-1
tcsh-6.16.00-1
filesystem-2.4.0-2
desktop-backgrounds-basic-2.0-37
pygobject2-doc-2.12.1-5.el5
emacs-leim-21.4-20.el5
libstdc++-4.1.2-44.el5
libjpeg-6b-37
libxml2-2.6.26-2.1.2.7
libxml2-2.6.26-2.1.2.7
sqlite-3.3.6-2
tcl-8.4.13-3.fc6
tcp_wrappers-7.6-40.6.el5
gmp-4.1.4-10.el5
procps-3.2.7-11.1.el5
glib2-devel-2.12.3-4.el5_3.1
make-3.81-3.el5
lapack-3.0-37.el5
indent-2.2.9-14.fc6
bc-1.06-21
hesiod-3.1.0-8
crash-4.0-7.2.3.el5_3.1
ethtool-6-2.el5
libvolume_id-095-14.20.el5_3
bison-2.3-2.1
ftp-0.17-35.el5
dev86-0.16.17-2.2
ctags-5.6-1.1
hdparm-6.6-2
compat-readline43-4.3-3
elfutils-libelf-0.137-3.el5
nspr-4.7.3-2.el5
blas-3.0-37.el5
libidn-0.6.5-1.1
libXfont-1.2.2-1.0.3.el5_1
audit-libs-1.7.7-6.el5
valgrind-3.2.1-6.el5
libtermcap-2.0.8-46.1
libXext-1.0.1-2.1
libXrandr-1.1.1-3.1
libXau-devel-1.0.1-3.1
libXcomposite-0.3-5.1
libfontenc-devel-1.0.2-2.2.el5
libattr-devel-2.4.32-1.1
glibc-headers-2.5-34
libxkbfile-1.0.3-3.1
gcc43-c++-4.3.2-7.el5
perl-libxml-perl-0.08-1.2.1
libXp-devel-1.0.0-8.1.el5
xorg-x11-xtrans-devel-1.0.1-1.1.fc6
blas-devel-3.0-37.el5
libtool-ltdl-devel-1.5.22-6.1
ncurses-devel-5.5-24.20060715
bzip2-devel-1.0.3-4.el5_2
libcap-devel-1.10-26
binutils-devel-2.17.50.0.6-9.el5
libXi-1.0.1-3.1
libXinerama-1.0.1-2.1
libXcomposite-0.3-5.1
gcc-4.1.2-44.el5
shadow-utils-4.0.17-14.el5
krb5-libs-1.6.1-31.el5_3.3
mysql-5.0.45-7.el5
libxml2-devel-2.6.26-2.1.2.7
ghostscript-fonts-5.50-13.1.1
pygobject2-2.12.1-5.el5
nfs-utils-lib-1.0.8-7.2.z2
python-numeric-23.7-2.2.2
postgresql-libs-8.1.11-1.el5_1.1
e2fsprogs-devel-1.39-20.el5
elfutils-libelf-devel-static-0.137-3.el5
xterm-215-8.el5
compat-openldap-2.3.43_2.2.29-3.el5
tcpdump-3.9.4-14.el5
ksh-20080202-2.el5
automake17-1.7.9-7
kernel-devel-2.6.18-164.6.1.el5
GConf2-2.14.0-9.el5
pygtk2-2.10.1-12.el5
gtk2-engines-2.8.0-3.el5
gd-2.0.33-9.4.el5_1.1
vim-X11-7.0.109-4.el5_2.4z
pam-0.99.6.2-4.el5
openldap-2.3.43-3.el5
mesa-libGL-devel-6.5.1-7.7.el5
which-2.16-7
libXext-devel-1.0.1-2.1
kbd-1.12-21.el5
yp-tools-2.9-0.1
authconfig-5.3.21-5.el5
mc-4.6.1a-35.el5
libXv-devel-1.0.1-4.1
libSM-devel-1.0.1-3.1
mysql-devel-5.0.45-7.el5
libXTrap-devel-1.0.0-3.1
libXfixes-devel-4.0.1-2.1
libXtst-devel-1.0.1-3.1
gail-1.9.2-1.fc6
apr-util-1.2.7-7.el5_3.1
libuser-0.54.7-2.el5.5
libXmu-devel-1.0.2-5
gail-devel-1.9.2-1.fc6
mesa-libGLU-devel-6.5.1-7.7.el5
gd-devel-2.0.33-9.4.el5_1.1
policycoreutils-1.33.12-14.2.el5
cups-1.3.7-8.el5_3.6
kdbg-2.0.2-1.2.1
selinux-policy-targeted-2.4.6-203.el5
libbonoboui-2.16.0-1.fc6
xorg-x11-xfs-1.0.2-4
xorg-x11-fonts-misc-7.1-2.1.el5
libgnomeprintui22-2.12.1-6
librsvg2-2.16.1-1.el5
openafs-1.4.10-1.1.1
pgi64-workstation-8.0-4
AdobeReader_enu-9.1.0-1
setup-2.5.58-4.el5
gnome-mime-data-2.4.2-3.1
termcap-5.5-1.20060701.1
glibc-common-2.5-34
yum-conf-53-1.SL
man-pages-2.39-12.el5
mailcap-2.1.23-1.fc6
zlib-1.2.3-3
zlib-1.2.3-3
pkgconfig-0.21-2.el5
libpng-1.2.10-7.1.el5_3.2
libart_lgpl-2.3.17-4
info-4.8-14.el5
libsepol-1.15.2-1.el5
expat-1.95.8-8.2.1
freetype-2.2.1-21.el5_3
cyrus-sasl-lib-2.1.22-4
libattr-2.4.32-1.1
atk-1.12.2-1.fc6
popt-1.10.2.3-9.el5
desktop-file-utils-0.10-7
ncurses-5.5-24.20060715
audiofile-0.2.6-5
m4-1.4.5-3.el5.1
bzip2-1.0.3-4.el5_2
libfontenc-1.0.2-2.2.el5
perl-5.8.8-18.el5
aspell-0.60.3-7.1
shared-mime-info-0.19-5.el5
file-4.17-15
blas-3.0-37.el5
gdb-6.8-27.el5
ed-0.2-39.el5_2
time-1.7-27.2.2
grep-2.5.1-54.2.el5
libogg-1.1.3-3.el5
pax-3.4-1.2.2
iptables-ipv6-1.3.5-4.el5
perl-Compress-Zlib-1.42-1.fc6
groff-1.18.1.1-11.1
libdaemon-0.10-5.el5
checkpolicy-1.33.1-4.el5
libdrm-2.0.2-1.1
iptstate-1.4-1.1.2.2
psutils-1.17-26.1
ltrace-0.5-13.45svn.el5
cyrus-sasl-plain-2.1.22-4
telnet-0.17-39.el5
gperf-3.0.1-7.2.2
swig-1.3.29-2.el5
rdist-6.1.5-44
ncompress-4.2.4-47
strace-4.5.18-2.el5_3.3
flex-2.5.4a-41.fc6
zip-2.31-2.el5
libXau-1.0.1-3.1
libgcrypt-1.2.4-1.el5
db4-4.3.29-9.fc6
tcl-8.4.13-3.fc6
ORBit2-2.14.3-5.el5
libgfortran-4.1.2-44.el5
nss-3.12.2.0-4.el5
libcroco-0.6.1-2.1
libdaemon-0.10-5.el5
gnutls-1.4.1-3.el5_2.1
libogg-1.1.3-3.el5
slang-2.0.6-4.el5
elfutils-libs-0.137-3.el5
cyrus-sasl-plain-2.1.22-4
libgomp-4.3.2-7.el5
compat-glibc-2.3.4-2.26
tcp_wrappers-7.6-40.6.el5
libXt-1.0.2-3.1.fc6
libXpm-3.5.5-3
libXp-1.0.0-8.1.el5
libXfixes-4.0.1-2.1
atk-devel-1.12.2-1.fc6
libXxf86vm-1.0.1-3.1
gtk+-1.2.10-56.el5
libXxf86dga-1.0.1-3.1
tcl-devel-8.4.13-3.fc6
libidn-devel-0.6.5-1.1
nspr-devel-4.7.3-2.el5
libtermcap-devel-2.0.8-46.1
glibc-devel-2.5-34
libXxf86misc-1.0.1-3.1
perl-HTML-Tagset-3.10-2.1.1
libstdc++43-devel-4.3.2-7.el5
compat-gcc-34-g77-3.4.6-4
openmotif22-2.2.3-18
grub-0.97-13.2
nss-devel-3.12.2.0-4.el5
libmng-devel-1.0.9-5.1
xorg-x11-xtrans-devel-1.0.1-1.1.fc6
libtool-ltdl-devel-1.5.22-6.1
gamin-devel-0.1.7-8.el5
blas-devel-3.0-37.el5
db4-devel-4.3.29-9.fc6
pstack-1.2-7.2.2
atk-devel-1.12.2-1.fc6
automake15-1.5-16
ncurses-devel-5.5-24.20060715
glib-devel-1.2.10-20.el5
audiofile-devel-0.2.6-5
libtiff-devel-3.8.2-7.el5_2.2
libstdc++43-devel-4.3.2-7.el5
libjpeg-devel-6b-37
libXrender-0.9.1-3.1
libXp-1.0.0-8.1.el5
libXcursor-1.1.7-1.1
libXxf86vm-1.0.1-3.1
libXres-1.0.1-3.1
libXv-1.0.1-4.1
tix-8.4.0-11.fc6
gcc-c++-4.1.2-44.el5
giflib-devel-4.1.3-7.1.el5_3.1
findutils-4.2.27-5.el5
libXft-2.1.10-1.1
openssl-0.9.8e-7.el5
module-init-tools-3.3-0.pre3.1.42.el5
kpartx-0.4.7-23.el5_3.2
mesa-libGL-6.5.1-7.7.el5
hicolor-icon-theme-0.9-2.1
newt-0.52.2-12.el5
autoconf-2.59-12
device-mapper-multipath-0.4.7-23.el5_3.2
neon-0.25.5-10.el5
openmotif-2.3.1-2.el5
vim-minimal-7.0.109-4.el5_2.4z
openjade-1.3.2-27
libxml2-python-2.6.26-2.1.2.7
m2crypto-0.16-6.el5.3
fipscheck-1.0.3-1.el5
logrotate-3.7.4-9
hwdata-0.213.11-1.el5
python-urlgrabber-3.1.0-5.el5
docbook-dtds-1.0-30.1
subversion-1.4.2-4.el5
gnupg-1.4.5-14
perl-DBD-MySQL-3.0007-2.el5
autofs-5.0.1-0.rc2.102
rhpl-0.194.1-1
libpcap-0.9.4-14.el5
parted-1.8.1-23.el5
audit-1.7.7-6.el5
vim-enhanced-7.0.109-4.el5_2.4z
perl-IO-Socket-SSL-1.01-1.fc6
libbonobo-devel-2.16.0-1.fc6
bitmap-fonts-0.3-5.1.1
cairo-1.2.4-5.el5
gtk2-2.10.4-20.el5
gnome-keyring-0.6.0-1.fc6
pycairo-1.2.0-1.1
scrollkeeper-0.3.14-9.el5
at-3.1.8-82.fc6
libwnck-2.16.0-4.fc6
arts-1.5.4-1
libutempter-1.1.4-4.el5
cvs-1.11.22-5.el5
GConf2-devel-2.14.0-9.el5
rpm-libs-4.4.2.3-9.el5
util-linux-2.13-0.50.el5
openssl-0.9.8e-7.el5
GConf2-2.14.0-9.el5
libXfixes-devel-4.0.1-2.1
passwd-0.73-1
mcstrans-0.2.11-3.el5
libICE-devel-1.0.1-2.1
libX11-devel-1.0.3-9.el5
libXft-devel-2.1.10-1.1
ypbind-1.19-11.el5
device-mapper-event-1.02.28-2.el5
sysstat-7.0.2-3.el5
libXt-devel-1.0.2-3.1.fc6
setuptool-1.19.2-1
microcode_ctl-1.17-1.47.el5
krb5-workstation-1.6.1-31.el5_3.3
yum-autoupdate-1-1.SL
libXv-devel-1.0.1-4.1
tk-devel-8.4.13-5.el5_1.1
libX11-devel-1.0.3-9.el5
xinetd-2.3.14-10.el5
libXcomposite-devel-0.3-5.1
pam-devel-0.99.6.2-4.el5
libXrandr-devel-1.1.1-3.1
libXTrap-devel-1.0.0-3.1
libXdmcp-devel-1.0.1-2.1
libXres-devel-1.0.1-3.1
libXfontcache-devel-1.0.2-3.1
libXpm-devel-3.5.5-3
libgnomecanvas-2.14.0-4.1
cryptsetup-luks-1.0.3-4.el5
fipscheck-1.0.3-1.el5
bind-libs-9.3.4-10.P1.el5
subversion-1.4.2-4.el5
cyrus-sasl-md5-2.1.22-4
openssl097a-0.9.7a-9.el5_2.1
kernel-2.6.18-164.6.1.el5
openmotif-devel-2.3.1-2.el5
libgnomecanvas-devel-2.14.0-4.1
libXaw-devel-1.0.2-8.1
curl-devel-7.15.5-2.1.el5_3.4
mesa-libGL-devel-6.5.1-7.7.el5
libXmu-devel-1.0.2-5
dbus-1.1.2-12.el5
man-1.6d-1.1
avahi-0.6.16-1.el5_2.1
libgnomecups-0.2.2-8
kdelibs-3.5.4-22.el5_3
setools-3.0-3.el5
libnotify-0.4.2-6.el5
yum-3.2.19-18.sl
hal-0.5.8.1-38.el5
libgnomeui-2.16.0-5.el5
nautilus-extensions-2.16.2-7.el5
urw-fonts-2.3-6.1.1
emacs-21.4-20.el5
xorg-x11-fonts-ISO8859-1-100dpi-7.1-2.1.el5
xorg-x11-fonts-100dpi-7.1-2.1.el5
evince-0.6.0-8.el5
gv-3.6.2-2.sl5
gimp-2.2.13-2.0.7.el5
gimp-data-extras-2.0.1-1.1.1
openafs-krb5-1.4.10-1.1.1
openafs-compat-1.4.10-1.1.1
intel-ccfc-10.1-1
compat-glibc-headers-2.3.4-2.26
nrpe-2.12-1
rcf-env-5.3-1
libgcc-4.1.2-44.el5
nash-5.1.19.6-44
compat-glibc-headers-2.3.4-2.26
tzdata-2009i-2.el5
rmt-0.4b41-2.fc6
dump-0.4b41-2.fc6
rootfiles-8.1-1.1.1
glibc-2.5-34
glib2-2.12.3-4.el5_3.1
libSM-1.0.1-3.1
popt-1.10.2.3-9.el5
libgcc-4.1.2-44.el5
bash-3.2-24.el5
ncurses-5.5-24.20060715
bzip2-libs-1.0.3-4.el5_2
libpng-1.2.10-7.1.el5_3.2
libtiff-3.8.2-7.el5_2.2
nss-3.12.2.0-4.el5
libSM-1.0.1-3.1
libtiff-3.8.2-7.el5_2.2
libcap-1.10-26
expat-1.95.8-8.2.1
diffutils-2.8.1-15.2.3.el5
cpio-2.6-23.el5
glib-1.2.10-20.el5
ORBit2-2.14.3-5.el5
gdbm-1.8.0-26.2.1
perl-DBI-1.52-2.el5
libmng-1.0.9-5.1
iptables-1.3.5-4.el5
patch-2.5.4-29.2.3.el5
vim-common-7.0.109-4.el5_2.4z
ttmkfdir-3.0.9-23.el5
libgomp-4.3.2-7.el5
pcre-6.6-2.el5_1.7
libexif-0.6.13-4.0.2.el5_1.1
libtool-ltdl-1.5.22-6.1
elfutils-0.137-3.el5
imake-1.0.2-3
libcroco-0.6.1-2.1
procmail-3.22-17.1
libgfortran43-4.3.2-7.el5
libevent-1.1a-3.2.1
sysfsutils-2.0.0-6
valgrind-3.2.1-6.el5
expect-5.43.0-5.1
attr-2.4.32-1.1
cscope-15.5-15.1.el5_3.1
units-1.85-1.2.2
beecrypt-4.1.2-10.1.1
lslk-1.29-17
unix2dos-2.2-26.2.3.el5
finger-0.17-32.2.1.1
traceroute-2.0.1-5.el5
splint-3.1.1-16.el5
libsepol-1.15.2-1.el5
libgpg-error-1.4-2
libacl-2.2.39-3.el5
audiofile-0.2.6-5
libIDL-0.8.7-1.fc6
libXdmcp-1.0.1-2.1
gnutls-1.4.1-3.el5_2.1
libusb-0.1.12-5.1
libvolume_id-095-14.20.el5_3
aspell-0.60.3-7.1
libvorbis-1.1.2-3.el5_1.2
libtool-ltdl-1.5.22-6.1
numactl-0.9.8-7.el5
compat-db-4.2.52-5.1
compat-libstdc++-296-2.96-138
compat-libf2c-34-3.4.6-4
xorg-x11-filesystem-7.1-2.fc6
libXmu-1.0.2-5
xorg-x11-font-utils-7.1-2
freetype-devel-2.2.1-21.el5_3
libXcursor-1.1.7-1.1
perl-URI-1.35-3
libXfontcache-1.0.2-3.1
libXTrap-1.0.0-3.1
tk-8.4.13-5.el5_1.1
glib-devel-1.2.10-20.el5
keyutils-libs-devel-1.2-1.el5
nss-devel-3.12.2.0-4.el5
crontabs-1.10-8
gcc43-4.3.2-7.el5
xorg-x11-server-utils-7.1-4.fc6
perl-HTML-Parser-3.55-1.fc6
libstdc++-devel-4.1.2-44.el5
gcc43-gfortran-4.3.2-7.el5
xorg-x11-twm-1.0.1-3.1
glibc-devel-2.5-34
libacl-devel-2.2.39-3.el5
libmng-devel-1.0.9-5.1
libXau-devel-1.0.1-3.1
slang-devel-2.0.6-4.el5
gdbm-devel-1.8.0-26.2.1
libIDL-devel-0.8.7-1.fc6
libattr-devel-2.4.32-1.1
lapack-devel-3.0-37.el5
perl-Convert-ASN1-0.20-1.1
redhat-rpm-config-8.0.45-29.el5
automake14-1.4p6-13
slang-devel-2.0.6-4.el5
libart_lgpl-devel-2.3.17-4
libtiff-devel-3.8.2-7.el5_2.2
libstdc++-devel-4.1.2-44.el5
zlib-devel-1.2.3-3
libXt-1.0.2-3.1.fc6
libXpm-3.5.5-3
gtk+-1.2.10-56.el5
libXaw-1.0.2-8.1
giflib-4.1.3-7.1.el5_3.1
libXxf86dga-1.0.1-3.1
openmotif22-2.2.3-18
gcc-gfortran-4.1.2-44.el5
giflib-devel-4.1.3-7.1.el5_3.1
coreutils-5.97-19.el5
device-mapper-1.02.28-2.el5
python-2.4.3-24.el5
gd-2.0.33-9.4.el5_1.1
Xaw3d-1.5E-10.1
psmisc-22.2-6
sgml-common-0.6.3-18
libutempter-1.1.4-4.el5
elfutils-libelf-devel-0.137-3.el5
gettext-0.14.6-4.el5
curl-7.15.5-2.1.el5_3.4
opensp-1.5.2-4
audit-libs-python-1.7.7-6.el5
python-elementtree-1.2.6-5
bind-libs-9.3.4-10.P1.el5
perl-Net-SSLeay-1.30-4.fc6
pygobject2-devel-2.12.1-5.el5
pciutils-2.2.3-5
xml-common-0.6.3-18
elfutils-libelf-devel-0.137-3.el5
nedit-5.5-21.el5
tmpwatch-2.9.7-1.1.el5.2
openldap-clients-2.3.43-3.el5
tkinter-2.4.3-24.el5
cyrus-sasl-md5-2.1.22-4
cryptsetup-luks-1.0.3-4.el5
zsh-4.2.6-1
mlocate-0.15-1.el5.1
openssl-devel-0.9.8e-7.el5
libbonobo-devel-2.16.0-1.fc6
liberation-fonts-1.0-1.el5
fontconfig-2.4.1-7.el5
pango-1.14.9-5.el5_3
libgnomecanvas-2.14.0-4.1
libwmf-0.2.8.4-10.2
openmotif-2.3.1-2.el5
libuser-0.54.7-2.el5.5
gimp-libs-2.2.13-2.0.7.el5
esound-0.2.36-3
Xaw3d-1.5E-10.1
nss_ldap-253-17.el5
libpcap-0.9.4-14.el5
SysVinit-2.86-15.el5
udev-095-14.20.el5_3
krb5-libs-1.6.1-31.el5_3.3
gtk2-2.10.4-20.el5
libXi-devel-1.0.1-3.1
initscripts-8.45.25-1.el5
openssh-4.3p2-29.el5
libXrandr-devel-1.1.1-3.1
libXdmcp-devel-1.0.1-2.1
cairo-devel-1.2.4-5.el5
libXinerama-devel-1.0.1-2.1
vixie-cron-4.1-76.el5
mkinitrd-5.1.19.6-44
libXpm-devel-3.5.5-3
dhclient-3.0.5-18.el5
cyrus-sasl-2.1.22-4
htmlview-4.0.0-2.el5
libXft-devel-2.1.10-1.1
gtk+-devel-1.2.10-56.el5
libXrender-devel-0.9.1-3.1
oprofile-devel-0.9.3-18.el5
libXcomposite-devel-0.3-5.1
e2fsprogs-devel-1.39-20.el5
libXres-devel-1.0.1-3.1
libXxf86vm-devel-1.0.1-3.1
libXtst-devel-1.0.1-3.1
libXxf86dga-devel-1.0.1-3.1
libXfontcache-devel-1.0.2-3.1
gtk2-devel-2.10.4-20.el5
mesa-libGL-6.5.1-7.7.el5
curl-7.15.5-2.1.el5_3.4
mkinitrd-5.1.19.6-44
cyrus-sasl-2.1.22-4
neon-0.25.5-10.el5
mysql-5.0.45-7.el5
nss_ldap-253-17.el5
compat-openldap-2.3.43_2.2.29-3.el5
parted-1.8.1-23.el5
libglade2-devel-2.6.0-2
libgnomecanvas-devel-2.14.0-4.1
libXaw-devel-1.0.2-8.1
mysql-devel-5.0.45-7.el5
curl-devel-7.15.5-2.1.el5_3.4
libglade2-devel-2.6.0-2
openmotif-devel-2.3.1-2.el5
rpm-4.4.2.3-9.el5
notification-daemon-0.3.5-9.el5
kdelibs-3.5.4-22.el5_3
avahi-glib-0.6.16-1.el5_2.1
libnotify-0.4.2-6.el5
rpm-devel-4.4.2.3-9.el5
rpm-devel-4.4.2.3-9.el5
redhat-lsb-3.1-12.3.EL
gnome-vfs2-2.16.2-4.el5
gnome-mount-0.5-3.el5
gtkhtml2-2.11.0-3
ghostscript-8.15.2-9.4.el5_3.7
glade2-2.12.1-6.el5
xorg-x11-fonts-Type1-7.1-2.1.el5
ghostscript-8.15.2-9.4.el5_3.7
transfig-3.2.4-16
gnome-vfs2-2.16.2-4.el5
librsvg2-2.16.1-1.el5
ImageMagick-6.2.8.0-4.el5_1.1
openafs-devel-1.4.10-1.1.1
grace-5.1.22-1
totalview-8.6.2-1
jdk-1.6.0_14-fcs
flex32libs-2.5.4a-41.fc6
basesystem-8.0-5.1.1
xorg-x11-util-macros-1.0.2-4.fc6
compat-libstdc++-33-3.2.3-61
words-3.0-9.1
libICE-1.0.1-2.1
libjpeg-6b-37
freetype-2.2.1-21.el5_3
libstdc++-4.1.2-44.el5
nspr-4.7.3-2.el5
db4-4.3.29-9.fc6
libXau-1.0.1-3.1
keyutils-libs-1.2-1.el5
libIDL-0.8.7-1.fc6
libbonobo-2.16.0-1.fc6
gamin-0.1.7-8.el5
elfutils-libs-0.137-3.el5
cpp-4.1.2-44.el5
libXdmcp-1.0.1-2.1
libvorbis-1.1.2-3.el5_1.2
iproute-2.6.18-9.el5
wireless-tools-28-2.el5
mingetty-1.07-5.2.2
db4-utils-4.3.29-9.fc6
nano-1.3.12-1.1
ElectricFence-2.2.2-20.2.2
diffstat-1.41-1.2.3.el5
dosfstools-2.11-7.el5
setarch-2.0-1.1
libxslt-1.1.17-2.el5_2.2
libfontenc-1.0.2-2.2.el5
gdbm-1.8.0-26.2.1
gamin-0.1.7-8.el5
libdrm-2.0.2-1.1
glib2-devel-2.12.3-4.el5_3.1
compat-libstdc++-33-3.2.3-61
libX11-1.0.3-9.el5
libXi-1.0.1-3.1
libpng-devel-1.2.10-7.1.el5_3.2
startup-notification-0.8-4.1
giflib-4.1.3-7.1.el5_3.1
libart_lgpl-devel-2.3.17-4
pygtk2-codegen-2.10.1-12.el5
libXtst-1.0.1-3.1
sl-release-5.3-1
xorg-x11-xauth-1.0.1-2.1
libacl-devel-2.2.39-3.el5
xorg-x11-xbitmaps-1.0.1-4.1
gdbm-devel-1.8.0-26.2.1
perl-Digest-HMAC-1.01-15
automake16-1.6.3-8
bzip2-devel-1.0.3-4.el5_2
libcap-devel-1.10-26
binutils-devel-2.17.50.0.6-9.el5
libXmu-1.0.2-5
libXrandr-1.1.1-3.1
tix-8.4.0-11.fc6
ORBit2-devel-2.14.3-5.el5
libselinux-1.33.4-5.1.el5
e2fsprogs-libs-1.39-20.el5
qt-3.3.6-23.el5
fontconfig-devel-2.4.1-7.el5
net-tools-1.60-78.el5
libsemanage-1.9.1-3.el5
nscd-2.5-34
arts-1.5.4-1
libselinux-python-1.33.4-5.1.el5
apr-util-1.2.7-7.el5_3.1
krb5-devel-1.6.1-31.el5_3.3
elfutils-libelf-devel-static-0.137-3.el5
system-config-securitylevel-tui-1.6.29.1-2.1.el5
python-devel-2.4.3-24.el5
openssl097a-0.9.7a-9.el5_2.1
psacct-6.3.2-44.el5
psgml-1.2.5-4.3
libselinux-devel-1.33.4-5.1.el5
libglade2-2.6.0-2
qt-3.3.6-23.el5
poppler-0.5.4-4.4.el5_3.9
python-devel-2.4.3-24.el5
gettext-0.14.6-4.el5
libselinux-1.33.4-5.1.el5
cups-libs-1.3.7-8.el5_3.6
e2fsprogs-1.39-20.el5
oprofile-0.9.3-18.el5
libXrender-devel-0.9.1-3.1
sysklogd-1.4.1-44.el5
gtk2-devel-2.10.4-20.el5
irqbalance-0.55-10.el5
sudo-1.6.9p17-3.el5_3.1
gtk+-devel-1.2.10-56.el5
oprofile-devel-0.9.3-18.el5
GConf2-devel-2.14.0-9.el5
libXxf86dga-devel-1.0.1-3.1
libXxf86vm-devel-1.0.1-3.1
libXt-devel-1.0.2-3.1.fc6
cyrus-sasl-devel-2.1.22-4
postgresql-libs-8.1.11-1.el5_1.1
pango-devel-1.14.9-5.el5_3
compat-libcom_err-1.0-7
gail-devel-1.9.2-1.fc6
sendmail-cf-8.13.8-2.el5
gd-devel-2.0.33-9.4.el5_1.1
rpm-libs-4.4.2.3-9.el5
avahi-compat-libdns_sd-0.6.16-1.el5_2.1
rpm-python-4.4.2.3-9.el5
selinux-policy-2.4.6-203.el5
libgnome-2.16.0-6.el5
libgsf-1.14.1-6.1
kudzu-1.2.57.1.21-1
libgnomeprint22-2.12.1-10.el5
libgsf-1.14.1-6.1
xfig-3.2.4-21.3.el5
condor-6.8.9-rhel3.racf.1
ganglia-gmond-3.0.7-rhel5.3.racf.8
cracklib-dicts-2.8.9-3.3
glibc-2.5-34
compat-libgcc-296-2.96-138
glib2-2.12.3-4.el5_3.1
mktemp-1.5-23.2.2
audit-libs-1.7.7-6.el5
sed-4.1.5-5.fc6
libICE-1.0.1-2.1
libacl-2.2.39-3.el5
bzip2-libs-1.0.3-4.el5_2
libcap-1.10-26
libidn-0.6.5-1.1
libXfont-1.2.2-1.0.3.el5_1
libgcrypt-1.2.4-1.el5
glib-1.2.10-20.el5
less-394-5.el5
gpm-1.20.1-74.1
libsysfs-2.0.0-6
libxslt-1.1.17-2.el5_2.2
unzip-5.52-3.el5
mailx-8.1.1-44.2.2
patchutils-0.2.31-2.2.2
rsync-2.6.8-3.1
dialog-1.0.20051107-1.2.2
compat-db-4.2.52-5.1
bogl-0.1.18-11.2.1.el5.1
byacc-1.9-29.2.2
cyrus-sasl-lib-2.1.22-4
readline-5.1-1.1
libbonobo-2.16.0-1.fc6
lcms-1.18-0.1.beta1.el5_3.2
lapack-3.0-37.el5
pcre-6.6-2.el5_1.7
expect-5.43.0-5.1
gpm-1.20.1-74.1
bogl-0.1.18-11.2.1.el5.1
zlib-devel-1.2.3-3
libXaw-1.0.2-8.1
libXinerama-1.0.1-2.1
libXv-1.0.1-4.1
ORBit2-devel-2.14.3-5.el5
libsepol-devel-1.15.2-1.el5
redhat-logos-4.9.16-1.SL.6
perl-XML-Parser-2.34-6.1.2.2.1
gdk-pixbuf-0.22.0-25.el5
readline-devel-5.1-1.1
libpng-devel-1.2.10-7.1.el5_3.2
lapack-devel-3.0-37.el5
sqlite-devel-3.3.6-2
aspell-en-6.0-2.1
perl-Config-General-2.40-1.el5
gmp-devel-4.1.4-10.el5
tcl-devel-8.4.13-3.fc6
libXext-1.0.1-2.1
tk-8.4.13-5.el5_1.1
libXtst-1.0.1-3.1
gdk-pixbuf-0.22.0-25.el5
libXp-devel-1.0.0-8.1.el5
cairo-1.2.4-5.el5
cups-libs-1.3.7-8.el5_3.6
tar-1.15.1-23.0.1.el5
esound-0.2.36-3
dmraid-1.0.0.rc13-33.el5
apr-1.2.7-11
cracklib-2.8.9-3.3
yum-metadata-parser-1.1.2-2.el5
MAKEDEV-3.23-1.2
automake-1.9.6-2.1
MySQL-python-1.2.1-1
gnuplot-4.0.0-14.el5
stunnel-4.15-2.el5.1
compat-libcom_err-1.0-7
lsof-4.78-3
libxml2-devel-2.6.26-2.1.2.7
pango-1.14.9-5.el5_3
alsa-lib-1.0.17-1.el5
cracklib-2.8.9-3.3
paps-0.6.6-18.el5
pam_krb5-2.2.14-10
fontconfig-devel-2.4.1-7.el5
device-mapper-1.02.28-2.el5
dbus-libs-1.1.2-12.el5
usermode-1.88-3.el5.2
libSM-devel-1.0.1-3.1
pango-devel-1.14.9-5.el5_3
lvm2-2.02.40-6.el5
openssh-clients-4.3p2-29.el5
smartmontools-5.38-2.el5
pygtk2-devel-2.10.1-12.el5
libXext-devel-1.0.1-2.1
xorg-x11-proto-devel-7.1-9.fc6
pam-devel-0.99.6.2-4.el5
libICE-devel-1.0.1-2.1
libXfont-devel-1.2.2-1.0.3.el5_1
libglade2-2.6.0-2
apr-1.2.7-11
libwmf-0.2.8.4-10.2
mdadm-2.6.4-1.el5
krb5-devel-1.6.1-31.el5_3.3
systemtap-0.7.2-3.el5_3
Xaw3d-devel-1.5E-10.1
openldap-devel-2.3.43-3.el5
dbus-glib-0.73-8.el5
avahi-0.6.16-1.el5_2.1
kdnssd-avahi-0.1.3-0.1.20060713svn.fc6
avahi-glib-0.6.16-1.el5_2.1
chkfontpath-1.10.1-1.1
gnome-desktop-2.16.0-1.fc6
xorg-x11-fonts-ISO8859-1-75dpi-7.1-2.1.el5
xorg-x11-fonts-75dpi-7.1-2.1.el5
eog-2.16.0.1-6.el5
gimp-help-2-0.1.0.10.1.1
openafs-client-1.4.10-1.1.1
pgi-workstation-sl3-5.1-6
nfs-utils-1.0.9-40
Special instructions
General
A blog page with compiler and specificities of sharing 32 and 64 bits architecture on the same node was created and accessible at You do not have access to view this node.
Instructions for administrators
You must save a copy of libmysqlclient.so.14 from an SL44 system and copy it under your SL5 distribution. This is due to the fact that SL5 libmysql is of version 15.0.0 but our older code hard linked to verison 14.0.0 . Hence, if you want support for your old libraries, you must preserve a copy of libmysql.
Similarly, you will need to make a copy of liblog4cxx.so.9 .
Both could be copied in $OPTSTAR/lib/ under the 32 bits deployment.
Supported STAR libraries
Native support
Backward compatible libraries
Scientific Linux 6.2 from 5.3
Configuration and RPM list
General configuration
Distribution
% cat /etc/redhat-release
Scientific Linux SL release 6.1 (Carbon)
Default compiler version
The default compiler coming with SL6 was installed.
% gcc --version
gcc (GCC) 4.4.6 20110731 (Red Hat 4.4.6-3)
Other revisions are in /opt/gcc at BNL and this location is supported by the STAR login's 'setup' script. Note that an alternative to set another compiler location is supported via an environment variable named USE_GCC_DIR. See documentation Setting up your computing environment for more information.
The secondary compiler choice is gcc 4.6.3 .
AFS sysname
See Setting up your computing environment for more information related to the sysname. The sysname can be determined by the command
% fs sysname
On sites where the sysname is set to other values than what STAR/RHIC cell expects, please note that you can always set alternate sysname for your systems by using the folowing command (from a privileged account and at boot time):
% fs sysname -newsys ppc_darwin_80 -newsys foo
The above adds two new sysname to the existsing system's default. This example is provided by the AFS manpages as well as at the bottom of our Setting up your computing environment page.
Special instructions
General
A blog page with compiler and specificities of sharing 32 and 64 bits architecture on the same node was created and accessible at You do not have access to view this node. This page was used since the SL5 32/64 bits transition.
New in SL6 - SIMD
Support for SIMD instructions may appear under SL6 (the large amount of currebt issues still make this a "if" as wide support for our sites will be rendered more difficult). Please note this page: SIMD instruction sets. SIMD instructions support will NOT guarantee ABI compatibility across hardware. THe STAR_HOST_SYS environment variable may be alterred accordingly.
ATTENTION: the introduction of SIMD instructions will also create a secondary issue: compiler bugs related to SIMD instructions are numerous. We hope for this situation to settle as SIMD instruction support matures. Therefore, only strictly approved compilers will be allowed in STAR. Any other minor/major version than the "approved" one cannot be supported. A table of acceptable gcc versions will be maintained on this page (compatibility links will not be created as they used to).
Instructions for administrators
(TBC)
You must save a copy of libmysqlclient.so.14 from an SL44 system and copy it under your SL5 distribution. This is due to the fact that SL5 libmysql is of version 15.0.0 but our older code hard linked to verison 14.0.0 . Hence, if you want support for your old libraries, you must preserve a copy of libmysql.
Similarly, you will need to make a copy of liblog4cxx.so.9 .
Both could be copied in $OPTSTAR/lib/ under the 32 bits deployment.
Supported STAR libraries
Native support
Backward compatible libraries
RPM list
Scientific Linux 6.4 from 6.2
Configuration and RPM list
General configuration
Distribution
% cat /etc/redhat-release
Scientific Linux release 6.4 (Carbon)
Default compiler version
The default compiler coming with SL6 was installed.
% gcc --version
gcc (GCC) 4.8.2 20140120 (Red Hat 4.8.2-15)
Our gcc compiler was backward and forward compatible with gcc 4.4.6 by using the devtoolset (repackaged).
Other revisions are in /opt/gcc at BNL and this location is supported by the STAR login's 'setup' script. Note that an alternative to set another compiler location is supported via an environment variable named USE_GCC_DIR. See documentation Setting up your computing environment for more information.
The secondary compiler choice is gcc 4.6.3 and we also supported 4.4.7 for an even smoother support.
sysname
The AFS canonical sysname for SL6 is x8664_sl6.
List of RPMs
The final list of RPMs is attached to this post as a text file for historical purposes (as well as helping setting up new systems).
Scientific Linux 7.3 from 6.2
Configuration and RPM list
General configuration
Distribution
% cat /etc/redhat-release
Scientific Linux release 7.3 (Nitrogen)
Default compiler version
The default compiler coming with SL6 was installed.
% gcc --version
gcc (GCC) 4.8.5 20150623 (Red Hat 4.8.5-11)
Other revisions are in /opt/gcc at BNL and this location is supported by the STAR login's 'setup' script. Note that an alternative to set another compiler location is supported via an environment variable named USE_GCC_DIR. See documentation Setting up your computing environment for more information.
The secondary compiler choice is gcc 4.8.2 (so we connect smoothly with the past 4.8.2/SL6.5 and 4.6.3/SL6.2 library releases) and we also have 4.4.7 so we can go backward as far as SL11).
Specific to our environment
sysname
The AFS fs sysname for those systems is a canonical x8664_sl7.
STAR_HOST_SYS
Since the transition begins at SL7.3, gcc 4.8.5, the new base for STAR software is sl73_gcc485 and sl73_x8664_gcc485 for the 32 and 64 bits versions respectively.
Possible support for variation of SL version / gcc version combinations (each greater than the base) would go through those directories. Possible supports of SL7.x x < 3 and/or gcc versions lower than 4.8.5 would have to be made toward the sl64_gcc482 and sl64_x8664_gcc482 paths instead (in those cases, please fix the AFS sysname to be the one indicated as used for SL6).
Noticeable changes from 6.2
- In the newer perl "." is not included as part of @INC
- SL7 has no f77 / g77 - users need to be aware of that (or a soft-link for g77 to gfortran created to facilitate the transition)
- While in previous SL6, we had repackaged libfl (as support for 32/64 was missing) but in SL7, the support is back so there will be NO need to install the BNL RPM (in other words, install SL7 flex packages for both 32 and 64 bits and this will work)
List of RPMs
The final list of RPMs is attached to this post as a text file for historical purposes (as well as helping setting up new systems).
STAR coding and naming standards
- C++ programming Guidelines
- C++ coding style guidelines
- General STAR rules (FORtran and C coding style, STAR specific requirements)
- File extensions
STAR StRoot/ makers naming standards
- The directory structure under StRoot tree
- Trees and implicit/hidden rules
- Current patterned exceptions
STAR coding standards
Fortran and C coding style manual
postscript
STAR Specific requirements
The C++ coding guide should be consulted for the general standards and allowed/discouraged features in the SRA environment. In addition, the following information are provided
- Hard-coded numbers within the code must be avoided for portability and maintainability reasons. The use of constants (const) is a valid solution. For values which are likely to change with time, a database approach should be considered. Refer to the database Web page area for more information.
- For printing messages in the STAR framework use the StMessage message manager package documented here. For all messages from a given portion of code, use a unique string, like:
{ LOG_XXX << "StZdcVertexMaker::Init(): in ZdcVertexMaker did not find ZdcCalPars." << endm; }
where XXX is either
- DEBUG
- INFO
- WARN
- ERROR
- FATAL
- QA
Then, you can filter in/out the wanted / unwanted messages using the logger filter mechanism. The Logger documentation is available here and its use is encouraged.
- To exit your code on an error condition in the STAR framework, return one of the STAR return codes (an enum) from your Maker:
enum EReturnCodes{
  kStOK=0,  // OK
  kStOk=0,  // OK
  kStWarn,  // Warning, something wrong but work can be continued
  kStEOF,  // End Of File
  kStErr,  // Error, drop this and go to the next event
  kStFatal      // Fatal error, processing impossible
};
Outside Makers in your application code AND for testing or debugging conditions that should never happen and indicate disaster if they do, we recommend the use of assert() (it aborts the program if the assertion is false). Don't use exit(). For info on assert() see the man page ('man assert').
assert() should not be used in official code (apart from rare cases). Generally speaking, it is BAD practice to just abort the program and should be avoided. Better to message an error and propagate up a fatal error flag. Unless your Maker is a fundamental and base maker (DAQ detecting a corruption, db finding an unlikely condition which should really never happen, IO maker not able to stream, ...) the use of assert() is prohibited as a single detector sub-system error shall not lead to an entire chain abort. The use of clear messages with level FATAL is emphasized. - See also Class and method naming good advice
File Extensions
-
C++ header files containing ROOT related code must have the extension .h, the referring source files must have the extension .cxx. This rule is imposed on us by ROOT.
-
Plain C++ header files, i.e. those without ROOT related code have the extension .hh, the source files the extension .cc. Only header files which contains definitions usable in C and C++ may have the extension .h. This is a convention commonly used in HEP (e.g. CLHEP, Geant4).
STAR StRoot makers naming standards
This document attempts to explain
-
the code directory structure and layout in STAR
-
the rules and assumptions triggered in the make system (cons) solely on the basis of the name choice
-
the existing exceptions to the rules
Naming convention in green are user discouraged (proliferation prevention) and such request should be accompanied with a strong reasoning. Items in magenta are obsolete forms (and code) which will disappear and rendered obsolete in a near future. Anything appearing in red should be forgotten immediately as they are forbidden (and were introduced due to unfortunate momentary laps of reason, power surge or extreme special transitional needs).
Why a naming convention ??
Naming convention keeps consistency between code and packages written by many users. Not only it enables users to have a feel for what-does-what but also, it allows managers to define basic default set of compilation rules depending sometimes naming convention. Naming conventions in general are fundamental to all large projects and although N users will surely have N best-solution, the rules should be enforced as much as possible.
The directory structure under StRoot tree
The StRoot/ tree Is of the following form
|
StRoot/ |
XXX/ |
ONLY base class should be freely named. Example: StarClassLibrary, StarRoot, Star2Root |
|
|
StXXX/ |
A directory tree which will contain a base class many makers will use and derive from. |
|
|
St_XXX_Maker/ |
XXX not being a detector sub-system but a set of character with underscores: the code is FORtran derived. XXX is a sub-system in a general sens (not necessarily a detector-sub-system) |
|
|
StXXXMaker/ |
A tree for a Maker, that is, code compiled in this tree will be assembled as one self-sufficient package. A maker is a particular class deriving from StMaker. Its purpose is to run from within a chain (StChain) of makers and perform a specific task. In this category, sub-name convention are as follow while XXX is in principle a detector sub-system identification (3 to 4 letters uniquely designating the sub-system), it may also be anything but a detector sub-system (StAssociationMaker, StMiniMcMaker, StDbMaker) or of the form XX=analysis or physics study. |
|
StXXXRaw*/ |
Any directory with named with the word Raw will make our make system include the necessary path for the Run-Time-System DAQ reader files automatically. This convention is additive to any other description and convention herein. Example: StEmcRawMaker is a "maker" 9as described above) and a code base using the DAQ reader and so would be the expectation for Stl3RawReaderMaker or StFgtRawMaker. |
|
|
|
StXXXUtil/ |
Code compiled in a Util or Utilities tree should be code which do not perform any action (nor a maker) but constitute by itself a set of utility classes and functions. Other classes may depend on a Utility library. |
|
|
StXXXPool/ |
This tree will contain a set of sub-directories chosen by the user, each sub-directory maybe a self-contained project with no relation with anything else. Each sub-directory will therefore lead to the creation of a separate library. The naming convention for the library creation is as follow : |
|
|
StXXXClient/ |
This tree will behave like the Pool trees in terms of library naming creation (separate libraries will be created, one per compilable sub-directory). |
Trees and implicit/hidden rules
|
StRoot/ |
StXXX./ |
README |
A basic documentation in plain text (not mandatory). If exists, the software guide will display the information contained in this file. |
|
|
|
A directory containing more elaborate documentation, either in html or in LaTeX. Note that if a file named index.html exists, the software guide will link to it |
|
|
|
|
local/ |
A subdirectory containing stand-alone Makefiles for the package and/or standalone configuration files |
|
|
|
A directory having a collection of code using the Maker or utility package of interest (case incensitive) |
|
|
|
|
A directory containing root macros example making use of the maker |
|
|
|
|
kumac/ |
This is an obsolete directory name (from staf time) but still considered by the make system. It may also appears in the pams/ tree structure. |
|
|
|
test/ |
This directory may contain test programs (executables should in principle not appear in our standard but be assembled) |
|
|
|
html/ |
A directory possibly containing cross-linked information for Web purposes. However, note that the documentation is, since 2002, auto-generated via the doxygen documentation system (see the sofi page for more information). |
|
|
|
images/ |
A directory containing images such as bitmap, pixmaps or other images used by your program but NOT assembled by any part of the build process. XPM files necessary for Qt for example should not be placed in this directory as explicit rules exists in 'cons' to handle those (but cons will ignore the xpm placed in images/). |
| wrk/ run/ |
|||
|
|
|
include/ |
A directory containing a set of common include files |
|
|
|
Any other name |
Will be searched for code one level down only. |
|
|
doc/ |
As noted above (i.e. the content of those directories will be skipped by the make system) |
|
|
|
|
Any other name |
The presence of every sub-directory will create a different dynamic library. Note that this is NOT the case with the other name format (all compiled code would go in a unique library name) |
Current patterned exceptions.
-
Directories within this pattern will be compiled using the extra include path pointed by the environment variable QTDIR. The moc program will run on any include containing the Q_OBJECT directive, -DR__QT define is added to CXXFLAGS.
Those are special. Compilation will consider MySQL includes and the created dynamic library will be linked against MySQL
St.*Db.*
Any directory following this pattern will use the MySQL include as an extra include path for the CPPPATH directive
StTrsMaker
StRTSClientAre two exceptions of kind (b) [see footnote 1] and uses its own include/ directory as a general extraneous include path.
StHbtMaker
For this maker, a pre-defined list of sub-directories is being added to the (CPPPATH)
StAssociationMaker
StMuDSTMaker
.*EmcUtil
StEEmcPool
StTofPool
StRichPool
Sti.*This form will include in the CPPPATH every sub-directories found one level below. Only macros/, examples/ and doc/ are excluded withing this form noted in (a). For the Pool directory, the extraneous rule mentioned here is additive to the one of Pool directories.
Direct comments to the STARSOFT list.
1However, if there is a need for StRoot/StXXX sub-directories compilation to include every available sub-paths (other than the exceptions noted above) (a) as a list of default path in a compiler option or if you want a default include/ directory (b) to be always added in a default include path compiler option statement, you may request this feature to be enabled. To do that, send an Email to STARSOFT .
2In this form, the sub-directory MUST be self-sufficient i.e. all code and include (apart from the default paths) must be in the sub-directory StZZZ
Class and method naming good advice
Ottinger's Rules for Variable and Class Naming
When a new developer joins a project which is already in progress, there is a steep learning curve. If the new developer already knows the methodology and programming language, some of this is reduced. If the new developer already knows the problem domain fairly well, this also shortens the ramp-up time.
There is often a great deal of artificial curve which is added to a project by decree or by accident.
The goal of this rule set is to help avoid creating one type of artifical learning curve, that of decyphering or memorizing strange names.
The rules were developed in group discussions, largely by examining poor names and dissecting them to determine the cause of their 'badness'.
- Use Pronouncable names:
If you can't pronounce it, you can't discuss it without sounding like an idiot. "Well, over here on the bee cee arr three cee enn tee we have a pee ess zee kew int, see?"
I company I know has genymdhms (generated date, year, month day, hour, minute and second) so they walked around saying "gen why emm dee aich emm ess". I have an annoying habit of pronouncing everything as-written, so I started saying "gen-yah-mudda-hims". It later was being called this by a host of designers and analysts, and we still sounded silly. But we were in on the joke, so it was fun.
Don't do that. It would have been so much better if it had been called 'timestamp' or something.
- Avoid Encodings:
Encoded names require decyphering. This is true for hungarian and other 'type-encoded' or otherwise encoded variable names. Besides, encoded names are seldom pronouncable (#1).
When you worked in name-length-challenged programs, you probably violated this rule with impunity and regret. Fortran forced it by basing type on the first letter, making the first letter a 'code' for the type. Hungarian has taken this to a whole new level.
We've all seen bizarre encoded naming standards for files, producing (real name) cccoproi.sc and SRD2T3. This is an artificially-created naming standard in the modern world of long filenames, though it had it's time.
Of course, you can get used to anything, but why create an artificial learning curve for new hires? Avoid this if you can avoid it.
- Don't be too cute:
If the names are too clever, they will be memorable only to people who share your sense of humor and remember the joke.
- Most meanings have multiple words. Pick ONE:
Pick one word and stick with it. For instance, it's confusing to have 'fetch', 'retrieve' and 'get' as members of the same class.
How do you choose?
Likewise, it's confusing to have a 'controller' and a 'manager' and a 'driver' in the same process.
The names are synonyms, making you thing the variables are the same, but there are several with mechanically different names, which leads you to think that they're not the same. You don't know what's different, or whether there is a difference.
Instead of using different words, use words which describe different the different use or aspects of things (be specific).
- Most words have multiple meanings:
Don't use the same word for two purposes, if you can at all avoid it.
Remember that it's not polite at all to have the same name in two scopes.
- Nouns and Verb Phrases
Classes and objects should have noun or noun phrase names.
There are some methods (commonly called "accessors") which calculate and/or return a value. These can and probably should have noun names. This way accessing a person's first name can read like:
string x = person.name();
Other methods (sometimes called "manipulators", but not so commonly anymore) cause something to happen. These should have verb or verb-phrase names. This way, changing a name would read like:
fred.changeNameTo("mike") - Use Solution Domain Names:
Use CS terms, algorithm names, pattern names, math terms, etc ...
Yeah, it's a bit heretical, but you don't want your developers having to run back and forth to the customer asking what every
name means *if* they already know the concept by a different name.
We're talking about code here, so you're more likely to have your code maintained by a CS major or informed programmer than by a domain expert with no programming background. End users of a system very seldom read the code, but the maintainers have to.
- Also Use Problem Domain Names:
When there is no 'programmer-ese' for what you're doing, use the name from the problem domain. At least the programmer who maintains your code *can* ask his boss what it means. In analysis, this becomes the superior rule over "Use Solution Domain Names", because the end-user is the target audience.
- Avoid Mental Mapping:
Readers shouldn't have to mentally translate your names into other names they already know. - Nothing is intuitive:
Sadly, and in contradiction to the above, all names require some mental mapping, since this is the nature of language.
If you use a term which might not be known to your audience, you must map it to the concept you'd like it to represent.
For this reason, most important names should be in a glossary or should be explained in comments at least. - Avoid Disinformation:
Avoid words which already mean something else. For example, "hp", "aix", and "sco" would be horrible variable names because
they are the names of Unix platforms or variants. Even if you are coding a hypotenuse and hp looks like a good abbreviation,it violates too many rules and also is disinformative.
Likewise don't refer to a grouping of accounts as an AccountList unless it's actually a list. A list means something to CS people. It denotes a certain type of data structure. If the container isn't a list, you've disinformed the programmer who has to maintain your code. AccountGroup or BunchOfAccounts would have been better. - Names are only Meaningful in Context:
There are few names which are meaningful in and of themselves. Most, however are not. Instead, you need to place names in
context for your reader by enclosing them in classes, well-named functions, or comments.
The term 'tree' needs some disambiguation, for example if the application is a forestry application. You may have syntax trees, red-black or b-trees, and also elms, oaks, and pines. The word 'tree' is a good word, and is not to be avoided, but it must be
placed in context every place it is used. - Don't add Artificial Context
In an imaginary application called 'Gas Station Deluxe', it is a bad idea to prefix every class with 'GSD' if there is a chance that the class might later be used in 'Inventory Manager' (at which time the prefix becomes meaningless).
Likewise, say you invented a 'Mailing Address' class in GSD's accounting module, and you named it AccountAddress.
Later, you need a mailing address for your customers. Do you use 'AccountAddress'?
In both these cases, the naming reveals an earlier short-sightedness regarding reuse. It shows that there was a failing at the design level to look for common classes across an application.
The names 'accountAddress' and 'customerAddress' are fine names for instances of the class. - No Disambiguation without Differentiation
The first part of this is to avoid "noise words" in your variable names.
Imagine that you have a Product class. If you have another called ProductInfo or ProductData, you have failed to make the names different. Info and Data are like "stuff": basically meaningless. Likewise, using the words Class or Object in an OO system is so much noise.
In short, sometimes people disambiguate for the compiler without differentiating for the reader.
MoneyAmount is no better than 'money'. CustomerInfo is no better than Customer.
The word 'variable' should never appear in a variable name.
The word 'table' should never appear in a table name.
How is NameString better than Name? Would a Name ever be a floating point number? Probably not. If so, it breaks an earlier rule about disinformation.
There is an application I know of where this is illustrated. I've changed the name of the thing we're getting to protect the guilty:
getSomething();
getSomethings();
getSomethingInfo();
The second tells you there are many of these things. The first lets you know you'll get one, but which? The third tells you nothing more than the first, but the compiler (and hopefully the author) can tell them apart. You are going to have to work harder.
If you have a name used twice, you must disambiguate in such a way that the reader knows what the different versions offer her, instead of merely that they're different.
The hardest thing about choosing good names is that it requires good descriptive skills and a shared cultural background. This is a teaching issue, rather than a technical, business, or management issue. As a result many people in this field don't do it very well.
Software Peer review
General Information
Before adding a new code to the CVS repository, any Maker and or code needs to be peer reviewed. Please, consult the STAR coding and naming standards pages before even starting to design a new maker or code. This document will help you shape, through basic guidelines, your code structure and layout.
Code peer review is a process by which members of the collaboration, code developers themselves, are asked to review your code as per its fitness to be included in the standard STAR framework. We hope this process will bring to developers of maker useful inputs as per the reuse of existing classes, the integration of the code within a chain, its interaction with our IO model etc ...
The task of the reviewers
The basic peer review should address the following issues :
- General coding style and standard Naming convention
- Naming convention must be followed
- Classes must have destructor / constructor
- Access to data members must be through access methods
- Global variables usage (should be avoided, suggestions if used)
- Constants, variables, method should have self-explanatory names
- ...
- The code layout i.e. The directory structure (is the documentation in the proper doc/ directory, the macros in the macros/ directory etc ...)
- The presence of documentation and if it was sufficient to understand what the intent of code was. Complete lack of documentation should be considered as a show stopper for the review.
- Code general suggestions and comments :
- issues related to re-use of existing base classes
- merging with existing or similar sub-systems developed classes etc ...).
- Hardwired constants and suggestions (for example, a database approach for calibration constants, if applicable, is a good suggestion).
- In case of simulation makers, the reviewers should pay particular attention to the GEANT geometry and how it relates to the reconstruction code and, for a sub-system in development mode, the geometry flexibility.
- Is the algorithm sound, any missing parts / improvements suggestions, approaches the developer should try or consider in future.
- General comments on readiness of the code to be inserted.
- The almost last and one of the mandatory requirements is for the code to compile (hum ... it should be never knows ...) and this, on at least the preferred platform (a code will NOT be added if it fails this basic requirement) but preferably the two supported platforms.
- Finally, can you run the code (always good to compile but if it crashes, it is not ready)? Does it seem to provide meaningful results within the provided example and/or instructions?
There are at least two peer reviewers per new code. The peer reviewers should agree that the code is important, should be included in the set of makers, is ready for deployment and, if there are more work to be done, should clearly state what is required in their views for the code to be functional. Suggestions for future improvements must be clearly stated and a road map for implementation offered to the developer . The reviewers should also explicitly sign-off on the code.
As a last note, a peer review is advisory to the STAR Software & Computing leader. In case of disagreement, a summary and ruling will be sent to the person reviewed (and reviewers) indicating the changes to be made. After a peer review is closed, a notice will be sent to starsoft so all (core team as well as other coordinators) are informed of the new incoming code.
Preparing your code for a peer review
You should first make sure that your code will pass the above criteria. Your code must be available to the reviewers from a public space. Please, check protection (g+r in NFS space) or acl (star rl in AFS).
When you feel ready to have your code reviewed, send an Email to STAR Software & Computing leader requiring a review process to take place along with a quick description of your maker / code and the status of your code (still in development mode, final version, why you would like to have it included to the official repository, etc ...). Avoid development code at all cost unless clear justifications.
For a meaningful review, please provide instructions (macro or chain) on how to run your code with all arguments specified (least work for the reviewers, should work as instructed). Possibly, how to verify the results are correct in case your code deals with Physics-ready structures is an asset. At minimum, we require the code compiles & run and that reviewers understand its purpose and documentation is adequate.
Members of the collaboration will be asked to take on this task within a day or two. Comments, answers and action items must be sent and communicated via Emails to all members of the peer review committee (they will appear in the initial Email starting the review process). After all reviewers have sent their contributions, you will be informed of the the critical items to be taken care off and an expected / suggested time frame for the insertion of the new code in our library.
Past peer reviews
| Makers | Developer / Contact | Reviewers | Date/Status |
|---|---|---|---|
| StPmdClusterMaker StPmdDiscriminatorMaker StPmdSimulatorMaker StPmdUtil |
Subhasis Chattopadyay | Alexandre P. Suaide Akio Ogawa |
August 2002 |
| StJetFinder | Mike Miller | David Hardtke Victor Perevoztchikov Gene Van Buren |
August 2002 StPythiaEvent requested but not created / delayed. |
| StBbcSimulationMaker | Mikhail Kopytine | Janet Seyboth Subhasis Chattopadyay |
September 2002 Several suggestions made as per the database interface. |
| StMinuitVertexMaker | David Hardtke | Lee Barnby Zhangbhu Xu |
Closed (not summarized) |
| StBichsel StdEdxY2Maker |
Yuri Fisyak | Jeff Porter Fabrice Retiere |
Closed with action items + testing needed |
| StSecondaryVertexMaker | Julien Faivre | Spyridon Margetis Gene Van Buren |
Closed (not summarized) |
| StEmcMixerMaker Addition to StAssociationMaker |
Alex P. Suaide Marcia Maria de Moura |
Patricia Fachini Maxim Potekhin |
January 21st 2003 |
| StEEmcUtil StEEmcDbMaker StEEmcCalibrationMaker StEEmcSimulatorMaker |
Jan Balewski | Alex P. Suaide Herb Ward |
January 27th 2003 Hardwired values should be removed and replaced by a database approach. |
| StHitFilterMaker | James Dunlop | Jerome Lauret | February 6th 2003 Argument passing to constructor should be changed (the hack violates code standards) Work on extraneous filters plug-and-play |
| StFtpcMixerMaker | Frank Simon | Frank Geurts Jerome Lauret |
February 14th 2003 Issues were all addressed (global variables, documentation etc ...) |
| StTriggerDataMaker | Akio Ogawa Mirko Planinic |
Jerome Lauret Thomas Ullrich |
June 2003 Initially added in the library, review missed a lack of destructor in reading mode (relying on the StEvent model too much). Was fixed by Victor in June and stabilized. |
| StTofpMatchMaker StTofpNtupleMaker |
Frank Geurts | Thorsten Kolleger Boris Hippolyte |
August 7th 2003 StTofpNtupleMaker recognized to be an analysis maker moved to StTofPool. Opened issue : some variables need to be moved in a database. |
| StSsdClusterMaker StSsdEvalMaker StSsdSimulationMaker StSsdPointMaker |
Christelle Roy | Frank Laue Yuri Fisyak |
March 12th 2004 Closed (one reviewer not responding). Some code will need re-evaluation later. StSsdPointMaker mostly addressed and ready. One concern about dimension used in multiple codes (not defined as const or other method) |
| StPmdReadMaker StPmdCalibConstMaker |
Subhasis Chattopadyay | Frank Simon Piotr Zolnierczuk |
Closed (not summarized) |
| StKinkMaker | Camelia Mironov | Jason C Web Claude Pruneau |
March 2nd 2004 Code lacks internal documentation (doxygen). There is an issue with the Bfield calculation (recalculated for every event). Code to be merged in StSecondaryVertexMaker library. |
| StTofrMatchMaker | Xin Dong | Thomas Ullrich Thomas Dietel |
March 8th 2004 Rather large histograms enabled by default (no external control) Many assert() commented to remove. Documentation needed. |
| StStarLogger | Valeri Fine | Dmitry Arkhipkin Gene Van Buren |
May 14th 2004 Done Nov 2004 with agreement that non-implemented methods (and unused) will be cleaned + doc needed, The configuration file would need to be relocated as well. |
| StTofCalibMaker | Xin Dong | Marcelo Munhoz Javier Castillo |
June 8th 2004 All requested changes applied. |
| StEventCompendiumMaker | Manuel Calderon | Jerome Lauret Yuri Fisyak |
June 9th 2004 No action items for this maker. The code was found to be concise and clear. |
| StSvtEmbeddingMaker | Petr Chaloupka | Mike Miller Camelia Mironov |
June 16th 2004 Chain options to be added |
| StHeavyTagMaker | Manuel Calderon | Jerome Lauret | July 28th 2004 Fast-lane reviewed |
| StSsdDaqMaker | Christelle Roy | Marcelo Munhoz Jerome Lauret |
October 2004 – Closed March 2005. Remaining hardwired values to consolidate, message severity all “high” to revisit. |
| StSpinDbMaker | Jan Balewski | Marcia Maria de Moura Michal Daugherty |
September 2005 – Requester abandoned the review although well on the way. Code not added to CVS. |
| Rich Scalers | Eric Hjort | Gene Van Buren Jerome Lauret |
December 2006 Internal review THIS REVIEW WAS STILL OPENED - DEAD |
| StTpcTracker | Pibero Kisa Djawotho (Jan Balewski) |
Jerome Lauret | November 2005 – Beam background track scavenger. Discussed in a separate meeting and S&C meeting on the 17th. Decision was to provide hooks in ITTF for this. |
| StFtpcCalibMaker | Janet Seyboth | Renee Fatemi Jason Webb |
January 2006 – Closed in April with the following minor remaining issues: Use of CassDef() not necessary for this class Over-use of comparison to 0 in if statement could be written as if (a) and if(!a). |
| StIstHit | Mike Miller | Yuri Fisyak Jerome Lauret |
January 2006 Internal review. Only one comment about the use of messenger. Class at the end supported both HFT and IST. |
| StIstSim | Willie Leight | Maxim Potekhin Adam Kocoloski Valeri Fine |
February 2006 – Forgot and re-visited May 2006 Some contentions and divergence of opinion on this. Would require a resolve and summary. This did not procceed forward. |
| StTpcBeamBackMaker | Pibero Kisa | Victor Perevoztchikov Yuri Fisyak |
Fast lane on Agust 8th 2006 Closed August 16th |
| StEmcMixerMaker | Jan Balewski Adam Kocoloski |
Victor Perevoztchikov Jonathan Bouchet |
Opened March 12th 2007 Done April 13th but closed July 12th. |
| StSsdFastSimMaker | Jonathan Bouchet | Helen Caines Anthony Timmins |
Requested June 27th 2007 Done August 8th 2007 – no remaining issues. |
| StTriggerUtilities | Akio Ogawa Renee Fatemi |
Jerome Lauret | Requested June 27th 2007 - done August 23rd. This suite of utilities was declared useful and moved under Renee Fatemi's responsibilities. It will be a "user" utility and hence, compilation and maintenance will follow this category. This did not need a formal peer review (not used in production). |
| StLaserAnalysisMaker | Yuri Fisyak | Gene V. Buren Richard Witt |
Requested Dec 3rd 2007 (used prior but not pushed to review). Closed on December 20th 2007. |
| StTofHitMaker | Xin Dong | Yuri Fisyak Renee Fatemi |
Requested February 26th 2008. Was previously named StTofEventMaker. Closed on March 11th 2008. |
| StTpcHitMaker | Yuri Fisyak | Akio Ogawa Jerome Lauret |
Requested March 13th 2008. This review was closed on May 27th 2008. Reviewer asked for explaination of what this is for (so not all clear) and this is the equivalent for TPX of St_tpcdaq_Maker and FCFMaker. The documentation is missing. |
| StBTofUtil StBTofHitMaker |
Xin Dong | Matt. Walker Valeri Fine Renee Fatemi |
Requested January 15th 2009. Closed on January 31st 2009 after a two pass comment / correction only. The remaining action items includes documentation (doxygen minimal documentation + follow-up longer documentation being worked on by a student as an action item of the TOF software review) and a reshape of the RTS includes (not within the purview of the TOF sub-system). |
| StMCFilter | Victor Perevoztchikov | Michael Betancourt Frank Geurts |
Initiated April 10th 2009, started 13th. Review was closed on June 18th with documentation action item. |
| StBTofMatchMaker StBTofCalibMaker |
Frank Geurts | Pibero Djawotho Rashmi Raniwala |
(re)initiated April15th 2009 [was previously requested by Xin Dong in February]. Started April 20th. StBTofMatchMaker done on June 22nd. StBTofCalibMaker done on September 22nd. |
| St_pp2pp_Maker | Kin Yip | Valeri Fine Thomas Ullrich Jerome Lauret |
Started on October 7th 2009, closed December 12th 2009. |
| StTpcRSMaker | Yuri Fisyak for the TPC sub-system | Pibero Djawotho Jan Balewski |
Initiated October 14th 2009. Closed November 5th 2009. Action items includes study of the code performance (now a factor of 12 to 13 slower than TRS) and cleaning for hard-coded constants. |
| StFmsDbMaker | Akio Ogawa | Matthew Walker Dmitry Arkhipkin |
Initiated October 14th 2009. Closed October 27th 2009. Action item include revisiting the documentation especially the doxygen self-documenting information. |
| StVpdCalibMaker | Frank Geurts | Gene V. Buren Oleksandr Grebenyuk |
Requested October 27th, started 28th. Closed November 9th 2009. |
| StBTofSimMaker | Frank Geurts (Dylan Thein) |
Akio Ogawa Gerrit V. Nieuwenhuizen |
Requested October 27th, started 28th. Closed December 9th 2009. |
| StEmbeddingQAMaker | Hiroshi Masui for the embedding team | Andrew Rose Anthony Timmins |
Requested September 15th, delayed start until November 3rd (priority scheduling). Closed December 23rd 2009. Renamed StEmbeddingUtilities. |
| StFmsHitMaker | Akio Ogawa (Jingguo Ma) |
Jerome Lauret Thomas Ullrich |
Rushed review on December 23rd 2009, closed February 2nd 2010. doxygen documentation to attend. |
| StFilterMaker | Michael Betancourt Alice Bridgeman |
Victor Perevoztchikov Pibero Djawotho |
Started on March 4th 2010, closed March 22nd 2010. |
| StTriggerUtilities |
Renee Fatemi Pibero Djawotho |
Dmitry Arkhipkin Jan Balewski |
Review started 2010/06/29 - main purpose: the code initially advertized as not for production is now included in spin PWG simulation request workflow via StTriggerSimuMaker. POC: Renee fatemi [This code moved forward but did exhibit issues such as direct access to DB that need to be periodically assessed] |
| StEEmcSlowMaker |
Oleksandr Grebenyuk |
Jason Webb Andrew Gordon |
Started on June 29th 2010, closed August 2nd 2010. |
| StHltMaker | Liang Xue for the HLT | Mike Betancourt Thomas Ullrich Anthony Timmins |
Discussion initiated 2010/10/29 but code goals were more than unclear (track addition expanded storage). Re-started officially 2011/01/10 after documentation was provided StHltEventis part of StEvent. Closed 2011/01/28. |
| StMtdHitMaker | Frank Geurts | Joseph Seele Justin Stevens |
Review requested 2011/02/23. Reviewer could not attend before after the STAR analysis meeting. Started on 2011/03/28, closed 2011/04/21. |
| StFgtRawMaker StFgtA2CMaker StFgtClusterMaker StFgtUtil StFgtDbMaker |
Anselm Vossen | Justin Stevens Thomas Burton |
Asked 2012/01/08 (but was on V-days). Picked back on the 25th. Review started on the 27th. Closed on 2012/03/23 but found that the StEvent structures were not passed to Thomas as initially recommended - all StEvent related reviews were done then and completed on 04/16. On 04/27, reviewers agreed with final changes. Constants to check again |
| StFgtSimulator | Anselm Vossen (Jan Balewski) |
Jason Webb Jonathan Bouchet |
Asked 2012/04/01, reviewers ready the same day but instructions not ready. Started 2012/05/09. Review closed on 2012/06/06. No remaining actions items. |
| P&P event generator framework - code TBC | Jason Webb for the S&C simulation R&D effort | Ming Shao Yuri Fisyak Thomas Burton |
Started July 12th 2012, closed 2012/11/02 for the reviewer's purposes but integration issues settled 2012/11/28 after agreement (pending OK, this is done). Documentation may need a revisit. |
| StMtdMatchMaker | Frank Geurts | Jason Webb Alice Ohlson |
Requested 2012/09/24, reviewers search began later (2012/11/20), stated 2012/12/03, review done 03/07 and officially closed 03/21. No action item pending. |
| StFgtPointMaker | Anselm Vossen | Jason Webb Mustafa Mustafa |
Requested 2013/01/16 - reviewers set on the 28th. Review done on 2013/03/04 and closed 03/13. Minor fix needed (constructor issue, new of a unused class + histogram booking issue) |
| StPxlSimMaker | Spyridon Margetis (Mustafa Mustafa) |
Anselm Vossen Dmitry Arkhipkin Helen Caines |
Requested 2013/03/26 - reviewers set and review started 2013/04/02. Review closed 2013/05/03 and code put in place - last verification / confirmation asked (final feedback on 05/21). |
| StMtdSimMaker | Frank Geurts | Mustafa Mustafa Jason Webb |
Requested 2013/08/22 but no "howto" provided. Reminded on 2013/10/01. Reviewers ready in 2013/10/09 but ... (??) Status: Pending the "how to test" |
| Pxl review asked - but too many makers at once | Spyridon Margetis (Hao Qiu) |
Initial request CC was not seen (CC to list auto-sorted). Seen 2013/10/07 7 makers at once is not manageable (14+ reviewers to find). Suggested a split - we have a go on 2013/11/04 and the 5 entries below the FmsSimulationMaker represents this. |
|
| StFmsSimulationMaker | Thomas Burton (Mriganka Mouli Mondal) |
Jason Webb Kevin Adkins |
Requested 2013/10/10. Was reminded on 2013/10/30 and started 2013/11/05. This review stopped in 2013/11 and had to be restarted due to availability in 2014/02/24. Review confirmed closed on 2014/04/22 and integrated on 2014/05/06. |
| StPxlDbMaker, StPxlConstant | Spyridon Margetis (Hao Qiu) | Dmitry Arkhipkin Akio Ogawa |
PXL Part 1 - new opening 2013/11/04 - started 2013/11/07, closed 2014/01/13. Code deployed in "dev" on the 28th (cvs merging was needed) |
| StPxlRawHit, StPxlRawHitCollection, StPxlRawHitMaker | Jason Webb Jeff Landgraf |
PXL Part 2 - new opening 2013/11/04 - started 2013/11/07. This review was closed on 2014/01/10. | |
| StPxlCluster, StPxlClusterCollection, StPxlClusterMaker | Dmitry Arkhipkin Dmitri Smirnov |
PXL Part 3 - new opening 2013/11/04 - started 2014/01/10. All comments addressed by 2014/03/18? Confirmed 2014/04/15. Added to dev on 2014/05/06. |
|
| StPxlHitMaker | Dmitri Smirnov Victor Perevozchikov |
PXL Part 4 - new opening 2013/11/04 - started 2014/01/10. This review was closed on 2014/02/08. Added to dev with previous code was actually done on 2014/05/06 (this was was definitly lagging behind) |
|
StPxlMonMaker |
Dmitri Smirnov Gene V. Buren |
PXL Part 5 - new opening 2013/11/04 - started 2014/01/29 Code submited for review was judged by the submitter as "below standard" - offered to move forward and provide internal help. Review aborted. |
|
| StIstDbMaker StIstUtil | Spyridon Margetis (Yaping Wang) | Dmitri Smirnov Dmitry Arkhipkin |
IST Part 1 - code submitted 2013/12/12 - intended opening 2014/01/16 (but no Email sent). Sent on the 29th. We had then two versions of the DbMaker. Review essentially done on 2014/03/25, closed and integrated 201404/10 It was re-opened once more (as the interface changed for the 3rd time). New wave 2014/07/29. Closed again on 2014/08/08. |
| StIstRawHitMaker StIstRawHit StIstClusterMaker StIstCluster | Dmitri Smirnov Victor Perevozchikov |
IST Part 2 - code submitted for review on 2013/12/12- chain based on a test SFS file (pending DAQ). DAQ file available on 2014/01/18. Asked we resume this on 2014/01/29 (Dmitri only) but was second priority as the geometry took a turn for the "not better" ... New try on 2014/08/19. Suggested to close on 2014/09/23 (explicit sign-off given but more changes appeared, confusing the state of matter). Code moved into dev on 2015/01/13. |
|
| StIstHitMaker StIstHit | Dmitri Smirnov Jerome Lauret |
IST Part 3 - code submitted 2013/12/12 - assignement was made with one reviewer only and on the back-burner. Reminded on 2014/10/06 by Xin, not concluded. Inquiry from Yaping 2015/01/09 re-energized this. Second reviewer self-assigned. Review closed 2015/01/22. |
|
| StIstFastSimMaker | Dmitri Smirnov Jason Webb |
IST Part 4 - code submitted 2013/12/12 - many pieces missing did not allow to evaluate/review this whenever submitted. Review opened 2015/01/22 and closed 2015/02/25. |
|
| StIstQAMaker StIstCalibrationMaker | Dmitri Smirnov Gene V. Buren |
IST Part 5 - code submitted 2013/12/12 Review did not proceed - code was not considered essential. |
|
| StMtdQAMaker | Rongrong Ma (Bingchu Huang) | Hao Qiu Mustafa Mustasfa |
Proposed for review on 2014/03/12 Review opened on 2014/07/29. Reviewer sign-off on 09/03 (doxygen ready headers asked to be added). Proposed integration and closure date 09/15, code fix on 19th was too close to the Friday cutt-off. Closed 2014/09/23. |
| StSstDAQMaker | Spirydon Margetis (Long Zhou) | Hongwei Ke Jeff Landgraf |
Proposed for review on 2014/04/04 Review opened on 2014/08/06 - we did not yet close the loop on this one but review should be done ... Reviewers thanked and noted closed on 2015/06/10. Noted in public list 2015/08/18 only. |
| StMtdCalibMaker | Rongrong Ma | Gene V. Buren Kevin Adkins |
Proposed for review on 2014/06/20 Review opened 2014/08/07 - closed 2014/09/25. |
| StFmsPointMaker | Thomas Burton (Yuxi Pan) |
Rongrong Ma Jonathan Bouchet |
Proposed for review on 2014/08/04 Review opened on 2014/09/12. Reviewer sign-off on 2015/01/13, structure not in StEvent (requested before closing). Non-official closing on 2015/02/25 (requested to verify and make sure all compiles after StEvent data struct modifs). Integration check revealed an issue - C++11 construct used does not allow compiling under SL5.3. gcc 4.3.2 (informed 2015/03/09). Added to dev on 2015/08/28 after both 5.3 and 6.4 gcc 4.8.2 forward compatible compilers were made available (and showed to work). Closed 2015/08/18. |
| StFpsRawHitMaker | Yuxi Pan (Akio Ogawa) |
Mustafa Mustafa Dmitri Smirnov |
Proposed for review o 2015/01/15 (confirmed by Yuxi on 01/20). Reviewers assigned 2015/02/25. Opened 2015/03/09 Closed 2015/03/20 and code in dev on 2015/03/23. |
| StMtdEvtFilterMaker | Rongrong Ma | Jerome Lauret Gene V. Buren |
Proposed 2015/02/26, reviewers assigned 2015/03/09 - assignement changed 2015/03/11 (V-days) and review started. Closed 2015/04/06. |
| StDataFilterMaker | Gene V. Buren for the MTD team | Jerome Lauret Victor Perevozchikov |
Proposed 2015/04/24, opened 2015/04/27, closed 2015/05/01 |
| code below are reviewed using the 2015 / C++STAR coding standard | |||
| StIstRawMaker | Spirydon Margetis (Bingchu Huang) |
Dmitri Smirnov Victor Perevozchikov |
Discussed 2015/11/19, general code change looked into by D.Smirnov before deciding if a review is appropriate. Re-factoring of the approach - decision is to do an internal review (2015/12/04) Review opened 2015/12/07, done 2015/12/31 and code deployed in CVS. Closed review officially on 2016/02/17. |
| StIstSlowSimulator | Spirydon Margetis (Bingchu Huang) |
Jason Webb Kolja Kauder |
See comment above. This code needs to be reviewed as novel (though snapped into the same Sim directory). Decision 2015/12/04. Review opened 2015/12/07, done 2016/01/05 and officially closed on 2016/02/17. |
| StFmsFpsMaker | Olge Eysser (Akio Ogawa) |
Rongrong Ma Daniel Brandenburg |
Requested 2016/01/26 (no special priority). Resumed search after Akio was available. Reviewers aligned 2016/02/25 but opened 2016/03/11 after Daniel back from WWND. Review sign-off 2016/06/09 but Akio not available. Reminded 2016/11/16. Integrated 2016/11/22 and closed 2016/11/30. |
| StPicoDST |
Mustafa Mustafa (PWG) |
Kolja Kauder Dmitri Smirnov |
Requested 2016/08/11 - Opened 08/22. Closed / not announced (will do after adjustments pending). |
| Mike Lisa, Prashanth Shanmuganathan (sub-system / PWG combined request) | Dmitri Smirnov, Dmitry Arkhipkin | EPD/BBC integration. Review opened 2017/07/26. Overall believed to be fine but pending EpdDbMaker (review closed 09/14, reminded reviewers of the pico part to resume review conclusion). 09/19, ping again for the Db connection. |
|
| Peifeng Liu (PWG) Shengli Huang |
Dmitri Smirnov, ... | (pending testing from Peifeng / second reviewer not yet assigned) - Shengli reviewed the changes on 08/08, modifs should be all ready. Considered closed. | |
| Daniel Nemes (PWG) | Jerome Lauret Dmitri Smirnov |
Opened 2017/07/26. Code and comments seem implemented 2017/08/30, reminded reviewers on 09/13. Some code modifs suggested but clearly, this is not yet complete (09/19 + Grigory added). |
|
| EvtGen | |||
| StVpdSimMaker StBTofMixerMaker |
Daniel Brandenburg (Nickolas Luttrell) |
Jason Webb Jinlong Zhang |
Requested 2016/11/02 - Opened 11/16 - some delays around hollidays, relaunched 01/18 and 02/23, reviewers sign-off on 02/23. Integration issue fixed on 2017/03/02 + Closed. |
| StEmcADCtoEMaker | Jinlong Zhang | Akio Ogawa Victor Perevozchikov |
This code has not been updated for a while. The coordinator is asking for a review to help bring it to spec. Requested 2017/04/24, opened 2017/05/11. Closed 2017/06/02. |
| StEpdDbMaker | Prashanth Shanmuganathan | Dmitry Arkhipkin Jerome Lauret |
Brought informally on 2017/08/25 but related to this comment. EpdDbMaker first pass review considered mostly done 2017/08/30 - sent OK to proceed 09/13 (code changes noted and handled by reviewers). Closed 09/14. |
| StPxlSimMaker | Xin Dong |
Jason Webb Victor Perevozchikov |
Brought forward 2017/09/05. Review opened 09/13 (integration issues resolved before using branch). Merging happened 2017/10/19 along with an AgML commit. This is considered closed now. |
| StEpdMaker | Mike Lisa (Prashanth Shanmuganathan) | Jason Webb Hongwei Ke |
Brought 2017/10/28 - code/repo in offline/users/lisa could be moved as-is after review. Not immediately critical but Mike requested focus time (when the review starts, focus) due to teaching schedule ... Started 2017/12/19 - Closed 2018/02/21 (no issues found, some documentation suggestions attended) |
| StETofDigiMaker StETofUtil StETofQAMaker | Florian Seck | Raghav Kunnawalkam Elayavalli Jerome Lauret |
Brought forward 2018/05/12, not started until after QM. Opened 2018/06/11, re-opened 2018/06/21 (re-assignment of peer reviewer). Review closed 2018/07/18 but some 64 bits compilation issues ("no known conversion for argument") delayed final commmit done on 07/25. |
| KF Particle Finder | Maksym Zyzak (Ivan Kisel) |
Daniel Brandenburg Dmitri Smirnov |
Review was discussed 2018/01/24 (after a discussion S&C had with Maksym and Iouri Vassiliev during a visit). Also discussed, /star/u/mzyzak/Review/StRoot
has little to do with what is under StRoot/. 2018/02/06, code from Maksym verified by Guannan (compilation and compatibility with "dev"). Discussion went toward cov matrix info in picoDST (planned new analysis format). picoDST format settled around mid 2018/08. Review re-launched 2018/09/17 (missed it, away) and noted 2018/10/01. Reviewers contacted 10/01, accepted 10/04. Started 10/05. First wave of comment son 10/10, second on 10/24. No new version provided. Discussed with Maksym 2018/12/11 (was busy with CBM, GSI closing during holidays, need more time). Informed reviewers 2018/12/12 of possible delays. Reminder sent 2019/01/10. Resumed by Maksym 02/01 and we seemed to converge 02/19. Licensing issue discussed 2019/02/21 (pending). Licensing announced to be resolved 2020/02/11. Searching for integration candidates. |
|
KFParticlePerformance StKFParticleAnalysisMaker |
Maksym Zyzak (Ivan Kisel) |
Brought up 2018/02 for the first time. Depend on previous review + Analysis Maker not complete.KFParticlePerformance - code to collect histograms and run MC analysis; StKFParticleAnalysisMaker - maker and interface to the code [still need to add TMVA]
|
|
| StRHICfDbMaker StRHICfRawHitMaker |
Minho Kim (Akio Ogawa) |
Dmitry Arkhipkin Florian Seck |
Review discussed or a while (new sub-system) but officially requested on 2018/12/03 Data model (StEvent) handled on 2018/12/11 Reviewer assembled during the analysis meeting 2018/12/13 and started. Reviewers sent feedback (last on 2018/12/18). No responses. Reminder sent 2019/01/10. |
|
StETofCalibMaker
StETofHitMaker
StETofMatchMaker
|
Florian Seck | Gene van Buren, Raghav Kunnawalkam Elayavalli |
Review requested 2018/11/20 - delayed due to holidays. Opened 2019/01/11. Review ended 2019/02/15 with StEvent structure implemented and MuDST class asked to be added. Sign-off 2019/02/15 and closed 02/22. |
|
StETofSimMaker
|
Florian Seck | Jason Webb, Jerome Lauret Xianglei Zhu |
Review requested 2018/11/20. Focused on previous series (data needed). Opened 2019/04/24 (small adjustments made prior). |
|
StFwdTrackMaker
StFstSimMaker StFttSimMaker |
James Brandenburg | Dmitri Smirnov, Raghav Kunnawalkam Elayavalli |
Review requested 2020/09/03, Opened 2020/09/08 Review closed 2020/11/23. Two external packages (GenFit, KiTrack) installed under /opt/star. |
|
StFcsDbMaker
StFcsFastSimulationMaker |
Akio Ogawa | Dmitry Arkhipkin, Jason Webb | Review requested 2021/02/10, Review closed 2021/03/17. |
|
StFcsRawHitMaker
StFcsWaveformFitMaker StFcsClusterMaker StFcsPointMaker |
Akio Ogawa | Hongwei Ke, Oleg Eyser | Review requested 2021/02/10, Review closed 2021/03/17. |
|
STAR code main repository moved from CVS to Git on 5/31/2021
|
https://github.com/star-bnl/star-sw https://github.com/star-bnl/star-mcgen |
||
|
StFttRawHitMaker
|
Daniel Brandenburg | Hongwei Ke, Jeff Landgraf | PR (#209, including StEvent containers) submitted on 2021/02/10, merged into main on 2021/11/29. |
|
StFstDbMaker
StFstRawHitMaker |
Daniel Brandenburg (Xu Sun) |
Dmitry Arkhipkin, Hongwei Ke | PR (#266) submitted on 2021/12/20, review closed on 2022/01/18, PR merged into main on 2022/01/25 StEvent containers (PR#265) reviewed by Thomas and Jason |
|
StFstClusterMaker
StFstHitMaker StFstUtil |
Daniel Brandenburg (Xu Sun) |
Flemming Videbaek, Grigory Nigmatkulov | PR (#266) submitted on 2021/12/20, review closed on 2022/01/18, PR merged into main on 2022/01/25 StEvent containers (PR#265) reviewed by Thomas and Jason |
|
StFttDbMaker
|
Daniel Brandenburg | Dmitry Arkhipkin | PR (#287) submitted on 2022/01/26. Originally used the local tables. New DB tables then requested and created. DbMaker updated accordingly. The review is closed and the PR is merged on 2022/03/21. |
|
StFttClusterMaker
StFttPointMaker StFttHitCalibMaker |
Daniel Brandenburg | Akio Ogawa, Grigory Nigmatkulov | PR (#287) submitted on 2022/01/26. approved on 01/31. merged on 2022/03/21. |
|
StFstQAMaker
StFstCalibrationMaker |
Daniel Brandenburg (Xu Sun) |
Gene van Buren | PR (#282) originally submitted on 2022/01/17 (combined with PR#266). closed on 2022/02/14, PR merged into main on 2022/02/15 |
|
StFwdTrackMaker
StFcsTrackMatchMaker |
Daniel Brandenburg | Zilong Chang, Victor Perevozchikov | PR (#398) originally submitted on 2022/09/13 (combined with PR#396 and 397). Review finished 2022/10/21. Later on PR was superseded by PR (#492) with new StFwdTrack model in StEvent. PR merged into main on 2023/04/19. |
|
StRHICfDbMaker
StRHICfRawHitMaker |
Seunghwan Lee | Dmitry Arkhipkin, Jeff Landgraf | PR (#460) originally submitted on 2022/12/08. Updated PR (#511). Review finished and PR merged into main on 2023/03/31. |
Storage
The pages in this section will related to storage and contain statistics, testings and other useful information (some historical).
Disk usage statistics 2008
An access pattern usage statistics was gather in 2008 to estimate the %tage of files no accessed for more than 60 (2 months) days and 160 days (5.5 months) respectively. This estimate was done on BlueArc storage and their BlueArc data migration tool (we acquired an evaluation which only allowed to sort those estimates).
This page is only a snapshot of the disk space. For an up-to-date usage profile and usage scope, please consult the Resource Monitoring tools under Software Infrastructure.
| filesystem | rule | data in f/s | amount migrated | files migrated | Percent Migrated | rule | amount migrated | files migrated | Percent Migrated |
| User disk | |||||||||
|
/star/u |
>60 days |
731.13 GB |
493.88 GB |
4195712 |
67.55% |
>160days |
226.22 MB |
1670 |
30.94% |
| User space (PWG, scratch) [back] | |||||||||
|
/star/data01 |
>60 days |
756.88 GB |
117.04 MB |
2303 |
0.01% |
>160days |
17.53 MB |
1785 |
0.00% |
|
/star/data02 |
>60 days |
772.28 GB |
47.31 GB |
53222 |
6.13% |
>160days |
0 |
0 |
0.00% |
|
/star/data05 |
>60 days |
2.12 TB |
499.59 GB |
441531 |
23.00% |
>160days |
2.52MB |
80 |
0.00% |
| General space for projects [back] | |||||||||
|
/star/data03 |
>60 days |
854.42 GB |
713.03 GB |
1535 |
83.45% |
>160days |
0.00 Bytes |
0 |
0.00% |
|
/star/data04 |
>60 days |
702.38 GB |
372.76 GB |
67170 |
53.07% |
>160days |
0.00 Bytes |
0 |
0.00% |
|
/star/data06 |
>60 days |
609.42 GB |
560.95 GB |
105179 |
92.05% |
>160days |
254.42 GB |
21256 |
41.75% |
|
/star/data07 |
>60 days |
731.17 GB |
544.22 GB |
558413 |
74.43% |
>160days |
505.89 GB |
457460 |
69.19% |
|
/star/data08 |
>60 days |
989.15 GB |
815.23GB |
1205452 |
82.42% |
>160days |
0 |
0 |
0.00% |
|
/star/rcf |
>60 days |
873.58 GB |
369.68 GB |
41730 |
42.32% |
>160days |
152.46 GB |
123261 |
17.41% |
|
/star/simu |
>60 days |
235.25 GB |
225.87 GB |
33617 |
95.75% |
>160days |
225.80 GB |
33321 |
95.75% |
| Data was gathered during FastOffline time (0% expected) | |||||||||
|
/star/data09 |
>60 days |
613.75 GB |
30.19 MB |
10 |
0.00% |
>160days |
25.80 MB |
5 |
0.00% |
|
/star/data10 |
>60 days |
483.96 GB |
28.92 MB |
272 |
0.00% |
>160days |
0.00 Bytes |
1 |
0.00% |
| Institution's disks [back] | |||||||||
|
institutions/bnl |
>60 days |
3.39 TB |
2.08 TB |
3490235 |
61.36% |
>160days |
1.40 TB |
3082800 |
41.30% |
|
institutions/lbl |
>60 days |
9.60 TB |
5.19 TB |
3765404 |
54.00% |
>160days |
2.93 TB |
3130797 |
30.52% |
|
institutions/mit |
>60 days |
894.69 GB |
510.66 GB |
78058 |
57.01% |
>160days |
303.60 GB |
67989 |
33.93% |
|
institutions/ucla |
>60 days |
1.44 TB |
911.61 GB |
2770202 |
61.82% |
>160days |
761.95 GB |
2439251 |
51.61% |
|
institutions/iucf |
>60 days |
785.49 GB |
185.14 GB |
99491 |
23.57% |
>160days |
26.44 GB |
36131 |
3.37% |
|
institutions/vecc |
>60 days |
731.06 GB |
401.20 GB |
258056 |
54.88% |
>160days |
270.28 GB |
55105 |
36.94% |
|
institutions/ksu |
>60 days |
647.62 GB |
197.30 GB |
87715 |
30.47% |
>160days |
83.99 GB |
76374 |
12.97% |
|
institutions/emn |
>60 days |
881.67 GB |
80.91 GB |
37272 |
9.18% |
>160days |
36.51 GB |
9139 |
4.14% |
|
institutions/uta |
>60 days |
407.68 GB |
351.52 GB |
20807 |
86.22% |
>160days |
195.66 GB |
13628 |
47.99% |
| Production space [back] | |||||||||
|
/star/data12 |
>60 days |
685.57 GB |
175.32 GB |
13967 |
25.57% |
>160days |
121.34 GB |
10674 |
17.70% |
|
/star/data13 |
>60 days |
1.64 TB |
388.72 GB |
20160 |
23.15% |
>160days |
307.55 GB |
17507 |
18.31% |
|
/star/data14 |
>60 days |
794.53 GB |
231.98 GB |
19797 |
29.20% |
>160days |
158.41 GB |
14020 |
19.90% |
|
/star/data15 |
>60 days |
791.08 GB |
231.74 GB |
16620 |
29.29% |
>160days |
128.60 GB |
11295 |
16.26% |
|
/star/data16 |
>60 days |
1.46 TB |
372.16 GB |
23055 |
24.88% |
>160days |
200.92 GB |
16978 |
13.44% |
|
/star/data17 |
>60 days |
869.25 GB |
229.98 GB |
14589 |
26,46% |
>160days |
128.80 GB |
10447 |
14.82% |
|
/star/data18 |
>60 days |
905.66 GB |
196.12 GB |
14115 |
21.66% |
>160days |
138.78 GB |
11227 |
15.32% |
|
/star/data19 |
>60 days |
696.64 GB |
156.17 GB |
12261 |
22.42% |
>160days |
88.87 GB |
8229 |
12.76% |
|
/star/data20 |
>60 days |
773.98 GB |
188.46 GB |
12299 |
24.35% |
>160days |
88.46 GB |
8298 |
11.39% |
|
/star/data21 |
>60 days |
710.00 GB |
189.90 GB |
12989 |
26.75% |
>160days |
111.88 GB |
9443 |
15.76% |
|
/star/data22 |
>60 days |
706.21 GB |
199.16 GB |
15688 |
28.19% |
>160days |
143.76 GB |
12504 |
20.36% |
|
/star/data24 |
>60 days |
798.54 GB |
213.04 GB |
17424 |
30.17% |
>160days |
151.88 GB |
13661 |
19.02% |
|
/star/data25 |
>60 days |
739.33 GB |
186.02 GB |
13804 |
25.17% |
>160days |
124.57 GB |
10678 |
16.86% |
|
/star/data26 |
>60 days |
798.36 GB |
528.72 GB |
13277 |
66.23% |
>160days |
497.14 GB |
11098 |
62.27% |
|
/star/data27 |
>60 days |
753.46 GB |
191.43 GB |
13667 |
25.36% |
>160days |
106.11 GB |
9768 |
14.08% |
|
/star/data28 |
>60 days |
797.47 GB |
204.35 GB |
13886 |
25.60% |
>160days |
118.36 GB |
9780 |
14.85% |
|
/star/data29 |
>60 days |
782.30 GB |
219.58 GB |
14096 |
28.08% |
>160days |
133.82 GB |
9763 |
17.11% |
|
/star/data30 |
>60 days |
812.72 GB |
122.56 GB |
8139 |
15.08% |
>160days |
61.27 GB |
4771 |
7.54% |
|
/star/data31 |
>60 days |
763.81 GB |
128.72 GB |
9629 |
16.78% |
>160days |
79.06 GB |
6735 |
10.35% |
|
/star/data32 |
>60 days |
1.54 TB |
353.22 GB |
23165 |
22.38% |
>160days |
178.26 GB |
14833 |
11.30% |
|
/star/data33 |
>60 days |
762.93 GB |
148.00 GB |
9974 |
19.42% |
>160days |
27.76 GB |
3957 |
3.64% |
|
/star/data34 |
>60 days |
1.45 TB |
428.74 GB |
26467 |
28.83% |
>160days |
208.23 GB |
15771 |
14.02% |
|
/star/data35 |
>60 days |
1.43 TB |
441.51 GB |
25620 |
30.15% |
>160days |
17.36 GB |
1251 |
1.19% |
|
/star/data36 |
>60 days |
1.42 TB |
476.07 GB |
28960 |
32.74% |
>160days |
256.63 GB |
21073 |
17.65% |
|
/star/data37 |
>60 days |
1.33 TB |
388.87 GB |
26653 |
28.55% |
>160days |
200.03 GB |
16368 |
14.69% |
|
/star/data38 |
>60 days |
1.52 TB |
449.63 GB |
27038 |
28.85% |
>160days |
164.45 GB |
13917 |
10.57% |
|
/star/data39 |
>60 days |
1.47 TB |
446.78 GB |
26317 |
29.63% |
>160days |
150.30 GB |
14513 |
9.98% |
|
/star/data40 |
>60 days |
1.62 TB |
446.26 GB |
22080 |
26.90% |
>160days |
134.60 GB |
10104 |
8.11% |
|
/star/data41 |
>60 days |
1.70 TB |
523.73 GB |
29711 |
30.04% |
>160days |
188.62 GB |
15561 |
10.84% |
|
/star/data42 |
>60 days |
1.56 TB |
409.76 GB |
26833 |
25.65% |
>160days |
140.44GB |
13362 |
8.79% |
|
/star/data43 |
>60 days |
1.68 TB |
434.58 GB |
28622 |
25.26% |
>160days |
213.89 GB |
17479 |
12.43% |
|
/star/data44 |
>60 days |
1.70 TB |
500.49 GB |
28955 |
28.75% |
>160days |
181.79 GB |
15550 |
10.44% |
|
/star/data45 |
>60 days |
1.58 TB |
538.92 GB |
31417 |
33.25% |
>160days |
259.11 GB |
19413 |
16.02% |
|
/star/data46 |
>60 days |
5.34 TB |
1.76 TB |
52450 |
32.96% |
>160days |
737.01 GB |
32405 |
13.48% |
|
/star/data47 |
>60 days |
6.07 TB |
3.14 TB |
74679 |
51.73% |
>160days |
564.87 GB |
23736 |
9.09% |
|
/star/data48 |
>60 days |
5.18 TB |
2.49 TB |
82906 |
48.07% |
>160days |
887.51 GB |
42679 |
16.73% |
|
/star/data53 |
>60 days |
1.34 TB |
492.05 GB |
30129 |
35.86% |
>160days |
248.89 GB |
23693 |
18.14% |
|
/star/data54 |
>60 days |
1.20 TB |
420.97 GB |
28666 |
34.26% |
>160days |
294.70 GB |
22135 |
23.98% |
|
/star/data55 |
>60 days |
759.39 GB |
475.69 GB |
20009 |
62.58% |
>160days |
258.48 GB |
17584 |
34.04% |
IO performance page
Tests
- BlueArc 2 Titan heads, fiber channel mounted over NFS on a farm of Linux 2.4.21-32.0.1.ELsmp #1 SMP
- stargrid03 to data10 Linux stargrid03.rcf.bnl.gov 2.4.20-30.8.legacysmp #1 SMP Fri Feb 20 17:13:00 PST 2004 i686 i686 i386 GNU/Linux to a reserved NFS mounted volume.
- PANASAS file system mounted on a Linux rplay15.rcf.bnl.gov 2.4.20-19.8smp #1 SMP Wed Apr 14 10:50:14 EDT 2004 i686 i686 i386 GNU/Linux.
Consult Panasas web site for more information about their products. This was tested in May 2004 (driver available) - PANASAS file system mounted on a Linux rplay21 2.4.20-19.8smp #1 SMP Mon Dec 29 16:49:59 EST 2003 i686 i686 i386 GNU/Linux.
Consult Panasas web site for more information about their products. This was tested on Dec 30st 2003 (driver version not available). - IDE RAID (SunOS rmine608 5.8 Generic_108528-22 sun4u sparc SUNW,Ultra-4)
- SCSI vs IDE comparison.
SCSI are 36 GB 10 rpm (QUANTUM ATLAS_V_36_SCA).
IDE disks are 40GB 5400 rpm (QUANTUM FIREBALLlct20 40)
on the same dual Pentum III processor machine, 1 GB of RAM, running linux 7.2, kernel 2.4.9-31smp (done on Dec 13 2002)
- Linux Client -> IBM Server tests. comments are in the page (done on Jan 7th 2002)
- MTI performances (done on Nov 17 2001)
- LSI performances (before it died) (done on Nov 6th 2001)
Notes : all keeping in mind that the 8KByte (2^3) tests may not represent the best scanning region ...- Both vendor have very poor write performance, maximum read/write seems to be around 16/47 MB/sec. This result is supported by IOzone.
- Individual IO tests shows similar MTI/LSI results, the LSI seems slightly better (the IO profile is flatter, ther are only little performance degradations depending on file size and/or block size).
- The MTI tests contains serveral Ioperf tables made under different conditions in order to get a detail on the 'best performance' ridge.
Basics
This page will contain results for different IO performance made on the RCF hardware. The performances tests are based on 2 programs
- IOzone : The benchmark generates and measures a variety of file operations. Iozone has been ported to many machines and runs under many operating systems. We used this program to get a quick estimate of the IO profile. I used the -a flag ( automatic mode, full) but reported only a few of the results I found relevant i.e.
- Left side : the Write operations
- Right side: the Read operations
- From top to bottom : Buffered IO, Random IO, un-buffered IO.
- Ioperf is a program I have written myself after great frustrations I had looking at the Bonnie results (Bonnie reports IO performances far higher than what the card can do, even in unbuffered mode, so it is wrong !!). In any cases,
- buffered C-IO (fwrite, fread) are made BUT ensuring that all IO are flushed when the test is done (sync). This was chosen as to be a representative of typical IO usage. However, the read operations may still be affected by buffering in case of NFS transactions between client and server. We recommend to test performances on the local machine.
- Character per character IO tests are displayed as a worst-case-scenario base line.
- random seeks tests are made over the entire file size. This tests the device ability to locate and access data at any place on the partition. Those values also give you an idea of what to expect as fragmentation occurs.
- Each result is tabulated by real time, CPU time (or maximum performance) and %tage efficiency. Note that the ratio (or percentage) may be affected by the system's load. However, all tests were done in no-load mode so the Realtime/CPUtime is in our case a good measure of the system's response.
- Ioperf does/creates a 400000 KB file for its test. That's 18.6 on the IOZone file size axis, a region where IOZone does not provide any results. One has to visually extrapolate ...
Disk IO testing, comparative study 2008
Two test nodes, named eastwood and newman, are configured for testing in summer 2008.
Testing is performed under Scientific Linux 5.1 unless otherwise stated.
See also You do not have access to view this node.
Hardware
The basic hardware specs common to both nodes:
Manufacturer: Penguin Computing
Model: Relion 230
Dual Intel(R) Xeon(TM) CPU 3.06GHz, w/ Hyper-threading
2 GB RAM, PC2100
6 IDE disks, 200GB each, all Western Digital "Caviar" series, model numbers starting with WD2000JB (there are some variations in the sub-model numbers, but I could find no documentation as to the distinctions amongst them). Manufactured in late 2003 or early 2004.
The disks are on two controllers:
--onboard, Intel Corporation 82801CA Ultra ATA Storage Controller with 2 channels
- hda (primary master)
- hdc (secondary master)
- hdd (CD-ROM, secondary slave)
--PCI card, Promise Technology, Inc. PDC20268 (Ultra100 TX2)
- hde (primary master)
- hdf (primary slave)
- hdg (secondary master)
- hdh (secondary slave)
There are some RAID configurations that would not make much sense, such as combining a master and slave from the same channel into an array, beacuse of the inherent limitation of IDE/ATA that the master and slave on a single channel cannot be accessed simultaneously.
Initial testing configuration is as follows:
On eastwood, no RAID is configured, and all drives are independent (other than the IDE master/slave connection). The drives are configured as follows:
- hda is part of a Logical Volume Group and hosts the OS on ext3
- hdc -- ext2
- hde -- ext2
- hdf -- ext2
- hdg -- ext3
- hdh -- ext3
On newman two software RAID arrays are confrigured in addition to the system disk:
- hda is part of a Logical Volume Group and hosts the OS on ext3
- hdc, hde and hdg (all IDE masters) are part of a RAID5 (striped with distributed parity) array, with 256KB stripe size, ext3
- hdf and hdh (both IDE slaves) are part of a RAID0 (striped, no parity) array, with 256KB stripe size, ext3
Additional test possibilities
Here are some additional tests that have occured to me, in no particular order:
- Swap hdc and hdg for instance to see if the poorer performance of eastwood's hdc follows the drive, or sticks with the controller.
- Try adding an additional PCI-X IDE controller. Then the two current slaves could become masters and possibly all be accessible simultaeously, allowing 4 disks in RAID0 or RAID5 while avoiding the Intel controller, which may be inferior.
- Try the "-e" option with IOzone to try to force disk access and reduce memory caching. A good test set is hdh and raid0. (These are done -- results to be posted)
- Try IOzone with 1/2 or even 1/4 of the RAM (1GB or 512MB). (tests with 1 GB RAM are done -- results to be posted)
- Vary the RAID0 stripe size?
- Vary the ext2/ext3 block size.
- Try different ext3 journalling modes (journal (the default), ordered and writeback).
- Filesystems other than ext2/3 (Reiser, JFS, XFS, ?). Support from Redhat for any filesystem other than ext2/3 is essentially non-existent, so any foray down this path will take some extra effort.
- Try running through database benchmarking with multiple clients ("super parallel" access), in the manner of Mike DePhillips's testing of STAR offline database servers.
- Multi-threaded/multi-process testing, possibly with IOzone.
- IOzone has tests for mmap and POSIX async I/O. I don't know if either of these is relevant to any STAR uses.
- Try different I/O elevators (see for instance http://www.redhat.com/magazine/008jun05/features/schedulers/ )
- IOperf - stalled on timing issues.
IOperf
Now trying tests with IOperf
( http://nucwww.chem.sunysb.edu/htbin/software_list.cgi?package=ioperf )
THIS PAGE DOES NOT CONTAIN MEANINGFUL NUMERICAL RESULTS YET!!! THERE ARE AT LEAST TWO PROBLEMS WITH THE IOPERF NUMBERS TO BE RESOLVED (as described below). Once resolved, this page will likely be completely rewritten.
The original IOperf code would not compile:
[root@dh34 ioperf]# make
cc -lm -o Ioperf ioperf.c
ioperf.c: In function 'main':
ioperf.c:133: error: 'CLK_TCK' undeclared (first use in this function)
ioperf.c:133: error: (Each undeclared identifier is reported only once
ioperf.c:133: error: for each function it appears in.)
ioperf.c: In function 'get_timer':
ioperf.c:477: error: 'CLK_TCK' undeclared (first use in this function)
make: *** [Ioperf] Error 1
Comments in /usr/include/time.h and /usr/include/bits/time.h lead me to think that "CLK_TCK" is just an obsolete name for CLOCKS_PER_SEC, though this struck me odd, because ioperf code is also using CLOCKS_PER_SEC for CLK_SCALE.
I modified ioperf.h, changing
# define SCALE CLK_TCK
to
# define SCALE CLOCKS_PER_SEC
and it compiled, but there is clearly a problem with the real timing scale factor (perhaps simply off by 1 million?).
So for now, these "real time" results are obviously not realistic numbers, BUT, they are would probably be correct in relative (ratio) terms -- twice as fast is twice as fast. The CPU % is meaningless for the same reason.
Another limitation (and more important for our purposes) in the "stock" ioperf appears to be a 2GB file size limit. To get around this, I added "-D_FILE_OFFSET_BITS=64" to the CFLAGS line in the makefile. I was able to write a 39GB file after this, but there is an overflow at some point in one or more variables, because the printed filesize was -1989672960 in the standard output. (Even at 8GB, the file size overflow appears). While the html output has a different filesize that the standard output, it too appears to be incorrect above a certain point. For instance, look at the third example below, in which the file size should be 8GB, but is instead only ~4GB.
With these two oddities (wrong real times and file sizes), I don't see much point in generating a lot of results at this time.
JUNE 27 update. With some wanton changes of int, long int and size_t to 'long long int' in declarations and casting of the ioperf code, I was able to get correct file sizes everywhere (?) for a test with 8GB file size. This still leaves the timing issue unresolved, so the actual rates are still not meaningful, I don't think, but now perhaps the results will at least be able to be contrasted amongst the different filesystems for relative differences.
On to some results:
Ioperf -l 5 -s 100 -n 100000 -html -w -m eastwood-hda:
| Block IO | Character | Random | ||||||||||||||
| fwrite | fread | putc | getc | seek | ||||||||||||
| Machine | KB | KB/sec Real | KB/sec CPU | %CPU | KB/sec Real | KB/sec CPU | %CPU | KB/sec Real | KB/sec CPU | %CPU | KB/sec Real | KB/sec CPU | %CPU | KB/sec Real | KB/sec CPU | %CPU |
| eastwood-hda | 400000 | 372786579.68 | 141342.76 | 263746.51 | 2325581395.35 | 232558.14 | 1000000.00 | 275292498.28 | 40444.89 | 680660.70 | 507614213.20 | 50697.08 | 1001269.04 | 23418764.99 | 2341.88 | 1000000.00 |
| eastwood-hda | 400000 | 376470588.24 | 141843.97 | 265428.39 | 2325581395.35 | 233236.15 | 997093.02 | 273130761.35 | 40120.36 | 680777.51 | 507292327.20 | 50664.98 | 1001268.23 | 23418764.99 | 2344.69 | 998800.96 |
| eastwood-hda | 400000 | 377477194.09 | 142180.09 | 265503.81 | 2325581395.35 | 233009.71 | 998062.02 | 273473108.48 | 40053.40 | 682775.59 | 502512562.81 | 50209.21 | 1000845.49 | 23344123.51 | 2336.27 | 999200.64 |
| eastwood-hda | 400000 | 377982518.31 | 142348.75 | 265541.52 | 2325581395.35 | 232558.14 | 1000000.00 | 273224043.72 | 40000.00 | 683062.62 | 500469189.87 | 50031.27 | 1000325.09 | 23320895.52 | 2332.09 | 999995.72 |
| eastwood-hda | 400000 | 377073906.49 | 142450.14 | 264720.80 | 2322880371.66 | 232558.14 | 998843.93 | 273410799.73 | 39952.06 | 684352.77 | 499625281.04 | 49975.01 | 999763.80 | 23306980.91 | 2329.59 | 1000472.76 |
Ioperf -l 5 -s 100 -n 100000 -html -w -m newman-hda:
| Block IO | Character | Random | ||||||||||||||
| fwrite | fread | putc | getc | seek | ||||||||||||
| Machine | KB | KB/sec Real | KB/sec CPU | %CPU | KB/sec Real | KB/sec CPU | %CPU | KB/sec Real | KB/sec CPU | %CPU | KB/sec Real | KB/sec CPU | %CPU | KB/sec Real | KB/sec CPU | %CPU |
| newman-hda | 400000 | 349650349.65 | 140350.88 | 249125.87 | 2325581395.35 | 232558.14 | 1000000.00 | 268456375.84 | 41025.64 | 654362.42 | 506970849.18 | 50697.08 | 1000000.00 | 23141291.47 | 2308.66 | 1002369.67 |
| newman-hda | 400000 | 351185250.22 | 141843.97 | 247578.81 | 2325581395.35 | 232558.14 | 1000000.00 | 263504611.33 | 40962.62 | 643481.34 | 506970849.18 | 50729.23 | 999366.29 | 23086583.92 | 2305.93 | 1001184.83 |
| newman-hda | 400000 | 355977454.76 | 141843.97 | 251054.37 | 2330097087.38 | 233009.71 | 1000000.00 | 259852750.11 | 41025.64 | 633791.60 | 507185122.57 | 50718.51 | 1000000.54 | 23086583.92 | 2308.66 | 1000001.87 |
| newman-hda | 400000 | 353904003.54 | 142095.91 | 249160.34 | 2325581395.35 | 232558.14 | 1000000.00 | 261865793.78 | 41025.64 | 638715.02 | 507292327.20 | 50729.23 | 1000000.40 | 23086583.92 | 2307.29 | 1000592.42 |
| newman-hda | 400000 | 354421407.05 | 142146.41 | 249417.40 | 2322880371.66 | 232288.04 | 1000000.00 | 263608804.53 | 41017.23 | 643131.80 | 507356671.74 | 50748.54 | 999746.51 | 23097504.73 | 2307.57 | 1000947.87 |
(All this shows is that the two machines perform almost identically, as expected,since they are the same hardware.)
Ioperf -l 5 -s 100 -n 2000000 -html -w -m eastwood-hda
| Block IO | Character | Random | ||||||||||||||
| fwrite | fread | putc | getc | seek | ||||||||||||
| Machine | KB | KB/sec Real | KB/sec CPU | %CPU | KB/sec Real | KB/sec CPU | %CPU | KB/sec Real | KB/sec CPU | %CPU | KB/sec Real | KB/sec CPU | %CPU | KB/sec Real | KB/sec CPU | %CPU |
| eastwood-hda | 3805696 | 185888536.12 | 64921.46 | 286328.33 | 193546050.96 | 103697.44 | 186644.97 | 177961000.70 | 19129.87 | 930278.23 | 195073863.35 | 23687.89 | 823517.35 | 11054431.89 | 1105.44 | 1000000.00 |
| eastwood-hda | 3805696 | 82291879.40 | 29158.53 | 282278.70 | 86875854.88 | 46547.99 | 186637.18 | 80702092.49 | 8594.50 | 939085.77 | 87483051.72 | 10636.85 | 822453.78 | 11054431.89 | 1105.31 | 1000118.98 |
| eastwood-hda | 3805696 | 48867732.72 | 17233.71 | 283610.19 | 51358024.69 | 27474.19 | 186932.21 | 47592167.71 | 5070.20 | 938725.47 | 51647935.60 | 6283.02 | 822025.09 | 11033428.33 | 1103.21 | 1000118.75 |
| eastwood-hda | 3805696 | 32029118.79 | 11267.06 | 284316.11 | 33571635.68 | 17943.67 | 187094.82 | 31230001.18 | 3316.26 | 941804.92 | 33758817.36 | 4104.79 | 822425.98 | 11039327.51 | 1103.87 | 1000059.31 |
| eastwood-hda | 3805696 | 21913097.65 | 7686.38 | 285134.41 | 22880094.31 | 12236.46 | 186983.55 | 21257190.34 | 2260.60 | 940410.63 | 23025180.52 | 2798.51 | 822765.06 | 11040245.73 | 1103.97 | 1000047.45 |
No explanation why the Block IO and character results decreased so dramatically with each iteration... (FWIW, according to the ioperf man page, each iteration is an average of the current result with all previous results, so it would seem that the first iteration was much faster than subsequent iterations for some reason...) This may be a side effect of the incorrect filesize, since there is an overflowed variable going into the calculations.
June 27 update: at least the file sizes are now as expected with an 8GB file after some changes to make variables long long ints:
| Block IO | Character | Random | ||||||||||||||
| fwrite | fread | putc | getc | seek | ||||||||||||
| Machine | KB | KB/sec Real | KB/sec CPU | %CPU | KB/sec Real | KB/sec CPU | %CPU | KB/sec Real | KB/sec CPU | %CPU | KB/sec Real | KB/sec CPU | %CPU | KB/sec Real | KB/sec CPU | %CPU |
| newman-hda | 8000000 | 389863547.76 | 123057.99 | 316812.87 | 516295579.22 | 171710.67 | 300677.64 | 367073506.47 | 39414.69 | 931311.37 | 409563303.13 | 49200.49 | 832437.41 | 171026707.53 | 17102.67 | 1000000.00 |
IOzone tests
Aug 14 update - I am running tests on new hardware with much (?) better hardware than was used in the tests below. I will probably put the results in a different location (search for R610 in drupal?)
First, a note -- There is some duplication in testing, because I reran all the original tests (which did not include small file operations on large files) using full coverage in the second test round. For what it's worth, I have not seen any surprises in this region.
Attached Excel files include test results for the test filesystems, using the IOzone's default test suite with files up to 4GB. All test results are plotted in the attached files, however there is no attempt to make the vertical scales them identical, so be sure to check the vertical scales before making any comparisons! I may attempt to add a plotting routine that will find the maximum within all test results (eg, maximum of all Writer tests, maximum of all Reader tests, etc.) and plot all the individual test results with the same maximum (ie. all Writer graphs would have the same vertical scale and coloring), so the graphs can be directly compared without having to look at the vertical scaling, but this is a bit more work.
Typical commands are:
- /opt/iozone/bin/iozone -Ra -g 4G -b eastwood-hda-iozone-4G.xls
- /opt/iozone/bin/iozone -Raz -g 4G -b eastwood-hda-iozone-full-4G.xls
- /opt/iozone/bin/iozone -Raz -g 4G -e -b eastwood-hda-with_flush-iozone-full-4G.xls
The meanings of the file name components:
"eastwood" or "newman" are the hostanmes
"hdX" or "raidX" are the device names. hda, hdg, hdh, raid0 and raid5 have ext3 filesystems, while hdc, hde and hdf have ext2.
"full" in the file name indicates test coverage throughout the test range. If "full" isn't in the file name, then the region of small operations on large file sizes was not tested.
"with_flush" indicates -e was used.
"4G" means the maximum file size tested.
"1GBRAM" means the system's RAM was reduced from 2GB to 1GB during the test. (NB -- these tests are underway as I write this.)
I have tried to make performance comparisons one by one between various filesystems and I'll describe some findings of the individual comparisons, followed by some summary thoughts. <Need to update this section more carefully>
Comparing ext3 with ext2:
eg, eastwood's hda (ext3/system disk) vs eastwood's hdc (ext2) or
eastwood's hde (ext2) vs eastwood's hdg (ext3) or
eastwood's hdf (ext2) vs eastwood's hdh (ext3):
Read performance is essentially indistinguishable, with a few anomolous variations here and there.
Writing to ext2 is almost universally faster than writing to ext3, which is to be expected because of the overhead to keep the journal on ext3. Somewhat surprising to me, in writing small files (in which most or all of the work is done in memory and flushed to disk later), ext2 writes could be 1.5-2.5 times faster than ext3 writes. As the file size gets larger (exceeding the system's available RAM for caching/buffering), ext2's writing advantage diminishes to only about ~15-25% for random writes and further down to about 10% for linear writes. Writing a bunch of small chunks to a large file is less efficient, especially when a journal is involved, than writing the same data in fewer large chunks When issuing a lot of write commands, ext2 will gain more over ext3.
Comparing Master to Slave on a single IDE channel:
eg. eastwood's hde (a "master" with ext2) vs eastwood's hdf (a "slave" with ext2) or
eastwood's hdg ("master"/ext3) vs eastwood's hdh ("slave"/ext3):
hde vs hdf is essentially indistinguishable in all tests. This is as expected -- the "master" and "slave" designations are not really meaningful terms anymore (and in fact, the terms are no longer used in recent ATA specifications). hdg has a slight (~5%) edge over hdh in most disk-bound operations -- I'm going to dismiss this as insignificant for the time being.
Comparing eastwood to newman:
eg. eastwood's hda vs newman's hda:
Since the machines are identical (or very, very nearly so), little or no variation is expected, but it doesn't seem to have worked out that way... For the large file sizes (disk-bound operations), write performances are indistinguishable (if anything, eastwood has a slight edge), but for some reason reads on newman were consistently faster than on eastwood, by 20-25% (maxing out at ~55MB/sec compared to ~45MB/sec). I don't have any explanation for this. In fact, on eastwood, writing was faster than reading in comparable tests! This is certainly a surprising result...
Comparing Controller to Controller on eastwood:
eg., eastwood's hda (Intel 82801CA controller onboard) vs. eastwood's hdg (Promise Technology PDC20268 PCI card) or
eastwood's hdc (Intel 82801CA controller onboard) vs eastwood's hde (Promise Technology PDC20268 PCI card) :
(caveats about this comparison -- hda is a system disk (/), so may have some slight contention with system operations during the test, and the disks on the two different controllers are not exactly the same models -- the major model numbers are all the same, but the minor revision numbers are different. I couldn't find any documentation about the differences between the minor versions.)
The disks on the Promise Controller are consistently faster than those on the Intel controller. Typical performance comparison is 40-50MB/sec on the Intel controller vs 60-70 MB/sec on the Promise controller. To investigate if this is a controller difference, or a difference in the minor disk versions, I could swap some disks around and see if the performance stays with the Controller, or follows the disk around. If you read this and would like to see this tried, let me know, otherwise I won't give it a high priority. :-)
Comparing single disk to RAID0 (with two disks):
eg., eastwood's hdh vs newman's raid0 (Why cross machines instead of comparing newman-hda to newman-raid0? Because as we saw on eastwood (above), the drives on the Intel controller are consistently slower than the drives on the Promise controller. The RAID0 array on newman consists of two drives on the Promise controller, so it seems better to compare it to eastwood drives on the Promise controller, rather than a drive on the Intel controller on newman.)
The RAID0 array is 50-100% faster in almost all cases, pretty much as one would expect, when both disks are able to be issued commands simultaneously. The overhead of software RAID in this case appears negligible. Where the advantage is least is when the RAIDed disks are not necessarily accessible simultaneously, because subsequent accesses may be on a single drive. An extreme example of this appears to be in the stride-read results using small accesses, where the single disk is actually faster. (Stride reading is reading a chunk of size X, seeking ahead Y bytes, reading X bytes, seeking Y bytes again and repeating.) For certain values of X and Y (and depending on the RAID stripe size), reads may all occur on the same disk, negating the RAID0 advantage (or perhaps even giving the single disk the edge, may be the case for a couple of these test results, though the ouperformance of the single disk in these two cases is beyond any explanation I can come up with. The IOzone documentation does not explain the relation ship between the "chunk size" variable and X and Y.
Comparing RAID5 (with three disks) to the rest:
The RAID5 array on newman includes disks on both controllers (specifically hdc on the Intel controller and hde and hdg on the Promise controller) and is also a mixture of minor disk versions, so there's no other filesystem to compare it to that is "fair". The hdc drive (or Intel controller) might be "crippling" it, or at least acting as a bottleneck. Compared to eastwood's hdg, the overall performance is relatively close, with the RAID5 array generally having an edge on reading, but falling behind in writing. I'm unwilling to try to draw any conclusions from these RAID5 test results, and I doubt there is any configuration of disks possible with this particular hardware to form a "good" RAID5 array. Ideally we should have three (or more) SCSI or SATA drives on a fast PCI (-X, -E, whatever) bus, which is the sort of thing we'd have with any recent server hardware.
Can we do anything else with IOzone and this hardware?
We can look a bit at the effect(s) of parallel/multi-threaded applications on performance. I have run some tests with multiple threads accessing the disk, which is likely frequently the case with STAR offline database servers. Some analysis will follow shortly...
Simple tests -- hdparm and dd
Starting with the basics, hdparm:
Five samples of the following:
On eastwood:
- hdparm -t -T /dev/hd{a,c,e,f,g,h}1
- hdparm -t -T /dev/mapper/VolGroup00-LogVol00 (/ on hda)
On newman:
- hdparm -t -T /dev/md{0,1}
- hdparm -t -T /dev/mapper/VolGroup00-LogVol00 (/ on hda)
| Timing cached reads (MB/s) | Timing buffered disk reads (MB/s) |
||
| eastwood - LV on hda | 1162.59 +/- 3.84 | 54.39 +/- 0.42 |
|
| eastwood - hda1 | 1167.32 +/- 2.31 | 54.55 +/- 0.21 | |
| eastwood - hdc1 | 1168.34 +/- 4.75 | 35.95 +/- 0.68 | |
| eastwood - hdc1 *** | 1027.43 +/- 4.89 | 42.65 +/- 0.39 |
*** -- for this test, I moved this disk to the Promise controller in position hde1 to see if it would improve. While there appears to be improvement in this test, the IOzone results show no improvement. Even with this "improved" hdparm result, it is clear this disk really is inferior for some reason. |
| eastwood - hde1 | 1167.39 +/- 3.41 | 57.5 +/- 0.04 | |
| eastwood - hdf1 | 1167.72 +/- 2.03 | 59.34 +/- 0.26 | |
| eastwood - hdg1 | 1166.46 +/- 2.63 | 57.27 +/- 0.09 | |
| eastwood - hdh1 | 1166.20 +/- 3.59 | 54.36 +/- 0.10 | |
| newman - LV on hda | 1180.26 +/- 10.32 | 51.70 +/- 1.51 | |
| newman - md0 (RAID5) | 1211.01 +/- 43.51 | 66.67 +/- 0.30 | |
| newman - md1 (RAID0) | 1197.65 +/- 15.77 | 113.67 +/- 0.45 |
Items of note:
- The Logical Volumes on the two nodes (hda in both cases) are essentially identical (as expected).
- hdc on eastwood is significantly slower for some reason (not expected). If this holds out in other tests and is true on newman, it will skew the RAID tests, since hdc is used in the RAID5 array on newman. (I originally hypothesized that this was a feature/flaw of the onboard Intel controller, since the masters and slaves on the Promise controller are indistinguishable, but after further testing (dd, IOzone and some hardware swapping), I have concluded that this disk (and likely all the model "-00FUA0" are simply not up to par with the "-00GVA0" models.))
- Other than hdc, the individual disks on eastwood all perform within a few percent of each other.
- ext2 and ext3 are essentially identical (as expected for reading)
- The RAID arrays on newman are noticably faster than individual disks (as expected for reading stripes in parallel). The RAID5 array is not nearly as fast though as the RAID0 array. This could be the "hdc" effect, in which case results are not really apples-to-apples comparisons.
On to dd:
Here are the test commands, using 1GB write/read and then 10GB write/read:
time dd if=/dev/zero of=/$drive/test.zero bs=1024 count=1000000
time dd of=/dev/zero if=/$drive/test.zero bs=1024 count=1000000
time dd if=/dev/zero of=/$drive/test.zero bs=1024 count=10000000
time dd of=/dev/zero if=/$drive/test.zero bs=1024 count=10000000
This sequence was run once on eastwood and five times on newman. (hda on eastwood was tested twice (by accident, but with surprisingly different results in the 10GB tests)). This is essentially an idealized test, the results of which are unlikely to be matched in a production system -- during this test there should be little or no rotational or seek latency (because the disks are mostly empty and the reading and writing proceeds sequentially, rather than randomly, plus there should be no contention from multiple processes.)
| DRIVE | OPERATION | REAL (s) | USER | SYS | dd TIME | dd RATE (MB/s) |
| eastwood - hda | 1GB write | 9.848 | 0.436 | 7.947 | 9.84596 | 104 |
| eastwood - hda | 1GB read | 2.426 | 0.401 | 2.026 | 2.42409 | 422 |
| eastwood - hda | 10GB write | 287.458 | 5.170 | 88.529 | 286.89 | 35.7 |
| eastwood - hda | 10GB read | 289.671 | 3.647 | 24.788 | 289.328 | 35.4 |
| eastwood - hda | 1GB write | 12.032 | 0.512 | 8.462 | 11.0798 | 92.4 |
| eastwood - hda | 1GB read | 2.734 | 0.402 | 2.333 | 2.73233 | 375 |
| eastwood - hda | 10GB write | 203.015 | 5.146 | 89.103 | 202.397 | 50.6 |
| eastwood - hda | 10GB read | 192.057 | 4.195 | 24.033 | 191.866 | 53.4 |
| eastwood - hdc | 1GB write | 6.242 | 0.386 | 4.273 | 6.22181 | 165 |
| eastwood - hdc | 1GB read | 2.695 | 0.434 | 2.262 | 2.69342 | 380 |
| eastwood - hdc | 10GB write | 232.640 | 3.874 | 44.764 | 232.588 | 44 |
| eastwood - hdc | 10GB read | 253.590 | 3.583 | 26.264 | 253.474 | 40.4 |
| eastwood - hdc (moved to Promise controller)*** | 1GB write | 4.594±0.011 | 0.4582±0.009 | 4.136±0.015 | 4.592±0.011 | 223±0.7 |
| eastwood - hdc (moved to Promise controller)*** | 1GB read | 2.604±0.010 | 0.4512±0.015 | 2.154±0.015 | 2.602±0.010 | 393.4±1.5 |
| eastwood - hdc (moved to Promise controller)*** | 10GB write | 231.193±0.923 | 4.3206±0.095 | 45.051±0.144 | 231.146±0.907 | 44.28±0.16 |
| eastwood - hdc (moved to Promise controller)*** | 10GB read | 222.119±0.458 | 3.758±0.048 | 26.514±0.724 | 222.074±0.451 | 46.14±0.09 |
| eastwood - hde | 1GB write | 5.920 | 0.377 | 4.295 | 5.86033 | 175 |
| eastwood - hde | 1GB read | 2.680 | 0.415 | 2.266 | 2.67825 | 382 |
| eastwood - hde | 10GB write | 185.871 | 4.072 | 44.518 | 185.808 | 55.1 |
| eastwood - hde | 10GB read | 192.924 | 3.648 | 25.640 | 192.841 | 53.1 |
| eastwood - hdf | 1GB write | 5.864 | 0.395 | 4.293 | 5.8289 | 176 |
| eastwood - hdf | 1GB read | 2.691 | 0.401 | 2.290 | 2.68856 | 381 |
| eastwood - hdf | 10GB write | 174.073 | 3.899 | 44.818 | 174.004 | 58.8 |
| eastwood - hdf | 10GB read | 282.014 | 3.847 | 27.576 | 281.878 | 36.3 |
| eastwood - hdg | 1GB write | 11.149 | 0.489 | 8.396 | 11.1013 | 92.2 |
| eastwood - hdg | 1GB read | 2.721 | 0.440 | 2.281 | 2.71868 | 377 |
| eastwood - hdg | 10GB write | 181.620 | 5.316 | 87.690 | 181.573 | 56.4 |
| eastwood - hdg | 10GB read | 183.700 | 3.880 | 24.359 | 183.613 | 55.8 |
| eastwood - hdh | 1GB write | 10.714 | 0.536 | 8.175 | 10.6598 | 96.1 |
| eastwood - hdh | 1GB read | 2.710 | 0.427 | 2.284 | 2.7075 | 378 |
| eastwood - hdh | 10GB write | 190.202 | 5.180 | 87.511 | 190.156 | 53.9 |
| eastwood - hdh | 10GB write | 194.078 | 4.013 | 24.908 | 194.012 | 52.8 |
| newman - hda | 1GB write | 10.670±1.308 | 0.504±0.026 | 8.242±0.065 | 10.628±1.281 | 97.6 ±12.99 |
| newman - hda | 1GB read | 3.582±1.222 | 0.440±0.012 | 2.281±0.041 | 2.720±0.043 | 376.6 ±6.0 |
| newman - hda | 10GB write | 269.355±5.300 | 5.173±0.131 | 88.529±0.373 | 268.738±5.294 | 38.1 ±0.7 |
| newman - hda | 10GB read | 211.516±4.548 | 4.331±0.263 | 24.237±0.281 | 211.124±1.035 | 48.5 ±1.0 |
| newman - raid0 | 1GB write | 10.012±0.459 | 0.525±0.029 | 8.605±0.128 | 9.972±0.453 | 102.9 ±4.6 |
| newman - raid0 | 1GB read | 2.764±0.029 | 0.426±0.020 | 2.338±0.043 | 2.762±0.029 | 370.8 ±3.7 |
| newman - raid0 | 10GB write | 123.691±3.427 | 5.130±0.378 | 86.677±0.700 | 123.636±3.427 | 82.9 ± 2.4 |
| newman - raid0 | 10GB read | 88.485±1.196 | 3.969±0.198 | 25.252±0.263 | 88.415±1.180 | 115.8 ±1.5 |
| newman - raid5 | 1GB write | 9.701±0.158 | 0.535±0.010 | 8.923±0.070 | 9.693±0.156 | 105.6 ±1.7 |
| newman - raid5 | 1GB read | 2.974±0.103 | 0.439±0.029 | 2.535±0.115 | 2.971±0.104 | 345.0 ±12.2 |
| newman - raid5 | 10GB write | 205.112±2.087 | 5.692±0.106 | 100.492±0.552 | 205.090±2.068 | 49.9 ±0.5 |
| newman - raid5 | 10GB read | 156.661±0.334 | 4.528±0.343 | 38.091±1.381 | 156.623±0.347 | 65.4 ±0.2 |
Observations:
- 1GB reads are likely dominated by file caching in RAM, since the file had just been written. 1GB writes may be faster than disk I/O because some of the writes may have only been buffered in RAM rather than actually written to disk at the end of the dd command.
- We see again that hdc is not able to perform as well as the drives on the Promise Controller (hde and up). Based on the results and the IOzone results after switching it to the Promise controller, the conclusion is that this drive is not up to par. An open question is whether this applies to all the "-00FUA0" model drives or just this one.
- The discrepancy between the first two hda tests on eastwood is disturbing, and may be worth further testing.
- Eastwood's hdf (ext2) 10GB read is surprisingly low. Perhaps this whole test suite should be run several more times to average out possible aberations.
- From these results and the hdparm, it appears uncontested single drives max out at about 55-60 MB/sec for both reads and writes, while RAID0 is roughly twice as fast. The RAID5 results are not encouraging, but this may be affected by the presence of hdc in the array.
Summary thoughts
Some conclusions and general suggestions, some based on the data, some on general principles:
1. RAID0 can significantly improve performance over a single drive, if it isn't bottlenecked by some other limitation of the hardware. Of course, for X drives in the array, it is X times more likely to suffer a failure than a single drive. From the test results so far, not much can be said about RAID5. On principle however, RAID5 should outperform bare drives and be a bit worse than RAID0. Like RAID0, it should improve as more drives are added (within reason).
2. The limitations of P-ATA/IDE drives and controllers are something to watch out for when planning drive layouts. (Fortunately, IDE is
obsolete at this point, so this is unlikely to be a factor in future purchases.)
3. Those filesystems that will be accessed the most should be put on disks in such a way as to allow simultaneous access if at all possible.
In the case of STAR database servers, /tmp (or wherever temp space is directed to), swap space and the database files (and if possible, system
files) should all be on individual drives (and in the case of IDE drives, on separate channels). (Of course, if servers are having to go
into swap space at all, then performance is already suffering, and more RAM would probably help more than anything else.)
4. For the STAR database server slaves, if they are using tmp space (whether /tmp or redirected somewhere else), then as is the case with using swap space, more RAM would likely help, but to gain a bit in writing to the temp space, make it ext2 rather than ext3, whether RAIDed or not. Presumably it matters not if the filesystem gets corrupted during a crash -- at worst, just reformat it. It is after all, only temp space...
Tools
A few tools and middleware and deployed on our nodes for monitoring, sanity or integraty checking purposes. We will describe here the basic setup of some of those with hope it will ease installation on your end.
Ganglia monitoring system
Introduction
Ganglia is a resource information gathering tools and a monitoring system in general. Ganglia was designed to be scalable but there are a few tips and tricks you may want to know and/or follow for a smooth deployment on your cluster. This page is meant to provide such help. Ganglia packages are available from http://ganglia.sourceforge.net/.
Note first that the BNL install of this tool is based on version 3.5.0 and so are the instructions below. It is likely you will find a copy of the package in the form of a Gzip TAR archive in the /afs/rhic.bnl.gov/star/common/ tree (search for -name 'ganglia*')where miscellaneous packages are placed for setting up our environment.
Components - basics
First of all, grab the package from source force. The packages comes in three parts
A monitor core component which include client only (gmond) and collector(gmetad).
rrdtools - this needs to be installed ONLY on the node on which you will deploy the Ganglia collector gmetad.
Note that gmetad will be build only if a version of the rrdtools is installed on the system. There is NO need to start multiple collectors. The decision of if a gmetad has to be deployed or not is only a logical structure decision. For example, grouping all of your compute nodes together (one gmetad running on a chosen node) could be one choice, all of your generic servers together (db and other service/servers including your Web-Server) could be another choice. At the end, if this information has to be useful, you have to create that logical separation right away. Especially, the Compute nodes should be together and this group should NOT include processors and/or nodes where no user jobs will run. If your farm is logically separated in sub-cluster or resources allocated to different groups, I would suggest to create as many categories as necessary to re-create this logical sub-division of CPU resources.Ganglia Web front-end - this is ONLY needed on the web front-end. Usually, there would be one such deployment per cluster (but you may also deploy on many nodes to create redundancies).
Each package is very straight forward and unless otherwise specified, use the usual software build/install procedure
% ./configure
% make
% make install
I won't say anything here ... You chose to install the packages wherever you see fit for your cluster providing you take notes of a few aspects of changing the default location for installs.
Some installation details
Collector / gmetad & rrdtools
I would first install the Ganglia collector(s). It was noted already how to decide where a collector needs to be deployed. At BNL, we have a few; one of them is running on the web server where the web front-end is deployed, creating a "server" category (see below) and one running on a dedicated node collecting information about the Analysis and Reconstruction farm. To install gmetad, do this
Install first rrdtools on all nodes which will do the data collection.
This should not be more that our Web server in the current offline STAR deployment.
Note from the 3.5.0: unlike the previous version of ganglia, version 3.x+ adds a dependency in libart.
The installation could be confusing as default locations are assumed and the recommendation is to do the following:% ./configure --prefix=/usr --disable-tcl ^_ because ganglia will be a pain otherwise ^_ because we don't care of tcl ^_ pain <=> because libart installed in /usr/local by default but ganglia will look into /usr (bummer!)Install the core monitor package. Note that gmetad program is installed during the 'make install' process.
Create a round-robin database (rrd) file or rrds file.
I used a pseudo-device for the RRD database. This greatly improve Ganglia's efficiency as the IO is made at OS level to a single file which in terns, do not make the machine to slow down under intensive IO (it may).The file was created using
% dd if/dev/zero of=/home/var/ganglia/rrds.img bs=1024 count=262144
(count is proportional to the size you need ; this is for a 256 MB file which is plenty)% mke2fs -F /home/var/ganglia/rrds.img % mkdir /var/lib/ganglia/rrds % chown -R nobody /var/lib/ganglia/rrds
The mount in fstab looks like
/home/var/ganglia/rrds.img /var/lib/ganglia/rrds auto looop 0 0
Install the start up files. On Linux, it goes something like this
% cp ./gmetad/gmetad /etc/rc.d/init.d/gmetad
% chkconfig --add  gmetad
% chkconfig --list gmetad
gmetad   0:off   1:off  2:on  3:on  4:on  5:on  6:off
Copy the default configuration file
% cp gmetad.conf /etc/
Adjust your gmetad.conf according to your need. Little needs to be done so, don't be too inventive as a start and leave most of the values as default. A few things you MUST change or check
trusted_host should be 127.0.0.1 if you install the collector on a node also running the web front-end. Note that because this is configurable, you do not necessarily need to have gmetad running on the Web server. It can be a totally dedicated node for monitoring purposes only. Trusted host would have to be set to the host IP which will however connect to the gmetad service for pulling the information out and displaying them on the web pages. trusted_host is also used to allow other gmetad to get the information (chain or proxy like structure). This allows for a tree structure and aggregation of information.
rrd_rootdir. According to our example, this should be /var/lib/ganglia/rrds
data_source: it has to have a name your CPU will be grouped under. At BNL, we have
data_source "STAR_RCF_Servers" 60 localhost
data_source "STAR CAS Linux Cluster" 60 ganglia.rcf.bnl.gov:8651
There can be as many data_source as "groups" to be displayed on your page. There are all of the format $IP{:$PORT } (port is optional) ; the syntax localhost indicates to gmetad that it has to grab the information from a local service i.e. a gmond process running locally. The second syntax is a reference to a remote ganglia collector. In this case, the name "STAR CAS Linux Cluster" has little importance and will be ignored. That connection alone in fact could lead to displaying several groups by itself.grid_name: a name you want to give to your groups. At BNL, we set this to "STAR Computing Resources" for the total aggregate of information.
To see how this configuration lead to an actual real structure, consult our BNL Ganglia pages. It will become more obvious.
Web front-end
Now, deploy the web front-end on your web-server Just unpack the package and move the entire tree to a place were it can be accessed on your web server. For example
% mv we /var/www/html/Ganglia-3.0.5
% cd /var/www/html/
% rm -f Ganglia && ln -s Ganglia-3.0.5 ./Ganglia
You should have this in place but it won't show anything until you get gmetad started and collecting. Before that, some adjustments need to be done. Note that for an update of the Web front-end, only the web directory need installing (so don't get over-zeleous replacing everything for a minor version correction).In the web front-end directory, you will find a file named php.conf . If you have installed the RRD tools elsewhere than the default location, you may want to modify it. The value should be something like this for a /usr/local installation
define("RRDTOOL","/usr/local/bin/rrdtool");You will have to make a few modifications to your PHP installation in case of a large cluster. This is done in /etc/php.ini. Two settings need adjustments
memory_limit = 16M
post_max_size = 16M
You should this only if the pages do not display or give an error about memory. The default values are 8 MB of memory which is little for a 400 nodes+ cluster.You can now start gmetad
% /etc/rc.d/init.d/gmetad start
Obviously, it won't be exciting until you actually deploy the monitoring daemon gmond.
Client / gmond
You are now ready to deploy gmond (and start it) on all the nodes in your cluster as defined by your logical groupings. You have to install the monitor core component but NOT the rrdtools. When installed, do the following
Usual install
% ./configure
% make
% make install
Copy the startup file and add the service (Linux example)
% cp ./gmond/gmond.init /etc/rc.d/init.d/gmond
% chkconfig --add gmond
% chkconfig --list gmond
gmond 0:off 	1:off  2:on  3:on  4:on  5:on  6:off
Copy the configuration file
% cp ./gmond/gmond.conf /etc/Note that what I did is to create one gmond.conf (one common configuration per group is what you need, they should be different across groups) and then, pulled the appropriate configuration file on all the nodes. A few things to check in this configuration fileThe block named cluster defines some parameters associated to the logical groupin you will be using
The field name MUST be set uniquely per group of nodes. For example
name = "STAR_RCF_Servers"
The field owner seems to have no effect. Do not worry too much about it although we DO set it at BNL as
owner = "RHIC/STAR"The next blocks of importance are udp_send_channel and udp_recv_channel
mcast_join is VERY important. mcast_join will tell Ganglia how to broadcast the information on the network. At BNL, I suggested the use a non-ambiguous yet unique set of number allowing to differentiate research groups or sub-groups within the department (so we would not sen information to each other). While this was in the old times of lose firewall/routing settings, the rule is good to keep and the convention I proposed was to use 239.2.$SUBNET.00 to those who are using Ganglia.
For the 88 STAR subnet, this would equate to
mcast_join = "239.2.88.00"
In udp_recv_channel, also use
bind = "239.2.88.00"
In those two blocks, ttl is another important parameter and should NOT be greater than 1 if your collectors and all your nodes are on the same network and/or behind the same router. TTL is decreased at each router boundary. If you increase this value, you will create useless network traffic (to flood the network if routers/switches do not drop BCAST).
ttl = "1"
In principle, you are done and ready to start
% /etc/rc.d/init.d/gmond start
Immediately after starting gmond, and providing you do have gmetad running, you should see the node appear on your web page. Note that all gmond collect information from each others (via multicast). The one running on your Web-server (if you have one) makes no difference. This explains our data_source entry to localhost.
Other Notes
Note again the syntax for data_source: you may specify several (redundant) gmond $IP:$PORT references for a given group.
- After you have gmond installed, you should be able to telnet to the gmond port (% telnet localhost 8649) and get a dump of the matrix. If the matrix comes empty but you have a header and preamble, likely multi-casting is not functional. You can then try unicast by having the following lines in gmond.conf :
....

udp_send_channel {
  host = localhost
  port = 8649
}

/* You can specify as many udp_recv_channels as you like as well. */
udp_recv_channel {
  port = 8649
}
Then try to telnet again. If this time you get the matrix, you could be certain multi-casting is blocked on your node (revert to multi-cast setup and use the next tip).
- If you are running a host firewall such as ipables, you will need to add lines like the below to your configuration to make sure the BCAST pass through
-A INPUT -p udp -m udp -d 239.2.88.0 --dport 8649 -j ACCEPT
-A INPUT -p igmp -j ACCEPT gmetric: you may add new matrices (customized) using the gmetric program. This could be useful to monitor extraneous features not covered by gmond. When you add or remove a matrix, you need to add it consistently to all nodes. Removing a matrix (or stopping it) on a few nodes DOES NOT make the graph associated to it disappear. In fact, you will have to go into the rrd database and physically remove the structure pertinent to a new matrix to have it gone from your web front-end regardless of if you have removed every instance of gmetric. Also, you will need to do that on ALL nodes having a copy of the data in their own rrd database. Shall a matrix appear even for a minute, a plot will appear and this manual removal will be needed.
Note that if you change the polling interval or any vital time bin information in gmond/gmetad, you will lose ALL historical data unless you take special care while doing so. At BNL, we changed the polling interval from 20 seconds to one minute to reduce network traffic and cope with CISCO deficient treatment of multi-cast requests. We then used ganglia-rrd-modify.pl script to modify the historical data without losing it.
% ganglia-rrd-modify.pl -v -H 180 -r /path/to/rrds/dir
Note that the value 180 is 2-3 times the update interval. You have to do this operation in the following orderStart from the "slave" or mirror server first
Adjust the polling value in the configuration file (data_source)
stop gmetad
execute the convert script
restart gmetad
Only when all slaves or mirror of a collector are done shall you go up in the tree of gmetad dependencies
Content of ganglia-rrd-modify.pl
#!/usr/bin/perl -w
#
# Simple script to read ganglia's rrds and modify some of their configuration values.
#  - Uses the tune and resize commands.
#
# Written by:  Jason A. Smith <smithj4 {at} bnl.gov>
#

# Modules to use:
use RRDs;  # Round Robin Database perl module (shared version) - from rrdtool package.
use RRDp;  # Round Robin Database perl module (piped version) - from rrdtool package.
use Cwd;
use Data::Dumper;
use File::Basename;
use Getopt::Long;
use strict;

# Get the process name from the script file:
my $process_name = basename $0;

# Define some useful variables:
my $rrd_dir = '/var/lib/ganglia/rrds';
my $heartbeat = 0;
my $grow = 0;
my $shrink = 0;
my $verbose = 0;
my $debug = 0;
my $num_files = 0;

# Get the command line options:
&print_usage if $#ARGV < 0;
$Getopt::Long::ignorecase = 0;  # Need this because I have two short options, same letter, different case.
GetOptions('r|rrds=s'      => \$rrd_dir,
           'H|heartbeat=i' => \$heartbeat,
	   'g|grow=i'      => \$grow,
	   's|shrink=i'    => \$shrink,
	   'v|verbose'     => \$verbose,
           'd|debug'       => \$debug,
           'h|help'        => \&print_usage,
          ) or &print_usage;

# Recursively loop over ganglia's rrd directory, reading all directory and rrd files:
my $start = time;
chdir("/tmp");  # Let the rrdtool child process work in /tmp.
my $pid = RRDp::start "/usr/bin/rrdtool";
chdir("$rrd_dir") or die "$process_name: Error: Directory doesn't exist: $rrd_dir";
&process_dir($rrd_dir);
my $time = time - $start;  $time = 1 if $time == 0;
my ($usertime, $systemtime, $realtime) =  ($RRDp::user, $RRDp::sys, $RRDp::real);
my $status = RRDp::end;

# Print final stats:
warn sprintf "\n$process_name: Processed %d rrd files in %d seconds (%.1f f/p)\n\n", $num_files, $time, $num_files/$time;

# Exit:
exit $status;

# Function to read all directory entries, testing them for files & directories and processing them accordingly:
sub process_dir {
  my ($dir) = @_;

  my $cwd = getcwd;
  warn "$process_name: Reading directory: $cwd ....\n";
  foreach my $entry (glob("*")) {
    if (-d $entry) {
      chdir("$entry");
      &process_dir($entry);
      chdir("..");
    } elsif (-f $entry) {
      &process_rrd("$cwd/$entry");
    }
  }
}

# Function to process a given rrd file:
sub process_rrd {
  my ($file) = @_;

  # Who owns the file (if resizing the file then I have to move the file & change the ownership back):
  my ($uid, $gid) = (stat($file))[4,5];

  # Read the rrd header and other useful information:
  warn "$process_name: Reading rrd file: $file\n" if $debug;
  my $info = RRDs::info($file);
  my $error = RRDs::error;
  warn "ERROR while reading $file: $error" if $error;
  print "$file: ", Data::Dumper->Dump([$info], ['Info']) if $debug;
  my $num_rra = 0;  # Maximum index number of the RRAs.
  foreach my $key (keys %$info) {
    if ($key =~ /rra\[(\d+)\]/) {
      $num_rra = $1 if $1 > $num_rra;
    }
  }
  my ($start, $step, $names, $data) = RRDs::fetch($file, 'AVERAGE');
  $error = RRDs::error;
  warn "ERROR while reading $file: $error" if $error;
  if ($debug) {
    print "Start:       ", scalar localtime($start), " ($start)\n";
    print "Step size:   $step seconds\n";
    print "DS names:    ", join (", ", @$names)."\n";
    print "Data points: ", $#$data + 1, "\n";
  }

  # Set the heartbeat if asked to:
  if ($heartbeat) {
    foreach my $n (@$names) {
      warn "$process_name: Updating heartbeat for DS: $file:$n to $heartbeat\n" if $verbose;
      RRDs::tune($file, "--heartbeat=$n:$heartbeat");
      $error = RRDs::error;
      warn "ERROR while trying to tune $file:$n - $error" if $error;
    }
  }

  # Resize the rrds if asked to (have to use the pipe module - resize doesn't exist in the shared version):
  if ($grow or $shrink) {
    my $action = $grow ? 'GROW' : 'SHRINK';
    my $amount = $grow ? $grow : $shrink;
    foreach my $n (0..$num_rra) {
      my $cmd = "resize \"$file\" $n $action $amount";
      warn sprintf "$process_name: %sING: %s:RRA[%d] by %d rows.\n", $action, $file, $n, $amount if $verbose;
      RRDp::cmd($cmd);
      my $answer = RRDp::read;  # Returns nothing.
      warn "$process_name: Renaming: /tmp/resize.rrd --> $file\n" if $verbose;
      system("mv /tmp/resize.rrd $file");
      chown $uid, $gid, $file if $uid or $gid;
    }
  }
  $num_files++;
}

# Print usage function:
sub print_usage {
  print STDERR <<EndOfUsage;

Usage: $process_name [-Options]

 Options:
  -r|--rrds dir		Location of rrds to read (Default: $rrd_dir).
  -H|--heartbeat #	Set heartbeat interval to # (Default: unchanged).
  -g|--grow #		Add # rows to all RRAs in rrds (Default: unchanged).
  -s|--shrink #		Remove # rows from all RRAs in rrds (Default: unchanged).
  -v|--verbose		Enable verbose mode (explicitly print all actions).
  -d|--debug		Enable debug mode (more detailed messages written).
  -h|--help		Print this help message.

Simple script to read ganglia's rrds and modify some of their configuration
values.

EndOfUsage

  exit 0;
}

#
# End file.
#
Video Conferencing
Video TeleConferencing (VTC) Service
BNL uses BlueJean video conferencing for now.
However, STAR also uses the eZuce SRN (aka SeeVogh Research Network or SRN) as one of its video conferencing system. The information below pertain to eZuce (for BlueJean VTC, please consult the ITD pages).
Our research community STAR became part of the SeeVogh Research Network, managed by Evogh, Inc. in 2013, transitioning from EVO. The eZuce SeeVogh Research Network community subscription and authorization model was changed.
For our community, an authorization key is needed for a user to join the SRN "STAR community". The user will be prompted for this key when subscribing to the community via the SeeVogh Client.
The "key" is the older STAR protected password (not the current one as tSeeVogh seem to not accept special characters). You should NOT provide that key to a non-STAR member (obviously) and as usual, do NOT propagate it through Emails or widely distributed mailing lists - it should remain a local / internal to each group: if you do not know the "STAR protected password" in other words, ask your local colleagues.
Please note that the authorization is only for new users i.e. (a) new to STAR and/or a user creating a new account with aim to join the eZuce SRN STAR community or (b) existing users who wants to join our STAR/SRN community (many old EVO users were created under the "universe" community). If you were already registered as part of the EVO/STAR community, there is no action needed.
Note that joining the STAR/SRN community means having the right to book a meeting on behalf of STAR (hence, STAR and BNL will receive the bill at the end).
- If you are NOT a member of the STAR collaboration, you should NOT join the STAR/SRN community and/or should NOT book a meeting under the "STAR community".
- If you are a member of the STAR collaboration, you should also NOT ask your colleagues at large to subscribe to the STAR/SRN community (a check will be done on a regular basis and STAR/SRN members not part of the STAR collaboration will be removed to banned).
- If you are invited to participate to a STAR meeting, do not belong to the STAR community but another community (you do have a SeeVogh account), you will always be able to join a STAR public meeting
- If you are invited to participate to a STAR meeting or want to create a SeeVogh meeting and have non-STAR members join but those individuals do NOT have a SeeVogh account please note the following: a meeting could be booked with "Guest Access" (see illustration below - note the check box) and this will allow you to have up to 5 guest users with no previous EVO/SRN registration joining the meeting (an EMail will be sent upon meeting creation with three links - an EVO one, an SRN one and a link for your 5 guests)
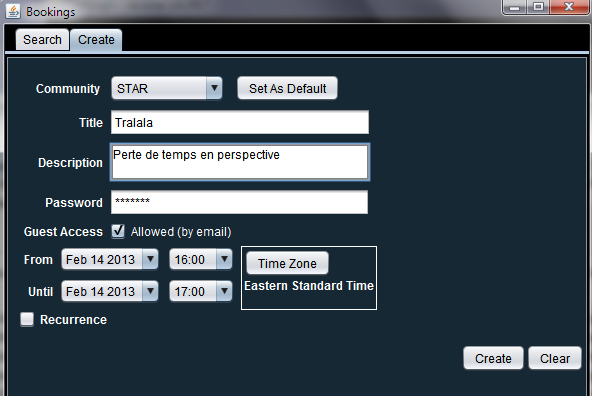 |
The Point of Contact and administrator for the STAR SeeVogh community is J. Lauret (jlauret [at] bnl.gov).
Factors influencing VTC call quality
To achieve best conference quality, please make sure to follow the below rule of thumbs:
- Special room designed for VTC are your first choice for a video-conference call. They are usually equipped with high end audio and video devices, have wall designed to absorb echoes, mics with echo cancellation etc ... If you do have such a room at your institution, please use it.
- The second best set of equipments and choice for your conference is a phone unit directly hardwired into telephone lines or a computer connected to the Internet via a cable. Converge toward such a room at your institution if you have one.
- If possible, avoid using cell phones and cordless phones as they often pick up static and background noise.
- Make sure your connection is good before joining - a bad connection can sometimes be the cause of background static. If this happens, hang up and dial in again until you get a clear line. Be aware that for VTC over IP, the local networking quality of service is a key factor to call clarity - avoid VTC if you are aware of major network infrastructure reshapes and long maintenance periods.
- By default, please consider to MUTE
- Please be mindful of your environmental conditions: Barking dogs, loud discussions, call to board the airplane or while driving with traffic and miscellaneous noises ... and even the relatives asking you if you did buy milk ... all of those are greatly disturbing a VTC call and the problem is emphasized as it occurs again and again with a few participants. There's no better way to guard against the issues of background noise than to be sure to hold your conferences in a quiet environment.
- Correlative: if you just join from a laptop or desktop computer, please do use headsets (and mute). Keyboard typing noise, background noise and even feedback oops (Larsen effects) are frequent when minimal precautions are not taken to isolate input and output.
- DO NOT use multiple audio points from the same room (if a fixed computer or phone bridge is used for example, do not open a laptop mic or audio). Multiple audio/mic points are certain to create feedback loops.
- Turn off the ringer of a multi-line phone or any other phone in the room.
- Do not put your phone on hold if you have on-hold music or advertisements. Your on-hold music will play for conference Participants making conversation impossible in your absence.
- Turn off your call waiting or its beeping will disrupt the conference and may be confused with joining/leaving.
Web Access
STAR web organization at BNL
- The STAR home page URL is http://www.star.bnl.gov/ . All pages from the root directory is strictly reserved to the webmaster. Several user contents are into sub-trees explained below.
- http://www.star.bnl.gov/STAR/ will (since 2007) redirect you into the Drupal Content Management System (CMS) for STAR. This page is in STAR's Drupal CMS and the base URL should appear as http://drupal.star.bnl.gov/STAR/. Note that both www.star and drupal.star are equivalent for the path STAR/.
- Drupal attachments menu are no visible by the public (however, the document may be accessible to those having the direct link)
- Comments added to the Drupal site are not visible by non-authenticated users
- URLs of form http://www.star.bnl.gov/public/* or http://www.star.bnl.gov/protected/* map respectively to the physical locations
Those areas are reserved for PWG related documents and information. The space is limited so, do not use it as an archival space.
- /afs/rhic.bnl.gov/star/doc_public/www/*
- /afs/rhic.bnl.gov/star/doc_protected/www/*
- The STAR computing home page URL is http://drupal.star.bnl.gov/STAR/comp/
- ANY path containing the word "protected" will see the Web server ask for the protected pasword.
ATTENTON: the word as a parameter of a cgi does NOT trigger requiring a password- See for example https://www.star.bnl.gov/~jeromel/test/protected/
- See for example https://www.star.bnl.gov/~jeromel/test/protected/
- When writing HTML, relative URLs (i.e. without http://hostname) of the form 'comp/xxx/yyy.html' (computing web) or 'public/comp/xxx/yyy.html' (general web) should be used such that mirroring of the web on other servers will work.
- Example of URL and location for a typical web directory, SOFI:
URL: http://www.star.bnl.gov/public/comp/train/
Physical location: /afs/rhic.bnl.gov/star/doc_public/www/comp/train/
- Example of URL and location for a typical web directory, SOFI:
- ACLs control access to AFS web areas. If you need (or think you might ever need) write access to a web area, just ask. See ACL info link below.
- There are STAR logos and other images in the images directory.
Personal Webpages and CGI access
Each STAR users should have a personal web area on the RHIC/STAR cluster, starting from the physical location and directory /afs/rhic.bnl.gov/star/users/$YOURUSERNAME/WWW . Since 2007 onward, you should NOT have administrative ACLs on this area. However, the area MUST have the following ACLs set for the Web server account tto be able to access your files:
- The top directory /afs/rhic.bnl.gov/star/users/$YOURUSERNAME should have "rl" ACL for starweb
- The Web startup directory /afs/rhic.bnl.gov/star/users/$YOURUSERNAME/WWW should also have the "rl" ACL for starweb
- Nothing else is needed
- Note that the rule related to path containing the word "protected" also applies to private area
- /afs/rhic.bnl.gov/star/users/$YOURUSERNAME/WWW should itself be readable by starweb account as showed in the previous bullet.
- the starweb account is NOT part of the "STAR" group. Explicit ACL to "rl" need to be set as instructed.
- ATTENTION:
- Although you should no longer have privileges to do so, you should NEVER set or reset the starweb account ACLs to values different than "rl" as instructed. Setting / resetting ACL for the special account system:anyuser has DIRE consequences and will be considered PROHIBITED.
- You should especially NEVER grant write access by those account to ANY area without prior notice and explicit approval.
- Several areas are protected with "protected password" for a reason (including our code repository, the path with the word /protected/, etc ...). DO NOT attempt to circumvent those protections without consulting with Infrastructure Leader. Circumventing may include replication of the content and providing it to a public space. Doing so may expose collaboration only information to a wide audience.
Your personal pages will be accessible as http://www.star.bnl.gov/~yourusername/. If not, please send a note to starsofi Hypernews confirming and specifying you have followed the instructions above. In some instances, old ACLs get cached on the Web server side and your page may not be displayable before a service restart (AFS) is issued. For more information on setting ACLs in AFS, please consult the Guide to AFS and ACLs page.
Running CGIs
Running CGIs on the STAR Web servers need to follow the below guidance and regulations:
- By default, all CGIs will (and MUST) be protected of access using the "protected" password or other (stronger) method of authentication.
- Any deviation and need for public access requires a review of the CGI by experts.
- The de-facto assumption will always be that CGIs must be protected - if a review cannot happen, the default assumption will be in effect.
- CGIs with read-only access and of general (outside STAR) interest are candidates for an exemption.
- CGIs having write access to files or database (hence subject to injection attacks) require special attention. You should always consider the question "can I write this CGI differently". For example:
- pre-generation of results (write) from a different account than starweb could be used as an example of privilege separation.
- two stage (two accounts) database access could be used to write and read
- ...
- After a review, a frozen version of the CGI will be put in place
- The area or database the CGI writes to should be documented.
- File access: ANY area in AFS having write access ACL for starweb but un-documented will see the ACLs removed (for both starweb and the administrator of the area) without prior notice.
- STAR provides standard CGIs for general use
- Use them
- DO not make and use private copies - send your changes and improvements to the developers if needed
- Virtually hosted site should comply with the guidance and rules described herein.
More information
More information is available below providing you are authenticated.
Accessing the World Wide Web from inside BNL
BNL Wireless or internal network are proxied network. Proxy is used to
- "hide" your client IP from the remote host
- Provide load balancing and caching (hot donloads are cached on the proxy)
- As a side effect, it also allows Cyber-security to perform activity monitoring of the traffic
Information explaining how to set a Web proxy for about all possible utilities and tools is available on The Information and Technology division (ITD) web server page Web Proxy configuration instructions. Instructions for other proxies (FTP, RealPlayer streaming,...) are also available.
Command line tools typically respect the value of http_proxy. The information for such manual proxy can be found as the IP provided here. As an example on how to set http_proxy,you will need to issue a command such as
setenv http_proxy http://192.168.1.130:3128/ # internalsetenv http_proxy http://192.168.1.140:3128/ # externalto have it all set. Note that on this page, by "outside BNL" one means outside the internal network (hence the Wireless).
Available CGIs
AutoIndex
AutoIndex provides the ability to have a directory structure automatically set with a nice browsing interface. There is no need to install this package in STAR. See You do not have access to view this node for more information.
Counters
In cgi-bin, We have a modified version of Frederic TYNDIUK's version of the Basic Graphical Counter. To set it up, just add lines similar to the below in your html page
<IMG SRC="/cgi-bin/counter.cgi?counter=test&digit=2">
<IMG SRC="/cgi-bin/counter.cgi?counter=test&digit=1">
<IMG SRC="/cgi-bin/counter.cgi?counter=test&digit=0&w">
The result would be:
This did set a three digits counter named test. Use a name appropriate for your page and be aware that changing names would make the counter reset to 0. Also, be careful to use only one &w as the counter needs to be incremented only once on the lowest digit.
counter.cgi accepts the following parameters
|
Parameter name |
Value |
Effect |
|
counter |
Any (string) |
Used to separate counters in classes. In the example above, all pages referencing counter=test if accessed, would share the same 'test' counter. |
|
digit |
(int) |
The digit to display. |
|
w |
|
This parameter do not need a value. Its effect is to increment the counter and it needs to appear only once per page (in short, use an arbitrary name relevant to your page). |
Cookies
This is note is for STAR users only. External visitors of our Web pages do not need to accept cookies.
However, in order for several STAR-users tools to work (Hypernews, Drupal, RT, etc...), you MUST set your client to accept cookies from sites www.star.bnl.gov and drupal.star.bnl.gov (or the full domain {star.}bnl.gov). To do this, here are a few recipes:
- Google instructions for several browsers
- Mozilla Firefox cookie settings and generally, all mozilla family cookie settings instructions
- Internet Explorer cookie settings (howto)